set AUDI A4 1998 B5 / 1.G Engine Oil Level Checking Workshop Manual
[x] Cancel search | Manufacturer: AUDI, Model Year: 1998, Model line: A4, Model: AUDI A4 1998 B5 / 1.GPages: 111, PDF Size: 1.26 MB
Page 15 of 111
21
X DTCs reco
gnized
If control module answers with its identification the number of stored
Diagnostic Trouble Codes (DTCs) will be indicated or "No DTCs
Recognized" will be displayed.
If one or more DTCs are stored, all stored DTCs will be dis played and
printed out in sequence. Following this, VAG 1551 displays the next
address word.
VAG On Board Dia
gnostic
HELP
1 - Rapid data transfer *
)
2 - Blink code output *
)
* Operating modes 1 and 2 are displayed alternately.
Corrective action must be taken if DTCs are stored. Diagnostic report
should be attached to repair order.
Note:
For resetting service internal display and performing any emissions test
VAG 1551 must remain connected. - Automatic test sequence is ended once the readout shown here
appears in the display.
- Turn ignition OFE
Pa
ge 15 of 111 Descri
ption of wor
k
11/20/2002 htt
p://127.0.0.1:8080/audi/servlet/Dis
play?action=Goto&t
yp
e=re
pair&id=AUDI.B5.ME01.01.6
Page 47 of 111
47
CAUTION!
Tires of same type and tread pattern must be
used on cars with All Wheel Drive (otherwise
risk of damage to central differential).
- Check tread wear pattern:
Tread wear pattern on front tires is an indication
of whether toe and camber settings need to be
checked:
"Feathering" on tread indicates incorrect toe.
If tread is worn on one side, this is usually
caused by incorrect camber.
If wear of this nature is noticed, check wheel
alignment.
Pa
ge 47 of 111 Descri
ption of wor
k
11/20/2002 htt
p://127.0.0.1:8080/audi/servlet/Dis
play?action=Goto&t
yp
e=re
pair&id=AUDI.B5.ME01.01.6
Page 66 of 111

66
Windshield washer nozzles, adjusting
Check setting of nozzles, adjust if necessary with
windshield washer aiming tool 3125A.
CAUTION!
To avoid damage never use a needle or
similar device to adjust nozzles.
Nozzle setting for windshield:
a = 235 mm (9.25 in.) c = 80 mm (3.15 in.)
b - 445 mm (17.52 in.) d = 620 mm (24.41 in.)
Note:
If spray is uneven or cannot be set to specified dimensions replace spray
nozzles.
- Fill windshield washer reservoir.
- Always add windshield cleaner to water in reservoir (antifreeze in
winter).
Pa
ge 66 of 111 Descri
ption of wor
k
11/20/2002 htt
p://127.0.0.1:8080/audi/servlet/Dis
play?action=Goto&t
yp
e=re
pair&id=AUDI.B5.ME01.01.6
Page 67 of 111
67
Headlights, adjusting
Requirements
Tires inflated to correct pressure.
Lenses clean and in proper condition.
Reflectors in proper condition.
Springs settled (load vehicle with approx. 75
kg (165 Ibs) on driver's seat and roll several
meters (yards).
Vehicle standing on level ground.
Adjust headlight housing from top with
screwdriver or allen wrench.
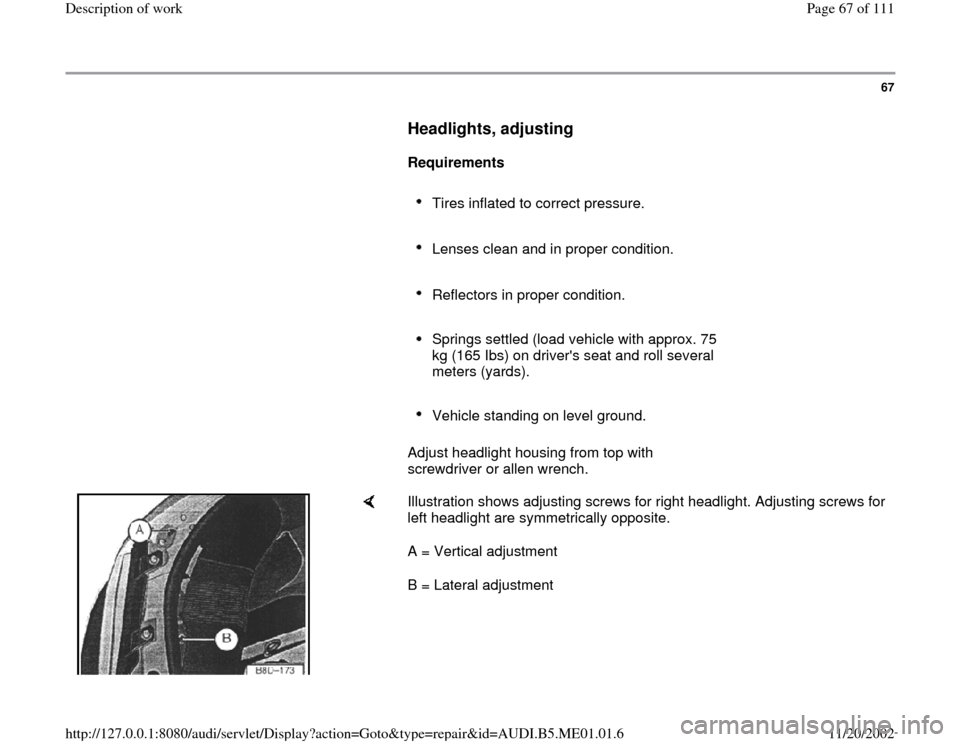
Illustration shows adjusting screws for right headlight. Adjusting screws for
left headlight are symmetrically opposite.
A = Vertical adjustment
B = Lateral adjustment
Pa
ge 67 of 111 Descri
ption of wor
k
11/20/2002 htt
p://127.0.0.1:8080/audi/servlet/Dis
play?action=Goto&t
yp
e=re
pair&id=AUDI.B5.ME01.01.6
Page 68 of 111
68
Headlights, aiming using Hella Universal
Beamsetter IV
Service
Align vehicle headlamps using the VAS 5107
(Hella Universal Beamsetter IV) and the following
procedure:
Additional instructions and diagrams
Instruction Manual for the Hella Beamsetter
Series IV
Have a second technician sit in the driver's seat while aligning the
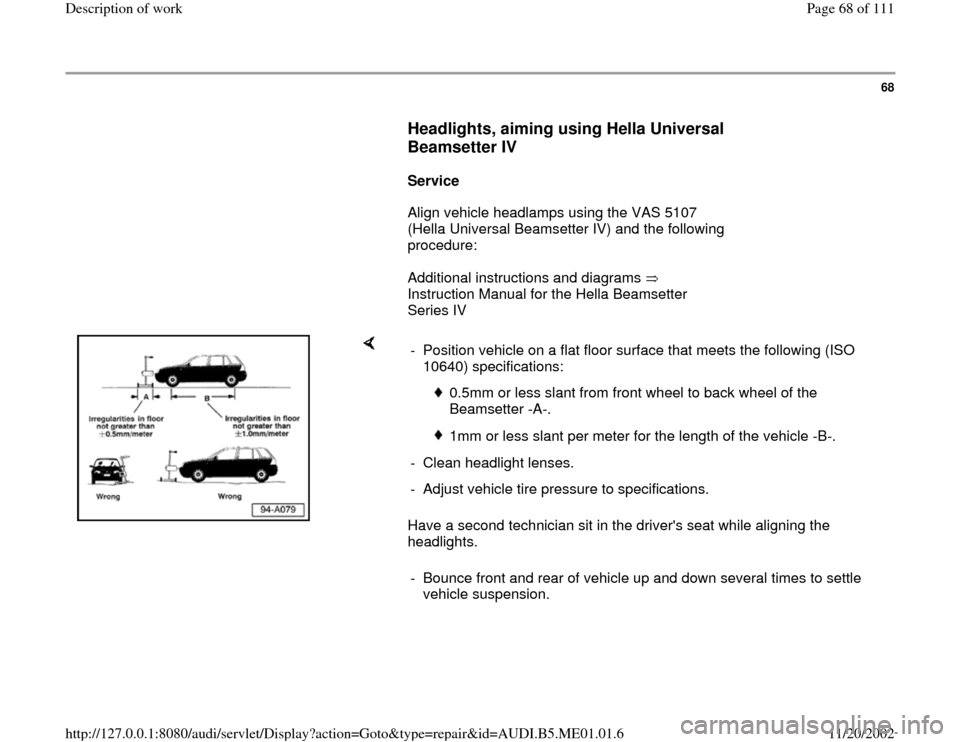
headlights. - Position vehicle on a flat floor surface that meets the following (ISO
10640) specifications:
0.5mm or less slant from front wheel to back wheel of the
Beamsetter -A-.
1mm or less slant per meter for the length of the vehicle -B-.
- Clean headlight lenses.
- Adjust vehicle tire pressure to specifications.
- Bounce front and rear of vehicle up and down several times to settle
vehicle suspension.
Pa
ge 68 of 111 Descri
ption of wor
k
11/20/2002 htt
p://127.0.0.1:8080/audi/servlet/Dis
play?action=Goto&t
yp
e=re
pair&id=AUDI.B5.ME01.01.6
Page 69 of 111

69
Setting low beam alignment of driver's side
headlight
- Move Beamsetter into position in front of the
vehicle so it is aligned with the vehicle and
Beamsetter box is 30 to 70cm (12 to 28 in.) from
the driver's side headlight.
- Switch headlights ON in low beam position.
- Align Beamsetter box so it is centered on the
headlight (align vertically then horizontally).
Note:
Use the arrows on the Beamsetter box as a
guide.
You may want to use a straight edge or tape
measure, because alignment must be within
3cm (1.2 in.) of the center of the headlight.
- Without moving the Beamsetter, slide Broad-
band sight toward center of vehicle (Broad-band
sight can also be moved up and down for a
better position).
Use Broad-band sight to make final alignment of
Beamsetter box to vehicle by:
Pa
ge 69 of 111 Descri
ption of wor
k
11/20/2002 htt
p://127.0.0.1:8080/audi/servlet/Dis
play?action=Goto&t
yp
e=re
pair&id=AUDI.B5.ME01.01.6
Page 70 of 111

- Loosening hand-wheel that locks column in
place.
- Sighting down through the slit in the Broad-band
sight and rotating Beamsetter box and column
until two similar points on vehicle are aligned.
Pa
ge 70 of 111 Descri
ption of wor
k
11/20/2002 htt
p://127.0.0.1:8080/audi/servlet/Dis
play?action=Goto&t
yp
e=re
pair&id=AUDI.B5.ME01.01.6
Page 71 of 111
70
Note:
Try using corners of the headlight housings or
two screws that are the same height and as far
apart as possible on the vehicle.
- Carefully tighten hand wheel without changing
Beamsetter position.
- Find correct State or Province Inclination %
specification for the low beam adjustment (If
there is no local specification use 1.2%).
Note:
DO NOT use the Inclination % molded into the
plastic of the headlight housing near the
headlight adjustment screws; it is for Europe
only!
- Set Beamsetter "Scaled wheel" to the proper low
beam inclination %.
- Adjust height (vertical) alignment first. Turn
headlight height adjuster screw to align the
upper edge of the flat portion of the beam with
the center horizontal line of the grid on the
Beamsetter pattern screen.
Pa
ge 71 of 111 Descri
ption of wor
k
11/20/2002 htt
p://127.0.0.1:8080/audi/servlet/Dis
play?action=Goto&t
yp
e=re
pair&id=AUDI.B5.ME01.01.6
Page 72 of 111
71
Note:
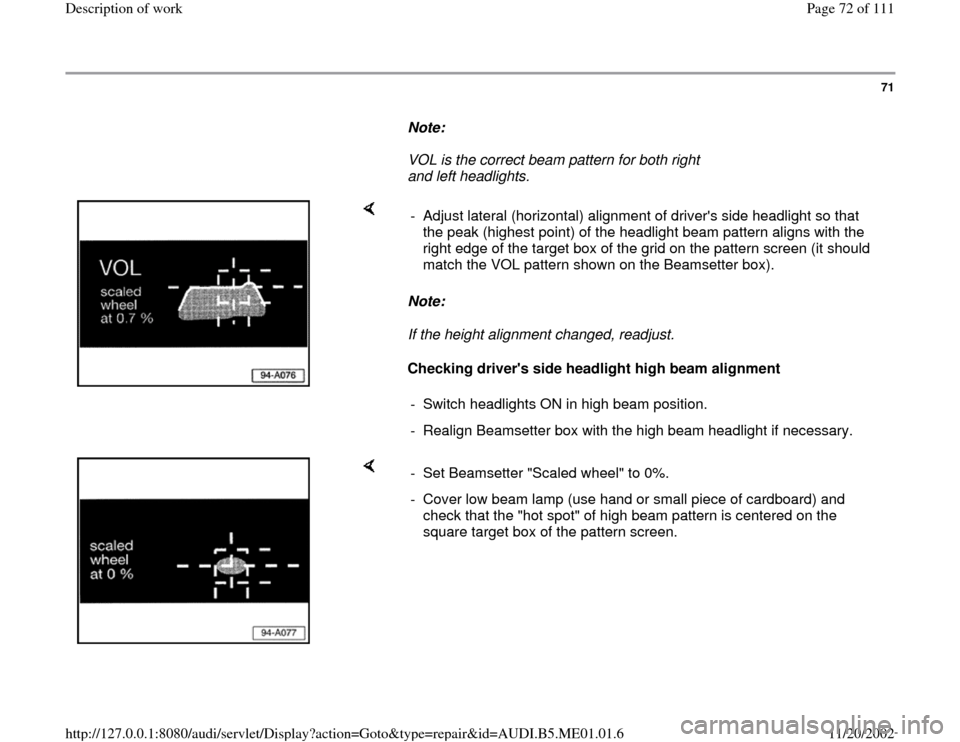
VOL is the correct beam pattern for both right
and left headlights.
Note:
If the height alignment changed, readjust.
Checking driver's side headlight high beam alignment - Adjust lateral (horizontal) alignment of driver's side headlight so that
the peak (highest point) of the headlight beam pattern aligns with the
right edge of the target box of the grid on the pattern screen (it should
match the VOL pattern shown on the Beamsetter box).
- Switch headlights ON in high beam position.
- Realign Beamsetter box with the high beam headlight if necessary.
- Set Beamsetter "Scaled wheel" to 0%.
- Cover low beam lamp (use hand or small piece of cardboard) and
check that the "hot spot" of high beam pattern is centered on the
square target box of the pattern screen.
Pa
ge 72 of 111 Descri
ption of wor
k
11/20/2002 htt
p://127.0.0.1:8080/audi/servlet/Dis
play?action=Goto&t
yp
e=re
pair&id=AUDI.B5.ME01.01.6
Page 73 of 111
72
Note:
High beam pattern is built into the reflector
design and cannot be adjusted separately.
If high beam pattern is way out of adjustment:
- Inspect for reflector damage.
- Replace reflector if needed.
Note:
Always align headlight in the low beam position.
Aligning fog lamp
- Switch fog lamps ON.
- Align Beamsetter box with fog lamp (make sure
it is between 30 and 70cm from the fog lamp
lens).
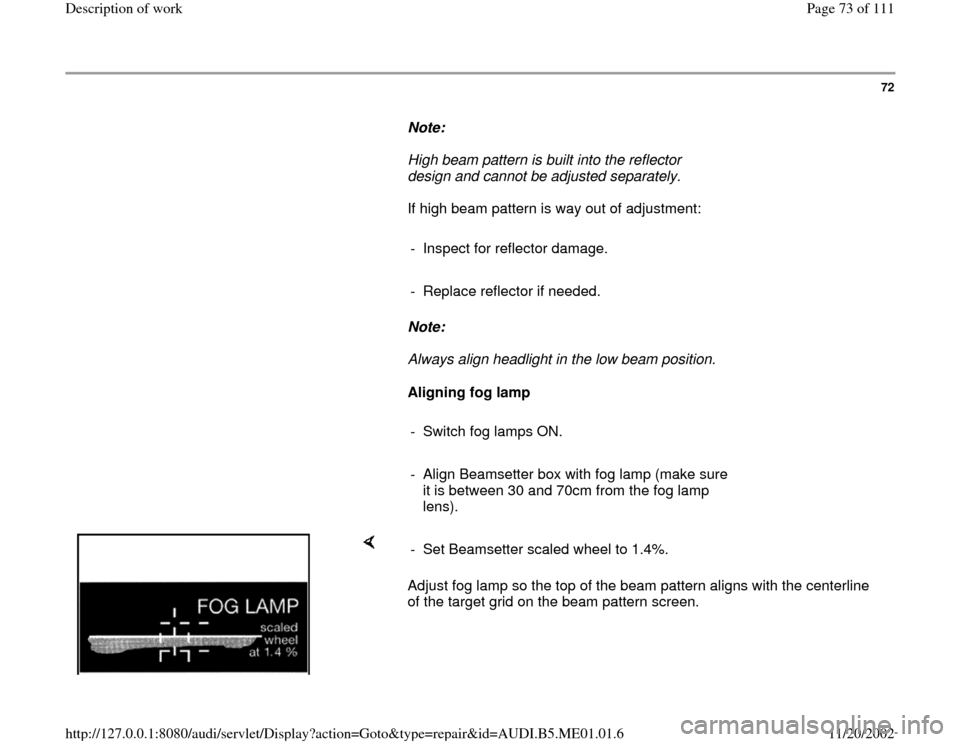
Adjust fog lamp so the top of the beam pattern aligns with the centerline
of the target grid on the beam pattern screen. - Set Beamsetter scaled wheel to 1.4%.
Pa
ge 73 of 111 Descri
ption of wor
k
11/20/2002 htt
p://127.0.0.1:8080/audi/servlet/Dis
play?action=Goto&t
yp
e=re
pair&id=AUDI.B5.ME01.01.6