check engine AUDI A4 2008 B8 / 4.G Owner's Manual
[x] Cancel search | Manufacturer: AUDI, Model Year: 2008, Model line: A4, Model: AUDI A4 2008 B8 / 4.GPages: 342, PDF Size: 13.14 MB
Page 232 of 342
Your vehicle and the environment 230Anticipate well in advance
A car uses most fuel when accelerating. If you anticipate hazards
and speed changes well in advance, you will need to brake less and
thus accelerate less. Wherever possible, let the car slow down grad-
ually with a gear engaged, for instance when you can see that the
next traffic lights are red. This takes advantage of the engine
braking effect, reducing wear on the brakes and tyres. Emissions
and fuel consumption will drop to zero due to the overrun fuel cut-
off.
Change gear early to save fuel
An effective way of saving fuel is to change up quickly through the
gears. Running the engine at high rpm in the lower gears uses an
unnecessary amount of fuel.
Manual gearbox: Shift up to second gear as soon as possible. If
possible, we recommend shifting up to the next gear at approx.
2,000 rpm.
Automatic gearbox: Press the accelerator slowly and avoid using
the “kick-down” feature.
Avoid driving at high speed
Avoid travelling at top speed. Fuel consumption, exhaust emissions
and noise levels all increase very rapidly at higher speeds. Driving at
moderate speeds will help to save fuel.
Do not let the engine idle for longer than necessary
It is worthwhile switching off the engine when waiting in a traffic
jam, at level crossings or at traffic lights with a long red phase. The
fuel saved after only 30 - 40 seconds is greater than the amount of
fuel needed to restart the engine.
The engine takes a very long time to warm up when it is running at
idling speed. Mechanical wear and pollutant emissions are also
especially high during this initial warm-up phase. It is therefore best
to drive off immediately after starting the engine. Avoid running the
engine at high speed.Regular servicing
Regular servicing can establish a basis for good fuel economy
before you start driving. A well-serviced engine gives you the
benefit of improved fuel efficiency as well as maximum reliability
and an enhanced resale value. A badly tuned engine can consume
up to ten percent more fuel than necessary.
Avoid short trips
The engine and emission control system need to reach their proper
working temperature in order to minimise fuel consumption and
emissions.
A cold engine uses disproportionately more fuel. The engine only
reaches its working temperature after about four kilometres, when
fuel consumption will return to a normal level. This is the reason
why we recommend avoiding short trips wherever possible.
Maintain the correct tyre pressures
Always make sure the tyres are inflated to the correct pressures
⇒page 268 to save fuel. If the tyre pressures are just 0.5 bar too low,
this can increase the fuel consumption by as much as 5 %. Due to
the greater rolling resistance, under-inflation also increases tyre
wear and impairs handling.
Do not use winter tyres all through the year; they will increase fuel
consumption by up to 10 %.
Avoid carrying unnecessary loads
Every kilo of extra weight will increase the fuel consumption, so it is
worth checking the luggage compartment occasionally to make
sure that no unnecessary loads are being transported.
A roof carrier is often left in place for the sake of convenience, even
when it is no longer needed. At a speed of 100-120 km/h your car will
use about 12 % more fuel as a result of the extra wind resistance
caused by the roof carrier - even when it is empty.
document_0900452a81b1b9de.book Seite 230 Donnerstag, 26. Juli 2007 9:16 09
Page 234 of 342
Towing a trailer 232Towing a trailerDriving the vehicle with a trailer or
caravanTechnical requirements
The towing bracket must comply with certain technical
requirements.Your car is intended mainly for transporting passengers and
luggage. However, if suitably equipped, it can also be used to tow a
trailer or caravan.
If the car is supplied with a factory-fitted towing bracket it will
already have the necessary technical modifications and meet the
statutory requirements.
A 13-pin socket is provided to make the electrical connection
between the car and the trailer. If the trailer has a 7-pin plug you can
use an adapter cable. This is available from Audi dealers.
WARNING
If a towing bracket is retrofitted, the installation should be carried
out by a qualified workshop.•
In particular in high outside temperatures it is not possible to
drive up long steep gradients without a suitable cooling system.
The engine would then overheat.
•
Incorrect installation can result in a safety risk.
Points to check before towingTrailer weights
Never exceed the maximum permitted trailer weights ⇒page 323.If you do not load the trailer up to the maximum permitted trailer
weight, you can then climb correspondingly steeper gradients.
The maximum trailer weights listed are only applicable for altitudes
up to 1000 m above sea level. With increasing altitude the engine
power and therefore the car's climbing ability are impaired because
of the reduced air density, so the maximum trailer weight has to be
reduced accordingly. The weight of the car and trailer must be
reduced by 10% for every further 1000 m (or part thereof). This
figure refers to the combined weight of the (loaded) vehicle and
(loaded) trailer.
The figures for the draw bar weight that appear on the identification
plate of the towing bracket are for certification purposes only. The
correct figures for your specific vehicle, which may be lower than
these figures for the towing bracket, are given in the registration
documents. Also refer to ⇒page 323.
Distributing the load
Distribute loads in the trailer so that heavy objects are as near to the
axle as possible. Loads carried in the trailer must be secured to
prevent them slipping.
Where possible, operate the trailer with the maximum permitted
draw bar weight on the ball joint of the towing bracket, but do not
exceed the specified limit.
Tyre pressure
Check the tyre pressures on your car and adjust for “full load” condi-
tions (refer to the sticker listing the tyre pressures on the end face
of the driver's door). It may also be necessary to adjust the tyre pres-
sures on the trailer according to the recommendations of the trailer
manufacturer.
Exterior mirrors
Check whether you can see enough of the road behind the trailer
with the standard mirrors. If this is not the case you should have
document_0900452a81b1b9de.book Seite 232 Donnerstag, 26. Juli 2007 9:16 09
Page 256 of 342
Checking and topping up fluids 254Checking and topping up fluidsBonnetReleasing the bonnet
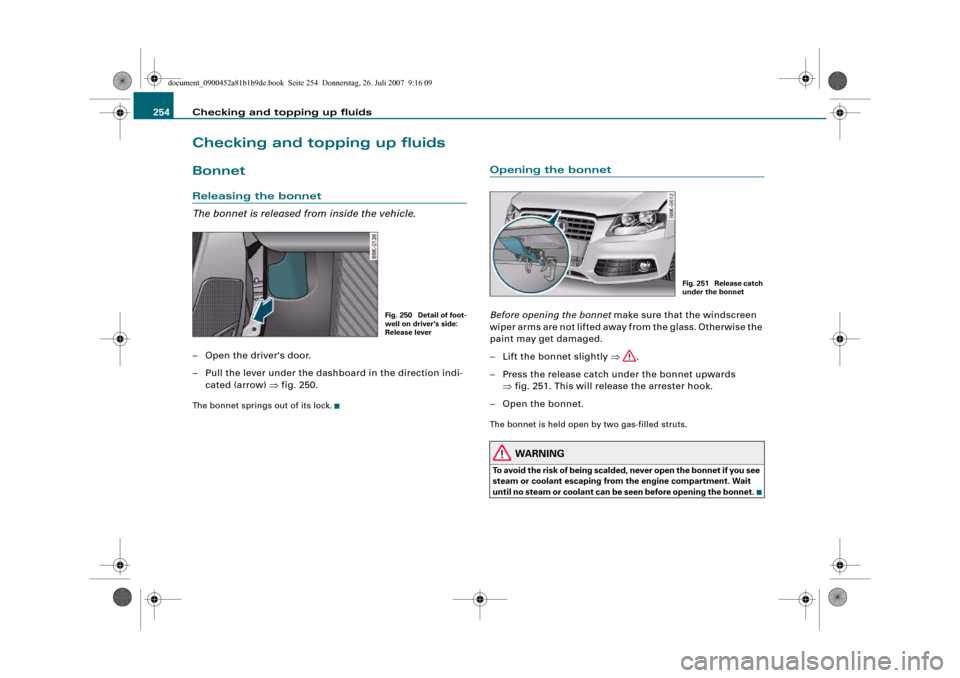
The bonnet is released from inside the vehicle.– Open the driver's door.
– Pull the lever under the dashboard in the direction indi-
cated (arrow) ⇒fig. 250.The bonnet springs out of its lock.
Opening the bonnetBefore opening the bonnet make sure that the windscreen
wiper arms are not lifted away from the glass. Otherwise the
paint may get damaged.
– Lift the bonnet slightly ⇒.
– Press the release catch under the bonnet upwards
⇒fig. 251. This will release the arrester hook.
– Open the bonnet.The bonnet is held open by two gas-filled struts.
WARNING
To avoid the risk of being scalded, never open the bonnet if you see
steam or coolant escaping from the engine compartment. Wait
until no steam or coolant can be seen before opening the bonnet.
Fig. 250 Detail of foot-
well on driver's side:
Release lever
Fig. 251 Release catch
under the bonnet
document_0900452a81b1b9de.book Seite 254 Donnerstag, 26. Juli 2007 9:16 09
Page 257 of 342
Checking and topping up fluids255
Controls
Safety
Driving tips
General maintenance
Self-help
Technical data
Working on components in the engine compartment
Extra caution is necessary when working on components
in the engine compartment.Always be aware of the danger of injury and scalding as well as the
risk of accident or fire when working in the engine compartment
(e.g. when checking and refilling fluids). Always observe the warn-
ings listed below and follow all normal safety precautions. The
engine compartment of any motor vehicle is a potentially
hazardous area. ⇒.
WARNING
•
Switch off the engine.
•
Remove the ignition key.
•
Apply the parking brake.
•
Put the gear lever in neutral or selector in P.
•
Wait for the engine to cool down.
•
Keep children away from engine compartment.
•
Never spill fluids on hot engine components. These fluids can
cause a fire (e.g. radiator anti-freeze).
•
Take care not to cause short circuits in the electrical system,
especially when working on the battery.
•
Do not touch the radiator fan when the engine is hot. The fan
may start running suddenly.
•
Do not unscrew the cap on the expansion tank when the engine
is hot. The cooling system is under pressure.
•
Protect face, hands and arms by covering the cap with a large,
thick rag to protect against escaping coolant and steam.
•
If any tests have to be performed with the engine running,
there is an extra safety risk from the rotating parts, such as the
drive belts, alternator and radiator fan, etc., and from the high-
voltage ignition system.
•
Vehicles with automatic gearbox: Never open the throttle inad-
vertently (for instance by hand from the engine compartment) if a
gear is engaged while the vehicle is stationary with the engine
running. The vehicle could otherwise start moving immediately
and possibly cause an accident.
•
Observe the following additional warnings if work on the fuel
system or the electrical system is necessary:
−Always disconnect the battery.
−Do not smoke.
−Never work near naked flames.
−Always keep an approved fire extinguisher immediately
available.Caution
When topping up fluids make sure the correct fluid is put into the
correct filler opening. This can otherwise cause serious malfunc-
tions or engine damage.
For the sake of the environment
Inspect the ground underneath your vehicle regularly so that any
leaks are detected at an early stage. If you find oil spots or other
fluids, have your vehicle inspected by a qualified workshop.
Note
On right-hand drive vehicles* some of the containers / reservoirs
mentioned below are located on the other side of the engine
compartment.
WARNING (continued)
document_0900452a81b1b9de.book Seite 255 Donnerstag, 26. Juli 2007 9:16 09
Page 258 of 342
Checking and topping up fluids 256Closing the bonnet– To close the bonnet, pull it down to overcome the spring
pressure.
– Then let it drop into the catches; do not press down ⇒.
WARNING
•
For safety reasons the bonnet must always be completely
closed when the vehicle is moving. After closing it always check
that it is properly secured. The bonnet must be flush with the adja-
cent body panels.
•
Should you notice that the bonnet is not safely secured when
the vehicle is moving, stop the vehicle immediately and close the
bonnet properly, otherwise it could cause an accident.
Engine compartment layoutEngine compartment layout
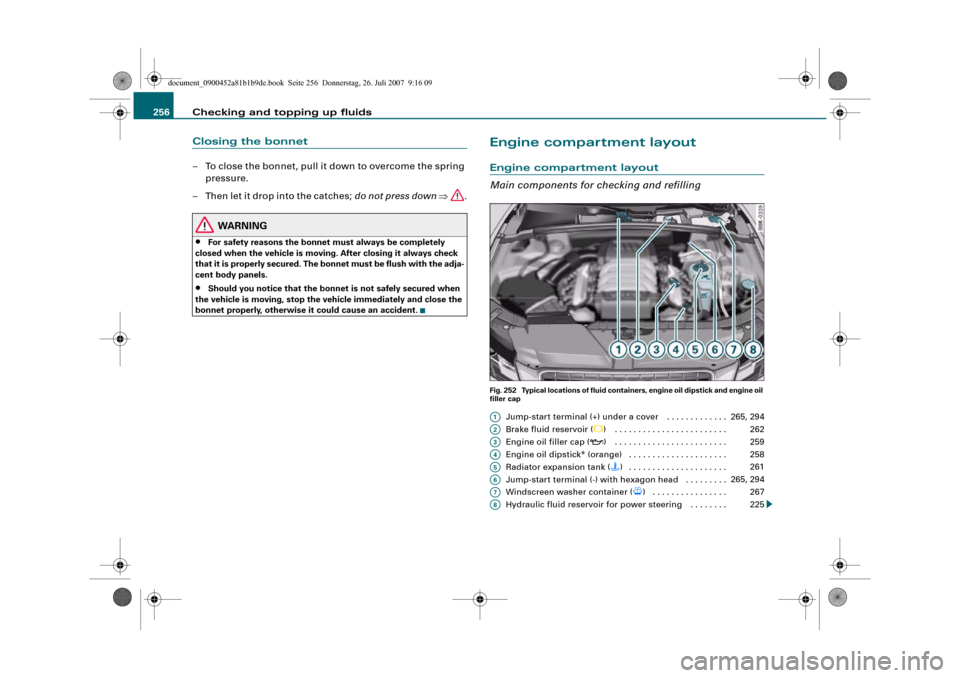
Main components for checking and refillingFig. 252 Typical locations of fluid containers, engine oil dipstick and engine oil
filler cap
Jump-start terminal (+) under a cover . . . . . . . . . . . . .
Brake fluid reservoir (
) . . . . . . . . . . . . . . . . . . . . . . . .
Engine oil filler cap (
) . . . . . . . . . . . . . . . . . . . . . . . .
Engine oil dipstick* (orange) . . . . . . . . . . . . . . . . . . . . .
Radiator expansion tank () . . . . . . . . . . . . . . . . . . . . .
Jump-start terminal (-) with hexagon head . . . . . . . . .
Windscreen washer container (
) . . . . . . . . . . . . . . . .
Hydraulic fluid reservoir for power steering . . . . . . . .
A1
265, 294
A2
262
A3
259
A4
258
A5
261
A6
265, 294
A7
267
A8
225
document_0900452a81b1b9de.book Seite 256 Donnerstag, 26. Juli 2007 9:16 09
Page 259 of 342
Checking and topping up fluids257
Controls
Safety
Driving tips
General maintenance
Self-help
Technical data The positions of the engine oil filler cap and the engine oil dipstick
⇒page 256, fig. 252 (items and ) may be different on some
engine versions.
Engine oilGeneral notesWe recommend that you have the oil change carried out by an Audi
dealership / qualified workshop according to the intervals stated in
the Service Schedule or according to the service interval display in
the instrument cluster.
Whether your vehicle is serviced at flexible service intervals or fixed
service intervals is shown in the Service Schedule.
The correct oil specifications for your engine are listed in the Te c h -
nical data section ⇒page 323, “Performance, weights and dimen-
sions”.
Check that the specifications quoted (VW standards) appear on the
container either singly or in combination with other specifications.
Flexible service intervals (Audi LongLife Service*)
Special engine oils ⇒page 323, “Performance, weights and dimen-
sions” have been developed as part of the Audi LongLife Service
(⇒“Service Schedule”).
This type of oil must be used if you intend to take advantage of the
extended maintenance intervals allowed by the Audi LongLife
Service.•
Do not mix the LongLife oil with oil intended for fixed service
intervals, as the requirements for the extended service intervals are
then no longer guaranteed.
•
In exceptional circumstances, if the engine oil level is too low
⇒page 258 and you cannot obtain the specified LongLife oil, you
can put in a small quantity of oil for fixed service intervals -
⇒page 323, “Performance, weights and dimensions”. This should not be done more than once and no more than 0.5 litres should be
used.
Fixed service intervals (Inspection Service)*
If you do not take advantage of the LongLife service for your car, you
can use the oils for fixed service intervals - ⇒page 323, “Perform-
ance, weights and dimensions”. In this case, your car must be serv-
iced after a fixed interval of 1 year / 15,000 km (9,000 miles) – see
Service Schedule.
•
In exceptional circumstances, if the engine oil level is too low
⇒page 258 and you cannot obtain the oil specified for your vehicle,
you can put in a small quantity of oil conforming to the specification
ACEA A2 or ACEA A3 (petrol engines) or ACEA B3 or ACEA B4 (diesel
engines). This should not be done more than once and no more than
0.5 litres should be used.
Vehicles with diesel particulate filter*
The Service Schedule states whether your vehicle is fitted with a
diesel particulate filter.
•
Vehicles with diesel particulate filter must only be filled with
engine oil VW 507 00. This oil can be used regardless of whether the
vehicle is serviced at flexible service intervals (Audi LongLife
Service) or fixed service intervals.
•
Avoid mixing this oil with other engine oils.
•
In exceptional circumstances, if the engine oil level is too low
⇒page 258 and you cannot obtain the oil specified for your vehicle,
you can put in a small quantity of oil conforming to the specification
VW 506 00 / VW 506 01 or VW 505 00 / VW 505 01 or ACEA B3 /
ACEA B4. This should not be done more than once and no more than
0.5 litres should be used.
A3
A4
document_0900452a81b1b9de.book Seite 257 Donnerstag, 26. Juli 2007 9:16 09
Page 260 of 342
Checking and topping up fluids 258Checking the oil level (with dipstick)Checking the oil level
– Park your vehicle on a level surface.
– Allow the warm engine to run briefly at idling speed and
then switch off the ignition.
– Wait approx. 2 minutes.
– Pull out the dipstick. Wipe the dipstick with a clean cloth
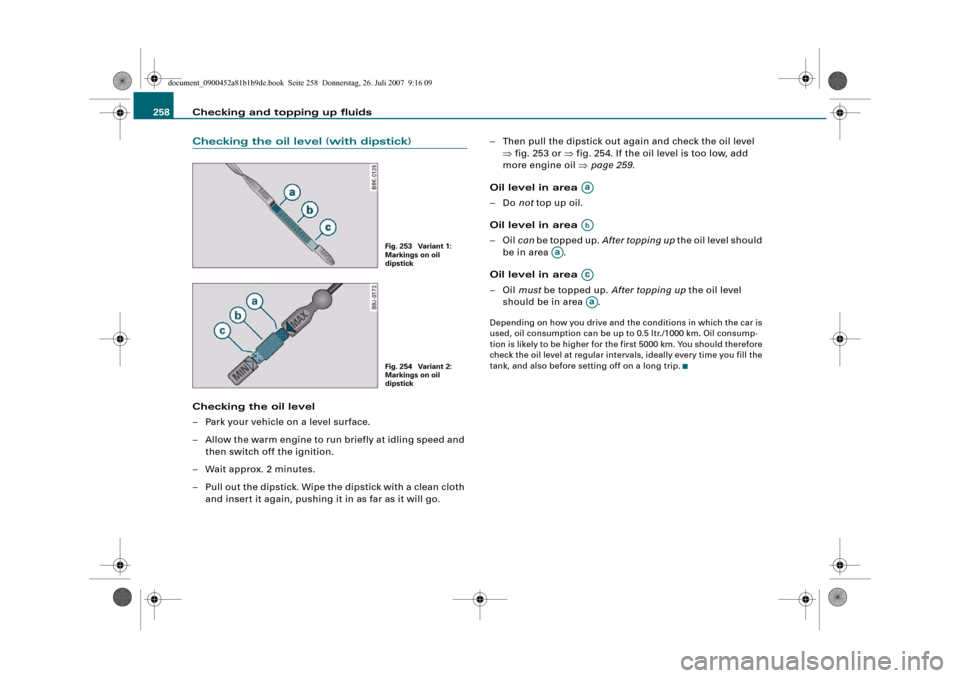
and insert it again, pushing it in as far as it will go.– Then pull the dipstick out again and check the oil level
⇒fig. 253 or ⇒fig. 254. If the oil level is too low, add
more engine oil ⇒page 259.
Oil level in area
–Do not top up oil.
Oil level in area
–Oil can be topped up. After topping up the oil level should
be in area .
Oil level in area
–Oil must be topped up. After topping up the oil level
should be in area .
Depending on how you drive and the conditions in which the car is
used, oil consumption can be up to 0.5 ltr./1000 km. Oil consump-
tion is likely to be higher for the first 5000 km. You should therefore
check the oil level at regular intervals, ideally every time you fill the
tank, and also before setting off on a long trip.
Fig. 253 Variant 1:
Markings on oil
dipstickFig. 254 Variant 2:
Markings on oil
dipstick
AaAb
Aa
AcAa
document_0900452a81b1b9de.book Seite 258 Donnerstag, 26. Juli 2007 9:16 09
Page 261 of 342
Checking and topping up fluids259
Controls
Safety
Driving tips
General maintenance
Self-help
Technical data
Applies to vehicles: without oil dipstickChecking the oil level (without dipstick)
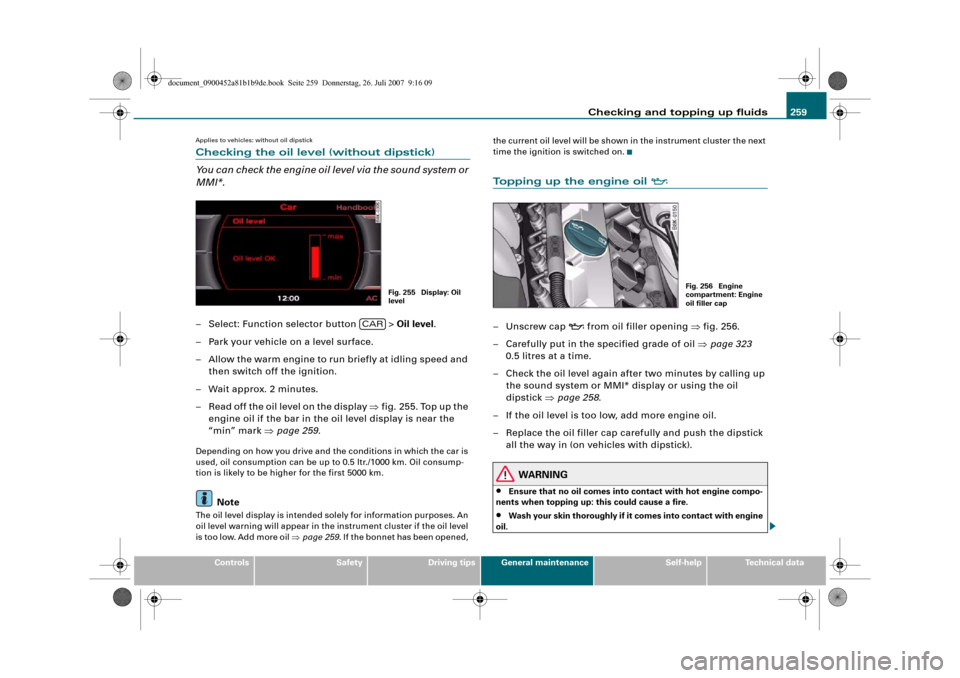
You can check the engine oil level via the sound system or
MMI*.– Select: Function selector button > Oil level.
– Park your vehicle on a level surface.
– Allow the warm engine to run briefly at idling speed and
then switch off the ignition.
– Wait approx. 2 minutes.
– Read off the oil level on the display ⇒fig. 255. Top up the
engine oil if the bar in the oil level display is near the
“min” mark ⇒page 259.Depending on how you drive and the conditions in which the car is
used, oil consumption can be up to 0.5 ltr./1000 km. Oil consump-
tion is likely to be higher for the first 5000 km.
Note
The oil level display is intended solely for information purposes. An
oil level warning will appear in the instrument cluster if the oil level
is too low. Add more oil ⇒page 259. If the bonnet has been opened, the current oil level will be shown in the instrument cluster the next
time the ignition is switched on.
Topping up the engine oil
–Unscrew cap
from oil filler opening ⇒fig. 256.
– Carefully put in the specified grade of oil ⇒page 323
0.5 litres at a time.
– Check the oil level again after two minutes by calling up
the sound system or MMI* display or using the oil
dipstick ⇒page 258.
– If the oil level is too low, add more engine oil.
– Replace the oil filler cap carefully and push the dipstick
all the way in (on vehicles with dipstick).
WARNING
•
Ensure that no oil comes into contact with hot engine compo-
nents when topping up: this could cause a fire.
•
Wash your skin thoroughly if it comes into contact with engine
oil.
Fig. 255 Display: Oil
level
CAR
Fig. 256 Engine
compartment: Engine
oil filler cap
document_0900452a81b1b9de.book Seite 259 Donnerstag, 26. Juli 2007 9:16 09
Page 262 of 342
Checking and topping up fluids 260
Caution•
The oil level must never be above area ⇒page 258, fig. 254,
as this may result in damage to the catalytic converter or to the
engine. On vehicles without an oil dipstick, you can check the oil
level via the sound system or MMI*. Contact a qualified workshop to
extract the engine oil if necessary.
•
No additives should be used with engine oil. Any damage caused
by the use of such additives would not be covered by the factory
warranty.For the sake of the environment
•
Never pour oil down drains or into the ground.
•
Always observe statutory requirements when disposing of
empty oil canisters.
Cooling systemCoolant
The purpose of the coolant is to carry heat away from the
engine. The correct amount of anti-freeze is important to
prevent the cooling system from freezing in winter.The cooling system is filled for life at the factory, so the coolant does
not need to be changed. The coolant consists of a mixture of water
and anti-freeze additive G12++. This is a glycol-based anti-freeze
with anti-corrosion additives.
Anti-freeze additive
The amount of anti-freeze additive required depends on the temper-
atures to be expected in the winter season. If the anti-freeze concen-
tration is too low the coolant can freeze, resulting in failure of the
cooling system and heater.The cooling system is filled at the factory with the correct amount of
anti-freeze for the country concerned.
In most cases the mixture consists of 60% water and 40% additive.
This mixture gives the required anti-freeze protection at tempera-
tures down to -25 °C and protects the alloy parts of the cooling
system against corrosion. It also prevents scaling and raises the
boiling point of the coolant.
Countries with warm climate
The coolant concentration must not be reduced by adding plain
water, even in the summer or in warm climates. The concentration
of the anti-freeze additive must always be at least 40%.
Countries with cold climate
If greater anti-freeze protection is required in very cold climates, the
proportion of the anti-freeze additive G12++ can be increased. A
concentration of 60% offers protection down to about - 40 °C. The
concentration of the anti-freeze additive must not be more than
60%, otherwise this would reduce the anti-freeze protection. In addi-
tion, the cooling effect will be adversely affected.
Vehicles for export to countries with a cold climate (such as Sweden,
Norway and Finland) are supplied with antifreeze protection down
to about -35 °C. The concentration of the antifreeze additive for
these countries should always be at least 50%.
Caution
•
It is advisable to have the cooling system checked before the
winter season to make sure that the antifreeze concentration is
adequate for the conditions to be expected. This applies particularly
if you intend to take the car into a colder climate zone. If necessary,
have the anti-freeze concentration increased to 50 - 60% as required.
•
Use only anti-freeze additive G12++, an additive meeting the
specification “TL 774 G”. Other additives may give considerably
inferior corrosion protection. The resulting corrosion in the cooling
system can lead to a loss of coolant, causing serious damage to the
engine.
Aa
document_0900452a81b1b9de.book Seite 260 Donnerstag, 26. Juli 2007 9:16 09
Page 263 of 342
Checking and topping up fluids261
Controls
Safety
Driving tips
General maintenance
Self-help
Technical data
•
The coolant additive G12++ can be mixed only with additives
G12+ and G12.
Checking coolant level
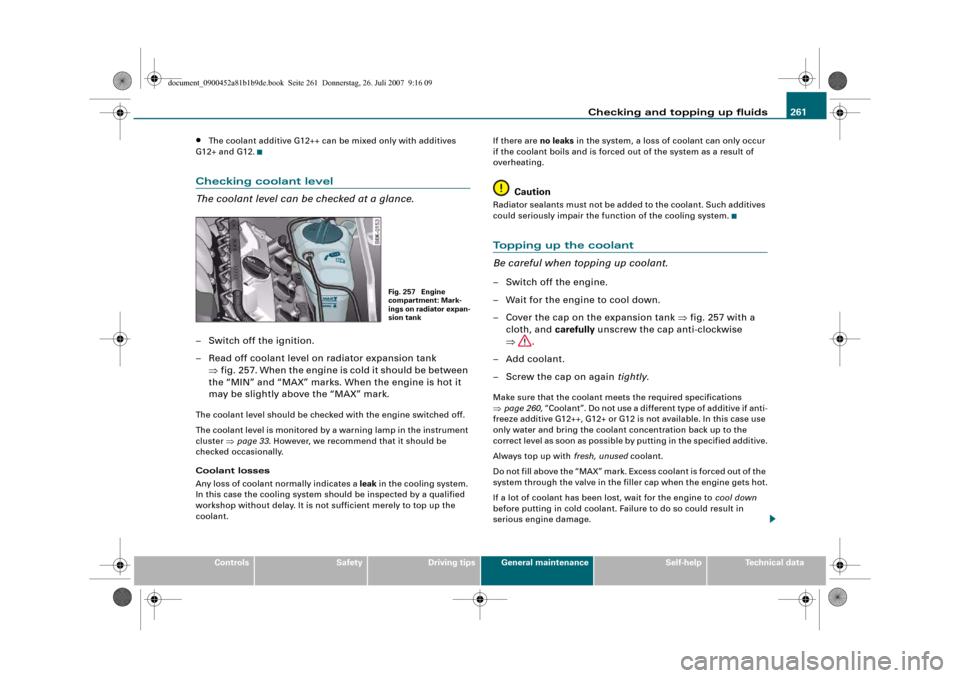
The coolant level can be checked at a glance.– Switch off the ignition.
– Read off coolant level on radiator expansion tank
⇒fig. 257. When the engine is cold it should be between
the “MIN” and “MAX” marks. When the engine is hot it
may be slightly above the “MAX” mark.The coolant level should be checked with the engine switched off.
The coolant level is monitored by a warning lamp in the instrument
cluster ⇒page 33. However, we recommend that it should be
checked occasionally.
Coolant losses
Any loss of coolant normally indicates a leak in the cooling system.
In this case the cooling system should be inspected by a qualified
workshop without delay. It is not sufficient merely to top up the
coolant.If there are no leaks in the system, a loss of coolant can only occur
if the coolant boils and is forced out of the system as a result of
overheating.
Caution
Radiator sealants must not be added to the coolant. Such additives
could seriously impair the function of the cooling system.Topping up the coolant
Be careful when topping up coolant.– Switch off the engine.
– Wait for the engine to cool down.
– Cover the cap on the expansion tank ⇒fig. 257 with a
cloth, and carefully unscrew the cap anti-clockwise
⇒.
– Add coolant.
– Screw the cap on again tightly.Make sure that the coolant meets the required specifications
⇒page 260, “Coolant”. Do not use a different type of additive if anti-
freeze additive G12++, G12+ or G12 is not available. In this case use
only water and bring the coolant concentration back up to the
correct level as soon as possible by putting in the specified additive.
Always top up with fresh, unused coolant.
Do not fill above the “MAX” mark. Excess coolant is forced out of the
system through the valve in the filler cap when the engine gets hot.
If a lot of coolant has been lost, wait for the engine to cool down
before putting in cold coolant. Failure to do so could result in
serious engine damage.
Fig. 257 Engine
compartment: Mark-
ings on radiator expan-
sion tank
document_0900452a81b1b9de.book Seite 261 Donnerstag, 26. Juli 2007 9:16 09