AUDI A4 2013 Owners Manual
Manufacturer: AUDI, Model Year: 2013, Model line: A4, Model: AUDI A4 2013Pages: 302, PDF Size: 75.61 MB
Page 181 of 302
Deactivating the convertible locking
retractor
The convertible locking retractor for child re
straints will be deactivated automatically when the belt is wound all the way back into the retractor.
" Press the red button on the safety belt
buckle. The belt tongue will pop out of the
buckle.
" Guide the safety belt all the way back into
its stowed pos ition.
Always let the safety belt retract completely
into its stowed pos ition. The safety belt can
now be used as an ordinary safety belt with
out the convertible locking retractor for child
rest raints .
If the convertible locking retractor should be
activated inadvertently , the safety belt must
be unfastened and guided completely back in
to its stowed position to deactivate this fea
t ure. If the conver tible locking retractor is not
deactivated, the safety belt will gradually be
come tighter and uncomfortable to wear .
A WARNING
Improperly installed child safety seats in
crease the risk of serious personal injury
and death in a collision.
- Never unfasten the safety belt to deacti
vate the convertible locking retractor for
child restraints while the vehicle is mov
ing. You would not be restrained and
could be seriously injured in an accident.
- Always read and heed all WARNINGS
whenever using a child restrained in ave
hicle is being used ¢
page 166. Special
precautions apply when installing a child
safety seat on the front passenger seat
¢ page 146, Child restraints on the front
seat -some important things to know .
Child Safety 1 79
•
•
Page 182 of 302
180 Child Safet y
LATCH Lower
anchorages and tether
for children
Child Restraint System anchors and how
are they related to child safety
To provide a simpler and more practicable way
to attach the child restraint on the vehicle
seat, Federal regulations require specia l lower
anchorages in veh icles and dev ices on new
child restraints to attach to the vehicle ancho
rages.
The combination of the tether anchorages and
the lower anchorages is now generally called
the
LA TC H system for "L ower Anchorages and
Tethers for C hildren ."
F orward-facing child restraints manufactured
after September 1, 1999, are required by U.S.
federal regulations to comply with new child
head movement performance requirements .
These new performance requirements make a
tether necessary on most new child seats.
I nstalling a child restraint that requires a top
tether without one can seriously impair the
performance of the child restraint and its abi l
ity to protect the child in a collision . Installing
a child restraint that requires a top tether
without the top tether may be a violation of
state law .
Ch ild restra int manufacturers offer LATCH
lower anchorages on their child seats with
hook-on or push-on connectors attached to
adj ustab le straps.
In addition to the LATCH lower anchorages,
these child restraint systems usually require
the use of tether straps to help keep the child
restra int firmly in place.
_&. WARNING
Imprope r insta llation of chi ld restraints
w ill increase the risk of inju ry and death in
a crash.
- Always fo llow the instructions p rov ided
by the manufacturer of the c hild re- straint yo
u intend to install in your vehi
cle.
- Never install a child restraint without a
properly attached top tether strap if the
child restraint manufacturer's instruc
tions require the top tether strap to be
used.
- Improper use of child restraint LATC H
lower anchorage points can lead to injury
in a collision . T he LATC H lower anchorage
points are designed to withstand on ly
those loads imposed by correctly fitted
chi ld res traints.
- Never mount two child restra int systems
on one LATC H lower anchorage point.
- Never secure or attach any luggage or
other item to the LATCH lower anchorag
es.
(D Tips
In Canada, the terms "top tether" with
"lower universa l anchorages" (or "lower
u niversa l anchorage ba rs") are used to de
scribe the system.
- In other countries, the term " ISOFIX" is
used to describe the lower a ncho rages.
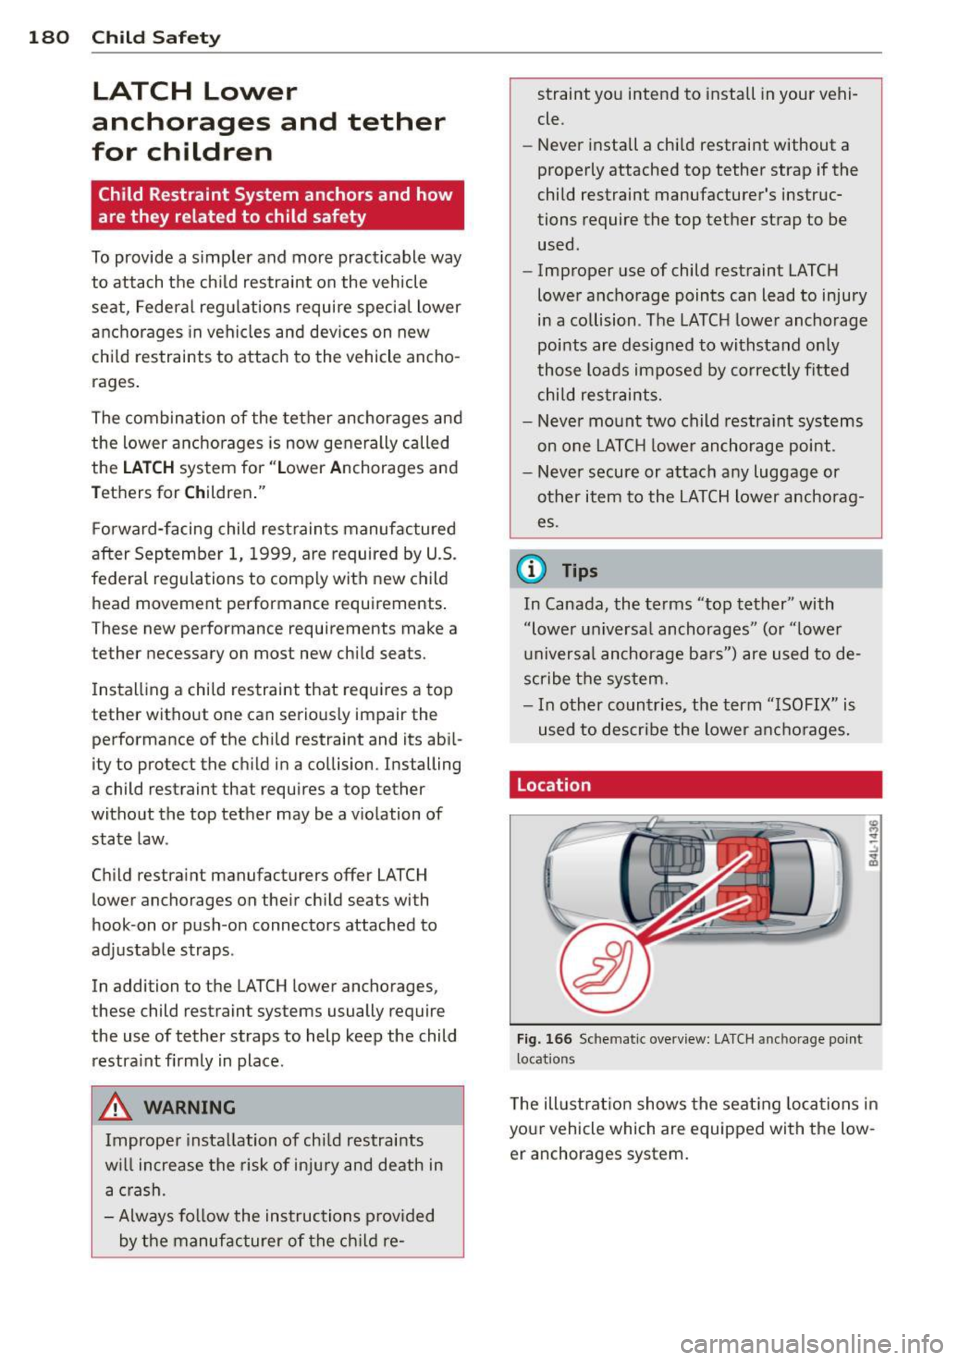
Location
Fi g. 166 Sc hem atic overview: LA TCH ancho rage point
l ocations
T he illust rat ion shows the seat ing loca tions in
you r vehicle which are equipped with the low
er anchorages system.
Page 183 of 302
Description
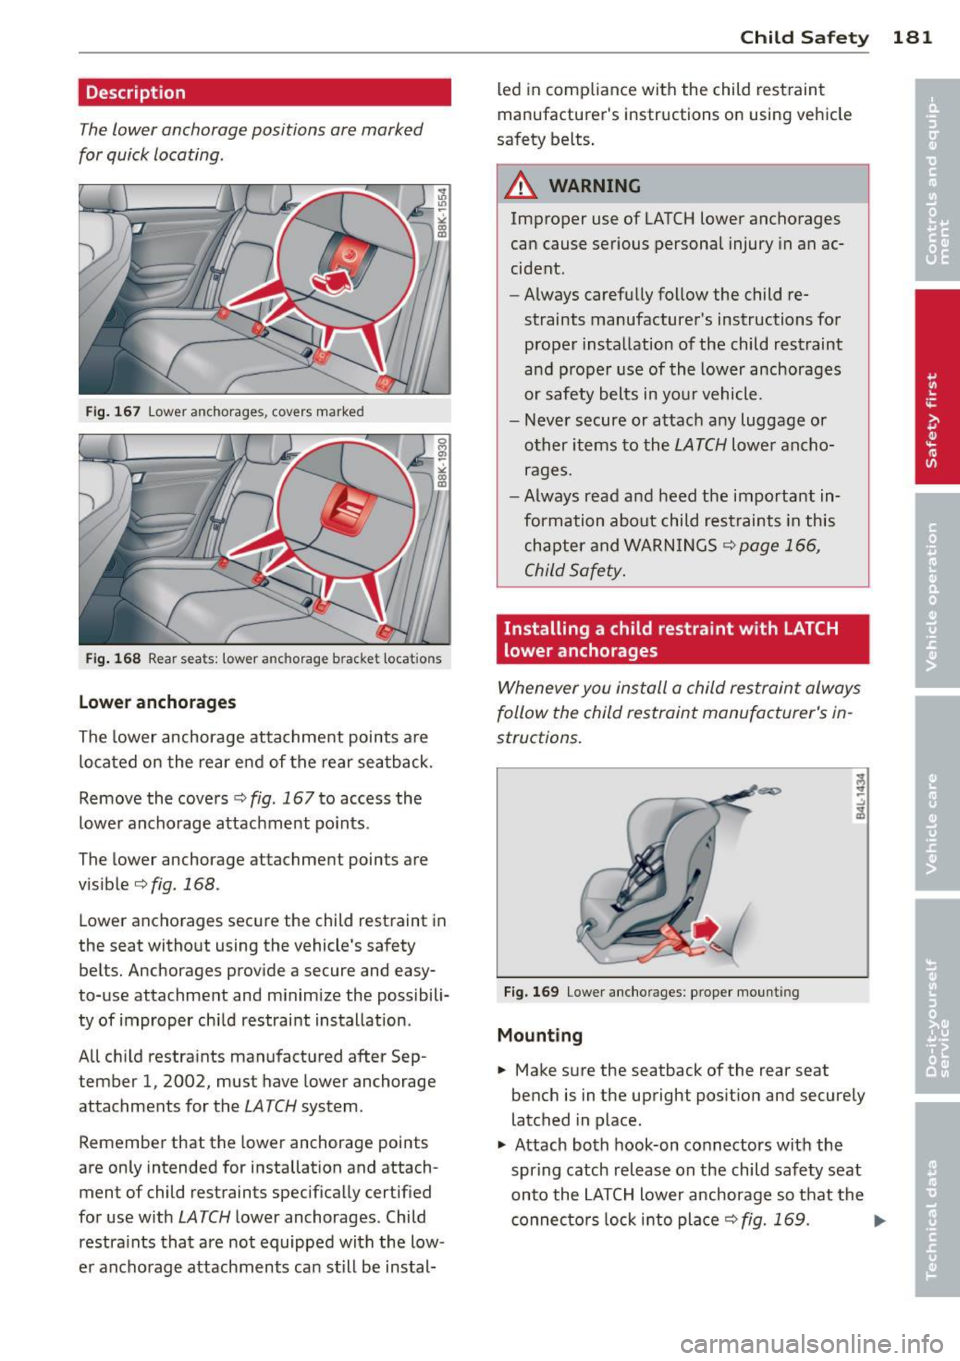
The lower anchorage positions are marked
for quick locating.
Fig . 167 Lower anchorages, covers marked
Fig . 168 Rear seats: lower anchorage b racket locat ions
Lowe r ancho rages
The lower anchorage attachment points a re
located on the rear e nd of the rear sea tback.
Remove the covers
c:;, fig . 167 to access the
l ower anchorage attachment po ints.
The lower anchorage attachment points are
visible
c:;, fig . 168 .
Lower anchorages secure the child restraint in
the seat without using the vehicle 's safety
belts. Anchorages prov ide a secure and easy
to-use attachment and minimize the possibili
ty of improper child restraint installation .
All ch ild restra ints manufactured after Sep
tember 1, 2002, must have lower anchorage
attachments for the
LATCH system .
Remember that the lower anchorage points
are only intended for installation and attach ment of child restraints specifically certified
for use w ith
LATCH lower anchorages . Child
restra ints that are not equipped with the low
e r anchorage attachments ca n still be instal-
Child S afety 181
led in compliance with the child restraint
manufacturer's instructions on using vehicle
safety belts .
_& WARNING
Improper use of LATCH lower anchorages
can cause serious personal injury in an ac
cident.
- Always carefully follow the child re
straints manufacturer's instructions for
proper installation of the child restraint
and p roper use of th e lower anchorages
or safety belts in yo ur vehicle.
- Never secure or attach any luggage or
other items to the
LATCH lowe r ancho
rages.
- Always read and heed the importa nt in
formation about child r estraints in this
chapter and WARN INGS
¢page 166,
Child Safety.
Installing a child restraint with LATCH
lower anchorages
Whenever you install a child restraint always
follow the child restraint manufacturer's in
structions.
F ig. 169 Lowe r anc horages: proper mount ing
Mounting
.,. Make sure the seatback of the rear seat
bench is in the upright pos it ion and securely
latched in place .
... Attach both hook-on co nnectors with the
spring catch rel ease on the child safety seat
onto the LATCH lower anchorage so that the
connec to rs lock into place
c:;, fig. 169 . ..,_
Page 184 of 302
182 Child Safet y
• Pull on the connector attachments to make
sure they are properly attached to the LATCH
lower anchorage.
• Pull straps tight following the child re
straint manufacturer's instructions.
Re leasin g
• Loosen the tension on the straps following
the chi ld restraint manufacturer 's instruc
tions .
• Depress the spring catche s to release the
anchorage hooks from the lower anchorag
es .
Remember: Use tether straps to help keep the
child restrain t firmly in place.
A WARNING ,.
Improper use of the LATCH system can in
crease the risk of ser ious personal injury
and death in an acc ident .
- T hese anchors were developed only for
child safety seats us ing the "LATCH" sys
tem .
- Never attach other child safety seats,
belts or ot her objects to these anchors .
-Always make sure that you hear a click when latching the seat in place . If you do
not hear a click the seat is not secure and
cou ld fly forward and h it the interior of
t he vehicle, or be ejected from the vehi
cle .
A WARNING
Improper insta llation of chi ld restraints
wi ll increase the risk of injury in an acc i
dent.
- Always follow the child restraint system manufacturer's instructions for proper
installation of the child restraint system
and proper use of tether straps as we ll as
the lower anchorages or safety belts in
your vehicle .
- Always read and heed the important in
format ion and WARNINGS about child
safety and the installation of child re
st raint systems ¢ page 166, Child Safe
ty.
-
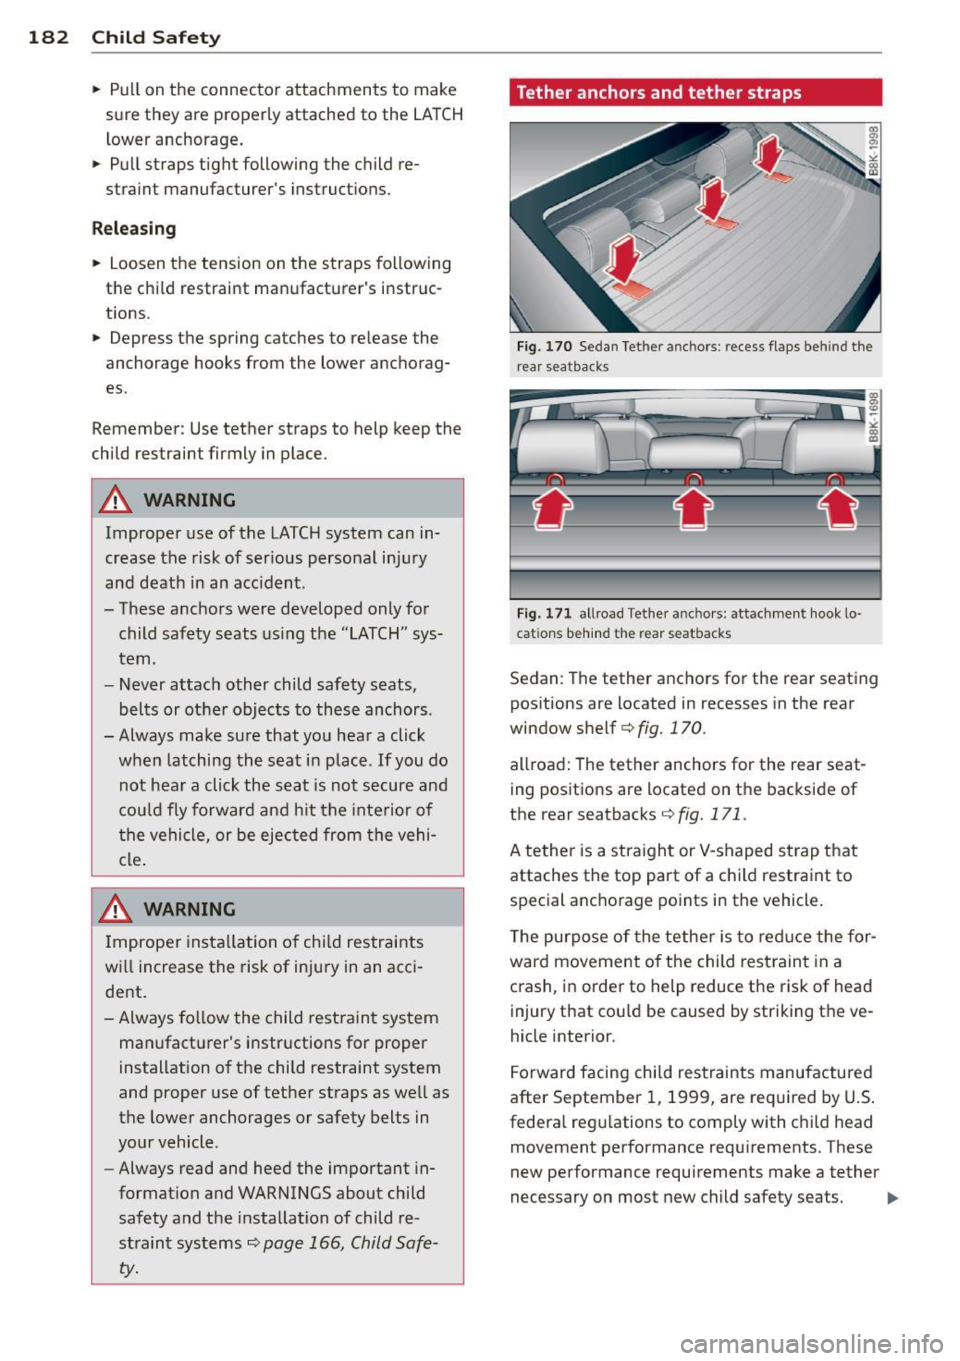
Tether anchors and tether straps
Fig. 170 Se dan Tet her an ch or s: r ecess flaps behind th e
rear sea tback s
Fig. 171 all road Tether a nch o rs: attachmen t hook lo
ca tions beh ind t he rear s eatb acks
Sedan: The tether ancho rs for the rea r seat ing
positions are located in recesses in the rear
windowshelf ¢fig.170.
allroad: The tether anchors for the rear seat
ing pos it ions are located on the backside of
the rear seatbacks
¢ fig. 171 .
A tether is a stra ight or V-shaped strap that
attaches the top part of a child restraint to
special anchorage points in th e vehicle.
T he purpose of the tethe r is to reduce the for
ward movement of the child restraint in a
crash, in order to help reduce the risk of head
injury that cou ld be caused by striking t he ve
hicle interior .
Forward facing child restraints manufactured
after September 1, 1999, are requ ired by U.S .
federal regu lations to comply with c hild head
movement performance requirements. These
new perfo rmance requirements make a tether
neces sary on mos t new child safety sea ts.
IIIJ.
Page 185 of 302
_& WARNING
Improper installation of child restraints
will increase the risk of injury and death in a crash.
- Always follow the instructions provided
by the manufacturer of the child re
straint you intend to install in your Audi.
- Improper use of child restraint anchors
(including tether anchors) can lead to in
jury in a collision. The anchors are de
signed to withstand only those loads im
posed by correctly fitted child restraints.
- Never mount two child restraint systems
on one LATCH lower anchor point.
- Never attach two child restraint systems
to one tether strap or tether anchorage.
- Never attach a tether strap to a tie-down
hook in the luggage compartment.
- Never use child restraint tether ancho rages to secure safety belts or other
kinds of occupant restraints.
- Never secure or attach any luggage or
other items to the LATCH lower ancho
rages or to the tether anchors.
- If a tether or other strap is used to at
tach a child restraint to the front passen
ger seat, make sure that it is not so
tight , that it causes the weight-sensing
mat to measure more weight than is ac
tually on the seat.
- The heavier weight registered can make
the Advanced Airbag System work as
though an adult were on the seat and de
ploy the Advanced Airbag when it must
be suppressed causing serious or even
fatal injury to the child.
- If you must install a rearward facing
child safety seat on the front passenger
seat because of exceptional circumstan ces and the
PASSENGER AIR BAG OFF
light does not come on and stay on, im
mediately install the rear-facing child
safety seat in a rear seating position and
have the airbag system inspected by your
Audi dealer.
Child Safety 183
Installing the upper tether strap on the
anchorage
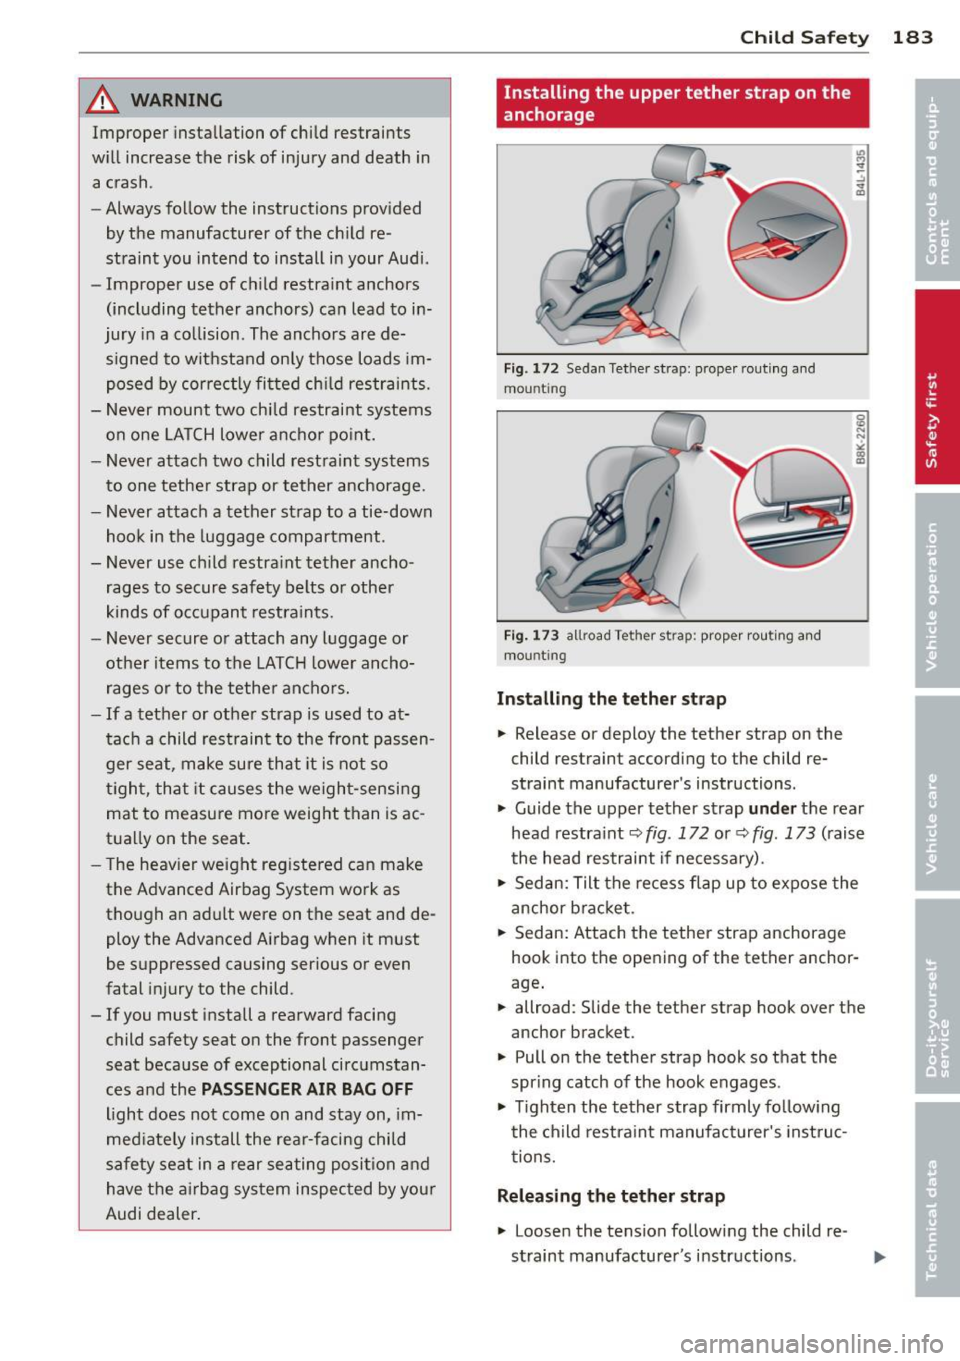
Fig . 172 Sedan Tether strap: proper routing and
mou nting
Fig. 173 allroad Tether strap: proper routing and
mo unting
Installing the tether strap
.,. Release or deploy the tether strap on the
child restraint according to the child re
straint manufacturer's instructions .
.,. Guide the upper tether strap
under the rear
head restraint ~
fig. 172 or¢ fig. 173 (raise
the head restraint if necessary).
.,. Sedan: Tilt the recess flap up to expose the
anchor bracket.
.,. Sedan: Attach the tether strap anchorage
hook into th e opening of the tether anchor
age .
.,. allroad: Slide the tether strap hook over the
anchor bracket.
.,. Pull on the tether strap hook so that the
spring catch of the hook engages .
.,. Tighten the tether strap firmly following
the child restraint manufacturer's instruc
t ions.
Releasing the tether strap
.,. Loosen the tension following the child re -
straint manufacturer's instructions.
1J1-
Page 186 of 302
184 Child Saf ety
• Depress the spring catch on the hook and
release it from the anchorage .
(D Note
If you leave the child restraint with the
tether strap firmly insta lled for several
days, this cou ld leave a mark on the up
holstery on the seat c ushion and backrest
in the area where the tether strap was in
stalled. The upholstery would a lso be per
manently stretched around the tether
strap. Th is applies especially to leather
seats.
Using tether straps on rea rward-facing
child restraints
Currently, few rearward-facing child rest raint
systems come with a tether . P lease read and
heed the child restraint system manufactur
er's instructions carefully to determine how to properly instal l the tether.
A WARNING
-
A child in a rea rward-facing child sa fety
s e at insta lled on the front passenger seat
w ill be seriously injured and can be killed if
t he fron t air bag infl ates -even wit h an Ad
vanced Airbag System.
- T he inflati ng a irbag wi ll hit the child
sa fety sea t or infan t carrier w it h grea t
f orce and w ill smash the c hild safety sea t
and child against the backrest, cente r
armrest, or door.
- A tight tet her or ot her st rap on a rear
wa rd-facing child restra int attached to
the front passenger seat can put too much pressure on the weight-mat i n the
seat and register a heavier weight in the
Advanced Airbag System. The heav ie r
we ight registe red can make the system
wor k as though a n adu lt were on the seat
and dep loy the A dvan ced Airbag when i t
mus t be suppres sed c ausing seriou s or
eve n fa tal injury to the child.
- If you mus t install a rea rw ard fa ci ng
ch ild s afety se at on the front passenge r
sea t beca use of excep tional circ ums tan - ces and t
he
PASSENGER AIR BAG OFF
light does not come on and stay on, im
mediately install the rearward-fac ing
child safety seat in a rear seating posi·
tion and have t he ai rbag system inspec t
e d by your authorized A udi dealer .
Additional Information
'
Sources of information about child
restraints and their use
There are a number of sources of add itiona l
information about child restra int selection, in
sta llation and use:
NHTSA advises that the best ch ild safety seat
is the one that fits your ch ild and fits in your
vehicle, and that you will use correct ly and
cons istently .
Try before yo u buy!
U .S National Highway Traffi c Safet y Admin
istration
Tel.: 1 -888-327- 4236 (TIY: 1-800-424-9153)
www.n htsa.gov
National SAFE KIDS Campaign
Tel.: (202) 662 -0600
www.safek ids.org
Safet y BeltSafe U.S.A
Tel.: (800) 7 45-SAFE (English)
T el.: (800) 7 47-SANO (Spanis h)
www.carseat.org
Transport Canada Information Centre
T el.: 1 -800 -33 3-0371 o r ca ll
1-6 13-998-86 16 if yo u are i n the Ottawa area
http://www.tc.gc.ca/eng/roadsafety/
menu. htm
Audi Cu stomer Relation s
Tel.: (800) 822 -2834
Page 187 of 302
Intelligent technology Notice about data
recorded by vehicle
control modules
Your vehicle is not equipped with an Event Da
ta Recorder (EDR), installed by some manu
facturers for the express purpose of capturing
data for retrieval after an accident or crash
event. EDR's are sometimes called "crash re
corders".
Some state laws restrict the retr ieval or down
loading of data stored by EDR's that were in
stalled in a vehicle for the express purpose of
retrieving data after an accident or crash
event without the owner's consent.
Although your vehicle is not equipped with an
EDR, it is equipped with a number of electron
ic control modules for various vehicle systems
such as, for examp le, engine function, emis
sion control, as well as for the airbags and
safety belts.
These electronic control modules also record
vehicle-related data during norma l vehicle op
eration for diagnostic and repair purposes.
The recording capacity of the electronic con
trol modules is limited to data (no sound is re
corded) and only a small amount of data is ac
tually recorded over a very limited period of
time and stored when a system fault or other
condition is sensed by a control unit. Some of
the data then stored may relate to vehicle
speed, direction, braking as we ll as restraint
system use and performance in the event of a
crash or other condition. Stored data can only be read and downloaded with special equip
ment.
Electronic Stabilization
Control (ESC)
Description
ESC helps to improve road holding and vehicle
dynamics to help reduce the probability of
skidding and loss of veh icle control. It works
only when the engine is running. ESC detects
Intelligent technology 185
certain difficult driving situations, including
when the vehicle is beginning to spin (yaw)
out of control and helps you to get the veh icle
back under control by se lectively braking the
wheels, and/or reducing engine power and
providing steering ass istance to help hold the
vehicle on the driver's intended course. The in
dicator light
JjJ in the instrument cluster
blinks when ESC is taking action to help you
control the vehicle.
ESC has limitations .
It is important to remem
ber that ESC cannot overcome the laws of
physics.
It will not always be able to help out
under all conditions you may come up against.
For example, ESC may not always be able to
help you master situations where there is a
sudden change in the coefficient of friction of
the road surface. When there is a section of dry road that is suddenly covered with water,
slush or snow, ESC cannot perform the same
way it would on the dry surface. If the vehicle
hydroplanes (rides on a cushion of water in
stead of the road surface), ESC will not be
able to help you steer the vehicle because con
tact with the pavement has been interrupted
and the vehicle cannot be braked or steered .
During fast cornering, particularly on winding
roads, ESC cannot always deal as effectively
with difficult driving situations than at lower
speeds. When towing a trailer, ESC is not able
to help you regain control as it would if you
were not tow ing a trailer.
A lways adjust your speed and driving style to
road, traffic and weather conditions. ESC can
not override the vehicle's physical limits, in
crease the available traction, or keep a vehicle
on the road if road departure is a result of
driver inattention. Instead, ESC improves the
poss ibility of keeping the vehicle under con
trol and on the road dur ing extreme maneu
vers by using the driver's steering inputs to
help keep the vehicle going in the intended di
rection. If you are traveling at a speed that
causes you to run off the road before ESC can
provide any assistance, you may not experi
ence the benefits of ESC.
•
•
Page 188 of 302
186 Intelligent technology
ESC includes and/or works together with the
anti-lock brake system (ABS), brake assist sys
tem, anti-slip regulation (ASR) , e lectronic dif
ferential lock (EDL), dynamic steering" and
e lectronic interaxle differentia l lock* /selective
wheel torque control* . ESC is switched on all
the t ime. I n certa in s ituations whe n you need
l ess t raction, you can switch
off ASR by p ress
i ng the bu tto n
[ru ¢ page 188, fig. 176 or
¢ page 188, fig. 177. Be sure to sw itch ASR
on aga in when yo u no longer need less t rac
tion .
Anti -lock braking system (ABS)
ABS prevents the wheels from locking up
when braki ng. The veh icle can still be steered
even d uring h ard br aking. Apply ste ady p res
sure to the brake pedal. Do no t pump the ped
a l. A pulsing in the brake peda l indicates t hat
the system is he lping yo u to b rake the vehicle .
Brake assist system
The brake assis t system can decrease b ra ki ng
d ista nce. It increases braking power w hen the
d river p resses the brake pedal quic kly in eme r
gency situations . You must p ress and hold the
brake peda l until the situation is over. In
vehicles w ith adapt ive cru ise contro l", the
brake assist system is more sensit ive if the
d ista nce detected to t he vehicle a head is too
small.
Anti-slip regulation (ASR)
ASR reduces engine power when the drive
wheels begin to spin and adapts the fo rce to
the road condit ions. This makes it eas ier to
start , accelerate and drive up hills.
Electronic differenti al lock (EDL )
The ED L brakes wheels that are spinn ing and
transfers the drive power to the other drive
wheel or whee ls if t he vehicle is equipped with
all-w heel drive*. This function is available up
to about 60 mph (100 km/h).
In extreme cases, EDL automat ica lly switches
off to help keep the bra ke on the braked whee l
from overheating. EDL wi ll switch on again au-tomat
ica lly when conditions have ret urned to
no rma l.
Dynamic steering*
On vehicles wi th dynam ic steering*, ESC he lps
st abi liz e the steer ing in cr itical situ ations.
Electronic interaxle differential lock* /
selective wheel torque control*
T he elec troni c int eraxle differentia l lock (front
whee l dr ive) o r th e se lec tive whee l torque
control (all-whee l dr ive) oper ates when dr iv
ing t hro ugh curves. The front wheel on the in
side of the c urve or both whee ls on the inside
of the c urve are b raked se lectively as needed.
This m inimizes sliding in the front wheels and
allows for more precise driving through
curves . The applicable system may not acti
vate when dr iving in wet o r snowy cond itions.
A WARNING
- ESC, ABS, ASR, EDL dynam ic steering*
a nd the ele ct roni c interaxle d ifferential
lo ck* /se lective whee l torque con trol *
cannot ove rcome the laws of physics .
This is especially important on sli ppery
or wet roads.
If the systems beg in acting
to stabilize your veh icle, yo u should im
mediately change your speed to match
the road and traffic conditions . Do not
let the increased safety prov ided by
these systems tempt you to take r isks.
Doing so will increase the risk of a loss of
veh icle cont ro l, col lision and ser ious pe r
sonal injur ies.
- Always ada pt your speed to road, traffi c
a nd wea ther conditions. The r isk of los-
ing con trol of the vehicle i ncreases when
d riving too fast, es pec ia lly through
curves and o n slippe ry or wet roads, an d
when dr iv ing too close to vehicles up
ahead. ESC, ABS, the brake ass ist sys
tem, ASR, EDL dynam ic steer ing* and the
e lectronic inte raxle differentia l lock*/se
lec tive whee l to rque control* cannot p re-
-
vent co llisi ons. ~
Page 189 of 302
-Always acce lerate with specia l care on
even, smooth surfaces s uch as those that
are wet or covered with ice and snow.
The drive wheels can spin even with
these assistance systems that cannot al
ways help to reduce the risk of loss of ve hicle control.
(0 Tips
- ABS and ASR on ly work correctly when
all four wheels are equ ipped w ith ident i
ca l tires. Different tire s izes can lead to a
reduct ion i n eng ine power.
- You may hear noises when the systems
described are wo rking .
- If the indicator light D] or m!S (USA
models) ;tiJ (Canada models) appears,
the re may be a malfunct ion
c:> page 19,
~ page 19.
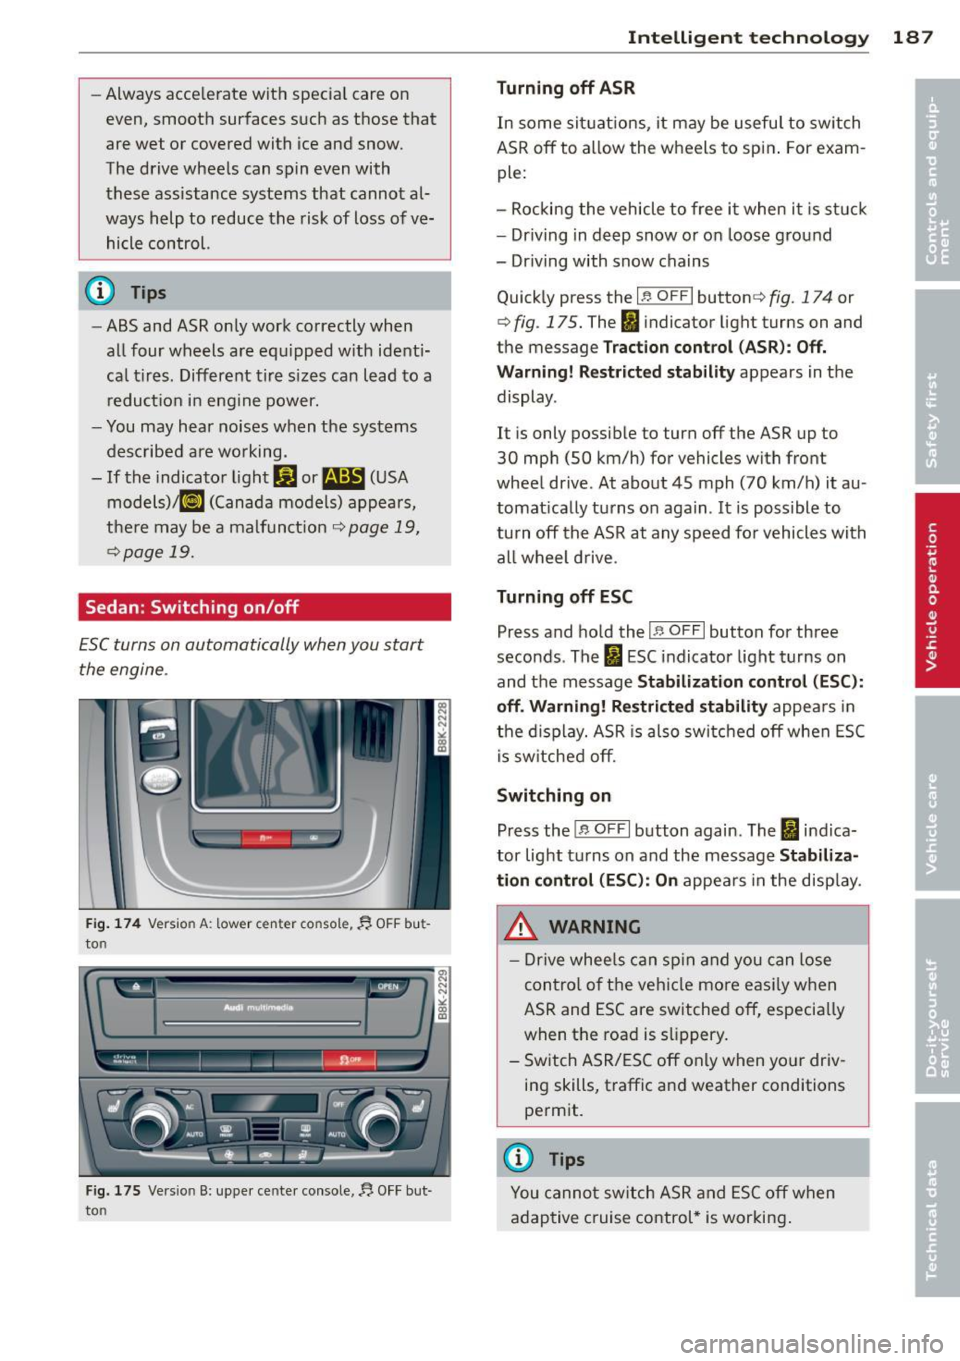
Sedan : Switching on/off
ESC turns on automatically when you start
the engine .
Fig . 174 Vers io n A: low er c en te r co nsol e, 1', O FF bu t
to n
Fig. 175 Ve rsio n B: upper ce nte r console,~ OFF bu t
to n
Intelligen t technolog y 187
Turning off ASR
In some sit uatio ns, it may be useful to switch
ASR
off to a llow the wheels to spin . For exam
ple:
- Rocking the vehicle to free it when i t is st uck
- Dr iving in deep snow or on loose ground
- Dr iving with snow chains
Qu ick ly press the
I~ O FF I button c:> fig. 174 or
c:>
fig . 175. The fil indica tor light turn s on and
t he me ssage
T rac tion control (A SR ): Off.
War ning! R estrict ed stability
appears in the
display .
It i s only possible to turn
off the ASR up to
30 mph (SO km/h) for vehicles wi th front
wheel drive . At about 45 mph (70 km/h) it au
tomat ically turns on again .
It is possible to
turn
off the ASR at any speed fo r vehicles with
all wheel drive .
Turning off ESC
Press and hold the I;; OFFI button for three
seconds . The
fl ESC indicator light turns on
and the message
Stabil ization cont rol (ESC ):
o ff . Warni ng ! Re str icted stab ilit y
appea rs in
the d isplay. ASR is also sw itched
off when ESC
i s sw itched off.
Switching on
Press the j ;; O FFI button again . The fi indica
tor light t urns on and the message
St abi liz a
t ion control (ESC ): On
appears in the disp lay.
_&. WARNING
- Drive whee ls can sp in and you can lose
contro l of the vehicle more eas ily when
ASR and ESC are switched off, especia lly
when the road is s lippery .
- Switch ASR/ESC
off only when yo ur driv
ing skills, traffic and weather conditions
permit.
@ Tips
You cannot sw itch ASR and ESC off when
adaptive cruise control* is working .
-
Page 190 of 302
188 Intelligent technology
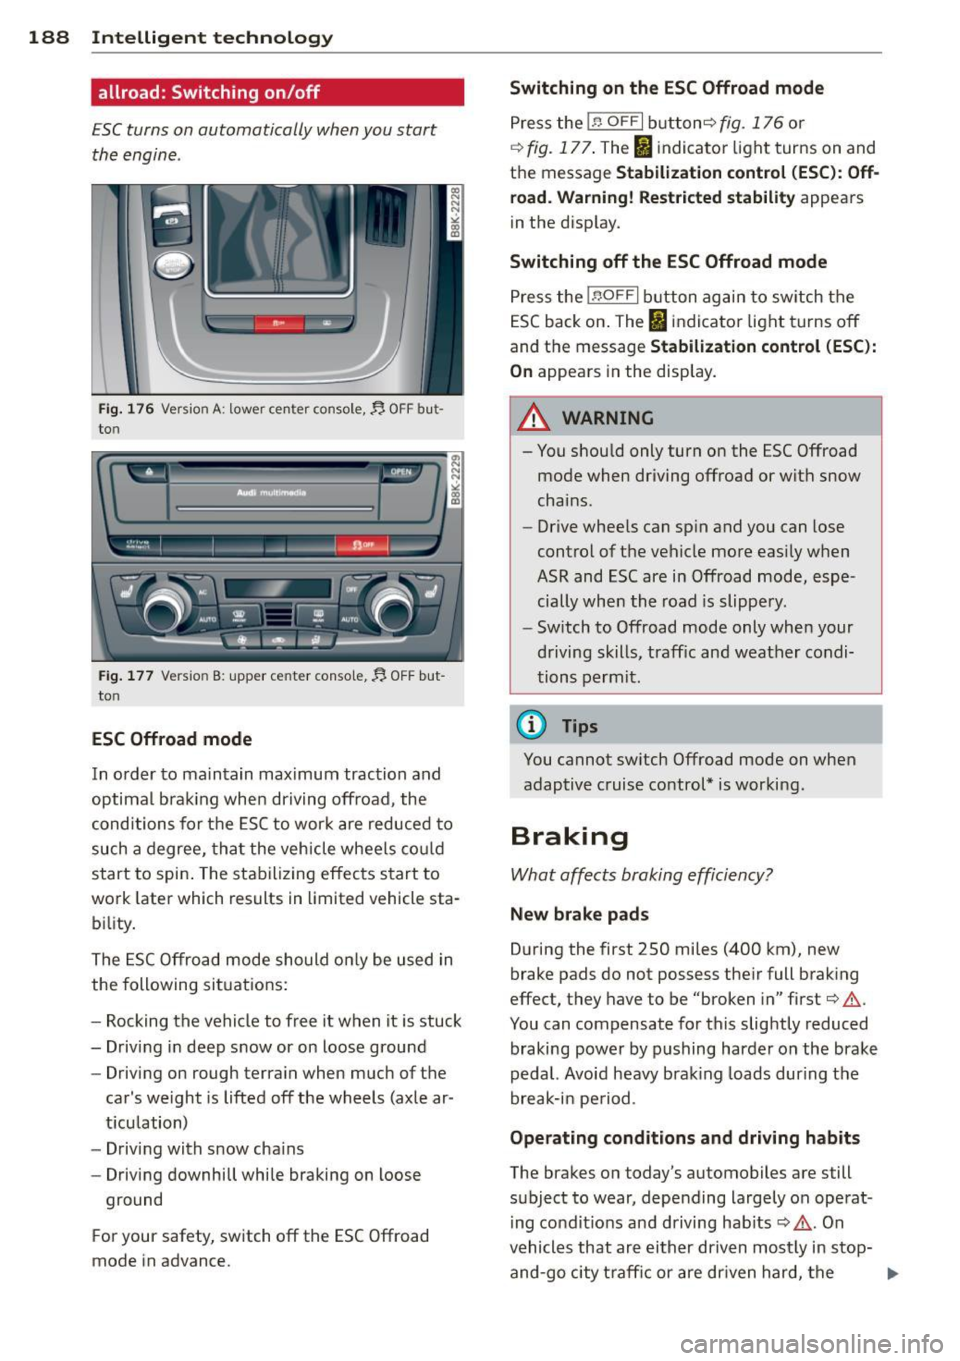
allroad: Switching on /off
ESC turns on automatically when you start
the engine .
Fig. 176 Version A: lower ce nter console,~ OFF but
to n
...... [ I I n-I _,,. .,., -------' -"~ __..,
Fig. 177 Versio n B: upper ce nter conso le,~ OFF but
to n
ESC Offroad mode
In order to maintain maximum traction and
optima l brak ing when driving offroad , the
conditions for the ESC to work are reduced to
such a degree, tha t the vehicle whee ls co uld
start to spin . The stabilizing effects start to
work later wh ich results in limited vehicle sta
b ili ty.
The ESC Offroad mode should on ly be used in
the following situations:
- Rocking the vehicle to free it when it is stuck
- Driving in deep snow or on loose ground
- Driving on rough terra in when much of the
car's weight is lifted off the wheels (axle ar
t icu lation)
- Driving with snow cha ins
- Driving downhill while braking on loose
ground
F or your safety, switch off the ESC Offroad
mode in advance.
Switching on th e ES C Offroad mode
Press the In OF FI button ¢ fig. 176 or
¢ fig. 177 . The I indicator light turns on and
the message
St abilization cont ro l ( ES C): Off
ro ad. Wa rning! Rest ricted stability
appears
in the disp lay.
Swit ching off th e ESC Offroad mode
Press the !.$ O FF I button again to sw itch the
ESC back on . The
IJ indicator light turns off
and the message
Stabil ization contro l (ESC ):
On
appears in the display.
_& WARNING
- You shou ld only turn on the ESC Offroad
mode when driving offroad or with snow
chains.
- Drive whee ls can sp in and you can lose
control of the vehicle more easi ly when
ASR and ESC are in Offroad mode, espe
cially whe n the road is slippery.
- Switch to Offroad mode only whe n your
driving skills, traff ic and weather condi
tions permit .
(D Tips
You cannot sw itch Offroad mode on when
adaptive cruise control* is working.
Braking
What affects braking efficiency?
New brake pad s
During the first 250 mi les (400 km), new
brake pads do not possess the ir full brak ing
effect, they have to be "broken in" first¢ .&,.
You can compensate for this slightly reduced
braking power by p ushing harde r on the brake
pedal. Avoid heavy brak ing loads dur ing the
break-in pe riod.
Oper ating cond ition s and driving habit s
The brakes on today's automobiles are still
subject to wear, depending largely on operat
ing co nd it ions and driving hab its
¢ .&, . On
vehicles that are either driven most ly in stop-
and-go city traff ic or are dr iven hard, the
lilJ,,