clutch AUDI A4 2013 Owners Manual
[x] Cancel search | Manufacturer: AUDI, Model Year: 2013, Model line: A4, Model: AUDI A4 2013Pages: 302, PDF Size: 75.61 MB
Page 29 of 302
The values in the single-trip or the total-trip
memory can a ll be reset to zero at the same
time under
Re set in the menu .
I n addition, you can determine what informa
tion from the trip computer should be shown in the instrument cluster display. If one of the
p ieces of driver information is turned
Off , that
driver information w ill not be shown in the
display. The information will con tinue to be
calculated by the trip computer and can be
turned back
On at any t ime .
(D Tips
-This function is not avai lab le on all
vehicles.
- The driving information in the efficiency
program is also reset to zero with the
s ingle-trip memory .
Gearshift Indicator
Appl ies to vehicles: with manu al transmis sion a nd gea r·
shi ft indica tor
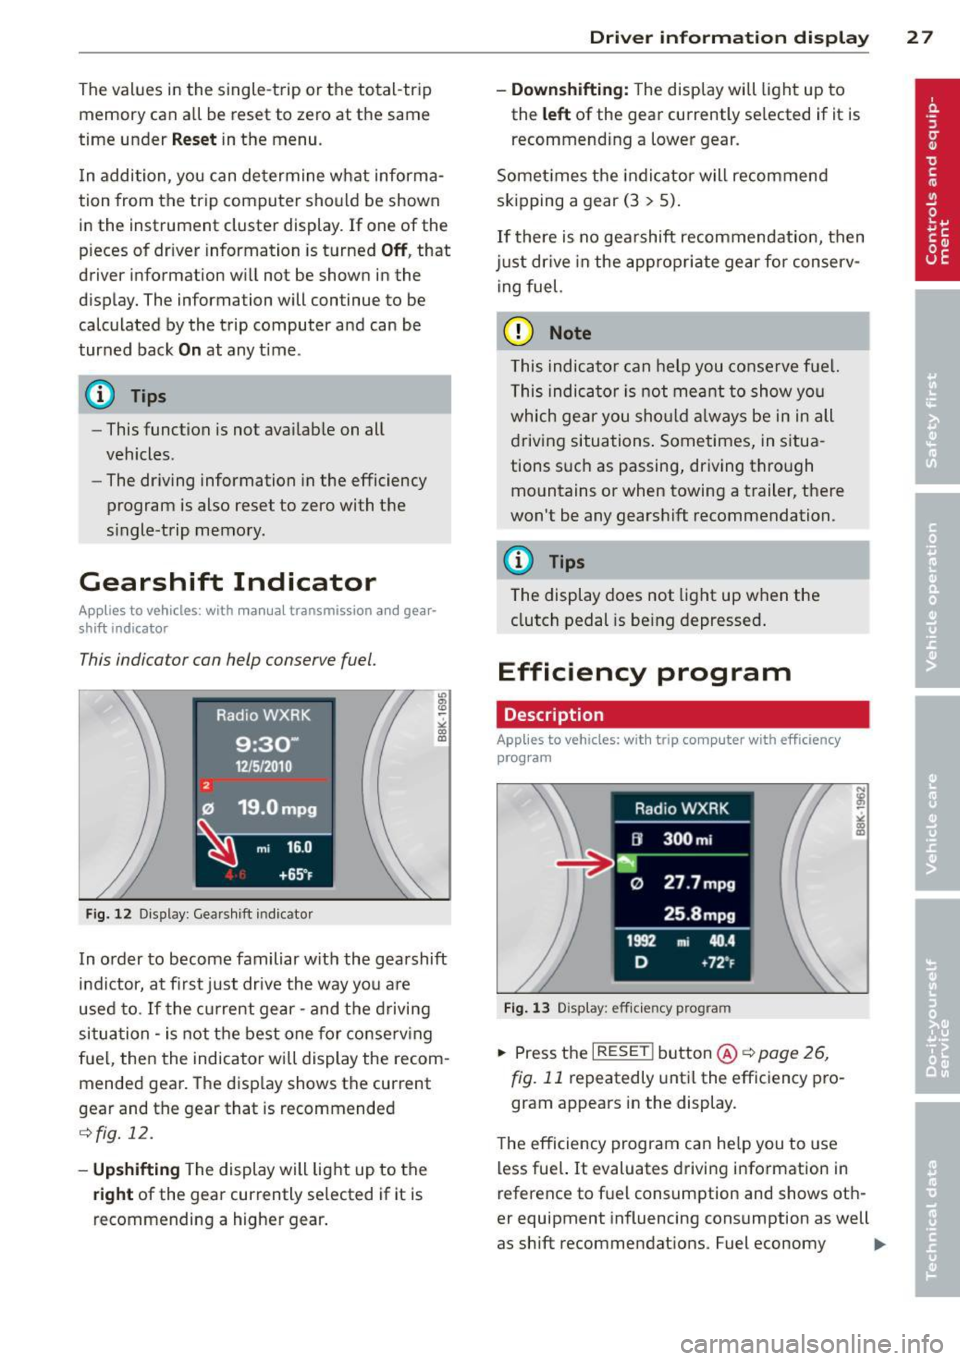
This indica tor con help conserve fuel.
~~~------------~~ ~.;;-
Fig. 12 Disp lay : Gea rs hi ft indicator
m ~ ~ a, a,
In order to become familiar with the gearshift
indictor, at first just drive the way you are
used to.
If the current gear -and the d riving
situa tion -is not the best one for conse rv ing
fuel, then the indicator will display the recom
mended gear. The disp lay shows the current
gear and the gear that is recommended
¢ fig. 12.
-Up shifti ng The display will light up to the
right of the gear currently selected if it is
recommending a higher gear .
Driver inform ation di spl ay 2 7
- Down shifting:
The display will light up to
the
left of the gear currently se lected if it is
recommending a lower gear.
Somet imes the indicator will recommend
skipping a gear (3
> 5).
If there is no gearshift recommendation, then
just dr ive in the app rop riate gear for conserv
ing fuel.
(D Note
This indicator can help you conse rve fuel.
This indica tor is not meant to show you
which gear you sho uld a lways be in in all
driving situations . Sometimes, in situa
tions s uch as passing, driving thro ugh
mountains or when towing a trailer, there
won't be any gearshift recommendation.
(D Tips
The display does not light up when the
clutch pedal is be ing depressed .
Efficiency program
Description
Applies to vehic les: wi th trip co mp uter with efficiency
prog ram
Fig . 13 Display : eff icie ncy pro gram
.. Press the I RESE TI button @¢ page 26 ,
fig . 11
repeatedly until the efficiency p ro
gram appears in the display .
The efficiency program can he lp you to use
less fue l. It evaluates driving information in
reference to f uel consumption and shows oth
er equipment influencing consumption as well
as shift recommendations . Fuel economy ...,
Page 66 of 302
64 Seats and storage
12-volt socket
Applies to vehicles: wit h 12-volt socket
Electrical accessories can be connected to the
12-volt socket.
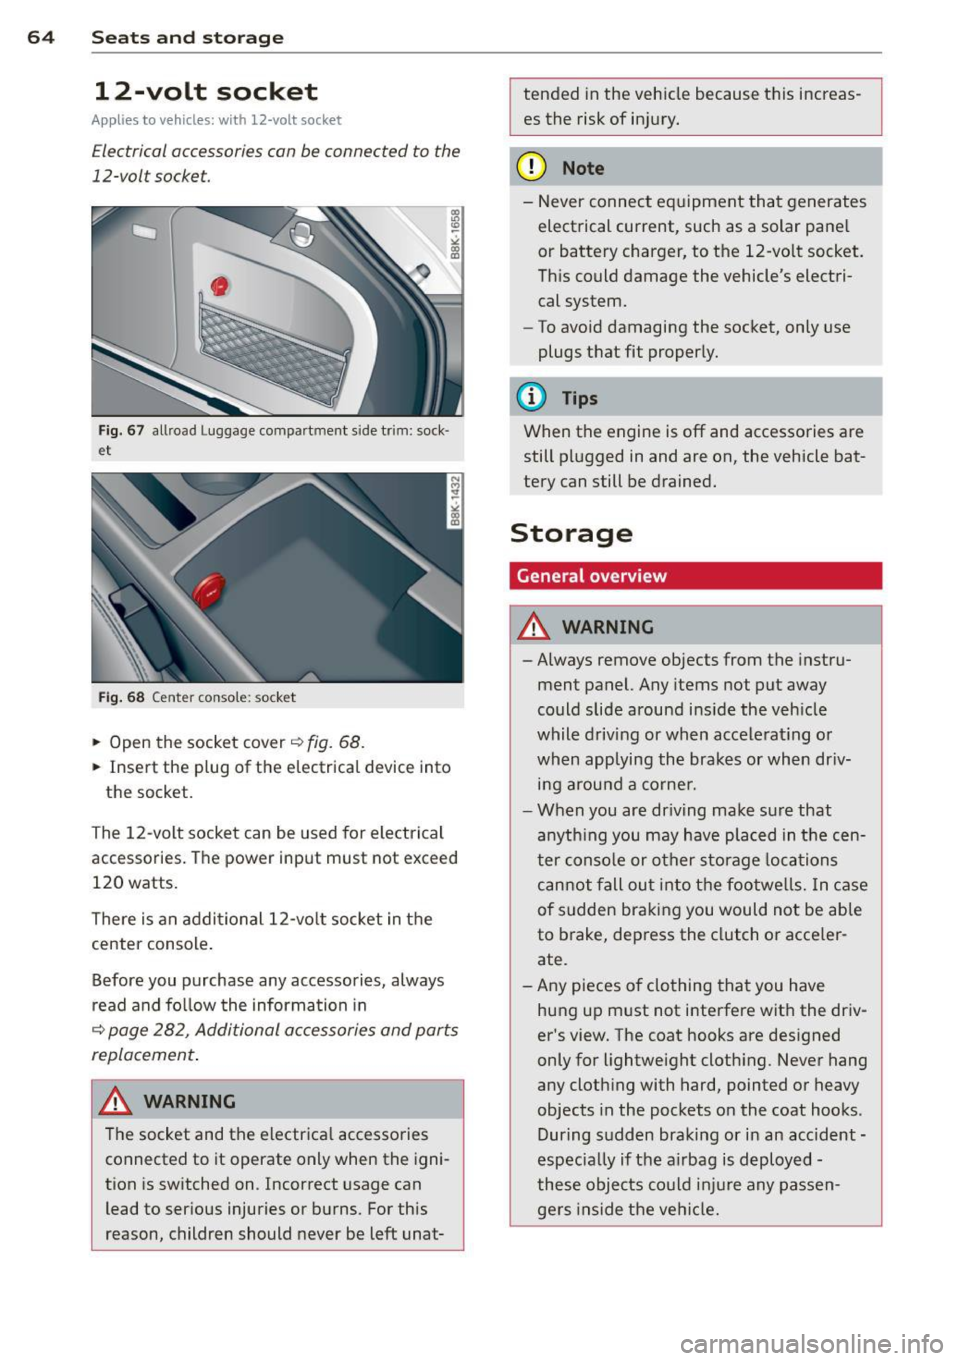
F ig . 6 7 allroad Luggage compartment s ide trim: sock·
et
Fig . 68 Center conso le: socket
.,. Open the socket cover~ fig. 68.
.,. Insert the plug of the e lectrica l device into
the socket.
The 12-volt socket can be used for elec trical
accessories. The power input must not exceed
120 watts.
There is an addi tional 12-vo lt socket in the
cente r console .
Before you purchase any accessories, always
r ead and fo llow the information in
~ page 282, Additional accessories and parts
replacement .
.&_ WARNING
The socket and the electrica l accessories
connected to it operate only when the igni
tion is sw itched on. Incorrect usage can
lead to serious injuries or burns. For this
reason, children should never be left unat-
-
tended in the veh icle because this increas
es the risk of in jury.
(D Note
-Never connect e quipment that generates
electrical current, such as a solar pane l
or battery charger, to the 12-vo lt socket.
Th is could damage the vehicle's electri
cal system.
- To avoid damaging the socket, only use
plugs t hat fit properly.
(D Tips
When the engine is off and accessories are
still pl ugged in and are on, the vehicle bat
tery can still be drained.
Storage
General overview
.&_ WARNING
-
- Always remove objects from the instru-
ment panel. Any items not put away
could slide around ins ide the veh icle
while driving or when accele rat ing or
when applying the brakes or when dr iv
i n g arou nd a corne r.
- When you are dr iving make su re that
anyth ing you may have pla ced in the cen
ter conso le or other sto rage locations
can not fall ou t in to t he footwe lls. In c ase
of sudden bra king you would not be able
to brake, dep ress the clutch o r acce ler
ate.
- Any pieces o f clothing that you have
hung up m ust not interfere with the driv
er 's view. The coat hooks are des igned
only for lightweight cloth ing. Never hang
a ny clothing with hard, pointed or heavy
objects in the pockets on the coat hooks .
During s udden braking or in an accident -
especia lly if the a irbag is d eployed -
these objec ts co uld inj ure any passen
gers inside the ve hicl e.
-
Page 82 of 302
80 On the road
On the road
Steering
Manually adjustable steering wheel
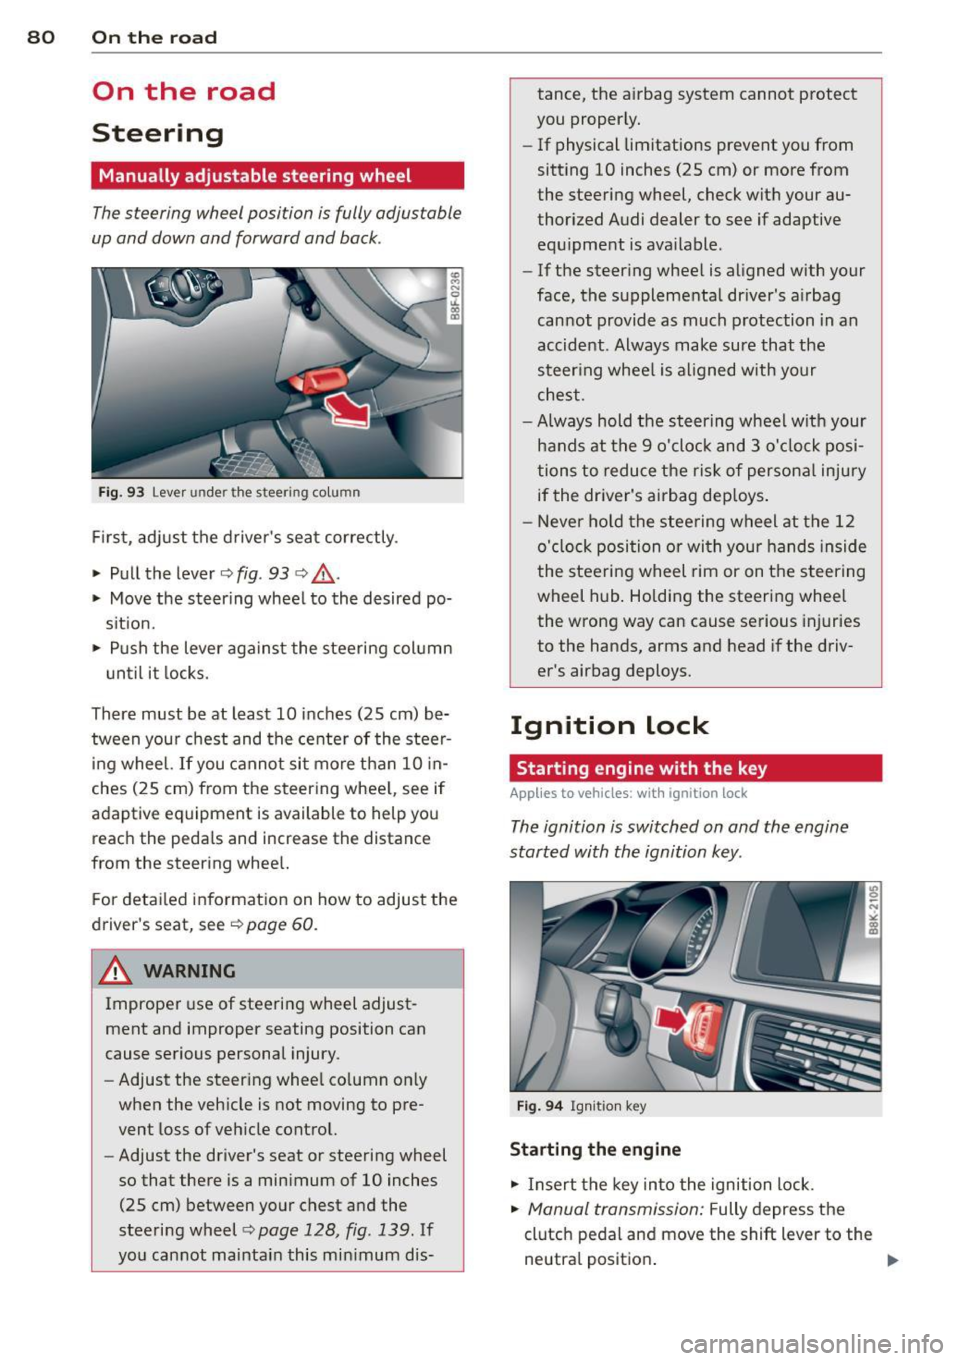
The steering wheel position is fully adjustable
up and down and forward and bock .
Fig. 93 Lever under the steer ing co lu m n
First, adjust the driver's seat correctly .
• Pull the lever
c:> fig . 93 c:> ,& .
• Move the steer ing whee l to the desired po
s it ion.
• Push the lever aga inst the steering col umn
u ntil it locks.
There must be at least 10 inches (25 cm) be tween your chest and the center of the steer
i ng wheel. If you cannot sit more than 10 in
ches (25 cm) from the steering whee l, see if
adaptive equipment is available to help you reach the pedals and increase the distance
from the steering whee l.
F or detai led information on how to adjust the
driver's seat, see
c:> poge 60.
A WARNING
Improper use of steering wheel adjust
ment and improper seating position can
cause serious personal injury.
- Adjust the steer ing whee l co lumn on ly
when the veh icle is not moving to pre
vent loss of veh icle control.
- Adjust the driver's seat or steering wheel
so that there is a minimum of 10 inches
(25 cm) between your chest and the
steering wheel
c;, page 128, fig . 139. If
yo u cannot maintain this min imum dis- tance, the airbag system cannot protect
you proper ly.
- If physical limitations prevent you from
sitting 10 inches (25 cm) or more from
the steering wheel, check with your au
thorized Audi dealer to see if adaptive equ ipment is ava ilable .
- If the steer ing wheel is aligned with your
face, the supplementa l driver's a irbag
cannot provide as much protection in an
accident . Always make sure that the
steer ing wheel is aligned with your
chest.
- Always hold the steering wheel w ith your
hands at the 9 o'clock and 3 o'clock posi
tions to reduce the risk of persona l injury
if the driver's airbag dep loys .
- Never hold the stee ring wheel at the 12
o'clock position or with your hands inside
the steeri ng wheel rim or on the steering
wheel hub . Holding the steering wheel
the wrong way can cause serious injuries
to the hands, arms and head if the driv
er's airbag deploys.
Ignition lock
Starting engine with the key
Applies to veh icles : w ith ign ition lock
The ignition is switched on and the engine
started with the ignition key .
Fig. 94 Igni tion k ey
St arting th e engine
• Insert the key into the ignition lock.
• Manual transmission: Fully depress the
clutch pedal and move the shift lever to the neutra l position .
Page 83 of 302
~ Automatic transmission: Step on the brake
peda l and move the se lector lever to the P
or N position .
~ Press the key c:> fig. 94 -the eng ine will
start.
Sw itching the i gnition on /off
If you wou ld like to switch the ignition on
without sta rting the engine, follow t hese
steps :
~ Insert the key i nto the igni tion lock .
~ Press the key b riefly w ithout press ing the
clutch peda l (for manual transmissions) or
the brake peda l (for automatic transmis
s ions) .
~ To sw itch the ignition off, press the key
again .
When starting the engine, ma jor e lectr ica l
loads are switched off temporarily .
You can only remove the key with the ignition
switched off.
I f the engine sho uld not star t immediately,
the starting process is automatically stopped
after a short time. Repeat starting procedure .
A WARNING
-Never allow the engine to run in confined
spaces -danger of asphyxiation.
- Never remove the ign ition key from the
ignition look while the vehicle is moving.
Otherw ise, the steering lock could sud
denly engage and you would not be able
to steer the vehicle.
- Always take the key with you whenever
you leave your vehicle . Otherwise, the
engine could be star ted or e lectr ica l
equipment such as the power w indows
cou ld be operated. This ca n lead to seri
o us inj ury.
- Never leave c hildren or persons requ iring
assistan ce unattended in the vehicle. The
doors c an be lo cked using the remote
t ransmit ter, preventing people from es
caping from the vehicle on their own in
the event of an emergency. Depend ing
on the time of year, people inside the ve-
On th e ro ad 81
hicle can be exposed to very high or very
low temperatu res.
(D Note
Avoid high eng ine rpm, fu ll th rottle and
heavy engine loads unti l the engine has
reached operating tempe rat ure -other
wise you r isk eng ine damage.
@ For the sake of the environment
Do not let the engine run w hile parked to
warm up. Begin dr iv ing immediately. T his
reduces unnecessary emissions.
@ Tips
- If the key cannot be removed from the
ignition lock, you have to pull the me
chanical key out of the maste r key in or
der to be able to lock the vehi-
cle c:>
page 35.
-After starting a cold engine, t here may
be a brief peri od of increased no ise be
cause the oil press ure must first bu ild up
in the hydraulic valve ad justers. This is
normal and not a cause for concern.
- If you leave the veh icle with the ignition
switched on, the ign it ion w ill switch off
afte r a certa in per iod of t ime . Please
note that ele ctrical equ ipment such as
exterior ligh ts w ill sw itch off as well
when that happens .
Page 85 of 302
CD Note
If the engine has been under heavy load
for an extended period, heat builds up in
the engine compartment after the engine
is switched off- there is a risk of damaging
the engine . Allow the engine to run at idle
for about two minutes before switching it
off.
Convenience key
Starting the engine
Applies to vehicles: with convenience key
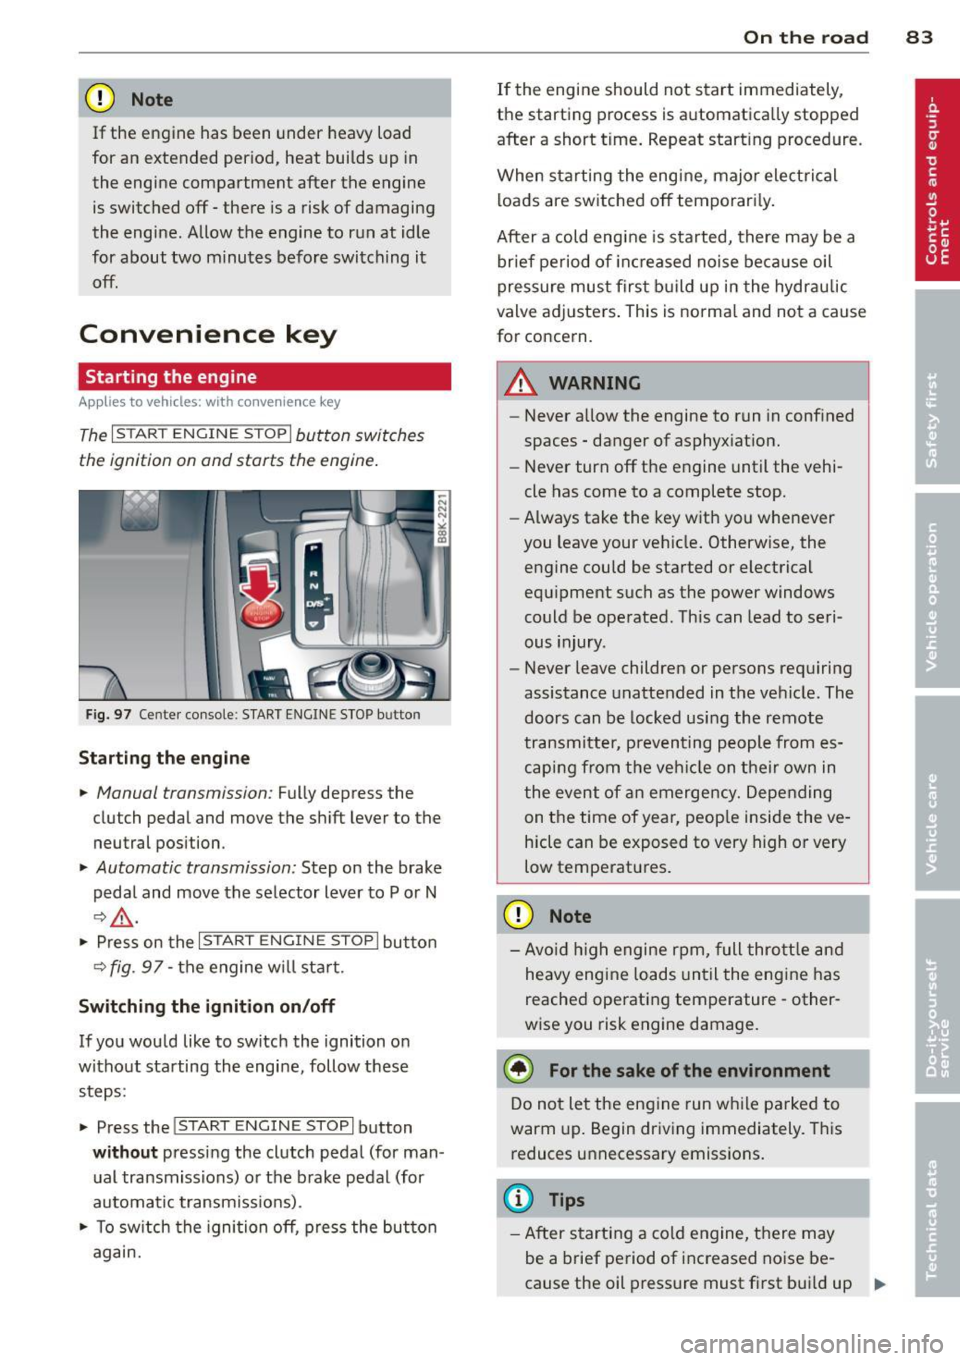
The I STAR T ENGINE ST OPI button switches
the ignition on and starts the engine.
Fig. 97 Center console : S TART ENGINE STOP b utto n
Starting the engine
.. Manual transmission: Fully depress the
clutch pedal and
move the shift lever to the
neutral position .
.. Automatic transmission: Step on the brake
pedal and
move the selector lever to P or N
~ .&, .
.. Press on the I STAR T ENGINE S T OPI button
~fig . 97-the engine will sta rt.
Switching the ignition on/off
If you would like to switch the ignition on
without starting the engine, follow these
steps :
.. Press the
!START E NGIN E STOPI button
without pressing the clutch pedal (for man
ual transmissions) or the brake pedal (for
automatic transmissions) .
.. To switch the ignition off, press the button
again.
On the road 83
If the engine should not start immediately,
the starting process is automatically stopped
after a short time. Repeat starting procedure .
When starting the engine , major electrical
loads are switched off temporari ly.
After a cold engine is started, there may be a
brief period of inc reased noise because oil
pressure must first build up in the hydraulic
valve adjusters. This is norma l and not a cause
for concern.
A WARNING
- Never allow the engine to run in confined
spaces - danger of asphyxiation.
- Never turn off the engine until the vehi
cle has come to a complete stop.
- Always take the key with you whenever
you leave your vehicle. Otherwise, the
engine could be started or electrical
equipment such as the power windows
could be operated . This can lead to seri
ous injury .
- Never leave children or persons requiring
assistance unattended in the vehicle. The
doors can be locked using the remote
transmitter, preventing people from es
caping from the vehicle on their own in
the event of an emergency. Depending
on the time of year, peop le inside the ve
hicle can be exposed to very high or very
low temperatures .
CD Note
-Avo id high engine rpm, full throttle and
heavy engine loads until the engine has
reached operating temperature - other
wise you risk engine damage.
@ For the sake of the environment
Do not let the engine run while parked to
warm up. Begin driving immediately. This
reduces unnecessary emissions.
(D Tips
-After starting a cold engine, there may
be a brief period of increased noise be-
cause the oil pressure must first bui ld up
II-
Page 86 of 302
84 On th e road
in the hy dra ulic valve adjusters. This is
norma l and not a cause for concern.
- If you leave the vehicle with the ignition
switched on, the ignition will switch
off
after a certain period of time . Please
note that e lectrica l equipment such as
exter ior lights w ill switch
off as well
when that happens.
Switching engine off
Applies to vehicles: with conven ience key
" Bring your vehicle to a complete stop.
" Automat ic transm iss ion: Move the selector
lever to the P or N pos it ion.
" Press the
!START ENGINE STOPI button
r::!;page 83, fig. 97.
St eering lock
The steering locks when you t urn the engine
off us ing the I STAR T ENGINE STOP I button
and open the dr iver's door. The locked stee r
i ng helps p reven t vehicle theft.
Emergency off
If necessary, the eng ine ca n be sw itched off
with the selector leve r in the R or D/S pos i
tions. To do so, step on the brake pedal and
p ress and hold the
I START ENGINE STOP I but
ton vehicle speed must be less th an 6 mph
(10 km/h).
_& WARNING
- Never turn off the eng ine before the ve
hicle has come to a complete stop . The
full f unction of the brake booster and the
power steering is not guaranteed. You
must use more force to turn or brake if
necessary. Because you cannot steer and
brake as you usua lly would, this could
lead to crashes and se rious injur ies.
- For safety reasons, you s hould always
par k your vehicle with the se lector lever
in P. Ot herwise, the ve hicle co uld i nad
vertent ly roll away.
- T he ra diator fan ca n continue to ru n for
up to 10 mi nutes even after yo u have
tu rne d
off the eng ine and remove d the ignit
ion key. The radiator fan can a lso
turn on again if the engine coo lant heats
up because of intense sunlight or heat
bu ild-up in the engine compartment.
- Always take the key w ith you whenever
you leave your ve hicle. Otherw ise, the
eng ine could be sta rted or electrical
equ ipme nt such as the power windows
could be ope rated. This can lead to seri
ous injury.
(D Note
If the engine has bee n under heavy load
fo r an extended pe riod, heat bu ilds up in
the engine compartment after the engine
i s sw itched
off -there i s a r is k of damag ing
the e ngine. A llow the eng ine to run at id le
for about two minutes before switching it
off.
Driver messages
Ignition i s on
This message appears and a warning tone
sounds if you open the d river's door when the
ignition is sw itched on.
No key id entified
This message appears when the
I S TART ENGI NE STOPI button is pressed if
there is no master key ins ide the veh icle or if
the system does not recognize it . Fo r exam
ple, the master key cannot be recognized if it
is covered by an object (e.g. al uminum b rief
case) which
screens the radio s ignal. Elec tron
ic dev ices such as cell phones can also inter
fere with the radio s ignal.
Pres s brak e pedal to start engine
This message appears if you do not press the
brake pedal to start the eng ine in a veh icle
with an automat ic transm iss ion.
Press clutch pedal to sta rt engine
T his message ap pears if you do not press the
clutch pedal to start the engine in a vehicle
with a manual transmission. .,.
Page 92 of 302
90 On the road
• To increase/dec rease the speed qu ickly,
hold the lever in the
G) !Q direction unti l
the des ired speed is d isplayed.
You can a lso press the accelerator pedal down
to increase your speed , e .g. if you want to
pass someone . The speed yo u saved earlier
will resume as soon as you let off of the accel
erator pedal.
If , however, you exceed your saved speed by
6 mph (10 km/h) for longer than S minutes ,
the cruise contro l will be turned off tempora
rily. The green symbol in the display turns
white . The saved speed remains the same .
Presetting your speed
You con preset your desired speed while the
vehicle is not moving.
• Switch on the ignition.
• Pu ll lever into pos ition
CD c:> page 89,
fig. 100.
• Press the lever in the 0 or O direction to
incr ease or decrease yo ur speed .
• Re lease the lever to save that speed .
This funct ion makes it possible, for example,
to save the speed you want before driving on
the hig hway . Once o n the hig hway, activate
the cruise contro l by pulling the lever towa rd
(D .
Switching off
Temporary deactivation
• Pres s the bra ke peda l, or
• Manual transmission : Keep the clutch pedal
pressed down
longer , or
• Press the lever into position @ (not clicked
into p lace) ¢
page 89, fig . 100, or
• Drive for longer than S minutes at more
t h an 6 mph (10 km/h) above the stored
speed .
Switching off completely
• Press leve r into position @(clicked into
place), or
• Switch the ignition off. The speed you saved will be retained if the
cruise control has been switched off tempora
rily . To resume the saved speed, let up on the
brake or clutch pedal and pu ll the lever to po
s ition (!).
Switching the ignition off erases the saved
speed.
_& WARNING
You shou ld only return to the saved speed
if it is not too fast for the current traffic
conditions -risk of an accident!
Page 93 of 302
Transmission Manual transmission
Gearshift lever
App lies to vehicles: with manual transmission
The clutch pedal must be depressed all the
way before you can start the engine.
T he manual transmission in your Audi is
equipped with an
interlock-feature.
~ Depress the clutch pedal all the way.
~ Start the engine with the gearshift lever in
Neutral and the clutch pedal depressed.
(D Note
Always depress the clutch pedal fully when
changing gears . Do not hold the vehicle on
a hill with the clutch pedal partially de
pressed. This may cause premature clutch
wear or damage .
@ Tips
-Resting your hand on the gearshift lever
knob while driving will cause premature
wear in the transmission.
- The back-up lights go on when you shift
into Reverse w ith the ignition on.
Gearshift pattern (6-speed manual
transmission)
Applies to vehicles: with manual transmission
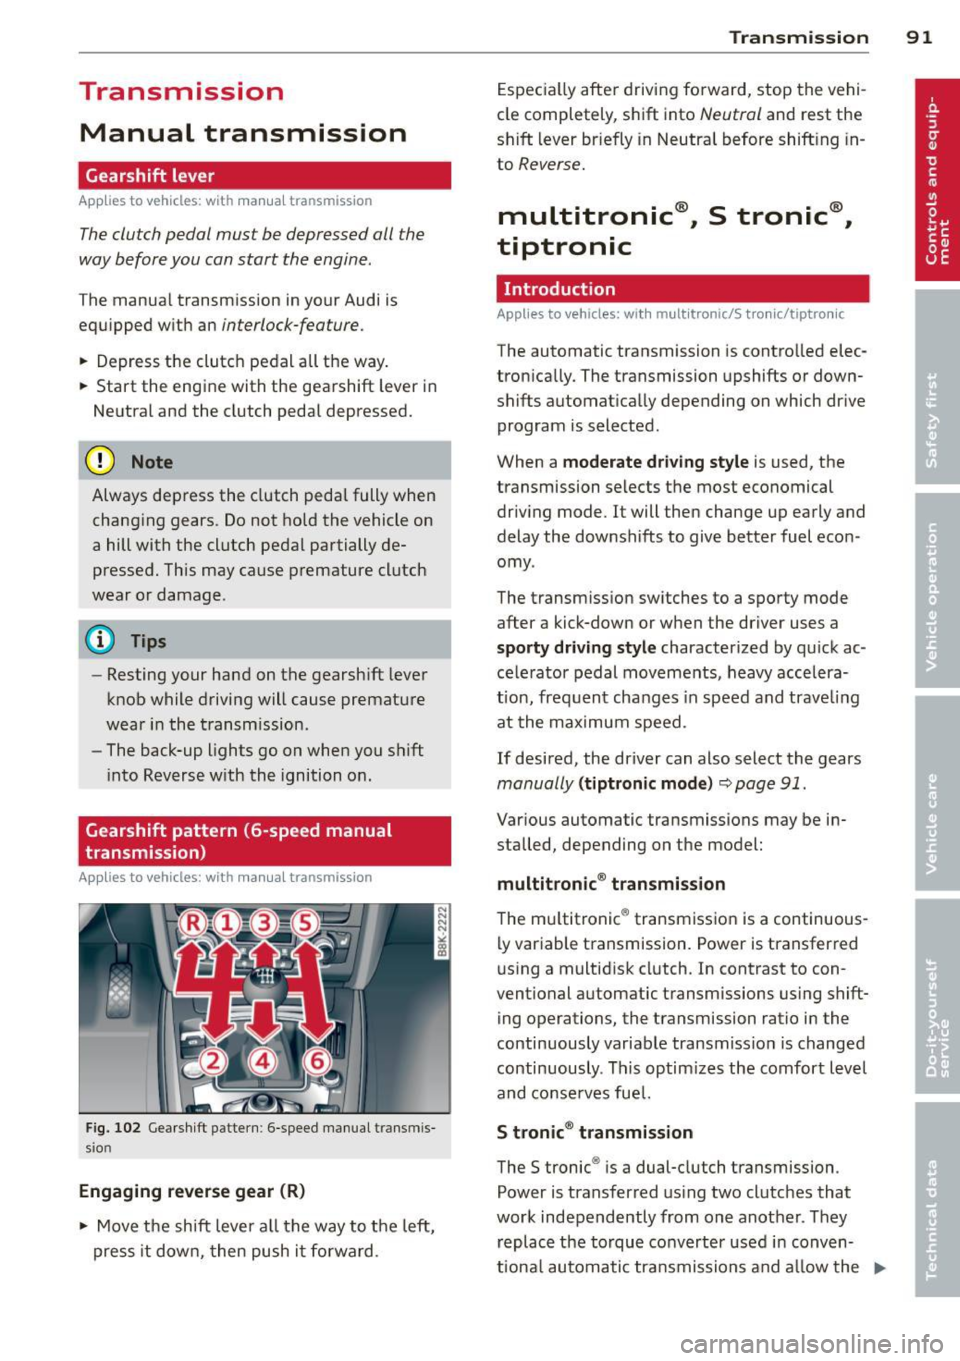
Fig. 102 Gearshift pattern : 6-speed manual transmis
sio n
Engaging reverse gear (R)
~ Move the shift lever all the way to the left,
press it down, then push it forward .
Transmission 91
Especially after driving forward, stop the vehi
cle completely, shift into
Neutral and rest the
shift lever br iefly in Neutral before shift ing in
to
Reverse.
multitronic ®, S tronic ®,
tiptronic
Introduction
Applies to vehicles: with mult itronic/5 tronic/tiptronic
The automatic transmission is controlled elec
tronically. The transmission upshifts or down
shifts automatically depending on which drive
program is selected .
When a
moderate driving style is used, the
transmission selects the most economical
driving mode. It will then change up early and
delay the downshifts to give better fuel econ
omy .
The transmission switches to a sporty mode
after a kick-down or when the driver uses a
sporty driving style characterized by quick ac
celerator pedal movements, heavy accelera
t ion, frequent changes in speed and trave ling
at the maximum speed.
If desired, the driver can also select the gears
manually (tiptronic mode) ~ page 91.
Various automatic transmissions may be in
stalled, depending on the model:
multitronic ® transmission
The multitronic ® transmission is a continuous
ly variable transmission. Power is transferred
using a multidisk clutch. In contrast to con
ventional automatic transmissions using shift ing operations, the transmission ratio in the
continuously variable transmiss ion is changed
continuously . This optimizes the comfort level
and conserves fuel.
S tronic® transmission
The S tronic ® is a dual-clutch transmission .
Power is transferred using two clutches that
work independently from one another_ They
replace the torque converter used in conven
tiona l automatic transmissions and allow the ..,_
Page 97 of 302
-Do not ride the brakes or press the brake
pedal too often or too long when driving
down a hill. Constant braking causes the
brakes to overheat and substantially re
duces braking performance, increases
braking distance or causes complete fail
ure of the brake system.
- To prevent the vehicle from rolling back
when stopping on inclines, always hold it
in place with the brake pedal or parking
brake.
- Never hold the vehicle on an incline with
a slipping clutch. The clutch opens auto
matically when it becomes too hot from
the overload. An indicator lamp
[O] illu
minates and a driver message appears
¢ page 9 7 when the clutch is overload
ed .
- If the engine must remain running, never
have any driving position engaged when
checking under the hood. Make sure the
selector lever has securely engaged and
is locked in P with the parking brake set
¢ page 213, Engine compartment . Oth
erwise, any increase in engine speed may
set the vehicle in motion, even with the
parking brake applied .
0 Note
-S tronic ®- and tiptronic transmission:
When stopping on an incline, do not try
to hold the vehicle in place by pressing
the accelerator pedal while a driving gear
is selected. This can cause the transmis
sion to overheat and can damage it. Acti
vate the parking brake or press the brake
pedal to prevent the vehicle from rolling.
- S tronic ®- and tiptronic transmission: Al
lowing the vehicle to roll when the en
gine is stopped and the selector lever is in N will damage the transmission be
cause it is not lubricated under those cir
cumstances .
(D Tips
For safety reasons, the parking brake is re
leased automatically only when the driv
er's safety belt is engaged in the buckle.
Transmission 95
Hill descent control
App lies to veh icles: w it h m ult itro nic/S tro nic/t iptro nic
The hill descent control system assists the
driver when driving down declines .
Hill descent control is activated when these
lector lever is in D/S and you press the brake
pedal. The transmission automatically selects
a gear that is suitable for the incline. Hill de scent control tries to maintain the speed ach
ieved at the time of braking, within physical
and technical limitations. It may still be nec
essary to adjust the speed with the brakes.
Hill descent control switches off once the de
cline levels out or you press the accelerator
pedal.
On vehicles with the cruise control system*
¢ page 89 , hill descent control is also activat
ed when the speed is set.
.&_ WARNING
-
Hill descent control cannot overcome
physical limitations, so it may not be able
to maintain a constant speed under all
conditions. Always be ready to apply the brakes.
Page 103 of 302

Audi adaptive cru ise control and brakin g guar d 101
Vehicles with manual transmission
App lies to vehicles: with Audi adaptive cruise control
The adaptive c ruise control is avai lab le from
the 2nd gear through the 6th gea r in the cus
tomary RPM.
When the adapt ive cruise control is turned on,
you must p ress the clutch to shift gears (as
usual) . When sh ifting normally or when press
ing the cl utch, the adap tive c ruise control re
mains turned on.
Afte r you have engaged the gear, you do
not
need to press the gas peda l. The adaptive
cru ise control accelerates automat ica lly if nec
essary.
I f you press dow n on the clutch fo r too long or
shift/coup le improperly, the adaptive cruise
control may turn off automat ically.
{D) Tips
You cannot tu rn on the adapt ive cru ise
contro l during a sh ifting operation.
Audi adaptive cruise
control
Description
App lies to vehicles: with Audi adaptive cruise control
Fig . 11 3 Detect ion range
What c an Audi adapt ive crui se cont rol d o?
The adaptive cruise control works in conjunc
tion with a radar sensor installed in the front
of the vehicle
¢page 99, fig. 110, which is
subject to desig nated system limits
<=:> page 101 . Stationary objects are disregard
ed . On open
roads with no traffic, adaptive cr uise
control works like a regular cruise contro l sys
tem. The stored speed is maintained . When
approaching a moving vehicle detected up
ahead, the adaptive cruise control system au
tomat ica lly slows down to match that vehi
cle's speed and then maintains the distance
that the dr iver previously stored . As soon as
the sys tem does not detec t a vehicle up
ahead, adaptive cruise cont ro l ac celerates
back up to the stored speed .
Which functions can be controlled?
When you switch adapt ive cruise control on,
you can set the cu rrent speed as the "contro l
speed "
¢ page 102, Switching on and off.
When dr iving, you can stop cru ise contro l
¢page 103 or change the speed ¢page 103
at any time.
You can also set the distance to t he object
ahead and set the adapt ive cru ise control driv
ing program
¢ page 104 .