check engine AUDI A4 2016 Owner's Manual
[x] Cancel search | Manufacturer: AUDI, Model Year: 2016, Model line: A4, Model: AUDI A4 2016Pages: 278, PDF Size: 70.26 MB
Page 213 of 278
,....,
N
0
""' CX) ,....,
I.Cl U"I ,....,
I.Cl ,....,
-To avoid being burned, do not spill anti
freeze or coolant on the exhaust system or hot engine parts. Under certain condi
tions, the ethylene glycol in engine cool ant can catch fire.
- Antifreeze is poisonous. Always store anti
freeze in its original container and well out
of the reach of children.
- If you drain the coolant, it must be caught
and safely stored in a proper container
clearly marked "poison".
(D Note
-Do not add coolant if the expansion tank is
empty . Air could enter the cooling system
and damage the engine. If this is the case,
do not continue driving. Seek professional
assistance.
- Coolant pollutes the environment and could
cause an engine fire. Excess coolant will be
forced out through the pressure relief valve
in the cap when the engine becomes hot.
- If, in an emergency, only water can be add
ed, the correct ratio between water and an
tifreeze
c::> page 208 must be restored as
soon as possible.
@) For the sake of the environment
Drained coolant should not be reused. Always
dispose of used coolant while observing all
environmental regulations.
Radiator fan
The radiator fan switches on automatically by it
self.
The radiator fan is driven by the engine via the V
belt . The viscous clutch regulates the speed of
the fan according to the temperature of the cool
ant.
An auxiliary electric radiator fan* switches on and
off depending on coolant temperature and other
vehicle operating conditions.
After you switch the engine off, the auxiliary fan
can continue running for up to 10 minutes -even
Checking and Filling
with the ignition off. It can even switch on again
later by itself
c::> & , if
- the temperature of the engine coolant rises due
to the heat build-up from the engine in the en
gine compartment, or
- the engine compartment heats up because the
vehicle is parked in intense sunlight.
A WARNING
-To reduce the risk of personal injury never
touch the radiator fan.
- The auxiliary electric fan is temperature
controlled and can switch on suddenly even
when the engine is not running.
- The auxiliary radiator fan switches on auto
matically when the engine coolant reaches a
certain temperature and will continue to run
until the coolant temperature drops.
Brake fluid
Checking brake fluid level
The broke fluid level con be checked with o quick
glance .
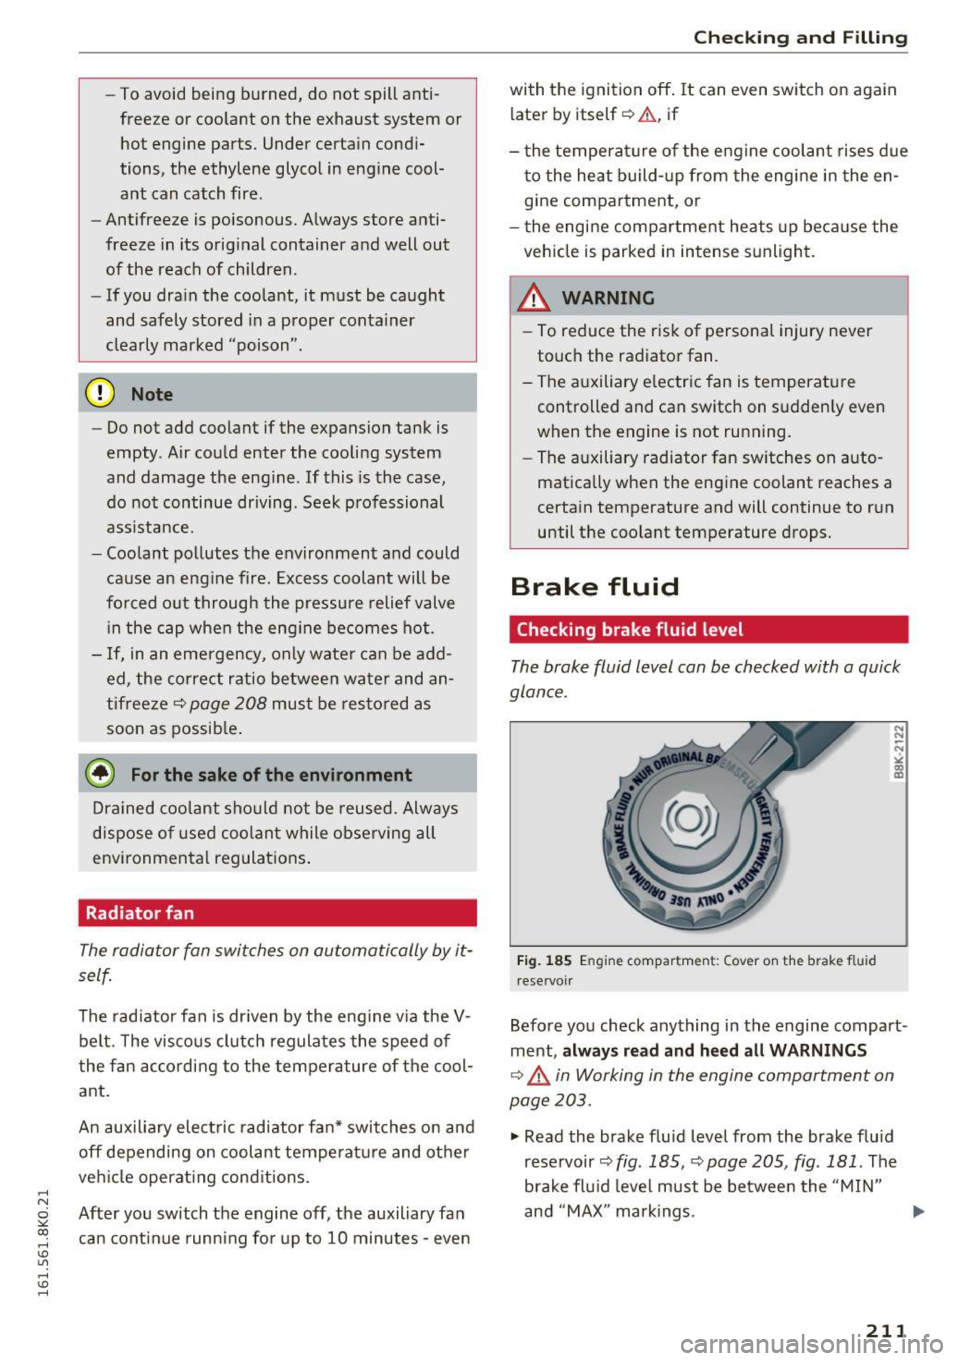
Fig. 185 En gi ne compartmen t: Cover on the b rake fl uid
reservoir
Before you check anything in the engine compart
ment,
always read and heed all WARNINGS
c::> _.& in Working in the engine comportment on
page 203.
.,. Read the brake fluid level from the brake fluid
reservoir
c::> fig. 185, c::> page 205, fig . 181 . The
brake fluid level must be between the "MIN"
and "MAX" markings.
211
Page 214 of 278
Check ing and F illing
The brake fluid rese rvoir is located at the rear
partition of the engine compartment on the l eft
side ¢
page 205 .
The fl uid level may drop slightly after some time
due to the automatic adjustment of the brake
pads . This is not cause for alarm.
If th e b rake fl uid level fa lls considerably be low
the "M IN" mark, the b rake warning/ind icator
lig ht ( U.S. mode ls :
1111 , Canadian models:. )
will come on ¢
page 15. Do not contin ue to oper
ate the vehicle . T he comp lete brake system
should be thoroughly checked by an authori zed
Aud i dealer or qualified workshop and the cause
corrected . If the brake flu id level is too low, the
b rake warning/indicator light will i llum inate.
Contact a n author ized Audi dealer
immediately .
{D) Tips
The brake fluid reservoir is located under
neath the cover .
Changing brake fluid
Have the brake fluid changed by an experienced
technician .
Brake fluid absorbs mo isture from the air. If the
water content in the b rake fluid is too high, cor
rosion in the brake system may resu lt afte r ape
riod of t ime. The boiling poi nt of the brake flu id
will also decrease cons iderably and decrease
b raking perfo rman ce.
Therefore, the brake fluid must be changed
every
two year s.
Always use new brake fluid wh ic h con
forms to Fede ral Motor Veh icle Standard "FMVSS
1 16 DO T 4".
The brake fluid reservoir can be diff icult to reach,
therefore, we recommend that yo u have the
brake fl uid changed by yo ur autho rized
Audi
dealer .
Your dealer has t he corre ct tools, t he
right brake fluid and the know-how to do this for
you.
A WARNING
- Brake fluid is poisonous. It must be stored
only in the closed orig inal container out of
the reach of chi ldren!
212
- Bra ke fa ilure ca n result from old or inapp ro
priate brake fluid . Observe these precau
tions:
- Use only brake fluid t hat meets SA E speci
fi ca ti on
J 170 3 and con forms to Federa l
Motor Ve hicle Standard 116 . Always check
wi th yo ur autho rized Audi dea le r to make
s ur e yo u are using the correct brake fluid .
The correct type of brake flu id is also ind i
cated on the b rake fluid reservo ir .
- The brake fluid m ust be new . Heavy use of
the brakes can cause a vapo r lock if the
brake fluid is left in the system too long .
This can se riously affect the efficiency of
the b rakes as well as your safety . This
could resu lt in an accident .
(D Note
Brake fluid will damage the paint of your veh i
cle.
@ For the sake of the environment
Because of the problem o f proper d isposa l o f
brake fluid as well as the spec ial too ls re
q ui red a nd the necessary expertise, we rec
omme nd that you have the bra ke f luid
changed by yo ur autho rized Aud i dea le r.
Battery
, General information
U nder normal operating condit ions, the battery
i n your Audi does not need any maintenance.
With
high outside temperatures or long daily
drives we recommend that you have the elect ro
lyte level c hecked by an au thorized Aud i dealer o r
qualified workshop. The electro lyte level shou ld
a lso be che cked each time the battery is c ha rged
~ page 214.
Have the batte ry chec ked when you take yo ur ve
hicle in for service. You are we ll adv ised to re
pla ce a battery tha t is older than 5 yea rs.
With certain types of airbag deployment, t he
batte ry is d iscon nected from the ve hicle electri
ca l system for safety reasons ¢.&.
in Repair, care
and disposal of the airbags on page 151. .,.
Page 215 of 278
..... N
0 ::..:: co .....
Some vehicle func tion s (p ower w indow reg ula
tors, for example) are lost i f th e battery termi
na ls are d isconnected. These functions have to be
relearned afte r the battery termina ls are con
nected aga in. To prevent th is, the batte ry shou ld
only be disconnected from the vehicle e lectr ica l
system w hen abso lute ly necessary for repairs.
Vehicles not driven for long periods
If yo u do not drive you r vehicle over a period of
seve ral days or weeks, e lectrical components a re
g radually c ut back or sw itched off. This reduces
e nergy consumption and ma inta ins starting ca
pability over a longer pe riod
c> page 182.
Some o f the conven ience f unctions may not ope r
ate, s uch as the inte rior lights or the power seat
ad justment. The convenience functions will be
ava ila ble aga in whe n you tu rn o n the ignition and
start the engine .
Winter operation
During the winter months, battery capacity tends
to dec rease as temperatu res dr op. This is be
cause more power is also consumed wh ile start
in g, and the head lights , rear wi ndow defogge r,
etc., are used more of ten .
Avoid un necessa ry power consumption, part icu
l arly in city traffic or when t rave ling on ly short
d ista nces . Let your authorized Audi dealer check
the capaci ty of the vehicle battery be fore w inte r
sets in
r=;, pag e 214. A well cha rged batt ery w ill
n o t onl y preven t st arti ng p roble ms w hen the
wea ther is cold, but will also last l on ger .
(D Tips
If your v ehicle is left stand ing fo r se ve ral
wee ks at extre mely low tem per at ures, the ve
hicle b attery sh ould be re moved and stor ed
w here it will not free ze . Th is will preve nt i t
from being dama ged and hav ing to be re
placed .
Checking and Filling
Working on the battery
Be especially careful when working on or near
the battery.
The battery is located in the luggage compart
ment under the floor. Befo re you check anything
i n the luggage compart ment ,
read and heed all
WARNINGS
c> &_ .
Always heed the safety warnings , when working
o n the veh icle batte ry or t he ve hicle elec trical
system to prevent in jury .
The following WARNINGS are very important
when working on the battery :
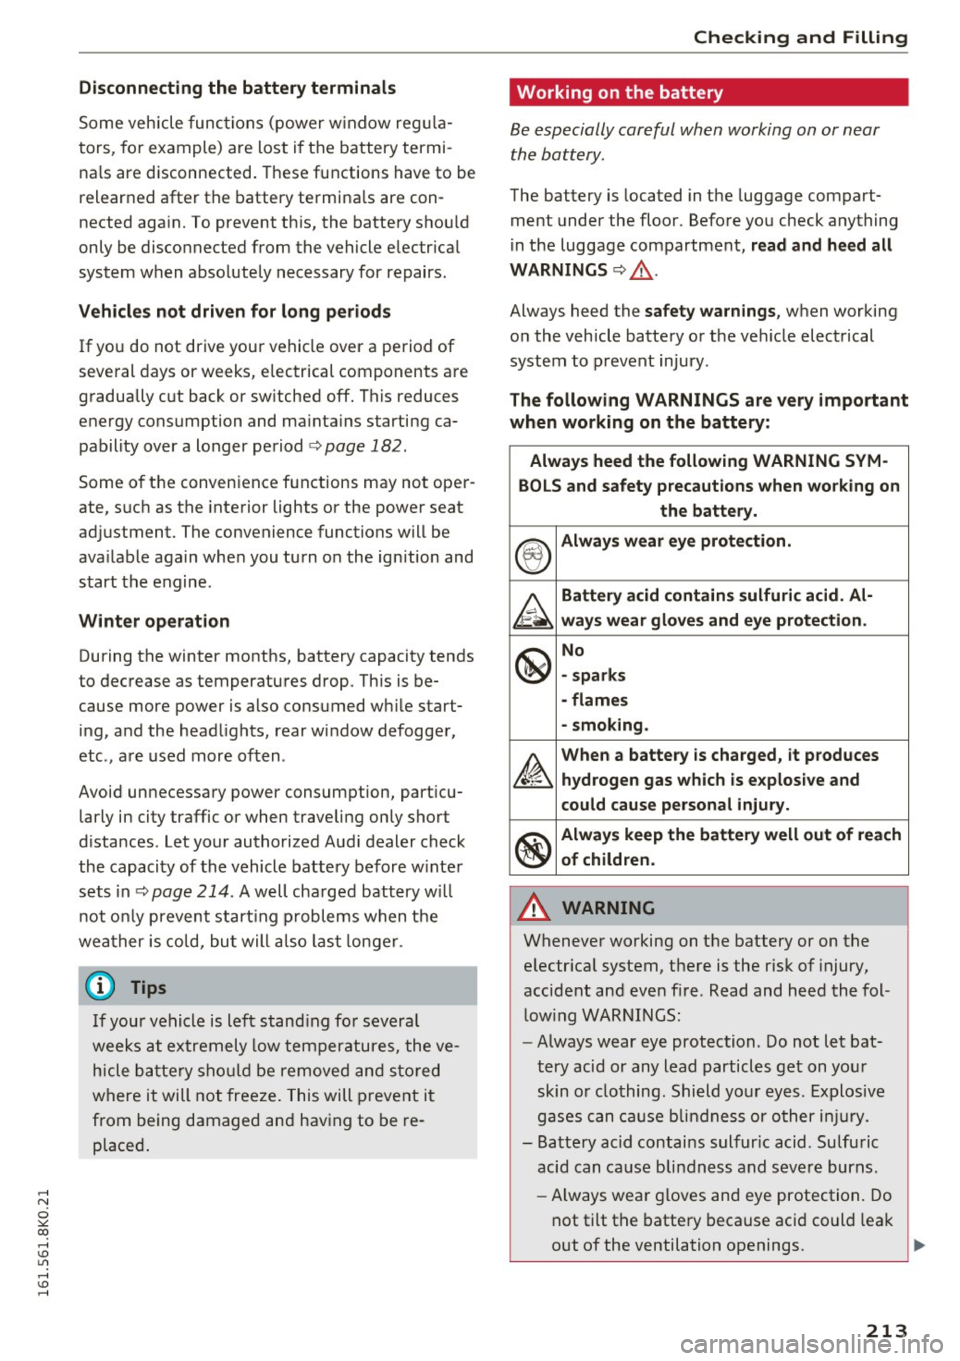
Always heed the following WARNING SYM-
BOLS and safety precautions when wo rking on
the battery.
®
Always wear eye protection.
A
Battery acid contains sulfuric acid. Al-
ways wear gloves and eye protection.
@
No
- sparks
- flames
- smoking.
~
When a battery is charged , it produces
hydrogen gas which is explosive and
could cause personal injury.
®
Always keep the battery well out of reach
of children.
A WARNING
= -
Whenever working on t he battery or on the
e lectr ica l system, the re is the r isk of injury,
accide nt a nd eve n fire. Read and he ed the fol
l ow ing W AR NIN GS:
- Always wear eye protection. Do not let bat
tery acid or any l ead particles ge t on you r
skin o r clothing. Shield yo ur eyes. E xplosiv e
g ases can ca use b lindne ss or other in jury.
- Ba tte ry acid contai ns sulfur ic acid. Sulfu ric
acid can ca use blindness and s evere burns.
- Always wea r gloves and eye protection . Do
n ot tilt t he batte ry because aci d could lea k
out of the ventilation openings. ""
213
Page 216 of 278
Checking and Filling
-If you get batt ery acid in your eyes or on
your skin, immediately rinse with cold wa
ter for several minutes and get medical at
tention .
- If you should ingest any battery acid, seek
medical attention immediately.
- Do not expose the battery to an open flame, electric sparks or an open light .
- Do not smoke.
- Do not interchange the positive and nega-
tive cables.
- When working on the battery, be sure not to short-circuit the terminals with tools or oth
er metal objects. This would cause the bat
tery to heat up very quickly, which could lead to damage or explosion and personal
injury.
- When a battery is charged, it produces hy
drogen gas which is explosive and could
cause personal injury.
- Always keep the battery well out of the
reach of children.
- Before work is done on the electrical sys
tem, disconnect the nega tive ground cable .
- Before performing any work on the electri cal system, switch off the engine and igni
tion as well as any electrical equipment. The negative cable on the battery must be dis
connected. If you are just going to replace a
light bulb, then it is enough to switch off
the lights.
- Before disconnecting the battery, sw itch off
the anti-theft alarm system! Otherwise you
will set off the alarm.
- When disconnecting the battery, first dis
connect the negative cable and then the
positive cable.
- Before reconnecting the battery, make sure
all electrical consumers are switched off.
Reconnect the positive cable first and then
the negative cable. Never interchange the
cabl es - this could start a fire!
- Never charge a frozen or a thawed-out bat
tery . It could explode! If a battery has fro
zen, then it must be replaced. A discharged
battery can freeze over at 32°F (0°C).
- Make sure the vent hose is always attached
to the opening on the side of the battery.
214
- Never use batteries which are damaged .
There is the danger of an explosion! Always
replace a damaged battery.
A WARNING
California Proposition 65 Warning:
- Battery posts, terminals and related acces
sories contain lead and lead compounds,
chemicals known to the State of California
to cause cancer and reproductive problems.
Wash hands after handling .
(D Note
- Do not disconnect the vehicle battery when
the ignition is switched on or when the en
gine is running, otherwise, you will damage
electronic components in the electrical sys
tem .
-If your vehicle is going to stand for a long
period of time without being driven, protect
the battery from "freezing" , otherwise it
will be damaged and will then have to be re
placed.
Battery charging
Starting the engine requires a well charged bat tery .
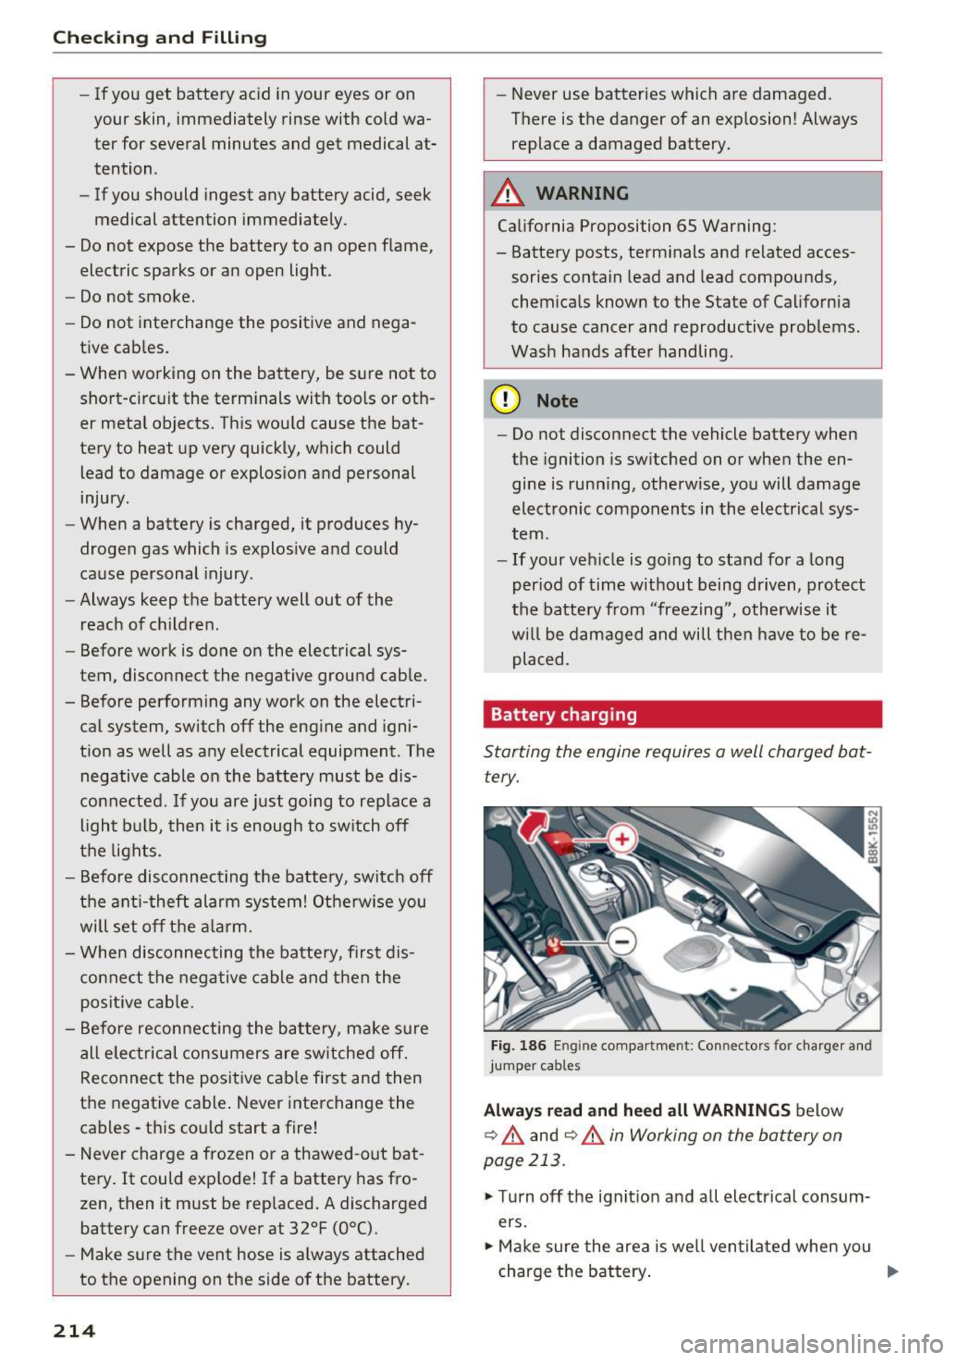
Fig. 186 En g in e compar tment : Co nnectors for charger and
jumper cab les
Always read and heed all WARNINGS below
9 A and ¢ A in Working on the battery on
page 213.
.,. Turn off the ignition and all electrical consum
ers.
.,. Make sure the area is well ventilated when you
charge the battery.
Iii>-
Page 217 of 278
..... N
0 ::..:: co .....
~ Open the cover on the positive pole~ fig. 186 .
~ Connect the charger connectors accord ing to
the instructions to the
ju mp st a rt b olts . (Bolts
under the cover= "positive", Bo lts with hex
head = "negative") .
~ Only now plug the mains lead for the charging
equipment into the wall outlet and turn it on
~ & -
~ Ma ke s ure t he c harging rate i s not ov er
30 amp s/14 .8 Vo lt.
~ When the battery is fu lly charged: Turn the
charging equipment off and remove the mains
lead from the wall outlet.
~ Now remove the clamps for the charging equip-
ment.
~ Close the cover on the posit ive pole .
~ Close the hood ~ page 203.
A discharged battery can freez e at temperatures
of only 32 °F (0 °C) . Allow a frozen battery to
thaw completely before attempt ing to charge it
~ _& . However, we recommend not us ing a
thawed batte ry again because the battery casing
can be cracked due to ice format ion and can leak
battery acid.
Battery charg ing (Maximum charging rate of
30 amps /14.8 Volt )
When cha rging at low vo ltages (e .g . with a tric k
l e char ger ),
the battery cables do not have to be
disconnected first. The battery caps should
not
be opened when charging a battery.
It is not necessary to remove the batte ry from
the luggage compartme nt.
F a st cha rging the battery (charg ing rate
above 14.8 Volt s)
For techn ical reasons do not use a battery charg
e r that uses voltage greate r than 14 .8 Volts to
charge your vehicle 's battery.
A WARNING
Charging a battery can be dangerous .
- Always follow the operating instructions
provided by the battery charger manufactur
er when charging your battery .
Check ing and Filling
-Never charge a frozen battery . It may ex
plode because of gas trapped in the ice. Al
low a frozen battery to thaw out first.
- Do not reuse batteries which were frozen.
The battery hous ing may have cracked and
weakened when the battery froze.
- Charge the battery in a well ventilated area. Keep away from open flame or electrical
spark. Do not smoke . Hydrogen gas generat
ed by the battery is explos ive.
- To reduce the danger of explosion, never
connect or disconnect charger cables while
the charger is operating .
- Fast charg ing a battery is dangerous and
should only be attempted by a competent
technician w ith the proper equipment.
- Battery acid that may spill during charging should be washed off w ith a solution of
warm water and baking soda to neutralize
the acid .
@ Note
Never use a fast charger as a booster to start
the engine . This will seriously damage sensi
tive electronic components, such as control units, re lays, radio, etc., as well as the battery
cha rge r.
Battery replacement
The new battery must have the same specifica
tions and dimensions as the original equipment
battery.
Intelligent energy management in your vehicle is
r esponsib le for distr ibut ing the e lectrical energy
t hr oughou t your vehicle ~
page 182. The intelli
gent energy management system will keep the
engine battery charged better then vehicles with
out this system. To make sure the additional
electrical energy is available once again after you
have changed the battery, we recommend that
you install batteries of the same type and manu
facture only (the same as those installed at the
t ime your vehicle was delivered) . Specifications
are listed on the battery housing . Your author
ized Audi dealer must code the battery in the en-
ergy managemen t system to enable you to use
ll>
215
Page 218 of 278
Checking and Filling
the energy m anag ement functions correctly after
replacing the battery.
I f it is not poss ible to use a battery of th is type,
the new battery must have the same capacity,
voltage (12 -volts), amperage, construction and
p lug sealing .
When insta lling the batte ry, make sure the igni
tion and all elec trical consumers are turned off.
CD Note
Ma ke sure the ventilation hose on the side of
t he batte ry is connected, othe rw ise f umes or
bat tery acid can lea k out.
@ For the sake of the environment
Because of the prob lem of proper dispo sal of
a ba tte ry, we recommen d your author ized
Audi de aler change the battery fo r you . Bat
teries contain su lf u ric acid and lea d and must
always be disposed of properly in compliance
w ith all environmental regu lations. D ispos ing
of vehicle batteries improperly is very danger
ous to the env ironment.
Windshield/headlight*
washer container
F ig. 1 87 Engine co mpar tment : Cove r o n th e w ind shie ld
and head lig ht ' was her fluid conta iner
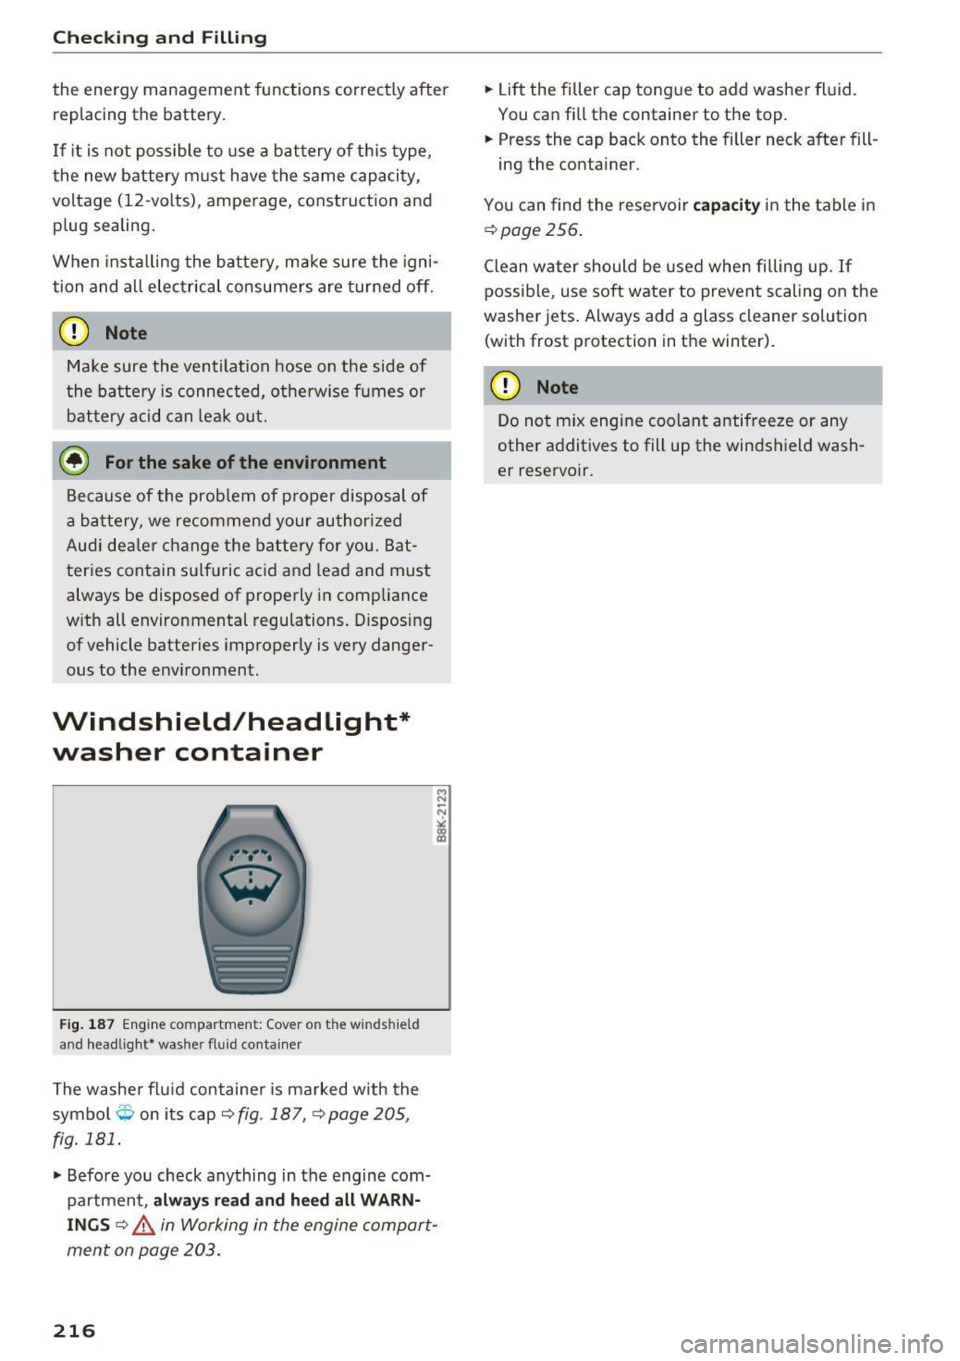
The washer fl uid containe r is m arked with the
symbo l
O on its cap ~ fig. 187, ¢ page 205,
fig . 181 .
.,. Befo re yo u check anything in the engine com
partment,
alway s read and heed all WARN
INGS ¢,& in Working in the engine compor t
ment on page 203.
216
.,. Lift the filler cap tongue to add washe r fl uid.
You ca n fill the conta iner to the top.
.,. Press the cap back onto the filler neck after fill -
ing the container .
You can find the reservoir
capacit y in the table in
~ page 256.
Clean water should be used when filling up . If
possib le , use soft wate r to prevent scaling on the
washer jets. Always add a glass cleaner solution
(with frost p rotection in the winter) .
CD Note
Do not mix engine coolant antifreeze or any
other additives to fill up the winds hield wash
er reservoir.
Page 252 of 278
Emergency situations
Emergency situations
General
This chapter is intended for trained emergency crews and working personnel who have the nec
essary tools and equipment to perform these
operations.
Starting by pushing or
towing
CD Note
Vehicles with an automatic transmission
cannot be started by pushing or towing.
Starting with jumper
cables
If necessary, the engine con be started by con
necting it to the battery of another vehicle.
If the engine should fail to start because of a dis
charged or weak battery, the battery can be con
nected to the battery of
another vehicle, using a
pair of jumper cables to start the engine.
Jumper cables
Use only jumper cables of sufficiently largecross
section
to carry the starter current safely. Refer
to the manufacturer's specifications.
Use only jumper cables with
insulated terminal
clamps which are distinctly marked :
plus(+) cable in most cases colored red
minus(-) cable
in most cases colored black.
A WARNING
Batteries contain electricity, acid, and gas.
Any of these can cause very serious or fatal in
jury. Follow the instructions below for
safe
handling of your vehicle's battery.
-Always shield your eyes and avoid leaning
over the battery whenever possible.
-A discharged battery can freeze at tempera
tures just below 32 °F (0 °C). Before con
necting a jumper cable, you must thaw the
250
frozen battery completely, otherwise it could explode.
- Do not allow battery acid to contact eyes or
skin. Flush any contacted area with water immediately.
- Improper use of a booster battery to start a
vehicle may cause an explosion.
- Vehicle batteries generate explosive gases.
Keep sparks, flame and lighted cigarettes
away from batteries.
- Do not try to jump start any vehicle with a
low acid level in the battery.
- The voltage of the booster battery must also
have a 12-Volt rating. The capacity (Ah) of
the booster battery should not be lower
than that of the discharged battery. Use of
batteries of different voltage or substantial
ly different "Ah" rating may cause an explo
sion and personal injury.
- Never charge a frozen battery. Gas trapped in the ice may cause an explosion.
- Never charge or use a battery that has been
frozen . The battery
case may have be weak
ened .
- Use of batteries of different voltage or sub
stantially different capacity (Ah) rating may
cause an explosion and injury. The capacity
(Ah) of the booster battery should not be
lower than that of the discharged battery.
- Before you check anything in the engine
compartment, always read and heed all
WARNINGS
~page 203.
CD Note
-Applying a higher voltage booster battery
will cause expensive damage to sensitive
electronic components, such as control
units, relays, radio, etc.
- There must be no electrical contact between
the vehicles as otherwise current could al
ready start to flow as soon as the positive
(+) terminals are connected.
@ Tips
The discharged battery must be properly con-
nected to the vehicle's electrical system. .,..
Page 254 of 278
Emergency situations
-The battery cell locking screws must be
tightened securely.
- Before you check anything in the engine
compartment, always read and heed all
WARNINGS
c:> page 203.
(D Note
Improper hook-up of jumper cables can ruin
the generator.
- A lways connect POSITIVE(+) to POSITIVE
(+), and NEGATIVE(-) to NEGATIVE(-)
ground post of the battery manager control
unit.
- Check that a ll screw plugs on the battery
cells are screwed in firmly. If not, tighten
plugs prior to connecting clamp on negative
battery terminal.
- Please note that the procedure for connect
ing a jumper cable as described above ap
plies specif ically to the case of your vehicle
being jump started. When you are giv ing a
jump start to another vehicle, do
not con
nect the negative(-) cable to the negative
(-) terminal on the discharged battery @
c:> fig. 210. Instead, securely connect the
negative (-) cab le to either a solid metal
component that is firm ly bolted to the en
gine block or to the engine block itself. If
the battery that is being charged does not
vent to the outside , escap ing battery gas
could ignite and explode!
Towing with a tow truck
General hint s
Your Audi requires special handling for towing.
The following information is to be used by com
mercial tow truck operators who know how to op
erate the ir equipment safely.
-Never tow your Audi, towing will cause dam
age to the engine and transmission.
- Never wrap the safety chains or winch cables
around the brake lines .
- To prevent unnecessary damage, your Audi
must be transported with a flat bed truck.
252
-To load the vehicle on to the flat bed, use the
towing loop found in the vehicle tools and at
tach to the front or rear anchorage
c:> page 252 and c:> page 253.
A WARNING
A veh icle being towed is not safe for passen
gers . Never allow anyone to ride in a vehicle
being towed, for any reason .
Front towing loop
Do not install the front towing loop until it is
needed .
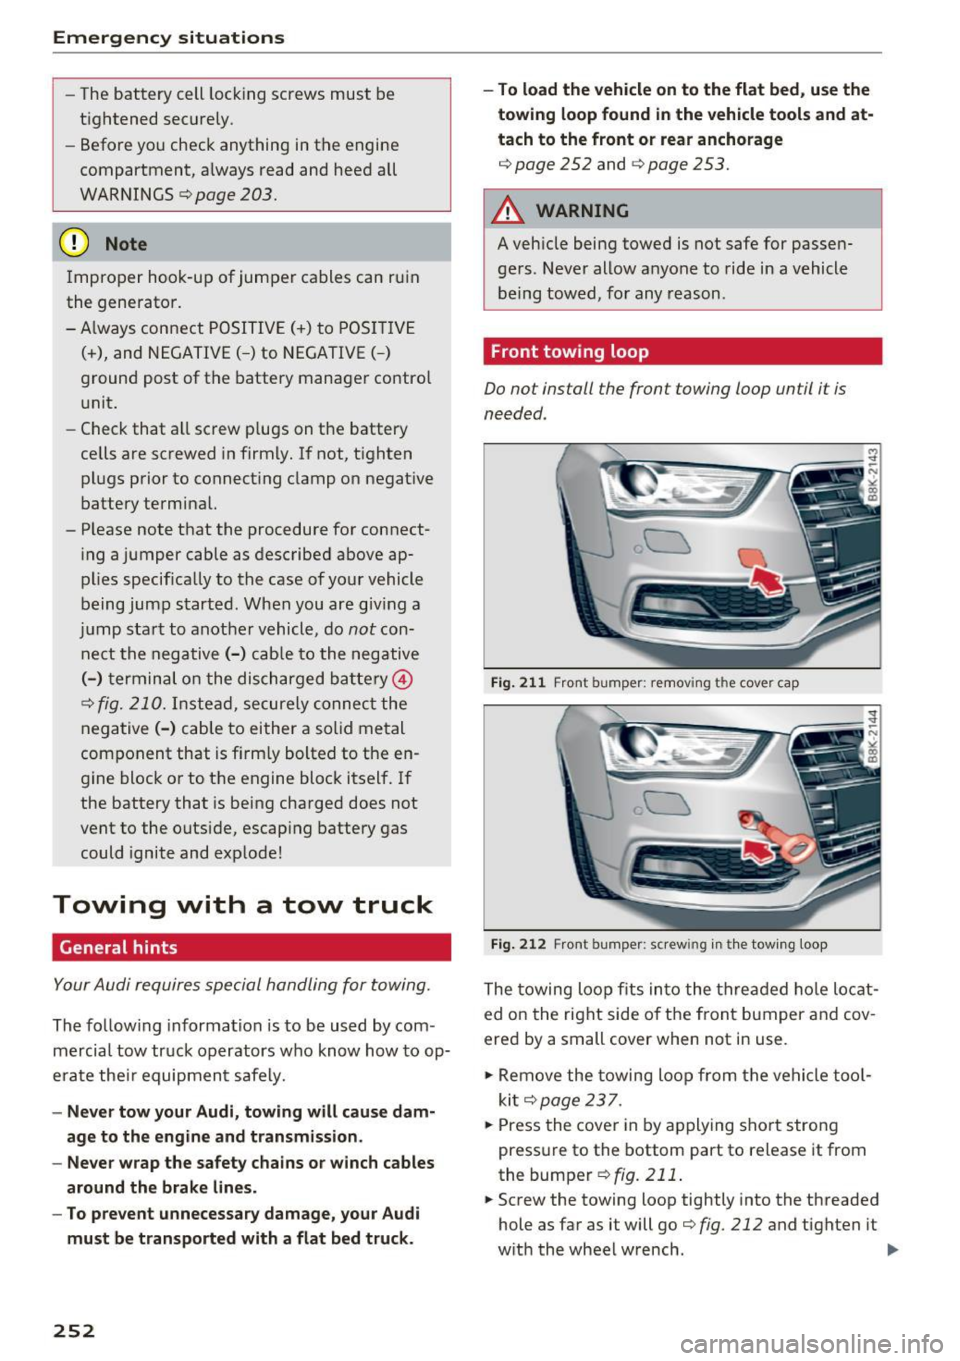
Fig. 211 Front bumper: removing th e cover cap
Fig. 212 Front bumper: s crew ing in t he towing loop
The towing loop fits into the threaded hole locat
ed on the right side of the front bumper and cov
ered by a small cover when not in use .
.,. Remove the towing loop from the vehicle tool
ki t
c:> page 23 7.
... Press the cover in by applying short strong
pressure to the bottom part to release it from
the bumper
c:> fig. 211.
... Screw the towing loop tightly into the threaded
hole as far as it will go
c:> fig. 212 and tighten it
with the wheel wrench. ..,.
Page 256 of 278
Emergency situations
Raising the vehicle
Lifting with workshop hoist and with floor
jack
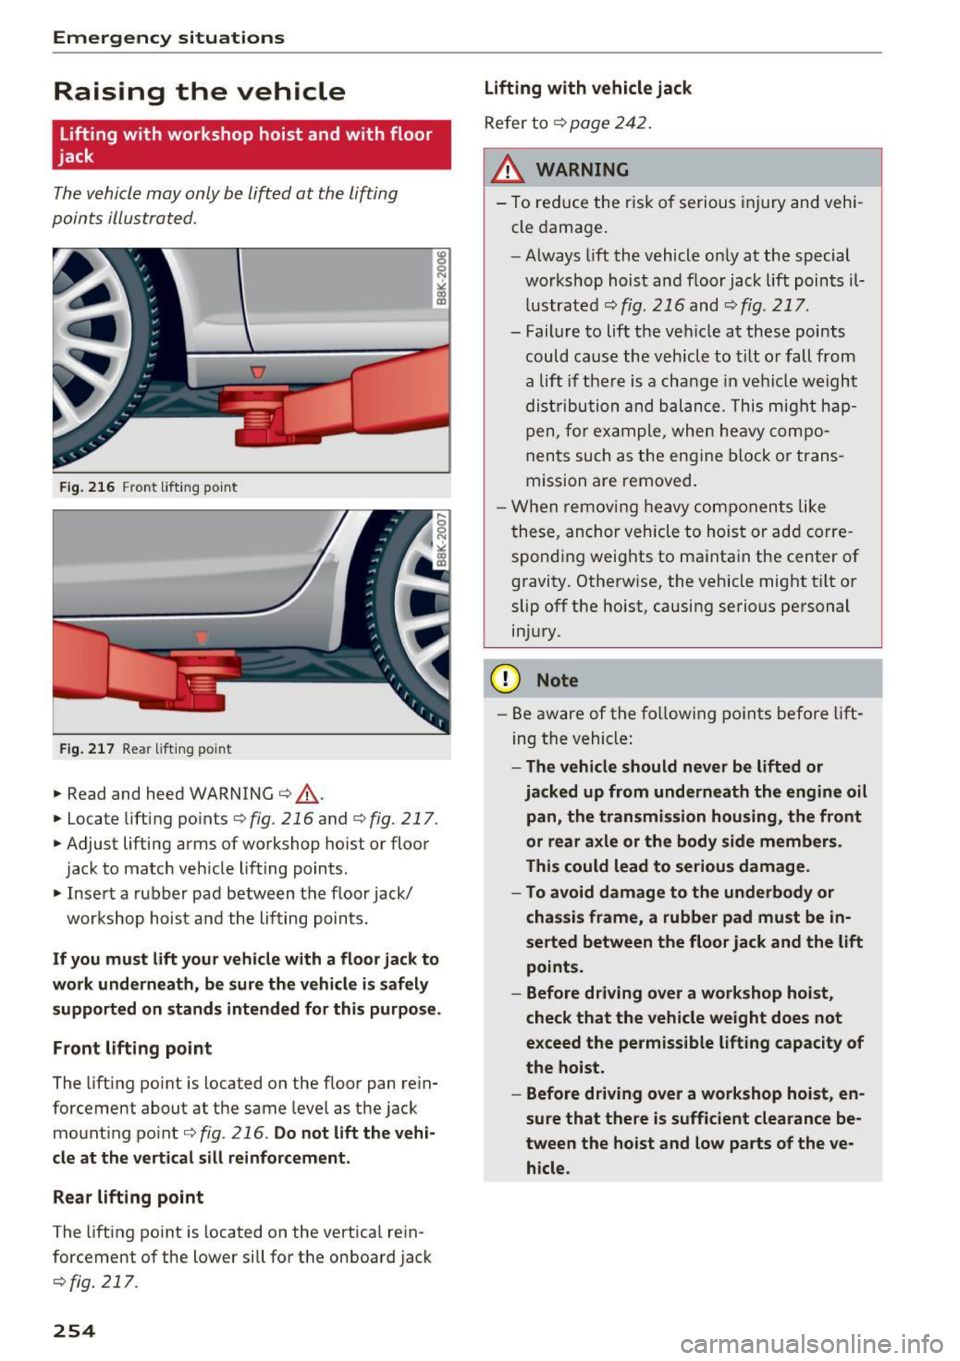
Th e vehicle may only b e lift ed at the lifting
poin ts illust rated.
F ig .. 216 F ro nt lift ing po int
F ig. 217 Rea r lifti ng po int
.,. Read and heed WARNING ¢ A-
.,. Locate lifti ng po ints ¢ fig. 216 and ¢ fig. 217 .
.,. Adjust lifting arms of wo rkshop hoist or floor
jack to match veh icle lifting points .
.,. In se rt a rubb er pad between t he floor jack/
wor kshop hoist a nd the lif ting poin ts .
If you must lift your vehicle with a floor jack to
work underneath, be sure the vehicle is safely
supported on stands intended for this purpose .
Front lifting point
The lift ing po int is located on the floo r pan re in
forcement about at the same leve l as the jack
mo unt ing point ¢
fig. 216 . Do not lift the vehi
cle at the vertical sill rei nforcement.
Rear lifting point
The lift ing po int is located on the vertica l re in
for cement of the lower sill fo r the on board jack
¢fig. 217.
254
Lifting with vehicle jack
Refer to ~ page 242.
A WARNING
-To re duce the r is k of serious injury and vehi
cle dama ge .
- Always lift the vehicle o nly at the special
workshop hois t an d floor jack lift points il
l ustrat ed
~ fig. 216 and ~ fig . 217.
- Failur e to lift the v ehicle at these points
could ca use the veh icle to tilt or fall from
a lift if the re is a cha ng e i n ve hicle weigh t
dis tribu tion and ba lan ce . T his mig ht hap
p en, for exa mple, whe n he avy co mpo
n en ts such as the engine block o r tr an s
mission are removed.
- W hen re m ov in g h eavy co mponen ts like
these, an cho r veh icle to hoist or ad d co rre
spond ing weights to ma inta in the ce nter of
gravity . Othe rw ise, the vehicle mi ght t ilt o r
slip off t he hoist, causing serious pe rsonal
in jur y.
(D Note
- Be aware of the fo llowing po ints befo re lift
ing the vehicle:
- The vehicle should never be lifted or
jacked up from underneath the engine oil pan, the transmission housing, the front
or rear axle or the body side members .
This could lead to serious damage .
- To avoid damage to the underbody or
chassis frame, a rubber pad must be in
serted between the floor jack and the lift
points.
- Before driving over a workshop hoist,
check that the vehicle weight does not
exceed the permissible lifting capacity of
the hoist.
- Before driving over a workshop hoist , en
sure that there is sufficient clearance be
tween the hoist and low parts of the ve
h icle.
Page 257 of 278
.... N
0
""' CX)
.... I.Cl U"I
.... I.Cl ....
Technical data
Vehicle identification
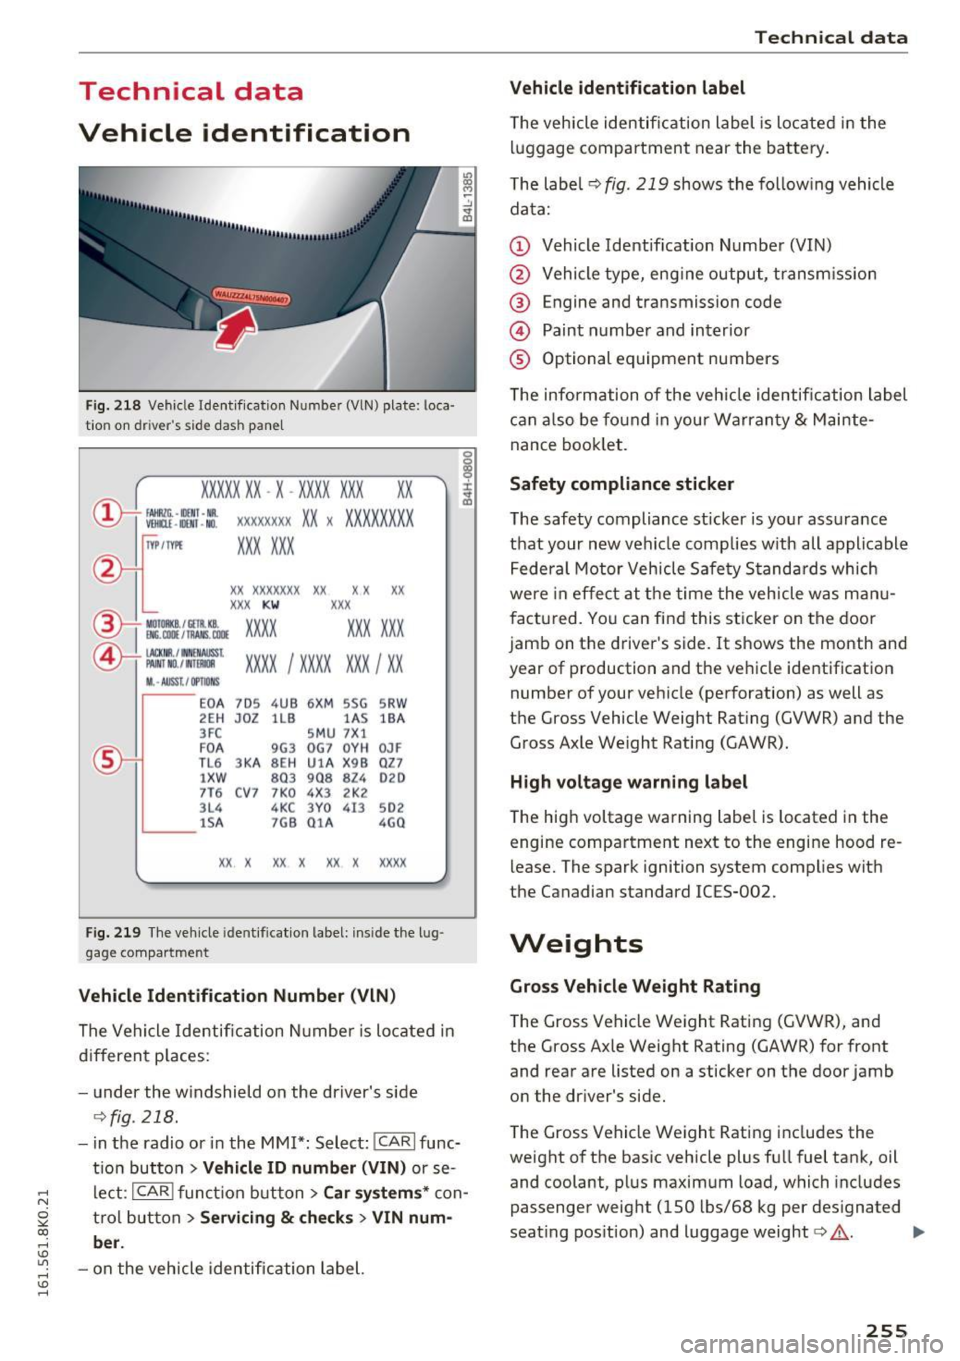
F ig . 2 18 Vehi cle Ident if icatio n Number (VlN) plate : loca·
t ion on dr iver 's side dash pane l
XXXXX XX -X -XX XX X XX XX
CD+ ~t :1:: xxxxxxxx xx x xx xxx xxx
TVP/fffl XXX XXX
XX XXXXXXX XX X X xx
XXX KW XXX
®i ~:J ·f lfils~~ XXXX XXX XXX
®-+ ~ N:a=i~l xxxx ; xxxx xx x ; xx
II. · AUSS, I OPTIONS
,__ __
EO A 7D 5
2E H J0Z
3FC
F O A
TL 6 3KA
lXW
7T6 C V7
3L4 lS A
4UB 6XM 5SG
llB lA S
S M U 7Xl
9G3 OG7 0YH
SE H UlA X 98
803 908 824
7 K0 4 X3 2K2
4KC 3Y0 413
7G8 01 A
5RW
18A
0JF
QZ7
020
502
4G0
XX . X XX X XX X XXXX
Fig. 219 Th e ve hicle ident ifica tion label: ins ide the l ug·
gage co mpartment
Veh icle Identification Number (VlN )
The Vehicle Identific ation N umbe r is lo cate d in
d if f eren t places:
- u nder the w indshield on the dr iver's side
~ fig. 218.
-in the radio or i n the MMI*: Select: !CAR! func
t io n but ton
> Vehicle ID number (VIN) or se
l e ct:
I CAR ! funct ion button > Car system s* con
t rol but ton
> Servicing & checks > VIN num
ber .
-on the vehicle identific ation label.
Technical data
Vehicle identification label
T he vehicle identi fica tion label is lo cate d in t he
l uggage compa rtment near the ba tte ry.
T he labe l
~ fig. 219 shows the fo llow ing vehicle
da ta:
(D Vehicle Identification Number (VIN)
@ Vehicle type, eng ine output, transm ission
@ Engine and transmission code
@ Paint numbe r and interior
® Optional equipment numbers
T he information of the veh icle identification label
c an also be fo und in your Warran ty
& Mainte
nance booklet.
Safety compliance sticker
The safety compliance sticker is yo ur ass urance
t h at your n ew vehi cle complies w ith all appli cable
Fede ral Motor Vehicle Safety Stand ard s which
we re in effe ct at the time the veh icle w as m anu
fac tured. Yo u ca n fi nd this sticker on the door
jamb on the driver 's side. It shows the month and
year of production and t he ve hicle identification
number of your ve hicle (perforation) as well as
t h e Gross Vehicle Weight Rat ing (GVWR) and the
G ross Axle We ight Rati ng (GAWR).
H igh vo ltage warning label
T he hig h voltage warning label is located in the
engine compa rtment ne xt to the engine hood re
lease. The spark ignition system complies with
the Canadian standard ICES-002.
Weights
Gross Vehicle W eight Rating
The Gross Vehicle Weight Rating (GVWR), and
the Gross Axle Weight Rating (GAWR) for front
and rear a re listed on a sticker on the door jamb
o n the dr iver 's side .
T he Gross Vehicle Weight Rating includes the
weight o f the basic vehicle plus fu ll fuel tank, oil
and coolant, p lus maxim um load, which includes
passenger weight (150 lbs/68 kg per des ignated
seat ing pos ition) and luggage weight
c:> .&, . .,.
255