display AUDI A4 2017 Owners Manual
[x] Cancel search | Manufacturer: AUDI, Model Year: 2017, Model line: A4, Model: AUDI A4 2017Pages: 386, PDF Size: 96.32 MB
Page 233 of 386
<( a, ..... N ,....
N ..... 0 0
3 a,
Data connection
Applies to vehicles w ith A ud i con nect (Infota inme nt)
The se rvices are prov ided t hrough a S IM ca rd in
s talled in the veh icle.
MMI connect app
App lies to vehicles w it h A udi connect (Infota inme nt)
R eq uiremen t: the Audi MMI connect app m ust
be installed and open on your mo bile device .
-Connect new device : search for and connec t a
mobile device (s uch as a smartp ho ne) .
- List of devices already paired : selec t your mo
bile devi ce from the l is t o f all the devi ces th at
are already paire d.
Music
A pplies to vehicles w it h B luetoot h or Wi -Fi aud io playe r
Audio player*
Requi reme nt: the Bl uetooth func tion and vis ib ili
ty mus t be sw itche d on in the MMI
¢ page 231
and on the ce ll phone.
- Connect new device : press the contro l knob.
Se le ct
Bluetooth audio player . Sea rch fo r and
connect a mobile device.
- List of devi ces already paired : selec t a Blue
too th devi ce from the list of a ll the devi ces th at
are already paire d.
Wi-Fi audio player*
R eq uireme nt: the W i-F i hots pot on the M MI
¢ page 1 77 and on you r ce ll phone mus t be
sw itche d on.
- Connect new device : press the contro l knob .
Sea rch for and connect a Wi -Fi capable device .
-Disconnect Wi-Fi audio player : deactivate the
Wi-Fi on your Wi-Fi capab le dev ice . T he dev ice
will be a utomat ically re m oved from the list.
System settings
Directory
App lies to : veh icles w it h te lep hone
Display contacts from a cell phone (or an addi
tional cell phone) .
Requirement: no cell phones can be connected to
t h e M MI using the
Handsfree profile.
- Connect new device: search fo r and connect a
new cell phone .
-List of devices alre ady paired : select yo ur ce ll
phone from t he list of all the cell phones that
are a lready paired .
Audi smartphone
Applies to : veh icles w it h Audi sm artph one interface
-Connect your ce ll phone to the Audi music in
terface ¢
page 215 using a USB adapter
¢page 215, fig. 194 .
-Select your cell pho ne from t he list of cell
pho nes tha t h ave a lready bee n connec ted .
Additional options
Depen ding on the selected function, yo u can use
t h e righ t control bu tton to ac ce ss the av ailab le
addi tion al op tion s in t he conne ction m anager.
Delete Bluetooth device*
The selec ted cell phone/mobile device is d iscon
nec ted from the MMI and is removed from the
li st of all devices that are a lready paired.
Show Bluetooth profiles*
You can indiv id ually Connect or Disconnect th e
Handsfree , Messages *, Directory /contacts and
Bluetooth audio player profi les .
Bluetooth settings*
- Bluetooth:
select an d confi rm a setting for the
Bluetooth connection visibility . Se lect
Visible
for the MMI to be vis ible to othe r devices. Se
lect
Invisible for the MMI to not be visible to
other dev ices. However, i t is st ill poss ible to es
t ablish a Blue tooth connect ion with pa ired de
vices whe n the visibility is sw itche d off. Sele ct
Off to t urn v is ibil ity off. Then a Blue too th con-
nec tion is no t possib le .
liJl,,
231
Page 234 of 386

System settings
-Bluetooth audio player : when this func tion is
switched on~, the Bluetooth audio player is
available as a so urce in t he
Media menu.
- Bluetooth name : the MMI B luetooth name (for
example ,,AUDI M MI 2015") is displayed and
can be changed.
Online settings*
- Data u sage counter :
the amoun t of d ata pac k
ets tha t are sent a nd received throug h the MM I
is d isp layed. You can reset the data usage infor
mation to zero using the
Reset data counter
option.
- Network status : the mobile netwo rk p rovider
fo r data se rvice as well as the netwo rk status
are disp laye d.
Wi-Fi options*
Refer to 9 page 1 77, Wi -Fi hotspo t.
Storing as a default telephone
Applies to: vehicles with telephone
Re qui remen t: a cell phone must be connec ted to
t he MMI
9page 160.
As soon as t he cell phone is i n range and the
Blue tooth func tion on the ce ll phone and in the
MM I is swi tched on, this ce ll phone is g iven pr ior
ity ove r th e other Blu et ooth devices and is con
ne cte d dire ct ly to the M MI. T he conn ecte d cell
p ho ne i s d ispl aye d first in the device list.
Network settings*
- Login :
you can chose an Automatic log in to
yo ur cell phone serv ic e prov ider's netwo rk, o r
yo u can c hoose a
Manual login from the lis t of
available networ ks.
- Network selection : networ ks avai lab le in t he
c ur rent lo ca ti on can be se le ct ed unde r ne twor k
sele ction. T his func tion is only av ailable for th e
Manual login se tting .
CarPlay sound settings/ Android Auto sound
settings
Applies to: vehicles with Audi smartphone interface
Refer to 9page 233.
232
About Apple CarPlay/ About Android Auto
Applies to: vehicles with Audi smartphone interface
Here you w ill find leg al inform ation reg arding
t h e use of Apple Car Play o r Andro id A uto and in
fo rmat ion about devi ce -specific data exc han ge.
Delete CarPlay device/Delete Android Auto
device
Applies to: vehicles with Audi smartphone interface
-Req uiremen t: your cell phone mu st not be con
nected to the A udi music inte rface with a USB
ada pte r.
- To remove you r ce ll p hone from the list o f all
cell phones that are a lrea dy paire d, select an d
confirm
Delete CarPlay device or Delete An
droid Auto device .
(D Tips
Some SIM card s do not a llow the SIM PIN
qu eries to be sw itche d
off.
System update
.,. Select : !ME NUI button> Settings > left control
button >
System maintenance.
- System update :
slide the sto ra g e device with
t he upda te da ta into the a pprop ria te drive
<=:> page 21 0. Se lect and confi rm the dr ive >
Start update . The length of the process de
pends on the size of the update.
- Reset driver installation: the selecte d media
driver package is reset to t he settings at the
tim e of delivery .
-Ve rsion information : information on the MMI
so ftware version and the navigation database*
software versi on is d is pl ayed. The
Software in
formation
function also prov ides i nformat io n
on the softwa re co nta ined in the M MI an d the
li censing agr eement .
Page 236 of 386
System settings
(D Tips
Volumes that are too h igh o r too low are a u
tomatically a djuste d to a set leve l w hen the
MM I is switched on .
Adjusting the system volume
.,. Se lect : I MENU I button > Sound > left contro l
button .
Telephone
Applies to: vehicles w ith telephone
Mute telephone: messages and ringtones are set
to mute.
Ringtone : refe r to ¢ page 170, Ringtone and
volume settings .
Ringtone volume :
you ca n adjust the volume of
the se le cte d r ing to ne by turning the con tro l
knob.
Me ssage volume : you ca n ad just t he volume of
the not ifi cat io n for an in comi ng tex t me ssage by
tur ning t he con trol kno b.
Microphone sensitivity: you ca n ad just the ca ll
volume du ring a phone ca ll by tu rning the co ntro l
knob.
Navigation
Applies to: vehicles with navigation system
Voice guidance: refer to ¢ page 196 .
Voice guidance during phone call: refer to
¢ page 196.
Voice guidance volume : you can ad just the vo ice
gu idance volume by tur ning the control knob .
Or:
you can ad just the vo ice gui dance volume during
active route g uidance by turning the On/Off
knob.
Enterta inment fader : the volume of au dio play
bac k can be tempo rarily lowe red w hen the pa rk
ing system or voice g uidance is active .
Voice recognition system
Applies to: vehicles with voice recognition system
Command display : the display o f poss ible co m
mands du ring voice input can be switc he d on or
off .
234
Short dialog : you can disp lay a sho rter form of
the p rompts.
Volume: you can adju st t he v olum e of the
prom pts by t urning the con trol knob .
Speech training (only w hen th e vehi cle is sta tion
a ry): yo u can adapt the vo ice recog nition sys tem
t o yo ur voic e or pro nunc iati on in o rd er t o i mpro ve
th e sys tem's ability to re co g ni ze yo ur s peech . In
dividua l train in g i s comprised of 20 speech en
tries that cons ist of commands and seque nces of
numbe rs. You can delete the programme d voice
training with the
Reset individual speech train
ing
function .
Parking system*
You can adjus t the vol ume o f the signa l tone by
turnin g the contro l knob.
- Adjusting th e Front volume : select and co n
fi rm
High , Medium or Low .
- Adjusting
th e Rear volume : sele ct and confirm
High , Medium or Low .
MMI touch*
You can adjus t the vol ume o f the prompts fo r the
MM I touch* by t urnin g the cont rol knob .
Restarting the MMI
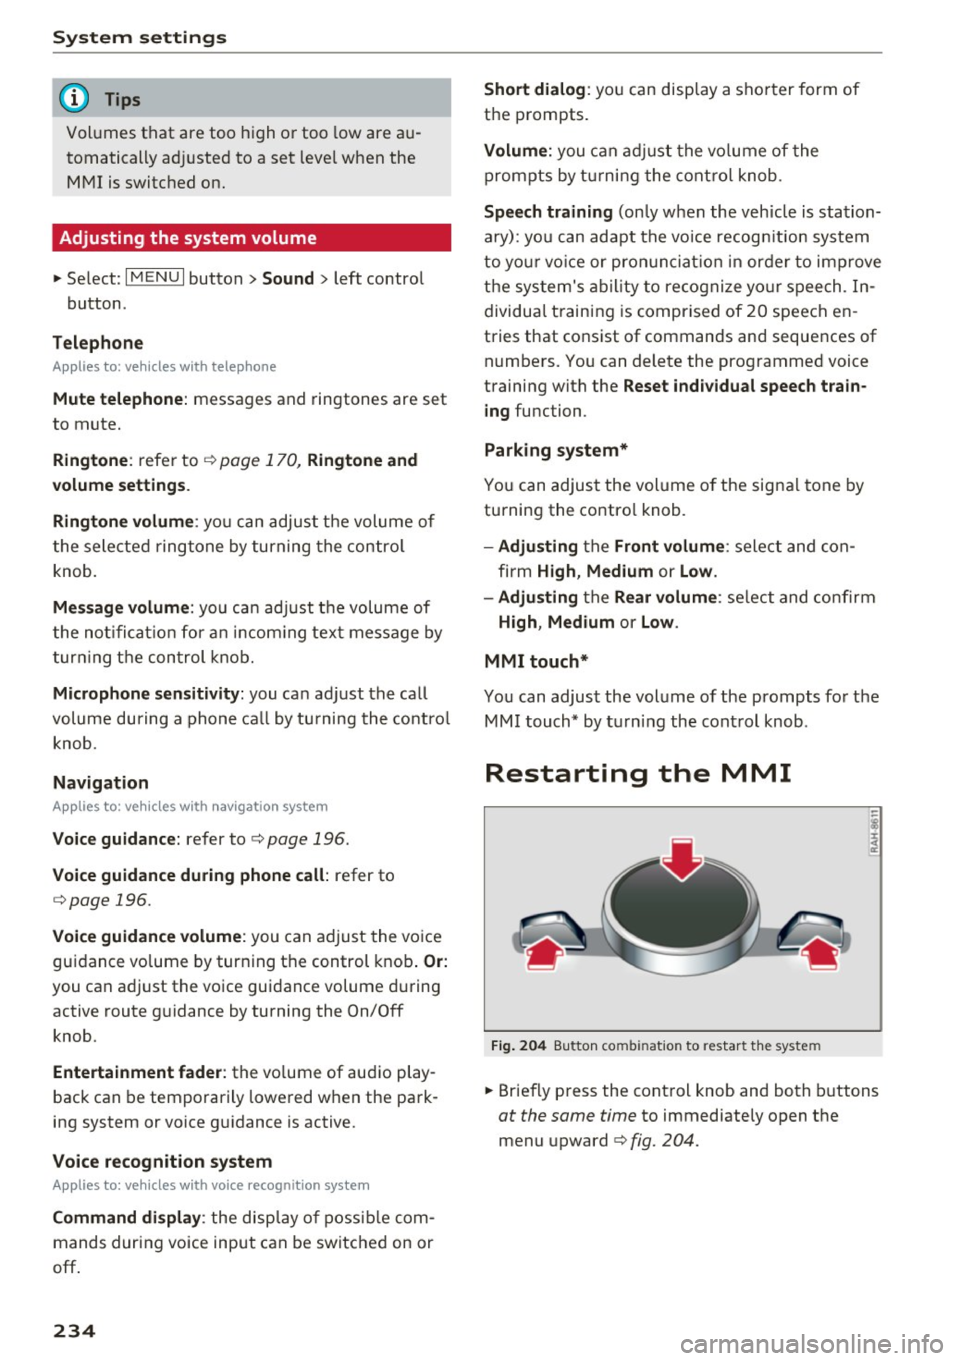
Fig. 204 Bu tton co mbin at io n to restart t he syste m
.,. Briefly p ress the cont rol knob and both buttons
at the same time to immediately open the
menu upward ¢
fig. 204.
Page 237 of 386
<( a, .... N ,....
N .... 0 0
Software license information
Information on the software contained in the
MMI and the license agreement.
- Se lect: I MENU I button > Settings > left control
button
> System maintenance > Vers ion infor
mation .
- Or:
on line at www .audi.com/softwareinfo .
Information on the software contained in the
Head-up display and the license agreement .
-Press and hold the button for the Head-up dis
play @longer than five seconds after switching
on the ignition~
page 8, fig. 1.
- To close the i nfo rmation w indow, press a but
ton on the multif unction steeri ng wheel or a
button to open a menu on t he M MI control
panel.
Information on the software contained in the
instrument cluster and the license agreement .
Press the reset button twice with in f ive seconds
of switching the ignition on.
1>
3 1) Not availab le in all ve hicles. a,
System settings
235
Page 302 of 386

Checking and Filling
authorized Audi dealer or authorized Audi
Service Facility for assistance.
Fuel filler door emergency release
If the central locking system is faulty, the fuel
filler door can be unlocked manually.
Fig. 241 L uggage compartment: opening the side t rim
panel
F ig. 242 luggage compartment: fue l fi ller doo r emergency
r elease
The emergency opening mechanism is located
behind the right side trim panel in the luggage
compartment.
• Open the cover in the side panel
¢fig. 241.
• Loosen the loop c> fig. 242 from the retainer
and then pull on the loop carefully
c>0 . The
fuel filler door releases.
• Press on the left side of the fuel filler door to
open it
¢page 298, fig. 239 .
(D Note
Only pull on the loop until you feel resistance .
You will not hear it release. Otherwise you
could damage the emergency re lease mecha
nism .
300
Selective catalytic
reduction (AdBlue)
General information
Applies to: vehicles with selective catalytic reduct ion
In vehicles with selective catalytic reduction, a
urea solution (AdBlue) is injected into the ex
haust system before a nitrogen oxide cata lytic
converter to reduce nitrogen emissions.
The Ad Blue is carried in a separate tank in the ve hicle. The Ad B lue usage accounts for approxi
mately 1.0% to 2.5% of the diesel fuel that is
used.
When a message about refi lling the AdBlue ap
pears in the instrument cluster display, you must
ref ill the Ad B lue yourself or have it refilled by an
authorized Audi dealer or authori zed Audi Service
Facility
c> page 301.
(l} Tips
- The d isp lay indicates the distance rema ining
that can be driven¢
page 300. If the Ad Bl
ue tank is completely empty, the engine will
not start again after the ignition is switched
off .
- Ad Blue is required by law to operate th is ve
hicle.
Messages in the instrument cluster display
App lies to: vehicles with selective cata lytic reduction
The display indicates if the Ad Blue level is low or
if there is a system malfunction .
Ad Blue level low
You will be informed in the instrument cluster
display if the Ad Blue in the tank drops below a
certain level. Add at a minimum the amount of
Ad Blue shown in the message:
• Refill with at least x qt (l) Ad Blue . Range
x mi (km)
This message appears when there is only enough
AdBlue left to drive the distance indicated in the
instrument cluster. Fill the AdBlue.
• Refill with at least x qt (I) AdBlue . No en
gine start in x mi (km ). See owner's manual
Page 305 of 386

Refilling AdBlue using a pump
Appl ies to: ve hicles with selective cataly tic reduction
"' Open the tank fi ller door ¢ page 298, fig. 239 .
.,. Turn the tank filler neck cap to the left to re
move
¢ page 301, fig. 243 .
.,. Refill Ad B lue until the pump nozzle switches
off for the first time
¢ (D.
.,. Close the filler neck. ¢ page 303, Completing
AdBlue refill
(D Note
- The pump nozzle handle must be pointing
downward when fill ing . Otherwise the
pump nozzle w ill not sw itch off automat i
cally
¢ @ in Preparation on page 301.
-Do not continue filling once the pump noz
zle automatically switches off for the first
time . The AdBlue tank system cou ld be
ove rfilled and leak Ad B lue
¢(Din Prepara
tion on page 301.
Completing AdBlue refill
A pp lies to: ve hicles with selective ca ta ly tic reduc tion
Closing the filler neck
.,. Turn the Ad Blue cap to the right on the filler
tube u ntil the cap cli cks into place ¢.&.
in
Preparation on page 3 01,
¢ d) in Preparation
on page 301.
.,. The n press on the left side of the tank door un-
t il it latches.
After filling
The vehicle mus t be driven so that the system
r ecognizes that the Ad Bl ue was refille d. Thi s can
take severa l min utes .
.,. If there was no Ad Blue left in the tank a nd a
ra nge of O mi (0 km) was shown in the display ,
switch the ig nition on for about 30 seconds be
f ore star ting the engine .
(D Tips
Ad Blue in the tank can free ze at very low tern-
; pe ra tures. If this happens, the system will
~ not detect that the Ad Bl ue was refilled and it N
8 wi ll continue to inform you of the low Ad Blue 0
3
level. The message t urns off as soon as the
tank thaws out again .
Emissions control
systems
Catalytic converter
Applies to vehicles a with gasoli ne engine : the
vehicle may only be driven with unleaded gaso li ne, otherwise the cata lytic converter will be de
stroyed .
Never dr ive until the tank is complete ly empty.
The irregu lar supply of fuel that resu lts from that
can cause eng ine misfires. Uncombusted fue l will
enter the exhaust system, which can cause over
hea ting and damage to the cata lytic converter .
Diesel particulate filter
Applies to vehicle s with a diesel engine : the die
sel part icu late filter filters nearly all of the soot
particles out of the exhaust. The f ilter cleans it
self automatically under normal dr iv ing cond i
t ions .
If the filter cannot clean itself (fo r exam
ple, bec ause you are only d rivi ng short distan
c es), the filte r becomes clogged wi th soo t and
t h e
Cl indica to r li gh t for the diese l part icu late
filter turns on ¢
page 34.
A WARNING
The temperat ure of the exhaust system is
h igh, both when driv ing and after stopping
the eng ine.
-
- Never touch the exhaust tail pipes once they
have become hot. This cou ld res ult in burns.
- Do not park your veh icle over flammable
materials such as grass or leaves because
the high temperature of the emissions con trol system (catalytic converter or d iesel
pa rtic ulate filter) could start a fire.
- Do not app ly underbody protectant in the
exhaust system area , beca use this increases
the r isk of f ire.
303
Page 310 of 386

Check ing and F illing
CJ) Note
Driving with an insufficient oil level is likely to
cause severe damage to the engine .
@ Tips
-The oil pre ssure warn ing display. is not
an ind icato r of the oil l evel. Do not rel y on
it. In stead , che ck th e oil le vel in your e n
gi ne a t regul ar int ervals, prefe rably e ach
t ime you re fuel , and al ways befo re go ing
on a long trip .
-If you have the impression your engine con
sumes excessive amounts of oil, we recom
mend that you consult an authorized Aud i
dealer to have the cause of your concern
properly d iagnosed . Keep in mind that the
accurate measurement of oil consumpt ion
r equi res great ca re and may take some
time. An authorized Audi dealer has instruc
tions about how to measure oil consump
tion accurately.
Checking the engine oil level
The engine oil level can be checked in the Info
tainment system
.. Park you r vehicle on a level surface.
.. Shut the engine off when it is warm.
.. Switch only the ignition back on.
.. Wait approximately two minut es .
.. Se lect in the Infotainment system: the
I MENU I
button > Ve hicle > left cont rol button > S er vice
& c h ecks > Oil lev el.
.. Check the oil level in the Infotainment system
display . Add engine oil if the bar in the oil level
indicato r is near "min "¢
page 308 .
The engine oil consumpt ion may be up to
0 .5 quart pe r 600 miles (0.5 l iter/1,000 km), de
pending on driving style and operating condi
tions. Consumption may be highe r d uring the
fi rst 3 ,000 mi les (5,000 km). Because of this, the
engine o il level must be checked regu larly. I t
wou ld be best to check each time you refuel your
vehicle and before long drives .
308
(D Tips
The oil level indicator in the disp lay is only an
i nformat ional disp lay .
If the oil leve l is too
l ow, a min imum oil warning appears in the in
strument cluster. Add oil and close the hood.
The current oil level is displayed in the instru
ment cluster the next t ime the ignition is
switched on.
Adding engine oil
cover
.. Read a nd follo w all WARNIN GS before check
ing anything in the engine compartment ¢
A
in Working in the engine compartment on
page 304 .
.. Turn the engine off .
.. Unscrew the cap
ce--: for the engine oil filling
opening <=>
fig. 248, <=> page 306 .
.. Carefully add 0 .5 quart (0.5 l iter) of the correct
oil ¢
page 306.
.. Check the oil level aga in after two minutes
¢ page 308, Checking the engine oil level .
.. Add more o il if necessary.
.. Close the engine oi l filler opening cap .
A WARNING
-When adding oil, do not let oil drip onto hot
engine components. This increases the risk
of a fire.
- You must secure the cap on the oil f iller
open ing correctly so that oil does not leak
out onto the hot engine and exhaust system
when the engine is runn ing, because this is
a fire hazard .
- Always clean sk in thoroughly if it comes into
contact with eng ine oil.
Page 318 of 386
Check ing and F illing
Windshield washer
system
.........
w •
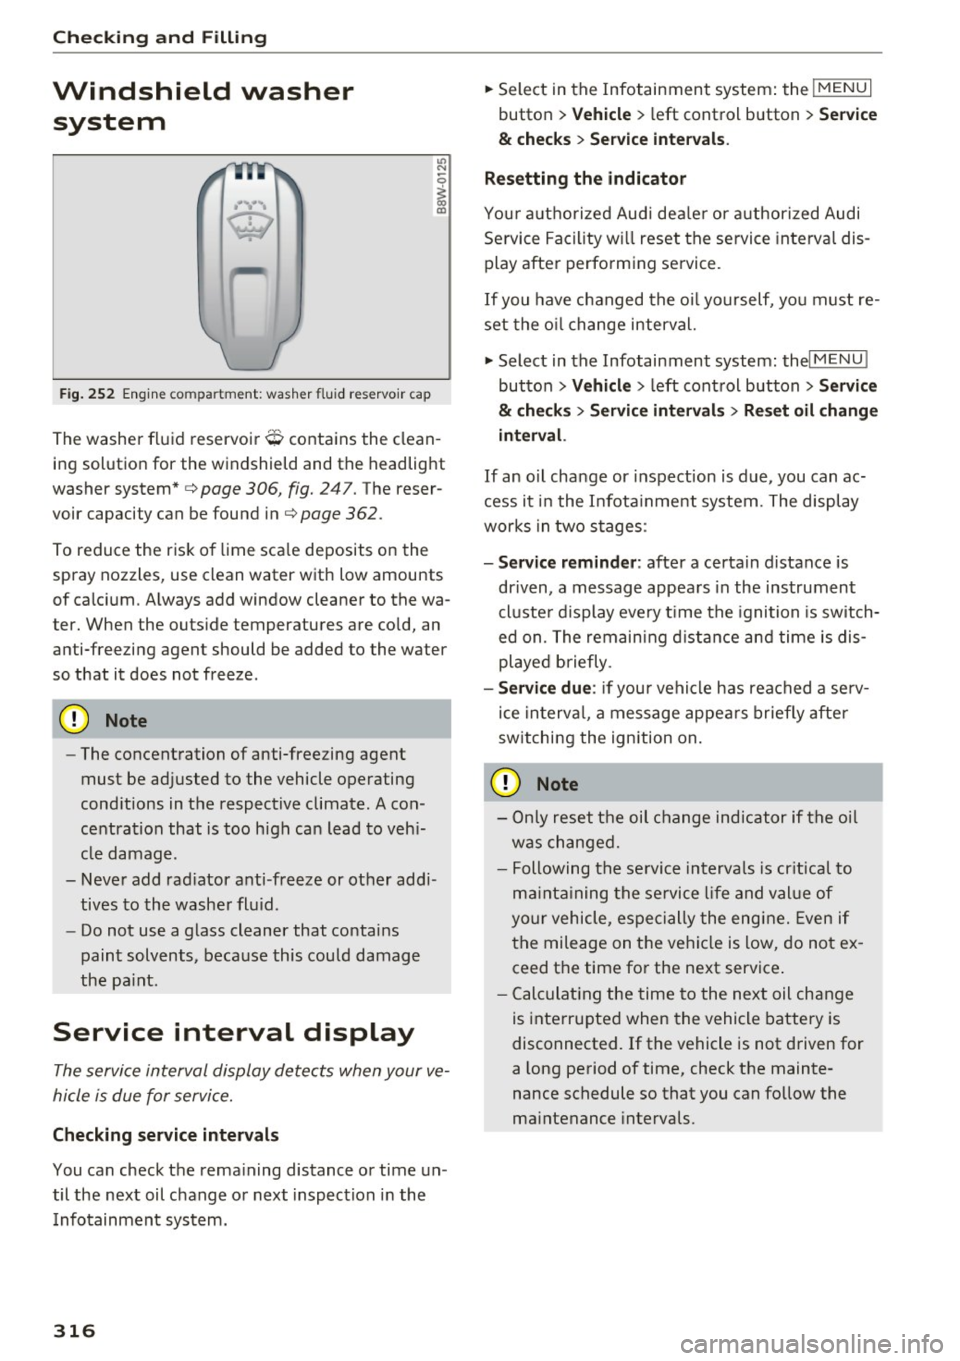
F ig. 252 Engin e comp artm ent : wash er fluid r ese rvoir cap
"' N
0
~ 00 m
The washer fluid reservoir O contains the clean
ing solution for the windshield and the headlight
washer system* c>
page 306, fig. 24 7. The reser
voir capacity can be found inc>
page 362 .
To reduce the risk of lime sca le deposits on the
spray nozzles, use clean water with low amounts
of calci um. Always add window cleaner to the wa
t er. When the outside temper atures are co ld, an
anti-free zing agent should be added to the water
so that it does not freeze .
Cl) Note
-The concentration of anti-free zing agent
must be adjusted to the vehicle operating
conditions in the respective climate. A con
centration that is too high can lead to veh i
cle damage .
- Never add rad iator anti -freeze or other addi
tives to the washer fluid .
- Do not use a glass cleaner that contains
paint solvents, beca use this could damage
the pa int.
Service interval display
The service interval display detects when your ve
hicle is due for service.
Checking se rv ice intervals
You can check the rema ining distance or time un
til the next oil change or next inspection i n the
I nfotainment system .
316
.. Select in the Infotainment system : the !MENUI
button > V ehicle > left control button > Se rvice
& che cks > Ser vice inte rvals .
Resettin g the indicator
You r authorized Audi dea le r or authorized Audi
Se rvice Facility w ill reset the se rvice interval dis
play after performing service.
If you have changed the oi l yourself, yo u must re
set the o il change interval.
.. Select in the Infotainment system: thel
M ENU !
button > Vehicle > left control button > Ser vic e
& check s > Service int erv al s > Re set oil chang e
int erva l.
If an o il cha nge or inspection is due, you can ac
cess it i n the Infota inment system. The display
works in two stages :
-Se rv ice re mind er: after a certain distance is
dr iven, a message appears in the instrument
cluste r display eve ry t ime the ignition is switch
ed on. The remaining d istance and time is dis
played briefly .
-Serv ic e due : if your vehicle has reached a se rv
ice in terva l, a message appears briefly after
sw itching the ignition on.
(D Note
- Only reset the oil change indicator if the oi l
was changed.
- Following the se rvice interva ls is cr itical to
ma inta ining the se rvice l ife and val ue of
yo ur vehicle, especially the engine. Even if
the mileage on the vehi cle is low, do not ex
ceed the time for the next service .
- Calc ulat ing the time to the next oil change
is interrupted when the vehicle battery is
disconnected.
If the vehicle is not driven for
a long period of time, check the mainte
nance schedule so that you can fo llow the
maintenance intervals .
Page 338 of 386

Wheels
A WARNING
-If the tire pressure indicator appears in the
display, reduce your speed immediately and
avoid any hard steering or braking maneu
vers. Stop as soon as possible and check the
tires and their pressure .
- The driver is responsible for maintaining the
correct tire pressure. You must check the
tire pressure regularly.
- Under certain conditions (such as a sporty
driving style, winter conditions or unpaved
roads), the tire pressure monitoring system
indicator may be delayed.
@ Tips
- The tire pressure monitoring system can al
so stop working when there is an ESC mal
function.
- Using snow chains may result in a system
malfunction.
- The Tire Pressure Monitoring System in your
Audi was calibrated with "Audi Original
Tires "~
page 324. We recommend that you
use these tires.
Storing tire pressures
If the tire pressure changes or a tire is replaced,
it must be confirmed in the Infotainment sys
tem .
.. Before storing the tire pressures, make sure the
tire pressures of all four tires meet the speci
fied values and are adapted to the load
~page 327 .
.. Switch on the ignition .
.. Select in the Infotainment system:
IMENU I but
ton
> Vehicle > Service & checks> Tire pres
sure monitor> Store tire pressure > Yes, store
now.
(D Tips
Do not store the tire pressures if snow chains
are installed .
336
Page 341 of 386
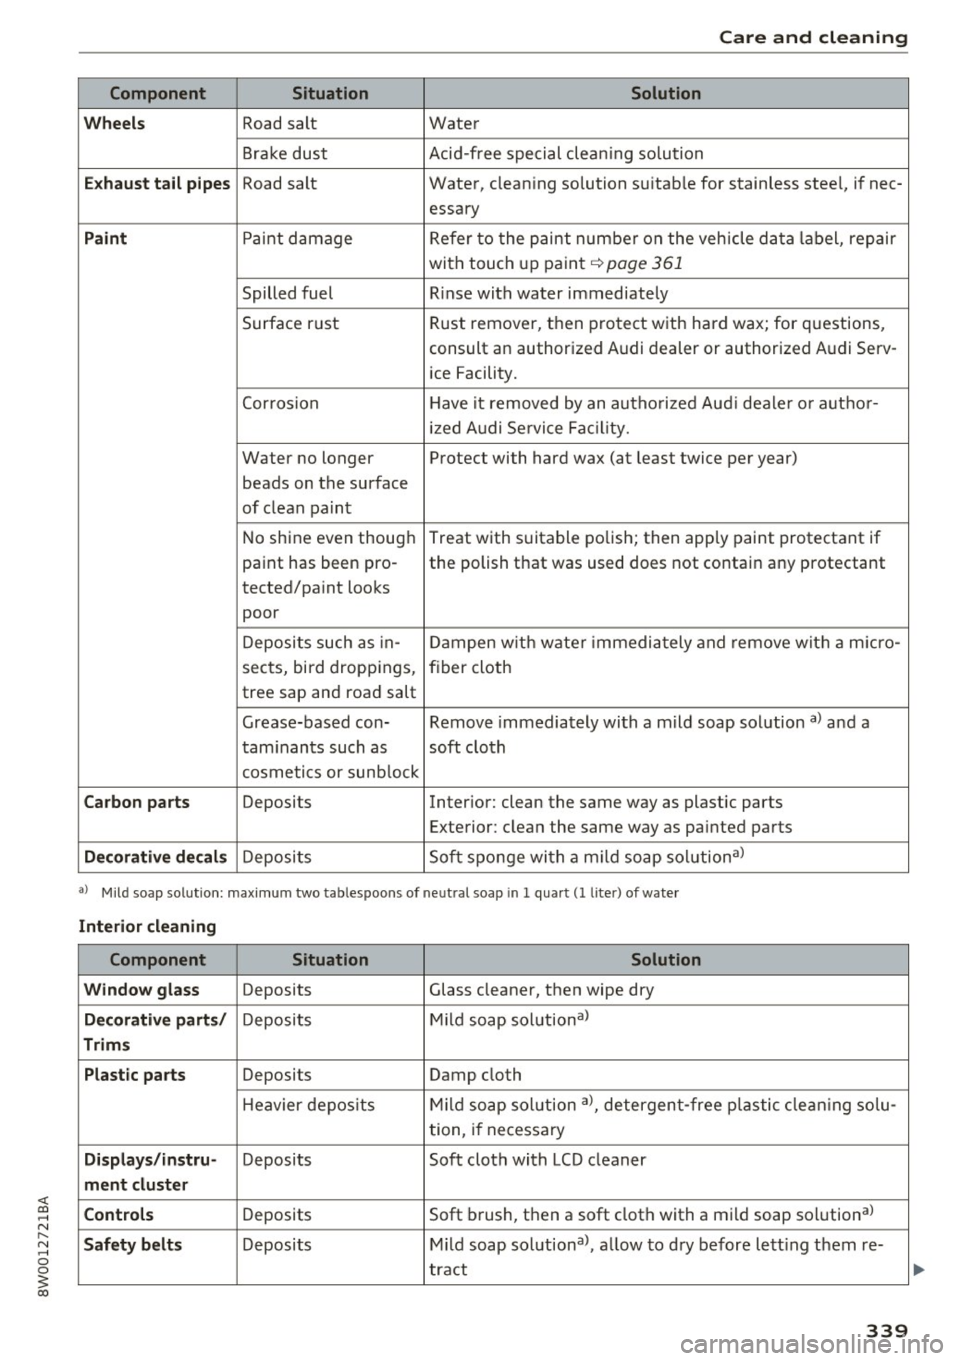
<( a, .... N ,....
N .... 0 0
3 a,
Care and cleaning
Component Situation Solution
Wheels
Road salt Water
Brake dust Acid-free special clea ning solution
Exhaust tail pipes Road salt Water, cleaning solution su itab le for stainless steel, if nee-
essary
Paint Paint damage Refer to the paint number on the vehicle data label, repair
with touch up paint
qpage 361
Spilled fuel Rinse with water immediately
Surface rust Rust remover, then protect with hard wax; for questions,
consult an authorized Audi dealer or authorized Audi Serv- ice Facility.
Cor rosion Have it removed by an autho rized Aud i dealer or author-
iz ed A udi Service Fac ility.
Water no longer Protect with hard wax (at least twice per year)
beads on the surface
of clean paint
No shine even thoug h Treat with suitable polish; then apply paint protectant if
paint has been pro- the polish that was used does not contain any protectant
tected/paint looks poor
Deposits such as in-
Dampen with wate r immedia tely and remove wit h a m icro-
sects, bi rd droppings, fiber cloth
tree sap and road salt
Grease-based con- Remove immediately with a mild soap solution
a) and a
taminants such as soft cloth
cosmetics or sunblock
Carbon parts Deposits Interior: clean the same way as plastic parts
Exterior: clean the same way as pa inted parts
Decorative decals Deposits Soft
sponge with a m ild soap solutional
a) Mild soap solut ion: max imum two tab lespoons of ne utral soap in 1 quart (1 lite r) of wate r
Interior cleaning
Component Situation Solution
Window glass
Deposits Glass cleaner, then wipe dry
Decorative parts/ Deposits Mi
ld soap solutiona>
Trims
Plastic parts
Deposits Damp cloth
H eavier deposits Mild
soap solution a>, detergent-free p lastic cleaning solu-
tion, if necessary
Displays /instru-Deposits Soft cloth with LCD cleaner
ment cluster
Controls
Deposits Soft
brush, then a soft cloth with a mild soap solutiona>
Safety belts Deposits Mild soap solutiona>, allow to dry before letting them re-
tract
339