lock AUDI A4 2017 Owner's Manual
[x] Cancel search | Manufacturer: AUDI, Model Year: 2017, Model line: A4, Model: AUDI A4 2017Pages: 386, PDF Size: 96.32 MB
Page 60 of 386
Lights and Vision
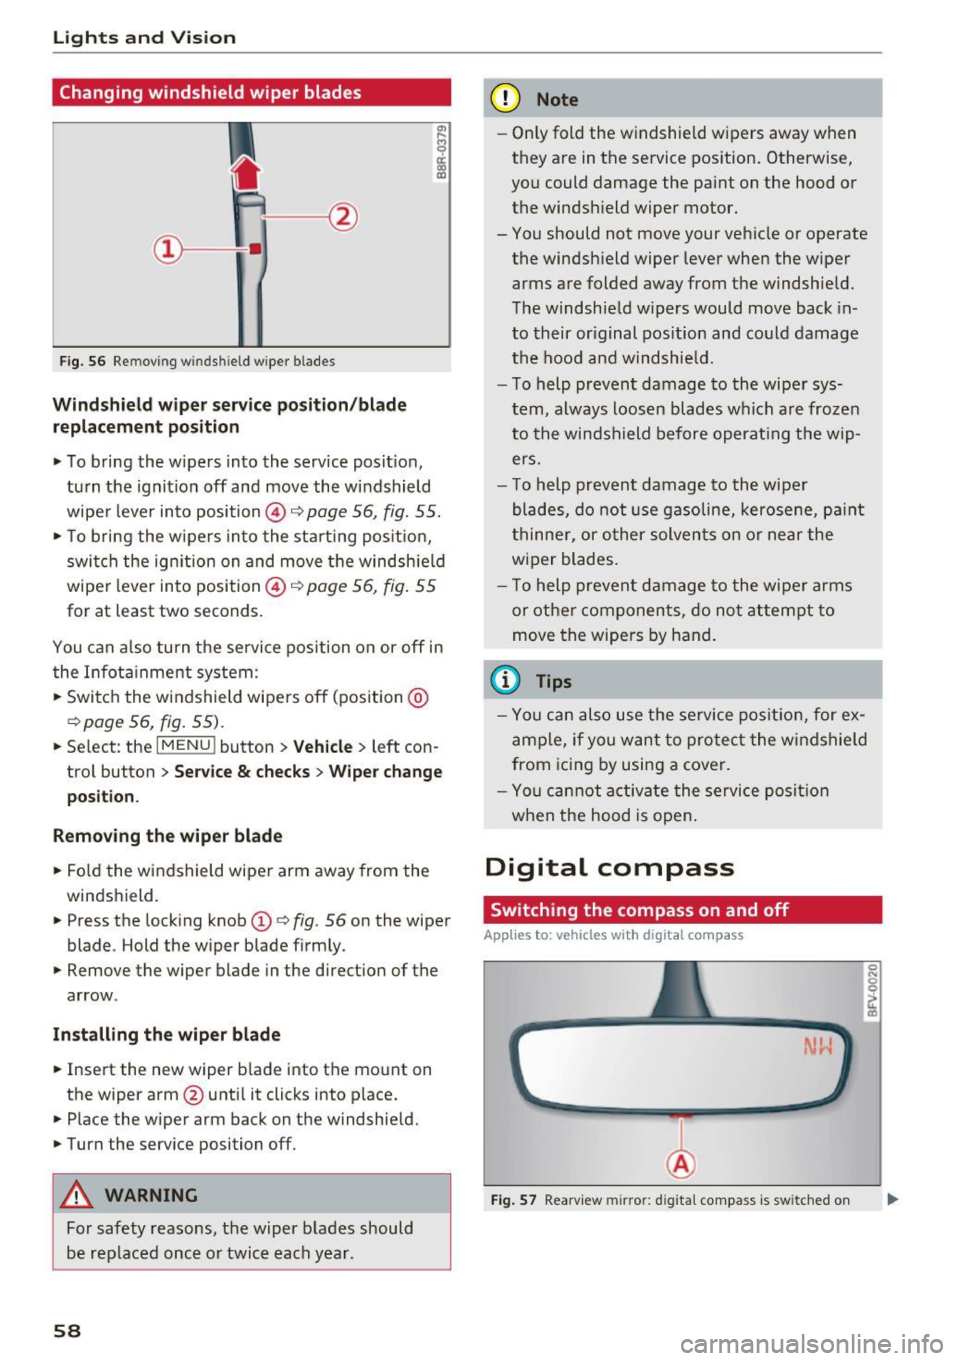
Changing windshield wiper blades
Fig. 56 Remov ing w indshi eld w iper blades
Windshield wiper service position/blade
replacement position
• To bring the wipers into the service position ,
turn the ignition off and move the windshield
wiper lever into position @~
page 56, fig. 55.
• To bring the wipers into the starting position,
switch the ignition on and move the windshield
wiper lever into position @~
page 56, fig. 55
for at least two seconds .
You can also turn the service position on or off in
the Infotainment system :
• Switch the windshield wipers off (position @
~page 56, fig. 55).
• Select : th e IMENU i button> Vehicle> left con
trol button >
Service & checks > Wiper change
position .
Removing the wiper blade
• Fold the windshield wiper arm away from the
windshield.
• Press the locking knob
(D ~ fig. 56 on the wiper
blade . Hold the wiper blade firmly.
• Remove the wiper blade in the direction of the
arrow .
Installing the wiper blade
• Insert the new wiper blade into the mount on
the wipe r arm @until it clicks into place.
• Place the wiper arm back on the windshield.
• Turn the service position off.
A WARNING
For safety reasons, the wiper blades should
be replaced once or twice each year .
58
-
(D Note
-Only fold the windshield wipers away when
they are in the service position. Otherwise,
you could damage the paint on the hood or
the windshield wiper motor.
- You should not move your vehicle or operate the windshield wiper lever when the wiper
arms are folded away from the windshield.
The windshield wipers would move back in
to their original position and could damage
the hood and windshield.
- To help prevent damage to the wiper sys
tem, always loosen blades which are frozen
to the windshield before operating the wip
ers.
- To help prevent damage to the wiper
blades, do not use gasoline, kerosene, paint
thinner, or other solvents on or near the
wiper blades.
- To help prevent damage to the wiper arms
or other components, do not attempt to
move the wipers by hand.
{l) Tips
-You can also use the service position, for ex
ample, if you want to protect the windshield
from icing by using a cover.
- You cannot activate the service position
when the hood is open.
Digital compass
Switching the compass on and off
App lies to: vehicles with digital compass
Fig. 57 Rearview mirror: d ig ital compass is sw itched on
Page 64 of 386

Seats and storage
Head restraints
Front head restraints
•
Fig. 61 Front seat : adjust ing the comfo rt head restra in t*
Adj ust the head restraints so the upper edge is as
even as possible wi th the top of your head. If that
is not possible, try to adjust as close to this posi
tion as possible.
~ To adjust the head restraint, press the side but
ton and place the head restraint in the desired
position until it locks into place
i:::.> fig. 61.
_& WARNING
Always read and fo llow the applicable warn
ings ¢
page 239, Proper adjustment of head
restraints.
Rear head restraints
Fig. 62 Rear seat: adjust ing th e hea d restra int
62
Fig. 63 Rear seat: removing the head restrai nt
If passengers are sitting in the outer rear seats,
adjus t the head restraints so that the upper edge
of the head restraint is as level as possible with
the upper part of their head.
If that is not possi
bl e, try to adjust as close to this position as pos
sible. Adjust the head restraint in the center seat
to be all the way up
c:> _& .
Adjusting the head restraints
~ To move the head restraint upward, hold it at
th e sides with both hands and slide it upward
until it clicks into place
c:> fig. 62.
~ To move the head restraint downward, press
the button -arrow-
c:> fig. 62 and slide the head
restraint downward .
Removing the head restraints
~ Move the head restraint upward as far as it can
go .
~ Press the re lease point ,:::., fig. 63 using the me
chanical key
c:> page 38, Key set and press the
button
c:> fig. 62. Pull the head restraint out of
the backrest at the same time ¢_& .
Installing the head restraints
~ Slide the posts on the head restraint down into
the guides until the posts click into place.
~ Press the button -arrow-c:> fig. 62 and slide the
head restraint all the way down. You should not
be able to remove the head restraint from the
backrest without pressing the button .
_& WARNING
-Always read and follow the applicable warn
ings
i:::.> page 239, Proper adjustment of
head restraints.
Page 65 of 386
-Only remove the head restraints from the
rear seats when it is necessary for installing
a child seat¢
page 2 77, Child safety. In
stall the head restra int aga in immediately
once the child seat is removed. D riving w ith
the head restra ints removed o r not in the
upr ight position in creases the risk of ser io us
lnJUry.
Memory function
Description
Applies to: vehicles with memory function
Using the memory funct ion, you can quickly and
eas ily store a personal seat profile for the driver
and recall the settings later. The memory func
tion is controlled by the remo te control key and
the memory bu ttons in the drive r's door.
The driver's seat profile is stored again and as
signed to t he remote contro l key each time the
ve hicle is locked . Whe n you open the door, the
seat profi le is automat ically reca lled. If two peo
p le use t he vehi cle, it i s recomme nded that each
person always uses "their own" remote cont ro l
key.
Up to 2 seat prof iles can be stored in the memory
bu tto ns in the dr iver's door. O nce they are sto r
ed, these sea t profiles can be sele cted at any
time .
The fo llow ing settings are stored :
Remote con-Memory but-
trot key ton
Driver Dr iver
Seat X X
Both exterior
X X mirrors*
Remote control key
Applies to: vehicles with memory function
The driver's sea t profile can be assigned to the
remo te control key when the vehicle is locked .
.. Se lect in the Infotainment system: !MENUI b ut
ton
> Vehicle > left contro l bu tto n > Vehicle
Seats and storag e
setting s > Seats > Driver 's seat > Store set
ting s on remo te control key.
(D Tips
If you do not wish to have t he seat profi le for
another drive r assigned to the remote cont rol
key, switch the memory fu nction off in t he In
fotainment system.
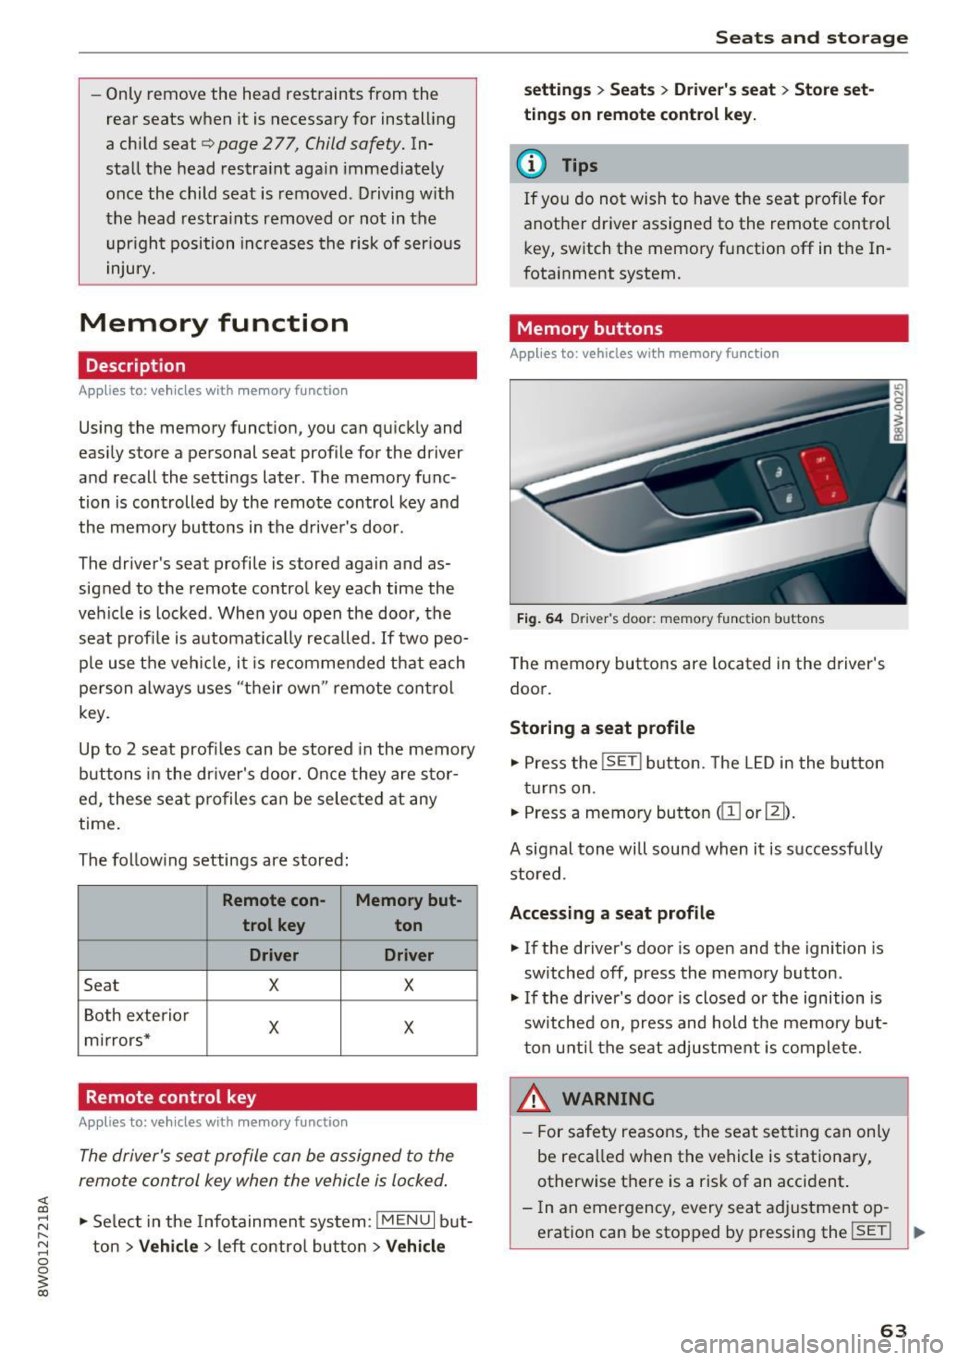
Memory buttons
Applies to: vehicles with memo ry function
Fig. 64 Drive r's door : memory function buttons
The memory butto ns are located in the driver's
doo r.
Storing a seat profile
.. Press the !SET I button. The LED in the button
t ur ns on .
.. Press a memory bu tton
dil or~).
A signal tone will sound when it is s uccessfu lly
stored.
Accessing a seat profile
.. If the driver's door is open and the ignition is
sw itched off, press the memory button .
.. If the driver's door is closed or the ignition is
sw itched on, press and hold the memory but
t on u nti l the seat adjustment is com plete.
,&_ WARNING
- F or s afety reasons, the seat se tting can on ly
be reca lled when the vehicle is stationa ry,
otherwise t here is a risk of an accident.
- In an emergency, every sea t ad justment op
eration can be stopped by pressing the
!SET ! ..,.
63
Page 67 of 386

- Glove compartment: the glove compartment can be locked using the mechanical key
¢ page 38, Key set.
-In the door trim panels
- Storage compartment under the front center
armrest
- Storage compartment* in the rear center arm-
rest
- Storage compartment* under the light switch
- Garment hooks above the rear doors
- Nets* on the backrests of the front seats
- Nets* on the left/right luggage compartment
trim panel
A WARNING
-Always leave the lid on the glove compart
ment cover closed while driving to reduce
the risk of injury.
- Make sure that the view to the rear is not
obstructed by hanging garments.
- Hang only lightweight cloth ing and be sure
that there are no heavy or sharp-edged ob
jects in the pockets.
- Do not use clothes hangers to hang gar
ments, because this could reduce the effec
tiveness of the side curtain airbags*.
- Only use the storage compartments in the
door trim panels to store small objects that
will not stick out of the compartment and
impair the range of the side airbags.
Luggage compartment
General information
A WARNING
Read and follow the important safety precau
tions in ¢
page 242, Storing cargo correctly.
-
Seats and storage
Increasing the size of the luggage
compartment
Applies to : vehicles wit h folding backrests
The rear seat backrests can be folded forward ei
ther separately" or together.
Fig. 68 Backrest: release lever, securing knob an d lock*
Fig. 69 Backrest: fold ing in the center backrest
Folding the outer rear backrests forward and
backward
.,. Pull the release lever @in the direction of the
arrow and fold the backrest forward .
.,. Fold the backrest back up again until it latches
and the red marking @ is no longer visible
¢&, .
Folding the center rear backrest forward and
backward
.,. Pull on the upper release lever© and fold the
backrest forward@¢
fig. 69 .
.,. Fold the backrest backward until it locks into
place.
The engaged backrest can be locked © using the
mechanical key¢
page 39. This would block ac
cess into the luggage compartment from the ve
hicle interior. You can only enlarge the luggage
compartment if the backrest is not locked. .,..
65
Page 68 of 386
Sea ts and stor age
_&. WARNING
- The backrest must be securely latched to
ensure th e safety belt is protect ing the rear
seat positions .
- The backrest must be latched secu re ly so
objects cannot slide forward out of the lug
gag e compartment dur ing sudden braki ng .
(D Note
- Make sure the seat belt is not pinched or
damaged when folding the backrest .
- If you move the front seat back when the
rear seat backrest is folded forward, you
could damage the head restraints on the
rear seat .
- To reduce the risk of damage, move the rear
head restra ints down before folding the
rear backrests forward
c:, page 62 .
-If the Rear Seat Entertainment (RSE) * is in
stalled, move the rear head restraints down
before folding the seat backrests forward
c:> page 62 to reduce the risk of damage .
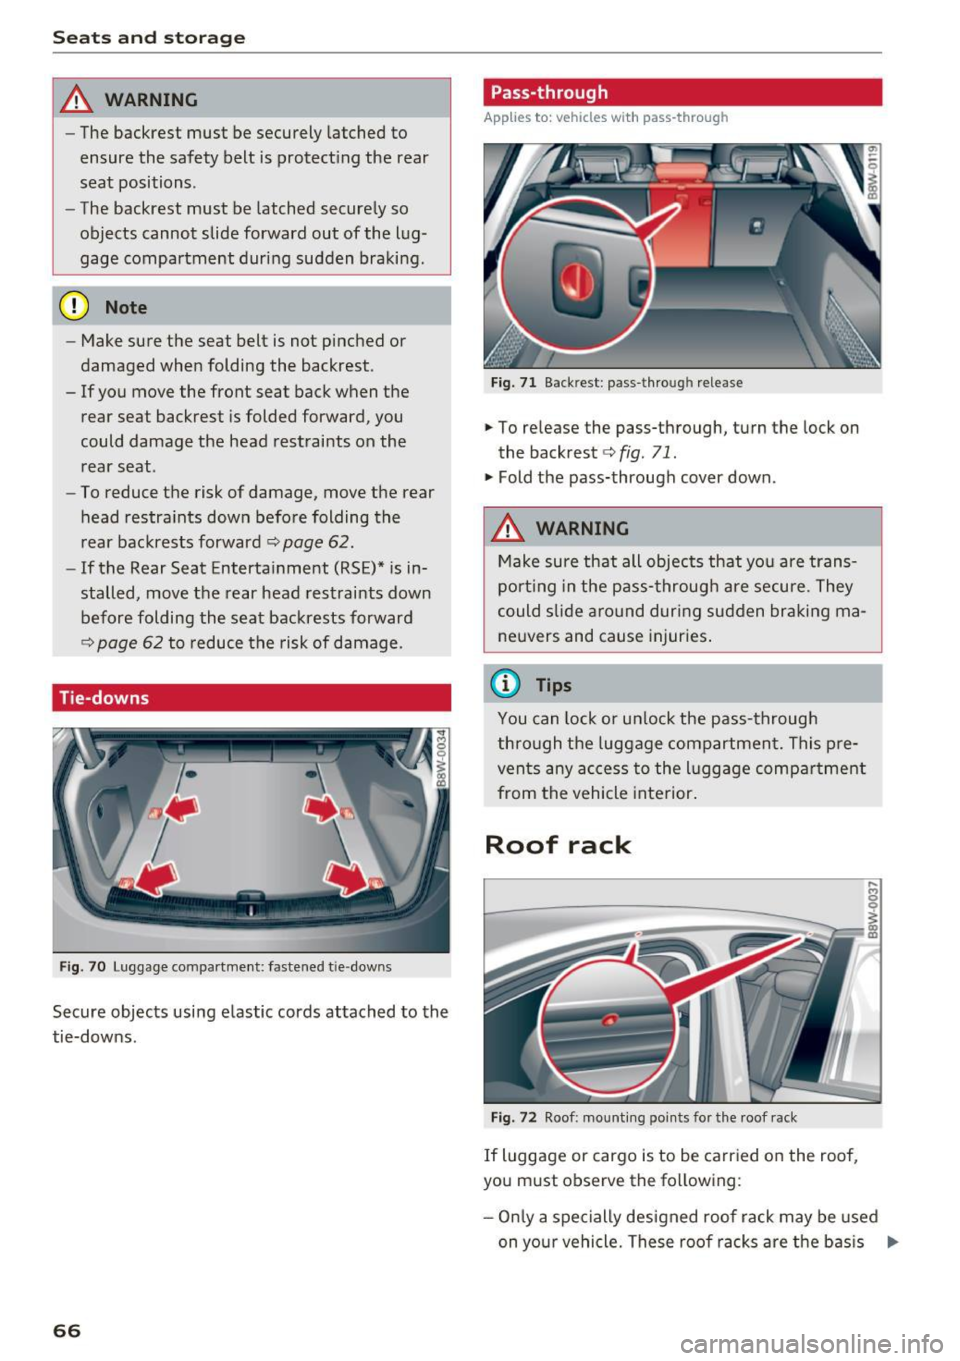
Tie-downs
Fig . 70 Luggage co mpartme nt: fa stene d tie -dow ns
Secure objects using elastic cords attached to the
tie-downs .
66
Pass-through
Applies to: vehicles with pass -through
Fig. 71 Backr est : p ass-thro ugh release
.,. To release the pass-through, turn the lock on
the backrest
c:> fig . 71.
.,. Fold the pass-through cover down .
_&. WARNING
Make sure th at all objects that yo u are trans
por ting in the pass- through are secure. They
could s lide around dur ing su dden br aking ma
ne uvers and cause injuries .
(D Tips
You can lock or un lock the pass-through
thro ugh the luggage comp artmen t. This p re
ven ts any ac cess to the l uggage compa rtment
from the vehicle interior .
Roof rack
Fig . 72 Roof : mo untin g poin ts fo r the roof rack
If luggage or cargo is to be carr ied on the roof,
you must observe the fo llowing :
- Onl y a spe cially designed roof rack may be used
on yo ur vehicle. These roo f racks are the bas is
Iii>
Page 71 of 386
Warm and cold
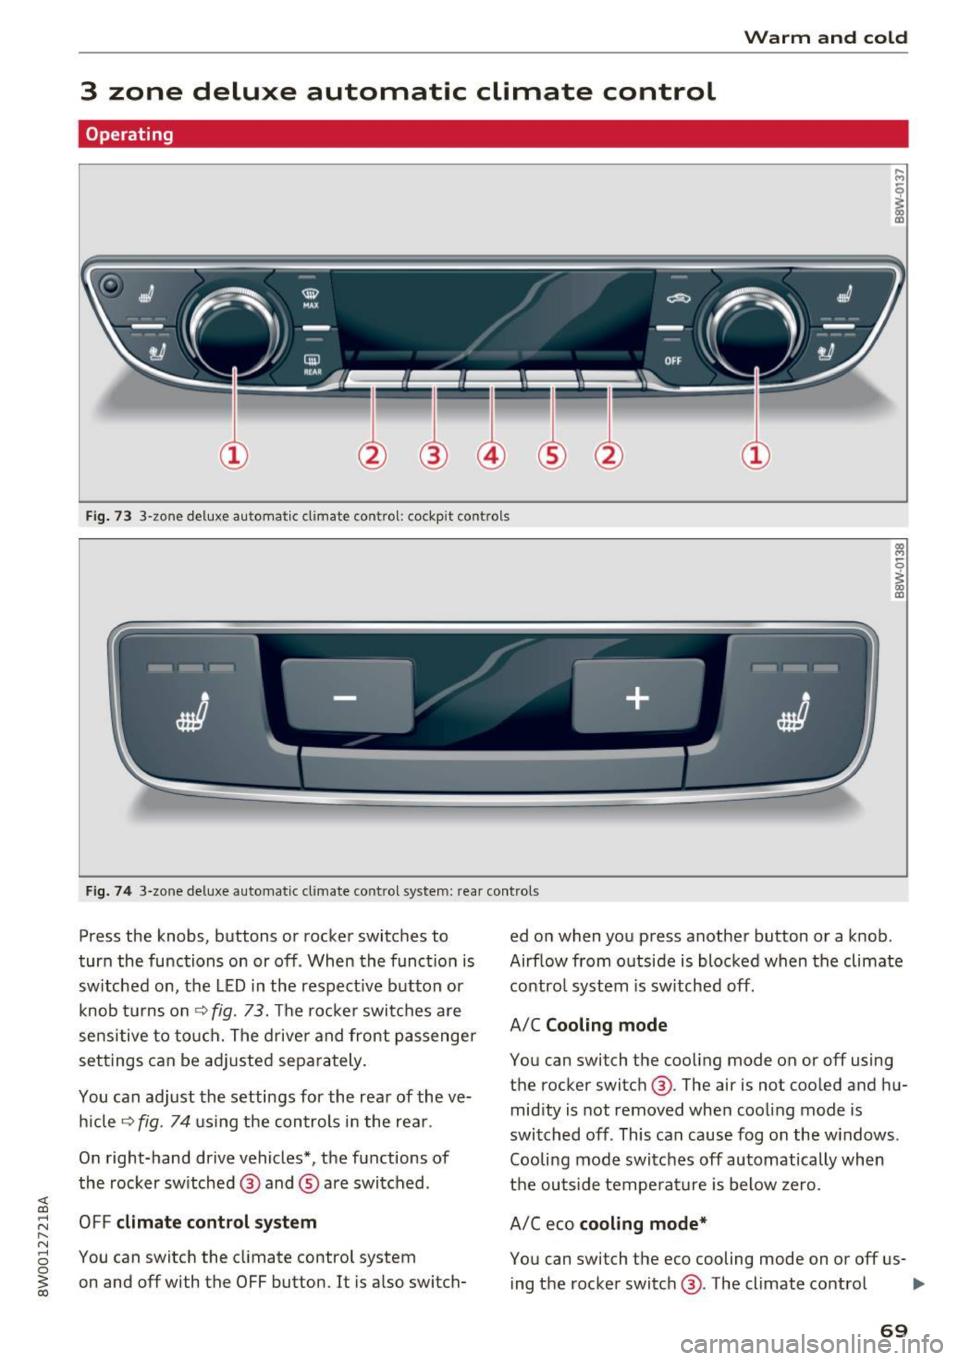
3 zone deluxe automatic climate control
Operating
.... M
~ a,
Fig. 73 3-zone de lu xe automat ic cl imate contro l; cockpit controls
Fig. 74 3-zone de luxe automatic cl imate contro l system: rear controls
Press the knobs, buttons or rocker switches to
turn the functions on or off . When the funct ion is
sw itched on, the LED in the respect ive button or
knob t urns on ¢
fig. 73. The rocker switches are
sensitive to touch. The driver and front passenger
settings can be adjusted separately.
You can adjust the settings for the rear of the ve
hi cle
~ fig . 74 using the controls in the rear .
On right-hand drive vehicles*, the functions of
the rocker switched ® and ® are switched .
OFF
climate control system
You can switch the climate control system
on and off with the OFF button.
It is also switch- ed on when you press another button or a knob
.
Airflow from outside is blocked when the climate
contro l system is sw itched off .
A/C
Cooling mode
You can switch the cooling mode on or off using
the rocker switch ®· The air is not cooled and hu
midity is not removed when cooling mode is
switched off. This can cause fog on the w indows .
Cooling mode switches off automatically when
the outside temperature is below zero.
A/Ceco
cooling mode*
You can switch the eco cooling mode on or off us-
ing the rocker switch ®· The climate control ..,.
69
Page 77 of 386

(D Note
-Have your vehicle maintained properly and
in accordance with the service recommenda
tions in your Warranty
& Maintenance book
let. lack of proper maintenance as well as
improper use of the vehicle will impair the
function of the emission control system and
could lead to damage .
- Do not alter or
remove any component of
the Emission Control System unless ap proved by the manufacturer.
- Do not alter or
remove any device, such as
heat shields, switches, ignition wires,
valves, which are designed to protect your
vehicle's Emission Control System and other important vehicle components.
{t) Tips
The consumption estimates as published by
ENVIRONMENTAL PROTECTION AGENCY
(EPA) and Transport Canada may not corre
spond to your actual consumption on the
road, which will vary depending upon vehicle
load and speed, road and weather conditions,
trip length, etc.
Steering
Adjusting the steering wheel position
The steering wheel position is adjustable up and
down and forward and back .
Fig. 76 Lever on the steeri ng col umn
.. Pull the lever in the direction of the arrow
¢,&. .
"'Bring the steering wheel into the desired posi
tion.
Driving
.. Push the lever against the steering column un
til it is secure.
A WARNING
Incorrect use of the steering wheel adjust ment and an incorrect seating position can
cause serious injuries.
-
- Only adjust the steering column when the
vehicle is stationary so that you do not lose
control of the vehicle.
- Adjust the driver's seat or steering wheel so
that there is at least a 10 in (25 cm) dis
tance between your chest and the steering
wheel. If you do not maintain this distance
I
you will not be properly protected by the air
bag system.
- If your physical characteristics prevent you
from sitting at least 10 in (25 cm) or more
away from the steering wheel, see if your
authorized Audi dealer or authorized Audi
Service Facility can provide adapters that
will help.
- If your face is level with the steering wheel,
the airbag does not provide as much protec
tion during a collision. Always make sure that the steering wheel is level with your
chest.
- Always hold the steering wheel with your
hands in the 9 o'clock and 3 o'clock posi
tions to reduce the risk of injury if the airbag
deploys.
- Never hold the steering wheel in the 12
o'clock position or with both hands on the
rim or the center of the steering wheel.
Holding the steering wheel incorrectly sig
nificantly increases the risk of injury to the
hands, arms and head if the airbag deploys.
75
Page 79 of 386

<( a, .... N ,....
N .... 0 0
3 a,
briefly or press and hold for longer than two sec
onds.
A WARNING
- Never t urn off the engine before the veh icle
has come to a comp lete stop.
- Please note that the brake booster and pow
er steering on ly work when the engine is
running. When the engine off, you must use
more force to steer or b rake the ve hicle. Be
cause the usual steering and brak ing capa
b ili ty is not ava ila ble, the risk of accid ents o r
injuries i ncre ases .
- For safety reasons, always park the vehicle
with the se lector lever in the P position .
Ot herwise, the re is the r is k t hat the vehicle
c o ul d roll uninten tion ally.
- After the engine h as bee n sw itched off, the
r adi ator fan c an con tinue to run for up to
1 0
m inu tes -even wi th the ig nition switche d
o ff . I t can a lso switch on again after some
t ime if the coolant temperature rises as the
result of heat buildup or if t he engine is a l
ready warm and the engine compartment is
also heated by the sun's rays.
(D Note
I f the en gine has been under heavy load for
an e xtended per io d of t ime, heat builds up in
the engine compartment after the engine is
sw itched off and there is a risk of damagi ng
the engine . For this reason, let the eng ine run
at idle fo r approximately two minu tes before
shut ting it off .
Messages
Engine running. Warning! Turn off ignition be
fore leaving car
This message appea rs and a warn ing tone sounds
i f you open t he d river's doo r when the engi ne is
ru nning.
Please press brake pedal
This message appea rs if you do not press the
brake pedal when starting the eng ine.
D riving
Ill Remote control key: key not recognized. Is
the key still in the vehicle?
T h is ind icator l igh t tu rns on and this message ap
pears if the ignition key was remove d from the
vehicle when the engi ne was running . If the ig ni
tion key is no lo nger in the vehicle, you cannot
switch on the ignition or start the engine once
you stop it . You also cannot lock the ve hicle from
the outside .
Shift to P, otherwise vehicle can roll away.
Doors can be locked in P only
T h is mess age appears for safety re asons if the
selector lever is in the N pos it ion when yo u
switch the ignition off. Move the se lector lever to
t h e P position . Othe rw ise the vehicle is not pro
tected from roll ing and it cannot be locked.
II Remote control key: hold back of key
against the de signated area. See owner' s man
ual
If t he indica to r ligh t turns on and this message
appea rs, there is a malfunction ~
page 78.
Shift to P before leaving car, otherwise vehicle
can roll away
Th is message appears if the drive r's door is
opened wh ile the ign ition is switched on an d the
t ran sm issio n has not been s hifte d to t he
P posi
t ion. Shift t he tr ansmission in to the
P p o sition
and t urn o ff the igni tion if you are leaving the ve
hicle . Otherwise the vehicle could roll. A lso refe r
to
~ page 80.
77
Page 82 of 386
Driving
Engine automatically r esta rt s
The standard Start/Stop mode will be canceled
during a stop phase in the follow ing situations.
The engine restarts without any action by the driver .
- The vehicle rolls, for examp le while on a slope.
- The inter io r temperatu re differs from the tem-
perature se lected in the A/C system.
- The w indshield is being defrosted.
- The brake pedal is pressed several t imes in a
row .
- The battery charge level becomes too low .
- Power consumption is high .
The engine can turn off again when the condi
tions for Start/Stop mode are met .
Ignition is swit ched off aut omaticall y
To prevent the battery from dra ining, the ignition
will sw itch off
aut omati cally under the following
conditions:
- T he Sta rt/Stop system has stopped the engine.
- The vehicle must be stationary .
- You left the veh icle and the engine was not re-
started within approximately 30 seconds.
If this happens, you will see the message
I gni
tion turn s off automatically in the instrument
cluster and the activated low beams are replaced
by the parking light. The parking lights will
sw itch off after approximately 30 minutes or
when you lock the vehicle .
The ignition also switches off when you lock the
veh icle from the outs ide dur ing a stop phase.
If the Start/Stop system has not turned off the
engine or if you have sw itched the Start/Stop sys
tem off manually, the ignition will not be auto
mat ically switched off and the engine w ill cont in
ue to run~& .
.&, WARNING
To red uce the risk of poisoning, neve r allow
t he engine to r un in confined spaces.
80
-
@ Tips
-If you leave the ve hicle with the D/S or R se
lector lever position engaged, the parking
brake is automatically set.
- If you select the D or N selector lever posi
tion after shifting into reverse, the vehicle must be driven faster than 6 mph (10 km/h)
in order for the engine to switch off again.
Manually switching the Start/Stop system
off/on
App lies to: vehicles wit h Start -Stop system
If you do not wish to use the system, you can
switch it off manually.
- -
. !.. r' '!. .:-,/'"~ ~
tJ .,. -,J
-----::::I
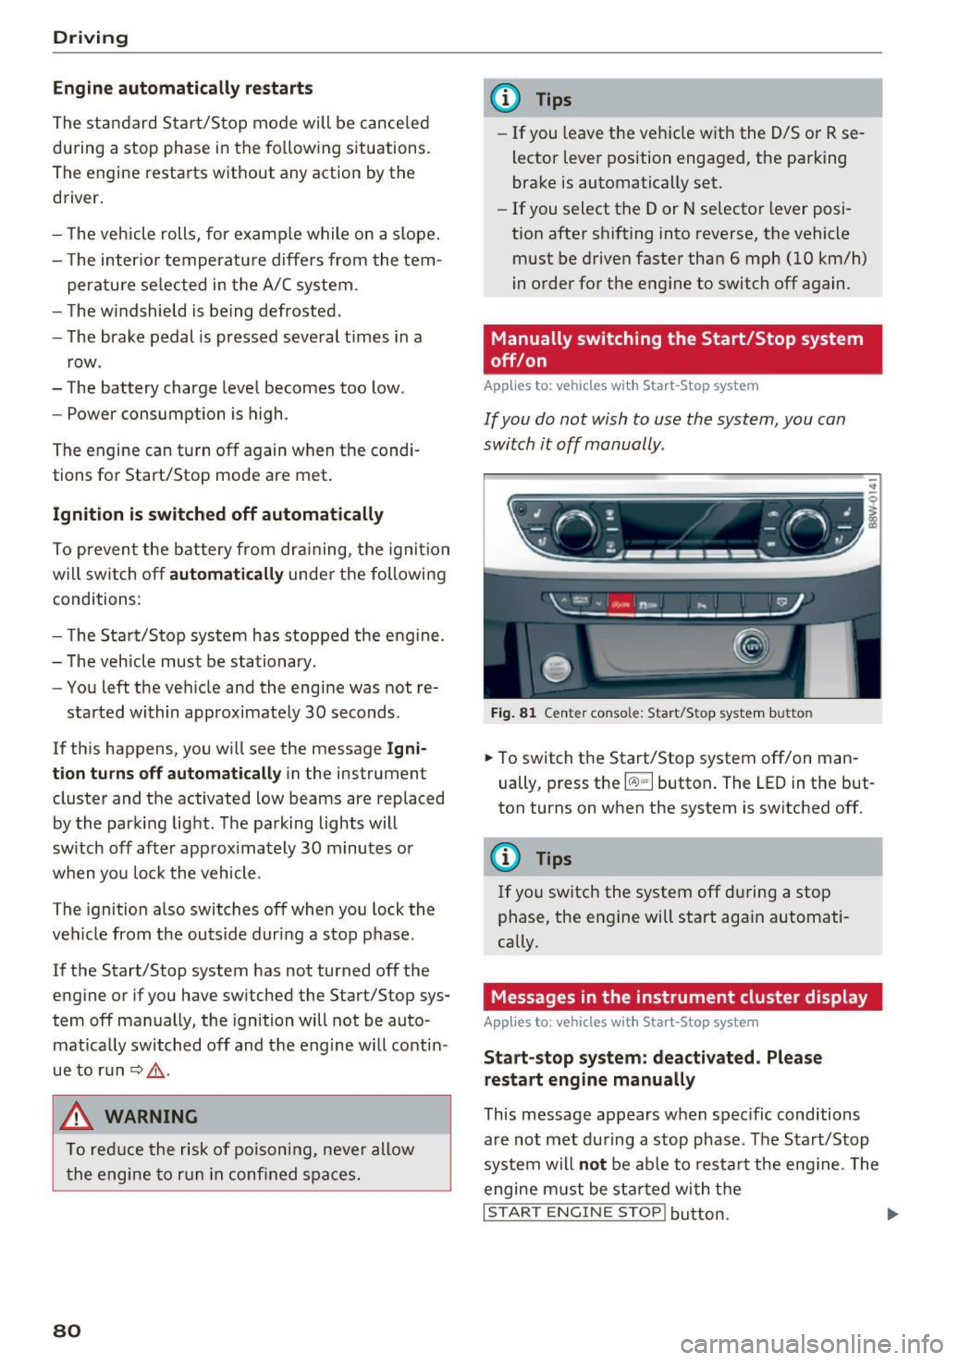
F ig . 81 Cen te r conso le: S tart/Stop system butto n
..
.,. To switch the Start/Stop system off/on man
ually, press the
l (A) "'I button . The LED in the but
ton turns on when the system is switched off.
(l} Tips
If you switch the system off during a stop
phase, the engine will start again automati
cally.
Messages in the instrument cluster display
App lies to: vehicles wit h Start-Stop system
St art- stop system: de activated . Please
restart engin e manually
This message appears when spec ific conditions
a re not met during a stop phase . The S tart/Stop
system will
not be ab le to res tart the eng ine . The
engine m ust be sta rted with t he
I STAR T ENGINE STOP! button. ....
Page 84 of 386

Driving
A WARNING
-Always switch th e ignit ion off and take the
vehicle key with you when leav ing the veh i
cle, eve n for a short per iod of t ime . This ap
plies particularly when chi ld ren remain in
the ve hicle. Othe rwi se, children coul d sta rt
the engine, re le ase the p arki ng bra ke o r op
er ate ele ctrica l equipmen t such as power
windows, which increases the risk of an acci
dent.
- When the vehicle is loc ke d , no one -particu
larly not children -sho uld rema in in the ve
hicle . Locked doors make it more difficult
f or eme rgency workers to get into the vehi
cle, which p uts lives at risk.
Starting from a stop
The hold assist function ensures that the parking
brake releases automatically when the vehicle
starts moving .
Stopping and setting the parking brake
" Pull th@(®) switch to s@t th @ parking bra k@ .
Starting and automat ically releasing the
parking brake
" When you pr ess t he accelerator pedal, the
par king b rake is autom atically released and
yo ur vehicle begins to move.
T he parki ng b rake c an be set if you must s top the
ve hicl e at a stop lig ht or in t raff ic. Th e ve hicle
does not have to be he ld with the brake pedal.
The parking brake e liminates the tendency to
creep when a selector lever position is engaged .
The par king b rake releases automatica lly and the
ve hicle beg ins to move as soon as you press the
accelerator pedal as usual.
Starting on hills
When starting on hills, hill start assist prevents
the vehicle from un intent iona lly rolling back. The
braking force of the parking brake does not re
lease until the wheels bu ild up enoug h driving
force.
82
(D Tips
Fo r safety reasons, the par king brake only re
l eases automatically when the drive r's door is
closed.
Starting to drive with a trailer
To prevent rolling back unintentionally on a hill,
do the following:
.. Keep the(®} switch pulled and press the acce l
erator pedal. The parking brake remains set
and prevents the ve hicle from roll ing backwar d.
.. You can release the<®> switch once you a re sure
that you are giv ing enough driv ing force to the
wheels by pressing the accelerator pedal.
Depend ing on the weight of t he rig (vehicle and
trailer) and the steepness of the incline, you may
r oll backward as you start.
Emergency braking function
In the event that the standard brake system fails
or locks up.
.. To brake your veh icle in an eme rgency, pull the
<® > switch and ho ld it pulled.
.. As soon as you re lease the <®> switch or acceler-
ate, the braking stops.
P ulli ng and ho ld ing the C®l switch wh ile driving
the ve hicle activates the eme rgency brak ing func
tion. The ve hicle brakes at all four wheels by acti
vat ing the braking hydraulics . T he braking effect
i s sim ila r to mak ing a n emergency stop .
Q &
To reduce the risk of act ivat ing the emergency
braking by m istake, an audib le warning tone
(buzzer) sounds w hen the C®l switch is pulled.
Emergency b raking s tops as soon as th e<®>
switch is re leas ed or the ac celerator p eda l is
presse d.
A WARNING
Eme rgen cy braking sho uld only be used i n an
emergency, when the normal brake pedal has
failed or the brake peda l is obst ructed. Using
the park ing bra ke for emergency b raking w ill
~