remote control AUDI A4 AVANT 2008 Owner's Manual
[x] Cancel search | Manufacturer: AUDI, Model Year: 2008, Model line: A4 AVANT, Model: AUDI A4 AVANT 2008Pages: 368, PDF Size: 46.19 MB
Page 162 of 368
___ H_ o_m_ e_ L_ in_ k_® ____________________________________________________ _
time interval is not sufficient for the Homelink® system to learn the
radio frequency signal, perform the
alternate step 8 in Phase 2:
programming the bumper mounted transmitter:
Alternate step 8
• Press and re-press ("cycle") the activation button on your remote
control every two seconds.
Once programming is successfully completed, the emergency
flashers will flash
three times (after about 15-60 seconds). You can
now release the button on the remote control.•
Applies to vehi cles: w ith Hom eLink ® un iversal r adio frequency re mo te con tro l
Oper ating the Homelink ® universal remote
control
The Homelink® Universal Remote Control activates the
functions of your garage door opener in precisely the
same manner as the original handheld remote control
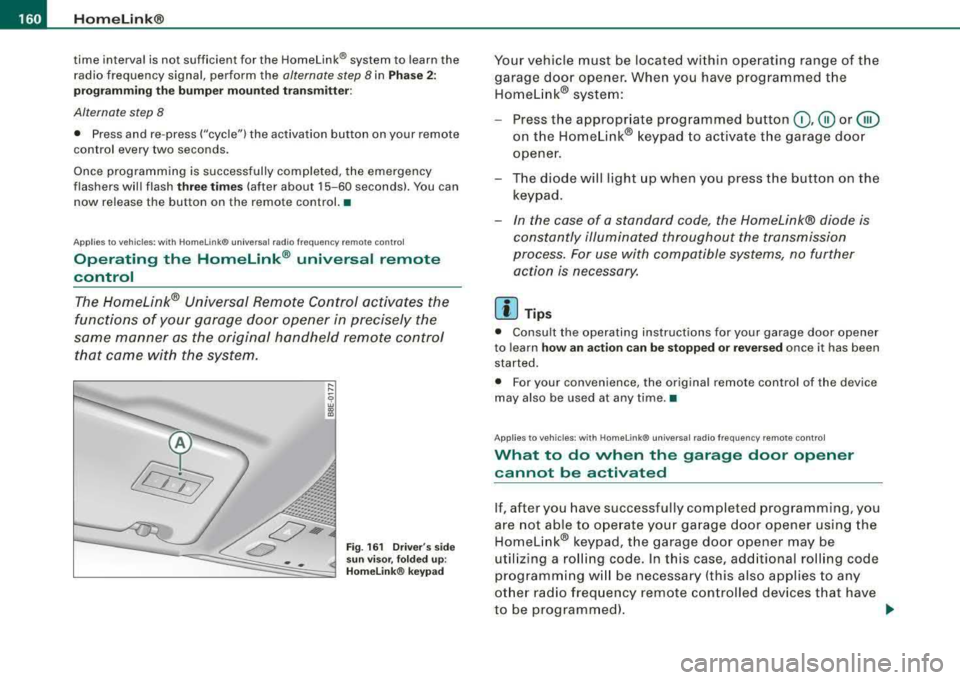
that came with the system.
... ...
9 w a,
"'
Fig. 161 Driver 's side
sun visor, folded up :
Homelink® keypad
Your vehicle must be located within operating range of the
garage door opener. When you have programmed the Homelink® system:
- Press the appropriate programmed button
0,@ or @
on the Homelink® keypad to activate the garage door
opener.
- The diode will light up when you press the button on the
keypad.
- In the case of a standard code, the Homelink® diode is
constantly illuminated throughout the transmission
process. For use with compatible systems, no further action is necessary.
[ i ] Tips
• Consult the operating instructions for your garage door opener
to learn
how an action can be stopped or reversed once it has been
started.
• For your convenience, the original remote control of the device
may also be used at any time. •
Applies to vehicles : wi th HomeLink® universal radio frequency remote cont ro l
What to do when the garage door op ener
cannot b e activat ed
If, after you have successfully completed programming, you
are not able to operate your garage door opener using the
Homelink® keypad, the garage door opener may be
utilizing a rolling code. In this case, additional rolling code
programming will be necessary (this also applies to any
other radio frequency remote controlled devices that have
to be programmed).
~
Page 163 of 368
_________________________________________________ H_ o_m _ e_L _i_n _k _® __ ftllll
Identifying a rolling code:
-Press the button for the programmed transmitter
channel again and hold it down.
- If the light emitting
diode @=> page 160 , fig. 161 first
flashes quickly and then remains lit after 2 seconds, the
garage door opener is using a rolling code.
•
A pplies to vehicle s: w it h H omelin k® u niv ers al radio fr equ enc y remot e con tro l
Rolling code programming
A rolling code is programmed in two phases: at the
garage door opener motor and inside the vehicle at the
overhead keypad.
Phase 1:
programming the garage door opener motor
1. Make sure that your vehicle is located within operat ing
range of the remote controlled garage door opener.
2. Locate the set button (teach button) on the garage door
opener motor (refer to the operating instructions for the
garage door opener).
3. Press the set button (teach button) on the garage door
opener motor.
Phase 2: programming the overhead keypad
4. Set the parking brake.
5. Turn the ignition on. Do not start the engine!
6. On the overhead keypad press the button for the previ
ously programmed transmitter channel.
7. Press this button a
second time in order to finish the
rolling code programming.
Controls and equip
ment The vehicle should be
located no further than 15 ft (5 m) from the
remote controlled garage door opener to remain within the average
signal range o f mos t remote con trolled systems.
Refer to the garage door opener operating instructions to locate the
set button (t each button) on the garage door opener motor .
After the keypad has been programmed, the g arage door opener
should recognize the radio frequency s ignal from the Homelink ®
Universal Remote Control and respond to signals from it.
[ i] Tips
Having a second person assist you makes programming of the
rolling code easier and faster . For some makes of garage door
op eners t he Homelink ® button may have to b e press ed a third time
to complete the teaching sequence. •
Applies to vehic le s: w it h Hom elink® univ ers al ra dio fr eque ncy remote c ontro l
Erasing the programming of the Homelink ®
universal remote control
When you erase the programming, the programming on
all three of the transmitter channels with be lost!
1. Set the parking brake.
2. Turn the ignition on. Do not start the engine!
3. Hold down both outside buttons
Ci) and @=> page 160,
fig. 161 simultaneously, until the diode begins to flash
(after about 20 seconds).
4. Release both buttons immediately. The programming on
all three transmitter channels is now erased.
.,_
Page 164 of 368
-~_H
_ o_ m
_ e
_ L_i _
n _k _® ____________________________________________________ _
The Homelink® system is now in the programming mode and is
ready to learn the codes for devices that are remote controlled by
radio frequency.
[ i] Tips
• Programmed buttons cannot be erased individually .
• For security reasons you are advised to erase the programming
of the Homelink® Universal radio frequency remote control system
before you sell your vehicle. •
Applies to vehic les: with Home link® universal radio frequency remote contro l
Homelink® universal transmitter,
reprogramming a single channel
A HomeLink® button can be reprogrammed individually without affecting the other button allocations.
Proceed as outlined in=> page 158, "Programming the Homelink®
Universal Remote Control" if you wish to program a different radio
frequency remote controlled device on a transmitter channel that is
already being used.
This procedure will cause the existing programming on these trans
mitter channels to be erased! •
Applies to vehic les: w ith Ho me link® universal radio frequency remote contro l
Accessories
Accessories for the Homelink® Universal Transmitter are available
from various sources.
If you would like more information on Homelink®, where to
purchase the Homelink® compatib le products, or would like to
purchase the Homelink® Home Lighting Package, please call toll
free : 1-800-355-3515
•
App lies to vehic les: with Homelin k® un iversal radio frequency remo te contro l
General notes
0 Note
The transmitter has been tested and complies with FCC and
DOC/MDC rules. Changes or modifications not expressly approved
by the party responsible for compliance could void the user's
authority to operate the device (DOC: ISTC 1763 102 264 Prince
MODEUFCC ID : CB2 V94800).
[ i] Tips
• The Homelink® Universal Transmitter complies with FCC rules
part 15. Operation is subject to the following conditions:
- this device may not cause any harmful interference, and
- this device must accept any interference that may be received
including interference that may cause undesired operation.•
Page 358 of 368
___ A_l-=- p _h_ a_ b_e _t_ic _ a_l _in _ d_e _x ____________________________________________ _
Starting .. .. .. ...... .... .... 135, 136
Starting with jumper cables ... .... 330
Stopping . .... .... .... ... .... ... 137
Engine compartment ... .. .... .... ... 274
Safety instructions . . . . . . . . . . . . . . . 273
Working the engine compartment .. 273
Engine coolant system . ...... ...... . 280
Adding coolant .. ...... .......... 282
Checking coo lant leve l .. .. .... .... 281
Checking the engine coo lant leve l .. 281
Radiator fan . . . . . . . . . . . . . . . . . . . . . 283
Engine coolant temperature Gauge ...... ...... .... ........... 13
Engine cooling system Ma lfunction .. .... ..... .. .... .... . 31
Engine data ...... .... .... .......... 343
Engine hood Closing . ...... ..... .. .... ...... . 273
How to release the hood . . . . . . . . . . 272
Engine oil ...... .... .... .... ... .... 275
Adding ... .... ... .... .... ...... . 278
Additives . . . . . . . . . . . . . . . . . . . . . . . 278
Changing ... .. .... .... ...... .... 279
Checking the engine oi l level .. .... . 277
Indications and conditions requiring extra
checking ..... .. .... .... ... .... 277
Oil consumption .. .... .... ... .... 277
Oil grades . . . . . . . . . . . . . . . . . . . . . . . 275
Recommended o il check interva ls .. 277
Specification and viscosity . . . . . . . . 275
Engine oil level .. .... .... .... ... .... . 34
Engine oil pressure Malfunction ...... ..... .. .... .... . 32 Engine oil sensor defective
....... .... . 34
Environment Break -in period .. ...... .... .... .. 243
Catalytic converter .. ...... .... ... 244
Disposing of your vehicle battery ... 291
Driving at high speeds .. .... .... .. 245
Driving to minimize pollution and noise . 245
Fuel ... ...... .... ... .. .... .... .. 269
Fuel economy ....... ...... .... .. 245
Leaks under your vehicle ... .... ... 273
Letting the vehicle stand and warm up .. 246
Proper disposa l of drained brake fluid
284
Proper disposal of drained engine
coo lant ...... ............. ..... 282
Proper disposa l of drained engine oil
278 ,279
Recycling used eng ine oil .. .... ... 278
Un leaded fuel ..... .... ... .... ... 267
What should I do with an old battery?
291
EPC
See Electronic power control .. ... .. . 23
ESP
See Electronic stabi ll ization program
(ESP) . ... .... .... ........ ... 22, 236
Event Data Recorder (EDR) .. ....... .. 236
Expansion tank .. .... ... .... .... .... 281
F
Fahrenheit
Switching between Fahrenheit and Centigrade . ...... .... ...... .... 128
Fan Adjusting the fan speed .. ...... ... 129
Climate controls ................. 129
Radiator ...... .... .... ...... .... 283
Fastening eyes ... .... .... .... .... .. 108
Flat tire ............................. 50
Changing .. .... .... ... .... .... .. 318
Flat tire changing .. ...... .... .... .... 50
Floor mats .. ... ... .... .... .... .... . 172
Fog lights ........................... 76
Fo lding master key with remote control . 52
Foot pedals .. .. .. .... .... .... ...... 17 2
For the sake of the environment Gaso line fumes and the environment 269
Letting your engine warm up ....... 136
Reducing engine noise by early upshifting .... .... ... .... .... ... 13
Reducing engine noise by upshift ing
early . .... .... .... ... .... .... ... 13
Refueling .... .... .... ....... .... 269
Saving fuel by early upshifting . .... . 13
Saving fuel by upshifting early .. .... 13
Using the rear window defogger 131, 132
Front airbags
Description . .... .... ... .... .... .. 191
How they work .. .... ... .... .... .. 196
Front ashtray . . . . . . . . . . . . . . . . . . . . . . . 119
Front fog lights .... .... .... .... .... .. 76
Page 360 of 368
-Alphabetical index
---=------------------------------------------------
I
Ignition key 135
Ignition lock ... ... .. .... .... ...... . 135
Electronic immobiliz er ..... ........ 54
Ignition lock posit ions .... .... ...... . 135
167
185
Impor
tant things to do before driving ..
Improperly worn safety belts
Ind icator light
Airbag system . . . . . . . . . . . . . . . 198 , 199
PASSENGER AIR BAG OFF ......... 199
Indica tor lights . . . . . . . . . . . . . . . . . . . 12, 19
Infant seats . . . . . . . . . . . . . . . . . . . . . . . . 215
How do I properly install an infa nt seat in
my vehicle? .............. ...... 215
Safety instructions . . . . . . . . . . . . . . . 215
Ins ide rear view mirror .... ....... .... . 90
Installing child safety seats
Safety belts . . . . . . . . . . . . . . . . . . . . . 220
Inst rument cluster il lum ination ........ 15
In strument panel
Illum ination ...... ........ ... .... . 78
Inst rument panel and controls .. ....... 12
Ins truments and controls
Genera l ill ustration .... ....... .... . 11
In terior lights ....................... 81
Ambient lighting .................. 82
Luggage compartment ............. 83
Rear ............................ 82
J
Jack and tools . . . . . . . . . . . . . . . . . . . . . . 316 Jumper cables
.......... .... .... .... 331
Jump -starting 330
K
Key ...... ..... .. ...... .... ... .. .... 52
Battery replacement . . . . . . . . . . . . . . . 54
Coded settings .. .... ....... ..... 132
Convenience opening and closing of windows ... .... ... .. .... .... ... 59
Emergency key . . . . . . . . . . . . . . . . . . . 52
Key replacement . . . . . . . . . . . . . . . . . . 52
Master key .......... ...... .... ... 52
Valet key . . . . . . . . . . . . . . . . . . . . . . . . . 52
Key-coded settings Climate controls .. ........ ....... 132
Keyl ess entry remote control
Keys 53, 56
Electronic immobilizer ...... .... ... 16
Kick-down ...... ....... ...... .. 146, 153
L
LATCH ............................ 225
Description ...................... 225
Guidance fixtures for lower anchorages .
226
Ins talling a child restraint .. .. .. ... 228
Location ......... .... .... .... ... 225
Mounting and re leasing the anchorage
hook .. ...... ...... .... ... .. ... 229
Leather ..... .. ...... ... .. .... .... .. 262
Cleaning ........................ 263
Le aving -home-function ............... 77 Lifting jack
......... .... .... .... .... 321
Lifting points ...... ...... ... .. .... .. 336
Lifting/raising the vehic le ............ 335
Light sensor defective ................ 34
Light sensor package
Automatic headlight contro l .. .. ... . 73
Lights Coming-home/leaving-home-function 77
Emergency flasher ................ 79
Front fog lights ............... .... 76
Headlights ....................... 72
High beam ..... .. .... .... .... . 72, 80
High beam warning/indicator light .. . 23
Instrument pane l il lumination . ...... 78
Rear fog lights ..... ............... 76
Side marker lights ................. 72
Turn signals ...................... 80
Xenon headlights ...... ..... .. .... 79
Loading the luggage compartment ... . 173
Loading the roof rack .. ....... .... ... 117
Locking Power locking switch .............. 59
Rear lid .......................... 61
Remote control . . . . . . . . . . . . . . . . . . . 56
Using the key .. .... .... ..... .. .... 58
Lower anchorage locator button ...... 225
Luggage Stowing ........................ 173
Luggage compartment Attachment hooks . ........ .... ... 112
Cargo net .... .... .... ........... 108
Fastening eyes ................... 108
Light ............................ 83
Page 362 of 368
___ A_,_ lp_h_ a_b_ e_ t
_ i_ c _ a_ l_ in_ d_ e_x ______________________________________________ _
Parking brake warning ..... .. .... .... . 29
Parking l ight
Defective . . . . . . . . . . . . . . . . . . . . . . . . 35
Park ing on a dec line (downhil l) ....... 138
Parking on an incline (uphill) ..... .... 138
Parktronic
See acoustic park assist . . . . . . . . . . . 139
Parts replacement . . . . . . . . . . . . . . . . . . 348
PASSENGER AIR BAG OFF light ........ 199
Passive safety system . . . . . . . . . . . . . . . 166
Pedals ............................ 172
Physical principles of a fronta l collision 177
Polishing . . . . . . . . . . . . . . . . . . . . . . . . . . 257
Power locking switch . . . . . . . . . . . . . . . . . 59
Rear ............................ 60
Power locking system . . . . . . . . . . . . . . . . 55
Convenience close/open feature ..... 59
Locking and unlocking the vehicle from
inside ........... ....... .... .... 59
Opening and c losing the windows ... 59
Operating locks from with key .. .... 58
Rear lid . .... ... .. .... .... .... .... 61
Remote control . . . . . . . . . . . . . . . . 53, 56
Unlocking and locking vehicle ....... 56
Power locks
Power sunroof ..... .... .... .... ... 69
Pow er outlets . . . . . . . . . . . . . . . . . . . . . . 121
Power roof ........ .... ... .. .... ..... 67
Power seats Adjusting the seatback ............. 99
Adjustment ........... .... .... ... 97
Pow er steering . . . . . . . . . . . . . . . . . 135 , 241 Power
sunroof
Emergency closing ................ 69
Power window switche ·s . ...... .... ... 65
In the driver's door ... .... ... .. .... 66
In the front passenger's door ....... 67
Reactivating the system ............ 67
Pregnant women Specia l considera tions when wearing a
safety belt . . . . . . . . . . . . . . . . . . . . . 183
Programming the Homelink® Universa l Re -
mote Contro l . . . . . . . . . . . . . . . . . . . 157
Prop er occupant seating positions .... 168
Proper safety be lt position . . . . . . . . . . . 182
P roper seating position
Front passenger . . . . . . . . . . . . . . . . . 169
Occupants . . . . . . . . . . . . . . . . . . . . . . 168
Rear passengers . . . . . . . . . . . . . . . . . 170
Protectiv e liner 113
a
Quartzclock ...... .... ........ ....... 14
quattro®
See All -whee l drive ............... 242
Question
R
What happens to unbelted occupants? ..
178
Why safety belts? . . . . . . . . . . . . . . . . 176
Radiator fan ...... ............. ..... 283
Radio Replacing ....................... 349 Rain sensor defective
... .. .... .... .... 34
Reading lights
Front ....... ...... .... ...... ..... 81
Rear .......................... 81, 82
Reararmrest . .... .... .... ....... ... 103
Rear ashtray ....................... 119
Rear fog lights .. ...... .... .... .... ... 76
Rear lid
Emergency un locking (on ly manually . 62
Locking/unlocking ............. .... 61
Rear light
Defective ........ .... .... .... .... . 35
Rear power locking switch ... .. .... .... 60
Rear seat bench .. .... .... ..... .. ... 104
Rear view mirror Inside rear view mirror ............. 90
Rear window defogger .... .... .... ... 131
Rearview mirror
See Mirrors ....................... 90
Red symbols .. ........... .... .... ... 30
Refuel ling .......................... 269
Release lever for hood .... ........ ... 272
Remote control . . . . . . . . . . . . . . . . . . . 53, 56
Assigning a seat position .. .... .... 102
Resetting remote control ........... 57
Unlocking and locking ............. 56
Remote master key
Battery replacement ....... ....... . 53
Check light ................ ...... . 53
Remote rear lid release .... ...... ..... 63
Removing luggage compartment cover/parti -
tion net ...... .... .... .... .... . 111
Page 363 of 368
______________________________________________ A_ l_,_ p _h_ a_ b_e _t_i c_ a_l _in _ d_e _ x _ ___.l'III
Repair manuals ... .. .... .... ...... .. 346 Safety belt tensioner .... .... .... .... . 185 Safety lock
Repa irs
Airbag system
Replacing 201
Wheel rims ...................... 307
Replacing a fuse ...... ...... ...... .. 326
Replacing a sound syste m .... .... .... 349
Replacing bu lbs . .... .... .... ...... .. 328
Replacing tires and wheels ........... 306
Reporting safety de fects .. ...... . 175, 345
Reset button ..... .. .... .... ...... 18, 39
Resetting remote control .. ...... .... .. 57
Retractor .. ...... .... ... .. .... .... . 181
Rims Cast a lloy
Replacing
Stee l rims 260
307
259
Roof rack Loading ...... .... .... ... .... .... 11 7
Mounting locations ............... 117
Safe mounting ... .... .... .... .... 116
Roof weight .. ...... .... .... ... .... . 117
s
SAFE (disp lay indica tion)
See Electronic i mmobi lize r .. .. .... .. 16
Safe driving habits .. .... .... ...... .. 166
Safety belt height adjustment ..... .... 184
Sa fety belt pos ition .. ..... .... .... ... 182
Safety belt height adjustme nt .. .. .. 184
Sa fety belt s worn by pregnant women ..
183
Controls and equip ment Safety first Care, service and disposal .
.... .... 186 Ignition key, automatic transmission 136
Safety belt war ning light ... .. .... . 22, 176
Seat adjustment
Safety belts . .......... ...... .... ... 181 Driver
's seat ....... ... .... .... .... 95
clean ing . .... .... .... .... .... ... 265 Driver's seat memory ...
... .... .... 100
Danger to passengers who do not wear a Extending/ shorten
ing the driver's seat
safety belt . .... ...... .... ... .. . 178 cushi
on .. .... ... .... .... .... ... 1 00
Fastening .......... .... .... .... . 181 Fr
ont passe nger's seat .... .... .... . 96
Improper ly worn . .......... ...... 185 Front power sea
ts .. ...... .... ... .. 97
Not worn . .... ...... .... ... .. .... 178 Head restraints ..
...... ..... .. .... 1 71
Safety belt position ... .... .... .... 182 Head restraints, front
seat ...... ... 105
Sa fety instruct ions . .... .... .... ... 180 Lumbar support
................... 99
Securi ng child saf ety sea ts ... .. .... 220 Manual controls ..
.... .... .... .... . 96
Spec ia l co nsiderat ions for pregnant Manual seats
.... .... .... .... ..... 96
women .... ....... .... .... .... . 183
Seat belts
Unfastening .. ......... ....... .. . 184
Why YOU MUST wear them ... ... .. 1 76
Warning/ind ica tor light ...... ...... 176
Seat position
Why YOU MUSTwearthem ........ 176
Incorrect seat pos itio n .... .... .... 171
Worn properly . ...... .... .... .... 179
Seating ca pa city .... .... .... .... .... 176
Safety compliance sticker ...... .. .... 340
Seating pos ition
Safety equip ment .. ...... ..... .. .... 166
Driver ... .. .... .... ... .... .... ... 1 68
Safety features for occupant restraint and Front passenger ....... .... .... ... 1 69
protection ... .. ..... .. .... .... . 166
How to adjust the front seats . ...... 169
Sa fety instruct ions
Occupants ....................... 168
Engine compart men t . .... .... .... . 273
Rear passengers ... .... ...... .... . 170
f or bo oster seats ... .. .... .... .... 218
Seats
f or side curtain a irbags .. ...... .... 208
Manual ad just ment controls ...... .. 96
f or using ch ild safety seats ... .. .... 213
Number of seats ...... .... .... ... . 176
for using convertible child seats . ... 216
Selector lever . ........... ........ ... 151
for using infant seats . .... .... .... 2 15
for using safety be lts . .......... ... 180 Selector
lever 6-speed automatic
trans missi on ... .. ... .... .... ... 1 44
Monitoring the Advanced Airbag System
200 Selector
lever mu ltitronic™ ...... .... . 151
Service in te rval display . ...... .... ... .. 17
Vehicle operation Vehicle care Do-it-yourself service Technical data
Page 365 of 368

Alph ab eti ca l ind ex 11111
----------------------------------------- -'------------J
Tire specifications .... ...... .... .. 306
Tread depth .. .... .... ........... 303
Uniform tire quality grading .. .... . 309
Winter tires .. .. .. .... .... ...... .. 310
Tires and vehicle load limits .. ... .... . 301
Tires and wheels Checking tire pressure ... .. ...... . 299
Co ld ti re inflati on pressure ... .. .... 297
Dimens ions ...... .... ... .... .... 305
Genera l notes ..... .... ... .... .... 293
G lossary of tire and loading terminology
294
New tires and whee ls ... .. ..... .. . 305
Replaci ng . ...... .... .... ... .... . 306
Snow chains ... .. .... .... .... .... 311
Tire pressu re monito ring system .. . 307
Tires and vehicle load limits .. ...... 301
Wheel bo lts .. .... .... ... .... .... 311
Winter tires .. .. .. .... .... ...... .. 310
Tires/Wheels Lowaspectrat iotires ..... ... .... . 312
Tire pressure monitoring sys tem . ... 20
T orn or frayed safety belts . ... .... .... 180
Touch -up paint .. .... .... ... .... .... 258
Towing Tow truck procedures
Tow line eye 332
front ...... ... .. .... .... .... .... 333
Trailer towing ... .... .... .... .... ... 248
Operating instructions .... ...... .. 249
Technical requirements ... .... 248, 249
Trailer towing tips ..... .. ...... ... 250
Controls and equip
ment Safety first
Transmission
Vehicle identification ...... .... .... .. 340
6 -speed ... ...... ... .. .... .... ... 142
Vehic le identificati on label . ....... ... . 340
Manual transmission .............. 142
Vehic le Identification Number (V IN) ... . 340
tiptron ic® .......... ...... .... ... 143
Vehicle jack .. .... .... .......... 316, 32 1
Transport Canada ... .... .... .... .... 345
Vehicle l iterature ...... ... .... .... .... . 5
Tread Wear Ind icator (TWll . ....... .. . 303
Vehicle-care products .... .... .... .... 254
Trip computer
Complete -trip memory ............ . 38
Fuel consumption rate ...... .. .... . 38
w
Mi leage .. .... .... .... .... .... ... . 38
Warning lights ... .... .... ...... ... 12, 19
Si ngle -trip memory . ...... .... .... . 38
Warning/i ndicator lights
Trip odometer ... ...... .... ... .. .... . 15
Airbag system .... .... .... ..... .. . 20
dEF indication in the trip odometer
Anti-lock Brake System (ABS) ... .... . 21
display ... .. .... .... .... ... .... . 15
Brake system ..................... 23
Turn s ignals ......................... 80
Cruise control ... .. .... ...... ...... 21
Warning/ind ica tor lights ............ 22
Electronic immobilizer ...... .. ..... 16
Electronic power control ... .... ..... 23
u Electron ic stabil ization program (ESP) 22
Generator ........................ 22
Undercoating ....... ... .. .... .... ... 261
High beam . ....... ... .... .... .... 23
Unfastening safety belts . .... .... .... 18 4
Malfunction Indicator La mp (M IU .... 20
Un idirectiona l tires . .... .... ...... ... 293 Park ing brake .. ...... .... .... ... .. 23
Uniform tire quality grading .. ... .... . 309 Safety belt ..
...... .... .... .... .... 22
U nlocking Tire pressure monitoring system ...
.. 20
Power locking switch ... .. .... .... . 59 Turn signals
...... .... .... .... .... 22
Rear lid ...... .... .... .... ... .... . 61 Warranty coverages .
.... .... .... .... 345
Remote control ................... 56 Washer reservoir .. .... ... .... .... ... 291
Using the key . ............ .... .... 58
Washing .. ...... .... .... ... .... .... 254
Automatic car wash . ...... .... ... . 255
V by hand ...... .... .... ... .... .... 255
with a power washer ... ... .... .... 256
Vanity mirror .... ............. ...... . 84
Washing the vehicle .. .... .... .... ... 254
Veh ic le e lec trical system ... .. .... .... . 22
Washing the vehicle by hand .......... 255
Vehicle operation Vehicle care Do-it-yourself service Technical data