remote control AUDI A4 AVANT 2008 User Guide
[x] Cancel search | Manufacturer: AUDI, Model Year: 2008, Model line: A4 AVANT, Model: AUDI A4 AVANT 2008Pages: 368, PDF Size: 46.19 MB
Page 66 of 368

Openin g and closing
Anti-theft alarm system
Description
The anti-theft alarm triggers an alarm if anyone attempts
to break int o the vehicle.
The anti-theft alarm system triggers an audible alarm and turns on
t he emergency flasher if an unauthorized interference with the
vehic le is sensed by the system .
How is the anti-theft al arm sy stem swit ched on ?
The anti -theft alarm system is switched on when you lock the
dr iver's door manually using your key, o r w hen you use the remote
control. The system is activated approximate ly 30 seconds after the
vehic le is locked. T he indicator light on top of the door trim s tart
flashing rapidly for 30 seconds and then b link slowly.
How is th e anti -theft alarm system switched off ?
The anti-theft alarm system is switched off only when you use the
r emote contro l to unlock your vehicle. If you do not open a doo r
within 60 seconds after you have un locked with the remote control,
the vehicle wi ll loc k itse lf aga in automat ical ly .
If you lock just the driver's door using your key , the front
passenger 's door, the rear and the fue l filler flap remain locked.
I f you use the veh icle key to unlock the driver's door, the other
doors , the rear lid and the fuel tank flap will remain locked . The
a lar m system wil l not be deactivated u nless you insert the key in the
ignition switch within 15 seconds and turn on the ignition . If you fail
to do this, the alarm wi ll sound.
Wh en w ill t he anti th eft ala rm sys tem b e trigg ere d?
When the vehicle is locked, the ala rm system monitors and pr otects
the fo llowing parts of the vehic le:
• engine compartment
• luggage compartment •
doors
• veh ic le incline
• ignition
• factory installed radio .
When the system is activated , the alarm will be triggered if one of
the doors, the engine hood or the rear lid are opened, or if the igni
tion is turned on or the radio removed or if the vehicle incline has
been changed .
The anti -theft alarm system wi ll also go off when you unlock the rear
lid with yo ur key and open it. The alarm is switched off again when
you c lose the rear lid .
The anti -theft alarm system wil l also go off when the battery is
disconnected.
You can also trigger the alarm by pressing the PANIC button on your remote c ontro l. This wil l a lert other people in case of emergency.
Press the
PANI C button again to turn off the a larm .
How i s the anti-theft alarm switched off when
trigg ere d ?
The ala rm system is switched off when you un lock the veh ic le using
the remote contro l or when the ignition is switched on . The a larm
wi ll also switch itse lf off when it co mes to the end of its cyc le .
Em ergen cy flash er
The emergency flasher wil l b link briefly when the doors, engine
hood and rear lid are properly closed .
I f the emergency flashers do not blink, check the doors, engine hood
and rear l id to make sure t hey are proper ly c losed . If you close a
door, the hood or the rear lid with the anti -theft a larm switched on,
the emergency flas hers wil l b link only after you have closed the
door or lid .
.,_
Page 71 of 368
-To tilt the roof down to any intermediate position pull and
hold
the switch until the roof reaches the desired posi
tion.
& WARNING
Improper use of the power sunroof can cause serious personal
injury.
• Be careful when closing the power sunroof. Not paying atten
tion could cause you or others to be caught and injured as the roof
closes.
• Always take the key with you whenever you leave the vehicle to
safeguard against injuries caused by closing the roof.
• Never leave children or persons depending on assistance alone
in the vehicle, especially when they could access the vehicle keys.
Unsupervised use of the keys can result in starting of the engine
or in the use of vehicle systems such as the power sunroof, etc.
which could result in serious injury . The doors could be locked
with the remote key, delaying help in an emergency.
• The power sunroof will continue to operate until the ignition
key has been removed and one of the front doors has been
opened. •
Applies to vehic les: w ith powe r sunroof
Convenience closing feature
The power sunroof can be closed from outside with a
vehicle key.
-Insert the key into the driver's door lock.
-Turn and hold the key in the lock pos ition => & in
"Closing the power sunroof" on
page 68.
Controls and equip
ment
Opening and closing
[ i] Tips
The convenience feature cannot be activated by pressing a button
on the remote key uni t. •
Ap plies to vehic les: wit h p ower sunroof
Power emergency closing
The sunroof can still be closed electrically if for some
reason the overload protection function becomes acti
vated.
The power sunroof is equipped with an overload protection
feature. If, under normal conditions, the power sunroof will
not close , you can close it using this feature.
-Turn the rotary switch to position@=> page 68, fig. 65.
-Now pull the switch and hold it in this position until the
power sunroof closes completely.
& WARNING
Improper use of the power sunroof can cause serious personal
injury.
• Be careful when closing the power sunroof. Not paying atten
tion could cause you or others to be trapped and injured as the
roof closes.
• Always take the key with you when you leave the vehicle to
prevent injuries caused by the roof closing
• Never leave children or persons requiring assistance alone in
the vehicle, especially when they could access the vehicle keys.
Unsupervised use of the keys can result in the engine being
started or use of vehicle systems such as the power windows, etc.
which could result in serious injury. The doors could be locked
with the remote key, delaying help in an emergency .
...
Page 79 of 368
Applies to vehi cles: with Ligh ting p ackag e
Coming home/leaving home function
The coming home/leaving home function switches on the
external lights on a vehicle parked in the dark to illumi
nate the surroundings.
Activating the function
Fig. 75 Dashboard
detail : coming
home/leaving home
switch beside light
switch
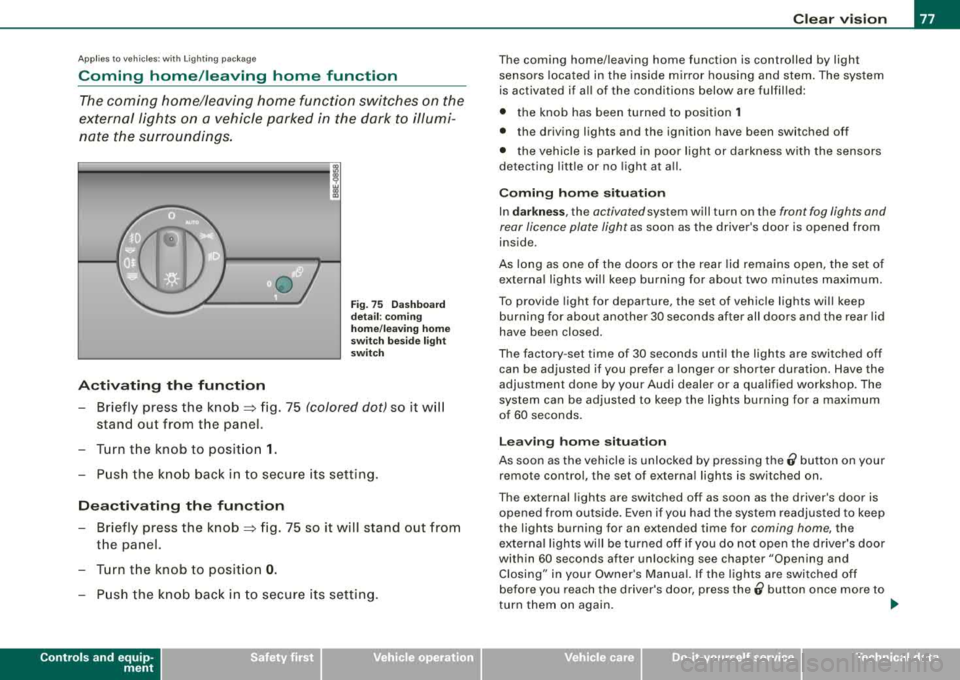
- Briefly press the knob => fig. 75 (colored dot) so it will
stand out from the panel.
- Turn the knob to position
1.
- Push the knob back in to secure its setting.
Deactivating the function
- Briefly press the knob => fig. 75 so it will stand out from
the panel.
- Turn the knob to position
0.
- Push the knob back in to secure its setting.
Controls and equip
ment
Clear vision
The coming home/leaving home function is controlled by light
sensors located in the inside mirror housing and stem. The system
is activated if all of the conditions below are fulfilled :
• the knob has been turned to position
1
• the driving lights and the ignition have been switched off
• the vehicle is parked in poor light or darkness with the sensors
detecting little or no light at all.
Coming home situation
In darkness, the activated system will turn on the front fog lights and
rear licence plate light as soon as the driver's door is opened from
inside .
As long as one of the doors or the rear lid remains open, the set of
external lights will keep burning for about two minutes maximum.
To provide light for departure, the set of vehicle lights will keep
burning for about another 30 seconds after all doors and the rear lid
have been closed.
The factory -set time of 30 seconds until the lights are switched off
can be adjusted if you prefer a longer or shorter duration. Have the
adjustment done by your Audi dealer or a qualified workshop. The
system can be adjusted to keep the lights burning for a maximum
of 60 seconds.
Leaving home situation
As soon as the vehicle is unlocked by pressing the ti button on your
remote control, the set of external lights is switched on.
The external lights are switched off as soon as the driver's door is
opened from outside. Even if you had the system readjusted to keep
the lights burning for an extended time for coming home, the
external lights will be turned off if you do not open the driver's door
within 60 seconds after unlocking see chapter "Opening and Closing" in your Owner's Manual. If the lights are switched off
before you reach the driver's door, press the
0 button once more to
turn them on again. _,,,
Page 80 of 368
![AUDI A4 AVANT 2008 User Guide Clear vision
[ i] Tips
• Do not attach any stickers to the windshield in front of the two
light sensors, as this would interfere with both the automatic oper
ation of t AUDI A4 AVANT 2008 User Guide Clear vision
[ i] Tips
• Do not attach any stickers to the windshield in front of the two
light sensors, as this would interfere with both the automatic oper
ation of t](/img/6/57552/w960_57552-79.png)
Clear vision
[ i] Tips
• Do not attach any stickers to the windshield in front of the two
light sensors, as this would interfere with both the automatic oper
ation of the headlights and the automatic dimming of the inside
mirror(sl.
• If the vehicle is remotely unlocked and locked
three times in
succession,
leaving home will not turn on the lights a fourth time to
safeguard the battery and lights .
• If you wish to use the coming home/leaving home function regu
larly, you can leave it activated at all times without risking perma
nent strain on the electrical system. As the system is controlled by
light sensors, it wi ll only be energized in darkness.
• Frequent use of the coming home/leaving home function for
approaching and departing a vehicle parked in the dark wil l strain
the battery. This applies particularly if only short distances are
driven between stops . Occas ionally drive longer distances to make
sure the battery is recharged sufficiently.
• If the fog lights have been switched on by the coming
home/leaving home function, they will always be switched off when
you switch on the ignition .•
Instrument panel illumination
The glow of the instruments, displays and the center
console can be adjusted to increase or reduce brightness.
Fig. 76 Instrumen t
panel illumination
Press the"+" button to increase the brightness.
- Press the"-" button to reduce the brightness.
Ignition ON, light switch at @.
With the ignition switched ON, the glow of instrument needles can
be adjusted to appear brighter or dimmer.
Ignition ON, light switch at ;oo~ or io.
With the lights switched on, the brightness of instrument cluster
!i.e . needles, gauges and displays) and center console illumination
can be adjusted.
0 Note
The instrument cluster and center console illumination (gauges and needles) comes on when you switch on the ignition and the vehicle
headlights are off. Be aware of the following difference between
models built to US or Canadian specifications : ..,
Page 95 of 368
Digital compass
Applies 10 vehicles: w ith di gita l com pass
Activating or deactivating the compass
The direction is displayed on the interior rear view mirror.
g
Fig . 94 Inside rear
view mirror: digital compass activated
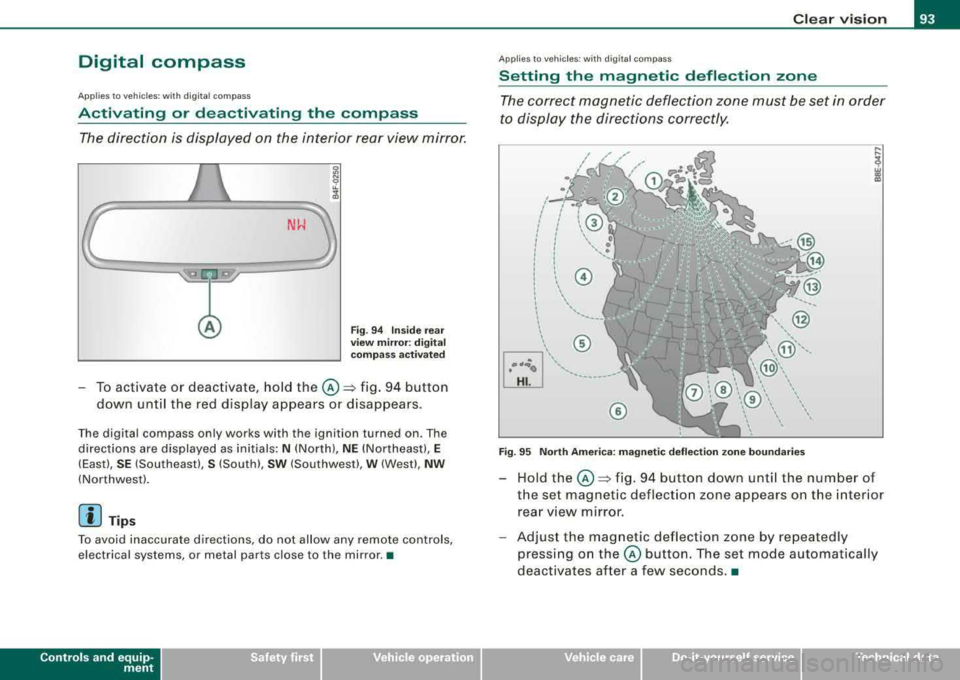
To activate or deactivate, hold the@~ fig. 94 button
down until the red display appears or disappears .
The digital compass only works with the ignition turned on . The
directions are displayed as initials:
N (North), NE (Northeast), E
(East), SE !Southeast), S (South), SW !Southwest), W !West), NW
(Northwest).
[ i] Tips
To avoid inaccurate directions, do not allow any remote controls,
electrical systems, or metal parts close to the mirror .•
Controls and equip
ment
Clear vision
Ap plies 10 vehi cles: w it h digi ta l c ompass
Setting the magnetic deflection zone
The correct magnetic deflection zone must be set in order
to display the directions correctly.
0
, _,,,,_,~~
(/
I : I I
' I r I I 1 © l I I
I I ' I~ ,.., ___ ~ ,,,..
' 1
'
®
\,, ,, ...... .. ... -------
©
Fig. 95 North America: magnetic deflection zone boundaries
Hold the@~ fig. 94 button down until the number of
the set magnetic deflection zone appears on the interior
. . rear view mirror.
Adjust the magnetic deflection zone by repeatedly pressing on
the @ button. The set mode automatically
deactivates after a few seconds .
•
irechnical data
Page 103 of 368
________________________________________________ S_ e_ a
_ t_
s _a_ n_d _ s_t _o _ r_ a_ g~ e __ ffllll
Memory buttons
On each memory button (On each memory button G) ,@ , G) and ©
=> page 100, fig. 102 , you can sto re a sea t and outside mirror posi
tion . Up to 4 different drivers can store their
settings .=> page 100,
fig. 102 , you can sto re a seat and outside mirro r position . Up to 4
d iffer ent driv ers can stor e their s ettings .
ST OP b utton
Press the STOP button to switch off the seat memory.
The word
OFF next to the STOP button wi ll illuminate. The 4 different
sea t adjust ments remain stored in th e memory . When the s eat
memory is switched off, then you can only adjust the seat and
outsid e mirrors in th e usual way .
It is recommended to use the STOP feature if your vehicle is going
to be used by another driver temporarily .
[ i ] Ti ps
• The vehicle must be turned on to p rogram the memory button
settings .
• You can recall a seat posi tion using either the memory bu ttons
or using the remote contro l
=> page 102.
• Seat position settings cannot be re ca lled if the s eat back is folded
forward. •
Applies t o vehi cle s: w ith po wer seats and driver's seat memory
Storing a seat position
Before you can store your seat position, the S TOP button
must be engaged (down) .
-Adjust the driver 's seat => page 97 .
Adjust both outside mirrors=> page 91.
Controls and equip
ment
-Press the MEMO button and hold it down. A t th e same time,
press one of the memory buttons for at least one seco nd.
-Re lease the buttons . The seat and outside mirror pos i-
t ions are now stored on that memory button.
Each time to assign a sea t position to a key , you ca ncel the seat posi
t ion, wh ich had be en assigned to that key befor e.
Whenever you store a new pos it ion on a memory button, the former
position is erased. W e recommend you assign m emory buttons
starting with button 1.
When you
l ock your vehicle using the remote control, the las t seat
and mirror position wil l be stored.
When you
unl ock your vehic le the next t ime, the mirrors and the
seat wi ll adjust automat ica lly to the last pos ition stor ed in your k ey .
This wil l not erase the seat posi tion a lready stored on memory
buttons (1) th rough (4).
•
App lies to veh ic les: w ith power seats and d river 's se at memory
Recalling a seat position
You can recall a seat position using either the memory
buttons or using the remote control in your key.
Usin g th e memory buttons
-Driver's door open -press the desired memo ry button.
-Driver's door c losed -press and hold the respective
memory button unt il the seat and the m irrors move into
t h eir store posi tion .
U sing th e remote control
-Un lock the vehicle using the remote contro l. Then open
the driver's door w ithin ten minutes . .,._
Page 104 of 368
___ S_ e
_ a_t_s _ a_n_ d
__ s _t _o _r_a ...::g==---- e ________________________________________________ _
If you do not open the door within ten minutes after unlocking it,
then you have to use the memory button to recall a seat position.
& WARNING
In an emergency, the recall operation can be stopped by pressing
the STOP button or by briefly pressing any given store button . •
App lies to vehicles: with power seats and driver's seat memory
Assigning the keys
Each remote key can be assigned to a memory button.
After you have stored your seat adjustments on a memory
button~ page 101 you can assign the remote key to the
memory button
Assigning a seat position to a key
- Press the memory button of the seat position you wish to
assign to your key.
- Hold down the memory button and within
ten seconds
press the unlock button on your remote control key.
- Release both buttons after
two seconds . Now that seat
position has been assigned to that remote key.
Canceling a seat position assigned to a key
-Hold the MEMO button depressed and within ten seconds,
press the unlock button on the remote control key.
- Release the
MEMO button after two seconds.
Each time to assign a seat position to a key, you cancel the seat posi
tion, which had been assigned to that key before. We recommend you assign
memory buttons (1) and (2) to the two
remote control keys you received with your vehicle. You can obtain
additional remote control keys from your authorized Audi dealer. •
Center armrest
The front center armrest can be adjusted to several posi
tions and contains a storage bin.
Adjusting the armrest
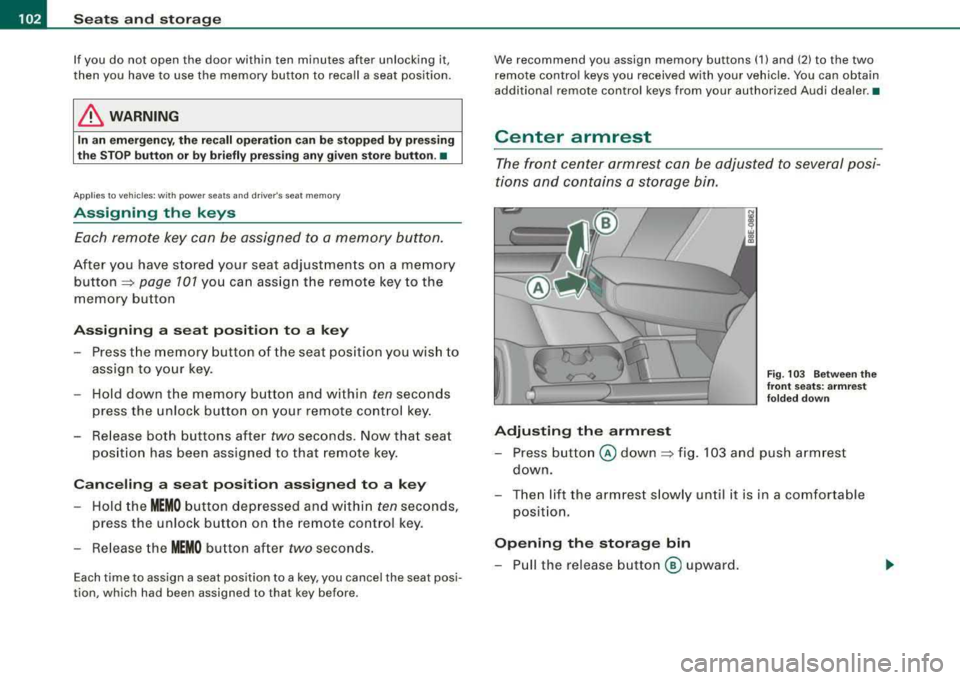
Fig. 103 Between the
front seats: armrest
folded down
- Press button @ down ~ fig. 103 and push armrest
down.
- Then lift the armrest slowly until it is in a comfortable
position.
Opening the storage bin
- Pull the release button ® upward.
Page 159 of 368
________________________________________________ ___:H....:..::: o:..:.m .:....:..:: e::L:.:. i.:....:n :.:..:k :..::® ::__ffllll
Homelink®
Universal radio frequency remote
control
Applies to vehicles: with Homelink® universal radio frequency remote cont ro l
How it works
The HomeLink® universal remote control can be
programmed with the hand held transmitters of the equip
ment you want to activate from inside your car.
The Homelink® system is capable of operating up to three different
remote contro lled devices from inside your vehicle using the
Homelink ® universa l radio frequency remote control.
The system lear ns t he rad io frequency codes of handheld transmit
ters used to operate garage doors, estate gates, home or outdoor
l ighting systems, and other devices 1
l.
The original handhe ld transmitters allocated to the remote
control led devices maintain their ab ility to activate these devices
and can be sti ll be used .
The Homelink® system has a nonvolati le memory, so that all
program ming will be retained after the vehicle battery has
completely discharged or been disconnected .
Before y ou can use the Homelink® universa l remote cont rol to
operate radio -frequency remote controlled devices, you wi ll first
need to program the Ho melink® transmitter.
ll Fo r the sake of readabil ity, a ga rage door opene r is always referred to in this
descr iption.
Controls and equip
ment • I I • • I
& WARNING
• Never use the Homelin kl!!I Universal Tran smitter with any
garage door opener that does have not the s afet y stop and reverse
feature a s required by federal s afety standard s. This include s any
garage door opener m odel manufa ctured before April 1 , 19 82.
• A garage door open er whi ch cannot detect an object , sign aling
the door to stop and rever se does not meet current federal s afet y
s tandard s. Using a garage door opene r without these feature s
in creases r isk of seriou s injury or de ath.
0 Note
When you program the Homelink® system, you are wel l advised to
turn off the garage door opener. A garage door opener whic h is
continuously triggered into action during programming may over
strain and damage its elect ric mot or, -an o verheated motor is a fire
hazard!
[ i ] Tips
• The Homelink® Universa l Remote Control will not affect your
equipment's current safety standard.
• The radio frequencies that are authorized for the country in
which the vehicle was sold are used. These frequencies may differ
in other countries.
• For addi tiona l informat ion cal l to ll-free 1 (800) 355 -3515 or look
up the website on the Internet for detai led instructions:
www .homelink .com •
Page 160 of 368
___ H_ o_ m_ e_L_ i_n _k_ ® __________________________________________________ _
Applies to vehicles: with Home link® univer sal rad io frequency remote contro l
Programming the HomeLink ® Universal
Remote Control
The Homelink® Universal Remote Control is programmed
in two phases: inside the vehicle at the overhead keypad
and outside the vehicle at the front bumper.
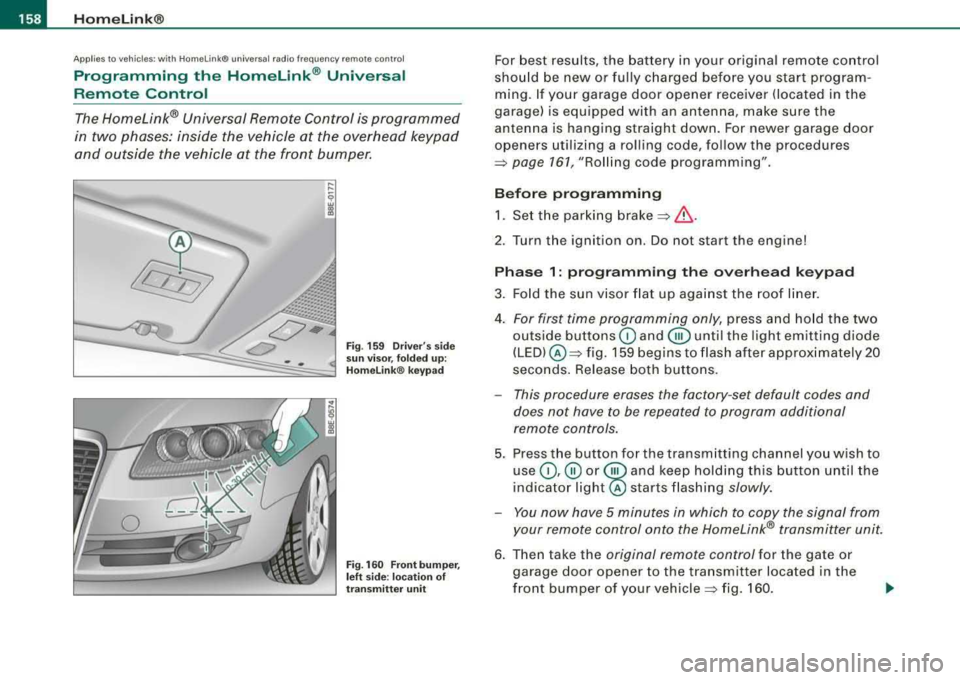
Fig . 159 Driver's side
sun visor, folded up:
Homelink ® keypad
Fig. 160 Front bumper,
left side : location of
transmitter unit
For best results, the battery in your original remote control
should be new or fully charged before you start program
ming. If your garage door opener receiver (located in the
garage) is equipped with an antenna, make sure the
antenna is hanging straight down. For newer garage door
openers utilizing a rolling code, follow the procedures
=> page 161, "Rolling code programming" .
Before programming 1. Set the parking
brake =>& .
2. Tur n the ignition on. Do not start the engine!
Phase 1: programming the overhead keypad
3. Fold the sun visor flat up against the roof liner.
4.
For first time programming only, press and hold the two
outside buttons
G) and @until the light emitting diode
(LED) @=> fig. 159 begins to flash after approximately 20
seconds. Release both buttons.
- This procedure erases the factory -set default codes and
does not have to be repeated to program additional
remote controls.
5. Press the button for the transmitting channel you wish to
use
G) ,@ or @ and keep holding this button until the
indica tor
light@ starts flashing slowly.
- You now have 5 minutes in which to copy the signal from
your remote control onto the Homelink® transmitter unit.
6. Then take the original remote control for the gate or
garage door opener to the transmitter located in the
front bumper of your
vehicle => fig. 160.
Page 161 of 368
___________________________________________________ H_ o_m_ e_ L_ i_ n _ k_ ®_~IJII
Ph ase 2:
pro gra mming th e bump er mounted transmitter
7. P oint the original remote control at the bumper below the
left
h eadlig ht => page 158, fig. 160.
8. Hold the remote control at a d istance between 0-12 in.
(0 -30 cm) to the bumper (use the shortest distance
possible).
9. Press and hold the activation button on the remote contro l (see garage door opener operating instructions)
=> page 159, "Canadian programming".
1 0 . Watch the emergency flashers on your ve hicle. Once
programming is successfu lly completed, the emergency
flashers will flash
three tim es (after about 15-60
seconds). You can now release the button on the remote
control.
-To program the two remaining buttons, repeat steps 4 to 9
with the remote control units for the devices you wish to
operate .
The required distance between the hand held transmitter and the
Homelink ® trans mitter depends on the device whose signals you
are learning . It may require several attempts at varying distances
unt il programm ing is successful.
If the 5 minute time limit is exceeded, programming will stop imme
diate ly . The
em erg ency fla sher s will flash one tim e to indicate that
this has occurred.
In this case, you wil l need to reprogram the system. Repeat the
process start ing with
Pha se 1 : programming the o verhead keypad.
If the emergency flashers do not flash three times (after about 15-
60 seconds), programming was not successful. In this case, repeat
Ph ase 2: pro gr amming the bump er mount ed tr an smitte r.
Controls and equip
ment
If programming fai ls in Ca nada, you may have to perform an alter
nate action at step 8
only => page 159, "Canadian programming" .
Perform al l other steps as described above .
& WARNING
• Fo r sa fet y re as on s never rel eas e th e parki ng br ak e o r start the
engin e while an yone i s standing in front of the v ehi cle .
• A g ara ge door or an es ta te gate m ay s ometim es be set in
motion wh en the Homelink ® univer sal remote control i s being
progr ammed . T o avo id possible i njur ies or p ropert y dama ge,
plea se alway s make ab solutely cer tain that no per son s or object s
are l ocated in the r ange of mot ion of an y eq uipm ent being oper
a ted.
0 Note
When you program the Homelink® sys tem, you are wel l advised to
turn off the garage door opener . A garage door opener which is
continuously triggered into action during programming may over
strain and damage its electric motor
-an overheated motor is a f ire
hazard!
[ i ] Tip s
As soon as the Homelink® system is programmed to work with your
garage door opener, two additiona l remote contro lled devices can
be trained on the two remaining transmitter channels. •
Applies to vehic les: with Homel in k® un iversal ra d io frequency remote control
Canadian programming
Remote con trol units for Canadian garage door openers
may require one different programming step.
Remote contro l units for Canadian garage door openers are set to
stop transmitting radio frequency signa ls after two seconds . If this .,._