Rear axle AUDI A4 AVANT 2008 Owners Manual
[x] Cancel search | Manufacturer: AUDI, Model Year: 2008, Model line: A4 AVANT, Model: AUDI A4 AVANT 2008Pages: 368, PDF Size: 46.19 MB
Page 119 of 368
________________________________________________ s_e_ a_ ts_ a_ n_d _ s_t _o _r_ a ..;; g:. e _ __._
Roof rack mounting locations
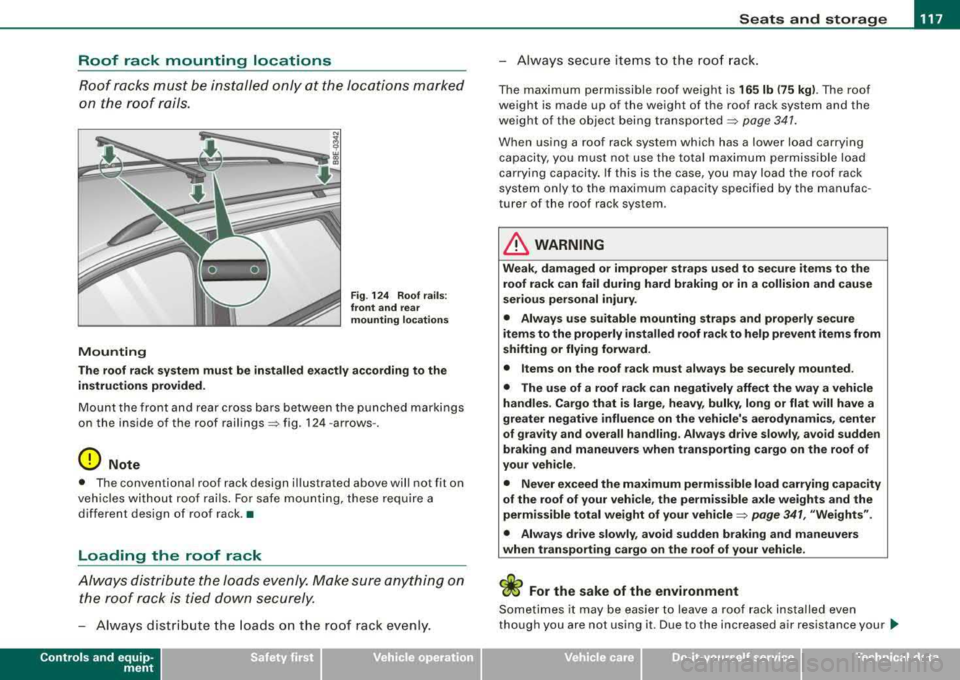
Roof rocks must be inst alled only at the locations marke d
on the roof roils.
Mounting
F ig . 12 4 Ro of ra ils :
fr ont and re ar
mounting lo cation s
The roof ra ck system must be in stalled exact ly a ccording to the
instructions provided .
Mount the front and rear cross bars between the punched markings
on the inside of the roof rail ings => fig. 124 -arrows -.
0 Note
• The conventiona l roof rack design i llustrated above will not fit on
vehicles withou t roof rai ls . For safe mounti ng, t hese require a
different design of roof rack .•
Loading the roof rack
Alw ays distri bute the loads evenly . Make sure anything on
the roof r ock is tied down securely.
Always distribute the loads on the roof rack evenly .
Controls and equip
ment
Always secure items to the roo f rack.
The maximum perm issible roof weight is 16 5 lb (75 kg ). The roof
weight is made up of the weight of the roof rack system and the
weight of the object being transported :=:>
page 341.
When using a roof rack system which has a lower load carrying capacity, you must not use the tota l maximum permissible load
carrying capacity. If this is the case, you may load the roof rack
system only to the maximum capacity specified by the manufac
turer of the roof rack system .
& WARNING
Weak, damaged or imp rope r strap s used to sec ure items to the
roof rack can fail during hard braking or in a collision and c aus e
se rious per son al injury .
• Alway s use suitabl e mounting strap s and properly secure
it em s to the prop erly in sta lled roof ra ck to help pre vent item s from
shifting or flying forward .
• Items on the r oof rack must al ways be securely mou nted.
• The use of a roof r ack can n egatively affect the w ay a vehi cle
h and les. C arg o th at is large , he avy, bulky , long or flat will have a
g reater negativ e influence on the vehicle' s aerodynamic s, ce nter
of grav ity and overall h andling . Alway s drive slo wly, a vo id sudden
braking and m aneuver s when t ran sp orting cargo on the roof of
your vehicle .
• Never exc eed the maximum permi ssible load carrying capa city
of the roof of your vehi cle, the p ermissibl e axle weights and the
perm issible tot al weight of your vehicle :=:>
page 341, "We ight s".
• Alway s drive s lowly, avoid sudden br ak ing and m aneuvers
when tran sporting cargo on the roof of your vehicle .
<£> For the sake of the environment
Sometimes it may be easier to leave a roof rack insta lled even
though you are not using it. Due to the increased air resistance your .,_
irechnical data
Page 176 of 368
___ D_ r
_ i_v _i_n ..;::g :;_ S_ a_ f_ e_, ly'----------------------------------------------------
& WARNING
Improperly stored luggage or other items can fly through the
vehicle causing serious personal injury in the event of hard braking
or an accident. To help reduce the risk of serious personal injury:
• Always put objects, for example, luggage or other heavy items
in the luggage compartment .
• Always secure objects in the luggage compartment using the
tie-down hooks and suitable straps .
& WARNING
Heavy loads will influence the way your vehicle handles. To help
reduce the risk of a loss of control leading to serious personal
injury :
• Always keep in mind when transporting heavy objects, that a
change in the center of gravity can also cause changes in vehicle
handling:
-Always distribute the load as evenly as possible.
- Place heavy objects as far forward in the luggage compart-
ment as possible.
• Never exceed the Gross Axle Weight Rating or the Gross
Vehicle Weight Rating specified on the safety compliance sticker on the left door jamb. Exceeding permissible weight standards
can cause the vehicle to slide and handle differently.
• Please observe information on safe
driving => page 166.
& WARNING
To help prevent poisonous exhaust gas from being drawn into the
vehicle, always keep the rear lid closed while driving.
• Never transport objects larger than those fitting completely
into the luggage area because the rear lid cannot be fully closed.
& WARNING (continued)
• If you absolutely must drive with the rear lid open, observe the
following notes to reduce the risk of poisoning :
- Close all windows,
- Close the power roof*,
- Open all air outlets in the instrument panel,
- Switch off the air recirculation,
- Set the fresh air fan to the highest speed.
& WARNING
Always make sure that the doors, all windows, the power roof*
and the read lid are securely closed and locked to reduce the risk
of injury when the vehicle is not being used.
• After closing the rear lid, always make sure that it is properly
closed and locked.
• Never leave your vehicle unattended especially with the rear lid
left open. A child could crawl into the vehicle through the luggage
compartment and close the rear lid becoming trapped and unable
to get out . Being trapped in a vehicle can lead to serious personal
injury.
• Never let children play in or around the vehicle.
• Never let passengers ride in the luggage compartment . Vehicle
occupants must always be properly restrained in one of the
vehicle's seating positions.
[ i] Tips
Air circulation helps to reduce window fogging. Stale air escapes to
the outside through vents in the trim panel, on the left side of the
luggage compartment. Be sure to keep these slots free and open. •
Page 239 of 368
_________________________________________ ___:l:.:.. n !.!t ~e :.:.11 :.!.ig ~e :.:..n !.!t :... t::.: e::.: c~ h:..:.:..,: n~o =.!l~o ~g Lly '.,_ _l!III
speed of the vehicle about its vertica l axis, the lateral acce leration
ac ting on the veh ic le, the brake pressure and the s teering ang le a re
a ll measured .
The direction in which the driver wishes to travel is determined with
the aid of the steering angle and veh icle speed and is continua lly
compared with the actual behavior of the vehicle. If the two do not
match, -for example, when the vehicle starts hydrop la ning on a
wet road -
, ESP will au tomatical ly brake the appropria te wheel to
correct the problem .
The vehicle is then stabi lized by the forces acting on the whee l
during braking . If the vehicle is
oversteering (r ea r tends to skid out
of the turn), t he brakes are main ly app lied on the whee l that is on
the outside of the curve . In the case of a vehicle that is
understeering
(tendency to s lide out of the curve) , the bra kes are applied at the
rear whee l that is on the inside of the curve. An acoustic signal indi
cates when ESP brake appl ication cuts in
=> & .
The system operates across the entire speed range in combination
wi th the ABS system
~ page 240. If the Ant i- Lock Brake Sys te m
(ABS) malfunctions, the ESP wi ll be out of act ion as well.
Ac tivat ion
When you turn on the engine, ESP will automatica lly be activated
and will perfo rm a self -test.
You can activate a deactivated ESP or deact ivated ASR as requ ired
by pressing the
=> page 236, fig. 199 button.
D eac tiva tion
Norma lly, the ESP should always be on .
When necessary, you can deact ivate Anti -Slip Regulat ion (ASR) or
the Electronic Stabilization Program (ESP) by pressing the button
=> page 236, fig. 199 .
• Dea ctivating A SR: Tap briefly on the ESP button . In certain excep
t iona l situations (e .g. driving wit h tire chains or a t a forced pace
around a track), the Anti-S lip Regu lation (ASR) can be deactivated
Controls and equip
ment Safety first Vehicle operation
=> page
238 . The ESP check light flashes . T ap the ESP button again
t o r eact ivate ASR. The ESP check light g oes out .
• Deactiv ating ESP : Press the ESP button for more than 3 seconds .
W ith ESP deactivated, the ESP check ligh t illum inates cons tant ly .
Press the ESP button again to reactivate ESP . The ESP check light
g o es out .
& WARNING
The Electronic Stabilization Program i s neve rthele ss subject to the
laws of physi cs . It is part icularly important to pa y attent ion to thi s
fact on we t and slippery roads . It is therefore important that you
always adapt your driving to the condit ion of the road and traffic
c onditions. Do not allow the inc reased safety provided by the Elec
tronic Stabiliz ation Program sy stem to lull you into a ccepting
additional safety ri sk s.
• Plea se note that when ESP or ASR is dea ctivated , the drive
wheels can spin on icy and slippery roads and the vehicle can
break a way -da nger of skidding! •
Electronic differential lock (EDL)
The elec tr o nic differen tial l ock mon itors t he r ota tion al
speed of the drive wheels .
Gener al not es
The elec tronic d if f erential l ock (EDU helps the ca r to start mov ing,
accelerate and c limb a grad ient on surfaces providing poor or
a lmost n o grip. W ithout EDL, th is w ould be difficult, if no t impos
sib le.
How the system works
The EDL operates automatical ly. It monitors the rotational speed of
the drive whee ls on an ax le with the he lp of t he ABS senso rs
=> page 2 40 . If a noticeable difference in rotational speed between
the drive wheels on one axle is de tected (e .g. on sl ippery grou nd
on .,,.
Vehicle care Do-it-yourself service Technical data
Page 303 of 368
________________________________________________ T_ i
_ r_e _s_ a_n_ d_ w_ h_ e_e _ l_s __ l'III
& W ARNING (continued )
• The driver is respon sible for the correct tire pre ssure s for all
tire s on the vehicle. The applicable pressure values are located on
a st icker on the driver 's side B-pillar or on the inside of the fuel
filler flap.
• Only when all tire s on the vehicle are filled to the correct pres
sure , the tire pressure monitoring system * can work correctly .
• The use of incorrect tire pressure values can lead to accidents
or other damage. Therefore it is essential that the driver observe
the specified tire pressure values for the tires and the correct pres
sures for the function of the tire pressure monitoring system*.
• Always inflate tires to the recommended and correct tire pres
sure before driving off.
• Driving with underinflated tires bend more , letting them get
too hot resulting in tread separation , sudden tire failure and loss
of control.
• Ex cessive speed and /overloading can cause heat build -up ,
sudden tire failure and loss of control .
• If the tire pressure is too low or too high, the tires will wear
prematurely and the vehicle will not handle well.
• If the tire is not flat and you do not have to change a wheel
immediately, drive at reduced speed to the nearest service station
to che ck the tire pressure and add air as required .
0 Note
Driving without valve stem caps can cause damage to the tire
valves. To preve nt th is, a lways make s ure th at f acto ry installed va lve
stem caps on al l whee ls are securely mounted on the va lve .
~ For the sake of the environment
Underinflated tires will a lso increase the fuel consumpt io n. •
Tires and vehicle load limits
There are limits to the amount of load or weight t hat any vehic le and
any tire can carry . A ve hicle that i s ove rloa ded will not handle well
and is more d iff icu lt to stop . Overload ing can not only lead to loss
o f vehi cle control, but can also damag e impor tan t p arts o f the
vehic le and can lead to sudden tire failure, including a blowout and
sudde n defla tion that ca n cause the veh ic le to c ra sh .
Your sa fety a nd t hat o f your passe ngers a lso depe nds o n maki ng
s u re that load li mits are not exceeded. Vehic le load incl udes every
b ody and everythi ng i n and on t he vehicle . T he se l oa d limi ts are
technical ly referred to as the ve hic le's
Gross Vehicle Weight Rating
("GVW R"l.
T he "GVWR" includes the wei ght of the basic vehic le, all factory
in sta lled acces so ries, a full t an k of f uel, o il, c oolant a nd oth e r flu ids
p lus max imum load . T he maximum load inc ludes th e number o f
p asse ngers tha t th e ve hicle i s intended t o carry ("seat ing ca paci ty")
with an assu med weight o f 150 l bs (68 kg) fo r each passe nger at a
designated seating position and the total weight of any luggage in
th e v ehic le. I f you tow a trai ler, the we ig ht o f the tra iler hitch a nd th e
tongue weight of the loaded trailer must be inc luded as part of the
ve hicle lo ad .
The
Gross Axle Weight Rating ("GAWR") is t he maximum load that
ca n b e app lie d at eac h of th e veh icle's two axle s.
T he G ross Ve hicle We ight Rati ng a nd th e G ross A xle Wei ght R ati ng
are listed on the safety comp liance stic ker label located either on
t he driver 's si de B-pi lla r o r on the in sid e of t he fue l fille r fl ap. You r
Aud i has 5 seating posit ions, 2 in the front and 3 in the rear for total
sea ting ca paci ty of 5. Each sea ting p osit ion has a safe ty b elt
=> page 176, "Saf ety be lts" .
The fact that there is an upper limit to your vehicle's Gro ss Vehicle
W eight Rat ing m eans that th e total weight o f whatever is b ein g
carried in the vehic le (including the weight of a traile r hitc h and the
ton gue we ight of the loaded tr aile r) is lim it e d. Th e m or e passe ng ers
~
Vehicle care
Page 306 of 368
___ T_ ir_e _ s_ a_ n
_ d_ w_ h_ e_ e_ls _________________________________________________ _
make, there w ill be six to eight of t hem evenly p laced around the
tir e. M arks o n the tire s idewall ( for example "TWI " or oth er sy mb ols)
indicate th e positions of the tread wear indicators. Worn tires must
b e re placed . Di fferen t fig ure s m ay apply i n other
c ountr ies=> & .
Tire pressure
Incorr ect tir e p ress ure c auses prematu re wear a nd can ca use
sudden tir e blow -out . For th is r eason, tir e pressur e must b e check ed
at leas t once a month
=> pa ge 299 .
Dri ving style
Drivi ng fa st aro und curv es, heavy acce le ra ti on and ha rd bra kin g
increase tire wear .
Rotating tires for more even wear
For all four tires on your vehic le to have the same service life, we
r ecom mend t hat the front a nd rea r tires ar e rotate d accord ing to the
tire manufacturer 's suggested tire rotation interva ls. Please
r e m emb er t he fo llo wi ng :
• Ti re rotation interva ls m ay d iffer from th e vehic le servic e inter
vals outl ined in y our M aintenance and Warran ty Boo kle t.
• T he longer one tire is used in one location on the vehicle, the
mor e it wea rs a t ce rtain points ; the re fo re, we rec omm end that yo u
fo llow t he ti re manufactu rer's su ggested tir e rotat ion int ervals .
• Vehi cle s with front -wh eel d rive e xper ience mo re trea d wea r on
the front wheels compared to al l-wheel drive (quattro®l .
• Ple as e ro tat e ti res as
sh ow n=> page 303, fig. 220.
• Extra care must be taken when rotating direction -specific tires
=> pag e 32 4.
Wheel balancing
T he wheels on n ew vehic les are bala nced. However, various situa
tions during eve ryday driving can cause them to become unba l
ance d, res ulting i n vi brat ions you ca n us ual ly f eel thro ugh t he
steering whee l. U
nba lanc ed wh eels must be rebalanced to avoid excessive wear on
s tee ring, s uspen sio n an d tir es. A w heel m ust also be reba la nced
when a new tire is install ed.
Incorrect wheel alignment
Incorrect whee l alignment can cause excessive tire wear, impairing
t he sa fety o f the vehicl e. If ti res sh ow ex cessiv e w ear, h av e the
whee l al ignm ent check ed by an autho riz ed Aud i d eal er or qualifi ed
w ork shop.
All Wheel Drive
Ve hicl es wi th qu attr o® must alw ays h ave t ires of t he sa me siz e,
construction and tread type . For deta ils
see=> page 242 .
& WARNING
Sudden tire failure can lead to loss of control , a crash and serious
personal injury!
• Never drive a vehicle when the tread on any tire is worn down
to the wear indicators .
• Especially in wet and slick driving situations , a preferably large
profile depth of the tires is necessary , and an approximately
similar profile depth of the front and rear axle tires.
• The diminished driving safety , caused by too small of a tire
profile, is negatively perceivable especially in handling , in danger
of hydroplaning when driving through deep puddles and ponds,
when driving around curves , and in braking behavior.
• Worn tires are a safety hazard , they do not grip well on wet
roads and increase your risk of "hydroplaning" and loss of control.
• Always keep chem icals that can cause tire damage , such as
grease, oil, gasoline and brake fluid away from tires .
• Tires age even if they are not being used and can fail suddenly ,
especially at high speeds. Tires that are more than 6 years old can
only be used in an emergency and then with special care and at
lower speeds .
~
Page 337 of 368

Emergency situations -
----------------=-=---
Rear hook up
These s te p s app ly fo r w in chi ng the vehi cle on to a car
c arr ier w ith the re a r f ir st.
- Have the vehic le ali gne d cent ered wi th the ca r carr ier
r a mp.
- Attach the win ch hook to t he
rear to wline eye
=> pa ge 334, fig. 237 .
- On ce th e ca r is po sit io ned on t he car ca rrie r, ha ve safety
c hain (s ) a ttach ed t o the
fron t towline eye => pag e 333an d
ti ghte ned .
[ i] Tips
Chec k carefu lly to ma ke sure the veh icle is hoo ked up securel y
b ef ore mov ing the ca r up the ca r ca rrier r amp. •
Lifting the vehicle
Important safety precautions
Be aware of the following hazards before l ift ing the vehic le w ith a
w ork sho p ho is t or f lo or jack :
• The vehicle should never be lifted or jacked up from underneath
the engine oil pan, the transmission housing , the front or rear axle
or the body side members . This could lead to serious damage.
• Use lifting equipment with padded contact surfaces to avoid
damage to the underbody or chassis frame.
• Alternatively, cover the contact surfaces on workshop hoist or
floor ja ck with rubber pads before lifting.
• Before driving over a workshop hoist , check that the vehicle
weight does not exceed the permissible lifting capacity of the hoist. •
Before driving over a workshop hoist , ensure that there is suffi
cient clearance between the hoist and low parts of the vehicle .
& WARNING
To reduce the risk of serious injury and vehicle damage:
• Always lift the vehicle only at the special workshop hoist and
floor jack lift points illustrated
=> fig . 239 and => fig . 240 .
• Failure to lift the vehicle at these points could cause the vehicle
to tilt or fall from a lift if there is a change in vehicle weight distri
bution and balance . This might happen, for example, when heavy
components such as the engine block or transmission are
removed .
• When removing such heavy components, anchor vehicle to
hoist or add corresponding weights to maintain the center of
gravity . Otherwise , the vehicle might tilt or slip off the hoist ,
causing serious personal injury .
•
Do-it -yourself service
Page 343 of 368

_________________________________________________ G_ e_ n_ e_r _a _l_ i_n _f_o _ r_ m_ a_ t
_ i
_ o _ n
__ __
T he sa fe ty co mplia nce s ticke r
is your assurance t hat your new vehicle complies with a ll applicable
Federa l Motor Vehic le Safety Standards which were in effect at the
t ime the veh ic le was manufactured . You can find t his st icker on the
left door jamb. It shows the mon th and year of production and the
vehic le identification number of your vehic le (perforation) as well as
the Gross Veh icle Weight Rating (GVWR) and the Gross Axle Weight
Rating (GAWRl.
Th e high volt ag e wa rning la bel
is located on the lock carrier .
The spark ignition syste m mee ts all requirement s of the Canadi an
Interf ere nc e-C au si ng Equipm ent Regulati ons. •
Weights
Gross Veh icle Weight R ating
The G ross Veh ic le Weight Rat ing (GVWR), and the Gross Ax le Weight
Rating (GAWR) for front and rear are listed on a sticker on the left
door jamb .
The Gross Vehicle Weight Rating includes the we ight of the basic
vehic le plus fu ll fuel tank, oil and coolant, plus maximum load,
whic h inc ludes passenger weight ( 150 lbs/68 kg per designated
seating position) and luggage weight.
Gr oss Axle Weight Ra ting
The Gross Ax le Weight Rating is the maximum load that can be
app lied at each axle of the
veh ic le =:> & .
Vehicl e cap acit y w eight
The vehicle capacity weight (max. load) is listed either on the
driver's side 8 -pillar or inside the fuel fi ller f lap .
Controls and equip
ment Safety first Vehicle operation
Roof
weight
The maximum permissible roof we ight is
165 lb (75 kg ). The roof
weight is made up of the weight of the roof rack system and the
weight of the object being
transported =:> page 117, "L oading the
roof rack".
LJ}. WARNING
• The actual Gr oss Axle Weight R atin g at the front and re ar ax les
s hould not ex ceed the permi ssible w eight s, and th eir combination
mu st not e xceed the Gr oss Vehicle Weight R atin g.
• Exceeding pe rmi ssible weight ratin gs can re sult in vehicle
d am age , acc ident s and per son al inju ry.
0 Note
• The vehicle capacity weight figures apply when the load is
distr ibuted even ly in t he ve hicle (passengers and l uggage). When
transporting a heavy load in the luggage compartment, carry the
load as near to the rear axle as possib le so that the vehic le's
handling is not impaired .
• Do not exceed the maxim um permissib le axle loads or the
maximum gross vehic le weight. Always remember that the vehic le's
handling wi ll be affected by the extra load . Therefore, adjust your
speed according ly.
• Always observe local reg ulations. •
Dimensions
The specifications refer to the basic mode l. Differences may occur
depending on the mode l type and options ordered, for example, tire
sizes.
..,
Vehicle care Do-it-yourself service Technical data