jack AUDI A4 AVANT 2008 Owners Manual
[x] Cancel search | Manufacturer: AUDI, Model Year: 2008, Model line: A4 AVANT, Model: AUDI A4 AVANT 2008Pages: 368, PDF Size: 46.19 MB
Page 5 of 368
Safety belts .................. .
Safety belt tensioner ..... ... .. .
Airbag system ........ .... .. .. .
Important th ings to know .. .... .
Front airbags .. ... .. ... ...... . .
Monitoring the Advanced Airbag
System ... ..... .... ..... .. ... .
Side airbags .... ... ...... ..... .
Side curtain airbags (SIDEGUARD™l
Child Safety .. ... ... ..... ... ... .
Important things to know .... .. .
Child safety seats ........ ... .. .
Insta lling a ch ild safety seat .... .
Addit ional Information .... ..... .
Lower anchorages and tether for
chi ldren (LA TCH) .......... ... .. .
t
181
185
187
187
191
198
203 207
210
210
215
220
223
225 Avoid damag
ing the vehicle .....
Operate your vehicle economically
and minimize pollution ......... .
Trailer towing .......... ... .. .. .
Driv ing w it h a trailer ... .... .... .
Trai ler towing t ips ....... ...... .
Vehicle care ........ ... ... .
C lean ing and protection ...... .
Genera l information ........... .
Care of exterior ....... .. .. .. ... .
Care of interior ................ .
Fuel supply and filling your fuel
tank ........ .... .. ... .... ...... .
245
245
248
248
250
253
254
254
254
261
267
Gasoline . . . . . . . . . . . . . . . . . . . . . . . 267
Fuel tank . . . . . . . . . . . . . . . . . . . . . . 268
Vehicle operation . . . . . . . . 235 Checking and filling . . . . . . . . . . . . 212
Intelligent technology ... ...... .
Notice about data recorded by
veh icle contro l modules ....... .
Electronic Stabilization Program
(ESP) ......................... .
Braking .. ... ... ... ... ... .. ... .
Servotronic®
-advanced power
steering system . ......... .. ... . 236
236
236
239
241
Driv ing w ith your quattro® . . . . . . 242
Driving and environment . . . . . . 243
The first 1,000 miles (1,500 kml and
afterwards . . . . . . . . . . . . . . . . . . . . 243
Cata lytic conver ter . . . . . . . . . . . . . 244 Engine
hood ......... ......... .
Engine compartmen t .... ... ... .
Engine oil ... ...... ... ....... .. .
Engine cooling system .. .... ... .
Brake fluid . ............... .... .
Ba ttery ...... .......... .... ... .
Windshield/headlight washer
con ta iner .. ........ ... ........ .
Tires and whee ls ..... ......... .
Tires .......... ...... .. .. ..... . 272
2 74
275
280
284
285
291
293
293
Tabl e of cont ents
Do-it-yourself service . . . 3 15
What do I do now? . ......... ... 316
Jack, tools and spare wheel . . . . . . 316
W hee l change ............... ... 318
Fuses and bulbs . . . . . . . . . . . . . . . . 326
Fuses ........ ......... ..... .... 326
Bu lbs .............. ... ... ... ... 328
Eme rgency sit uations . . . . . . . . . . 330
Genera l . . . . . . . . . . . . . . . . . . . . . . . . 330
Starting by pushing or towing . . . . 330
Starting with jumper cables . . . . . . 330
Use of jumper cables . . . . . . . . . . . . 331
Emergency tow ing with comme rcial
tow truck . . . . . . . . . . . . . . . . . . . . . . 332
Lif ting the vehicle . . . . . . . . . . . . . . . 335
Technical data
General in for matio n
339
340
E xplanat ion of technical data . . . . 340
Vehicle identification . . . . . . . . . . . . 340
Weights . . . . . . . . . . . . . . . . . . . . . • . . 341
Dimensions . . . . . . . . . . . . . . . . . . . . 341
irechnical data
Page 318 of 368
lllffll....__W_ h_ a_ t_d_ o_ l _d _o_ n_ o_ vv_ ? ______________________________________________ _
What do I do now?
Jack, tools and spare wheel
Jack and tools
The tools and jack are stored underneath the floor panel
in the luggage compartment.
F ig. 222 Tool case and
ve hicle jack
Fi g. 223 O pen too l
case
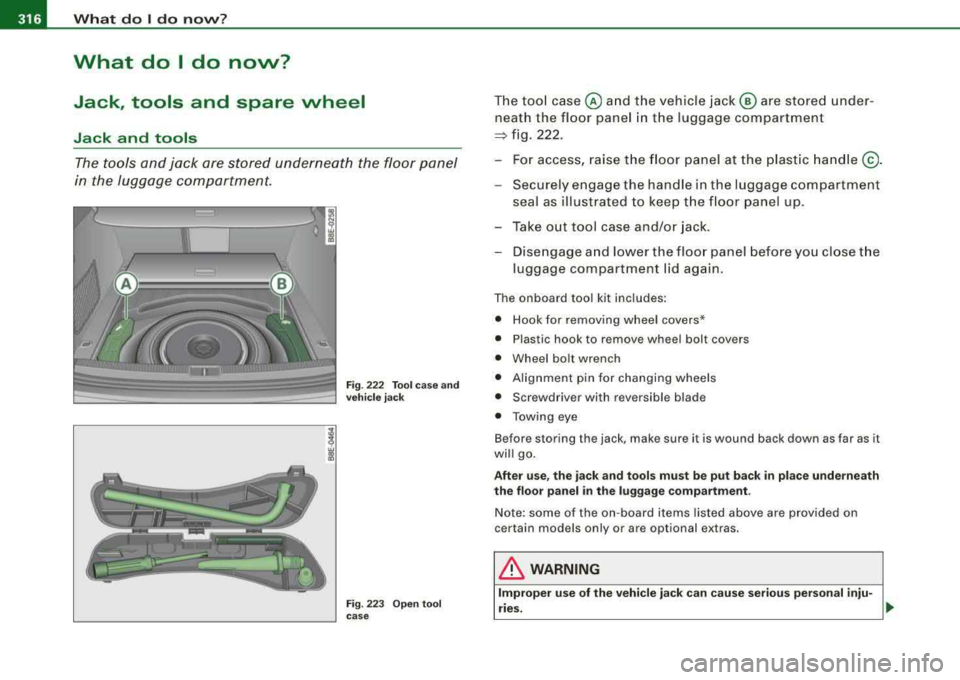
The tool case @ and the vehicle jack@ are stored under
neath the floor panel in the luggage compartment
=> fig. 222.
- For access, raise t he floor panel at the plastic ha ndle @ .
- Securely engage the handle in the luggage compartment
seal as illustrated to keep the floor panel up.
- Take out tool case and/or jack.
- Disengage and lower the floor panel before you close the
luggage compartment lid again.
The onboard tool kit inc ludes:
• Hook for removing wheel covers*
• Plastic hook to remove wheel bolt covers
• Wheel bo lt wrench
• Alignment pin for changing wheels
• Screwdriver with reversible blade
• Towing eye
Before storing the jack, make sure it is wound back down as far as it
will go.
Afte r use, th e ja c k a nd tools m us t b e put bac k in pl ace u nderneath
th e floor p an el in th e lu g gage c omp artment .
Note: some of the on -board items listed above are provided on
certain models only or are optional extras.
& WARNING
Improper us e of th e vehi cle ja ck ca n ca use se rious pe rso nal inju
r ies.
Page 319 of 368
_____________________________________________ W_ h_ a_t _d_ o_l
_ d_o _ n_o_ w_ ? _ __,_
/b, WARNING (continued)
• Using a bumper jack to raise the vehicle will damage the
bumper system. The jack may slip, causing injury.
• Never support your vehicle on cinder blocks, bricks or other
objects. These may not be able to support the load and could
cause injury when they fail.
• Never start or run the engine while the vehicle is supported by
the jack.
• If you must work under the vehicle, always use safety stands
specifically designed for this purpose.
• Never try and use the hexagonal socket
in the handle of the
screwdriver to loosen or tighten the wheel bolts.
• Always make sure the spare tire and even a flat tire are secured
in place and not loose, otherwise they could fly forward, causing
personal injury to passengers in the vehicle in an accident or
sudden maneuver.
• Never use the jack supplied with your Audi on another vehicle,
particularly on a heavier one. The jack is only suitable for use on
the vehicle it came with.
•
Spare wheel
The spare wheel is stored in the wheel well underneath
the floor panel in the luggage compartment.
Fig. 224 Luggage
compartment : spare
wheel
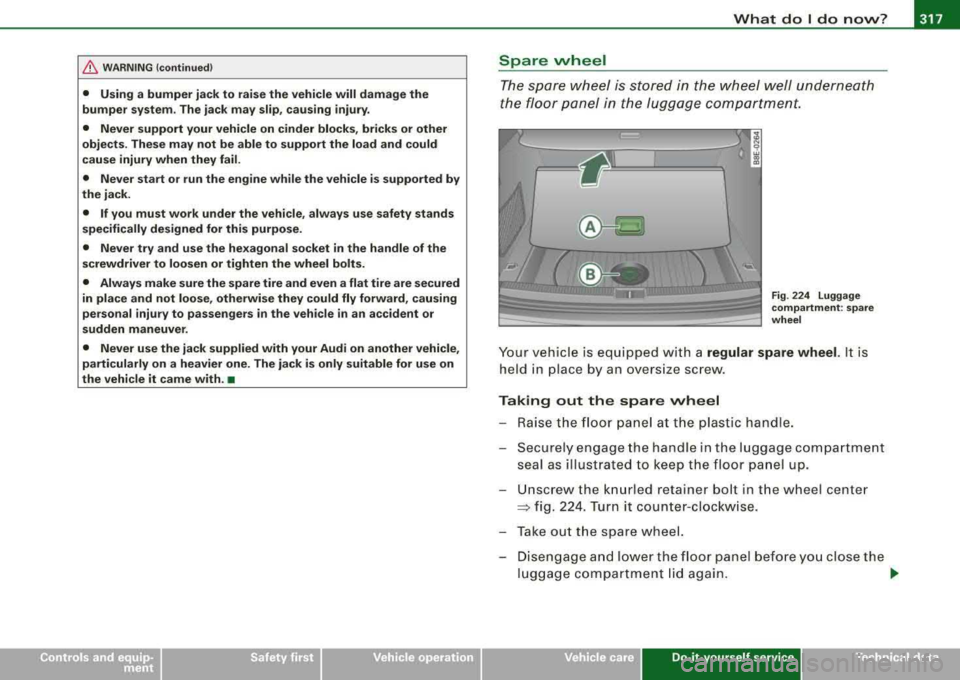
Your vehicle is equipped with a regular spare wheel. It is
held in place by an oversize screw.
Taking out the spare wheel
- Raise the floor panel at the plastic handle.
- Securely engage the handle in the luggage compartment
seal as illustrated to keep the floor panel up.
- Unscrew the knurled retainer bolt in the wheel center
=> fig. 224. Turn it counter -clockwise .
- Take out the spare wheel.
- Disengage and lower the floor panel before you close the
luggage compartment lid again.
..,.
Do-it-yourse lf service irechnical data
Page 320 of 368

___ w_ h_ a_t _ d_ o_ l_d _ o_ n_ o_w _ ? ______________________________________________ _
Storing the replaced wheel
- Place the replaced wheel inside the spare wheel well in
the luggage compartment.
- Tighten the knurled retaining screw clockwise to secure
the wheel in place.
- Disengage and lower the floor panel before you close the
luggage compartment lid again.
& WARNING
Loose items in the passenger compartment can cause serious
personal injury during hard braking or in an accident.
• Never store the spare wheel or jack and tools
in the passenger
compartment.
• Always store all jacking equipment, tools, and the spare wheel
in the luggage compartment.
• Tighten the knurled retaining screw for the spare wheel
securely.
[ i] Tips
Check the inflation pressure of the spare tire periodically to keep the
tire ready for use. •
Wheel change
Before changing a wheel
Follow these points for your own and your passenger's
safety when replacing a wheel.
After you experience a tire failure, pull the car well away
from moving traffic and try to reach
level ground before
you
stop ~& .
-All passengers should leave the car and move to a safe
location (for instance, behind the
guardrail) ~& .
-Apply the parking brake firmly ~& .
-Move selector lever to position P on an automatic trans-
mission; put manual transmission in
first gear~& .
-If you are towing a trailer: unhitch the trailer from your
vehicle.
- Take the
tool case and the spare tire ~ page 316 out of
the luggage compartment.
& WARNING
You or your passengers could be injured while changing a wheel if
you do not follow these safety precautions:
• If you have a flat tire, move a safe distance off the road. Turn off
the engine, turn the emergency flasher on and use other warning
devices to alert other motorists.
• Make sure that passengers wait
in a safe place away from the
vehicle and well away from the roadway and traffic.
• To help prevent the vehicle from moving suddenly and possibly
slipping off the jack, always fully set the parking brake and block
the wheel diagonally opposite the wheel being changed . When one
front wheel is lifted off the ground, placing the Automatic Trans-
~
Page 321 of 368
What do I do now? 11111111
-----------------------------------
& WARNING (continued)
mission in "P" (Park), or engaging a gear in a manual transmission
will
not prevent the vehicle from moving.
• Before you change a wheel, be sure the ground is level and firm.
If necessary, use a sturdy board under the jack.
• After installing the spare wheel, make sure that you remount
the flat tire/wheel in its storage area properly and tighten the
knurled retaining screw securely . •
Changing a wheel
When you change a wheel, follow the sequence described
below step-by-step and exactly in that order.
1. Remove the decorative wheel cover*. For more details
see also
=> page 320, "Decorative wheel covers" or
=> page 320, "Wheels with cap -covered wheel bolts".
2. Loosen the wheel bolts => page 321.
3.
Locate the proper mounting point for the jack and align
the jack below that
point=> page 321.
4. Lift the car with the jack => page 321.
5.
Take the flat wheel off and then put the spare on
=> page 323.
6. Tighten all wheel bolts lightly.
7.
Lower the vehicle with the jack.
8. Use the wheel bolt wrench and
firmly tighten all wheel
bolts=> page 321.
9. Put the decorative wheel cover* back on.
LJ}. WARNING
Always read and head all WARNINGS and information :::::> & in
"Raising the vehicle" on
page 321 and :::::, page 324. •
After changing a wheel
A wheel change is not complete without the following
actions.
-Store and secure the replaced wheel in the spare wheel
well.
-Put the tool case and the jack back in place in the luggage
compartment.
-Check the tire pressure on the spare wheel immediately
after mounting it.
- As soon as possible, have the
tightening torques on all
wheel bolts checked with a torque wrench. The correct
tightening torque is
90 ft lb (120 Nml.
- Have the flat tire
replaced as soon as possible.
[ i] Tips
• If you notice while changing a tire that the wheel bolts are
corroded and difficult to turn, then they should be replaced before
you check the tightening torque.
• Drive at reduced speed until you have the tightening torques
checked .•
Do -it -yourself service
Page 323 of 368
What do I do now ? -
------------------'
Loosening and tightening the wheel bolts
The wheel bolts must be loosened before raising the
vehicle .
Loosening
Fig . 227 Wheel
c h an ge : loose ning t he
w heel b olts
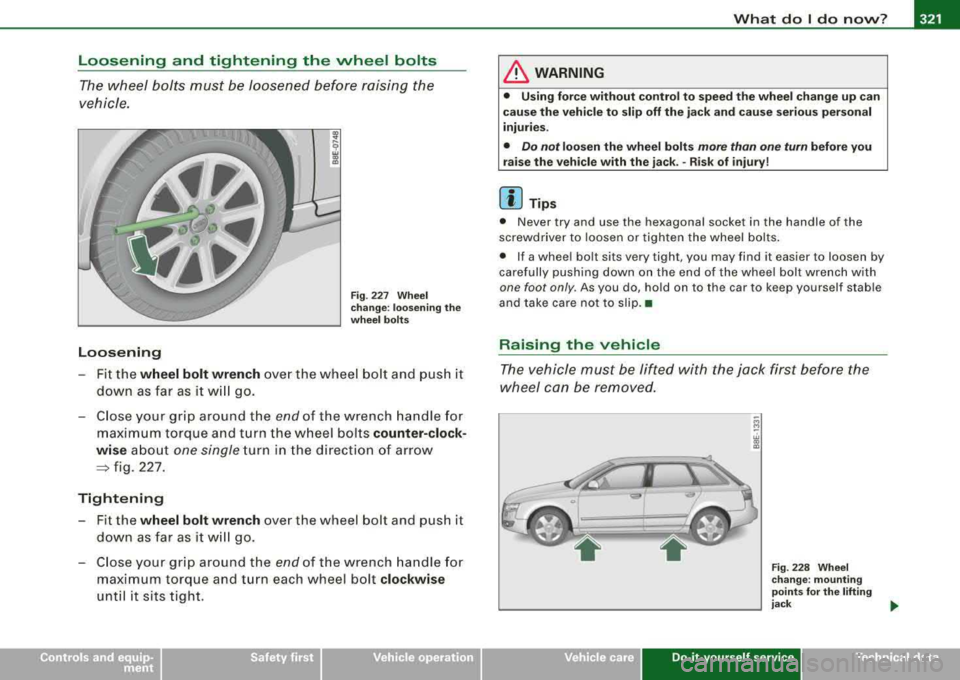
- Fit the wheel bolt wrench over the whee l bo lt and push it
down as far as it w ill go.
- C lose your grip around the
e n d of the wrench ha n dle for
maximum torque and t urn the wheel bolts counter-clock
wi se abo ut
one single turn in the direction of ar ro w
=> fig. 227.
Tight ening
Fit the wheel bolt wrench over the wheel bolt and push it
down as far as it w ill go .
- C lose your grip around the
end of the wrench handle for
maximum torque and turn each wheel bolt clockwise
until it sits tight.
LJ}. WARNING
• Using f orc e without control t o speed t he wh eel ch a nge up can
c au se th e vehicle t o slip off the jack and cau se seriou s per son al
injurie s.
• Do n ot lo osen the wheel b olt s more than one turn before y ou
r a is e th e vehi cle with the jack .
-Ris k of inju ry!
[ i] Tip s
• Never try and use the hexagonal socket in the handle of the
screwdriver to loosen or tighten the wheel bolts .
• If a whee l bolt sits very tight, you may find it easier to loosen by
carefully pushing down on the end of the whee l bolt wrench w ith
one foot only . As you do, ho ld on to the car to keep yourself stab le
and take care not to slip. •
Raising the vehicle
The vehicle must be lifted with the jack first before the
wheel can be removed.
F ig . 228 W hee l
c ha nge : m ount ing
po ints
for th e li fting
j ack _,.
Do-it-yourself service irechnical data
Page 324 of 368
-What do I do now? Pt'l:f....__ ______________ _
Fig. 229 Clo se- up:
pr ope r pos itio ning of
l ifting ja ck
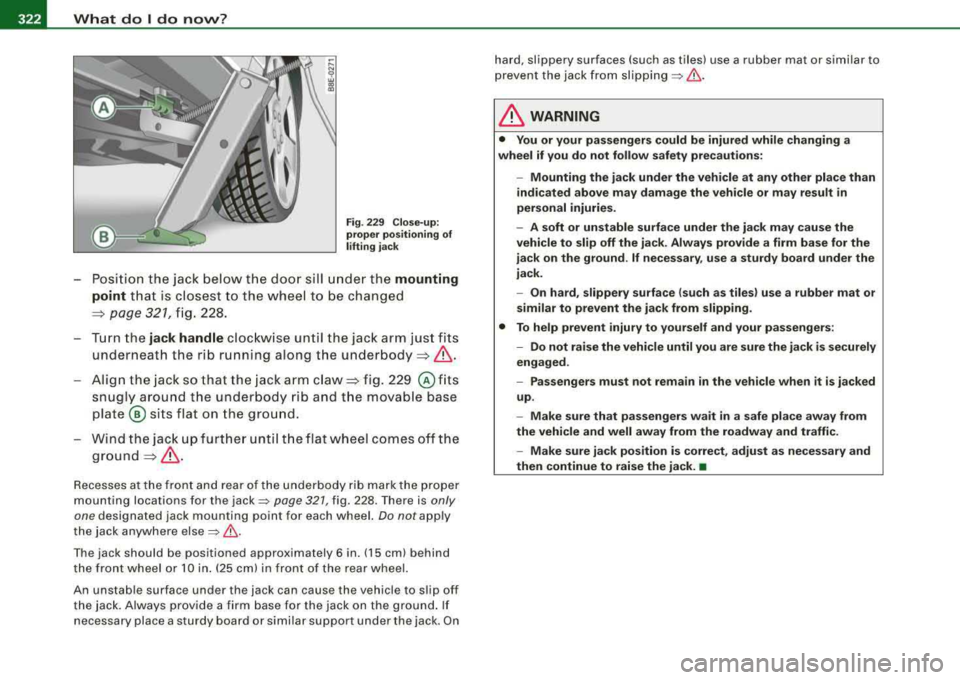
- Posi tion the jack below the doo r si ll un der the mounting
point
t h at is c losest to the whee l to be changed
=> page 321, fig . 228.
- Turn the
jack handle cloc kw ise unt il the jack arm jus t fits
underneath the rib running along th e under body
=> & .
Align the jack so that th e jack arm claw=> fig. 229 @ fits
snugly arou nd the under bod y rib and t he movab le base
plate @ sits flat on the ground.
W ind t he jac k up fur ther until th e fl at wh eel comes off th e
g roun d=> & .
Recesses a t the fron t a nd r ear of th e u nderbody rib ma rk the prop er
mounting locations for the
jack~ page 321 , fig. 228. There is only
one
designated jack mo unting point fo r each w hee l. Do not apply
the jack anywhere else
=> & -
The jack should be positioned approximately 6 in. (15 cm) behind
t he fron t whe el or 10 in . (25 cm) in fron t of t he rear whee l.
An unstab le surface unde r the jack can cause the vehicle to s lip off
the jac k. Alwa ys provi de a fir m base fo r the jack on the g roun d. If
necessary place a sturdy board or simi lar support under the jack . On hard
, slippery surfaces (su ch as tiles) use a rubber mat or simi lar to
p revent the jack fr om
slippi ng => & .
& WARNING
• You or your pa ssengers could be injured while changing a
wheel if you do not follow safety precaut ions:
- Mounting the jack under the veh icle at any other place than
indicated above may damage the vehicle or may result in
personal injuries .
- A soft or unstable surfa ce under the ja ck may cause the
vehicle to slip off the ja ck. Always provide a firm base for the
jack on the gro und .
If nece ss ary , use a sturdy board under the
jack .
- On hard , slippery surface (such as tiles) use a rubber mat or
similar to prevent the jack from slipping .
• To help prevent injury to yourself and your passengers :
- Do not raise the vehicle until you are sure the jack i s securely
engaged .
- Passengers must not remain in the vehicle when it is jacked
up .
- Make sure that pa ssengers wait in a s afe pla ce away from
the vehicle and well away from the roadway and traffic .
- Make sure jack position is correct , adjust as necessary and
then continue to raise the jack .
•
Page 325 of 368
What do I do now? -
------------------'
Taking the wheel off /putting the spare on
Follow these instructions step-by-step for changing the
wheel
Fig . 230 Wheel
change : using the
screwdriver handle
(with the blade
removed) to turn the
bolts
Fig . 231 Wheel
change : alignment pin
inside the top hole
After you have loosened all wheel bolts and jacked the
vehicle off the ground, perform the following steps to
remove and replace the wheel:
Removing the wheel
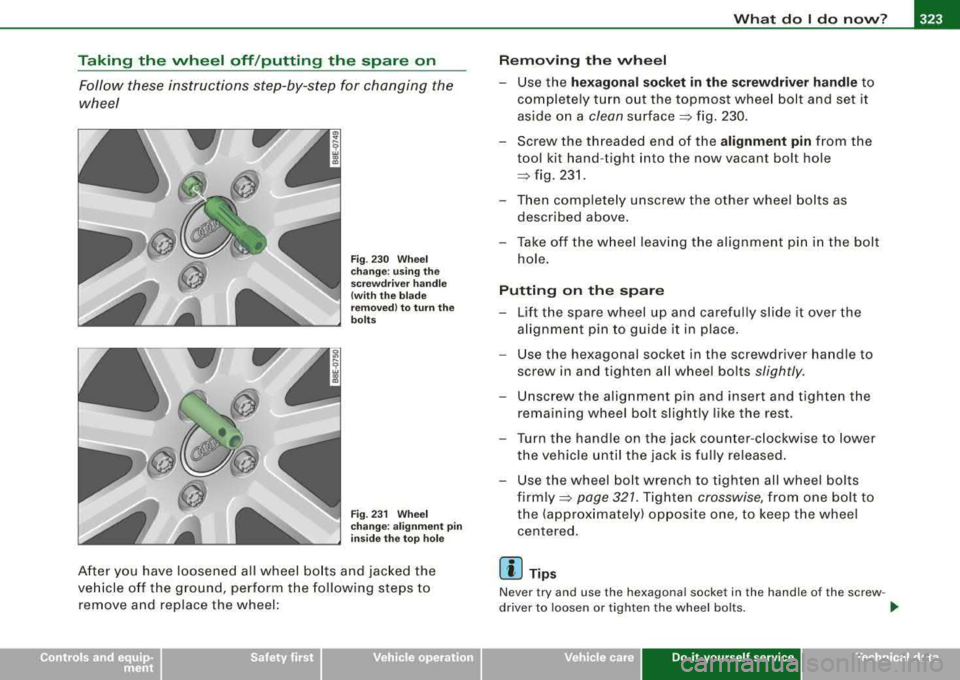
-Use the hexagonal socket in the screwdriver handle to
completely turn out the topmost wheel bolt and set it
aside on a
clean surface => fig. 230.
-Screw the threaded end of the alignment pin from the
tool kit hand -tight into the now vacant bolt hole
=> fig. 231 .
-Then completely unscrew the other wheel bolts as
described above.
-Take off the wheel leaving the alignment pin in t he bolt
hole.
Putting on the spare
-Lift the spare wheel up and carefully slide it over the
alignment pin to guide it in place.
-Use the hexagonal socket in the screwdriver handle to
screw in and t ighten all wheel bolts
slightly .
-Unscrew the alignment pin and insert and tighten the
remaining wheel bo lt slightly like the rest.
-Turn the handle on the jack counter-clockwise to lower
the vehicle until the jack is fully released.
-Use the wheel bolt wrench to tighten all wheel bolts
firmly =>
page 327. Tighten crosswise, from one bolt to
the (approximately) opposite one, to keep the wheel
centered.
[ i] Tips
Never try and use the h exagonal socket in the handle of the screw -
driver to loosen or tighten the wheel bolts.
.,
Do-it-yourse lf service irechnical data
Page 326 of 368
____ w_ h_ a_t _ d_ o_ l_d _ o_ n_ o_w _ ? ______________________________________________ _
• Pull the reversible b lade from the screwdriver before you use the
h exago nal soc ket i n the ha ndle to tur n the wheel bo lts.
• When mounting tires with
unidirectional tread design make sure
th e trea d pat tern is po inte d the rig ht
way => page 324.
• T he whee l bo lts should be clean and easy to turn. Check for dirt
and c orrosio n on the m ating su rfaces of bo th the whee l a nd th e
hub . Remove a ll dirt from these surfaces before remou nting the
w heel. •
Tires with unidirectional tread design
T ir es wit h unid irectio nal tr ea d d esign must b e moun ted
with th eir tread pattern po int ed the r ight direction .
Using a spare tire with a tread pattern intended for use
in a specific direction
Whe n usi ng a s pa re t ire wi th a tre ad patte rn inte nd ed for use in a
specific direct ion, please note the followin g:
• The di rec tio n of rot ation is marked by an arr ow on th e s ide o f the
tir e.
• If the s pare tir e ha s to be ins talle d in th e inco rrect directi on i n the
event of a flat tire, use th e spar e tire on ly temporarily since the tire
w ill n ot be a ble to achieve it s optimum pe rform ance cha rac te ri sti cs
wi th r egar d to a qua plani ng , noise an d w ear .
• W e rec om mend th at p arti cula r att ent ion be pai d to this fac t
dur in g wet weath er and that you adjust your sp eed to match road
c o nd it io ns.
• R eplace the flat ti re with a new one and have it instal led on your
v e hi cle as soo n as poss ib le to re st ore th e hand ling a dva ntages of a
p roper ly pointed direction -dependent t ire.•
Notes on wheel change
P lease read the information => page 305 , "N ew tire s and replacing
t ir es a nd whe els" if you are going to use a spa re tire w hich is
different from the t ires on you r ve h ic le.
Aft er you ch ange a tire:
• Check the tire pressure on the spare immediately after
mounting .
• Have the wheel bolt tightening torque checked with a torque
wrench as soon as possible by your authorized Audi dealer or a qualified service station .
• On steel and alloy wheel rims , the wheel bolts are correctly tight
ened with a torque of 90 ft lb (120 Nm ).
• If you notice while changing a tire that the wheel bolts are
corroded and difficult to turn while changing a tire , they should be
replaced before you check the tightening torque.
• Replace the flat tire with a new one and have it installed on your
vehicle as soon as possible . Remount the wheel cover.
Until then, drive with extra care and at reduced speeds .
& WARNING
• If you are going to equip your vehi cle with tires or rims which
differ from those which were factory installed , then be sure to read
the information
=> page 305 , "New tires and replacing tires and
wheels ".
• Always make sure the damaged wheel or even a flat tire and
the jack and tool kit are properly secured in the luggage compart
ment and are not loose in the passenger compartment .
• In an accident or sudden maneuver they could fly forward ,
injuring anyone in the vehicle .
• Always store damaged wheel, jack and tools securely in
luggage compartment . Otherwise, in an accident or sudden
Page 337 of 368

Emergency situations -
----------------=-=---
Rear hook up
These s te p s app ly fo r w in chi ng the vehi cle on to a car
c arr ier w ith the re a r f ir st.
- Have the vehic le ali gne d cent ered wi th the ca r carr ier
r a mp.
- Attach the win ch hook to t he
rear to wline eye
=> pa ge 334, fig. 237 .
- On ce th e ca r is po sit io ned on t he car ca rrie r, ha ve safety
c hain (s ) a ttach ed t o the
fron t towline eye => pag e 333an d
ti ghte ned .
[ i] Tips
Chec k carefu lly to ma ke sure the veh icle is hoo ked up securel y
b ef ore mov ing the ca r up the ca r ca rrier r amp. •
Lifting the vehicle
Important safety precautions
Be aware of the following hazards before l ift ing the vehic le w ith a
w ork sho p ho is t or f lo or jack :
• The vehicle should never be lifted or jacked up from underneath
the engine oil pan, the transmission housing , the front or rear axle
or the body side members . This could lead to serious damage.
• Use lifting equipment with padded contact surfaces to avoid
damage to the underbody or chassis frame.
• Alternatively, cover the contact surfaces on workshop hoist or
floor ja ck with rubber pads before lifting.
• Before driving over a workshop hoist , check that the vehicle
weight does not exceed the permissible lifting capacity of the hoist. •
Before driving over a workshop hoist , ensure that there is suffi
cient clearance between the hoist and low parts of the vehicle .
& WARNING
To reduce the risk of serious injury and vehicle damage:
• Always lift the vehicle only at the special workshop hoist and
floor jack lift points illustrated
=> fig . 239 and => fig . 240 .
• Failure to lift the vehicle at these points could cause the vehicle
to tilt or fall from a lift if there is a change in vehicle weight distri
bution and balance . This might happen, for example, when heavy
components such as the engine block or transmission are
removed .
• When removing such heavy components, anchor vehicle to
hoist or add corresponding weights to maintain the center of
gravity . Otherwise , the vehicle might tilt or slip off the hoist ,
causing serious personal injury .
•
Do-it -yourself service