oil temperature AUDI A4 AVANT 2008 Owners Manual
[x] Cancel search | Manufacturer: AUDI, Model Year: 2008, Model line: A4 AVANT, Model: AUDI A4 AVANT 2008Pages: 368, PDF Size: 46.19 MB
Page 15 of 368

® Reset button for Service indicator .... ... .. .... ... .
@ Reset button for trip odometer .... .... .... ...... .
17
18
The instrument cluster illuminates whenever you switch on the ign i
tion with the
vehicle headlights off. The instrument cluster illumina
tion dims automatically as the daylight begins to fade away . It goes
out completely when the outside light is very dim . The reason for
this is to remind you to turn on the headlights when the light condi
tions become poor.
•
Engine coolant temperature gauge
The engine coolant gauge 0~ page 12, fig . 2 only works when the
ignition is on. To prevent damage to your engine, please note the
f o llowing important points:
Engine cold
As long as the needle remains at the left end of the gauge, the
engine still has not reached its operating temperature. Avoid high
engine speeds, heavy engine loads and heavy throttle .
Normal temperature
When the engine has reached its operating temperature, the needle
wi ll move into the midd le of the gauge and remain there. If the
engine is working hard at high outside temperatures, the needle
may turn further to the right. This is no cause for concern as long as
the
J_ warning light in the instrument cluster does not illuminate.
When the
_t_ warning light starts to flash, this can mean one of two
th ings : either the coolant
temperature is to o high, or the coolant
level is too low~ page 31 .
& WARNING
• Always observe the warning in ~ page 265, "Engine compart
ment" before opening the engine hood and checking the engine
c oolant level .
Controls and equip
ment
Instruments and warning /indicator lights
& WARNING (continued )
• Never open the engine hood if you see or hear steam, or if you
see engine coolant dripping from the engine compartment . You
could burn yourself. Let the engine cool off first so that you cannot
hear or see any steam or engine coolant.
0 Note
• Mounting additional lights or accessories in front of the air inlets
reduces the coo ling effect of the radiator . At high outside tempera
tures or high engine load, the engine cou ld overheat.
• The front spoi ler has been designed to properly distribute the
cooling air when the vehicle is moving. If the spoiler is damaged,
this could reduce the cooling effect and the engine could then over
heat. Ask your author ized Audi dealer for assistance .•
Tachometer {engine rev counter)
The tachometer indicates the engine RPM (revolutions per
minutes).
The tachometer 0 ~ page 12, fig. 2 is the left one of the two large
c lock -type displays.
The engine turns at a speed
1,000 times the sin gle digit in the
display, e .g . if the needle points at the "2", the engine turns at
2,000 RPM.
If the engine RPMs drop below 1,500, you shou ld downshift to the
next lower gear. The red area at the end of the scale indicates
maximum permissible engine RPMs after the break-in period.
Before reaching this area, you should either shift into the next
higher gear or ease your foot off the accelerator pedal.
.,_
Page 33 of 368
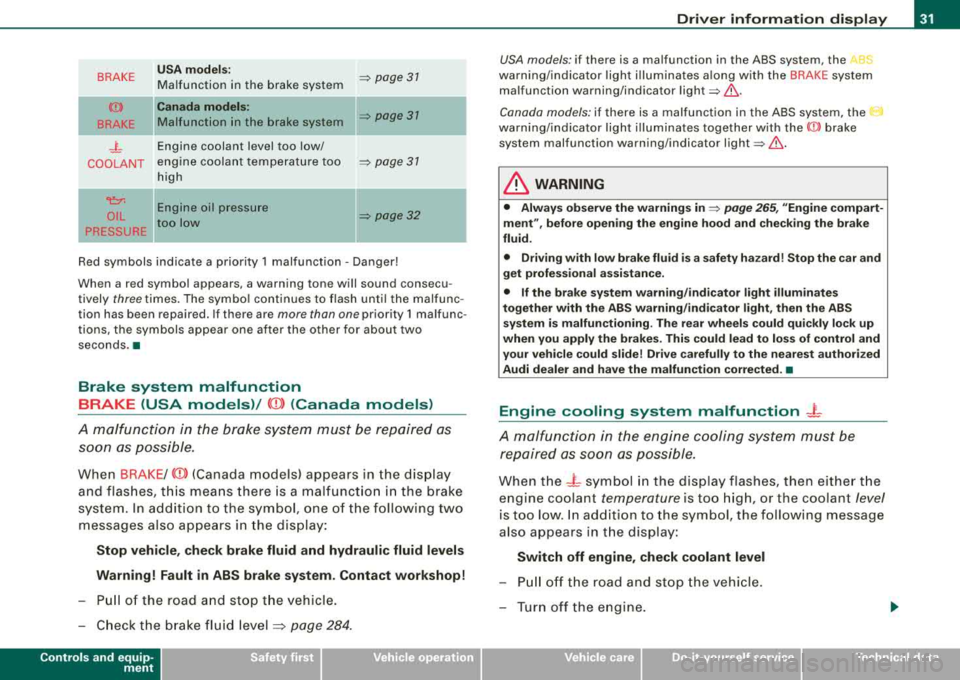
BRAKE
(Ci))
BRAKE
_j_
COOLANT
~
OIL
PRESSURE USA
models:
Malfunction in the brake system
Canada models:
Malfunction in the brake system
Engine coolant level too low/
engine coolant temperature too
high
-
Engine oil pressure
too low =>
page 31
=> page 31
=> page 31
=> page 32
Red symbols indicate a priority 1 malfunction -Danger!
When a red symbol appears , a warning tone will sound consecu
tively three times. The symbol continues to flash until the malfunc
tion has been repaired. If there are more than one priority 1 malfunc
tions, the symbols appear one after the other for about two
seconds .a
Brake system malfunction BRAKE (USA models)/
(CD) (Canada models)
A malfunction in the brake system must be repaired as soon as possible.
When BRAKE/ (CD) (Canada models) appears in the display
and flashes, this means there is a malfunction in the brake
system. In addition to the symbol, one of the following two
messages also appears in the display:
Stop vehicle, check brake fluid and hydraulic fluid levels
Warning! Fault in ABS brake system. Contact workshop!
- Pull of the road and stop the vehicle.
- Check the brake fluid
level :::;, page 284.
Controls and equip
ment
Driver information display
USA models : if there is a malfunction in the ABS system, the ABS
warning/indicator light illuminates along with the BRAKE system
malfunction warning/indicator
light=> ,&..
Canada models: if there is a malfunction in the ABS system, the 0
warning/indicator light illuminates together with the ((l)) brake
system malfunction warning/indicator
light =>,&. .
& WARNING
• Always observe the warnings in => page 265, "Engine compart
ment", before opening the engine hood and checking the brake
fluid.
• Driving with low brake fluid is a safety hazard! Stop the car and
get professional assistance.
• If the brake system warning/indicator light illuminates
together with the ABS warning/indicator light, then the ABS
system is malfunctioning. The rear wheels could quickly lock up
when you apply the brakes. This could lead to loss of control and
your vehicle could slide! Drive carefully to the nearest authorized
Audi dealer and have the malfunction corrected. •
Engine cooling system malfunction -L
A malfunction in the engine cooling system must be
repaired as soon as possible.
When the - L symbol in the display flashes, then either the
engine coolant
temperature is too high, or the coolant level
is too low. In addition to the symbol, the following message
also appears in the display:
Switch off engine, check coolant level
- Pull off the road and stop the vehicle.
- Turn off the engine.
Page 257 of 368
Cleaning and protection -
------------~---
High temperatures, as from exposure to intense sunlight, intensify
the corrosive effect particularly when humidity is high as well.
Under certain circumstances,
weekly washing may be necessary.
Under other conditions, a monthly washing and waxing may be
adequate.
After the winter, the
underside of the vehicle should be thoroughly
washed preferably in a professional car wash.
& WARNING
Always read and heed all WARNINGS and the information
~ page 254 . •
Automatic car wash
The vehicle can be washed in almost any modern auto
matic car wash.
The vehicle paint is so durable that the vehicle can normally be
washed without problems in an automatic car wash. However, the effect on the paint depends to a large extent on the design of the
facility, the filtering of the wash water, the type of wash and care
material, etc. If the paint has a dull appearance after going through
the car wash or is scratched, bring this to the attention of the oper
ator immediately . If necessary, use a different car wash .
Before going through a car wash, be sure to take the usual precau
tions such as closing the windows and power roof* . Remove
antenna if applicable.
If you have installed additional accessories on the vehicle -such as
spoilers, roof rack, etc . - it is best to ask the car wash operator if
these should be removed.
& WARNING
Always read and heed all WARNINGS and the information
=> page 254. •
Washing the vehicle by hand
A lot of water is needed when washing a vehicle by hand.
- Before you start washing, make sure you have read and
understood the
WARNINGS=> & in "General informa
tion" on
page 254 .
- First soak all dried dirt until it is soft, then rinse it off.
- As you clean your vehicle, start with the roof and work
your way down to the bottom, using a sponge, a sponge
glove or a clean brush.
- Rinse the sponge or the sponge glove often, flushing it
clean each time.
- Use special car shampoo only for very persistent dirt.
- Rinse the car thoroughly with water.
- Use a chamois leather to gently wipe the exterior dry.
Use a separate sponge for cleaning the wheels, door sills and other
regions exposed to pick up road dirt. In this way, you will not
scratch the paint with coarse particles imbedded in the sponge the
next time you wash the car.
& WARNING
• Do not clean the underside of the chassis, fenders, wheel
covers, or other hard to reach parts without protecting your hands
and arms . You may cut yourself on sharp-edged metal parts.
.,
Vehicle care
Page 278 of 368
___ C_ h_ e_c _k _ i_n ~g _ a_n_ d_ f_il _li _n_ g~--------------------------------------------
prevent the formation of harmful deposits, sometimes called
"sludge", that over time can lead to expensive repairs.
At the time of printing, engine oils available in the U .S . and Canada
that meet the exacting specifications of Audi oil standard VW 502 00
are synthetic engine oils. This does not mean, however, that every
synthetic engine oil will meet Audi oil standard VW 502 00. So
always be sure that you use an approved oil.
To help prevent the formation of harmful deposits use only oil with
the following specifications printed on the oil container:
Audi oil standard VW 502 00
Oil container labels may carry the specification singly or in combi
nation with other designations and oil quality standards.
Viscosity
Engine oils are graded according to their viscosity. The proper
viscosity grade oil for your engine depends on climactic or seasonal
condi tions where you drive. You can use oil wi th a viscosity grade of
SAE 5W40 across all temperature ranges for normal driving condi
tions .
However, if engine oil viscosity grade SAE 5W40 is not available, you
can also use viscosity grade SAE 5W-30 or SAE 0W-40 as long as it
meets Audi oil quality standard VW 502 00 specifications.
Because engine oil that meets the Audi oil standard may not be
available everywhere when you need it, we strongly recommend
that you always carry with you an extra quart (liter) of oil that
expressly conforms to the VW 502 00 specification, in case you have
to top off the oil while on the road.
Only if the level of the oil is at or below the minimum mark on the
oil dipstick -and no oil that expressly conforms to Audi oil standard
VW 502 00 specifications is available - may you top off with a high
quality engine oil, preferably synthetic -based , that meets ACEA A3,
ACEA A5 or ACEA B5, API SL or ILSAC GF -3 specifications, but even
then, only in viscosity grades SAE 5W -40, SAE 5W -30, or SAE 0W -40 .
However, during the entire time between oil change intervals, never top off with more than a total of 0
.5 qt/liter engine oil that does not
conform to Audi oil specification VW 502 00.
For more information about engine oil that has been approved for
your vehicle, please contact either your authorized Audi dealer or
Audi Customer Relations at 1 (800) 822-2834 or visit our web site at
www.audiusa.com or www.audicanada.ca. Here you will also find a
current list of oils (manufacturers, brand names etc.) that conform
to Audi oil standard VW 502 00.
Changing the engine oil
The engine oil and oil filter must be changed according to the
mileage (kilometers) and time intervals specified in your vehicle's
Maintenance & Warranty booklet. Do not exceed these intervals -
harmful deposits from old engine oil can reduce engine perfor
mance and can lead to expensive engine repairs.
Changing the oil at the recommended intervals is so very important
because the lubricating properties of oil decrease gradually during
normal vehicle use. If you are not sure when you have your oil
changed, ask your authorized Audi Service Advisor.
Under some circumstances the engine oil should even be changed
more frequently . Change oil more often if you drive mostly short
distances, operate the vehicle in dusty areas or mostly under stop
and-go traffic conditions, or when you use your vehicle where
temperatures stay below freezing point for long periods.
Detergent additives in the oil will make fresh oil look dark after the
engine has been running for a short time. This is normal and is not
a reason to change the oil more often than recommended.
Damage or malfunctions due to lack of maintenance
It is essential that you change your oil at the recommended intervals
using only engine oil that complies with Audi oil standard
VW 502 00. Your Limited New Vehicle Warranty does not cover
damage or malfunctions due to failure to follow recommended
maintenance and use requirements as set forth in the Audi Owner's
Manual and Maintenance & Warranty booklet. Your dealer will have
to deny warranty coverage unless you present to the dealer proof in
.,_
Page 280 of 368
llffll...__C_ h_ e_c _k _ i_n ..::g ,_ a_n_ d_ f_il _li _n....: g==---------------------------------------------
Fig. 208 Illustra tion o f
principle 2: Markers on
oil dipstick
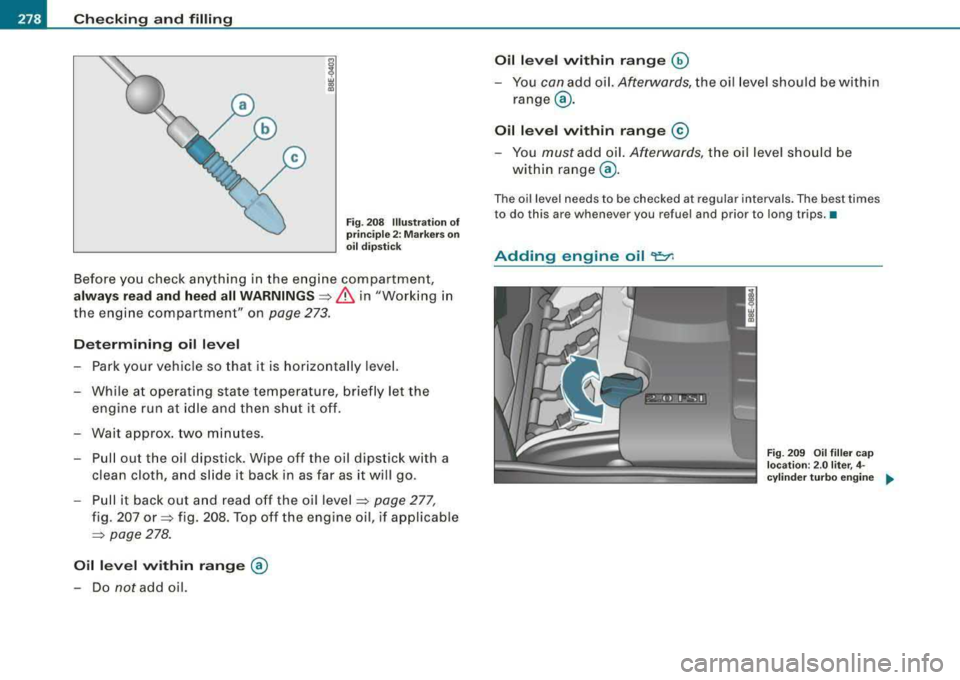
Before you check anything in the engine compartment,
always read and heed all WARNINGS => & in "Working in
the engine compartment" on
page 273.
Determining oil level
-Park your vehicle so that it is horizontally level.
- While at operating state temperature, briefly let the
engine run at idle and then shut
it off.
- Wait approx. two minutes.
- Pull out the oil dipstick . Wipe off the oil dipstick with a
clean cloth, and s lide it back in as far as it will go.
- Pull it back out and read off the oil level
=> page 277,
fig. 207 or=> fig . 208. Top off the engine oil, if applicable
=> page 278.
Oil level within range @
-Do not add oil.
Oil level within range ~
You can add oil. Afterwards, the oil level should be within
range @.
Oil level within range ©
-You must add oil. Afterwards, the oil level should be
within range @.
The oil level needs to be checked at regular intervals. The best times
to do this are whenever you refuel and prior to long trips. •
Adding engine oil 'l:::7:
Fig. 209 Oil filler cap
locat ion: 2.0 liter , 4-
cylinder turbo engine
...
Page 282 of 368
-~_C_ h_ e_c _k _ i_n ..::g :..._ a_n_ d_ f_il _li _n_, g=-----------------------------------------------
Under some circumstances the engine oi l should be changed more
frequen tly . Change oil m ore often if you drive most ly shor t
distances, operate the vehicle in dusty areas or under predom i
n ant ly stop -and -go traffic conditions , or have yo ur vehicle whe re
temperatures remain below freezing for extended periods.
Detergent additives in the oil will make fresh oil look dark after the
engine has bee n run nin g fo r a sh ort time. This is nor mal and is not
a reason to change the oi l more often than recommended .
Beca use of the proble m of p roper d isposal, along wi th the s pec ia l
tools and necessary expertise required, we strongly recommend
t hat yo u have your oi l ch anged by an authorized
Audi dealer or a
qua lified serv ice stat ion .
If you choose to change your o il yourself , please note the follow ing
i mportan t informatio n:
& WARNING
To reduce the risk of personal injury if you must change the engine
oil in your vehicle yourself :
• Wear eye prote ction .
• To reduce the risk of burns from hot engine oil , let the engine
c ool down to the touch .
• When removing the oil drain plug with your fingers, stay as far
away as po ssible . Always keep your forearm parallel to the ground
to help prevent hot oil from running down your arm.
• Drain the oil into a container designed for this purpose , one
large enough to hold at least the total amount of oil in your engine.
• Engine oil is poisonous . Keep it well out of the rea ch of ch ildren .
• Continuous contact with used engine oil is harmful to your
skin . Always prote ct your skin by washing oil off thoroughly with
soap and water.
0 Note
Never m ix o il add it ives w ith your engine o il. These add it ives can
damage you r engine and adversely affect your A udi Limited New
Ve hicle Warranty.
'i> For the sake of the environment
• B efore chang ing you r oil, fi rst make sure you k now w here you
can properly dispose of the used o il.
• Always dispose o f used eng ine oil properly. Do not dump it o n
garden soi l, wooded areas, into open st reams or down sewage
drains .
• Recycle used engine oi l by ta king it to a used engine oi l collec
tion fac ility in your area, or contac t a service stat io n .•
Engine cooling system
Coolant
T he engine coolan t performs two fun ctions: it keeps the
engine from overhe ating and it pr otec ts the engine from
f reez ing i n th e win ter.
Th e cooling system is sea led and general ly requires l itt le attention.
T he coo ling system has been fi lled at the factory with a permanent
coo la nt which does not need to be c hange d. The c oolan t consis ts of
a mixture of water and the manufacturer's glycol -based coolant
additive G12 + an tifreeze wi th anticorros io n add itives (50% for USA
models; 60% for Canadian models). This mixture both assures the
necessary frost protection and protects me tal components in the
engine's cool ing system from corrosion and scaling . It also raises
the boiling poi nt of the coolant .
Do n ot reduce t he co ncentration o f the coolan t in the su mmer by
adding plain water .
The proportion of coolant additive must be at .,_
Page 348 of 368

lffl __ C_ o_n_ s_ u_m _ e_ r_ ln_ f_
o _r _m _ a_ t_ i_o _n ______________________________________________ _
For additional road safety information, please visit the Road Safety
website at:
http://www.tc.gc.ca/roadsafety/menu.htm
•
Operating your vehicle outside the U.S.A. or Canada
Government regu lations in the United States and Canada require
that automob iles meet specif ic em ission regulations and safety
standards. Therefore, vehic les bui lt for the U.S.A . and Canada differ
from veh icles sold in ot her countries.
I f you p lan to take your vehic le outside the continental limits of the
Un ited States or Canada, there is the possib ility tha t
• unleaded fue ls for vehicles with cata lytic converter may not be
avai lable;
• fuel may have a considerably lower octane rating. Improper fuel
may cause engine damage;
• service may be inadequate due to lack of proper service faci lities,
t ools or test ing equ ipment;
• replacement parts may not be readily avai lable .
• Navigation syste ms for vehicles bu ilt for the U.S.A . and Canada
wi ll not necessarily work in Europe, and may not work in other coun
tries outside of Nort h America .
0 Note
Audi cann ot be responsible fo r mechan ical damage t hat cou ld
result from inadequate fuel, service or parts avai lab ility. •
Audi Service Repair Manuals and
Literature
Audi Official Factory Service Manuals are published as soon as
possible after model introduction Serv ice manuals are available
from :
Audi Technical Literature Ordering Center Ca ll tol l-free:
Tel. : 1 (800) 544-8021
(from 8:00 AM to 8:00 PM, EST, Monday through Friday)
or access their website www.audi .ddsltd .com on the Internet to
order repair manua ls and ot her Audi literature. •
Maintenance
General
Your vehicle has been des igne d to help keep main tenance requ ire
ments to a minimum. However, a certain amount of regu lar mainte
n ance is st ill necessary to assu re y ou r veh ic le's safety, ec onomy and
reliabi lity. For detai led vehic le maintenance consu lt your Mainte
nance
& Warran ty booklet.
Under difficult operating condition s, for example at extreme ly low
outside temperatures, in very dusty regions, when towing a trailer
very frequently, etc ., some service work sho uld be perfo rme d
between the intervals specified. This applies particu lar ly to :
• oil ch anges, and
• cleaning or replacing the air filter.
Page 356 of 368
111'1_....::::A::.:l:.!: p :.:h..:.: a:::.:: b:.::e :.:t::i c::.::: a.:..l ..:.: in :..:.:: d:.:e :.:x::..... ___________________________________________ _
Centigrade
Switching between Centigrade and Fahre nheit ...... .... .... ... ....
128
Changing a flat tire .. .... .... .... 50,318
Changing a wheel ................... 318
Changing engine oil ...... .... ...... . 279
Chassis
Undercoating .. .... .... .... .... ..
261
CHECK button . . . . . . . . . . . . . . . . . . . . . . . 16
Checking
Battery acid leve l . . . . . . . . . . . . . . . . .
288
Eng ine coo lant level . ... .. .... .... 281
Checking tire pressure ............... 299
Child restraint
Danger of using child restraints in the front seat . . . . . . . . . . . . . . . . . . . . . .
189
Child restraints
What types of chi ld restraint anchors are
ava ilable? . .... .... .... ........
223
Where can I get additional information
about child restraints? ... .... ....
224
Child safety .. .... .... ....... ... 210 ,215
Additional information .... .... .... 229
Booster seats . . . . . . . . . . . . . . . . . . . . 218
Convertible child safety seats . . . . . . 216
Convertible locking retractor . . . . . . . 220
Guidance fixtures for lower anchorages
226
Important safety instructions for using
ch ild safety seats .... .... ... ....
213
Important things to know when driving
with chi ldren ...................
210
Infant seats ..................... 215
Installing a child restraint using the
LATCH system ... ... .... .... ....
228
Lower anchorages .... ....... .... . 225
Mounting and re leasing the anchorage
hook .... .... ...... .... ... .. ...
229
Older children and safety belts 219
Safety belts and o ld er children .. ... 219
Tether anchors ...... .... .... .... 229
Tether strap .. ....... .... .... .... 230
Which rest raint system should my o lder
chi ld wear? .. ...... .... ... .. ...
219
Child safety lock ... .... ... .. ...... ... 63
child safety seat
LATCH system ....... .... .... ....
228
Child safety seats .............. .... . 215
Convertible locking retractor ....... 220
How do I properly insta ll a child safety
· h ' I 7 213 seat in my ve 1c e, .. .... .... ... .
Installing .... .... ... .. .... ......
220
Safety instructions .... .... .... ... 213
Cigarette lighter ........ .... ... .. ... 120
Cleaning
Alcantara (synthetic suede) ........
264
Engine compartment .. ... ... .. ... 265
Fabrics and fabric coverings ... .... 261
Instrument pane l .. ... .. ...... .... 262
Interior ...... .... ... .. .... .... .. 261
Leather . . . . . . . . . . . . . . . . . . . . . . . . . 263
P lastic and vinyl . .... .... ... .. ... 258
Plastic parts . .... .... .... ... .... . 262
Safety belts . . . . . . . . . . . . . . . . . . . . . 265
Trim strips . .... .... ... .... .... .. 257
trim strips . .... ...... .... ... .. ... 258
Cleaning and protection ........ .... . 254
Climate controls ...... .... .......... 125
Air distribution .... .... ..... .. ... 130
Air outlets . .... .... ... ........... 131
Air recirculation ... .... .... ..... .. 128
AUTO (standard setting) .... .... ... 127
Automatic a ir recircu lation ... ..... 129
controls . . . . . . . . . . . . . . . . . . . . . . . . 126
Defrosting/defogging .... .... .... . 131
Description ... .... .... ........... 125
ECON .... ... .. .... ...... .... .... 128
Fan .. .... .... .... .... ... .... ... 129
Key -coded setting . .... .... .... ... 132
Recommended settings ........... 125
Setting the temperature .... .... ... 127
Switching between Fahrenheit and
Centigrade . .... .... .... .... ....
128
Switching the air conditioning on and off
128
Using the c limate control economically ..
132
Warm and cold ... .... .... .... ... 125
Clock ... .... .... .... ... .. ...... .... . 14
Closing
Power sunroof ....................
68
Coat hooks . . . . . . . . . . . . . . . . . . . . . . . . . 124
Co ld tire inflation pressure .... .... ... 297
Coming-home-function .... .... ...... . 77
Compartments in the door trims ..... . 124
Compass mirror .. .... .... ..... .. .... 93
Consumer Information .... ........... 345
Continuously Variable Transmission (CVT)
See multitronic™ .. .... ........... 149
Page 358 of 368
___ A_l-=- p _h_ a_ b_e _t_ic _ a_l _in _ d_e _x ____________________________________________ _
Starting .. .. .. ...... .... .... 135, 136
Starting with jumper cables ... .... 330
Stopping . .... .... .... ... .... ... 137
Engine compartment ... .. .... .... ... 274
Safety instructions . . . . . . . . . . . . . . . 273
Working the engine compartment .. 273
Engine coolant system . ...... ...... . 280
Adding coolant .. ...... .......... 282
Checking coo lant leve l .. .. .... .... 281
Checking the engine coo lant leve l .. 281
Radiator fan . . . . . . . . . . . . . . . . . . . . . 283
Engine coolant temperature Gauge ...... ...... .... ........... 13
Engine cooling system Ma lfunction .. .... ..... .. .... .... . 31
Engine data ...... .... .... .......... 343
Engine hood Closing . ...... ..... .. .... ...... . 273
How to release the hood . . . . . . . . . . 272
Engine oil ...... .... .... .... ... .... 275
Adding ... .... ... .... .... ...... . 278
Additives . . . . . . . . . . . . . . . . . . . . . . . 278
Changing ... .. .... .... ...... .... 279
Checking the engine oi l level .. .... . 277
Indications and conditions requiring extra
checking ..... .. .... .... ... .... 277
Oil consumption .. .... .... ... .... 277
Oil grades . . . . . . . . . . . . . . . . . . . . . . . 275
Recommended o il check interva ls .. 277
Specification and viscosity . . . . . . . . 275
Engine oil level .. .... .... .... ... .... . 34
Engine oil pressure Malfunction ...... ..... .. .... .... . 32 Engine oil sensor defective
....... .... . 34
Environment Break -in period .. ...... .... .... .. 243
Catalytic converter .. ...... .... ... 244
Disposing of your vehicle battery ... 291
Driving at high speeds .. .... .... .. 245
Driving to minimize pollution and noise . 245
Fuel ... ...... .... ... .. .... .... .. 269
Fuel economy ....... ...... .... .. 245
Leaks under your vehicle ... .... ... 273
Letting the vehicle stand and warm up .. 246
Proper disposa l of drained brake fluid
284
Proper disposal of drained engine
coo lant ...... ............. ..... 282
Proper disposa l of drained engine oil
278 ,279
Recycling used eng ine oil .. .... ... 278
Un leaded fuel ..... .... ... .... ... 267
What should I do with an old battery?
291
EPC
See Electronic power control .. ... .. . 23
ESP
See Electronic stabi ll ization program
(ESP) . ... .... .... ........ ... 22, 236
Event Data Recorder (EDR) .. ....... .. 236
Expansion tank .. .... ... .... .... .... 281
F
Fahrenheit
Switching between Fahrenheit and Centigrade . ...... .... ...... .... 128
Fan Adjusting the fan speed .. ...... ... 129
Climate controls ................. 129
Radiator ...... .... .... ...... .... 283
Fastening eyes ... .... .... .... .... .. 108
Flat tire ............................. 50
Changing .. .... .... ... .... .... .. 318
Flat tire changing .. ...... .... .... .... 50
Floor mats .. ... ... .... .... .... .... . 172
Fog lights ........................... 76
Fo lding master key with remote control . 52
Foot pedals .. .. .. .... .... .... ...... 17 2
For the sake of the environment Gaso line fumes and the environment 269
Letting your engine warm up ....... 136
Reducing engine noise by early upshifting .... .... ... .... .... ... 13
Reducing engine noise by upshift ing
early . .... .... .... ... .... .... ... 13
Refueling .... .... .... ....... .... 269
Saving fuel by early upshifting . .... . 13
Saving fuel by upshifting early .. .... 13
Using the rear window defogger 131, 132
Front airbags
Description . .... .... ... .... .... .. 191
How they work .. .... ... .... .... .. 196
Front ashtray . . . . . . . . . . . . . . . . . . . . . . . 119
Front fog lights .... .... .... .... .... .. 76