AUDI A4 CABRIOLET 2009 Owners Manual
Manufacturer: AUDI, Model Year: 2009, Model line: A4 CABRIOLET, Model: AUDI A4 CABRIOLET 2009Pages: 340, PDF Size: 77.32 MB
Page 141 of 340

___________________________________________________ H_ o_m_ e_ L_ i_ n _ k_ ® ____ l'III
HomeLink®
Universal remote control
Ap plies to vehicles : with Home link ® unive rsa l remote cont ro l
General information
The Homelink® fea ture c an le arn u p to thr ee r ad io
frequency codes for mos t cu rrent transmi tters used for
operating gar age doors, es tate gates, home or ou tdoor
ligh tin g sy stems, an d other de vices .
You m ust first pr ogra m the Hom eLin k® trans mitte r befo re y ou can
use the system=> page 140, "Programm ing the HomeLink® tra ns
mi tter".
I n ord er to program the HomeLink® tra nsmitter fo r devices uti lizing
ro lling code, a second person on a ladder who can safe ly reach the
gara ge doo r ope ner moto r is r eco mmended. It is also necessa ry to
locate the "learn" button on your garage door opener motor . Refer
t o th e ope rati ng in stru ction s f or the opener, as the loca tion and
color of th is button may vary b y manufacturer.
Yo u ca n st ill u se the origina l re mote cont ro l f or the device a t any
tim e.
& WARNING
• Never use the Homelink'"' transmitter with any garage door
opener that does have not the safety stop and reverse feature as
required by federal safety standards . This includes any garage
door opener model manufactured before April 1 , 1982 .
• A garage door opener whi ch cannot detect an object , signaling
the door to stop and reverse does not meet current federal safety standards . Using a garage door opener without these features
increases risk of serious injury or death .
Controls and equip
ment
& WARNING (continued)
• For safety reasons never release the parking brake or start the
engine while anyone is standing in front of the vehicle .
• A garage door or an estate gate may sometimes be set
in
motion when the Homelink ® remote control is being
programmed . If the device is repeatedly activated , this can over
strain motor and damage its electrical components -an over
heated motor is a fire hazard!
• To avoid possible injuries or property damage , please always
make absolutely certain that no persons or objects are located in
the range of motion of any equipment being operated.
[ i ] Tips
• If you wou ld lik e m ore informa tion on H om eli nk®, wh ere to
purchase the HomeLink ® compatib le products, or would lik e to
p urc h ase the H omeLink® Hom e Ligh ting Package , p lease ca ll to ll
fre e: 1- 80 0-355 -3515.
• Fo r D ec lara tion of Co mplian ce to Unite d S tate s FCC and I ndustry
C anada regulat ions => page
320 . •
Page 142 of 340

• .___H_ o_m _ e_ L_ i_ n _k_ ®_R __________________________________________________ _
App lies to vehicles: w ith Homelin k® un ive rsal remote contro l
Programmi ng th e Hom eLink ® transmitt er
The transmitter is programmed in two phases. For rolling
code transmitters, a third phase is also necessary .
Fig. 151 Overhead
console : Homelink®
keypad
Fig.152 Frontbumper,
driver side: location of
transmitter unit
Phase 1: programming the overhead keypad
1. Make sure your vehicle is w ithin operat ing range o f the
remote controlled garage door opener .
2. Set the parking brake=>
& in "General information" on
page 139.
3. Turn the ignit ion on. Do not sta rt the engine! 4. Press and ho
ld the two outside Homelink® buttons
(D
and @for app roximately 20 seconds until indicator
light ©=:> fig.
151 beg ins to flash. Then release both
buttons . Do not hold the buttons for longer than
30
seconds.
This procedure only needs to be performed
once. It
erases the factory-set default codes and does not have to
be repeated to program additional remote controls.
5. Press and hold the Homelink ® button (D, ® or @ until
the indicator light © starts flashing
slowly. Release the
button.
- The system will remain in programming mode for 5
minutes.
Go to the front of the v ehicle and proceed w ith
phase 2.
Phase 2:
programming the bumper mounted transmitter
6. Hold the original remote control at a distance between 0-
6 in. (0-15 cm) from the b umper below the appropriate
headlight for your vehicle => fig.
152 (use the shortest
distance possible) .
7. Aim the remote control just below the
driver side head
lig ht.
8. Press and hold the act ivation button on the remote
control.
- May be different in Canada . If so, press and re-press
(cycle) the activation button on your remote control every
two seconds. -.,
Page 143 of 340
______________________________________________________ H_o_ m __ e_L _i_n _k _@_R _ __,_
9. The emergency flashers will flash three times (after
about 15-60 seconds) when the programming is
successful. Release the button on the remote control.
- To program more devices, repeat steps 4 to 9 .
10. Press and hold the trained Homelink® button and observe the ind icator light@=> page 140, fig. 151.
- If the indicator light is solid/continuous, programming is complete and your device should activate when you press and release the trained Homelink® button.
- If the indicator light blinks rapidly for 2 seconds and is
then a solid/continuous light , proceed with phase 3 to
program a rolling code device.
Phase 3: rolling code programming
- A second person on a ladder who can safely reach the
garage door opener motor is recommended.
11. Locate the "learn" button on the garage door opener
motor (refer to the operating instructions for the opener,
as the location of this button may vary by manufacturer).
12. Press and release the learn button on the garage door
opener motor.
- Note: once the button is pressed, there are 30 seconds in
which to initiate the next step.
13. On the Homelink® keypad inside the vehicle, firmly
press and hold the Homelink® button previously
programmed in phases 1 and 2 for two seconds and
release. Repeat this sequence
twice.
Contro ls and eq uip
ment
- Some vehicles may require the press/hold/release
sequence up to three times to complete the training
process.
- HomeLink ® should now activate your rolling code
equipped device.
If the 5 minute time limit is exceeded , the emergency flashers will
flash one time to indicate that the proc ess has been terminated . In
this case, repeat steps 4 through 9 .
If the em erg ency flashers do not flash
three tim es (after about 15-
60 seconds), programming was not successful. In this case, repeat
s teps 4 through 9.
Remote control units for garage door openers in Canada are set to
stop transmitting radio frequency signals after two seconds. This
t ime may no t be sufficient for the HomeLink® system to l earn th e
radio frequency signal. Perform all other steps as described
above. •
Applies to vehicles: with H omel ink® un iversal re m ote cont ro l
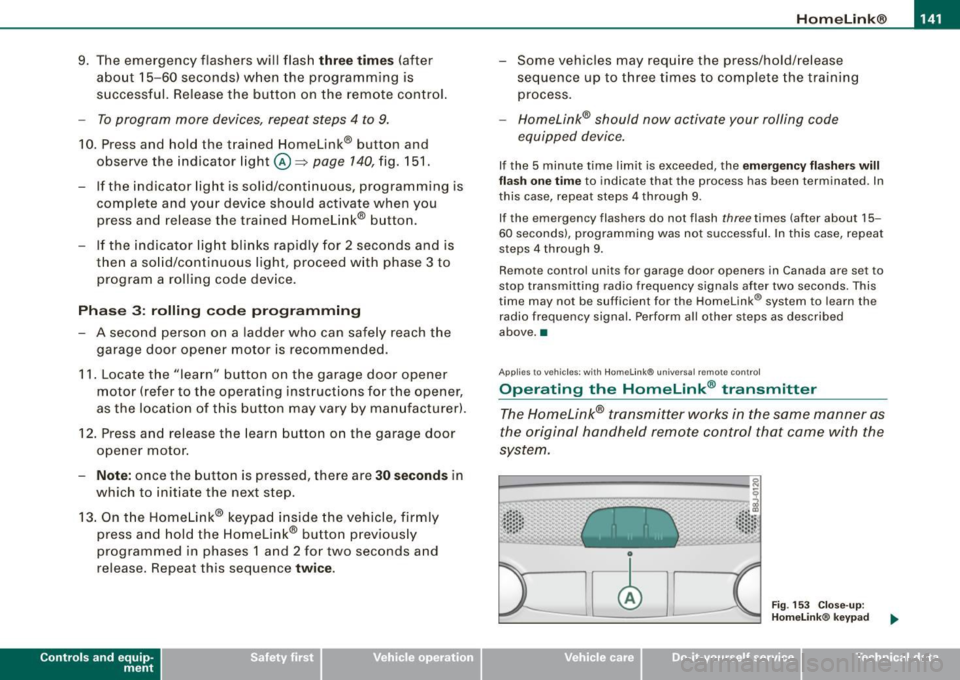
Operating the HomeLink ® transmitter
The Homelink® transmitter works in the same manner as
the original hand held remote control that came with the
system.
· ·· ·· ····· · ~::: ::; .• ... .. , '~· ·" ..
Fig . 153 Close-up:
Homelink® keypad
~ehicle care irechnical data
Page 144 of 340
• .___H_ o_m_ e_ L_ · _,n _k_ ® __________________________________________________ _
- Press the appropriate programmed button 0,@ or@
to activate the desired remote control function~
& in
"General information" on
page 139. •
Applies to vehicles: with Homelink® universal remote contro l
Reprogramming a single button
A HomeLink® button can be reprogrammed individually without affecting the other button a/locations.
Programming the overhead keypad
- Press the appropriate Homelink® button until the indi
cator light begins flashing slowly.
Programming the bumper mounted transmitter 1. Hold t he
original remote control at a distance between 0-
5 in. (0-13 cm) from the bumper below the appropriate
headlight for your vehicle (use the shortest distance
possible).
2. Aim the remote control just below the
driver side head
light.
3. Press and hold the activation button on the remote control.
4. The emergency flashers will flash
three times (after
about
15-60 seconds) when the programming is
successful. Now release the button on the remote
control.
- If the device utilizes a rolling code, please follow phase 3
of ~
page 140, "Programming the Homelink® trans
mitter" for rolling code programming.
This procedure will cause the existing programming on the
Homelink ® button to be erased! •
App lies to vehicles: with Homelink® unive rsa l remote contro l
Erasing the programming of the Homelink ®
transmitter
When you erase the programming, the programming on
all three of the transmitter channels with be lost!
- Perform steps 1 to 4 as described on~ page 140, "Phase
1: programming the overhead keypad".
When completed , the Homelink® system will be in the prog ram
ming mode and is then ready to learn the codes for remote
controlled devices.
[I) Tips
• Programmed buttons cannot be erased individually.
• For security reasons you are advised to erase the programming
of the Homelink ® system befo re you sell your vehicle.•
Page 145 of 340

___________________________________________________ H_ o_m_ e_ L_ i_ n _ k_ ® ____ ftllll
Controls and equip
ment
Page 146 of 340

Page 147 of 340
Page 148 of 340
___ D_ ri_v _i_n ..;;:g::;,._ S_ a_ f _e__, ly'-- -------------------------------------------------
Driving Safely
General notes
Safe driving habits
Please remember -safety first!
This chapter contains important information, tips, instructions and
warnings that you need to read and observe for your own safety, the
safety of your passengers and others. We have summarized here
what you need to know about safety belts, the active rollover protec
tion system, airbags, child restraints as well as child safety. Your
safety is for us priority number 1 . Always observe the information
and warnings in this section -for your own safety as well as for that
of your passengers .
The information in this section applies to all model versions of your
vehicle. Some of the features described in this sections may be
standard equipment on some models, or may be optional equip
ment on others. If you are not sure, ask your authorized Audi dealer.
& WARNING
• Always make sure that you follow the instructions and heed
the WARNINGS in this Manual. It is in your interest and in the
interest of your passengers.
• Always keep the complete Owner's Literature in your Audi
when you lend or sell your vehicle so that this important informa
tion will always be available to the driver and passengers.
• Always keep the Owner's literature handy so that you can find
it easily if you have questions .•
Safety equipment
The safety features are part of the occupant restraint
system and work together to help reduce the risk of injury
in a wide variety of accident situations.
Your safety and the safety of your passengers should not be left to
chance. Advances in technology have made a variety of features
available to help reduce the risk of injury in an accident. The
following is a listing of just a few of the safety features in your Audi:
• sophisticated safety belts for driver and all passenger seating
positions,
• safety belt pre-tensioners for the outboard seating positions,
• front airbags,
• knee airbags for the front seats,
• side airbags in the front seats,
• LATCH anchorages for child restraints,
• head restraints for each seating position,
• adjustable steering column.
These individual safety features can work together as a system to
help protect you and your passengers in a wide range of accidents.
These features cannot work as a system if they are not always prop erly adjusted and properly used!
Safety is everybody's responsibility! •
Important things to do before driving
Safety is everybody's job! Vehicle and occupant safety
always depends on the informed and careful driver.
For your safety and the safety of your passengers, before
driving always: ..,
Page 149 of 340
________________________________________________ D_r_iv _ i _n...: g=--- S_ a_ fe--= ly'---------"'
- Make sure that all lights and signals are operating
correctly.
- Make sure that the tire pressure is correct.
- Make sure that all windows are clean and afford good
visibility to the outside.
- Secure all luggage and other items carefully~
page 107.
-Make sure that nothing can interfere with the pedals.
- Adjust front seat, head restraint and mirrors correctly for
your height.
- Instruct passengers to adjust the head restraints
according to their height.
- Make sure to use the right child restraint correctly to
protect children~
page 190, "Child Safety".
- Sit properly in your seat and make sure that your passen
gers do the same
~ page 92, "General recommenda
t ions" .
- Fasten your safety belt and wear it properly. Also instruct
your passengers to fasten their safety belts properly
~ page 159. •
What impairs driving safety?
Safe driving is directly related to the condition of the
vehicle, the driver as well as the driver's ability to concen
trate on the road without being distracted.
The driver is responsible for the safety of the vehicle and all
of its occupants. If your ability to drive is impaired, safety
risks for everybody in the vehicle increase and you also
Controls and equip
ment Safety first Vehicle operation
become a
hazard to everyone else on the road ~& .There
fore:
- Do not let yourself be distracted by passengers or by
using a cellular telephone.
- NEVER drive when your driving ability is impaired (by
medications, alcohol, drugs, etc.I.
- Observe all traffic laws, rules of the road and speed limits
and plain common sense.
- ALWAYS adjust your speed to road, traffic and weather
conditions.
- Take frequent breaks on long trips. Do not drive for more
than two hours at a stretch.
- Do NOT drive when you are tired, under pressure or when
you are stressed.
& WARNING
Impaired driving safety increases the risk of serious personal
injury and death whenever a vehicle is being used. •
Vehicle care Do-it-yourself service Technical data
Page 150 of 340
___ D_ r_ i_v _in -= g'- S _ a_f _e _ly.:,._ ______________________________________________ _
Proper occupant seating positi·ons
Proper seating position for the driver
The proper driver seating position is important for safe,
relaxed driving.
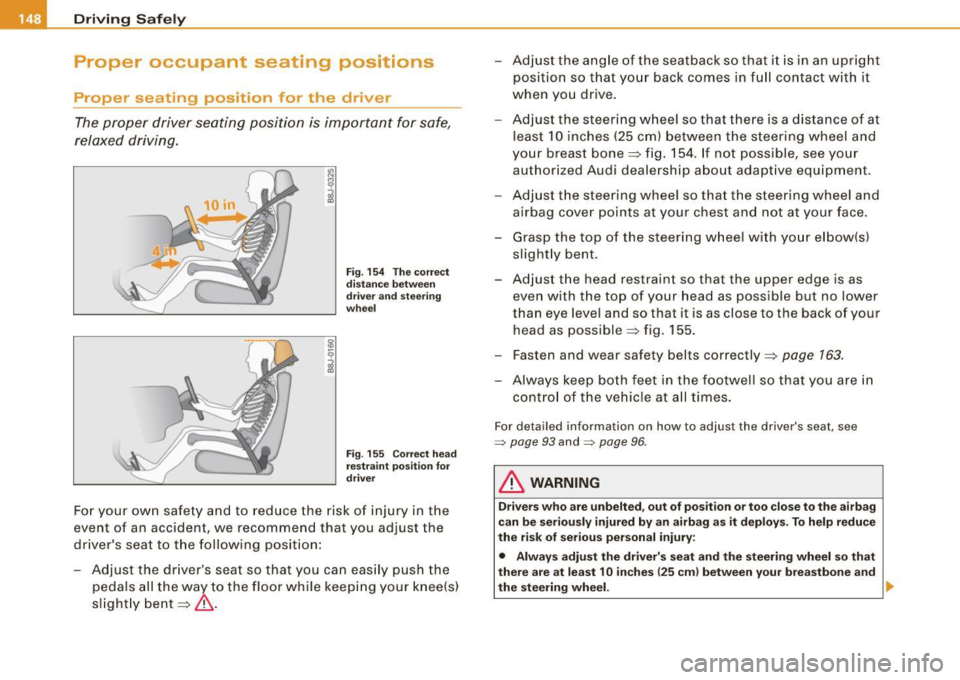
Fig. 154 The correct
distance between
driver and steering
wheel
Fig . 155 Correct head
restraint position for
driver
For your own safety and to reduce the risk of injury in the
event of an accident, we recommend that you adjust the
driver's seat to the following position:
- Adjust the driver's seat so that you can easily push the
pedals all the way to the floor while keeping your knee(s)
slightly bent=:>& . - Adjust the angle of the seatback so that
it is in an upright
position so that your back comes in full contact with it
when you drive.
- Adjust the steering wheel so that there is a distance of at
least 10 inches (25 cm) between the steering wheel and
your breast bone=:> fig. 154. If not possible, see your
authorized Audi dealership about adaptive equipment.
- Adjust the steering wheel so that the steering wheel and
airbag cover points at your chest and not at your face.
- Grasp the top of the steering wheel with your elbow(s)
slightly bent.
- Adjust the head restraint so that the upper edge is as
even with the top of your head as possible but no lower
than eye level and so that it is as close to the back of your
head as possible =:> fig. 155.
- Fasten and wear safety belts correctly=:>
page 163.
- Always keep both feet in the footwell so that you are in
control of the vehicle at all times.
For detailed information on how to adjust the driver's seat, see
=> page 93 and :::::, page 96 .
& WARNING
Drivers who are unbelted, out of position or too close to the airbag
can be seriously injured by an airbag as it deploys. To help reduce
the risk of serious personal injury:
• Always adjust the driver's seat and the steering wheel so that
there are at least 10 inches
125 cm) between your breastbone and
the steering wheel. ...