AUDI A4 CABRIOLET 2009 Owners Manual
Manufacturer: AUDI, Model Year: 2009, Model line: A4 CABRIOLET, Model: AUDI A4 CABRIOLET 2009Pages: 340, PDF Size: 77.32 MB
Page 241 of 340
![AUDI A4 CABRIOLET 2009 Owners Manual _____________________________________________ C_ l_ e _ a_ n_ in--= g--- a_n _d___, p_ r _o_ te_ c_t _io _ n __ lftll
•
[ i ] Tip s
Open Ve lcro fasteners on your cloth ing can damage the AUDI A4 CABRIOLET 2009 Owners Manual _____________________________________________ C_ l_ e _ a_ n_ in--= g--- a_n _d___, p_ r _o_ te_ c_t _io _ n __ lftll
•
[ i ] Tip s
Open Ve lcro fasteners on your cloth ing can damage the](/img/6/57553/w960_57553-240.png)
_____________________________________________ C_ l_ e _ a_ n_ in--= g'--- a_n _d___, p_ r _o_ te_ c_t _io _ n __ lftll
•
[ i ] Tip s
Open Ve lcro fasteners on your cloth ing can damage the seat cover .
Please make sure that Ve lcro fasteners are closed .•
Plastic parts and instrument panel
A lways use a c lean cloth moistened in clear water to clean these
areas . For persistent dirt use an Audi approved
solvent-free plastic
cleaner/protectant.
& WARNING
Solvents can change the properties of some plastics and make it
harder for the airbag to deploy .
• Never clean the instrument panel or the surfa ce of Airbag
module s with c leaning produ cts that contain sol vents .
• Products containing solvent s will make the surface of th is part
porous .
• Serious injuries can re sult if plastic parts come loo se when the
airbag is deployed .
• Alway s read and heed all WARNINGS and the information
~ page 230 .
0 Note
Cleaning agents containing solvents wil l attack the material and can
change the way it be haves. •
Applies to veh ic les : wi th n atural leat her
Natural leather
Audi makes great effor ts to maintain the proper ties,
n at ural look an d feel of in terior le ather.
General
We offer many different types of leather on our vehic les . Most are
d iff erent types of nappa leather, which has a smoo th surface and
comes in various co lors .
The in tens ity of the c olor de termines the visua l characteristics and
appearance. I f the surface of the leather has a typ ical natu ra l loo k,
then the leather is a nappa leather that has been left in a re latively
natura l condition. This leathe r off ers pa rticu larly good com fort and
breathes we ll. Fine veins, closed grains, insect bites, skin folds, and
su btle varia tions in c olor remain visib le . These characterist ics
demonstrate that the material is natural.
Natura l nappa lea ther is not c ove red by a color finish. It is th erefo re
more sensitive to soiling and wear, which is something you need to
consider if children, animals or other factors might prove to be
particularly hard on the leather .
By contrast, leather types that are covered by a colored finish layer
are m ore dura ble. This has a pos itive effect on the lea ther's resis
tance to wear and soiling in daily use. On the other hand, the typical
c haracte ristics of natura l leather are barely or not appa re nt.
However , this does not mean that the leather itse lf is of inferior
quality.
Care and handling
Because of the exclusive nature of the types of leat her that Audi
uses and their unique properties (such as sensitivity to oi ls, grease ,
s o iling, etc.), y ou will need to be somewhat ca ref ul w ith t hese
leathers, and a certain type of care is required . For example, dark
c lothing materials can discolor leathe r seats (especially if such
clothing is damp and was not dyed correctly!. Dust and dirt particles .,_
Vehic le care
Page 242 of 340
___ C_ le_ a _ n_i_n ~g _ a_ n_ d __ p_r _o _t _e _c_ t_ i_o _n ___________________________________________ _
in pores, folds, and seams can have an abrasive effect and can
damage the leather surface as well as weaken seams.
The leather should be cleaned regularly as needed . After having
been used for a relatively long time, your leather seats will acquire
a rich aged finish. This is a characteristic of natural leather and a
sign of true quality.
In order to maintain the value of this natural product over the life of
your vehicle, you should follow the recommendations below :
0 Note
• To keep your leather from bleaching out, do not allow it to be
exposed to bright sunlight for long periods of time. If you have to
leave the vehicle parked outside for long periods, cover the leather
to protect it from direct exposure to sunlight.
• Sharp objects on clothing, such as zippers, rivets or sharp pieces
on belts can leave permanent scratches or scrape marks on the
surface of the leather .
[ i ] Tip s
• After each time you clean the leather and at regu lar intervals, use
a leather preservative creme that contains UV -blockers and that
works into the leather. This creme will nourish and moisturize the leather, helping it to breathe and stay supple . It also helps to build
up a protective coating on the surface .
• Clean the leather every 2 -3 months, and clean any areas that get
soiled.
• Remove fresh marks made by ballpoint pens, ink, lipstick, shoe
polish, etc . as soon as possible.
• Preserve the color of the leather as needed by using a special
colored leather care creme to touch up areas of uneven color .•
Ap plies to vehi cles: w it h n atu ral leather
Cleaning and caring for leather upholstery
and trim
Natural leather requires special care and attention.
Norm al c leaning
- Clean soiled areas with a slig htly mo istened cotton or
woolen cloth.
Mor e stubborn dirt
- More stubborn dirt can be removed using a cloth satu
rated with a mild soap solution (2 tablespoons mi ld
liquid soap).
- Never allow the soap solution to saturate the leather, and
make certain that no water soaks into the seams .
Wipe off the soap solution with a soft, dry cloth.
Cl eaning spot s
- Remove fresh wate r-ba sed spots (such as coffee, tea,
juices, blood) w ith an absorbent c loth or paper towe l.
- Remove fresh greas e or oil-ba sed spots (such as butter,
mayonnaise, chocolate) with an absorbent cloth or paper
towel, or use the c leaner from the leather care kit if the
spot has not yet penetrated into the surface of the leather.
- Use an oil/grease dissolving spray, if oil /gr ease spots
h ave dried on .
- Remove specific kinds of spots (ballpoint pen, felt
marker, fingernail polish, water-based paint, shoe polish,
etc.) with a spot remover specifically formulated for leather . .,_
Page 243 of 340
_______________________________________________ C_l_e _a_ n_ in ____ g ___ a_n_ d ___ p_r _o _t_ e_ c_ t _i _o _ n __ llllll
•
Leather care
-Every half year use an approved leather care product
(available from your Audi dealer) to care for the leather.
- Apply the product very sparingly .
- Wipe it off with a damp cloth.
If you have any questions about cleaning and caring for the leather
in your vehicle, it is best to contact your authorized Audi dealer, who
will be glad to help you and tell you about our full range of leather
care products, such as:
• Leather cleaning and care kit
• Cremes to care for colored leather
• Spot removers for ballpoint pens, shoe polish, etc.
• Oil/grease dissolving spray
• New and upcoming products.
& WARNING
Always read and heed all WARNINGS and the information
=:> page 230.
0 Note
• Never use chemical solvents (e.g. lighter fluid, turpentine),
waxes, shoe polish or similar products on the leather surfaces in
your Audi.
• To avoid damage, have stubborn stains removed by a commer
cial cleaning specialist. •
Applies to veh ic les : wi th A lcantara up holste ry
Cleaning Alcantara ® (synthetic suede)
Removing dust and dirt
- Moisten a cloth, squeeze out excess water and wipe down
the seat surfaces.
Removing stains
- Moisten a cloth with lukewarm water or with diluted
ethyl (rubbing) alcohol.
- Dab at the stain. Start at the outside and work inwards.
Once the stain is no longer visible, use a soft dry cloth or
tissue to soak up the moisture.
Do not use leather cleaning products on Alcantara.
You may use a suitable shampoo for removing dust and dirt.
Dust and grit in the pores and seams can scratch and damage the
surface. If the car is left standing in the sun for long periods, the
Alcantara should be protected against direct sunlight to prevent it
from fading. Slight color variations will develop in normal use and
are not an indication of material deterioration .
0 Note
• Never use chemical solvents (e .g. lighter fluid, turpentine),
waxes, shoe polish or similar products on Alcantara ® surfaces.
• To avoid damage , have stubborn stains removed by a commer
cial cleaning specialist.
• Do no t use brushes, stiff sponges or similarly abrasive cleaning
aids. •
Vehic le care
Page 244 of 340
___ C_ le_ a _ n_i_n ~g _ a_ n_ d __ p_r _o _t _e _c_ t_ i_o _n ___________________________________________ _
Safety belts
Only well-maintained safety belts work reliably when
needed.
Heavily soiled safety belts may not retract properly.
- Keep belts clean.
- For cleaning, use a mild soap and water solution. Let
belts dry thoroughly and away from direct sunlight.
- Do not allow inertia reel safety belts to retract before
they are completely dry.
- Check the condit ion of your safety belts
regularly.
& WARNING
Damaged safety belts can break in a crash .
• Anything that might damage your safety belts could mean that
you and your passengers would not be adequately protected in an
accident.
• Safety belt performance depends on correct installation. Never
remove belts from the vehicle to clean them.
• Do not use chemical cleaning agents, bleach or dyes. They have
corrosive properties which weaken the webbing.
• When cleaning your safety belts, inspect them for damage. If
you discover damage, see your Audi dealer.
• Always read and heed all WARNINGS and the information
=:> page 230. •
Engine compartment
Be especially careful when cleaning the engine compart
ment.
Always switch off the ignition before cleaning the engine :::::, &.
Plenum panel
Remove leaves from the plenum panel in front of the windshield
under the engine hood. This prevents the water drain holes from
becoming blocked, and it prevents debris from entering the vehicle
interior through the heating and ventilation ducts.
Corrosion protection
The engine compartment and transmission have been corrosion
protected at the factory.
Good anti-corrosion treatment is very important, particularly in the
winter. If the vehicle is frequently driven on salt treated roads, the
entire engine compartment and plenum panel should be thor
oughly cleaned at the end of winter and retreated to prevent salt
damage. At the same time, the underside of the vehicle should be
washed as well.
I f the engine compartment is cleaned at any time with grease
removing solutions
21 , or if you have the engine washed, the anti
corrosion treatment is almost always removed as well. It is therefore
essential to have a long-lasting corrosion protection reapplied to all
surfaces, seams, joints and components in the engine compart
ment.
& WARNING
Be aware: The engine compartment of any motor vehicle is a
potentially hazardous area.
• Before working in the engine compartment, be sure to read the
information :::::,
page 242. .,.,
21 Use only the correct cleaning solutions. Never use gasoline or diesel fuel.
Page 245 of 340
_____________________________________________ C_ l_ e _a_ n_ in_ g_a _ n_d_ p_ r_ o_ t _e_ c_t _io _ n __ _
•
& WARNING (continued)
• Before reaching into the front plenum panel, always remove the
ignition key. Otherwise, the windshield wiper system could unin
tentionally be switched on, possibly causing personal injury from
the moving wiper linkage.
• Never reach into the area around or touch the radiator fan. The
auxiliary fan is temperature controlled and can switch on suddenly
- even when the ignition is off .
• Do not wash, wax or dry the engine with the engine running .
Moving or hot parts could injure you.
• Do not clean the underside of the chassis, fenders, wheel
covers , or other hard to reach parts without protecting your hands
and arms. You may cut yourself on sharp-edged metal parts .
• Always read and heed all WARNINGS and other information
=> page 230. •
Vehic le care
Page 246 of 340
Fuel supply and filling your fuel tank
Fuel supply and filling your fuel tank
Gasoline
Fuel supply
Using the right fuel helps keep the environment clean and
prevents engine damage.
Fuel recommendation
Th e fuel recommended for your vehicle is unleaded premium grade
gasoline. See also=>
page 314, "Data". Audi recommends using TOP
TIER Detergent Gasoline with a minimum octane rating of 91 AKI (95
RON). For more information on TOP TIER Detergent Gasoline, please
go to the official website (www .toptiergas.coml.
The recommended gasoline octane rating for your engine can also be found on a label located either on the driver's side B-pillar (visible
when the door is open) or inside the fuel filler flap. This rating may
be specified as AKI or RON.
Your vehicle may also be operated using unleaded regular gasoline
with a minimum octane rating of 87 AKl/91 RON. However, using 87
AKl/91 RON octane fuel will slightly reduce engine performance.
Use unleaded gasoline only. Unleaded gasoline is available
throughout the USA, Canada, and in most European countries. We
recommend that you do not take your vehicle to areas or countries
where unleaded gasoline may not be available.
For more information on refueling your vehicle, see=>
page 245.
Octane rating
Octane rating indicates a gasoline's ability to resist engine
damaging "knock" caused by premature ignition and detonation.
The refore, buying the correct grade of gasoline is very important to
help prevent possible engine damage and a loss of engine perfor
mance. Gasoline most commonly used
in the United States and Canada has
the following octane ratings that can usually be found on the filler
pump:
• Pr emium Grade: 91 -96 AKI
• Regular Grade: 87 -90 AKI
Explanation of the abbreviations:
AKI = Anti Kno ck Ind ex= (R+Ml/2 = (RON+MON)/2
RON= Research Octane Number
MON = Motor Octane Number .
0 Note
• Do not use any fuel with octane ratings lower than 87 AKI or 91
RON otherwise expensive engine damage will occur .
• Do
not use leaded gasoline. The use of leaded gasoline will
severely damage your vehicle's catalytic converter and its ability to
control exhaust emissions. •
Blended gasoline
Use of gasoline containing alcohol or MTBE (methyl
tertiary butyl ether)
You may use unleaded gasoline blended with alcohol or MTBE (commonly referred to as oxygenates) if the blended mixture meets
the following criteria:
Blend of gasoline methanol (wood alcohol or methyl alcohol)
• Anti-knock index must be 87 AKI or higher.
• Blend must contain no more than 3% methanol.
• Blend must contain more than 2% co-solvents.
Page 247 of 340
•
Ble nd o f gas oline and eth ano l (gr ain al coh ol o r eth yl a lcoho l)
• Anti -knock index must be 87 AKI or higher.
• Blend must not contain more than 10% ethanol.
Blend of gasoli ne a nd MTBE
• Anti-knock index must be 87 AKI or higher.
• Blend must contain not more than 15% MTBE.
Seasonall y ad ju ste d ga solin e
Many gasoline grades are blended to perform especially well for
winter or summer driving . During seasona l change -over, we suggest
that you fil l up at busy gas stations where the seasonal adjustment
is more likely to be made in time.
0 Note
• Methanol fuels which do not meet these requirements may
cause corrosion and damage to p lastic and rubber components in
the fuel system.
• Do not use fuels that fail to meet the specified criteria in this
chapter .
• If you are unable to determine whether or not a particu lar fuel
blend meets the specifications, ask your service station or its fuel
suppl ier.
• Do not use fuel for which the contents cannot be identified.
• Fuel system damage and performance problems resu lting from
the use of fuels different from those specified are not the responsi
bility of Audi and are not covered under the New Vehicle or the
Emission Control System Warran ties.
• If you experience a loss of fue l economy or driveability and
performance problems due to the use of one of these fue l b lends,
we recommend that you switch to unblended fuel.•
Fue l supply and fillin g yo ur fu el tank
Gasoline additives
A major concern among many auto manufacturers is carbon
deposit build-up caused by the type of gasoline you use.
Although gasoline grades d iffer from one manufacturer to another,
they have certain things in common. A ll gaso line grades contain
substances that can cause deposits to collect on vita l engine parts,
such as fuel injectors and intake valves. Although most gaso line
brands inc lude additives to keep engine and fue l systems c lean,
they are not equally effective.
Audi recommends using TOP T IER Detergent Gasol ine. For more
information on TOP TIER Detergent Gaso line, please go to the offi
cial website (www.toptiergas .coml.
After an extended period of using inadequate fue ls, carbon deposit
build -ups can rob your engine of peak performance.
(D Note
Damage or malfunction due to poor fuel qua lity is not covered by
the Audi New Vehic le Limited Warranty .•
Fuel tank
Fuel filler neck
The fuel fi ller neck is located on the right rear side panel behind the
fue l filler f lap.
If the power locking system should fail, you can still open the flap
manually - for detailed instructions see~
page 248.
You can find the fuel tank capacity of your vehicle in Tech nic al Dat a
~ page 314 . _,.
Ve hic le care
Page 248 of 340
Fuel supply and filling your fuel tank
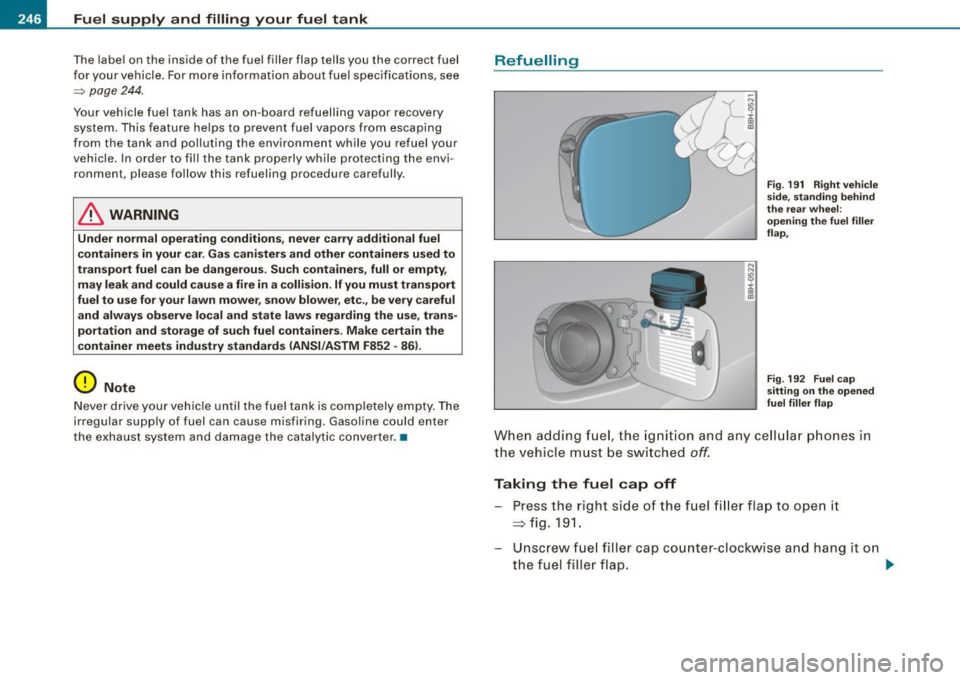
The labe l on the inside of the fuel filler flap tells you the correct fuel
f o r your vehicle . Fo r m ore inf ormatio n about f uel specifica tions, see
~ page 244.
Y our vehicle fuel tank has an on -b oard refuelling vapor recove ry
system. This feature he lps to preve nt fuel vapors from escap ing
from the tank and polluting the environment while you refue l you r
veh ic le . I n o rder t o fill the tank properly while protec ting the envi
ronmen t, please follow this re fueling procedure carefully .
L1}. WARNING
Under normal operating conditions , never carry additional fuel
containers in your car. Gas canisters and other containers used to
transport fuel can be dangerous . Such containers , full or empty,
may leak and could cau se a fire in a collision . If you must transport
fuel to use for your lawn mower , snow blower , etc ., be very careful
and alway s ob serve local and state laws regarding the u se , tran s
portat ion and storage of su ch fuel container s. Make certain the
c ontainer meets industry standard s (ANSI/ASTM F852 -861 .
0 Note
Never d rive your vehic le un til the fue l tank is co mpletely empty . The
irregular supply of fuel can cause misfiring . Gasoline could enter
t he exhaus t system and damage the catalytic converter . •
Refuelling
Fi g. 191 Rig ht v ehi cle
si de , st andi ng beh ind
the rear whe el:
opening the fuel filler
flap ,
F ig . 19 2 Fuel cap
s itting on th e opened
fuel filler f lap
W hen a dding fuel, th e i gnit io n a nd any ce llular ph ones in
th e v ehicl e m ust be sw itch ed off.
Taking the fuel cap off
Press the rig ht side o f the f uel fi ller fla p to ope n it
=> fig .19 1.
Unsc rew fuel filler cap co unter-clock wise and han g it o n
t h e fuel fille r flap .
~
Page 249 of 340
•
Refuelling procedure
-Insert the fue l nozzle from the gaso line pump i nto the
fue l fi ller neck as far as it w il l go.
- Select a medium refue lling rate so that the nozzle
swi tches off automatica lly w hen the tank is ful l.
Putting the fuel cap back on
-Aft er fillin g yo ur ta nk, twist th e fue l fille r cap clockw is e
unt il you hear a de finit e cli ck .
- Cl ose the fue l fille r flap.
To avo id fu el sp illing or evapora ting from the fuel tan k always close
fu el filler cap p rop erly and co mplet ely . An i mprope rly clo sed fue l
fi ller cap may a lso cause a messa ge in the dr iver in fo rm ation display
=>
page 27 or cause the MIL lamp=> page 27 to come on.
,& WARNING
Improper refueling or handling of fuel can cause fire, explosion
and severe burns .
• Fuel is highly flammable and can cause severe burns and other
injuries .
• Failure to shut the engine off while refueling and /or to insert
the pump nozzle fully into the fuel filler ne ck could cause fuel to
spray out of filler neck or to overflow. Fuel spray and overflowing
fuel can cause a fire .
• Never use a cellular telephone while refueling . The electromag
netic radiation can cause sparks that can ignite fue l vapors and
c ause a fire .
• Never get ba ck into your vehicle wh ile refueling . If in e xcep
tional circumstan ces you must get ba ck in your vehicle while refu
eling , make certain that you close the door and touch metal to
di scharge static electricity before touching the filler nozzle again.
Fu el supply and filling your fu el tank
& W ARNING (continued )
Static electricity can cause sparks that can ignite fuel vapors
released during refueling .
• Never smoke or have an open flame anywhere in or near your
vehicle when refueling or filling a portable fuel container.
• For your safety , we strongly recommend that you do not travel
with a portable fuel container in your vehicle. The container , full or
empty may leak and could cause a fire , especially in a crash .
• If, under e xcept ional circumstances , you must transport a
portable fuel container, please observe the following:
-Never fill a portable fuel container while it is anywhere
in or
on the vehicle (for example , in the luggage compartment , or on
the trunk) . Static electricity can build up while filling and can
ignite fuel vapors causing a fire.
- Always place a portable fuel containe r on the ground before
filling.
- Always keep the filler nozzle completely inside the portable
container before and during filling .
- If filling a portable container made of metal , the filler nozzle
must always be in contact with the container. Thi s will help
prevent static ele ctricity from discharging and cause a fire.
- Never spill fuel inside the vehicle or luggage compartment .
Fuel vapors are h ighly flammable .
- Always observe local and state/provincial laws regarding the
use , storage and transportation of fuel conta iners.
- Make certain the fuel container meets indu stry standards
(ANSI / ASTM F852-86).
0 Note
If any fuel has spil led onto the car , it should be removed immedi -
ate ly to prevent da mage to the pa int. _,.
Vehic le care
Page 250 of 340
Fuel supply and filling your fuel tank
ffi For the sake of the environment
As soon as the correctly operated nozzle switches off automatical ly
for the first time, the tank is full. Do not try to add more fuel because
fuel may spill out. In addi tion, the expansion space in the fuel tank
will be filled -causing the fuel to overflow when it becomes warm
and po llute the environment.
[ i ) Tips
• Running your engine while refuelling may cause vapors to
escape or even cause fuel to spill out of the tank. This would then
shut off the fue l nozzle before the tank is full.
• Do not refuel your vehicle with the ignition turned on. The fuel
gauge may otherwise not indicate the correct fuel level after
refuelling. •
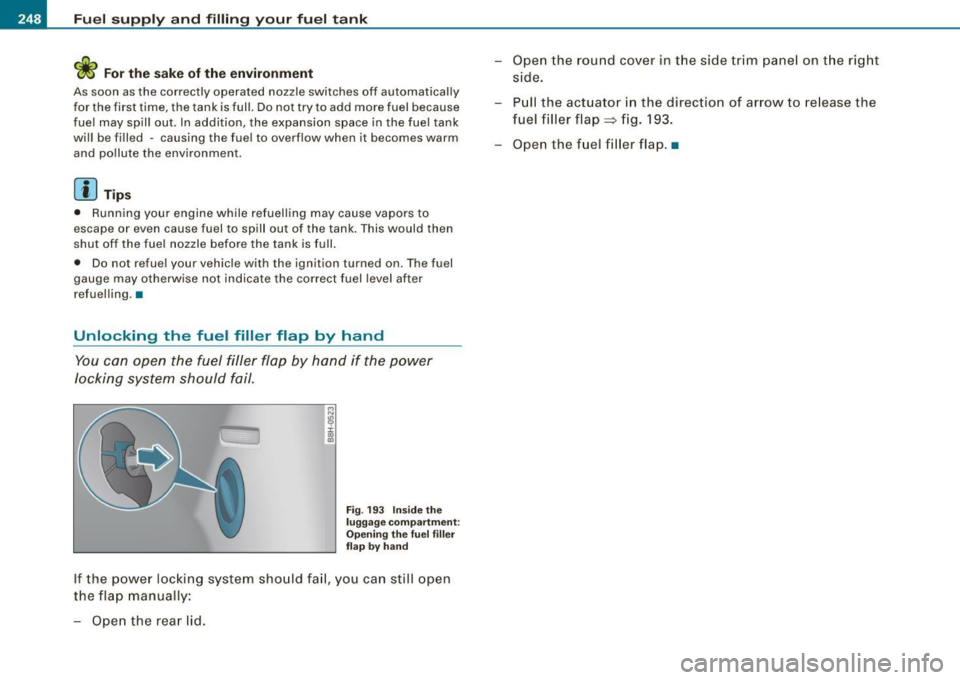
Unlocking the fuel filler flap by hand
You can open the fuel filler flap by hand if the power
locking system should fail .
Fig. 193 Inside the
luggage compartment:
Opening the fuel filler
flap
by ha nd
If the power locking system should fail, you can still open
the flap manually:
- Open the rear lid. -
Open the round cover in the side trim panel on th e right
side.
- Pull the actuator in the direction of arrow to release the
fuel filler flap~ fig. 193.
- Open the fuel filler flap. •