display AUDI A4 CABRIOLET 2009 Workshop Manual
[x] Cancel search | Manufacturer: AUDI, Model Year: 2009, Model line: A4 CABRIOLET, Model: AUDI A4 CABRIOLET 2009Pages: 340, PDF Size: 77.32 MB
Page 137 of 340
Transmission -
----------------
Applies to vehi cles : wit h m ultit r o ni c® Con tin uous ly Variab le Tra nsmi ssion (CVTl
Automatic Shift Lock (ASL)
The Automatic Shift Lock safeguards you against acciden
tally shifting into a forward or the reverse gear and
causing the vehicle to move unintentionally.
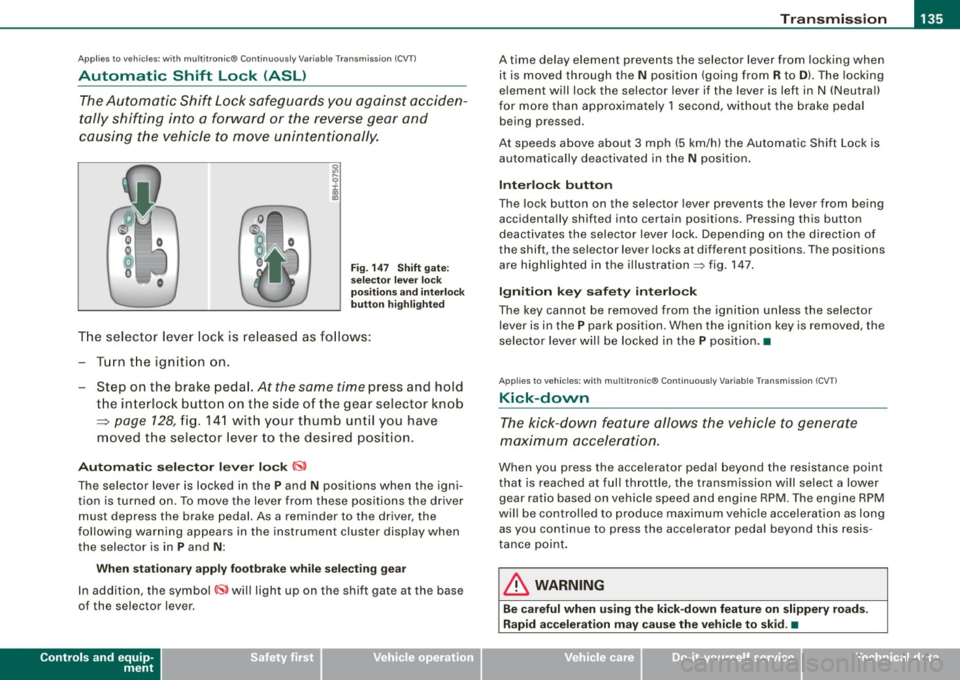
Fig. 147 Shift gate:
selector lever lock
positions and interlock
button highlighted
The selector lever lock is released as follows:
-Turn the ignition on.
- Step on the brake pedal.
At the same time press and hold
the interlock button on the side of the gear selector knob
=> page 128, fig. 141 with your thumb until you have
moved the selector lever to the desired position.
Automatic selector lever lock CS,
The selector lever is lock ed in the P and N positions when the igni
tion is turned on. To move the lever from these positions the driver
must depress the brake pedal. As a reminder to the driver, the
following warning appears in the instrument cluster display when
the selec tor is in
P and N :
When stationary apply footbrake while selecting gear
In addition, the symbol~ will light up on the shift gate at the base
of the selector l ever.
Controls and equip
ment
A time delay element prevents the selector lever from locking when
it is moved through the
N position (going from R to D). The locking
element will lock the selector lever if the lever is left in N (Neutral)
for more than approximately 1 second, without the brake pedal
being p ressed .
At speeds above about 3 mph (5 km/h) the Automatic Shift Lock is
automatically deactivated in the
N position.
Interlock button
The lock button on the selecto r lever prevents the lever from being
acc identally sh ifted into certain positions. Pressing this button
deactivates the selector lever lock. Depending on the direction of
the shift, the sel ector lever locks at different positions . Th e positions
are highlighted in the illustration=> fig. 147.
Ignition key safety interlock
The key cannot be removed from the ignition unless the selector
lever is in the
P park posit ion . Wh en the ignition key is removed , th e
selector lever will be locked in the P position. •
Applies to vehicl es : wit h mu lt itro nic® Co nti nuous ly V ariab le Tra nsmi ssion ( CVTl
Kick-down
The kick-down feature allows the vehicle to generate
maximum acceleration.
Wh en you press the accel erator pedal beyond the res istance point
that is reached at full throttle , the transmission will select a lower
gear ra tio based on veh icle speed and engin e RPM . The eng ine RPM
will be controlled to produce maximum vehicle acceleration as long as you cont inu e to press the accelerator pedal beyond this resis
tance point.
& WARNING
Be careful when using the kick-down feature on slippery roads.
Rapid acceleration may cause the vehicle to skid . •
Page 138 of 340
• .___T_ r_a _n_ s_ m_ is_ s_io _ n ______________________________________________________ _
Applies to vehicles: with mult it ron ic® Contin uously Variable Transm iss io n (CVT )
Dynamic shift program (DSP)
The multitronic® transmission is electronically
controlled .
The transmission selects the appropriate gear ratio (upshifts and
downshiftsl automatically based on preset driving programs .
The transmission will select one of the
economy programs when
you drive at a steady speed or a gradually changing speeds without heavy acceleration. This gives best fuel efficiency, with early
upshifting and delayed downshifting .
The transmission will automatically select th e
sporty shift programs
when you drive at higher speeds, or with heavy acceleration and
fr equ ently changing speeds. Upshifts are d elay ed to make full use
of engine power. Downshifting takes place at higher engine speeds
than in the economy programs .
The selection of the most suitable shift program is a continuous,
automatic process . The driver can also make the transmission
switch to a sporty program by
quickly pressing down the gas pedal.
This causes the transmission to shift down into a lower gear ratio
a n d makes quick acceleration possible (to pass another vehicle) You
do not need to press the gas pedal into the kickdown range. After
the transmission has upshifted, the original prog ram is selected
according to your driving style .
An additional shift program allows the automatic transmission to select the prop er gear for uphill and downhill gradients .
This prevents the transmission from shifting up and down unneces
sarily on hills. The transmission
will shift down to a lower gear ratio
when the driver presses the brake pedal on a downhill gradient . This
makes use of the braking effect of the engine without the need to
shift down manually.
If you are driving in hills and mountains, the transmission will
continuously adjust the g ear ratio to the road grade . If you press the brake pedal when driving downhill, the transmission will downshift
automatically. This increases the braking effect
of the engine.
If the cruise control is on when you are trave.ling downhill, the trans
mission will automatically select a lower gear ratio in order to main
tain the set vehicle speed. This will cause the engine speed to
increase. •
Applies to vehic les: with mult it ro ni c® Continu ous ly Varia ble Trans mission (CVT )
tiptronic ® manual shift program
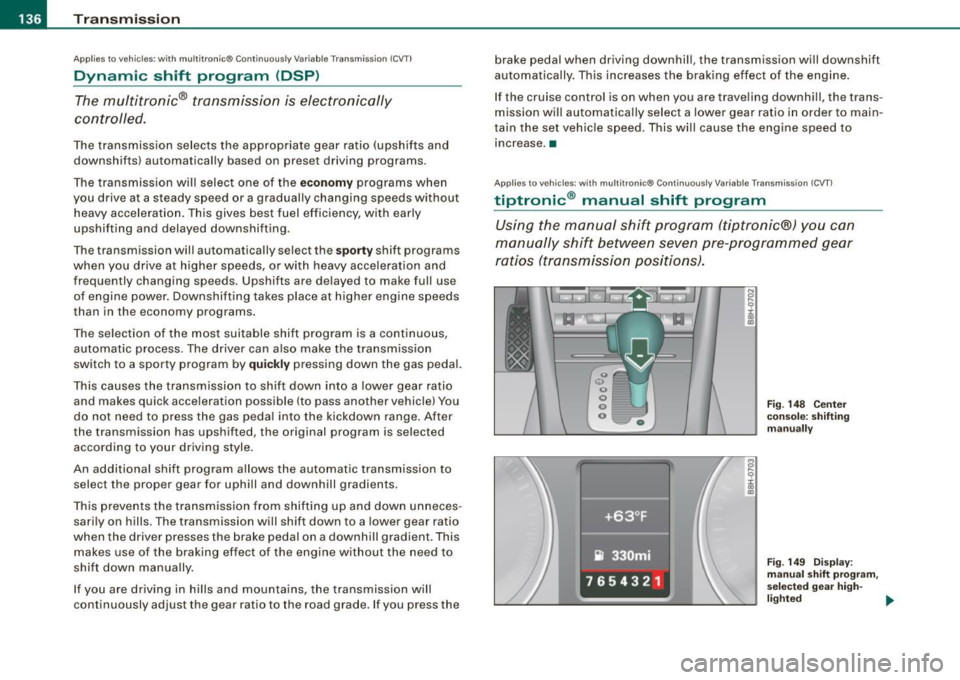
Using the manual shift program (tiptronic®) you can
manually shift between seven pre -programmed gear
ratios (transmission positions).
I
Fig . 148 Center
console: shifting
manually
Fig. 149 Display:
manual shift program ,
selected gear high-
lighted ._
Page 139 of 340
_______________________________________________________ T_ r _a_ n_s_ m __ is_ s_ io_ n _ ___,_
Swi tching to m anual shift pro gra m
- With the selector lever in D, push lever to the right. The
display will show7
6 5 4 3 21 as soon as the selector lever
is switched over. The gear you select wi ll also be h igh
lighted in the display:::::,
page 136, fig. 149 .
To up shift
Push the selecto r lever forward to the plus position
:::::, page 136, fig. 148 G) .
To d ownshift
- Pu sh the lever to the mi nus positio n Q.
When accelerating, the transmission wi II a utomatica I ly shift into the
next higher gear before the engine reaches the maximum RPM .
When accelerating, if you apply a light throttle, the tiptronic® wil l
automatically shift into the next higher gear to save fuel. If you app ly
a heavy throttle, the transmission will stay in gear engaged until
near maximum RPM are reached, or until the driver manually shifts
into a higher gear .
If you take your foot off the accelerator peda l when driving down a
steep incline, the tiptronic ® wi ll downshift from the selected gear
into the next lower gear based on road speed and engine RPM . The
automatic downshifting is interrupted as soon as you apply throttle
again .
[ i ] Tips
• When you shift into the next lower gear, the engine will down
shift only when there is no possibility of over-revving.
• When the kick -down comes on, the transmission wi ll sh ift down
to a lower gear depending on vehicle and engine speeds.
• The tiptronic® is inoperative when the transmission is in the fai l
safe mode .•
Contro ls and eq uip
ment
Ap plies to vehicles : w it h mu ltit ron ic® Co nti nuou sly V ariable Transmi ssion ( CVT)
Steering vvheel vvith t iptronic ®
The shift buttons on the steering wheel allow the driver to
shift gears manually.
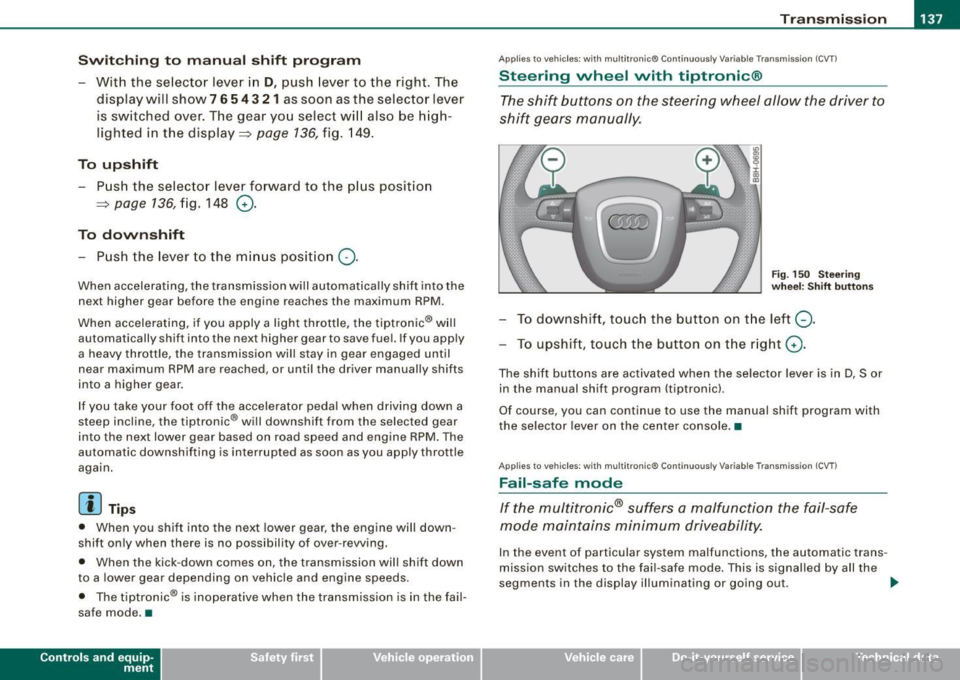
F ig. 15 0 Stee ring
w he el: S hift b utto ns
To downshift, touch the button on the left Q .
To upshift , touch the button on the r ight G) .
The shif t buttons are activated when the selector lever is in D, S or
in the manual shift program (tiptronic).
Of course, you can continue to use the manual shift program with
the selector lever on the center console. •
Applies to vehicles : wi th mu lt itro nic® Co nti nuously Var iab le Tra nsmis sion (CVT)
Fail -safe mode
If the multitronic® suffers a malfunction the fail-safe
mode maintains minimum driveability.
In the event of particular system malfunctions, the automatic trans
mission switches to the fai l-safe mode. This is signal led by all the
segments in the display illuminating or going out . _,,,
~ehicle care irechnical data
Page 160 of 340
___ D_ r _i_v _i_n ..;;:g ::;,._ S_ a_ f_ e---= ly'----------------------------------------------------
- Then press the rollover bar all the way down until you
hear it engage.
Check to make sure the rollover bar is securely engaged
before you release your grip on the bar.
Close the cover @~ page
157, fig. 160 .
- Perform the same procedure on the second rollover bar.
- You can now open and close the power top again.
& WARNING
• If there is a problem in the rollover protection system, the
system must be checked by a professional mechanic as soon as
possible.
If this is not done, there is a risk that the rollover protec
tion system may not be activated in the event of an accident.
• No modifications of rollover protection system components
are permitted.
• Work on the rollover protection system must only be done by a
professional mechanic . Improperly performed work can cause the
system to fail or release unintentionally, possibly causing an
injury!
• Always have your vehicle serviced whenever the service
interval display indicates that it is time for service . This will ensure
that the system will operate properly over the long term. The roll over protection system must be checked by a professional
mechanic every two years or sooner. •
Page 173 of 340
Airbag system -----------------=~-
as defined in the electronic contro l unit:::::, page 18 0, "P ASSENG ER
A IR BAG OFF lig ht".
A lways remember, a ch ild safety s eat or infant carrier insta lled on
the front seat may be struck a nd knocked out of position by the
rap id ly infl atin g p ass eng er's ai rba g in a front al co llision . The air bag
co uld greatly reduce the effectiveness of the chi ld re st raint and
e v en s erio usl y inju re the chi ld during inflati on.
F or this reason, and because the bac k seat is t he safest plac e for
c hi ldr en -w he n prop erly res train ed acc ordi ng to th eir age a nd size
- w e stro ng ly recomme nd that c hildren a lways s it in t he bac k seat
::::;, page 190, "Chil d Safe ty" .
& WARNING
A child in a rearward -facing child safety seat installed on the front
passenger seat will be seriously injured and can be killed if the
front airbag inflates - even with an Advanced Airbag System.
• The inflating ai rbag will hit the child safety seat or infant
carrier with great force and will smash the child safety seat and
child against the ba ckrest , center arm rest , door or roof.
• Always install rear-facing child safety seats on the rear seat. • If you must install a rearward facing child safety seat on the
front passenger seat because of exceptional circumstances and
the PASSENGER AIR BAG OFF light does not come on and stay on,
immediately install the rear-facing child safety seat in a rear
seating position and have the airbag system inspected by your
Audi dealer .
• Forward-facing child safety seats installed on the front
passenger's seat may interfere with the deployment of the airbag
and cause serious personal injury to the child .
& WARNING
If, in exceptional circumstances , you must install a forward-facing
child restraint on the front passenger's seat:
Controls and equip ment Safety first
Vehicle operation
& WARNING (continued)
• Always make sure the forward-facing seat has been designed
and certified by its manufacturer for use on a front seat with a
passenger front and side airbag .
• Never put the forward -facing child restraint up against or very
near the instrument panel .
• Always move the passenger seat into its rearmost position in
the seat's fore and aft adjustment range, as far away from the
airbag as possible before installing the forward-facing child
restraint. The backrest must be adjusted to an upright position.
• Make sure that the PASSENGER AIR BAG OFF light comes on
and stays on all the time whenever the ignition is switched on.
& WARNING
To reduce the risk of serious injury, make sure that the PASSENGER
AIR BAG OFF light will be displayed whenever a child restraint is installed on the front passenger seat and the ignition is switched
on.
• If the PASSENGER AIR BAG OFF light does not stay on , perform
the checks described :::::,
page 179, "Monitoring the Advanced
Airbag System" .
• Take the child restraint off the front passenger seat and install
it properly at one of the rear seat positions if the PASSENGER AIR
BAG OFF light does not stay on .
• Have the airbag system inspected by your Audi dealer immedi
ately .
• Always carefully follow instructions from child restraint manu
facturers when installing child restraints .
& WARNING
If, in exceptional circumstances, you must install a forward or
rearward-facing child restraint on the front passenger's seat :
Vehicle care Do-it-yourself service Technical data
Page 183 of 340
__________________________________________________ A_ i_ r _b _a...; g::- s_ y=--- s_t _e _m ___ ffllll
the weight -sensing mat to measure more weight than is actually on
the seat .
If the PA SSENGER AIR BAG OFF light still d oes not come on and does
not stay on continuously (when the ignition is switched on),
• take the child restraint off the front passenger seat and insta ll it
properly at one of the rear seat positions. Have the airbag system
inspec ted by your Audi dea ler immediately .
• move the child to a rear seat position and make sure that the
child is proper ly restrained i n a child restraint that is appropriate for
its size and age.
The
PASSENGER AIR BAG OFF light shou ld NOT come on when the
ignition is on and an adult is sitting in a proper seating position on
the front passenger seat . If the
PASSENGER AIR BAG OF F light
comes on and stays on or flashes for about 5 seconds whi le driving,
under these circumstances, make sure that:
• the adult on the front passenger seat is properly seated on the
center of the seat cushion with his or her back up against the back
rest and the back rest is not reclined => page 148, "Pro per occupant
seating positions",
• the adult is not taking weight off the sea t by ho lding o n to the
passenger assist handle above the front passenger door or
suppo rting thei r weight on the armrest,
• the safety belt is being proper ly worn and that there is not a lot
of slack in the safety bel t webbing,
• accessory seat covers or cushions or other things that may cause
an incorrect reading or impression on the weight -sensing mat
under the upho lstery of the seat have been removed from the front
passenger seat,
• a safety belt extender has not been left in the safety be lt latch for
t he front passenger seat .
In addition to the
PASSENGER AIR BAG OFF l ight in the center of the
instr ument panel, the message
PASSENGER AIR BAG OFF or
PAS SENGER AIR BAG ON wi ll briefly appear in the instrument c luster
Controls and equip ment Safety first
Vehicle operation display. This is to inform the driver of the current front passenger
a
ir b ag status .•
Important safety instructions on monitoring
the Advanced Airbag System
& WARNING
An airbag system that is not fun ctioning properly cannot provide
supplemental protection in a frontal cra sh .
• If the airbag ind icator li ght come s on , it means that there may
be something wrong with the Advan ced Airbag System . It is
possible that the airbag will inflate when it is not suppo sed to , or
will not inflate when it should .
• Ha ve the airb ag system inspected immedi ately by your Audi
dealer.
& WARNING
If the front airbag inflate s, a child witho ut a child restraint , in a
rearward-facing child safety seat or i n a forward -fa cing child
restr aint that has not been properly installed will be seriously
injured and can be killed .
• Even though your vehicle is equipped with an Advanced Airbag
Sy stem , make certain that all children , e speci ally 12 year s and
younger , always ride on the back seat p roperly re strained for their
age and size .
• Always install forward or rear -facing child safety seat s on the
re ar s eat - even with an Ad van ced Airb ag Sy stem .
• If you mu st install a rearward -fa cing child safety seat on the
front pa ssenger seat be cau se of ex ceptional cir cum stance s and
the PASSENGER AIR BAG OFF light does not appear and stay on ,
immediately in stall the rear -facing child safety seat in a rear ...
Vehicle care Do-it-yourself service Technical data
Page 249 of 340
•
Refuelling procedure
-Insert the fue l nozzle from the gaso line pump i nto the
fue l fi ller neck as far as it w il l go.
- Select a medium refue lling rate so that the nozzle
swi tches off automatica lly w hen the tank is ful l.
Putting the fuel cap back on
-Aft er fillin g yo ur ta nk, twist th e fue l fille r cap clockw is e
unt il you hear a de finit e cli ck .
- Cl ose the fue l fille r flap.
To avo id fu el sp illing or evapora ting from the fuel tan k always close
fu el filler cap p rop erly and co mplet ely . An i mprope rly clo sed fue l
fi ller cap may a lso cause a messa ge in the dr iver in fo rm ation display
=>
page 27 or cause the MIL lamp=> page 27 to come on.
,& WARNING
Improper refueling or handling of fuel can cause fire, explosion
and severe burns .
• Fuel is highly flammable and can cause severe burns and other
injuries .
• Failure to shut the engine off while refueling and /or to insert
the pump nozzle fully into the fuel filler ne ck could cause fuel to
spray out of filler neck or to overflow. Fuel spray and overflowing
fuel can cause a fire .
• Never use a cellular telephone while refueling . The electromag
netic radiation can cause sparks that can ignite fue l vapors and
c ause a fire .
• Never get ba ck into your vehicle wh ile refueling . If in e xcep
tional circumstan ces you must get ba ck in your vehicle while refu
eling , make certain that you close the door and touch metal to
di scharge static electricity before touching the filler nozzle again.
Fu el supply and filling your fu el tank
& W ARNING (continued )
Static electricity can cause sparks that can ignite fuel vapors
released during refueling .
• Never smoke or have an open flame anywhere in or near your
vehicle when refueling or filling a portable fuel container.
• For your safety , we strongly recommend that you do not travel
with a portable fuel container in your vehicle. The container , full or
empty may leak and could cause a fire , especially in a crash .
• If, under e xcept ional circumstances , you must transport a
portable fuel container, please observe the following:
-Never fill a portable fuel container while it is anywhere
in or
on the vehicle (for example , in the luggage compartment , or on
the trunk) . Static electricity can build up while filling and can
ignite fuel vapors causing a fire.
- Always place a portable fuel containe r on the ground before
filling.
- Always keep the filler nozzle completely inside the portable
container before and during filling .
- If filling a portable container made of metal , the filler nozzle
must always be in contact with the container. Thi s will help
prevent static ele ctricity from discharging and cause a fire.
- Never spill fuel inside the vehicle or luggage compartment .
Fuel vapors are h ighly flammable .
- Always observe local and state/provincial laws regarding the
use , storage and transportation of fuel conta iners.
- Make certain the fuel container meets indu stry standards
(ANSI / ASTM F852-86).
0 Note
If any fuel has spil led onto the car , it should be removed immedi -
ate ly to prevent da mage to the pa int. _,.
Vehic le care
Page 256 of 340
-~_C_ h_e _c _ k_ i_ n ...:::g:;..._ a_n_ d_ f_ i_ll _in ....;g:::;.._ ___________________________________________ _
the form of Service or Repair Orders that all scheduled maintenance
was performed in a timely manner. •
Engine oil consumption
The engine in your vehicle depends on an adequate
amount of oil to lubricate and cool all of its moving parts.
In order to provide effective lubrication and cooling of internal
engine components , all internal combustion engines consume a
certain amount of oil. Oil consumption varies from engine to engine
and may change significantly over the life of the engine. Typically,
engines with a specified break -in period (see~
page 219) consume
more oil during the break-in period than they consume after oil
consumption has stabilized.
Under normal conditions, the rate of oil consumption depends on
the quality and viscosity of the oil, the RPM (revolutions per minute)
at which the engine is operated, the ambient temperature and road
conditions. Further factors are the amount of oil dilution from water
condensation or fuel residue and the oxidation level of the oil. As
any engine is subject to wear as mileage builds up , the oil consump
tion may increase over time until replacement of worn components
may become necessary .
With all these variables coming into play, no standard rate of oil
consumption can be established or specified. There is no alternative
to regular and frequent checking of the oil level, see
Note.
If the yellow engine oil level warning symbol in the instrument
cluster lights up, you should check the oil level as soon as
possible
with the oil dipstick~ page 254. Top off the oil at your
earliest convenience~
page 255.
& WARNING
Before you check anything in the engine compartment, always
read and heed all WARNINGS
~ & in "Working in the engine
compartment" on
page 250.
0 Note
Driving with an insufficient oil level is likely to cause severe damage
to the engine.
[ i] Tips
• The oil pressure warning display 't!::r. is not an indicator of the oil
level. Do not rely on it. Instead, check the oil level in your engine at
regular intervals, preferably each time you refuel, and always before
going on a long trip.
• If you have the impression your engine consumes excessive
amounts of oil, we recommend that you consult your Audi dealer to
have the cause of your concern properly diagnosed . Keep in mind
that the accurate measurement of oil consumption requires great
care and may take some time . Your Audi dealer has instructions
about how to measure oil consumption accurately. •
Checking the engine oil level
Fig. 198 Illustration of
principle 1: Markers on
oil dipstick ..,_
Page 285 of 340
__________________________________________________ T_ ir_e_ s_ a_ n_d _ w_ h_ e_ e_l_s _ ...... fflll
•
0 Not e
• For technical reasons, it is not genera lly possible to use the
wheel rims from other vehic les. This can hold true for wheels of the
same vehicle type.
• If the spare tire is different from the tires that you have mounted
on your vehicle (for example winter tires or wide profile t ires), then
use the spare tire for a short period of time only and drive with extra
care. Rep lace the flat tire with the tire matching the others on your
vehic le as soon as possible.
• If you should put different wheels and tires on your vehic le (e.g.
winter wheels and tires), you must be certain that the wheels and
tires are compatib le with the tire pressure monitoring system.
Otherwise the system will register a malfunction and a fault
message will be displayed . For more information, contact your Aud i
dea ler.
0 Note
• When insta lling new tires, be carefu l not to damage the valves or
t ire pressure monitoring system* senso rs.
• Never drive without the va lve stem cap. The va lves could get
damaged.
• If the sensors must be replaced, then the valve must also be
replaced at the same t ime.
Uniform tire quality grading
• Tread wear
• Traction AA A B C
• Temperature A B C Qua
lity grades can be found where applicable on the tire side wall
be tween tread shoulder and maximum section widt h =>
page 279,
fig. 21 1.
For example : Tread wear 200, Traction AA , Temperature A.
All passenger car tires must conform to Federa l Safety Require
ments in addition to these grades.
Tre ad w ear
The tread wear grade is a comparative rating based on the wear rate
of the tire when tested under con trol led conditions on a specified
government test course.
F o r exam ple, a tire g raded 150 would wear one and one half (1 1/2)
times as well on the government course as a tire graded 100 .
The relative performance of tires depends upon the actual condi
tions of the ir use, however, and may depart significantly from the
norm due to variations in driving habits, service practices and differ
ences in road cha racteristics and c limate .
Tra ction
The traction grades, from highest to lowest , are AA, A, Band C.
Those grades represent the tire's ability to stop on wet pavement as
measu red under contro lled conditions on specified government
test surfaces of asphalt and concrete. A tire marked C may have
poor traction performance =>
/.1.
Temperatur e
The temperature grades are A (the highest), B, and C, representing
the tire 's resistance to the generation of heat and its ability to dissi
pate heat when tested under contro lled conditions on a specified
indoor laboratory test wheel.
Sus tained high temperature can cause the material of the ti re to
degenerate and reduce tire life, and excessive temperature can lead
to sudden tire failure=>
/.1.
The grade C corresponds to a level of performance which all
passenger car tires must meet under the Federal Motor Vehicle
Vehic le care
Page 329 of 340

Alph ab eti ca l ind ex --------------=-----
Convertible locking retractor
Activating ...... ... .. .... ...... .. 202
Deactivating .. ... ..... ..... .. ... . 203
Using to secure a child safety seat 200 ,
202
Convertible top ........ .... .... .... .. 61
Coolant system
Cooling System 257
Expansion tank ... .... ...... .... .. 258
cornering light . .......... .. .... .... .. 79
Cruise control .. ... ... ...... ...... .. 123
Changing a stored sp eed . .... .... . 124
Setting and storing a vehicle speed . 124
Switching off .................... 125
Switching off temporari ly .. ........ 124
Switching on .... .... .... ...... .. 124
Warning/indicator lights ... ... .... .. 20
Cruising range .. .... .... .... ...... ... 37
Cupholder . ... .. ...... ..... .. .. .... 104
D
Data . .... ... . ... .. ... ... .... ..... . 314
Data recorder ... .... ...... ..... .... . 212
Date dis play . . . . . . . . . . . . . . . . . . . . . . . . . 14
Daytime running lights ... .. ... .. ... ... 78
Declaration of compliance Cell phone package .. .. .... .... ... 320
Elect ronic immobilizer . ..... .. .... 320
Homelink® universal remote con trol 320
Remote control key .. .... .... .... . 320
Tire pressure monitoring system ... 320
Controls and equip
ment Safety first
def
Dublicate key ... ...... ... .. . ... .... .. 47
What does this mean when it appears in
Dynamic shift program ....... ... ... . . 136
the trip odometer display? .. ...... . 15
Defogging the windows . ....... ..... . 116
E
Defrosting the windows .. ... ..... ... . 116
Determining correct load lim it ... .... . 276 ECON
Digi tal clock ............. .. ... ... .... 14 When should I use ECON?
... .... .. . 113
Setting the time ......... .... .... .. 14 EDL
Digital compass . ... ... . ... ... .. .... .. 90 See Electronic differential lock (EDU . 213
Dimensions ..... .... .... .... .... ... 313 Electric roof .
..... ... ..... .. .... .... . 61
Dipstick Electrically heated front seats .
.. .... .. 116
Reading the dipstick properly ...... 254 Electronic differential lock
Distance ... .... ... ... .. ... .... .... .. 38 Warning/indicator
lights ..... ... .... 20
Doors, power locks ........ ....... .... 53
Driver Electronic differ
ential lock (EDU
How the system works ...... .. .... 213
See S eating position .. ... ... ... ... 148 Electronic immobilizer ..
.. .. . .. .. .. 15, 49
Driver information dis play
Miles (kilometers) to empty .. .. ... .. 26 Electronic power control
EPC warning/indicator light ......... 22
Parking brake warning ... ... ..... .. 30 Electronic sp
eed limiter ..... .. .... .... 28
D river information sys.tern . .... ...... .. 24 Electronic stabilization program (ESP)
Driver information messages .. .... .. 29 How the system works ...
..... .. .. 212
Fuel filler cap . .. . ........ ....... .. 27 Elec
tronic stabiliza tion program (ESP)
Menu button .... . .. .. .... .... .... . 40 Warning/indicator lights
.... ...... .. 22
Menu display .... ... .... .... . ... .. 39 Emerg
ency flasher ... .... ... .. ....... 82
Open door or rear lid warning ...... . 26 Warning/indicator
lights .... ...... .. 21
Outside temperatu re disp lay ... ..... 25
Emergency locking . .... .... ... .. .. . .. 55
Sound system display .... .... .... .. 25
Emergency starting ..... ....... .. .... 304
Driver's seat memory ... .... .... ..... 101
Emergency towing . .. ... .. .. .... .... 306
Recalling a seat position .... .... ... 102
Engine
Storing a seat position ... ... .... .. 102
4-cylinder (200 hp) . ... .. .. .... .. .. 251
Driving messages ...... ........ ..... . 29
6-cylinder (255 hp) . ... .. .. .... .. .. 252
Driving safely . ... .. . ... .. .... .... ... 146
Compartment .... ... .. ...... .... . 251
Driving time . .... ...... .... ... .. .... . 37 Coolant ...
.. ... .... .... .... ..... 257
Vehicle operation Vehicle care Do-it-yourself service Technical data