child lock AUDI A4 SEDAN 2013 Owners Manual
[x] Cancel search | Manufacturer: AUDI, Model Year: 2013, Model line: A4 SEDAN, Model: AUDI A4 SEDAN 2013Pages: 294, PDF Size: 73.71 MB
Page 36 of 294
34 Openin g and clo sing
keys. Unguarded access to the keys pro
vides children the opportunity to start the engine and/or act ivate vehicle sys
tems such as the power w indows etc . Un
supervised operation of any veh icle sys
tem by ch ildren can res ult in serious in
Jury.
- Do not remove the key from the ignition
lock until the vehicle has come to a com
plete stop. Otherwise the steering col
um n loc k co uld suddenly e ngage -caus
ing the risk of an accident.
@ Tips
- The operation of the remote contro l key
c a n be tempo rarily disrupted by in terfer
ence from tran smi tters in t he v ici nity of
the veh icle work ing in the same frequen
cy ra nge (e.g . a ce ll phone, radio equip
ment).
- Fo r security reasons, replacement keys
are on ly available from Aud i dea le rs .
- Fo r De clarat ion o f Compliance to United
States FCC and Industry Canada regu la
tions
¢ page 275.
Removing the mechanical key
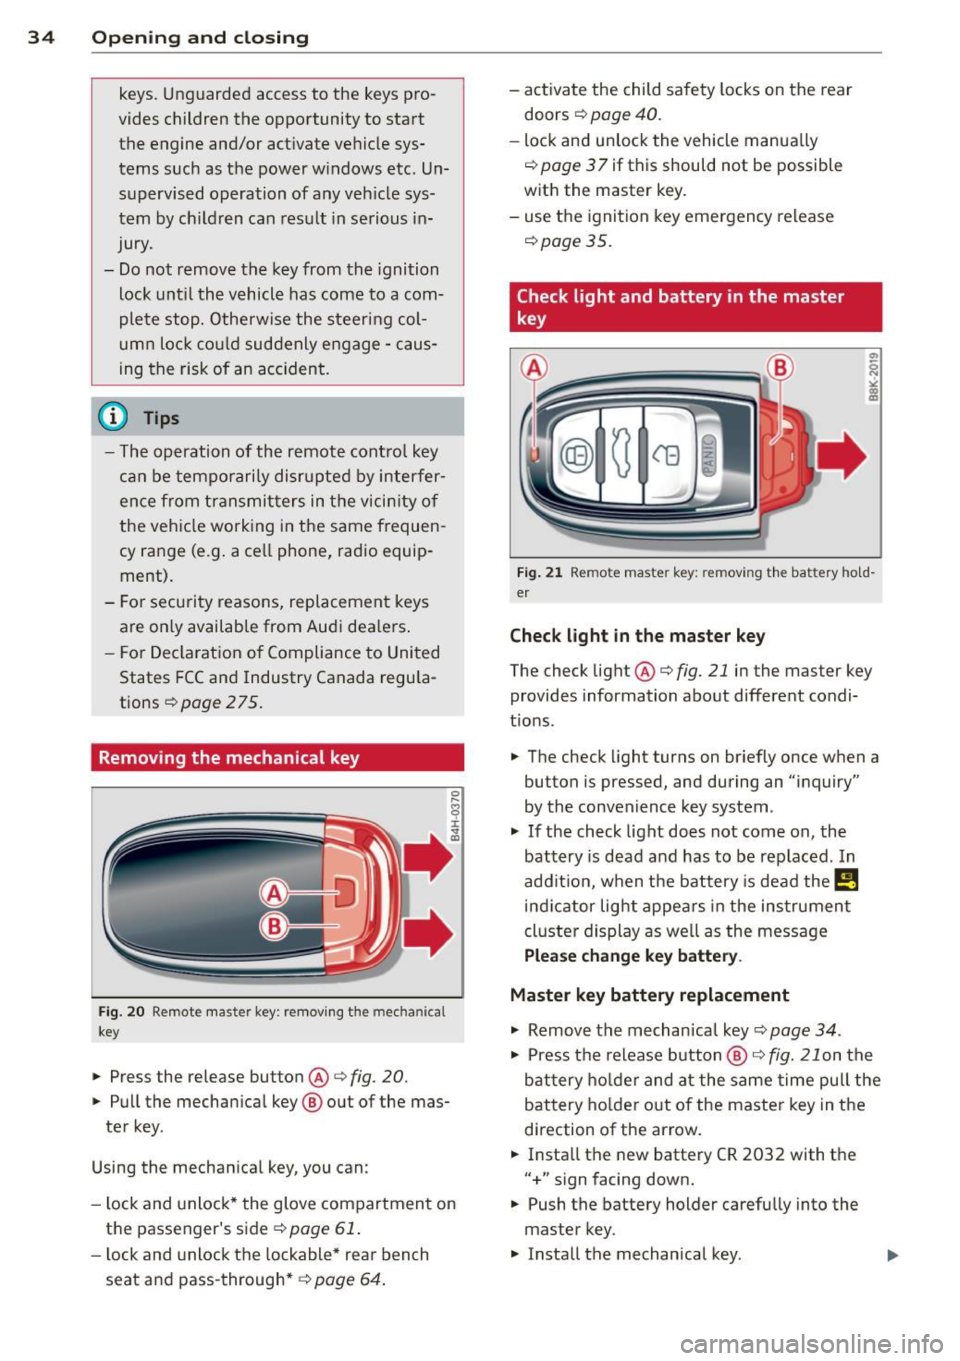
Fig . 20 Remot e ma ste r key: re mov ing the mec hanic al
key
.. Press the release button @¢ fig. 20.
.. Pu ll the mecha nical key @ out of the mas
te r key .
Using the mechan ica l key, you can :
- l ock and unlock* the glove compartmen t on
the passenger's side ¢
page 61 .
-lock and unlock t he lockable* rear bench
seat and pass-through* ¢
page 64. -
activate the child sa fety locks on the rear
doors ¢
page 40.
- lock and unlock the vehicle manua lly
~ page 3 7 if this should not be possible
w ith the master key.
- use t he ignition key emergency release
~ page 35.
Check light and battery in the master
key
Fig. 21 Rem ote mas ter key: re m ov ing th e ba ttery h old
e r
Check light in the ma ster key
The check light@¢ fig. 21 in the mas ter key
provides information about different condi
t ions .
.. The check light turns on br iefly once when a
button is pressed, and during an "inquiry"
by the convenience key system .
.,. If the check light does not come on, the
battery is dead and has to be replaced . In
add it io n, w hen t he battery is dead
the m
indicator light appea rs in the instrument
cl uster display as we ll as the message
Please change key battery .
Master key battery replacement
.,. Remove the m echan ical key ~ page 34.
.,. Press t he release button @~
fig. 21 on the
b attery ho lde r and at the same time pull the
battery holder o ut o f the master key in the
direction of the arrow .
.. Insta ll the new battery CR 2032 with the
"+ " sign facing down.
.. Push the battery holder carefully into the
master key .
.. Insta ll the mechanical key .
Page 40 of 294
38 Opening and closing
If the centra l locking system ma lfunctions ,
you must unlock/lock the doors separately us
ing the emergency key or the mechan ica l key .
Unlocking/locking the driver's door with
the mechanical key
.. Remove the mechanical key¢ page 34.
.. To unlock the driver's door, turn the key to
the open position@¢
fig. 25.
.. To lock the driver's door, move the selector
lever to the P position (automatic transmis
s ion*) and turn the key
once to the close po
s it ion
@ ¢ A in General description on
page
32.
Locking the front passenger's door/rear
doors* with the mechanical key
The emergency lock is located on the rear side
of the front passenger's door and the rear
doors.
It is only visible when the door is open.
.. Remove the mechanical key¢
page 34 .
.. Pull the cover cap out of the opening
¢fig . 26.
.. Inse rt the key in the inside slot and turn it
all the way to the right (r ight doo r) or left
(left door).
Once the front passenger's doorrear doo rs*
close, you cannot open them again from the
outside. The door can be opened from the in
side by pulling the door handle. If the child
safety lock in a rear door* is activated, you
must first pull the door handle on the inside .
Then you can open the door from the outside.
A WARNING
Read and follow all WARNINGS ¢.&. in
General description on page
32.
After the ign ition is switched on, the pow
er lock ing system switch and the unlocking
button for the rear lid~ in the door are
enabled.
Electronic immobilizer
The immobilizer prevents your vehicle from
being started by unauthorized persons .
Inside the key there is a computer chip. This
chip automatically activates/deactivates the
electronic immobilizer .
Applies to vehicles with ignition lock:
The electronic immobilizer deactivates auto
matically when you insert the remote control
key into the ign ition lock.
It activates again
automat ically when you remove the remote
control key from the ignition lock .
Applies to vehicles with convenience key:
If the remote control key is located inside the
vehicle and you press the
I START ENGINE STOP I button, the electronic
immobilizer deactivates automatically . If you
switch the ign ition off and remove the remote
control key from the vehicle, the electronic
immobilizer activates aga in automat ically .
_& WARNING
-
Always take the key with you when you
l eave the vehicle. The key can disa rm the
e lectronic engine immobilizer and permit
an unauthorized person to start the engine
and enable operation of the vehicle sys
tems such as power w indow or power sun
roof leading to serious personal injury.
(D Tips
- The vehicle cannot be started if an unau
thorized key is used. The vehicle may not
start if another radio device such as a key
for another veh icle or a transponder is
located on the key ring.
- For Declaration of Compliance to United
States FCC and Industry Canada regula
tions¢
page 275 .
Page 41 of 294
Rear lid
Opening/closing rear lid
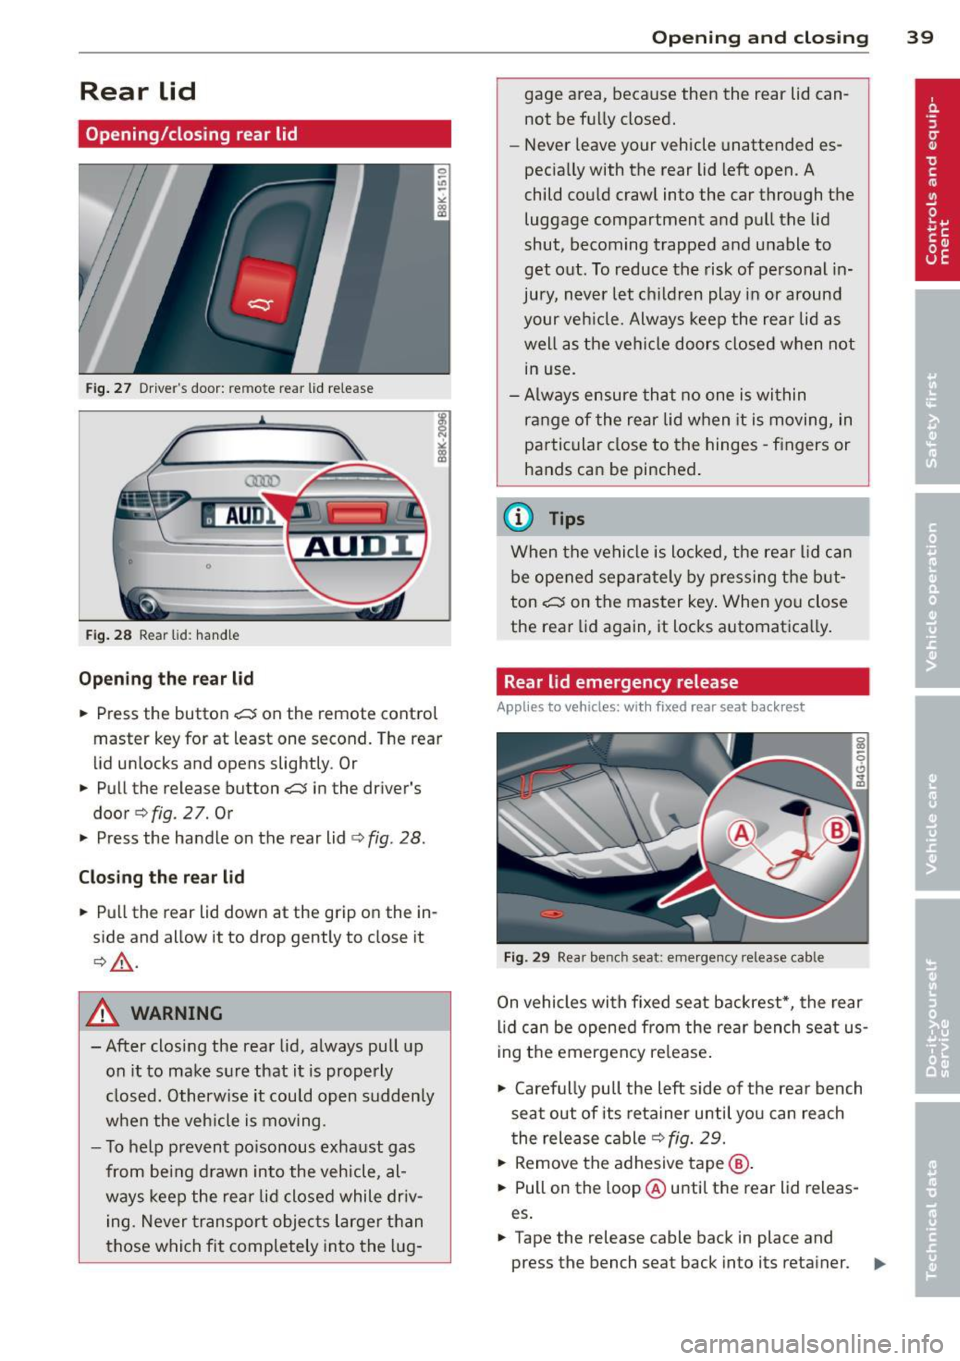
Fig. 27 Drive r"s door: re m ote rear lid rele ase
Fig. 28 Rear lid: handle
Opening the rear lid
.,. Press the button .c::5 on the remote control
master key for at least one second. The rear
lid unlocks and opens slightly . Or
.,. Pull the release button
.c::5 in the driver's
door
q fig. 2 7. Or
.,. Press the handle on the rear lid
¢fig . 28.
Closing the rear lid
.,. Pull the rear lid down at the grip on the in
side and allow it to drop gently to close it
¢ ,&. .
A WARNING
-After closing the rear lid, always pull up
on it to make sure that it is properly
closed. Otherwise it could open sudden ly
when the veh icle is moving .
- To help prevent poisonous exhaust gas
from being drawn into the vehicle, al
ways keep the rear lid closed while driv
ing. Never transport objects larger than
those which fit comp letely into the lug-
Opening and closing 39
gage area, because then the rear lid can
not be fully closed.
- Never leave your vehicle unattended es
pecia lly with the rear lid left open. A
child could craw l into the car through the
luggage compartment and pull the lid
shut, becoming trapped and unable to
get out. To reduce the risk of personal in
jury, never let childre n play in or around
your vehicle. Always keep the rear lid as
well as the vehicle doors closed when not
in use.
- Always ensure that no one is within
range of the rear lid when it is moving, in
particular close to the hinges -fingers or
hands can be pinched .
@ Tips
When the vehicle is locked, the rear lid can
be opened separately by pressing the but
ton
.c::5 on the master key . When you close
the rear lid aga in, it locks automat ica lly.
Rear lid emergency release
Applies to vehicles: wi th fixed rear seat back rest
Fig. 29 Rear be nch s eat: eme rgen cy re lease cab le
On vehicles with fixed seat backrest*, the rear
lid can be opened from the rear bench seat us
ing the emergency re lease .
.,. Carefully pull the left side of the rear bench
seat out of its retainer until you can reach
the release cable¢
fig. 29.
.,. Remove the adhesive tape @.
.,. Pull on the loop ® until the rear lid releas
es .
... Tape the release cable back in place and
press the bench seat back into its retainer .
liJ,
Page 42 of 294
40 Opening and closing
_&. WARNING
After opening the rear lid using the emer
gency release in vehicles with a fixed rear
seat backrest, make sure the bracket under
the rear bench seat
9 fig. 29 locks securely
into the mounting eye let again.
Trunk escape handle
In case of an emergency, the luggage com
partment lid can be opened from the inside using the trunk escape handle.
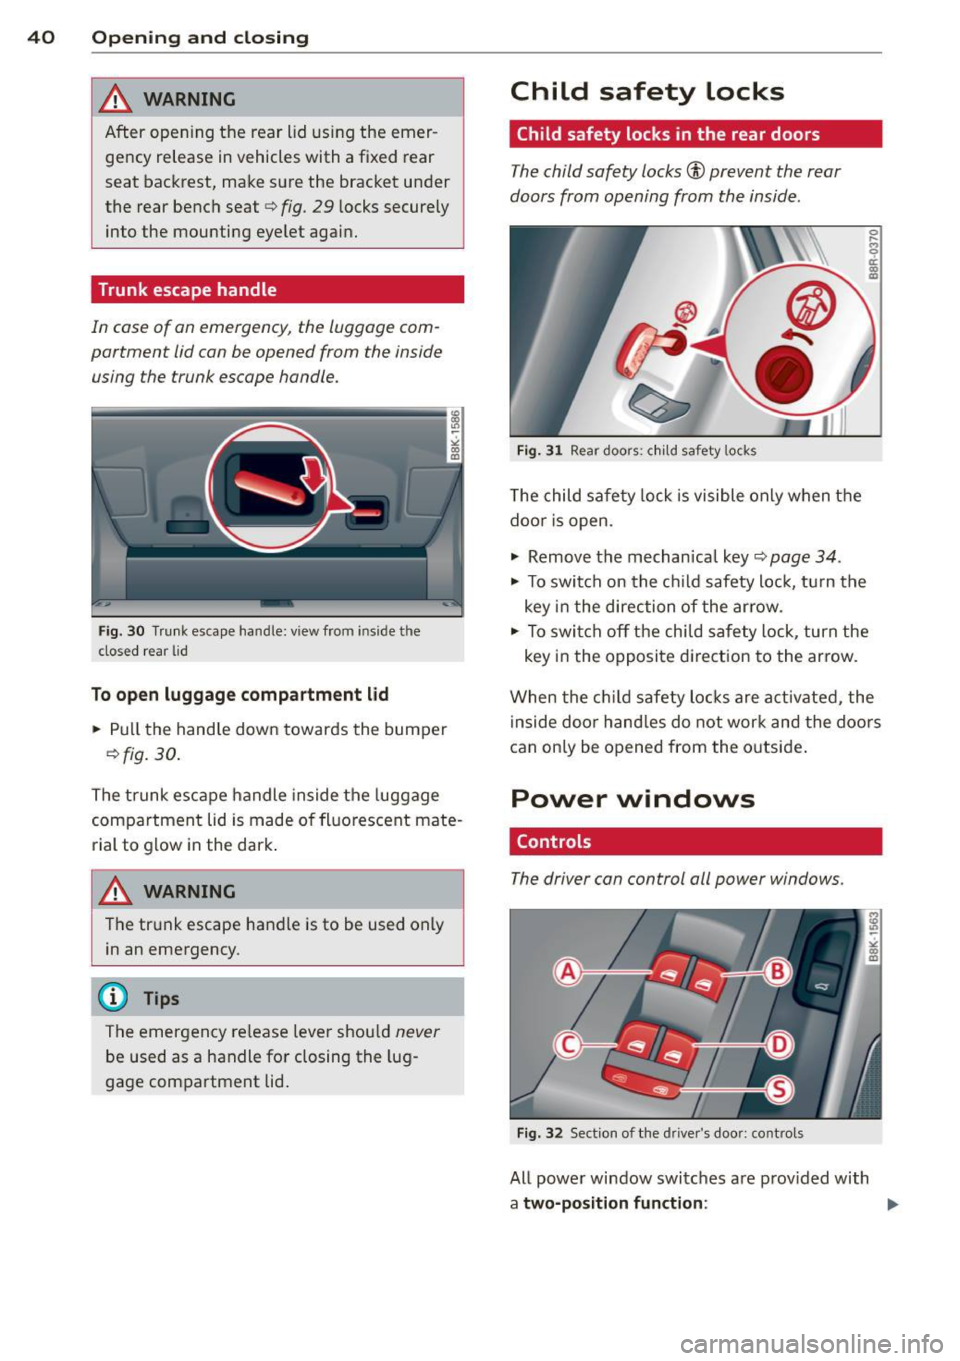
Fig. 30 Tru nk escape handle: view from inside the
closed rear lid
To open luggage compartment lid
.. Pull the handle down towards the bumper
r=;, fig. 30.
The trunk escape handle inside the luggage
compartment lid is made of fluorescent mate
rial to g low in the dark .
,&. WARNING
The trunk escape handle is to be used only
in an emergency .
@ Tips
The emergency re lease leve r shou ld never
be used as a handle for closing the lug
gage compartment lid.
Child safety locks
Child safety locks in the rear doors
The child safety locks® prevent the rear
doors from opening from the inside.
Fig. 31 Rear doors: chil d safety locks
T he child safety lock is visible only when the
door is open .
.. Remove the mechan ica l key
c:> page 34 .
.,. To switch on the child safety loc k, turn the
key in the direction of the arrow .
0
s ti:
"' "'
.. To switch off the child safety lock, turn the
key in the opposite direction to the arrow.
When the child safety locks are activated, the
inside doo r hand les do not work and the doors
can only be opened from the outside .
Power windows
Controls
The driver can control all power windows.
Fig. 32 Section of the driver's door: con tro ls
All power window switches a re provided with
a two-position function :
Page 43 of 294
Opening th e windows
"' Press the switch to the firs t stop and hold it
until the window reaches the desi red posi
tion.
"' Press the switch briefly to the se cond stop
to automatically open the window .
Cl os ing th e windows
"' Pull the swi tch to the first sto p and hold it
until the window reaches the desi red posi
tion .
"' Pu ll the switch brief ly to the sec on d st op to
automatica lly close the window.
P ow er w ind ow switch es
@ Driver's door
@ Passenger's door
© Left rea r door
@ R ight rear door
® Safety button
Child safety loc ks
When the safety button® is pressed
c::> fig. 32, the ~ symbol in the button lights
up . The power w indow switches in the rear
doors are switched off.
A WARNING
- When you leave your veh icle - even if on
ly briefly - always remove the ign ition
key. This applies part icularly when chil
dren remain in the vehicle. Otherw ise the
children cou ld s tart the engine or oper
ate e lectr ica l equipment (e.g . power win
dows). The power windows a re f unction
al until the driver's door or passenger's
door has been opened.
- Pay close attention when closing the win
dows to prevent pinching of hands or
limbs.
- When locking the vehicle from outside,
the vehicle must be unoccupied s ince the
windows can no longer be opened in an
emergency.
Opening and clo sin g 41
(D Tips
After the ignition has been switched off,
the w indows can still be opened or closed
for about 10 minutes. The power windows
are not switched off until the driver's door
or passenger's door has been opened .
Convenience opening/closing
The windows and the power sunroof can be
opened and closed with the mechanical key or the emergency key.
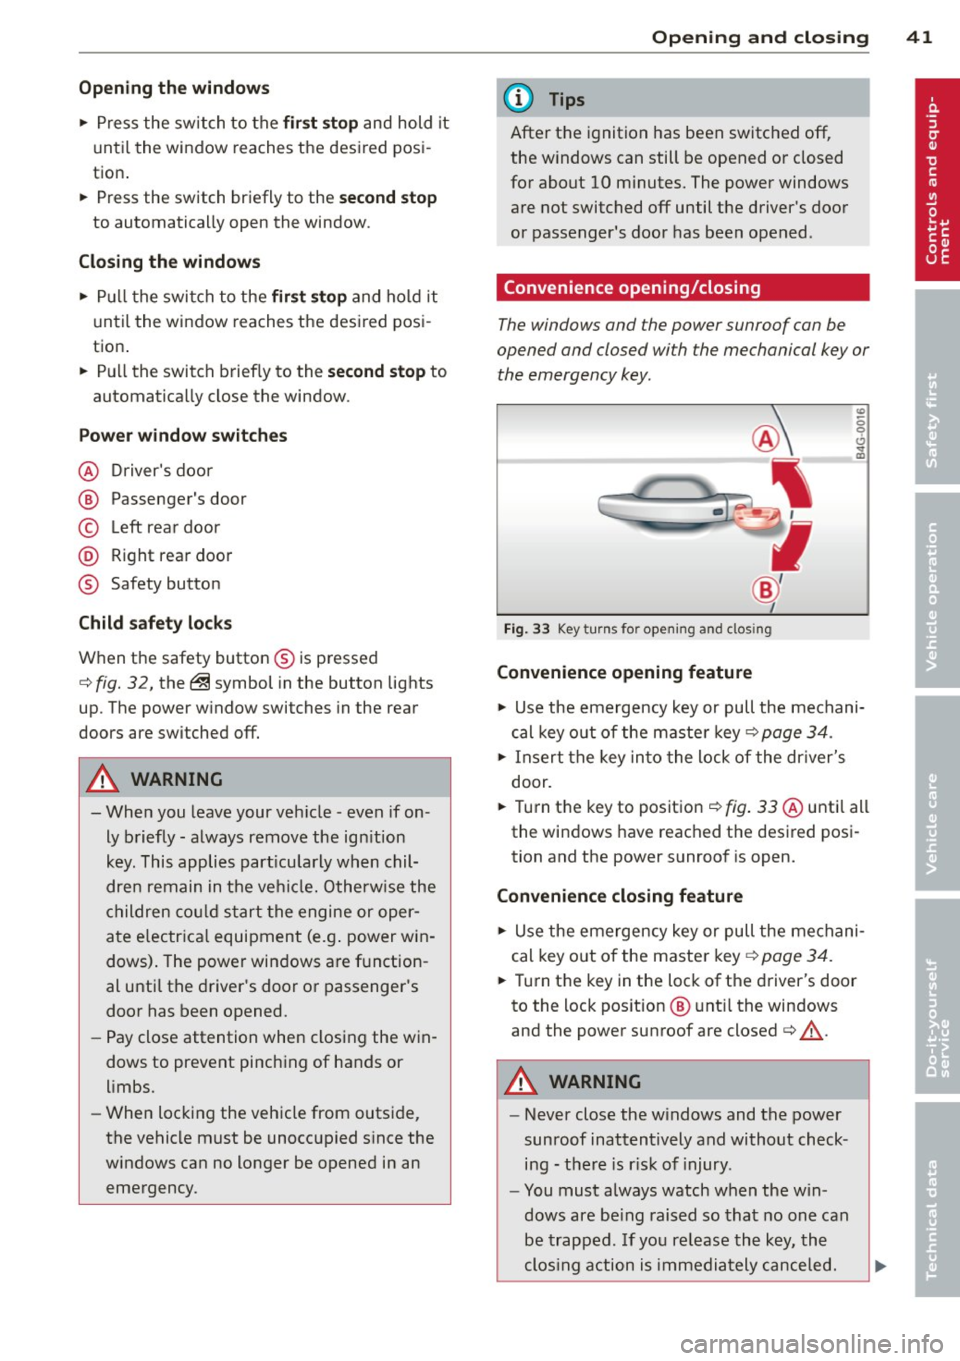
Fig. 33 Key turns for opening and clos ing
Convenience opening feature
"' -0 0 t!, ., a,
"' Use the emergency key or pull the mechani
cal key out of the maste r key
c:? page 34.
"' Insert the key into the lock of the dr iver's
door.
"' Turn the key to position¢
fig. 33 @until all
the windows have reached the desired posi
tion and the power sunroof is open.
Convenience clo sing f eature
"' Use the emergency key or pull the mechani
cal key out of the master key¢
page 34.
"' Turn the key in the lock of the driver's door
to the lock position @ unt il the windows
and the power sunroof are closed¢
A.
A WARNING
- Never close the w indows and the power
sunroof inattentively and without check ing - there is r isk of injury.
- You must always watch when the win
dows are be ing raised so that no one can
be trapped. If you re lease the key, the
clos ing action is immediately canceled.
Page 76 of 294
7 4 On the road
Starting the vehicle with the emergency
key
Applies to vehicles: with ig ni tion lock
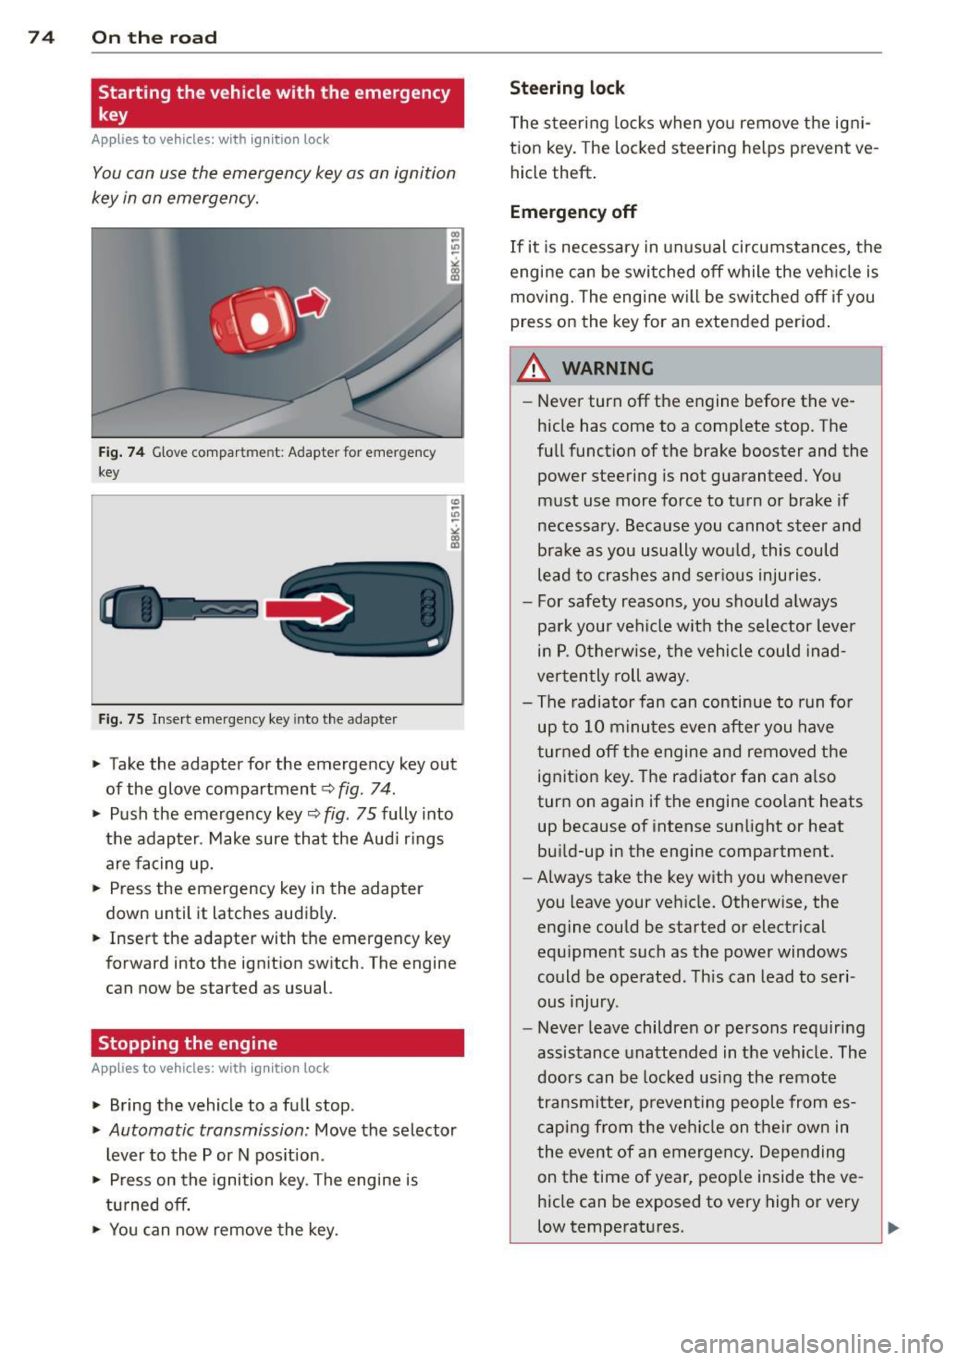
You can use the emergency key as an ignition
key in on emergency.
Fi g. 74 G love compar tme nt: Adapter for emergency
key
Fig. 75 Inse rt emergency key into the adapter
.. Take the adapter for the emergency key out
of the glove compartment
c!> fig . 74 .
.. Push the emergency key c::> fig . 75 fully into
the adap ter . Make sure tha t the Aud i rings
are facing up.
.. Press the emergency key in the adapter
down until it latches audibly .
.. Insert the adapter with the emergency key
forward into the ignition switch. The engine
can now be started as usual.
Stopping the engine
App lies to vehicles: with ig n ition lock
.. Bring the vehicle to a full stop.
.. Automatic transmission: Move the selector
lever to the P or N pos ition .
.. Press on the ignition key. The engine is
t u rned off.
.. You can now remove the key.
Steering lock
T he steering locks when yo u remove the igni
t ion key. The locked steering helps prevent
ve
hicle theft .
Emergency off
If it is necessary in un usual circumstances, the
engine can be switched off while the veh icle is
moving. The engine will be switched off if you
press on the key for an extended period .
A WARNING ~
-Never turn off the engine before the ve
hicle has come to a comp lete stop. The
fu ll function of the brake booster and the
power steering is not guaranteed. You
must use more force to turn or brake if
necessary. Because you cannot steer and
brake as you usually wou ld, this could
lead to crashes and ser ious injuries.
- For safety reasons, you should a lways
park your vehicle w ith the selector lever
in P. O therwise, the vehicle could in ad
ver ten tly roll away.
- The radiator fan can continue to run fo r
up to 10 minu tes
even after you have
turned off the engine and removed the ignit ion key. The radiator fan can a lso
turn on agai n if the engine coo lant heats
up because of intense sunlight or heat
bu ild-up in the engine compartment.
- Always take the key with you whenever
you leave your vehicle. Otherw ise, the
engine could be started or electrical
equ ipment such as the power windows
could be operated. This can lead to seri
ous injury.
- Never leave children or persons requiring
assistance unattended in t he vehicle . The
doors can be locked using the remote
transm itter, preven ting people from es
caping from the ve hicle on their own in
the event of an emergency . Depending
on the time of year, peop le inside the
ve
hicle can be exposed to very high or very
low temperatures .
Page 77 of 294
CD Note
If the engine has been under heavy load
for an extended period, heat builds up in
the engine compartment after the engine
is switched off- there is a risk of damaging
the engine . Allow the engine to run at idle
for about two minutes before switching it
off.
Convenience key
Starting the engine
Applies to vehicles: with convenience key
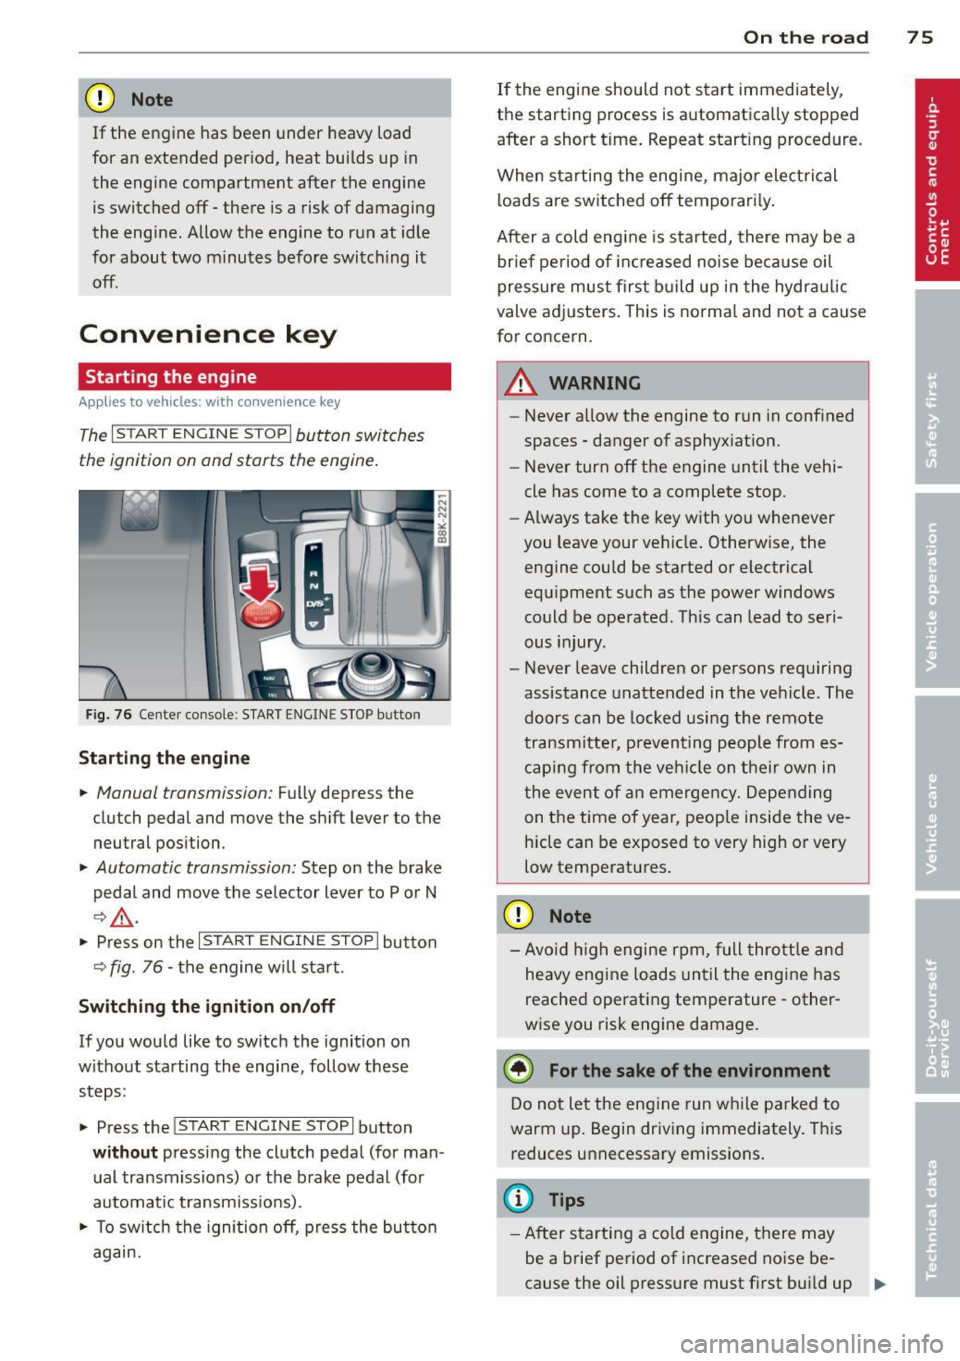
The I STAR T ENGINE ST OPI button switches
the ignition on and starts the engine.
Fig. 76 Ce nter console : S TART ENGINE STOP b utto n
Starting the engine
.. Manual transmission: Fully depress the
clutch pedal and
move the shift lever to the
neutral position .
.. Automatic transmission: Step on the brake
pedal and
move the selector lever to P or N
~ .&, .
.. Press on the I STAR T ENGINE S T OPI button
~ fig . 76 - the engine will sta rt.
Switching the ignition on/off
If you would like to switch the ignition on
without starting the engine, follow these
steps :
.. Press the
!START E NGIN E STOPI button
without pressing the clutch pedal (for man
ual transmissions) or the brake pedal (for
automatic transmissions) .
.. To switch the ignition off, press the button
again.
On the road 75
If the engine should not start immediately,
the starting process is automatically stopped
after a short time. Repeat starting procedure .
When starting the engine , major electrical
loads are switched off temporarily.
After a cold engine is started, there may be a
brief period of inc reased noise because oil
pressure must first build up in the hydraulic
valve adjusters. This is norma l and not a cause
for concern.
A WARNING
- Never allow the engine to run in confined
spaces - danger of asphyxiation.
- Never turn off the engine until the vehi
cle has come to a complete stop.
- Always take the key with you whenever
you leave your vehicle. Otherwise, the
engine could be started or electrical
equipment such as the power windows
could be operated . This can lead to seri
ous injury .
- Never leave children or persons requiring
assistance unattended in the vehicle. The
doors can be locked using the remote
transmitter, preventing people from es
caping from the vehicle on their own in
the event of an emergency. Depending
on the time of year, peop le inside the ve
hicle can be exposed to very high or very
low temperatures .
CD Note
-Avo id high engine rpm, full throttle and
heavy engine loads until the engine has
reached operating temperature - other
wise you risk engine damage.
@ For the sake of the environment
Do not let the engine run while parked to
warm up. Begin driving immediately. This
reduces unnecessary emissions.
(D Tips
-After starting a cold engine, there may
be a brief period of increased noise be-
cause the oil pressure must first bui ld up
II-
Page 80 of 294
78 On the road
Emerg ency b rake function
An emergency brake ensures t hat the vehicle
can be slowed down even if the
normal brakes
fail c::>
page 79, Emergency broking.
Indicat or light s
-If the par king b rake is closed w ith the igni
t ion
s witc hed on the . (USA models) /
• (Canada mode ls) indica tor lights come
on in the instrum ent cluster and the switch .
-If the parking brake is closed w ith the igni
tion
s witc hed off the . (USA models) /
• (Canada mode ls) indicator lights come
on in the instrument clust er and th e switch
for about 20 seconds .
A WARNING
If a gear or a drive range (automat ic trans
m ission) is engaged with the vehicle sta
tionary and the engine runn ing, you must
in no instance accelerate o r release the
cl utch carelessly. Otherwise the vehicle
w ill sta rt to move immediately- r isk of an
accident .
@ Note
If the . symbol in the display or the
.. (USA models) . (Canada models)
ind icator light in the instr ume nt cl uster
flashes, there is a ma lf u nction in the brake
system. By pressing the
ISETI button, you
can bring up a driver message which ex
plains the malfunction in more detail. If
the driver message
Pa rking brake! ap
pears, there is an operating malfunction in
the park ing brake which you should have
repaired immediately by an authorized
Aud i deale r or other qualified workshop
c::>
page 15.
(D Tips
- You can apply the parking brake at any time - even w ith the ignition switched
off . Th e ignit ion must be t urned on in o r
der to release the par king brake. - Occasional noises when the parking
bra ke is applied and released are normal
and are not a cause for concern.
- When the vehicle is parked , the parking
brake goes through a self-test cycle at
regu lar interva ls. Any associated noises
are normal.
Parking
Parking
"' Press the br ake ped al to s top the veh icle .
"' Pull the button @ c::>
page 77, fig. 77 to set
the parking brake.
"' Automatic transmission: Move the selector
lever to P.
.,. Turn t he engine off c::>
,& .
.,. Man ual transmission: Shift into 1st gear.
In addition on inclines and gr ades
.,. Turn the steering wheel so that your vehicle
w ill roll aga inst the curb in case it shou ld
start to move.
A WARNING
- When you leave yo ur vehicle -even if on
ly briefly -always remove the igni tion
key. This app lies particularly when chi l
dren remain in the vehicle. Otherwise the
children could start the eng ine, release
the park ing brake or operate electrical
equ ipme nt (e .g . power windows). There
is the risk of an acc ident .
- When the veh icle is locked, no one -par
ticularly not children should rema in in
the vehicle . Locked doors make it mo re
d ifficult for emergency worke rs to get in
to the vehicle -putting lives at r isk .
Starting from rest
The starting assist function ensures that the
parking brake is released automatically upon starting.
Stopping and applying parking brake
"' Pull the switch @c::> page 77, fig . 77 to ap-
ply the parking brake . .,.
Page 130 of 294
128 Driving Safely
• Always keep both feet in the footwell so
that you are in control of the vehicle at all
times.
For detailed information on how to adjust the
driver's seat, see
¢ page 56.
A WARNING
Drivers who are unbelted, out of position
or too close to the airbag can be seriously
injured by an airbag as it unfolds. To help
reduce the risk of serious personal injury:
- Always adjust the driver's seat and the
steering wheel so that there are at least
10 inches (25 cm) between your breast
bone and the steering wheel.
- Always hold the steering wheel on the
outside of the steering wheel rim with
your hands at the 9 o'clock and 3 o'clock positions to help reduce the risk of per
sonal injury if the driver's airbag inflates.
- Never hold the steering wheel at the
12 o'clock position or with your hands at
other positions inside the steering wheel
rim or on the steering wheel hub. Hold
ing the steering wheel the wrong way
can cause serious injuries to the hands,
arms and head if the driver's airbag de
ploys.
- Pointing the steering wheel toward your
face decreases the ability of the supple
mental driver 's airbag to protect you in a
collision .
- Always sit in an upright position and nev
er lean against or place any part of your
body too close to the area where the air
bags are located.
- Before driving, always adjust the front
seats and head restraints properly and
make sure that all passengers are prop
erly restrained.
- Never adjust the seats while the vehicle
is moving . Your seat may move unexpect
edly and you could lose control of the ve
hicle.
- Never drive with the backrest reclined or
tilted far back! The farther the backrests
are tilted back, the greater the risk of in- jury due to incorrect positioning of the
safety belt and improper seating posi
tion.
- Children must always ride in child safety
seats ¢
page 165. Special precautions
apply when installing a child safety seat
on the front passenger seat¢
page 144 .
Proper seating position for the front
passenger
The proper front passenger seating position
is important for safe, relaxed driving .
For your own safety and to reduce the risk of
injury in the event of an accident, we recom
mend that you adjust the seat for the front
passenger to the following position :
• Move the front passenger seat back as far
as possible . There must be a minimum of
10 inches (25 cm) between the breastbone
and the instrument panel¢,&. .
• Adjust the angle of the seatback so that it is
in an upright position and your back comes
in full contact with it whenever the vehicle is
moving.
• Applies to vehicles with adjustable head re
straints: Adjust the head restraint so the up
per edge is as even as possible with the top
of your head. If tha t is not possible, try to
adjust the head restraint so that it is as
close to this position as possible.
• Keep both feet flat on the floor in front of
the front passenger seat.
• Fasten and wear safety belts correctly
¢page 139.
For detailed information on how to adjust the
front passenger's seat, see
¢ page 54.
A WARNING
-
Front seat passengers who are unbelted,
out of position or too close to the airbag
can be seriously injured or killed by the air
bag as it unfolds. To help reduce the risk of
serious personal injury:
Page 135 of 294
A WARNING
Always make sure that the doors, all windows, the sunroof and the rear lid are se
curely closed and locked to reduce the risk
of injury when the vehicle is not being
used.
- After closing the rear lid, always make
sure that it is properly closed and locked.
- Never leave your vehicle unattended es
pecially with the rear lid left open . A
child could crawl into the vehicle through
the luggage compartment and close the
rear lid becoming trapped and unable to
get out. Being trapped in a vehicle can
lead to serious personal injury.
- Never let children play in or around the
vehicle .
- Never let passengers ride in the luggage
compartment. Vehicle occupants must
always be properly restrained in one of
the vehicle's seating positions.
(D Tips
- Air circulation helps to reduce window
fogging. Stale air escapes to the outside
through vents in the trim panel. Be sure
to keep these slots free and open .
- The tire pressure must correspond to the
load. The tire pressure is shown on the
tire pressure label. The tire pressure la
bel is located on the driver's side B-pillar.
The tire pressure label lists the recom
mended cold tire inflation pressures for
the vehicle at its maximum capacity
weight and the tires that were on your
vehicle at the time it was manufactured.
For recommended tire pressures for nor
mal load conditions, please see chapter
c>poge234.
Driving Safely
Tie-downs
The luggage comportment is equipped with
four tie-downs to secure luggage and other
items .
Use the tie-downs to secure your cargo prop
erly
c> page 132, Loading the luggage com
portment .
In a collision, the laws of physics mean that
even smaller items that are loose in the vehi
cle will become heavy missiles that can cause
serious injury. Items in the vehicle possess en
ergy which vary with vehicle speed and the
weight of the item. Vehicle speed is the most
significant factor.
For example, in a frontal collision at a speed
of 30 mph (48 km/h), the forces acting on a 10-lb (4.5 kg) object are about 20 times the
normal weight of the item . This means that
the weight of the item would suddenly be
about 200 lbs. (90 kg). You can imagine the
injuries that a 200 lbs. (90 kg) item flying
freely through the passenger compartment
could cause in a collision like this.
A WARNING
Weak, damaged or improper straps used
to secure items to tie-downs can fail dur
ing hard braking or in a collision and cause
serious personal injury.
- Always use suitable mounting straps and
properly secure items to the tie-downs in
the luggage compartment to help pre
vent items from shifting or flying for
ward as dangerous missiles.
- When the rear seat backrest is folded
down, always use suitable mounting
straps and properly secure items to the
tie-downs in the luggage compartment
to help prevent items from flying for
ward as dangerous missiles into the pas
senger compartment .
- Never attach a child safety seat tether
strap to a tie-down .
133
•
•