trailer AUDI A4 SEDAN 2013 Owners Manual
[x] Cancel search | Manufacturer: AUDI, Model Year: 2013, Model line: A4 SEDAN, Model: AUDI A4 SEDAN 2013Pages: 294, PDF Size: 73.71 MB
Page 5 of 294
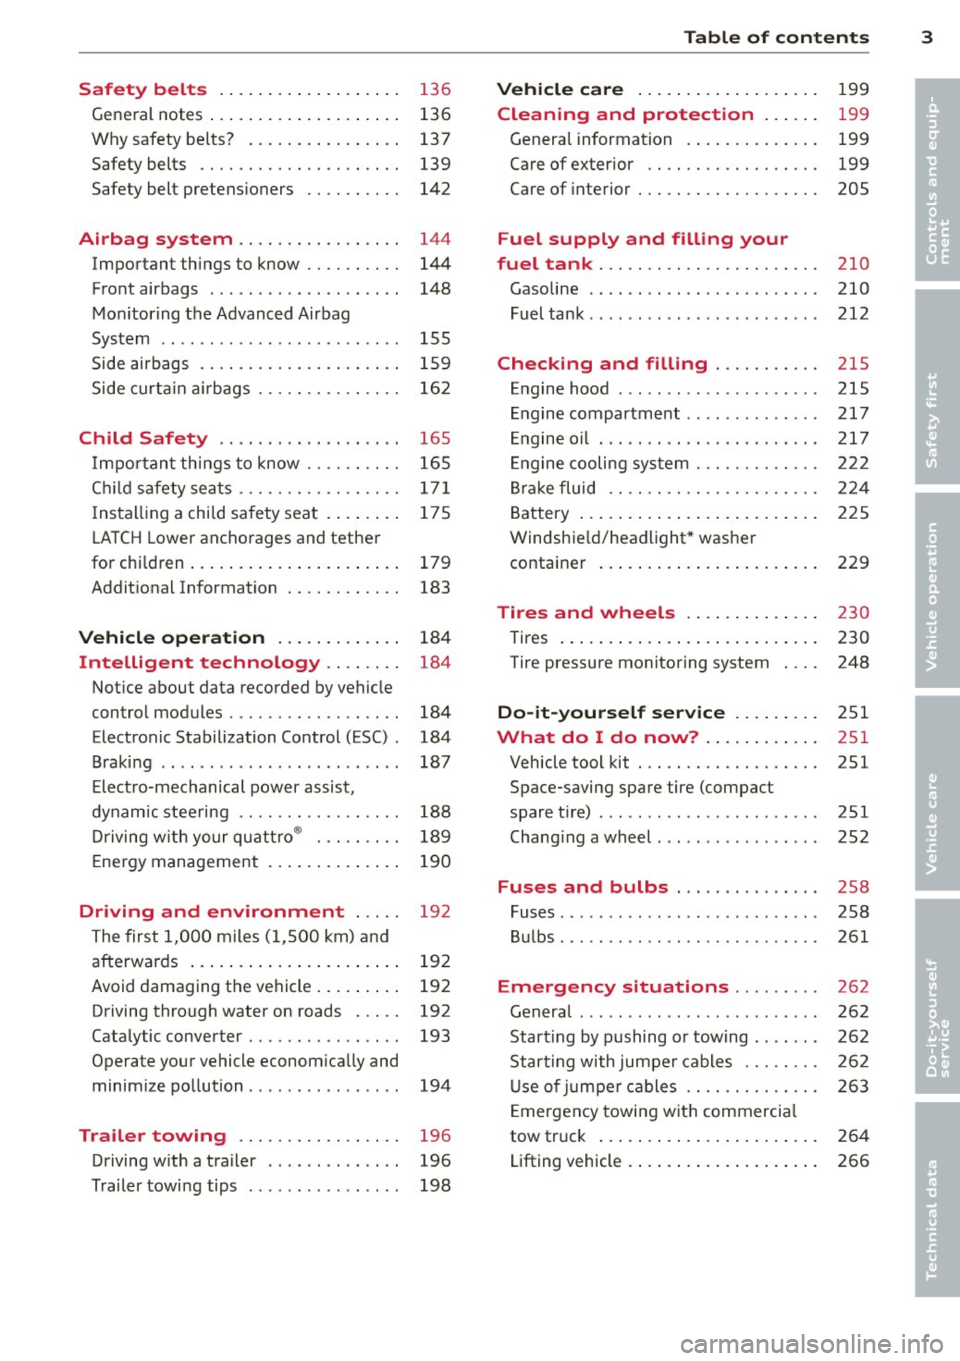
Safety belts . . . . . . . . . . . . . . . . . . . 136
General notes . . . . . . . . . . . . . . . . . . . . 136
Why safety be lts? . . . . . . . . . . . . . . . . 137
Safety belts . . . . . . . . . . . . . . . . . . . . . 139
Safety belt pretens ioners . . . . . . . . . . 142
Airbag system ................ .
Important things to know ......... .
Front airbags ................... .
Mon itor ing the Advanced Airbag
System ........................ .
Side airbags ............. .... .. . .
Side curta in a irbags .............. .
Child Safety ........ .... ... .. . .
Impor tant th ings to know ......... .
C hi ld safety sea ts ................ .
I nstall ing a chi ld safety seat . ... .. . .
L A T CH Lower anchorages and tether
for children ... .... .... ... .. .. .. . .
Addit ional Information
Vehi cle operat ion ..... .. .. .. . .
Intelligent technology .. .. .. . .
Not ice about data recorded by vehicle
control modules .......... .... .. . .
Electronic Stabilization Control (ESC) .
Braking .. ... ................ ... .
E lect ro-mechanical power assist ,
dynamic stee ring ................ .
Driving w ith your qu attro ® ... .. .. . . 144
144
148
155
1 59
162
165
165
17 1
175
179
183
184
184
184
184
187
188
189
E nergy management . . . . . . . . . . . . . . 190
Driving and environment . . . . . 192
The first 1,000 miles (1,500 km) and
afterwards . . . . . . . . . . . . . . . . . . . . . . 192
Avoid damaging the vehicle . . . . . . . . . 192
Driving through water on roads . . . . . 192
Catalytic converter . . . . . . . . . . . . . . . . 193
Operate your vehicle econom ically and
minim ize pollution . . . . . . . . . . . . . . . . 194
Trailer towing . . . . . . . . . . . . . . . . . 196
Driving w ith a trailer . . . . . . . . . . . . . . 196
Trailer towing tips . . . . . . . . . . . . . . . . 198
Table of contents 3
Vehicle care . . . . . . . . . . . . . . . . . . .
199
Cleaning and protection . . . . . . 199
Genera l information . . . . . . . . . . . . . . 199
Care of exterior . . . . . . . . . . . . . . . . . . 199
Care of interior . . . . . . . . . . . . . . . . . . . 205
Fuel supply and filling your
fuel tank ... .. .. .. . .............
210
Gasoline . . . . . . . . . . . . . . . . . . . . . . . . 210
Fuel tank .. .. .. .. .. . .. .... ...... . 212
Checking and filling . . . . . . . . . . . 21S
Engine hood . . . . . . . . . . . . . . . . . . . . . 215
Engine compartment . . . . . . . . . . . . . . 217
E ngine oil . . . . . . . . . . . . . . . . . . . . . . . 217
E ngine cooling system . . . . . . . . . . . . . 222
B ra ke fluid . . . . . . . . . . . . . . . . . . . . . . 224
Battery . . . . . . . . . . . . . . . . . . . . . . . . . 225
Windshie ld/headlight* washer
container . . . . . . . . . . . . . . . . . . . . . . . 229
Tires and wheels . . . . . . . . . . . . . . 230
Tires . . . . . . . . . . . . . . . . . . . . . . . . . . . 230
Tire pressure monitoring system 248
Do-it-yourself service . . . . . . . . . 251
What do I do now? . . . . . . . . . . . . 251
Vehicle tool kit . . . . . . . . . . . . . . . . . . . 251
Space-saving spare tire (compact
spare tir e) . . . . . . . . . . . . . . . . . . . . . . . 251
Changi ng a wheel . . . . . . . . . . . . . . . . . 252
Fuses and bulbs . . . . . . . . . . . . . . . 258
Fuses ... .. .. .. .. .. . .. .... ...... . 258
Bulbs . . . . . . . . . . . . . . . . . . . . . . . . . . . 261
Emergency situations . . . . . . . . . 262
General . . . . . . . . . . . . . . . . . . . . . . . . . 262
Starting by pushing or towing . . . . . . . 262
Star ting with jumpe r cables . . . . . . . . 262
U se of jumpe r cables . . . . . . . . . . . . . . 263
E mergency towing with commercia l
tow truck . . . . . . . . . . . . . . . . . . . . . . . 264
Lifting vehicle . . . . . . . . . . . . . . . . . . . . 266
•
•
Page 20 of 294
18 Instrum ent s and w arn ing /indic ato r light s
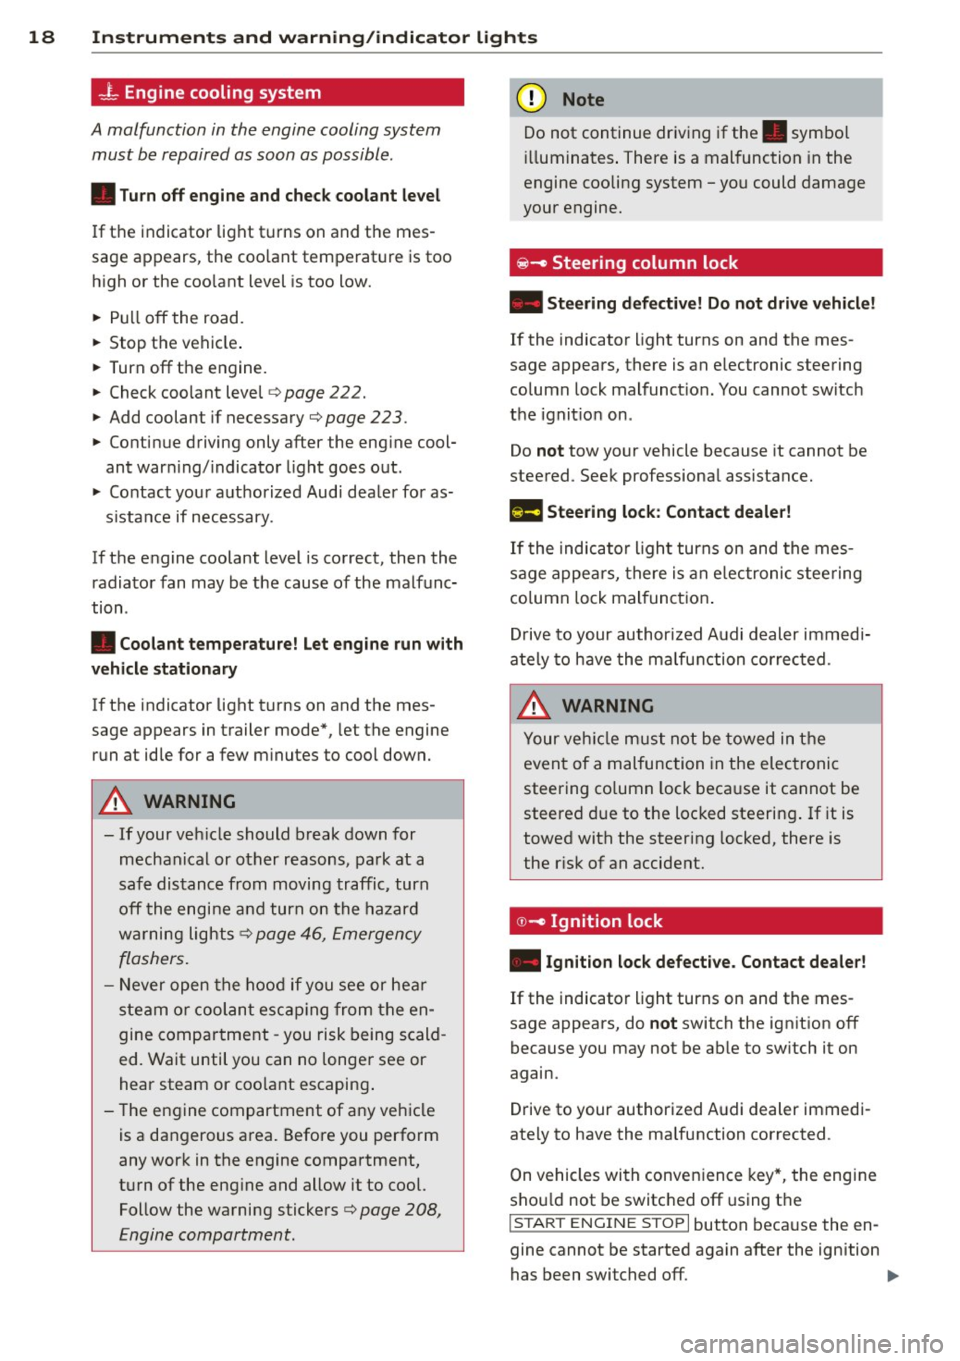
...L Engine cooling system
A malfunction in the engine cooling system
must be repaired as soon as possible .
• Turn off engine and chec k coolant le vel
If the indicator light t urns on and the mes
sage appears, the coo lant temperature is too
high or the coo lant level is too low.
> Pu ll off the road.
> Stop the vehicle .
> Turn off the engine.
> Check coolant level ¢ page 222.
> Add coolant if necessary¢ page 223.
> Continue driving only after the eng ine cool
ant warn ing/ indicator light goes out .
> Contact your authorized Audi dealer for as-
s istance if necessary .
If the engine coolant level is correct, then the radiator fan may be the cause of the malfunc
tion .
• Coolan t tempe rature! Let engine run w ith
v eh icl e s tationary
If the indicator light turns on and the mes
sage appears in trailer mode*, let the engine
run at idle for a few m inutes to cool down.
A WARNING
- If your veh icle should break down for
mechanical or other reasons, park at a
safe distance from moving traffic, turn
off the engine and turn on the hazard
wa rning lights ¢
page 46, Emergency
flashers.
-
- Never open the hood if you see or hea r
steam or coolant escap ing from the en
gine compartment - you risk being scald
ed. Wait until you can no longer see or
hear steam or coo lant escaping .
- The engine compartment of any vehicle
is a dangerous area. Before you perform
any work in the engine compartment,
turn of the eng ine and allow it to cool.
Follow the warning stickers¢
page 208,
Engine compartment .
(D Note
Do not continue driving if the . symbol
ill um inates . There is a malfunction in the
engine cooling system -you could damage
your engine.
@ -Steering column lock
• Stee ring d efec tive ! Do not dri ve vehicle!
If the indicator light turns on and the mes
sage appears, there is an electronic steering
column lock malfunct ion. You cannot switch
the ignit ion on .
Do
not tow yo ur vehicle because it cannot be
steered . Seek professional assista nee.
l!J:I Steering lock : Cont act de ale r!
If the indicator light turns on and the mes
sage appears, there is an e lectronic stee ring
co lumn lock malfunct ion .
Drive to your authori zed A udi dealer immedi
ately to have the ma lfunction corrected .
A WARNING
-
Your vehicle must not be towed in the
event of a malfunction in the elect ronic
steering co lumn lock beca use it cannot be
steered due to the loc ked steering . If it is
towed with the steering locked, there is
the r isk of an accident.
© -Ignition lock
• Ignit ion lo ck defecti ve . Contact dealer!
If the indicator light turns on and the mes
sage appears, do
n ot switch the ignit ion off
because you may not be ab le to sw itch it on
again.
Drive to your authorized A udi dealer immedi
ately to have the malfunction corrected .
On vehicles with convenience key*, the engine
shou ld not be switched
off using the
I S TAR T ENGINE ST OPI button beca use the en
gine cannot be started again after the ignition
has been switched
off. ..,.
Page 29 of 294
The values in the single-t rip or the total-trip
memory can a ll be reset to zero at the same
time under
Reset in the menu .
I n addition, you can determine what informa
tion from the trip computer should be shown
in the instrument cluster display. If one of the
p ieces of driver information is turned
Off , that
driver information w ill not be shown in the
display. The information will continue to be
calculated by the trip computer and can be
turned back
On at any t ime.
(D Tips
- This function is not avai lab le on all
vehicles.
- The driving information in the efficiency
program is also reset to zero with the
s ingle-trip memory.
Gearshift Indicator
A ppl ies to vehicles: with manu al transmi ssion a nd gea r·
shi ft indica tor
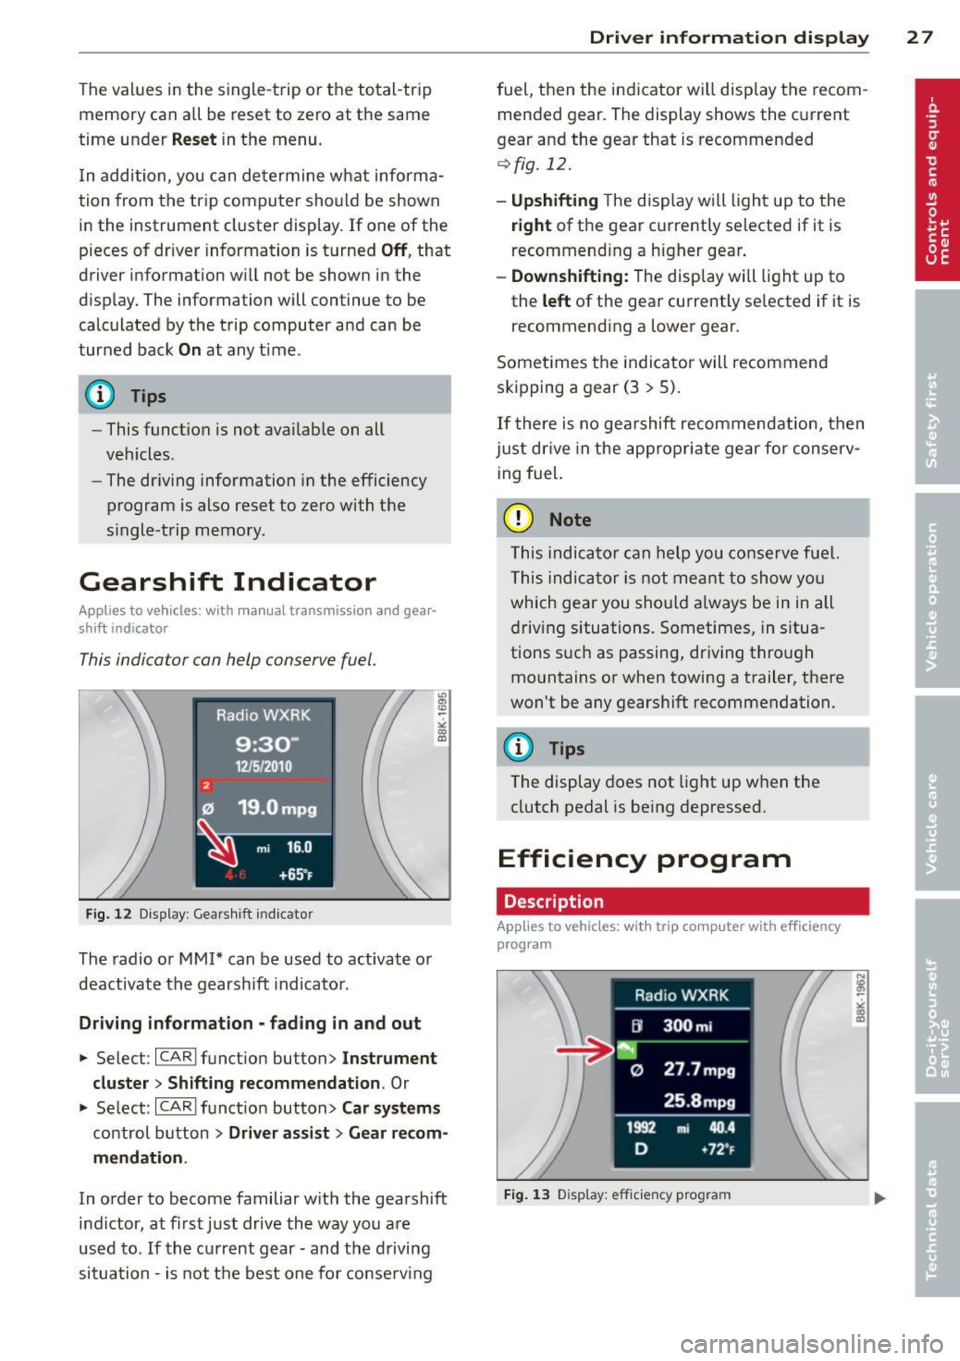
This indicator con help conserve fuel.
~~~------------~~ ~.;;-
Fig. 12 Display: Gea rs hi ft indicator
The radio or MMI* can be used to activate or
deactivate the gearsh ift indicator.
Driving information -fading in and out
.,. Se lect: ICARlfunction button> Instrument
cluster
> Shifting recommendation . Or
m ~ ~ a, a,
.,. Select: ICARI funct ion button> Car systems
control button > Driver assist > Gear recom
mendation .
In order to become familiar with the gearshift
indictor, at first just drive the way you are
used to.
If the current gear -and the driving
situation -is not th e best one for conserving
Driver information display 2 7
fuel, then the indicator wi ll display the recom
mended gear. The display shows the current
gear and the gear that is recommended
¢fig. 12.
-Upshifting The disp lay wi ll light up to the
right of the gear currently selected if it is
recommend ing a higher gear .
-Downshifting: The display wi ll lig ht up to
the
left of the gear currently se lected if it is
recommending a lower gear .
Sometimes the indicator will recommend
skipping a gear (3
> 5).
If there is no gearshift recommendation, then
just drive in the appropriate gear for conserv
ing fuel.
(D Note
This indicator can help you conserve fuel.
This indicator is not meant to show you
which gear you sho uld always be in in all
driving situations . Sometimes, in situa
tions s uch as passing, dr iv ing through
mountains or when towing a trailer, there
won't be any gearshift recommendation.
(D Tips
The display does not light up when the
clutch pedal is be ing depressed.
Efficiency program
Description
App lies t o vehicles: wi th trip co mp ute r wi th effici ency
prog ram
Fig. 13 D isplay: efficie ncy progra m
Page 30 of 294
28 Driver information d isplay
• Press the I RESET I button @c:::> page 26,
fig. 11 repeatedly until the efficiency pro
gram appears in the display.
The effic iency program can help you to use
less fuel. It evaluates driving information in
reference to fuel consumption and shows oth
er equipment influencing consumption as well
as shift recommendations. Fuel economy messages c:::>
page 29 prov ide tips for effi
cient driving .
The efficiency program uses distance and con
sumption data from trip computer
1. If the
data are deleted in the eff iciency program,
those values are also reset in trip computer
1.
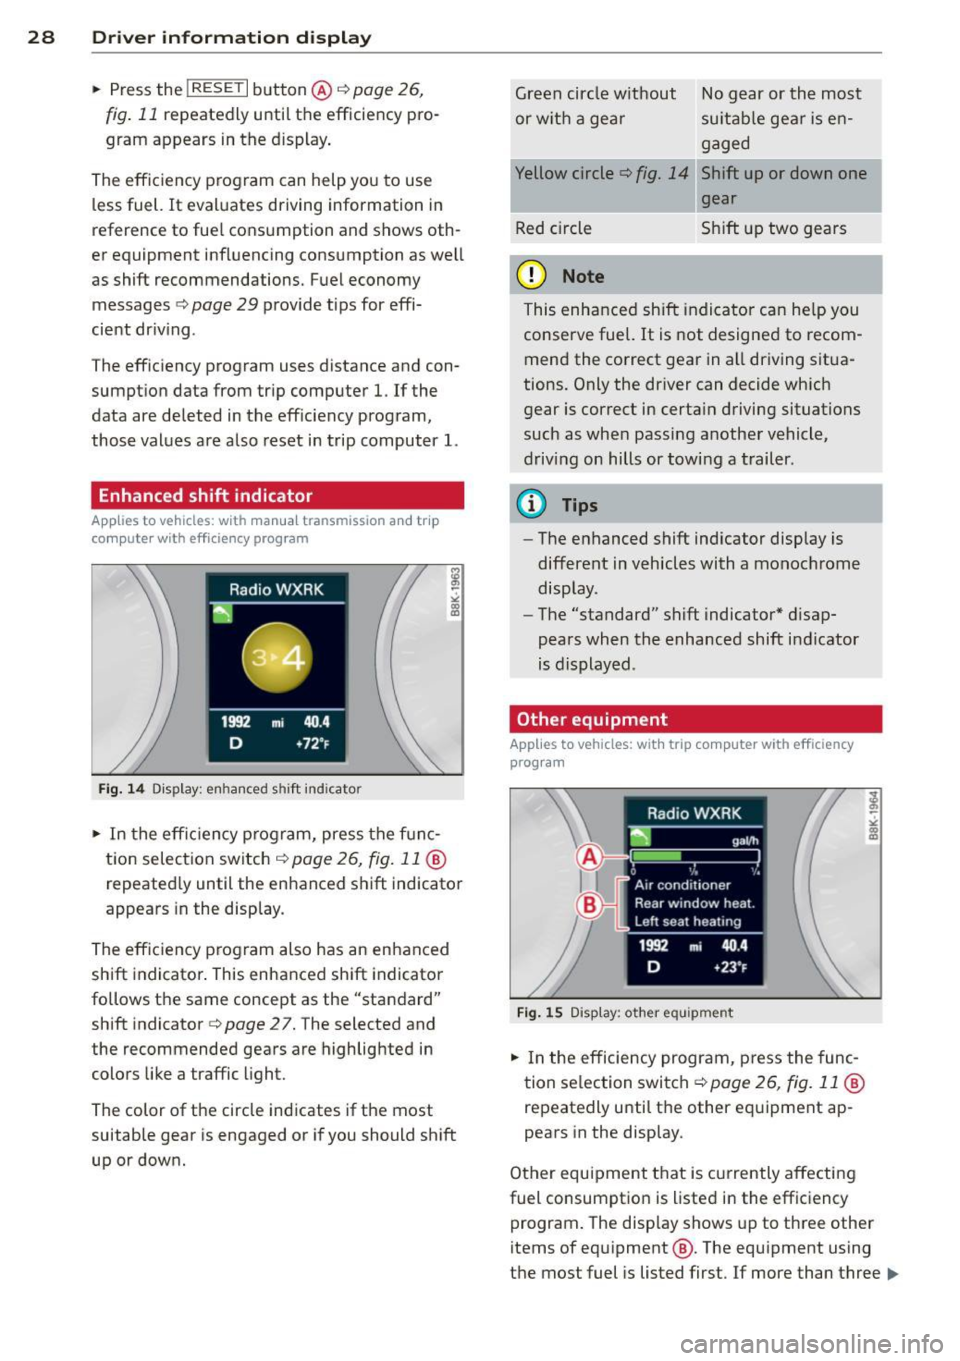
Enhanced shift indicator
Applies to vehicles: with manual transmission and trip
co mpute r with efficiency program
Fig . 14 D is p lay: e nhance d shi ft ind icato r
• In the efficiency program, press the func
tion selection switch c:::>
page 26, fig. 11 @
repeated ly until the enhanced shift indicator
appears in the display.
The effic iency program also has an enhanced
shift indicator. This enhanced shift indicator
follows the same concept as the "standard"
shift indicator
c:::> page 27. The selected and
the recommended gears are highlighted in
colors like a traffic light.
The color of the circle indicates if the most
suitable gear is engaged or if you should shift
up or down. Green
circle w ithout No gear or the most
or w ith a gear su itable gear is en
gaged
Yellow circle
c:::> fig. 14 Shift up or down one
gear
Red circle Shift up two gears
(D Note
This enhanced shift indicator can help you
conserve fuel.
It is not designed to recom
mend the correct gear in all driving situa
tions. Only the driver can decide which
gear is correct in certain driving situations
such as when passing another vehicle,
driving on hills or towing a trailer .
(!) Tips
-The enhanced shift indicator display is
different in vehicles with a monochrome
display .
- The "standard" shift indicator* disap
pears when the-enhanced shift indicator
is displayed .
Other equipment
Applies to vehicles: with trip computer with eff iciency
program
Fig. 15 D isplay : oth er equi pm en t
• In the efficiency program, press the func
tion selection switch ¢
page 26, fig. 11 @
repeatedly until the other equipment ap
pears in the display .
Other equipment that is currently affecting
fuel consumption is listed in the efficiency program. The disp lay shows up to three other
items of equipment @. The equipment using
the most fuel is listed first .
If more than three ""
Page 81 of 294
Starting and autom ati call y relea sing the
pa rking b rake
~ When you start to drive as usua l, the park
ing brake is automatically re leased and your
vehicle begins to move.
When stopping at a traffic signa l or stopp ing
in city traffic on vehicles with an automatic
transmission, the parking brake can be ap plied. The vehicle does not have to be held
w ith the footbrake . The park ing brake elimi
nates the tendency to creep with a drive range
engaged. As soon as you dr ive off as usual,
the park ing brake is released automatically
and the vehicle starts to move .
Starting on slop es
When starting on inclines, the start ing ass ist
prevents the vehicle from unintentionally roll
ing back. The braking force of the parking
brake is not released until sufficient dr iving
force has been b uilt up at the whee ls.
(D Tips
For safety reasons, the park ing brake is re
leased automatically only when the dr iv
er 's safety belt is engaged in the bu ckle.
Starting off with a trailer
To prevent rolling back unintentionally on an
incline, do the following:
~ Keep the switch@¢ page 77, fig. 77
pulled and depress the accelerator . The
park ing b rake stays app lied and p revents
the vehi cle from rolling backward.
~ You can release the switch @once you are
s u re that yo u are developing enough driving
force at the wheels by depressing the accel erator.
D epending on the weight of the rig (vehicle
and trai ler) and the severity of the incline, you
may roll backwards as you start. Yo u can pre
vent roll ing backwards by holding the parking
brake switch @pulled out and accelerating -
just as you would when starting on a hill wit h
a conventional hand brake .
On the ro ad 79
Emergency braking
In the event that the conventional brake sys
tem fails or locks .
~ In an emergency, pull the sw itch @
¢
page 77, fig. 77 and continue to pull it to
slow your vehicle down with the parking
brake .
~ As soon as you release the switch @ or ac-
celerate, the b ra ki ng process s tops.
If you pull the switch @and hold it above a
speed of about 5 mph (8 km/h), the eme rgen
cy bra king funct ion is initia ted . T he ve hicle is
braked at all four whee ls by activating the hy
draulic brake system. The brake performa nce
is similar to making an emergency stop¢&..
In order not to act ivate the eme rgency brak
ing by mis take, an audib le warning tone (buz
zer) so unds when the switch @is pulled. As
soon as the switch @ is re leased, or the acce l
erato r peda l is depressed, emergency braking
stops.
A WARNING
...--
Emergency braking should only be used in
an emergency, when the normal foot brake has fa iled or the brake pedal is obstructed .
Using the par king b rake to pe rform eme r
gency brak ing will slow your vehicle down
as if you had made a full bra ke application.
The laws of physics cannot be suspended
even with ESC and its associated compo
nents (ABS, ASR, EDS) . In corners and
when road or weather conditions are bad,
a full brake application can ca use the vehi
cle to sk id or the rear end to break away -
risking an accident.
Speed warning system
Overview
The speed warning system helps you to keep
your driving speed below a set speed limit.
The speed warn ing system warns if the driver
exceeds a p reviously sto red max imum speed .
A warn ing tone w ill sound as soon as the
Ill>
Page 109 of 294
Audi side assist Lane change assistant
Description
Applies to vehicles: with s ide assist
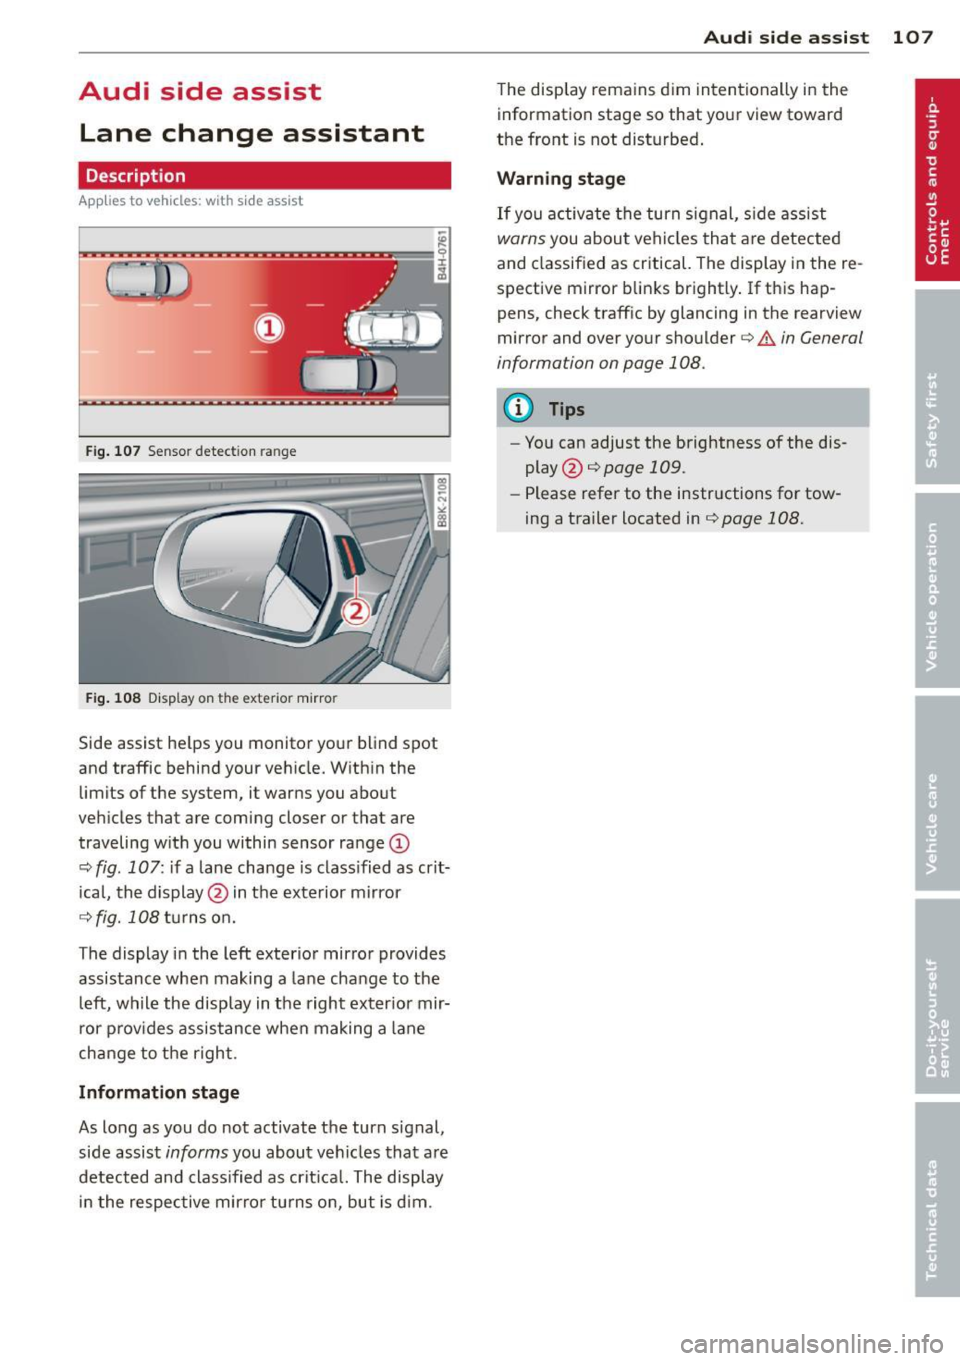
Fig . 107 Sensor detection range
Fig. 108 Disp lay on the exterior mirror
Side assist he lps you monitor your blind spot
and traffic behind your veh icle. W ith in the
limits of the system, it warns you about
vehicles that are coming closer or that are
traveling w ith you within sensor ra nge
(D
c::, fig . 107: if a lane change is class ified as crit
ical, the display @ in the exterior mirror
c::> fig. 108 turns on.
The display in the left exterior mirror provides
assistance when making a lane change to the l eft, while the display in the right exter ior mir
r or p rov ides assistance when making a lane
change to the right.
Information stage
As long as you do not activate the turn signal,
side assist
informs you about vehicles that are
detected and class ified as crit ical. The display
i n the respective mirror turns o n, but is d im.
Aud i side assist 10 7
The display remains d im intentionally in the
information stage so that your view toward
the front is not disturbed .
Warning st age
If you activate the turn signal, s ide assist
warns you about veh icles that are detected
and classified as critical. The display in the re
spective mirror blinks brightly . If this hap
pens, check traff ic by glancing in the rearview
mirror and over your shoulder¢
A in General
information on page 108.
@ Tips
- You can adjust the brightness of the dis
play @¢
page 109.
-Please refer to the instructions for tow
ing a trailer located in¢
page 108.
Page 110 of 294
108 Audi side assist
General information
App lies to vehicles: with side assist
®
©
Fig. 109 Driving s it u at ions
AU Dr- l
• •
Fig . 11 0 Rea r of th e ve hicle: pos it io n of t he se nso rs
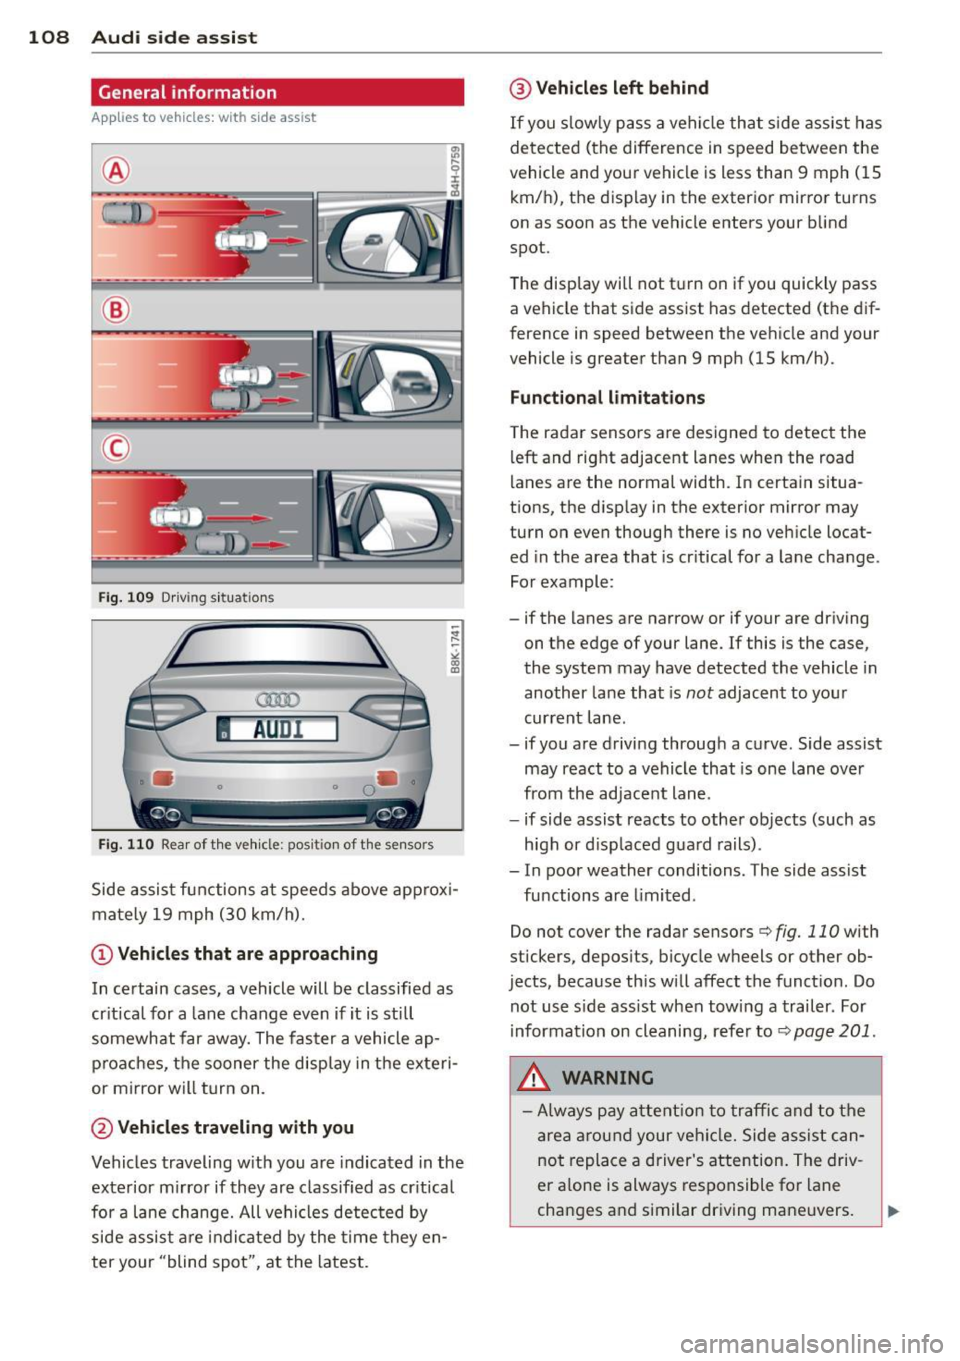
Side assis t fu nctions at speeds above ap prox i
ma tely 19 mph (30 km/h).
(D V ehicles that are approaching
In certain cases, a vehicle will be classified as
cr itical for a lane change
even if it is still
somewhat far away. The fas ter a vehicle ap
p ro aches, the sooner the disp lay in the exteri
or m irror will t urn on.
@ Vehicles traveling with you
Vehicles traveling w ith you are indicated in the
exterior m irror if they are classified as cr it ical
for a lane change. All vehicles detec ted by
side assis t are in dicated by the time they en
ter your "blind spot", at the latest.
@ Vehicles left behind
If you s low ly pass a ve hicl e tha t sid e ass ist has
dete cted ( the difference in s peed between the
vehicle and you r vehicle is less than 9 mph ( 15
km/ h), t he display in the exterior mirro r turns
on as soon as the vehicle enters your blind
spot.
The disp lay wi ll not t urn on if you quickly pass
a vehicle that s ide assist has detected (t he d if
f erence in speed between the ve hicle and your
vehicle is greater than 9 mph (15 km/h).
Functional limitations
T he radar senso rs are designed to detect the
left and right adjacent lanes whe n the road
l anes a re the normal width. In certain situa
t ions, the d isp lay in the exterior mirror may
turn on
even though there is no ve hicle locat
ed in the area that is cr itical fo r a la ne cha nge.
Fo r example:
- if the lanes are narrow or if your are driving on t he edge of your lane. If this is the case,
the system may have detected the vehicle in
another la ne that is
not adjacent to you r
cur rent lane .
- if you a re driving throug h a c urve . Side assist
may react to a vehicle that is one lane
ove r
from the ad jacent lane .
- if side assist reacts to other objects (such as
high or d isp laced gua rd rails) .
- In poor weather conditions. The side assist fu nctions are limited .
Do not
cover the radar sensors c::> fig. 110 with
stickers, depos its, bicycle wheels or other ob
jects, because this will affect the funct ion. Do
not use s ide ass ist when towing a trailer . For
i nforma tion on cleaning, refe r to
c::> page 201 .
&_ WARNING
-Always pay a ttention t o traffic and to th e
ar ea arou nd your vehi cle. Side a ssist c an
no t repl ace a driver 's atte ntion. The driv
er a lone is always res ponsible fo r lane
cha nges a nd similar driving maneuvers.
Page 112 of 294
110 Audi side assist
-Side assist is not active while you are
making the adjustment.
- Your settings are automatically stored
and assigned to the remote control key
being used.
Driver messages
App lies to vehicles: with side assist
If side assist switches off by itself, the LED in
the button turns off and a message will ap
pear in the instrument cluster display:
Audi side assist unavailable: Sensors blocked
The radar sensors' vision is affected. Do not
cover the area in front of the sensors with bike
wheels, stickers, dirt or other objects. Clean
the area in front of the sensors, if necessary
c:::;,page 108, fig. 110.
Audi side assist: Currently unavailable
Side assist cannot be switched on temporarily
because there is a malfunction (for example,
the battery charge level may be too low).
Audi side assist: System fault!
The system cannot guarantee that it will de
tect vehicles correctly and it is switched off .
The sensors have been displaced or are faulty .
Have the system checked by an authorized
Audi dealer or authorized Audi Service Facility
soon .
Audi side assist: Unavailable when towing
Side assist switches off automatically when a
factory-installed trailer hitch is connected to
the electrical connector on the trailer . There is
no guarantee the system will switch off when
using a retrofitted trailer hitch. Do not use
side assist when towing a trailer.
Page 117 of 294

_& WARNING
-Sensors have dead spaces in which ob
jects cannot be detected. Be especially
alert for small children and animals,
since they are not always detected by the
sensors.
- The acoustic park ing system is not a sub
st itute for the driver 's own caution and
alertness. Ultimate responsibi lity always
remains with the driver during parking
and simi lar maneuvers . Always watch
where you are driving.
- You should always adjust the volume and
frequency of the warning tones so that
yo u can easily hear the acoustic distance
warning even if the radio is p laying, the
air-cond itioner blower is on High or there
is a high level of outside noise .
- Check the settings whenever anyone
else has driven the vehicle before you.
(D Note
-Remember that low obstacles for which
a warn ing has already been issued may
"dive" below the system's sensing zone if
the vehicle is being backed up closer. In
this case, the warning sound shutting off
does
not in dicate that you have cleared
the obstacle . Instead, impact is immi
nent.
- Objects such as trailer hitches, chains,
narrow posts or fences covered by a th in
l ayer of paint may not always be detect
ed by the system. They can still damage
your vehicle without warning .
@ Tips
Keep the sensors in the rear bumper clean
and free of snow and ice so that the acous
tic parking assist system can function
properly.
Park assist 115
Adjusting the warn ing tones
Applies to vehicles: with parking system (rear)
The warning tones can be adjusted in the
MM!*.
.. Select: I CAR ! function button > Parking sys
tem .
Or
.. Select:
I CAR I function button > Car systems
contro l butto n > Driver assist > Parking aid .
- Rear volume -
rear sensor vo lume
- Rear frequency -rear sensor frequency
-Music volume while parking -when the
parking system is switched on, the volume
of the active audio source is lowered.
The newly adjusted value is briefly heard from
the signal generator. The settings are auto
matically stored and assigned to the master
key w ith remote control.
Parking system (rear,
with rear view camera)
Introduction
Applies to vehicles: with parking system (rear, wit h rear
view camera)
Fig . 114 Parking mode
1: reve rse parki ng
Fig . 115 Parking mode 2 : pa rallel parki ng
q
" "' CD
Page 119 of 294
The accuracy of the orientation lines and blue
surfaces diminis hes if:
- the rear view camera does not prov ide a re li
able image, for examp le, in poor vis ibility
conditions or if the lens is dirty,
- the image on the screen is not visible due to
sun g lare and reflection .
Caring for th e rear view came ra lens
The rear view camera is located above the rear
license plate b racket . Fo r the pa rking assist to
ope rate, the lens,=:,
fig. 117 must be kept
clean:
- Dampen the lens with a househo ld alcohol
based glass cleane r, and clean the lens with
a dry cloth
,=:, CD.
- Remove s now with a hand brush and ice
prefe rably with a de-icing spray
,=:, (D .
A WARNING
- T he pa rking aid cannot repla ce the dr iv
er's attention. The driver a lone is respon
sible for parking and similar driving ma
neuvers .
- Always keep your eyes on the vehicle's
su rroundings, using the rear view mirror
as well.
- Do not a llow yourse lf to be d istracted
from traffic by the rear view camera pic
tures.
- If the position and the installation ang le
of the camera has changed, fo r example,
after a rear end collision, do not continue
to use the system for safety reasons. Have it checked by a qua lified dealership.
(D Note
- Low obstacles already signaled by a
warning can disappear from the system's
detection range as they are approached
and will not continue to be signaled . Ob
jects such as barrier cha ins, trailer draw
bars, thin pa inted ve rtical po les o r fe n
ces may not be detected by t he system,
pos ing risk of damage.
- Never use warm or hot water to remove
s n ow or ice from the rear view camera
.
P ark a ssis t 11 7
lens -dange r of crack format ion on the
lens !
- When cleani ng the lens, never use prod
ucts that a re ab rasive.
Switching on/off
Applies to vehicles: with parking system (rear, with rear
view camera)
The rear view camera switches on automati
cally together with the acoustic park assist
when you put the vehicle in reverse.
Switching on
"' Put the veh icle in reverse gear, the acoust ic
parking system with rear view camera is ac
tivated automat ica lly. Act ivat ion of the
acoust ic par king system is confirmed by a
brief ac knowledgement sou nd.
Switching off
"' Drive faster than 9 mph (15 km/h) , or
"' take the vehicle out of reverse gear . The
acoust ic park ing system is immediate ly de
activated, and the rea r view came ra p icture
is deact ivated a utomat ically afte r a pe riod
o f abo ut 1 5 seconds , or
"' switch off the ignition.
T he de lay in deact ivat ing the came ra prov ides
an unin terrup ted view beh ind the ve hicle es
pe cially when mane uver ing in tig ht park ing
spaces and prevents the picture from t urning
off the every time you shift out of reverse .
If the wa rning mess age ap pears in the dis play
but not the rea r view came ra p icture, read and
confirm the warni ng message. The acoustic
distance signal is always active .
If you press a fu nction button on the M MI
control console, the rea r view came ra p icture
disappears . The rear view camera picture reap
pears the next time yo u pa rk.
Fur the r in forma tion on the warning mess age
and the MMI con tro l conso le can be found in
the MMI instruction book let.
Ill-