sensor AUDI A5 2015 Owner´s Manual
[x] Cancel search | Manufacturer: AUDI, Model Year: 2015, Model line: A5, Model: AUDI A5 2015Pages: 264, PDF Size: 66.83 MB
Page 16 of 264
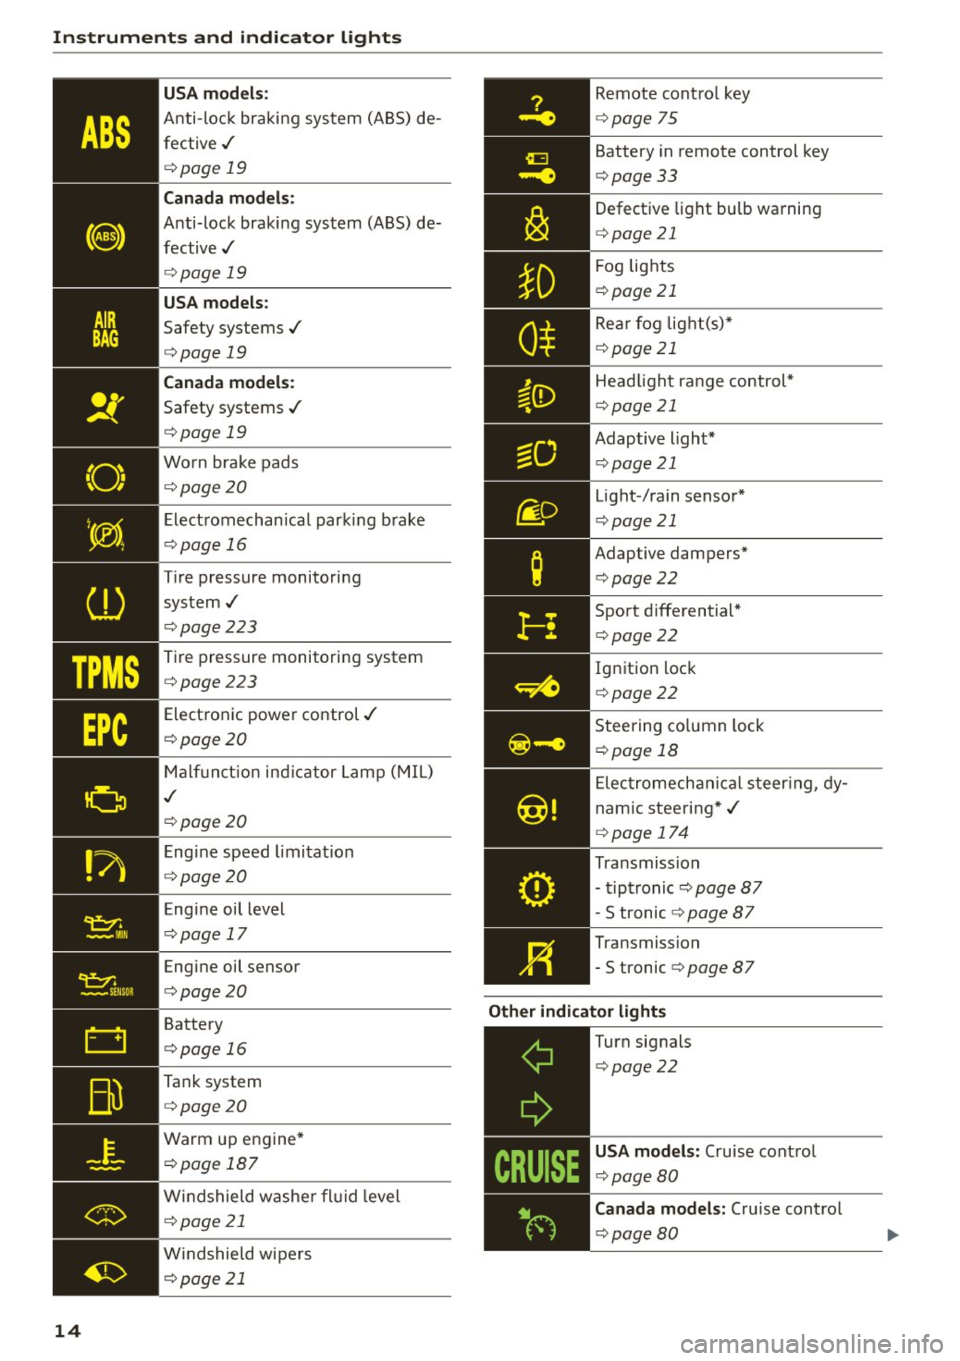
Instruments and indicator lights
TPMS
-~--
14
USA m odel s:
Anti-loc k braking system (ABS) de
fective,/
¢ page 19
Canada mod els :
Anti-lock braking system (ABS) de
fective,/
¢ page 19
USA models :
Safety systems./
¢page 19
Canada model s:
Safety systems ./
¢page 19
Worn brake pads
¢ page20
Elect romechanical parking b rake
¢page 16
Tire pressure monitoring
system,/
¢ page 223
Tire pressure monitoring system
¢page223
Electronic power control./
¢page20
Malf unct ion ind icator Lamp (MIL)
,I
c::>page 20
Engine speed limitat ion
c::> page20
Engine oil level
c::> page 17
Engine oil sensor
c::>page20
Battery
c::>page 16
Tank system
c::>page20
Warm up engine*
¢page 187
Windshield washe r flu id leve l
¢page 21
Windshield wipers
¢page 21
Remote cont ro l key
¢ page 75
Battery in remote control key
¢page 33
Defect ive light bulb wa rning
<=> page 21
Fog lights
¢page 21
Rear fog lig ht(s)*
c> page 21
Headlight range control*
c>page 21
Adaptive light*
c>page 21
Light-/rain sensor*
c>page 21
Adaptive dampers*
c>page22
Sport d ifferential *
<=>page22
Ig nition lock
c>page22
Steering co lumn lock
¢ page 18
Elec tromechanical s teer ing, dy
nam ic stee ring* ,/
c>page 174
Transmission
- tiptronic
c> page 87
-S tronic c::> page 87
Transmission
-5 tronic
<=> page 87
Other indicator light s
~--==------------Turn signals
<=>page22
USA mod els: Cruise cont rol
c> page80
Canada mod els : Cru ise contro l
c>page 80
Page 22 of 264
Instruments and indicator lights
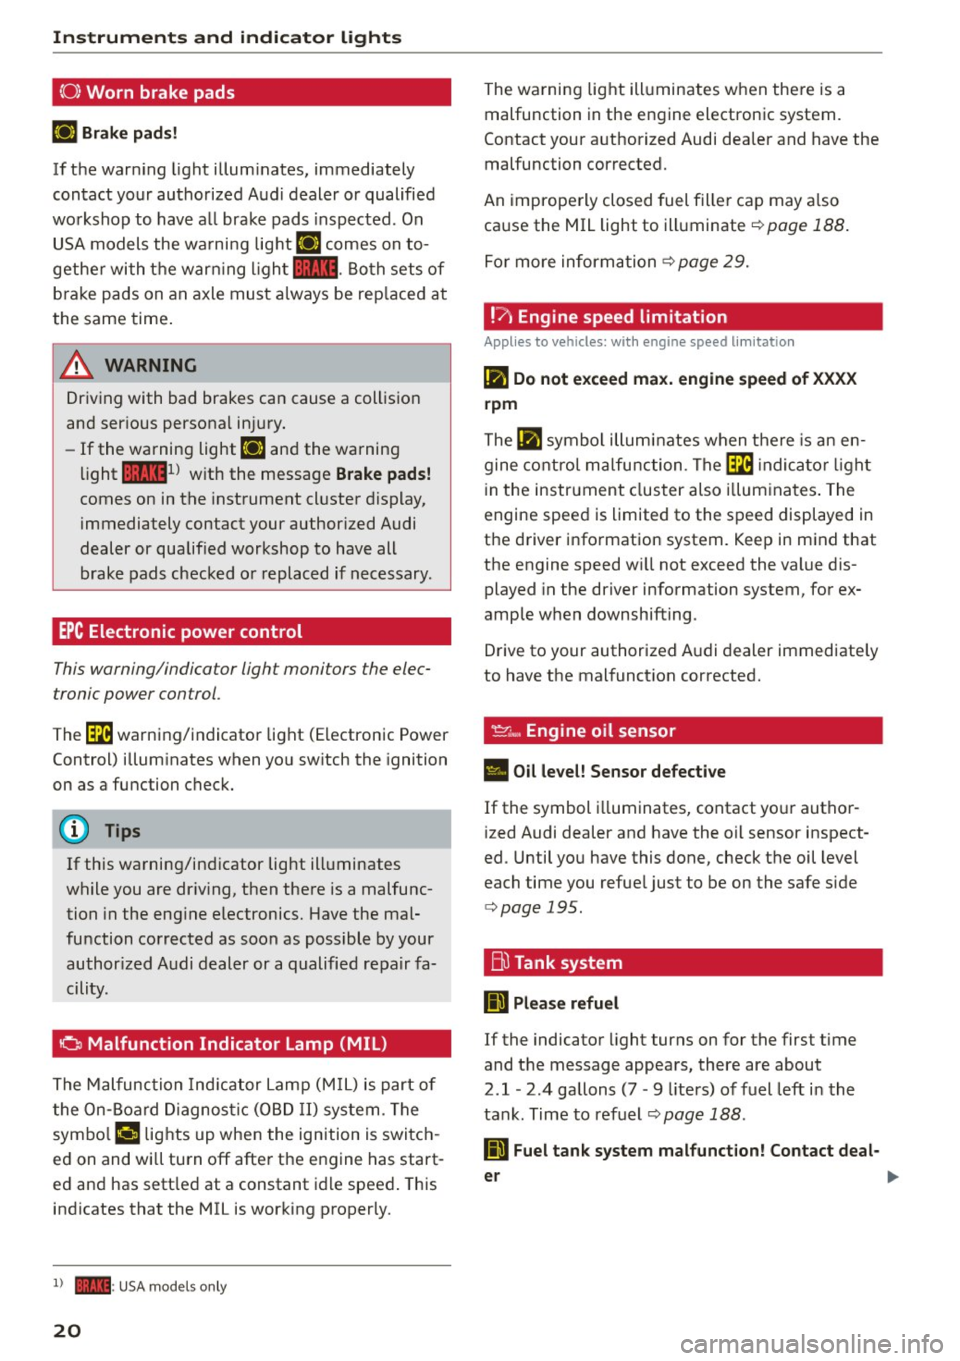
(0) Worn brake pads
El Brak e pads!
If th e warn ing lig ht illum ina tes, imme diately
c o ntact your authorized Aud i dealer or qualified
workshop to have a ll brake pads i nspected. On
USA models the wa rni ng light
El comes on to
gethe r with the war ning l igh t
1111 . Both sets of
b ra ke pads on an axle must a lways be rep laced at
the same time .
A WARNING
Driv ing with bad brakes can cause a collis ion
and ser ious personal in jury.
- If the warning light El and the warning
light
11111 ) w ith the message Brake pads!
comes on in the instrument cl uster display,
immediately contact your author ized Audi
dealer or qualified workshop to have all
brake pads checked o r replaced if necessary .
EPC Electronic power control
This warning/indicator ligh t monitors the elec
tronic power control .
The~ warning/indicator light (Electronic Power
Control) illum inates when yo u sw itch the ignition
on as a function check.
(D Tips
If this wa rning/ind icator light ill uminates
while you are dr iv ing, then the re is a malfunc
tion in the eng ine electronics. Have the mal
function corrected as soon as possible by your
author ized A udi dealer or a qualified re pair fa
cility.
0 Malfunction Indicator Lamp (MIL)
T he Malfunc tion Ind ica tor Lamp (M IL) is part o f
the On-Board Diagnos tic (O BD II ) system . The
symbo l
('4 lights up when the ignition is switch
e d on and wi ll turn off afte r the engine has start
e d an d has sett le d at a constant i dle speed . This
indicates that the MIL is working p roperly.
l) - : USA mo dels o nly
20
The wa rning lig ht ill uminates when the re is a
malfunction in the engine electronic system.
Contact your a uthorized Audi dea ler and have the
malfunction corrected.
An imprope rly closed fuel fille r cap may a lso
ca use the MIL light to illuminate ¢
page 188 .
For more inform ation ¢ page 29.
!?) Engine speed limitation
Applies to vehicles: wi th engine speed limitation
(II Do not exceed max. engine speed of XXXX
rpm
The (II symbo l illu min ates when t here is an en
gine co ntro l m alfu nction . The ~ indica tor light
in the instrument clus ter also i llum ina tes . T he
engine spee d is limited to the speed displayed in
t h e d river i nfo rmation system. Keep in m ind that
the engine speed w ill not exceed the value dis
played in the driver information system, for ex
amp le w hen downshifting .
D rive to your authorized A udi dealer immediate ly
to have t he mal funct ion corrected.
~~. Engine oil sensor
• Oil level! Sensor defective
If the symbol illuminates, contact yo ur autho r
i zed Audi dealer and have the oil sensor inspect
ed . Until you have this done, check t he oil level
each time you refue l just to be on the safe s ide
¢ page 195.
Bu Tank system
ID Please refuel
If the indicator light turns on for the first time
and the message appea rs, there are about
2
.1 -2 .4 gallons (7 -9 liters) of fuel left in the
ta nk . Time to refuel
¢page 188.
ID Fuel tank system malfunction! Contact deal -
er
~
Page 23 of 264
M N
i? co ,...., \!) ..,.,
N ..,., ,....,
If the indicator light turns on and this message
appears, there is a malfunction in the tank sys
tem.
Drive to your authorized Audi dealer immediately
to have the malfunction corrected.
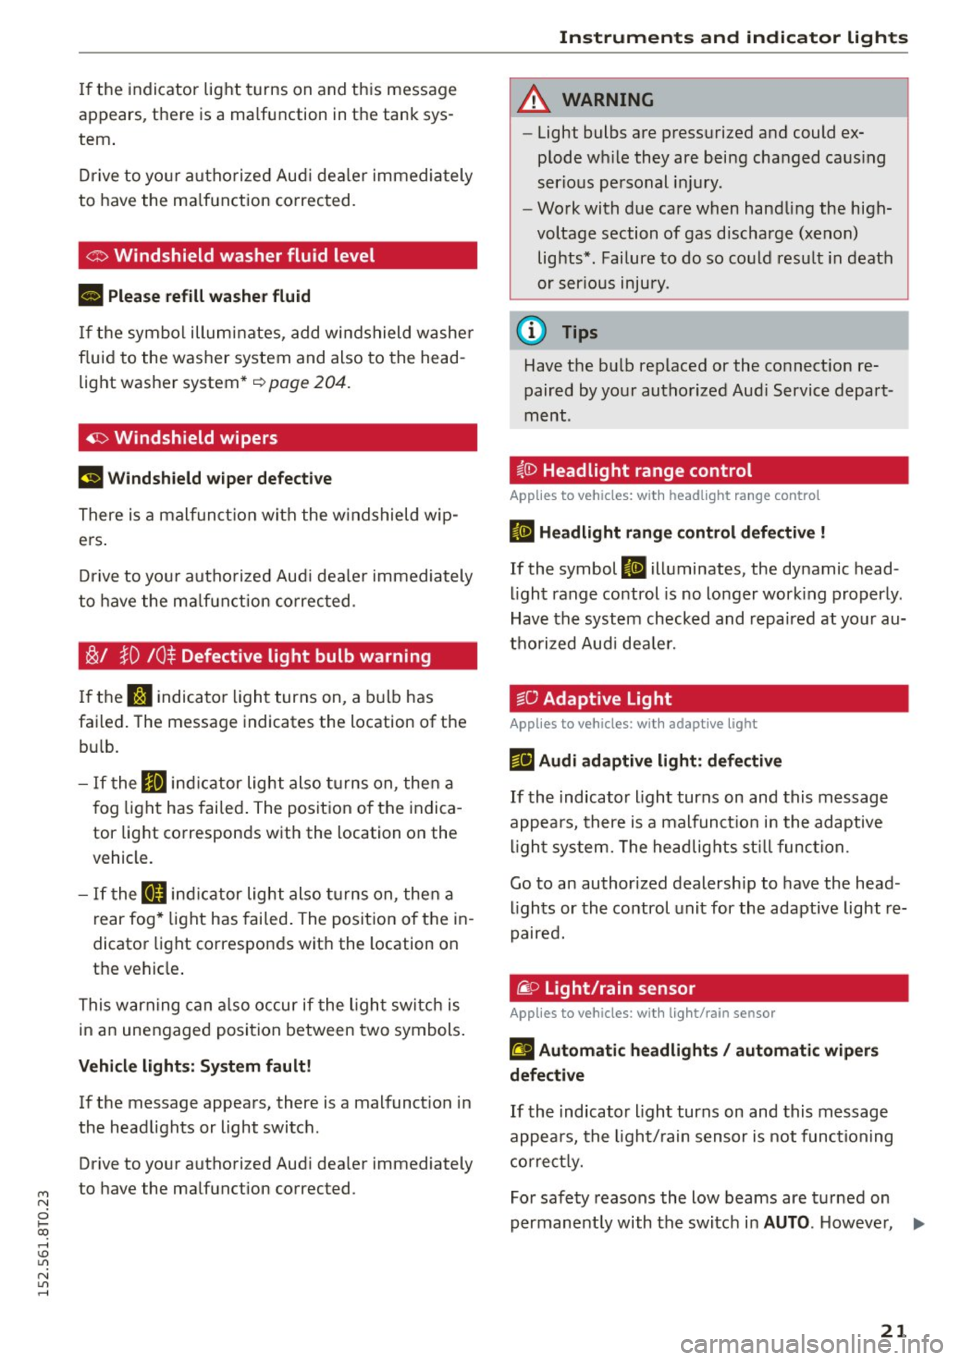
Ci:> Windshield washer flu id level
B Please refill washer fluid
If the symbol illuminates, add windshield washer
fluid to the washer system and also to the head
light washer system*
~ page 204.
~ Windshield wipers
(•j Windshield wiper defective
There is a malfunction with the windshield wip
ers.
Drive to your authorized Audi dealer immediately
to have the malfunction corrected.
~/ }D 10$ Defective light bulb warning
If the r.:J indicator light turns on, a bulb has
failed. The message indicates the location of the
bulb.
- If the Im indicator light also turns on, then a
fog light has failed. The position of the indica
tor light corresponds with the location on the
vehicle.
- If the II indicator light also turns on, then a
rear fog* light has failed. The position of the in
dicator light corresponds with the location on
the vehicle.
This warning can also occur if the light switch is
in an unengaged position between two symbols.
Vehicle lights: System fault!
If the message appears, there is a malfunction in
the headlights or light switch.
Drive to your authorized Audi dealer immediately
to have the malfunction corrected.
Instruments and indicator lights
A WARNING
-Light bulbs are pressurized and could ex
plode while they are being changed causing
serious personal injury.
-
- Work with due care when handling the high
voltage section of gas discharge (xenon)
lights*. Failure to do so could result in death
. . . or serious inJury.
@ Tips
Have the bulb replaced or the connection re
paired by your authorized Audi Service depart
ment.
i,0 Headlight range control
Applies to vehicles: with headlight range control
II Headlight range control defective !
If the symbol II illuminates, the dynamic head
light range control is no longer working properly.
Have the system checked and repaired at your au
thorized Audi dealer.
§0 Adaptive Light
Applies to vehicles: with adaptive ligh t
rlJ Audi adaptive light: defective
If the indicator light turns on and this message
appears, there is a malfunction in the adaptive
light system. The headlights still function.
Go to an authorized dealership to have the head
lights or the control unit for the adaptive light re
paired.
@. o Light /rain sen sor
Applies to vehicles: with light/ra in sensor
II Automatic headlights/ automatic wipers
defective
If the indicator light turns on and this message
appears, the light/rain sensor is not functioning
correctly.
For safety reasons the low beams are turned on
permanently with the switch in
AUTO . However, Ii),,
21
Page 24 of 264
Instruments and indicator lights
you can continue to turn the lights on and off us
ing the light switch . You can still control a ll func
tions that are independent of the rain sensor
through the windshield wiper lever .
Contact your authorized A udi dealer as soon as
possible to have the problem corrected.
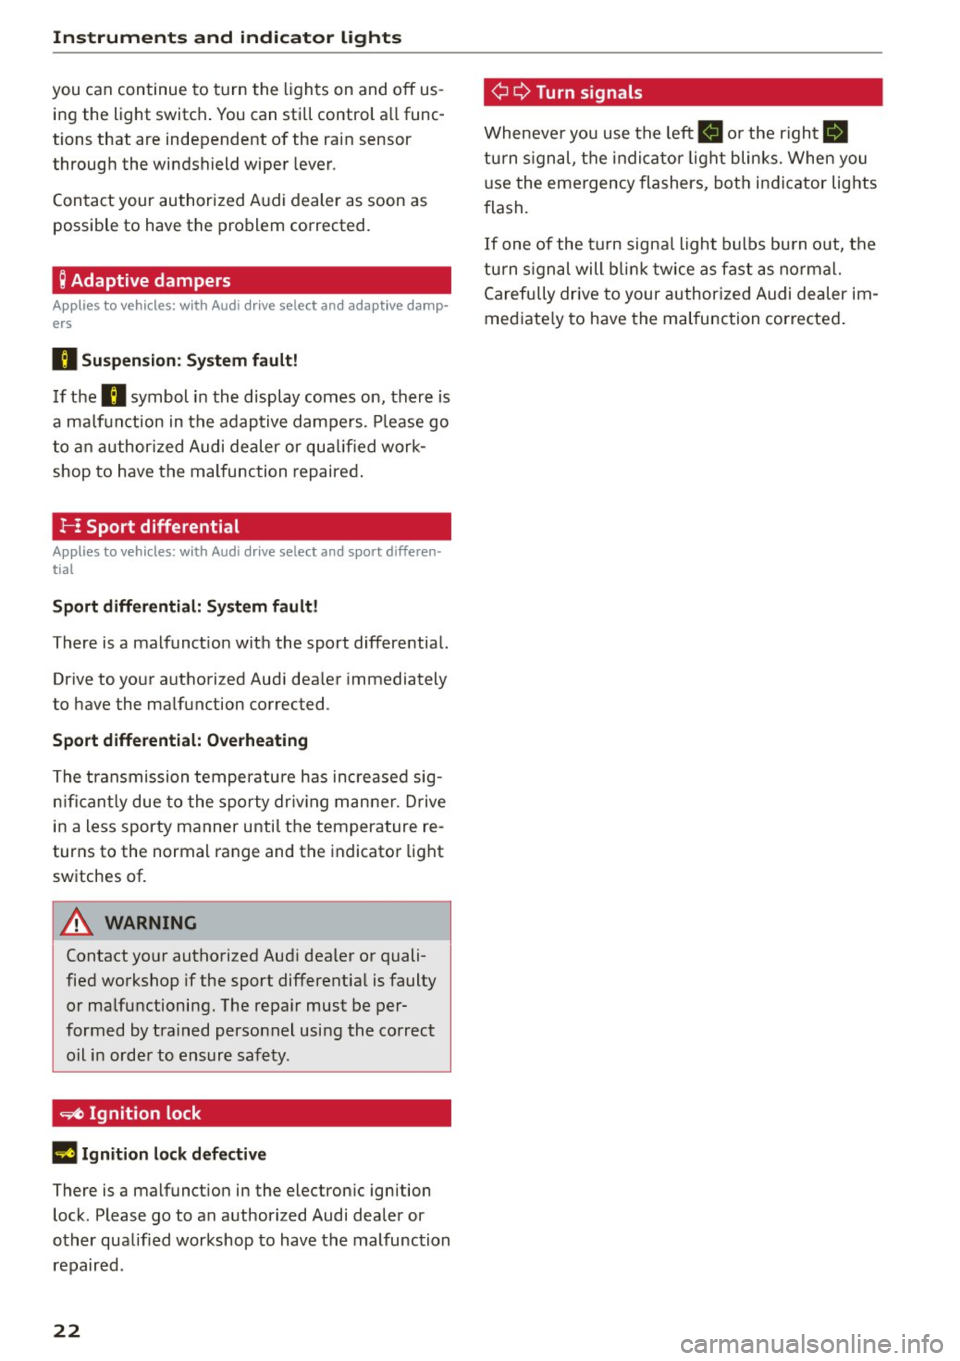
; Adaptive dampers
Applies to veh icles: w ith Audi drive select and adapt ive damp ·
ers
B Suspen sion : S ystem fault!
If the B symbol in the display comes on, there is
a ma lf u nction in the adaptive dampers. P lease go
t o an author ized Audi dealer or qua lified work
shop to have the malfunction repaired .
!-: Sport differential
Applies to vehicles: w ith Audi drive select and sport differen
tial
Sport differential: Sy ste m fault!
There is a malfunct ion wit h the sport differential.
Drive to yo ur authori zed Aud i dea ler immediately
to have the malfunction corrected .
Sport differential: Overheating
The transmission tempe ratu re has increased sig
n ifican tly due to the sporty dr iv ing manner. D rive
in a less sporty manner unti l the temperature re
turns to the normal range and the indicato r light
switches of.
A WARNING
Contact yo ur authorized Aud i dealer or quali
fied workshop if the sport differential is faulty
or ma lfunctioning. The repa ir must be per
formed by trained personnel using the co rrect
oil in orde r to ensure safety .
~ Ignition lock
II Ignition lock defective
There is a malfunct ion in the electron ic ignition
lock . Please go to an authorized Audi dealer or
other qualified workshop to have the malfunction repair ed .
22 ¢
Q Turn s
ignal s
Wheneve r you use the left B o r the right Ill
turn s ignal, t he indica to r li ght blinks. When you
u se the emergency flashers, bot h indicator lights
flash.
If one of the tu rn signa l ligh t bulbs bu rn out, the
turn s ign al will b link t wice as fast as normal.
Carefully drive to your author ized Audi dealer im
mediate ly to have the malfunction corrected .
Page 37 of 264
M N
0 loo
rl I.O
"' N
"' rl
"'To lock the vehicle, close the door and touch
the sensor in the door hand le
once ¢ fig. 23
¢ A in General description on page 31 . Do not
reach inside the door handle.
The vehicle can be locked and unlocked at any
door. The remote control key cannot be more
than 1.5 m away from the door hand le. It makes
no difference whether the master key is in your
jacket pocket or in your brief case .
If you g rip the door handle while locking, this can
adversely affect the locking function.
It is not possible to re -open the door for a brief
pe riod directly after closing it . This allows yo u to
ensure that the doors are properly locked .
It depends o n the se ttings i n the radio or MM I*
whether the entire vehicle is un locked or one o f
the doors ¢
page 36.
A WARNING
Read and follow all WARNINGS ¢ A in Gener·
al description on page 31.
@ Tips
I f your vehicle has been stand ing fo r an ex
tended period, please note the following:
- The proximity sensors are deac tivated after
a few days to save power. Yo u then have to
pull on the door handle once to unlock the
vehicle and a second time to open the vehi
cle.
- To prevent the battery from being dis
charged and to preserve your veh icle's abili
ty to start for as long as possible, the ener
gy management system g radually switc hes
off unnecessary convenience functions. It is poss ible that you w ill not be ab le to unlock
you r vehicle using these convenie nce func
tions .
- Fo r Decla rat ion of Compliance to Uni ted
Sta tes FCC a nd Industry Canada regulations
~ page 24 7.
Open ing and clo sing
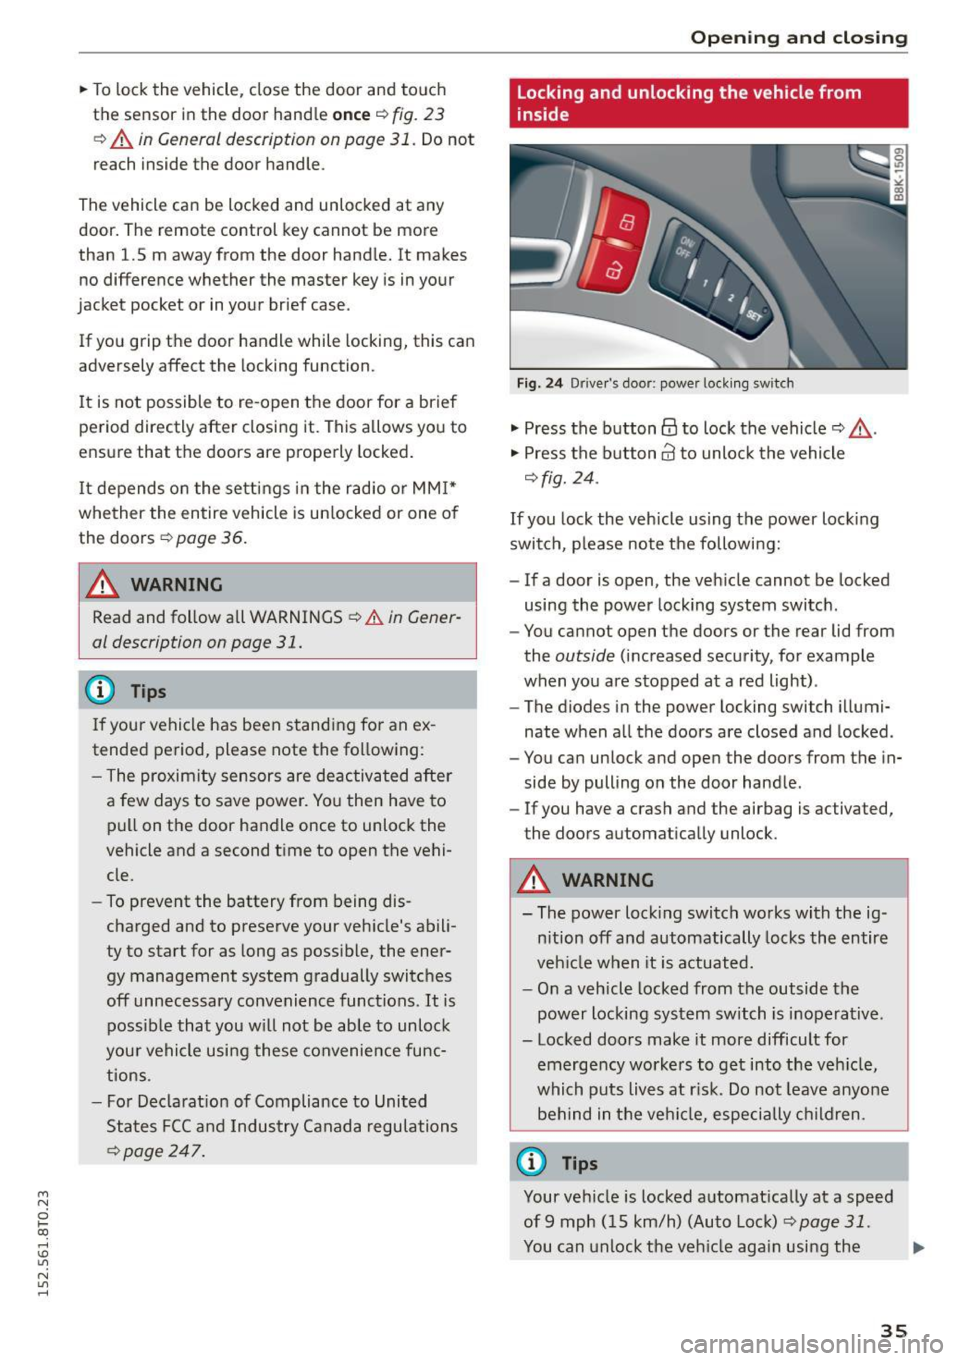
Locking and unlocking the vehicle from
inside
F ig. 2 4 Driver's door; power lock ing sw itch
"' Press the button@ to lock the vehicle¢_& .
"' Press the button@ to unlock the vehicle
¢fig. 24 .
If you lock the veh icle using the power loc king
swit ch, p lease note the following:
- If a door is open, the veh icle cannot be locked
using the power locking system switch .
- You cannot open the doors or the rear lid from
the
outside (increased security, for example
when you are stopped at a red light) .
- The diodes in the power locking switch illumi
nate when a ll the doors are closed and locked .
- You can unlock and open the doors from the in
side by pulling on the door hand le .
- If you have a crash and the airbag is activated,
the doors automa tically unlock .
A WARNING
-- The power lock ing switch works with the ig-
n ition off and automatically locks the entire
veh icle when it is actuated.
- On a vehicle locked from the outside the
power locking sy stem switch is inoperative .
- Locked doors make it more difficult for
emerge ncy worke rs to get into the veh icle,
which puts liv es at r isk. Do not leave anyone
be hind in the vehi cle, especially children .
@ Tips
Your vehicle is locked a utomat ically at a speed
of9 mph ( 15 km/h) (Auto Loc k)
¢ page 31.
You can unlock the veh icle aga in using the .,.
35
Page 46 of 264
Lights and Vi sion
Lights and Vision
Exterior Lighting
Switching the lights on and off
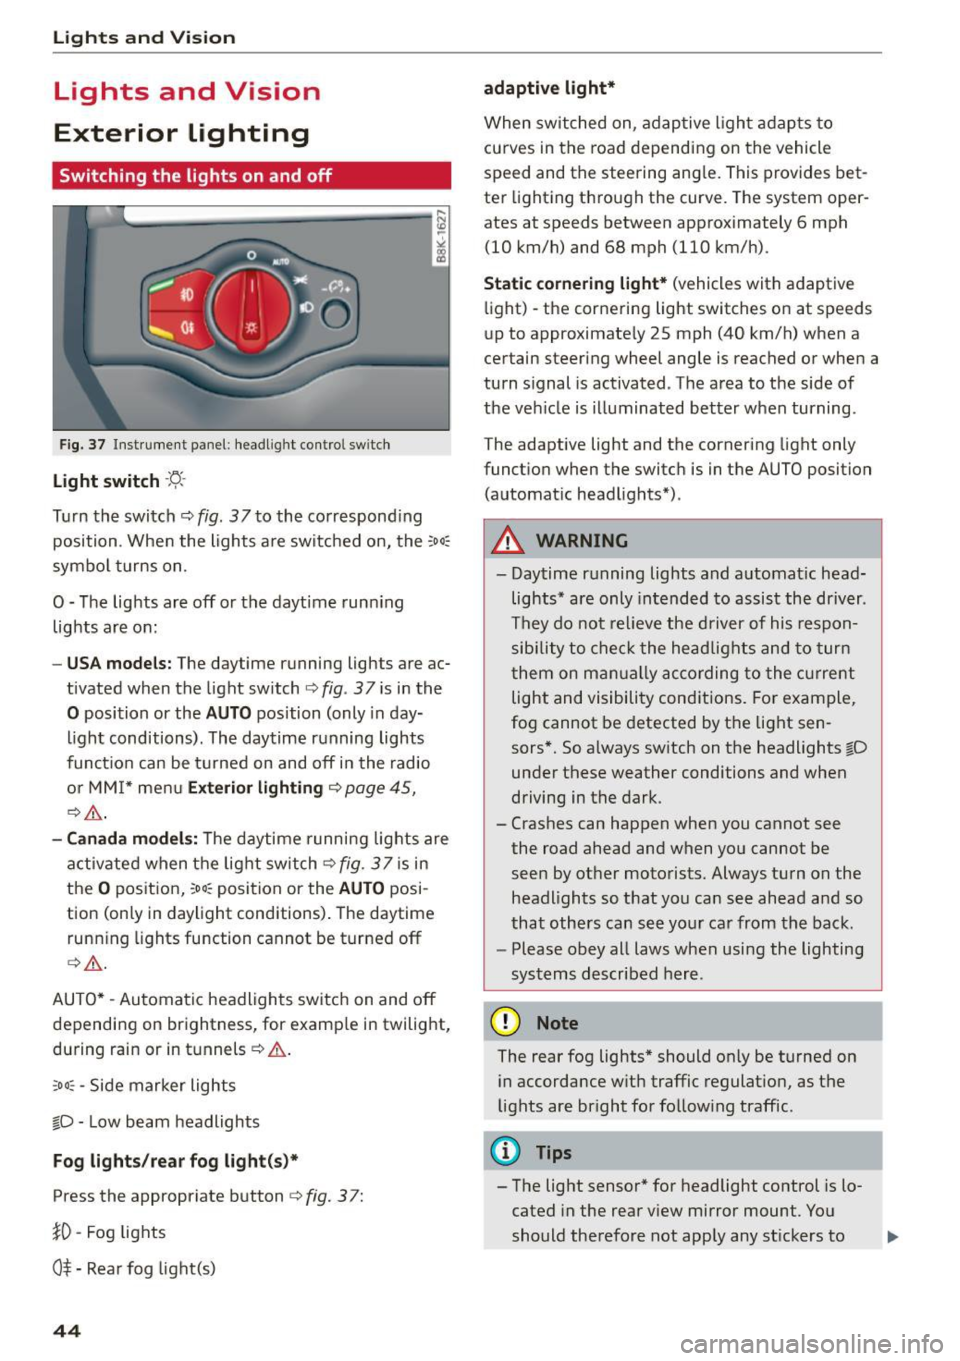
Fig. 3 7 Instrume nt pane l: headl ig h t co ntrol switc h
Light switch ·'t/-·
Tu rn the switch ¢ fig. 37 to the co rr e spond ing
position . Whe n the lights a re switched on, the
:oo,
symbo l turns on.
0 -The lights are off or the daytime runn ing
lights are on:
- USA models : The daytime running lights are ac
tivated when the light sw itch
¢ fig . 37 is in the
0 position or the AUTO position (only in day
li ght conditions). The daytime running lights
funct io n can be turned on and off in the radio
o r MM I* men u
Exterior lighting ¢ page 45,
c:?,& .
-Canada model s: T he daytime r unni ng lights are
activated when the lig ht switch
C?fig. 37 is in
t h e
O pos it ion, 300, position or the AUTO posi
tion (only in daylight conditions) . The daytime
runn ing lights function cannot be turned off
¢ ,A .
AUTO* -Au tomatic headlights swi tch on and off
depending on brightness, for examp le in twilight,
during rain or in tu nnels ¢
A.
:oo , -Side marker lights
fO -Low beam headlights
Fog lights /rear fog light(s )*
Press the appropriate button c:? fig. 3 7:
}0 -Fog lights
O* -Rea r fog light(s)
44
adaptive light*
When switched on, adap tive ligh t ad ap ts to
curves in the road depending on the vehicle
speed and the steering ang le. This provides bet
ter light ing through the curve. The system oper
ates at speeds between approximately 6 mph
(10 km/h) and 68 mph (110 km/h).
Static cornering light* (vehicles with adaptive
li ght) -the corne ring light switches on at speeds
up to approximate ly 25 mph (40 km/h) when a
certain steering wheel angle is reached or when a
turn s ignal is act ivated . T he area to the side of
the ve hicle is illuminated better when turning .
The adaptive light and the cornering light only
funct io n when the switc h is in the AUTO position
(automat ic head lights*) .
A WARNING
- Daytime r unning lights and a utomat ic head
lights* are only intended to as sist the driver .
T h ey do not re lieve the driver of his respon
sibility to c heck t he hea dlights and to tur n
t hem on m anually ac co rding to the cur rent
light and visibili ty conditions. Fo r exam ple,
fog cannot be detected by the light sen
sors*. So a lways sw itch on the headlights
l[D
under these weather conditi ons and when
driving in the dark.
- Crashes can happen when y ou cannot see
the road ahead and when you cannot be
seen by ot her moto rists. Always tu rn on the
headlights so that yo u ca n see ahead a nd so
that othe rs can see yo ur ca r from the back.
- Please obey all laws when usi ng the lighting
sys tems described here.
(D Note
The rear fog lights* should on ly be turned on
i n accordance w ith traffic regulat ion, as t he
lights are br ight for follow ing traffic.
{!) Tips
- The light sensor* for headlight control is lo
cated in the rear v iew mirror mount. Yo u
should the refore not app ly any st ickers to
Page 47 of 264
M N
0 loo
rl I.O
"' N
"' rl
the windshield in this a rea in order to
prevent malfunctions or failures .
- Some exterior lighting functions can be ad
ju ste d
~ page 45 .
-When yo u remove your key from the igni tion
while the vehi cle's ligh ts are turned o n, a
buzzer sounds as long as t he driver 's door is
open.
- In coo l o r dam p weather, t he inside of the
h eadlights, turn sig nals and tail lights can
fog over d ue to the temperature difference
between the inside and outs ide. They will
clea r shortly after switching them on. T his
does not affect t he service li fe of the light
i ng.
- In the event of a light sensor malfunction,
the driver is not ified in the instr ume nt clus
te r display~
page 21.
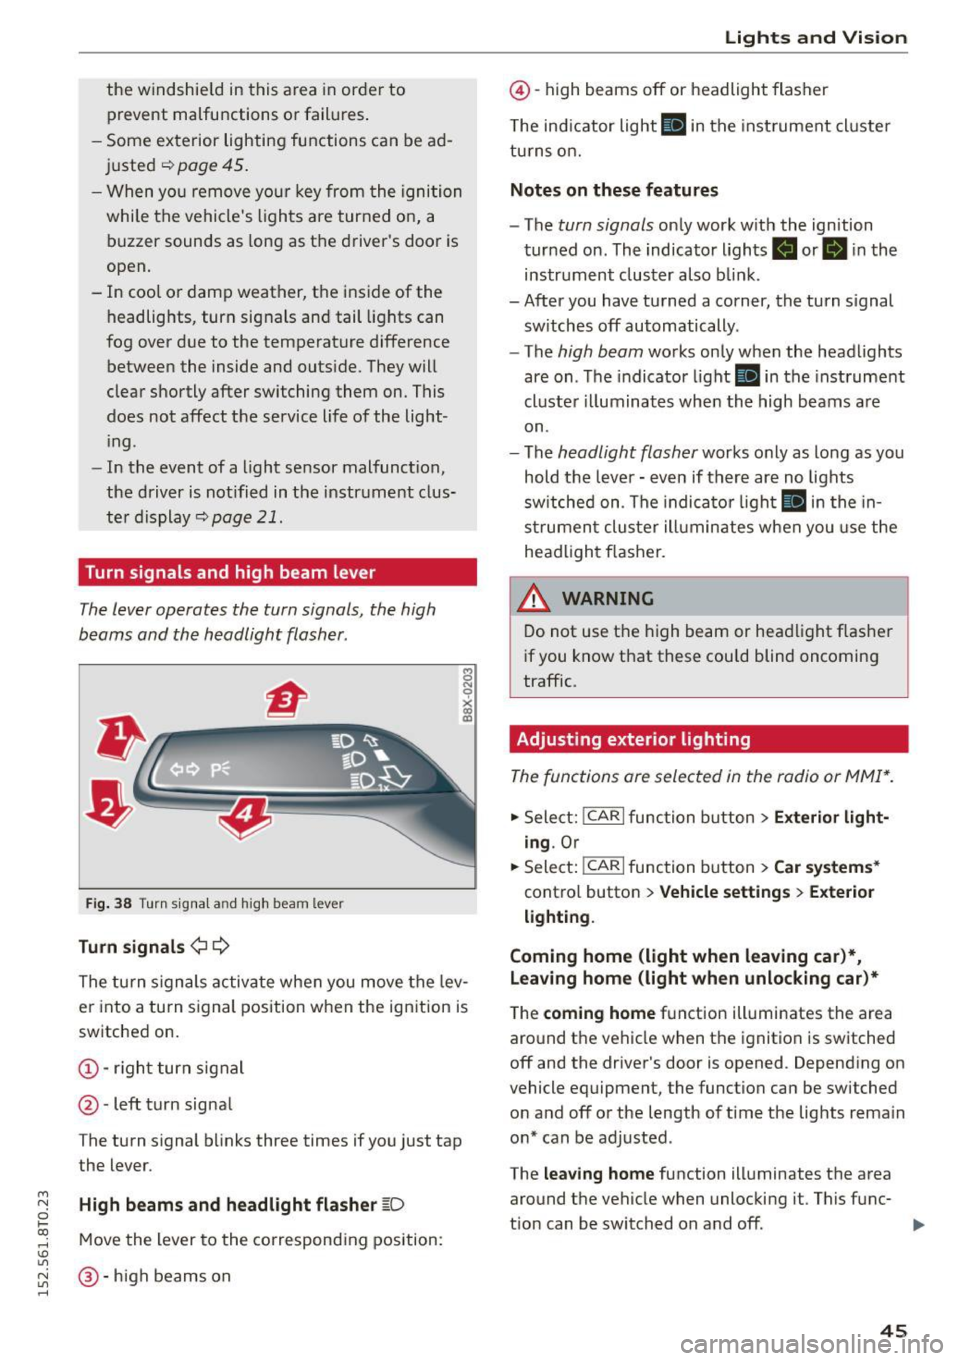
Turn signals and high beam lever
The lever operates the turn signals, the high
b eams and the headlight flasher.
Fi g. 3 8 Tu rn signa l and high beam lever
Turn signals ¢ Q
g N
0
~ CD
The turn signals activate when you move the lev
er into a turn s ignal position when the ignition is
switched on.
@ -righ t tur n signal
@ -left turn signa l
The turn s ignal b links three times if you just tap
the lever.
High beams and headlight flasher
[0
M ove the lever to the corresponding position:
@ -high beams o n
Lights and Vis ion
@ -high beams off or headlight flasher
T he ind icator light
II in t he inst rument cl uste r
tu rns on.
Notes on these features
- The
turn signals on ly wor k w ith the ign ition
tur ned on. The indicator ligh ts . or
II in the
instr um ent clus ter also b link.
-After you have tu rned a corner, the turn s ignal
sw itches off automatically.
- The
high beam works on ly when the headlights
are on . T he indicator light
II in the instrument
cluste r illuminates whe n the high beams a re
on.
- The
headlight flash er works o nly as long as yo u
hold the leve r - even if there are no lights
sw itched on . The indica to r li ght
II in the in
s trumen t cluste r ill umin ates when you use t he
head light flasher.
,&. WARNING
D o not use t he h igh beam or hea dlight flashe r
i f you know that these could blind oncoming
traffic.
Adjusting exterior lighting
The func tions are selected in the radio or MMI* .
.,. Select: !CAR I func tion b utton > Exterior light
ing .
Or
.,. Sele ct: !~C_A _R~ I function b utton > Car systems *
contro l butto n > Vehicle settings > Exterior
lighting .
Coming home (light when leaving car )*,
Leaving home (light when unlocking car)*
The
coming home f u nction illuminates the area
aro und t he vehicle when the ignition is switched
off and the driver's door is opened. Depend ing on
vehicle equipment, the function can be switched o n and off o r the length of t ime t he lig hts rema in
on* can be adjusted .
The
leaving home function illuminates t he area
around th e vehicle when unloc kin g it. This func-
t ion can be switched on and off. ""
45
Page 52 of 264
Lights and Vi sion
You can adju st the settings for the rear sun shade
so the shade retracts a utomatica lly when you se
lect the reverse gear. To do this, se lect the
I CAR !
function button
> Windows > Rea r blind > au to
matic > on
or! CA R! function button> Car sys
tems *
control button > Vehicle sett ings > Auto
matic rear blind > On .
The cur ren t setting is au
tomatically stored and assigned to the remote
key. The sun shade is extended again as soon as
the vehicle is traveling forwa rd at a speed gre ater
than
9 mph (15 km/h) if the ignition has not
been switched off in t he meantime .
_& WARNING
Whe n lowe ring or raising the sunshade, make
sure there is nothing in its way and that it has
a free path to t ravel. Th is co uld cause perso n
al injury.
@ Tips
- Pressing t he button ru several times con
secutively can trigger the over load protec
tion. The sun shade can only be extended/ r etracted aga in after a br ief waiting period.
- The rear window sun shade only f unctions
when the vehicle interior is warmer tha n
14°F (-10°C).
Windshield wipers
Switching the windshield wipers on
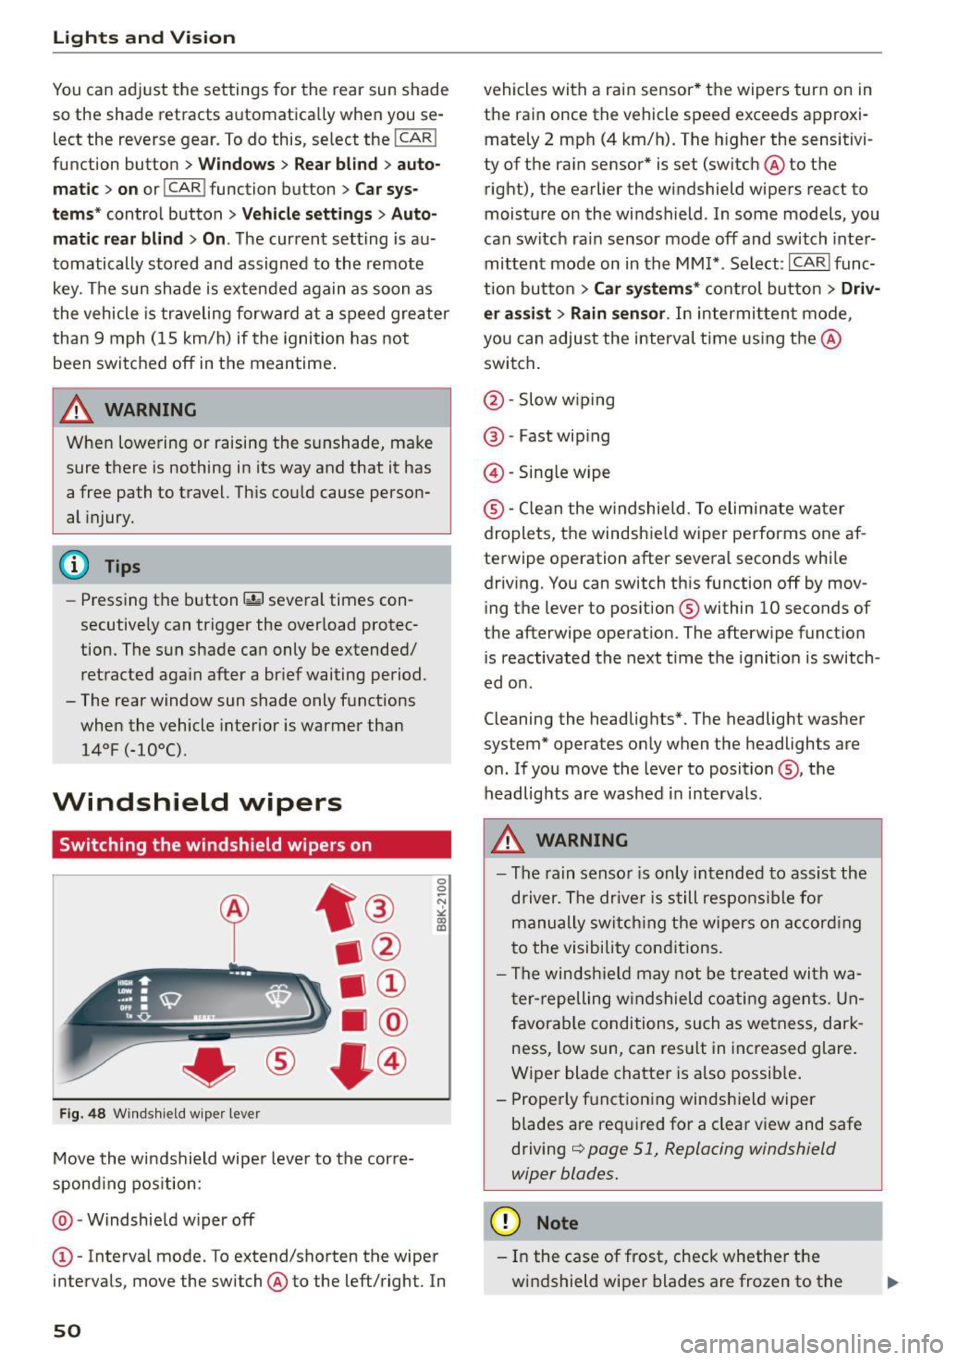
Fig . 48 W inds hield w iper leve r
Move the windshield wipe r leve r to the corre
spond ing pos ition:
@ -Windshie ld w iper off
0 0 -N st co Ul
© -Interva l mode. To extend/shorten the wiper
i n tervals , move the switch @to the left/right. In
50
vehicles with a rain sensor * the wipers turn on in
the rain once the vehicle speed exceeds approxi
mately 2 mph (4 km/h). The higher the sensitivi
ty of the ra in sensor * is set (switch @to the
right), the earlier the windshield wipe rs react to
moist ure o n the windsh ield . In some models, you
can switc h ra in sensor mode off and switch inte r
mittent mode on in the MM !* . Se lect :
I CAR I func
t ion but to n
> Car systems * cont rol bu tton > Driv
er assi st > Rain sensor .
In intermi tten t mode,
you can a djus t the interval time using the @
swi tch .
@ -Slow w iping
@ -Fast wip ing
@ -Sing le wipe
® -C le a n the w indshield. To elim inate water
droplets, the windsh ie ld wiper pe rforms one af
te rwipe operation after several seconds whi le
driv ing. You can switch th is function off by mov
ing the lever to pos ition ® within
10 seconds of
the afterwipe operation. The afterw ipe funct io n
i s reactivated the next t ime t he ignit ion is switch
ed o n.
C leaning the headlig hts". The headlight was her
system* operates on ly when the headlights are
o n. If you move the lever to position @, the
headlig hts are washed in in terva ls .
_& WARNING
- The rain senso r is only intended to assis t the
d river. The drive r is s till respons ible for
manu ally swi tching the wipers on a ccor din g
t o the visibility con ditions.
- The winds hiel d may not be treate d wi th w a
t er -repelling w ind shiel d coati ng a gents. Un
f avor able conditions, su ch as wetness, dar k
ness, low sun , can res ult in inc reased glare.
Wiper blade chatte r is a lso possib le .
- Properly f unctioning windsh ie ld wiper
b lades are req uired for a clear v iew and safe
driving
c::> page 51, Replacing windshield
wiper blades.
(D Note
- In the case of fr ost, check whether the
wi ndshie ld wipe r blades are frozen to t he
Page 53 of 264
M N
i? co ,...., \!) 1.1"1
N 1.1"1 ,....,
windshield. Switching on the windshield
wipers can damage the wiper blades!
- Prior to using a car wash, the windshield
wiper system must be switched off (lever in
position @). Th is helps to prevent uninten
tiona l switching on and damage to the
windsh ield wiper system.
(D Tips
- The windshield wipers are switched off
when the ignition is turned off . Activate the
windsh ield wipers after the ignition is
switched back on by moving the winds hield
wiper lever to any posit ion .
- Worn or dirty windshie ld wiper blades result
i n streaking. This can affect the rain sensor*
funct ion. Check your windshield wiper
blades regularly.
- The washer fluid nozzles of the windshield washer system are heated at low tempera
tures when the ignit ion is on.
- When stopping temporarily , (e.g . at a traffic
light) the set speed of the windsh ield wipers
i s automatically reduced by one speed.
Cleaning windshield wiper blades
C lea n the windshield wi per blades when they be
gin to leave streaks . Use a soft cloth and glass
cleaner to clean the windshield wiper blades.
.,. Place the windshield wiper arms i n the service
pos ition. Re fer to ¢
page 51.
.,. Lift the wiper arm away from the front window .
A WARNING
-
Dirty windshield wiper blades can impair your
view . Th is can lead to acc idents.
Light s and Vis ion
Replacing windshield wiper blades
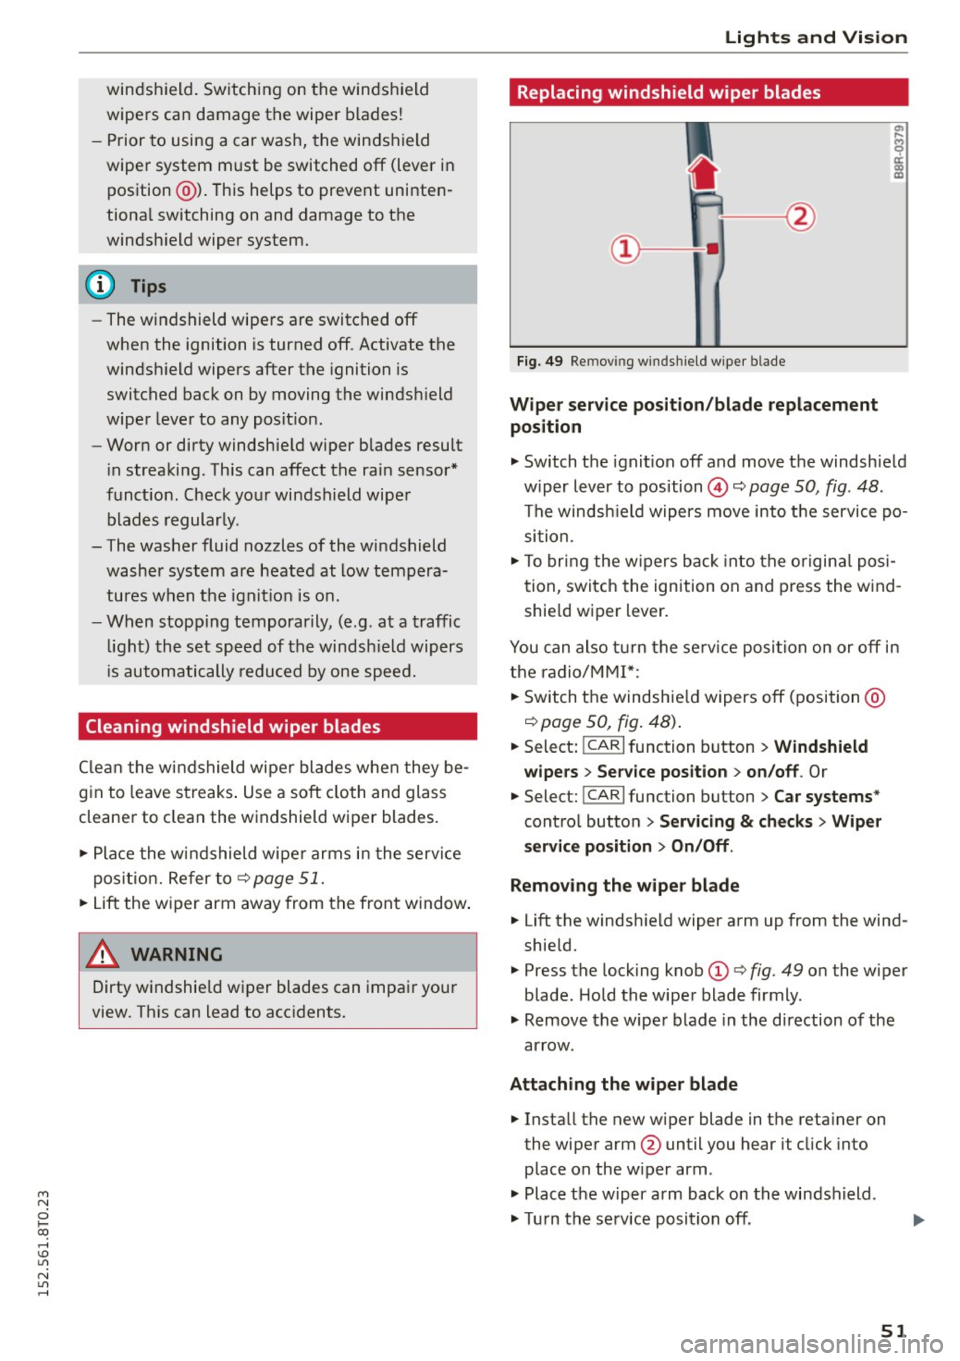
Fig. 49 Re mov ing wi nd sh ie ld wipe r bla de
Wipe r ser vice position /bl ade repl acement
position
.,. Switch the ignit ion off and move the windshield
w iper lever to pos ition @¢
page 50, fig. 48 .
The windsh ield wipers move into the service po
si tion.
.,. To bring the w ipers back into the o rigina l posi
tion , switch the ignition on and press the wind
shie ld wiper l ever .
You can also t urn the se rv ice position on or off in
the radio/MM!*:
.,. Switch the windshie ld wipers off (position @
¢page 50, fig. 48) .
.,. Select: !CAR I function button > Win dshield
wipe rs
> Serv ice po sition > on /off . Or
.,. Select: !CAR I func tion button > C ar systems *
control button
> S erv ici ng & checks > Wip er
s er vice po sition
> On /Off .
R emoving th e wiper bla d e
.,. Lift the windshie ld wiper arm up from the wind
shield.
.,. Press the locking knob
(D ¢ fig. 49 on the wiper
blade . Hold the wiper blade firmly .
.,. Remove the wiper blade in the d irection of the
ar row .
Att aching the w ipe r blade
.,. Install the new wiper blade in the reta iner on
the wiper arm @until you hear it click into
place on the w iper arm .
.,. Place the w iper arm back on the windshield.
.,. Turn the se rvice position off .
51
Page 91 of 264
M N
0 loo
rl I.O
"' N
"' rl
Audi adapt ive crui se cont rol and bra king gu ard
Audi adaptive cruise
control and braking
guard
Introduction
App lies to vehicles: with Audi adaptive cruise co ntrol
The adaptive cruise control system assists the
driver by regu lating vehi cle speed and helping to
maintain a set distance to the vehicle ahead,
within the limits of the system.
If the system de
tects a moving vehicle up ahead, adaptive cruise
control can brake and then accelerate your vehi
cle. This helps to make driving more comfortable
on long highway stretches.
The braking guard system can warn you about an impend ing collision and initiate braking maneu
vers
¢ page 95.
Adaptive cruise control and braking guard have
technical limitations that you must know, so
p lease read this section carefu lly, understand
how the system works and use them properly at
all times.
General information
General information
A pp lies to vehicles: with Audi adaptive cruise co ntrol
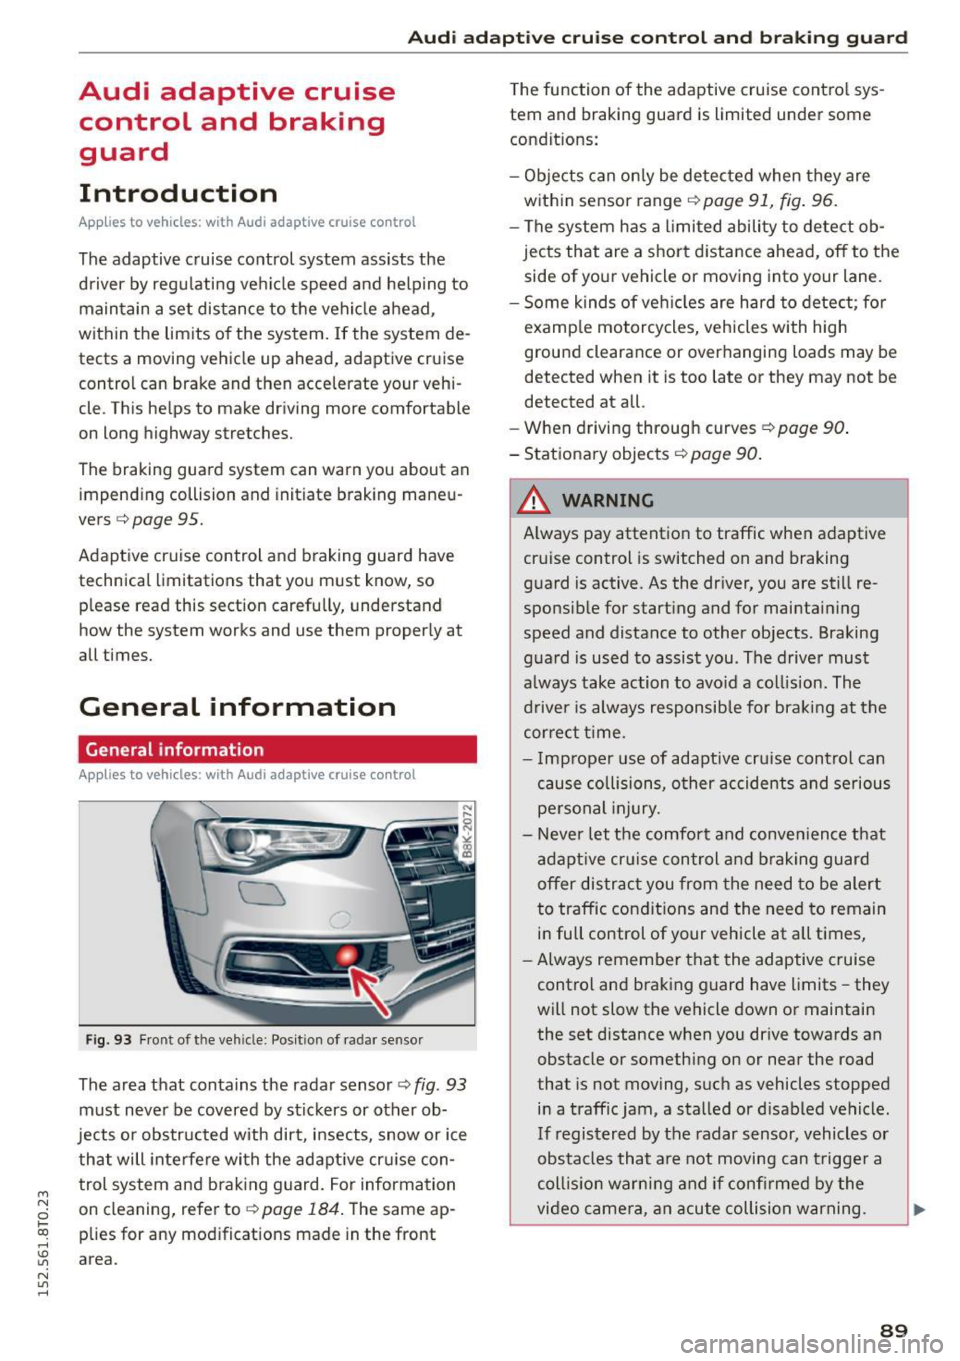
Fig. 93 Fr ont of th e veh icle : Posit ion of radar sensor
The area that contains the radar sensor¢ fig. 93
must never be covered by stickers or other ob
jects or obstructed with dirt, insects, snow or ice
that will inte rfe re with the adapt ive cr uise con
trol system and brak ing guard. For information
on cleaning, refer to ¢
page 184. The same ap
p lies for any mod ificat ions made in the front
area. T
he function of the adaptive cruise cont ro l sys
tem and braking guard is limited under some
condit ions:
- Ob jects can on ly be de tected when they are
with in sensor range¢
page 91, fig. 96.
-The system has a limited ability to de tect ob
jects that are a short distance ahead, off to the
side of your vehicle or moving into your lane .
- Some kinds of veh icles are hard to detect; for
examp le motorcycles, vehicles with high
ground clearance or overhanging loads may be
detected when it is too late or they may not be
detected at all.
- When driving through curves
¢page 90 .
-Stationa ry objects ¢ page 90.
,&_ WARNING
-= -Always pay attention to traffic when adaptive
cruise control is switched on and braking
g uard is active. As the driver, you are still re
sponsib le for start ing and for maintai ning
speed and distance to other objects. Braking
g uard is used to assist you . The drive r must
a lways take action to avo id a col lision . The
d river is always responsible for bra kin g at the
cor re ct t ime.
- I mp roper use of adaptive cruise control can
cau se collisions, o ther accidents and serious
pe rsonal injury.
- Never let the comfort and conve nience that
adapt ive cr uise control and braking guard
offer distrac t you from the need to be alert
to traffic con dit ions and the need to remain
i n full control of your vehicle at all times,
- Always remember that the adaptive cruise
control and braking guard have limits -they
will not slow the vehicle down or maintain
the set distance when you dr ive towards an
obstacle or somethi ng on or near the road
that is not moving, such as vehicles stopped
in a traff ic jam, a sta lled or d isabled vehicle.
If registered by the radar sensor, vehicles or
obstacles that a re not moving can t rigger a
coll is io n warning and if confi rmed by the
video came ra, an acute collision war ning.
~
89