light AUDI A5 2015 Owner´s Manual
[x] Cancel search | Manufacturer: AUDI, Model Year: 2015, Model line: A5, Model: AUDI A5 2015Pages: 264, PDF Size: 66.83 MB
Page 49 of 264
M N
0 loo
rl I.O
"' N
"' rl
Interior lighting
Front/rear interior lights
(• ' .,;,I
~~~
8 8
O. ~O
l
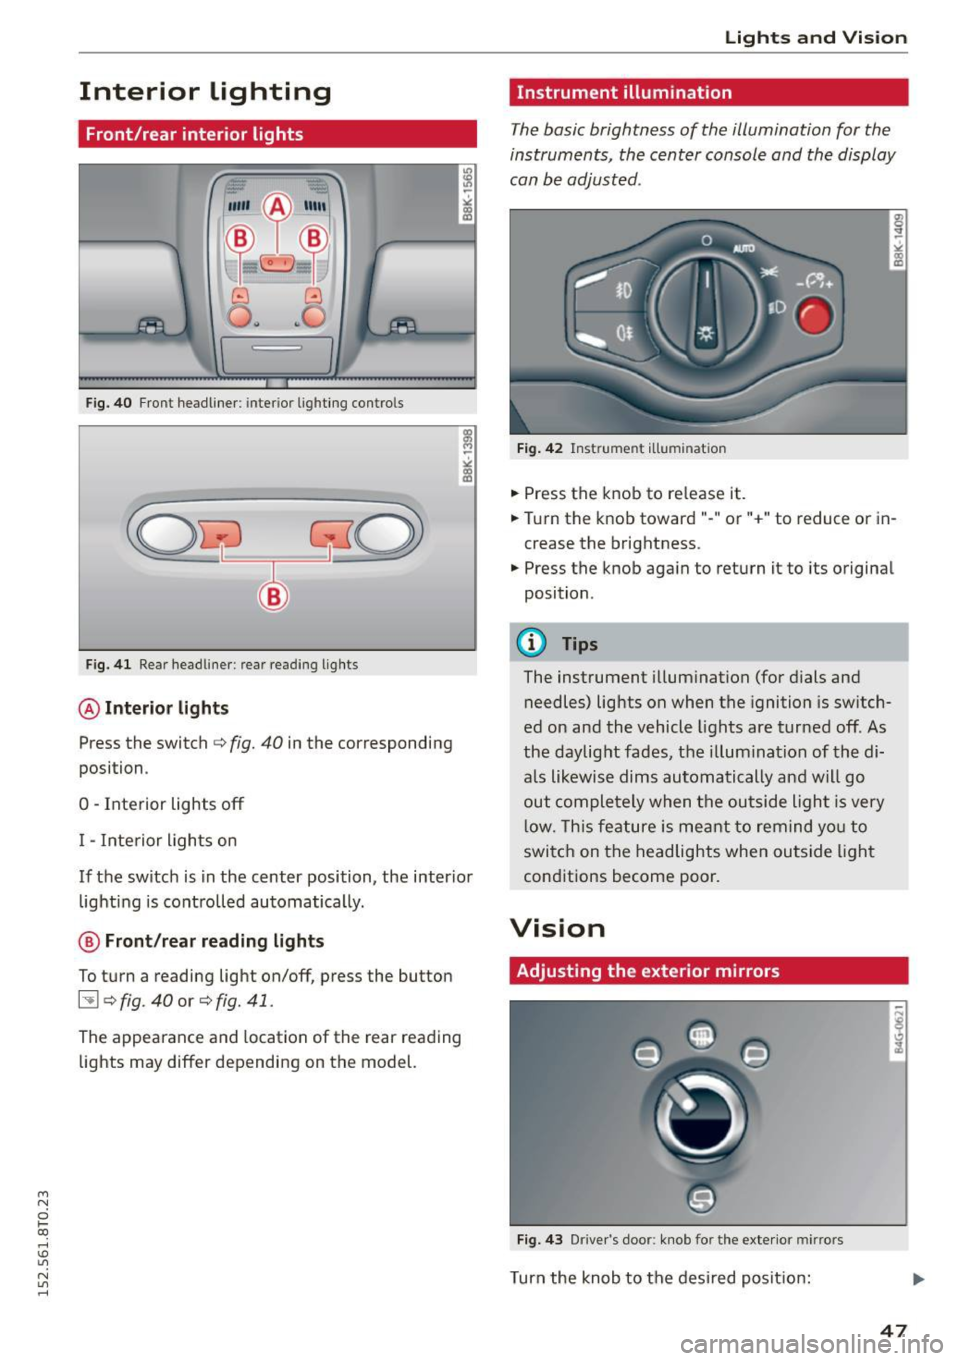
Fig. 40 Front headliner : interior lighting contro ls
Fig. 41 Rear headliner: rear reading lights
@Interior lights
Press the switch c> fig. 40 in the corresponding
position .
0 -Interior lights off
I -Inte rior lights on
If the switch is in the center position, the interior
lighting is controlled automatically.
@ Front /rear reading lights
To turn a reading light on/off, press the button
~ c> fig. 40 or c> fig. 41.
The appearance and location of the rear reading
lights may differ depending on the model.
Lights and Vision
Instrument illumination
The basic brightness of the illumination for the
instruments, the center console and the display
can be adjusted .
Fig. 42 Instrume nt illumination
• Press the knob to re lease it .
.. Turn the knob toward"-" or "+" to reduce or in
crease the brightness.
• Press the knob again to return it to its original
position .
@ Tips
The instrument illumination (for dials and
needles) lights on when the ignition is switch
ed on and the vehicle lights are turned off. As
the daylight fades, the illum ination of the di
als likewise dims automatically and will go
out completely when the outside light is very
low. This feature is meant to remind you to
switch on the headlights when outside light
conditions become poor.
Vision
Adjusting the exterior mirrors
Fig. 43 Drive r's door : knob for the exterio r mir rors
Turn the knob to the desired position:
47
Page 50 of 264
Lights and Vision
Q/P -Adjusting the left/right exterior mirror .
Move the knob in the des ired direction.
4ill -Heat ing the m irror g lass depending on the
outside temperature*.
.9 -Folding exterior mirrors* . In the Infotain
ment system, you can select if the mirrors fold in
automatically when you lock the vehicle
¢ page 36.
Front passenger's exterior mirror tilt
function*
To help you see the curb when backing into a
parking space, the surface of the mirror t ilts
slightly . Fo r this to happen, the knob must be in
the position for the front passenger 's outside
mirror.
You can adjust the tilted mirror su rface by turn
ing the knob in the des ired direction . Wh en you
move out of revers e and into another gear, the
new mirror position is stored and assigned to the
key you are using.
The mirror goes back into its origina l position
once you drive forward faster than 9 mph (15 km/h) or turn the ignition off.
A WARNING
Curved mirror surfaces (convex or spherical*)
increase your field of view. Remember that
vehicles or other objects will appear smaller
and farther away than when seen in a flat mir
ror. If you use this mirror to estimate distan
ces of following vehicles when changing
lanes, you cou ld estimate incorrectly and
cause an accident.
(D Note
-If the mirror hous ing was moved by force
(for example, by running into an object
when maneuvering the vehi cle), the mirror
must be folded all the way in using the pow
er folding function. The mirror housing
must not be moved back into place by hand
because this would impair the function of
the mirror mechanism.
- If you wash the vehicle in an automatic car
wash, you must fold the exterior mirrors in
48
to reduce the risk of damage to the mirrors.
Never fold power folding exterior mirrors*
by hand. Only fold them in and out using
the power controls.
(D Tips
-If the power adjusting function malfunc
tions, the g lass in both mirrors can be ad
justed by pressing on the edge of it by hand.
- The exterior mirror settings are stored with
the memory function* ¢
page 58.
Dimming the mirrors
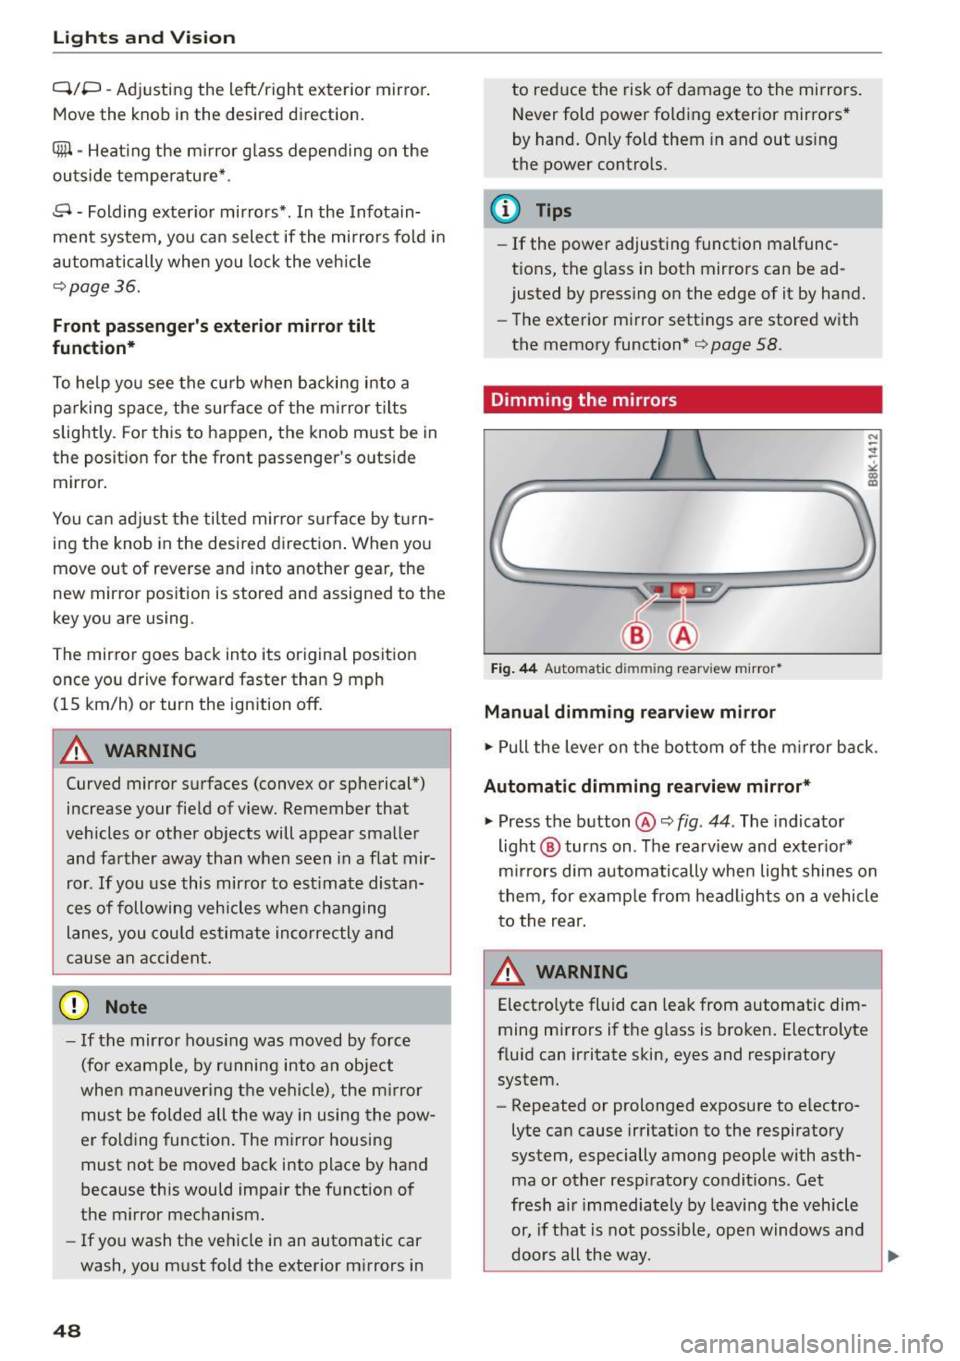
Fig. 44 Automat ic dimmin g rearv iew mirro r•
Manual dimming rearview mirror
.,. Pull the lever on the bottom of the m irror back .
Automat ic dimming rearview mirror*
.,. Press the button@¢ fig. 44. The indicator
light @ turns on . The rearview and exter ior*
mirrors dim automatically when light shines on
them, for example from headlights on a vehicle
to the rear.
~ WARNING
Electro lyte fluid can leak from automatic dim
ming mirrors if the glass is broken. Electrolyte
fluid can irritate skin, eyes and respiratory system.
- Repeated or prolonged exposure to e lectro
lyte can cause irritation to the respiratory
system, especially among people with asth
ma or other resp iratory conditions . Get
fresh a ir immediately by leaving the vehicle
or, if that is not possible, open windows and
doors all the way.
~
Page 51 of 264

M N
0 loo
rl I.O
"' N
"' rl
-If electrolyte gets into the eyes, flush them
thoroughly with large amounts of clean wa
ter for at least 15 minutes; medical atten
tion is recommended .
- If electrolyte contacts skin, flush affected
area with clean water for at least 15 mi
nutes and then wash affected area with
soap and water; medical attention is recom
mended. Thoroughly wash affected clothing
and shoes before reuse .
-If swallowed and person is conscious, r inse
mouth with water for at least 15 minutes.
Do not induce vomit ing unless instructed to
do so by medical professional. Get medical
attention immediate ly .
(D Note
Liquid electrolyte leaking from broken mirror
glass will damage any plastic surfaces it
comes in contact with. Clean up spilled elec
trolyte immediate ly with clean water and a
sponge .
@ Tips
-Switch ing off the dimming function of the
i nside rear view mirror also deactivates the
automatic dimming function of the exterior
mirrors .
- Automatic dimming for the mirror only op
erates properly if the sun shade* for the rear
window is not in use or the light striking the
inside mirror is not hindered by other ob
jects .
- The automatic dimming mirrors do not dim
when the interior lighting is turned on or
the reverse gear is selected.
Lights and Vision
Sun visors
Fig. 45 Dr iver's s ide: sun visor
The sun visors for the driver and passenger can
be pulled out of their brackets in the center of
the vehicle and turned towards the doors@.
The mirror light switches on when the cover over
the vanity mirror @opens.
Sun shade
App lies to vehicles: with s un shade
The rear window is equipped with a sun shade.
Fig. 46 With MMI: Button for rear window sun shade
Fig . 47 W ithout MMI: Button for rear window sun shade
"'To extend/retract the sun shade, press the Q;;I
~ 0
0
I-' CD U)
button ~ fig. 46 or¢ fig . 47 . ..,.
49
Page 52 of 264
Lights and Vi sion
You can adju st the settings for the rear sun shade
so the shade retracts a utomatica lly when you se
lect the reverse gear. To do this, se lect the
I CAR !
function button
> Windows > Rea r blind > au to
matic > on
or! CA R! function button> Car sys
tems *
control button > Vehicle sett ings > Auto
matic rear blind > On .
The cur ren t setting is au
tomatically stored and assigned to the remote
key. The sun shade is extended again as soon as
the vehicle is traveling forwa rd at a speed gre ater
than
9 mph (15 km/h) if the ignition has not
been switched off in t he meantime .
_& WARNING
Whe n lowe ring or raising the sunshade, make
sure there is nothing in its way and that it has
a free path to t ravel. Th is co uld cause perso n
al injury.
@ Tips
- Pressing t he button ru several times con
secutively can trigger the over load protec
tion. The sun shade can only be extended/ r etracted aga in after a br ief waiting period.
- The rear window sun shade only f unctions
when the vehicle interior is warmer tha n
14°F (-10°C).
Windshield wipers
Switching the windshield wipers on
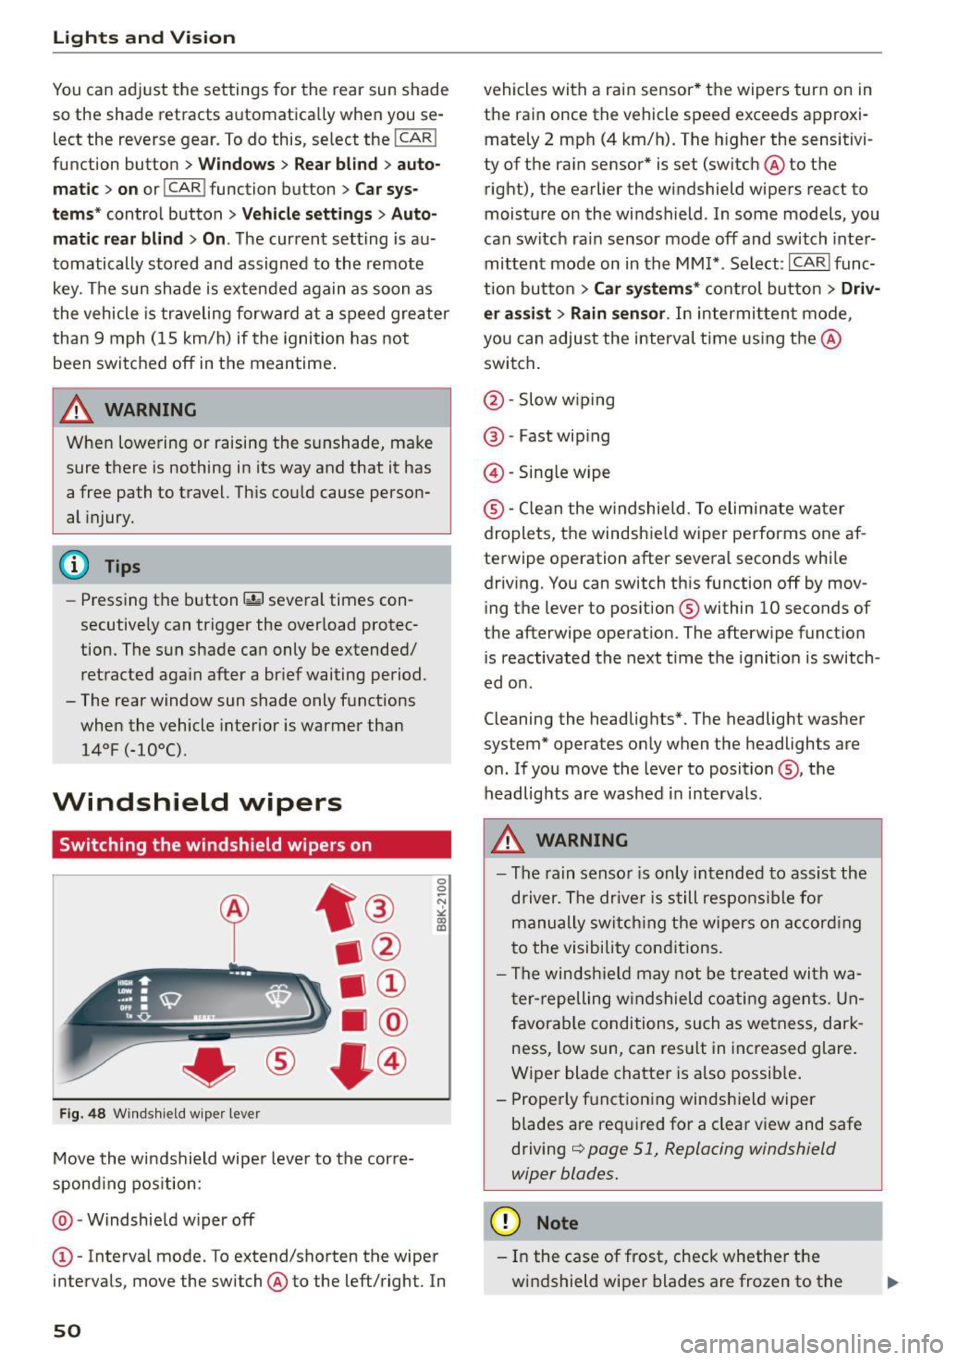
Fig . 48 W inds hield w iper leve r
Move the windshield wipe r leve r to the corre
spond ing pos ition:
@ -Windshie ld w iper off
0 0 -N st co Ul
© -Interva l mode. To extend/shorten the wiper
i n tervals , move the switch @to the left/right. In
50
vehicles with a rain sensor * the wipers turn on in
the rain once the vehicle speed exceeds approxi
mately 2 mph (4 km/h). The higher the sensitivi
ty of the ra in sensor * is set (switch @to the
right), the earlier the windshield wipe rs react to
moist ure o n the windsh ield . In some models, you
can switc h ra in sensor mode off and switch inte r
mittent mode on in the MM !* . Se lect :
I CAR I func
t ion but to n
> Car systems * cont rol bu tton > Driv
er assi st > Rain sensor .
In intermi tten t mode,
you can a djus t the interval time using the @
swi tch .
@ -Slow w iping
@ -Fast wip ing
@ -Sing le wipe
® -C le a n the w indshield. To elim inate water
droplets, the windsh ie ld wiper pe rforms one af
te rwipe operation after several seconds whi le
driv ing. You can switch th is function off by mov
ing the lever to pos ition ® within
10 seconds of
the afterwipe operation. The afterw ipe funct io n
i s reactivated the next t ime t he ignit ion is switch
ed o n.
C leaning the headlig hts". The headlight was her
system* operates on ly when the headlights are
o n. If you move the lever to position @, the
headlig hts are washed in in terva ls .
_& WARNING
- The rain senso r is only intended to assis t the
d river. The drive r is s till respons ible for
manu ally swi tching the wipers on a ccor din g
t o the visibility con ditions.
- The winds hiel d may not be treate d wi th w a
t er -repelling w ind shiel d coati ng a gents. Un
f avor able conditions, su ch as wetness, dar k
ness, low sun , can res ult in inc reased glare.
Wiper blade chatte r is a lso possib le .
- Properly f unctioning windsh ie ld wiper
b lades are req uired for a clear v iew and safe
driving
c::> page 51, Replacing windshield
wiper blades.
(D Note
- In the case of fr ost, check whether the
wi ndshie ld wipe r blades are frozen to t he
Page 53 of 264
M N
i? co ,...., \!) 1.1"1
N 1.1"1 ,....,
windshield. Switching on the windshield
wipers can damage the wiper blades!
- Prior to using a car wash, the windshield
wiper system must be switched off (lever in
position @). Th is helps to prevent uninten
tiona l switching on and damage to the
windsh ield wiper system.
(D Tips
- The windshield wipers are switched off
when the ignition is turned off . Activate the
windsh ield wipers after the ignition is
switched back on by moving the winds hield
wiper lever to any posit ion .
- Worn or dirty windshie ld wiper blades result
i n streaking. This can affect the rain sensor*
funct ion. Check your windshield wiper
blades regularly.
- The washer fluid nozzles of the windshield washer system are heated at low tempera
tures when the ignit ion is on.
- When stopping temporarily , (e.g . at a traffic
light) the set speed of the windsh ield wipers
i s automatically reduced by one speed.
Cleaning windshield wiper blades
C lea n the windshield wi per blades when they be
gin to leave streaks . Use a soft cloth and glass
cleaner to clean the windshield wiper blades.
.,. Place the windshield wiper arms i n the service
pos ition. Re fer to ¢
page 51.
.,. Lift the wiper arm away from the front window .
A WARNING
-
Dirty windshield wiper blades can impair your
view . Th is can lead to acc idents.
Light s and Vis ion
Replacing windshield wiper blades
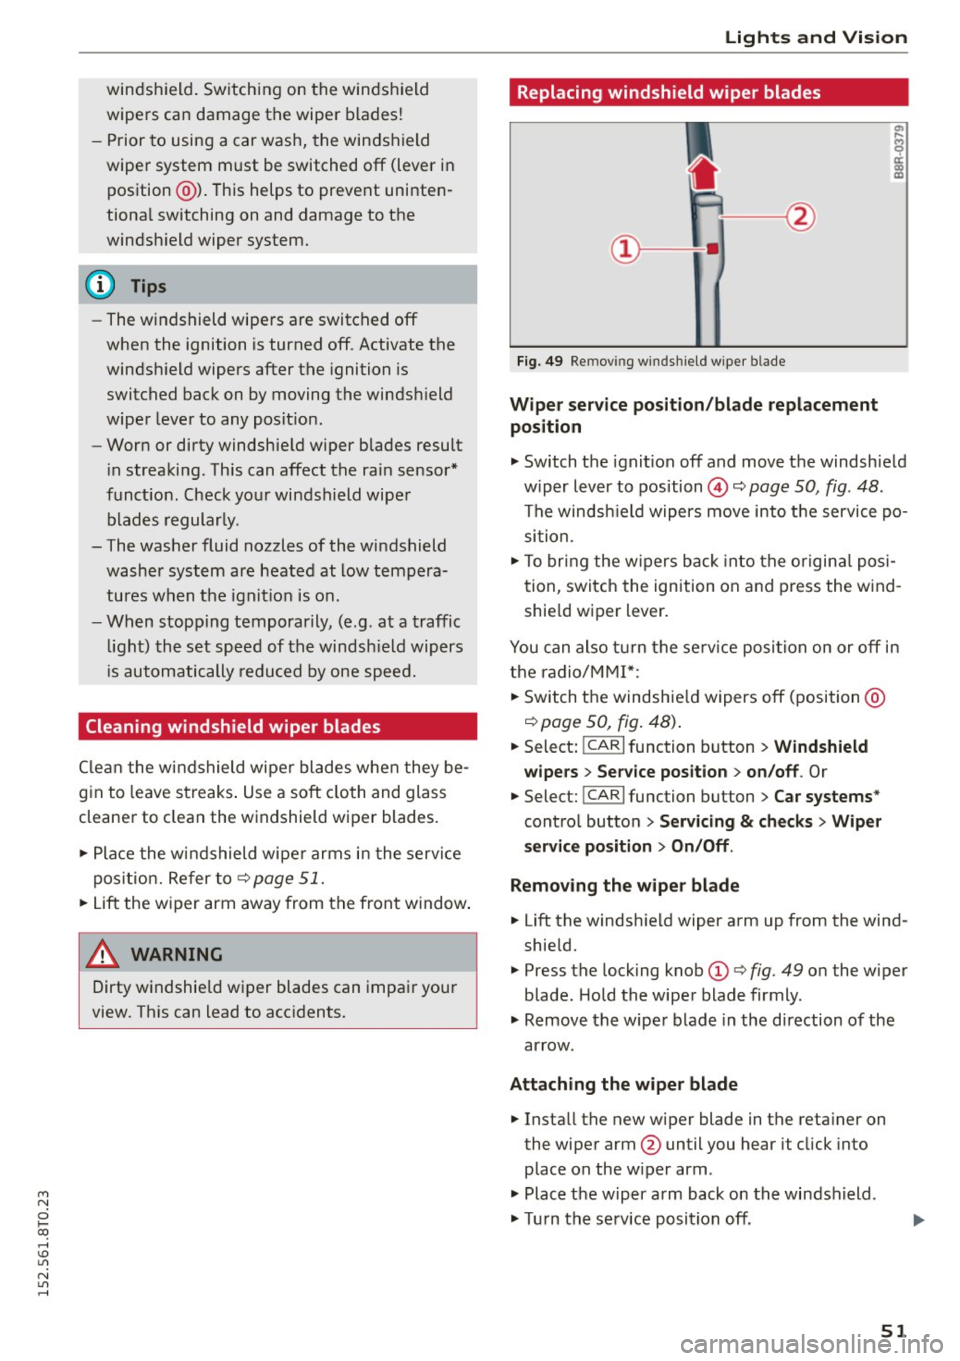
Fig. 49 Re mov ing wi nd sh ie ld wipe r bla de
Wipe r ser vice position /bl ade repl acement
position
.,. Switch the ignit ion off and move the windshield
w iper lever to pos ition @¢
page 50, fig. 48 .
The windsh ield wipers move into the service po
si tion.
.,. To bring the w ipers back into the o rigina l posi
tion , switch the ignition on and press the wind
shie ld wiper l ever .
You can also t urn the se rv ice position on or off in
the radio/MM!*:
.,. Switch the windshie ld wipers off (position @
¢page 50, fig. 48) .
.,. Select: !CAR I function button > Win dshield
wipe rs
> Serv ice po sition > on /off . Or
.,. Select: !CAR I func tion button > C ar systems *
control button
> S erv ici ng & checks > Wip er
s er vice po sition
> On /Off .
R emoving th e wiper bla d e
.,. Lift the windshie ld wiper arm up from the wind
shield.
.,. Press the locking knob
(D ¢ fig. 49 on the wiper
blade . Hold the wiper blade firmly .
.,. Remove the wiper blade in the d irection of the
ar row .
Att aching the w ipe r blade
.,. Install the new wiper blade in the reta iner on
the wiper arm @until you hear it click into
place on the w iper arm .
.,. Place the w iper arm back on the windshield.
.,. Turn the se rvice position off .
51
Page 55 of 264
M N
0 loo
rl I.O
"' N
"' rl
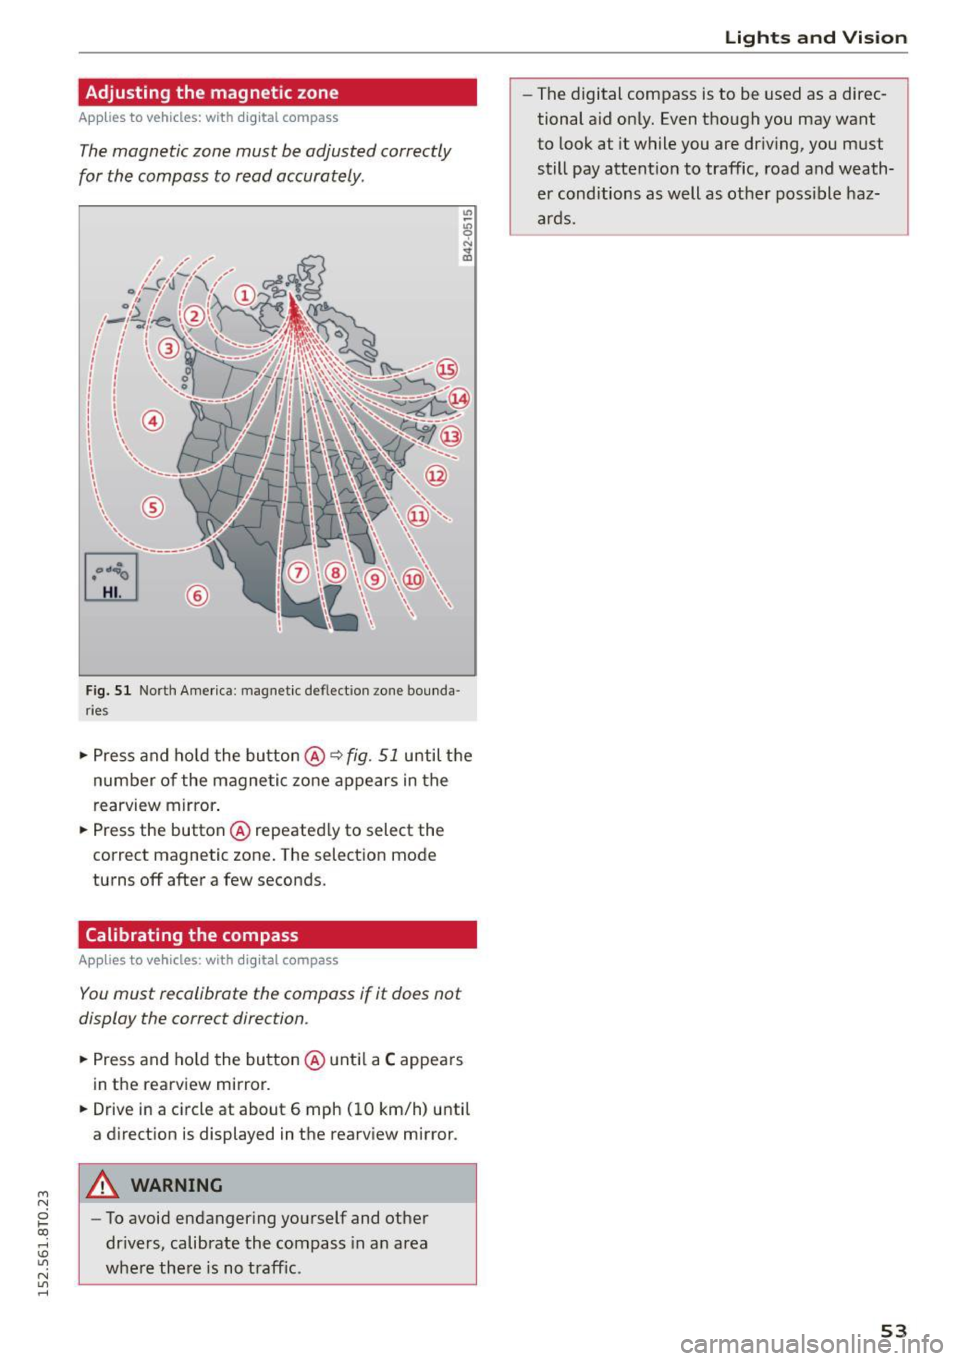
Adjusting the magnetic zone
Applies to vehicles: with digital compass
The magnetic zone must be adjusted correctly
for the compass to read accurately .
®
Fig. 51 North America : magnetic de flect io n zone bounda
r ie s
• Press and ho ld the button @~ fig. 51 until the
number of the magnetic zone appears in the
rearview mirror .
• Press the button @repeatedly to select the
correct magnetic zone. The selection mode
turns off after a few seconds .
Calibrating the compass
Applies to vehicles: with digital compass
You must recalibrate the compass if it does not
display the correct direction .
• Press and hold the button @until a C appears
in the rearview mirror.
• Drive in a circle at about 6 mph (10 km/h) until
a direction is displayed in the rearview mirror .
A WARNING
-To avoid endangering yourself and other
drivers, calibrate the compass in an area
whe re there is no traffic.
Lights and Vision
-The digital compass is to be used as a direc
tional aid only. Even though you may want
to look at it while you are driving, you must
still pay attention to traffic, road and weath
er conditions as well as other poss ible haz
ards.
53
Page 56 of 264
Seat s and storage
Seats and storage
General information
Why is your seat adjustment so important?
The safety belts and the airbag system can only
provide maximum protection if the front seats are correctly adjusted .
There are various ways of adjusting the front
seats to provide safe and comfortable support
for the dr iver and the front passenger . Adjust
your seat properly so that :
- you can easily and quickly reach all the switches
and controls in the instrument panel
- your body is properly supported thus reducing
physical stress and fatigue
- the safety belts and a irbag system can offer
maximum protection
¢ page 129.
In the following sections, you will see exactly
how you can best adjust your seats.
There are special regulat ions and instructions for
installing a child safety seat on the front pas
senger's seat . Always fo llow the information re
garding child safety provided in¢
page 151 ,
Child safety.
_&. WARNING
Refer to¢ page 112, Driving safety for im
portant information, tips, suggestions and
warnings that you should read and follow for
your own safety and the safety of your pas
senge rs.
_&. WARNING
Incorrect seating position of the driver and all
other passengers can resu lt in serious person
al injury.
- Always keep your feet on the floor when the
vehicle is in motion -neve r put your feet on
top of the instr ument pane l, out of the win
dow or on top of the seat cushion. This ap
plies espec ially to the passengers . If your
seat ing position is incorrect, you increase
the risk of injury in the case of sudden brak ing or an accident. If the airbag inflates and
54
the seating position is incorrect, this cou ld
result in personal injury or even death.
- It is important for both the driver and front
passenger to keep a distance of at least
10 inches (25 cm) between themselves and
the steering wheel and/or instrument panel.
If you're sitting any closer than this, the air
bag system cannot protect you properly . In
addition, the front seats and head restraints
must be adjusted to your body height so
that they can give you max imum protect ion.
- Always try to keep as much distance as pos sible between yourself and the steer ing
wheel or instrument pane l.
- Do not adjust the driver's or front passeng
er 's seat while the vehicle is moving. Your
seat may move unexpected ly, causing sud
den loss of vehicle control and persona l in
jury.
If you adjust your seat while the vehicle
is moving, you are out of position.
Driver's seat '
The correct seat position is important for safe
and relaxed driving.
We recommend that you adjust the dr iver's seat
in the following manner:
~ Adjust the seat in fore and aft direction so that
you can easi ly push the pedals to the floor
while keepi ng your knees slightly bent¢ .&,
in
Why is your seat adjustment so important? on
page 54.
~ Adjust the seatback so that when you sit with
your back against the seatback, you can still
grasp the top of the steering wheel.
~ Applies to veh icles with adjustable head re
straints: Adjust the head restraint so the upper
edge is as even as possible with the top of your
head.
If that is not poss ible, try to adjust the
head restra int so that it is as close to this posi
tion as possible ¢
page 57.
_&. WARNING
Never place any objects in the driver's foot
well. An object could get into the pedal area
and interfere with pedal funct ion. In case of
-
Page 61 of 264

M N
0 loo
rl 1.0
"' N
"' rl
In addition to the d river 's seat settings, you can
also store and access the exterior mirror adjust
ment settings* using the remote control key or
memory button.
Remote control key
App lies to vehicles: with seat memory
To assign the driver's seat settings to the remote
control key when locking the veh icle, the funct ion
must be act ivated in the radio or
MM!*
• Select: I CARI function button > Seat adjust·
ment
> Driver's seat > Remote control key >
on .Or
• Select : I CAR I function button > Car sy stem s*
control button > Vehicle settings > Seats >
Driver' s seat > Remot e contro l key > On .
@ Tips
If you do not want anoth er driver's settings to
be assigned to the remote key, sw itc h off the
memory f un ct io n using the radio or MM I* or
the
I O N/OFF I but ton ¢ page 59 .
Memory buttons
Applies to vehicles: with seat memo ry
Fig. 6 0 Driver's door: memory fu nct io n buttons
The memory butto ns are located in the dr iver's
d oor.
Switching the memory function on /off
• Press the ION/O FF I button to switch the memo
ry function on/off . The word
OFF lights up when
the memory function is switched off. Seat p ro·
files are nei ther stored no r r eca lled.
Seats and storage
Storing a seat profile
• Press the ISET I button. Whe n the word SET
lights up, the memory is ready to store set
tings.
• Press a memory button
dil or [II) briefly . A tone
confirms that the settings were stored.
Accessing a seat profile
• If the driver's door is open and the ignition is
sw itched off, press the memory button .
• If the driver's door is closed or the ignition is
switched on, press and hold the memory but
ton unti l the seat adjustment is complete.
A WARNING
- For safety reasons, the seat setting can o nly
be recalled when the veh icle is stationary·
otherwise you risk hav ing an accident.
- In an emergency the recall procedure can be
cancelled by pressing the
I O N/OF F! switch o r
by tappi ng the memory buttons.
Ashtray
Fi g. 6 1 Center console: ashtray
Opening /clo sing
• To open the ashtray, sl ide the cover up
r:!) fig. 61.
• To close the ashtray, press down on the cover.
Emptying the ashtray
• To remove the insert, slide the latch to the right
r:!) fig. 61 -arrow-.
• To insta ll the insert, press it down into the
mou nt.
59
Page 62 of 264
Seats and storag e
_& WARNING
Never put waste paper in the ashtray . Hot
ashes or other hot objects in the ashtray could
set waste paper on fire .
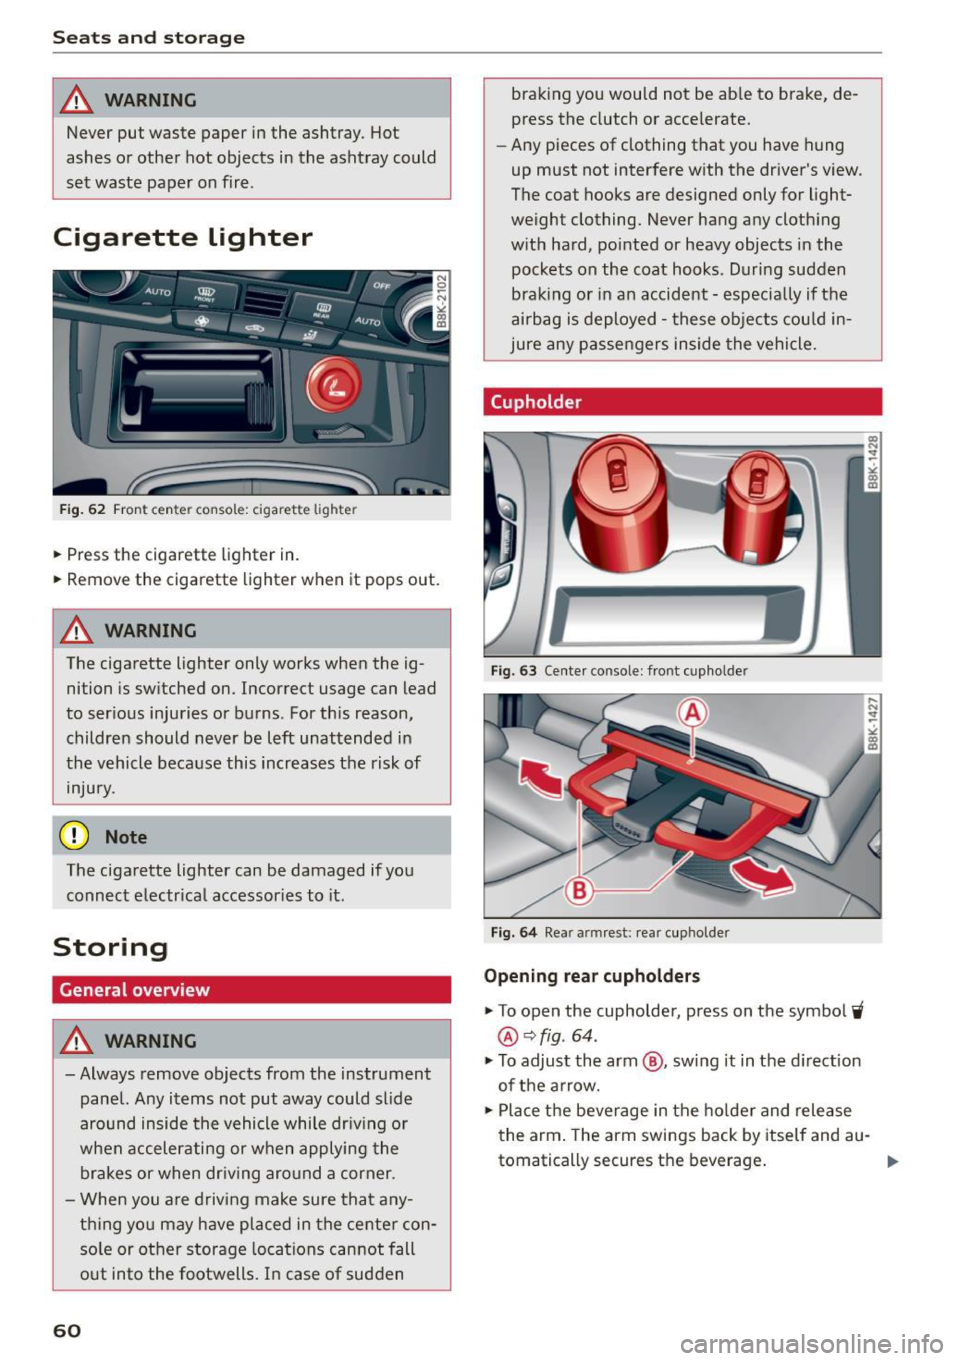
Cigarette Lighter
Fig. 62 Fron t center c onso le: cig arett e lighter
.,. Press the c igarette lighter in .
.,. Remove the cigarette lighter when it pops out .
_& WARNING
The cigarette lighter only works when the ig
nition is sw itched on. Incorrect usage can lead
to ser ious injuries or burns. For this reason,
children should never be left unattended in
the vehicle because this increases the risk of
injury.
(D Note
The ciga rette lighter can be damaged if you
connect electrical accessories to it .
Storing
General overview
_& WARNING
- Always remove objects from the instrument
panel. Any items not put away could slide
around inside the vehicle while dr iv ing or
when accelerating or when applying the brakes or when dr iv ing aro und a corner .
- When you a re driv ing make sure that a ny
thing yo u may have placed in the ce nter con
so le or ot her storage locations can not fall
o ut into the footwells. In case of sudden
60
braking you would not be ab le to brake, de
press the clutch or accelerate.
- Any pieces of clothing that you have hung
up must not interfere with the driver's view .
The coat hooks are designed only for light
weigh t clothing. Never hang any cloth ing
w ith ha rd, pointed or heavy objects in the
pockets on the coat hooks. During sudden
braking or in an accident -espec ially if the
airbag is deployed -these objects cou ld in
jure any p assengers inside the vehicle.
Cupholder
F ig. 63 Center co nsole: front cup holde r
Fig. 6 4 Rea r arm rest: rear cuphol der
Opening re ar cupholders
.,. To open the cupholder, press on the symbol~
®Qfig . 64 .
.,. To adjust the arm @, sw ing it in the d irection
of the a rrow.
.,. Place the beverage in the ho lder and release
the arm . The arm sw ings back by itself and au-
tomatically secures the beverage .
Ill>-
Page 64 of 264
Seats and storag e
The coat hooks are des igned only for light
weight cloth ing . Never hang any clothing
with hard, pointed or heavy objects in the
pockets on the coat hooks . During sudden
braking or in an acc ident -especially if the
airbag is deployed -these objects could in
jure any passenge rs ins ide the veh icle.
- T o reduce the r isk of persona l injury in an ac
cident or sudden stop, always keep the
glove compartment closed while dr iv ing .
- Read and follow all WARNINGS
9 page 147, Important safety instructions
on the side airbag system.
- Hang clothes in such a way that they do not
impa ir the d river's vision.
- The coat hooks must only be used for light
weight clot hing . Do not leave any heavy o r
sharp edged objects in the pockets which may in terfere with the side curtain airbag
deployment and can cause personal injury in
a cras h.
- Do not use coat hangers for hanging cloth
ing on the coat hooks as this can interfere
with proper deployment of the side c urtain
airbags in an accident.
- Do not hang heavy objects on the coat
hooks, as they could cause personal injury in
a sudden stop.
- Always keep the compartment above the
rearview mirror closed while dr iving to re
duce the r isk of injury in the event of sudden
braking maneuvers or a collision .
(D Note
Objects located on the rear shelf that rub
against the rear window could damage the
heating wires for the rear window defogger.
(D Tips
- A vent slot is located between the shelf and
the rear window. Do not b lock the
vent with
any items you may place on the rear window
shelf.
- Do not place bulky items on the rear w indow
shelf as they could restrict or b lock the driv
er 's vision in the rear view m irror.
62
Roof rack
Description and mounting locations
Additional cargo can be carried with a roof lug
gage rack .
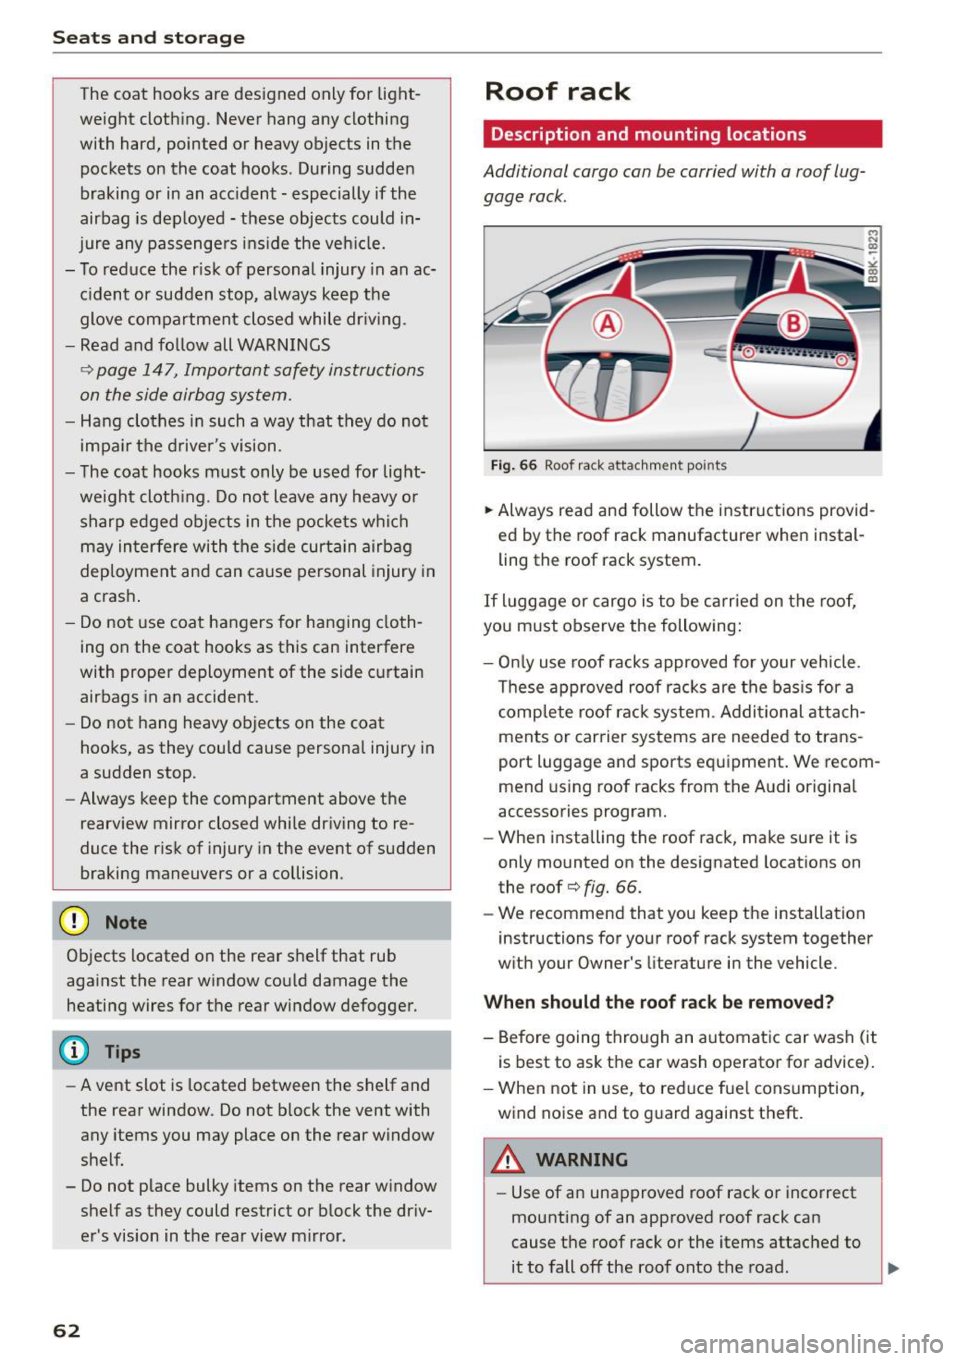
Fig. 66 Roof ra ck attachm en t po ints
.. Always read and follow the instructions provid
ed by the roof rack manufacturer when instal
ling the roof rack system .
If luggage or cargo is to be carr ied on the roof,
you must observe the following:
- Onl y use roof racks approved for your vehicle .
T hese approved roof racks are the bas is for a
comp le te roof rack system . Addi tional attach
ments or carrier systems are needed to trans
port luggage and sports equipment. We recom
mend using roof racks from the Aud i origina l
accessories program.
- When installing the roof rack, make sure it is
only mounted on the designated locations on
the roof
c:> fig. 66.
- We recommend that you keep the installation
instructions for your roof rack system together
w ith your Owner 's litera ture in the vehicle.
When should the roof rack be r em oved?
- Before going through an automatic car wash (it
is best to ask the car wash operator for advice).
- When not in use, to reduce fue l consumption,
wind noise and to guard against theft .
A WARNING
-Use of an unapproved roof rack or incorrect
mounting of an approved roof rack can
cause the roof rack or the items attached to
it to fall off the roof onto the road .
~