display AUDI A5 CABRIOLET 2015 Owner's Manual
[x] Cancel search | Manufacturer: AUDI, Model Year: 2015, Model line: A5 CABRIOLET, Model: AUDI A5 CABRIOLET 2015Pages: 268, PDF Size: 66.88 MB
Page 54 of 268
Lights and Vision
The coming home and leaving home functions
only operate when it is dark and the light switch
is in the AUTO position ¢
page 50, fig. 54.
Auto headlights*
When the light switch is in the AUTO¢ page 50
position, the switch-on point of the lights can be
changed in the automatic driving light function.
Daytime running lights
USA models:
You can switch the daytime running
lights
on and off.
Canada models:
The function cannot be turned
off. It is activated automatically each time the ig
nition is switched on.
Travel mode*
The headlight beam is asymmetrical. This pro
vides stronger illumination on the side of the
road on which you are driving. If you are driving
in a country that drives on the opposite side of
the road from your own country, this will cause
glare for oncoming drivers. To prevent glare:
- Travel mode must be selected in vehicles with
Xenon headlights* .
- In vehicles with halogen headlights, certain
areas of the headlight lenses must be covered
with waterproof adhesive covers that prevent light from passing through. For more informa
tion, please see your authorized Audi dealer or authorized repair facility.
When travel mode is activated, a display in
the driver information system indicates this
each time you switch the ignition on.
52
Emergency flashers
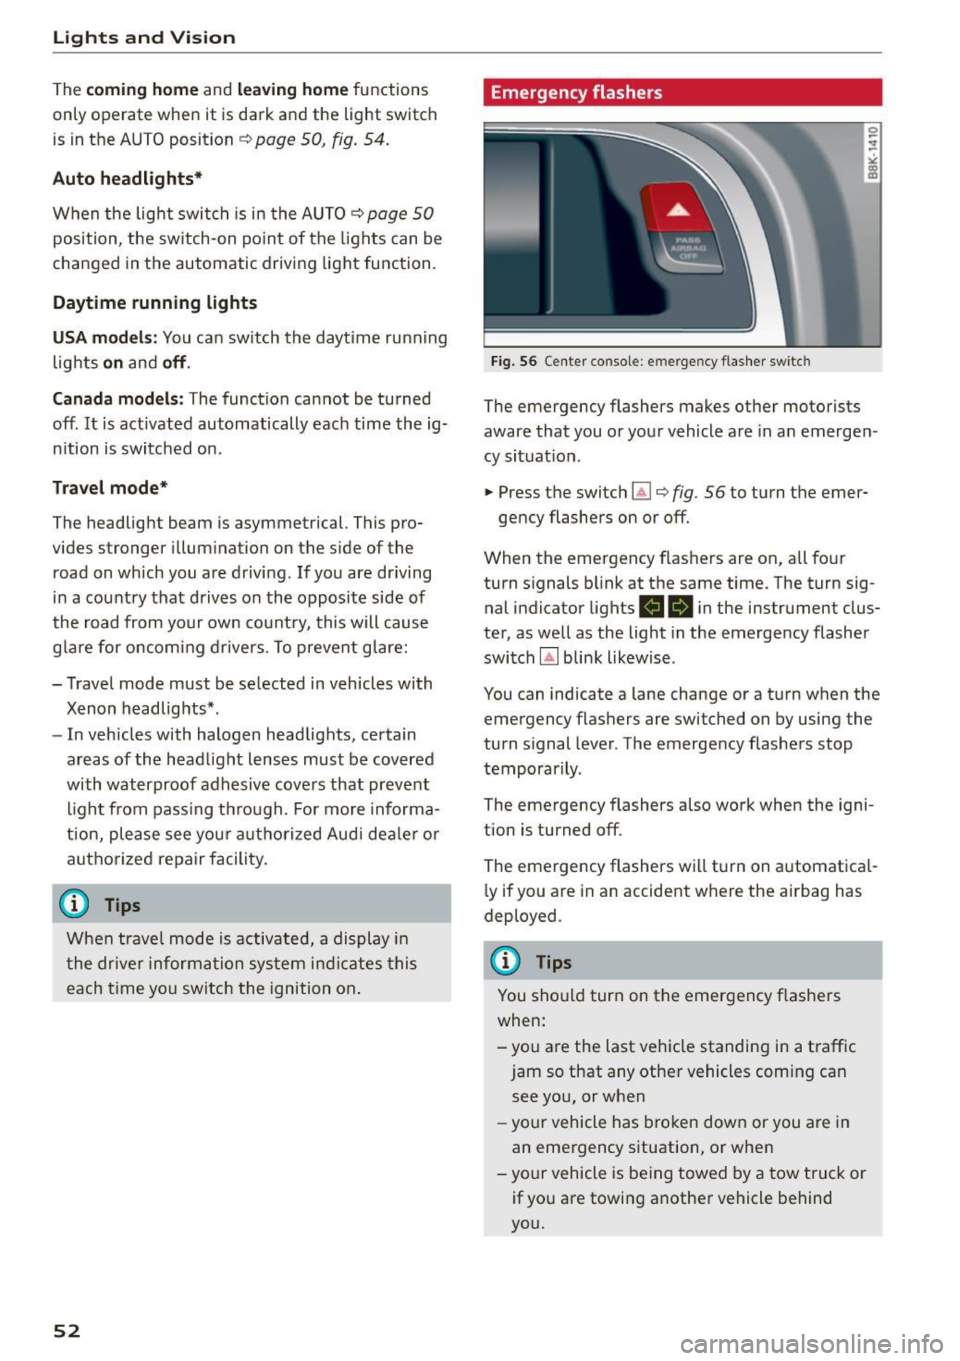
Fig. 56 Center console: emer gency flasher switch
The emergency flashers makes other motorists
aware that you or your vehicle are in an emergen
cy situation .
.. Press the switch ~¢
fig. 56 to t urn the emer-
gency flashers on or off.
When the emergency flashers are on, all four
turn signals blink at the same time. The turn sig
nal indicator lights
RB in the instrument clus
ter, as well as the light in the emergency flasher
switch
IA] blink likewise .
You can indicate a lane change or a turn when the
emergency flashers are switched on by using the
turn signal lever . The emergency flashers stop
temporarily .
The emergency flashers also work when the igni
tion is turned off.
The emergency flashers will turn on automatical
ly if you are in an accident where the airbag has
deployed.
@ Tips
You should turn on the emergency flashers
when:
-you are the last vehicle standing in a traffic
jam so that any other vehicles coming can see you, or when
- your vehicle has broken down or you are in
an emergency situation, or when
-your vehicle is being towed by a tow truck or
if you are towing another vehicle behind
you.
Page 55 of 268
M N
ci LL co
rl I.O
"' N
"' rl
Interior lighting
Front/rear interior lights
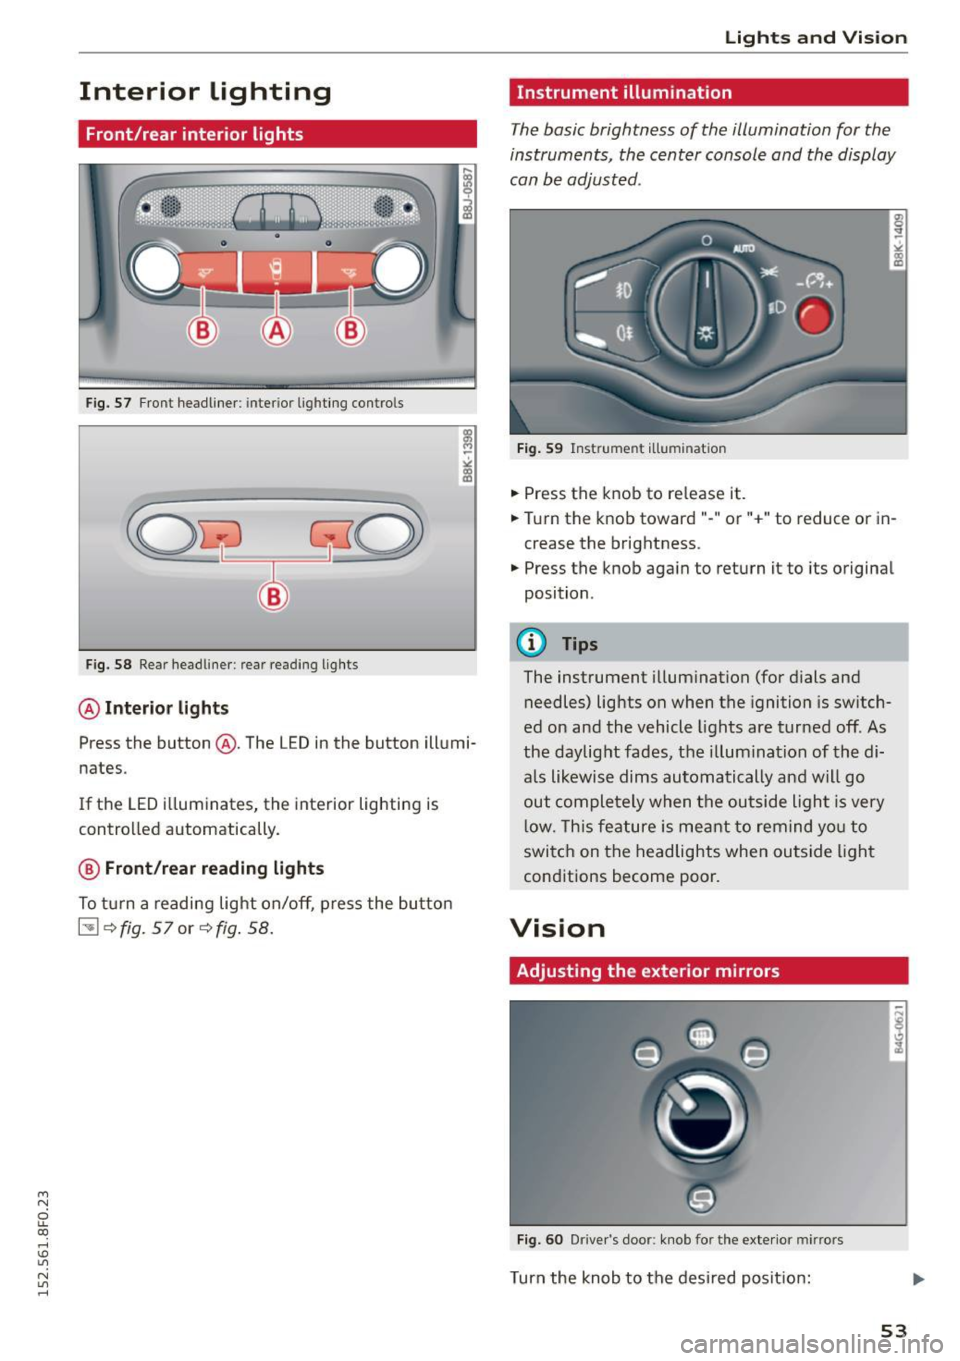
Fig. 57 Fr ont headliner : interio r ligh ting contro ls
F ig. 58 Rear headliner: rea r reading lig hts
@ Interior lights
Press the button @. The LED in the button illumi
nates.
If the LED i lluminates, the interior lighting is
controlled automatically.
@ Front/rear reading lights
To tu rn a reading light on/off, p ress the bu tton
[!] ~fig. Sl or~fig . 58.
Lights and Vis ion
Instrument illumination
The basic brightness of the illumination for the
instruments, the center console and the display
can be adjusted .
Fig . 59 Inst rume nt illumination
• Press the knob to re lease it .
.. Tu rn the knob toward"-" or "+" to reduce or in
crease the brightness.
• Press the knob again to return it to its original
position .
@ Tips
The instrument illum ination (for d ials and
needles) lights on when the ignition is sw itch
ed on and the vehicle lights are tur ned off. As
the daylig ht fades, the illum ination of the di
a ls likewise dims automatically and will go
out comple tely when the out side ligh t is very
l ow. Th is fe ature is meant to remind yo u to
swi tch on the headlights when ou tside light
cond itions become poor.
Vision
Adjusting the exterior mirrors
Fi g. 60 Drive r's door : knob for the exte rio r mirrors
Turn the knob to the desired posit ion:
53
Page 60 of 268
Lights and Vi sion
Adjusting the magnetic zone
Applies to vehicles: with digital compass
The magnetic zone must be adjusted correctly
for the compass to read accurately .
~
LIU ®
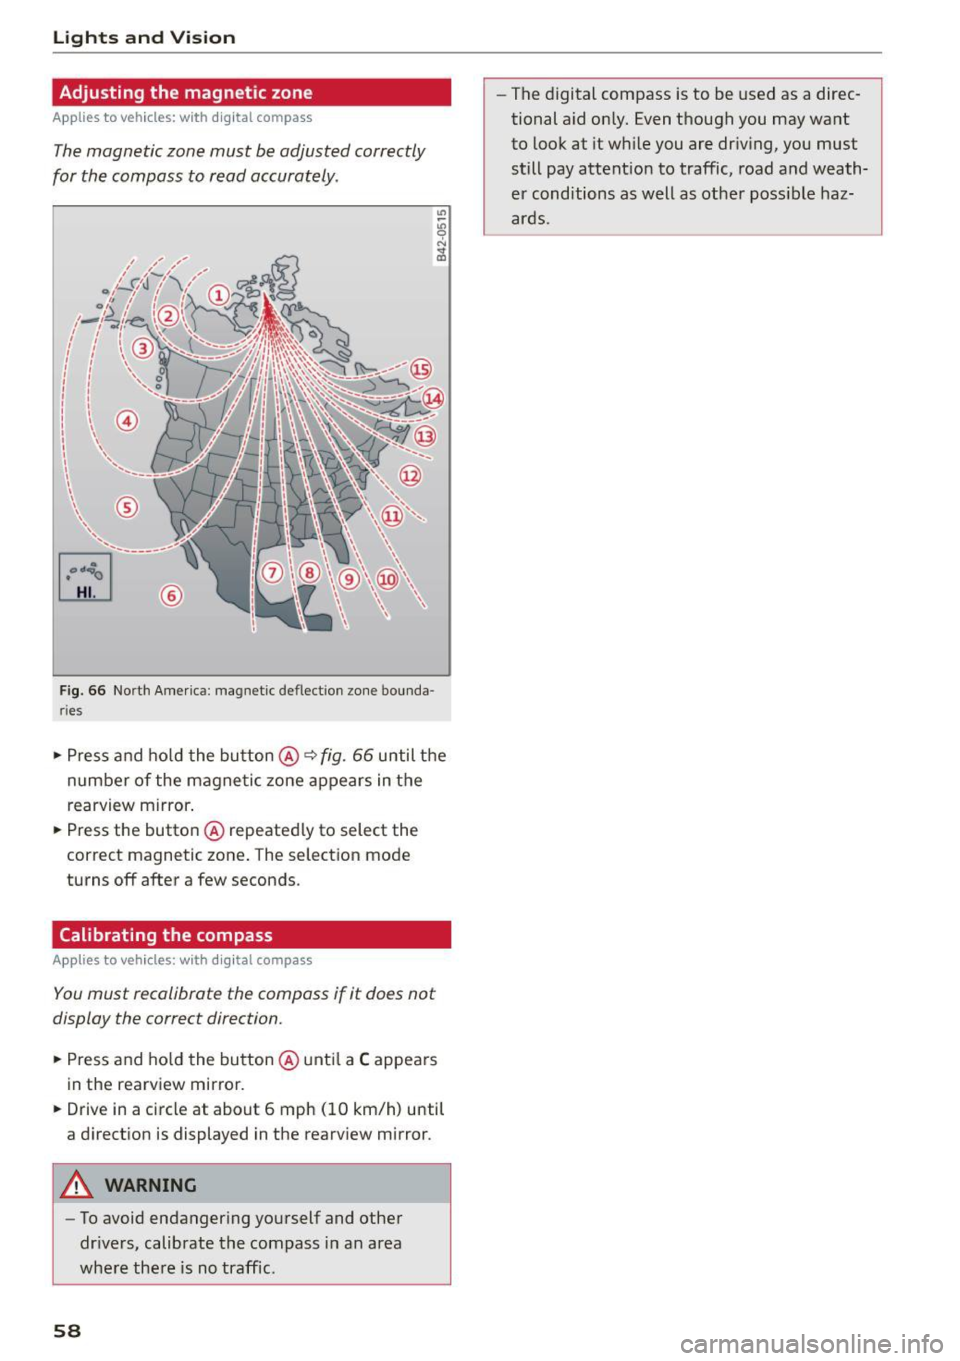
Fig . 6 6 No rth A meri ca: magnet ic deflection zo ne bo unda
ri es
"' Press a nd ho ld the button @~ fig. 66 until the
number of the magne tic zone ap pears in the
rearview mirror .
"' Press the butto n @ repeated ly to select the
correct magnetic zone . The selection mode
turns off after a few seconds.
Calibrating the compass
Applies to vehicles: w ith d ig ital compass
You must recalibrate the compass if it does not
display the correct direction.
"'Press and ho ld the bu tton @unt il a C appea rs
in the rearview mirror.
"' Drive in a circle at about 6 mph (10 km/h) until
a direct ion is displayed in the rearv iew m irror .
A WARNING
-To avoid endanger ing yo urself and othe r
dr ivers, calibrate the compass i n an area
whe re the re is no traffic.
58
- The digital compass is to be used as a direc
tional a id on ly. Even though you may want
to look at it wh ile you are dr iv ing, you must
still pay attent io n to traffic, road a nd weath
er cond itions as well as other poss ible haz
ar ds.
Page 71 of 268

Warm and cold
Operation
We recommend pressing the !AUTO I button and setting the temperature to 72 °F (22 °C).
Fig. 83 Automatic cl imate control system: control
Fig. 84 3-zone del ux e automatic climate controt•: controls
Press the buttons to turn the functio ns on or off.
Use the dials to adjust the temperature, the
b lower speed and the air distrib ution . The LED in
a button will light up when the function is
switched on. The settings are displayed for a few
seconds in the radio or MMI* display.
In vehicles with a 3-zone del uxe automat ic cl i
mate control systems*, the dr iver and front pas
senger side can be adjusted separately. The set·
tings are also disp layed in the climate control
M system display. N
ci LL co
rl I.O
"' N
"' rl
IOFF I Switching the climate control system
on/off
The i OFF i button switches the climate contro l
system on or off. It also sw itches on when you
press the knob. Airflow from outside is blocked
when the climate control system is switched off.
IA/Cl Switching cooling mode on/off
The air is not coo led and humidity is not removed
when cool ing mode is switched off. This can
cause fog on the windows . The cooling mode is
switched off automatically at low outside tern· peratures. .,.
69
Page 82 of 268
Driving
appears in the display . The symbol's appearance
m ight be diff erent in some models.
The speed warning system has two warn ing
thresholds that function independently of each
other and that have somewhat different purpos
es:
Speed warning 1
You ca n use speed wa rning 1 to set the maximum
speed while yo u are driving. This setting w ill re
main in effect unt il you tu rn
off the ignition , as
suming that you have not c hanged or reset the
setting .
The . (USA models) /. (Can ada mode ls)
speed war ning symbol in the wa rni ng
1 display
appears when you exceed the maximum speed.
It
goes o ut when the speed fa lls below the stored
maximum speed.
The speed wa rning symbo l w ill also go out if the
speed
exceeds t he stored maximum speed by
mo re tha n about 25 mp h
(40 km/h) for at least
10 seconds. The stored maximum speed is de let
ed.
Speed warn ing 2
S toring wa rn ing 2 is recommended if you always
want to be reminded of a certain speed, for ex
ample when you are trave ling in a co unt ry that
has a genera l maxim um speed limit, or if you do
not want to exceed a specified speed for w inter
tires .
The . (USA models)
I. (Canada mode ls)
speed warn ing 2 symbo l appears in the disp lay
when yo u exceed the stored speed limit. Unlike
warn ing 1, it will not go out until the veh icle
speed d rops be low the stored speed limit .
Sett ing speed warning 2
c::> page 80.
(D) Tips
Even tho ugh your vehicle is equip ped with a
spee d war ning system, you s ho ul d still watch
the speedometer to make sure you are not
driving faster than t he speed limit.
80
Speed warning 1: setting a speed limit
Warning threshold 1 is set by the ISETI button .
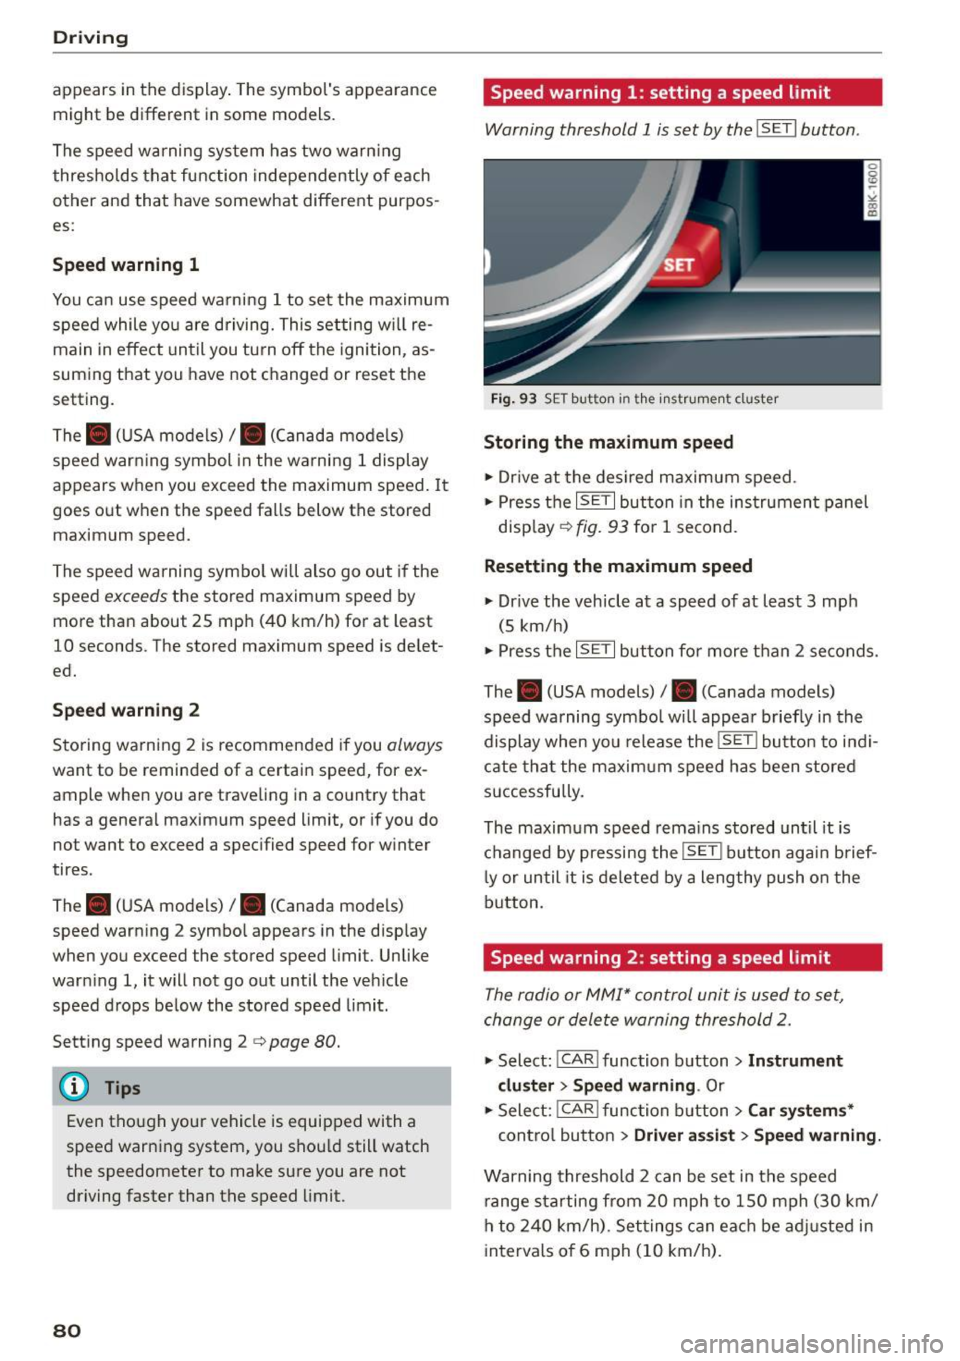
Fig. 9 3 SE T button in the instru men t cl uster
Storing the maximum speed
.,. Dr ive at the desi red maximum s peed .
.,. Press t he
ISE TI but ton in the ins trumen t panel
disp lay ¢
fig. 93 for 1 second .
Resetting the maximum speed
.,. Dr ive the veh icle at a speed of at leas t 3 mph
(5 km/h)
.,. Press the
~ 1s =ET= I button fo r more t han 2 seconds.
The . (USA models)/ . (Canada models)
speed warning symbo l wi ll appea r briefly in the
display when you release the
ISE T! bu tton to i ndi
cate tha t the m axim um speed has been stored
successfully.
The maxim um speed r ema ins stored until it is
c h anged by pressing the
ISE TI b ut ton aga in brief
l y or until it is deleted by a lengthy push o n the
bu tton.
Speed warning 2: setting a speed limit
The radio or MMI* control unit is used to set,
change or dele te warning threshold
2.
.,. Select : ICAR ! function b utton> Instrument
cluster > Speed warning .
Or
.,. Select: I CAR I func tion button > Car sy stem s*
contro l bu tton > Dri ver a ssist> Speed warning.
Warning threshold 2 can be set in the speed
r ange starting from 20 mph to 150 mph (30 km/
h to
2 4 0 km/h) . Se ttings can eac h be ad justed in
intervals o f 6 mph (10 km/h) .
Page 83 of 268
M N
ci LL co
rl I.O
"' N
"' rl
Cruise control system
Switching on
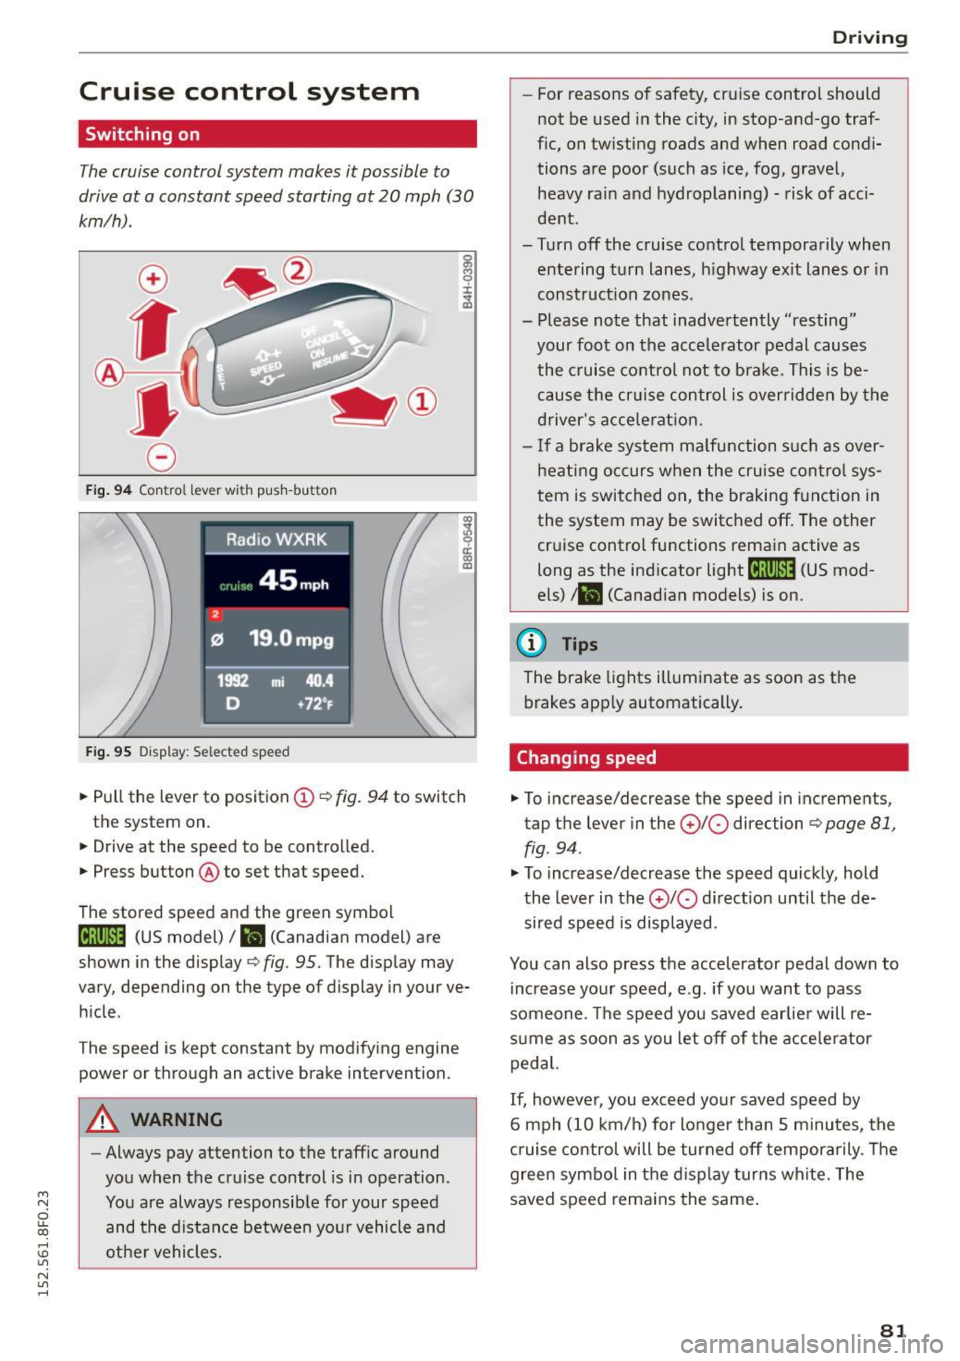
The cruise control system makes it possible to
drive at a constant speed starting at 20 mph (30
km/h) .
0
f
®t
0
Fig. 94 Control lever with push-bu tton
Fig. 95 Display : Selected speed
al M 0 ±
ti
~ 0 er: a,
"'
• Pull the lever to position (D ¢ fig. 94 to switch
the system on.
• Drive at the speed to be controlled.
• Press button @to set that speed.
The stored speed and the green symbol
[lj;(i )~i4 (US model)/ l'I (Canadian model) are
shown in the display ¢
fig. 95. The display may
vary, depending on the type of display in your ve
hicle .
The speed is kept constant by modifying engine
power or through an active brake intervention.
A WARNING
-Always pay attention to the traffic around
you when the cruise control is in operation.
You are always responsible for your speed and the distance between your vehicle and
other vehicles.
Driving
- For reasons of safety , cruise control should
not be used in the city, in stop-and-go traf
fic, on twisting roads and when road condi
tions are poor (such as ice, fog, gravel, heavy ra in and hydroplaning) - risk of acci
dent .
- Turn off the cruise control temporarily when entering turn lanes , highway exit lanes or in
construction zones.
- Please note that inadvertently "resting" your foot on the accelerator pedal causes
the cruise control not to brake. This is be
cause the cr uise control is overridden by the
driver's accele rat ion.
- If a brake system malfunction such as over
heating occurs when the cruise control sys
tem is switched on, the braking function in
the system may be switched off . The other
cruise control functions remain active as
long as the ind icator
light til;rnM4 (US mod
els)
t l'I (Canadian models) is on.
(D Tips
The brake lights illuminate as soon as the
brakes apply automatically.
Changing speed
• To increase/decrease the speed in incremen ts,
tap the lever in the
(£)10 direction ¢ page 81,
fig . 94 .
"'To increase/decrease the speed quickly, hold
the lever in the
010 direct ion until the de
sired speed is displayed.
You can also press the accelerator pedal down to increase your speed, e.g . if you want to pass
someone . The speed you saved earlier will re
sume as soon as you let off of the accelerator
pedal.
If, however, you exceed your saved speed by
6 mph (10 km/h) for longer than 5 minutes, the
cruise control will be turned off temporarily . T he
green symbo l in the display turns white. The
saved speed remains the same .
81
Page 85 of 268
M N
ci u.. co ,...., \!) 1.1'1
N 1.1'1 ,....,
Automatic transmission
multitronic, S tronic,
tiptronic
Introduction
Appl ies to vehicles: with multitronic/5 tronic/tiptronic
The automatic transmission is controlled elec
tronically. The transmission upshifts or down
shifts automatically depending on which drive
program is se lected.
When a
moderate driving style is used, the
transmission selects the most economica l driving
mode. It will then change up early and delay the
downshifts to give better fuel economy .
The transmission switches to a sporty mode after
a kick-down or when the driver uses a
sporty driv
ing style
characterized by quick accelerator pedal
movements, heavy acceleration, frequent
changes in speed and traveling at the maximum
speed .
If desired, the driver can also se lect the gears
manually (tiptronic mode) q page 83.
Various automatic transmissions may be instal
led, depending on the model:
multitronic transmission
The multitronic transmission is a continuously
variable transmission. Power is transferred using
a mu ltidisk clutch. In contrast to conventional
automatic transmissions using shifting opera
tions, the transmission ratio in the continuously
variable transmission is changed continuous ly.
This optimi zes the comfort level and conserves
fuel.
S tronic transmission
The 5 tronic is a dual-clutch transmission. Power
is transferred using two clutches that work inde
pendently from one another. They replace the
torque converter used in conventional automatic
transmissions and allow the vehicle to accelerate
without a noticeable interruption in traction .
tiptronic transmission
In the tiptronic transmission, power is transfer
red by a torque converter.
Automatic transmission
Selector lever positions
Applies to vehicles: with multitronic/S tronic/tiptronic
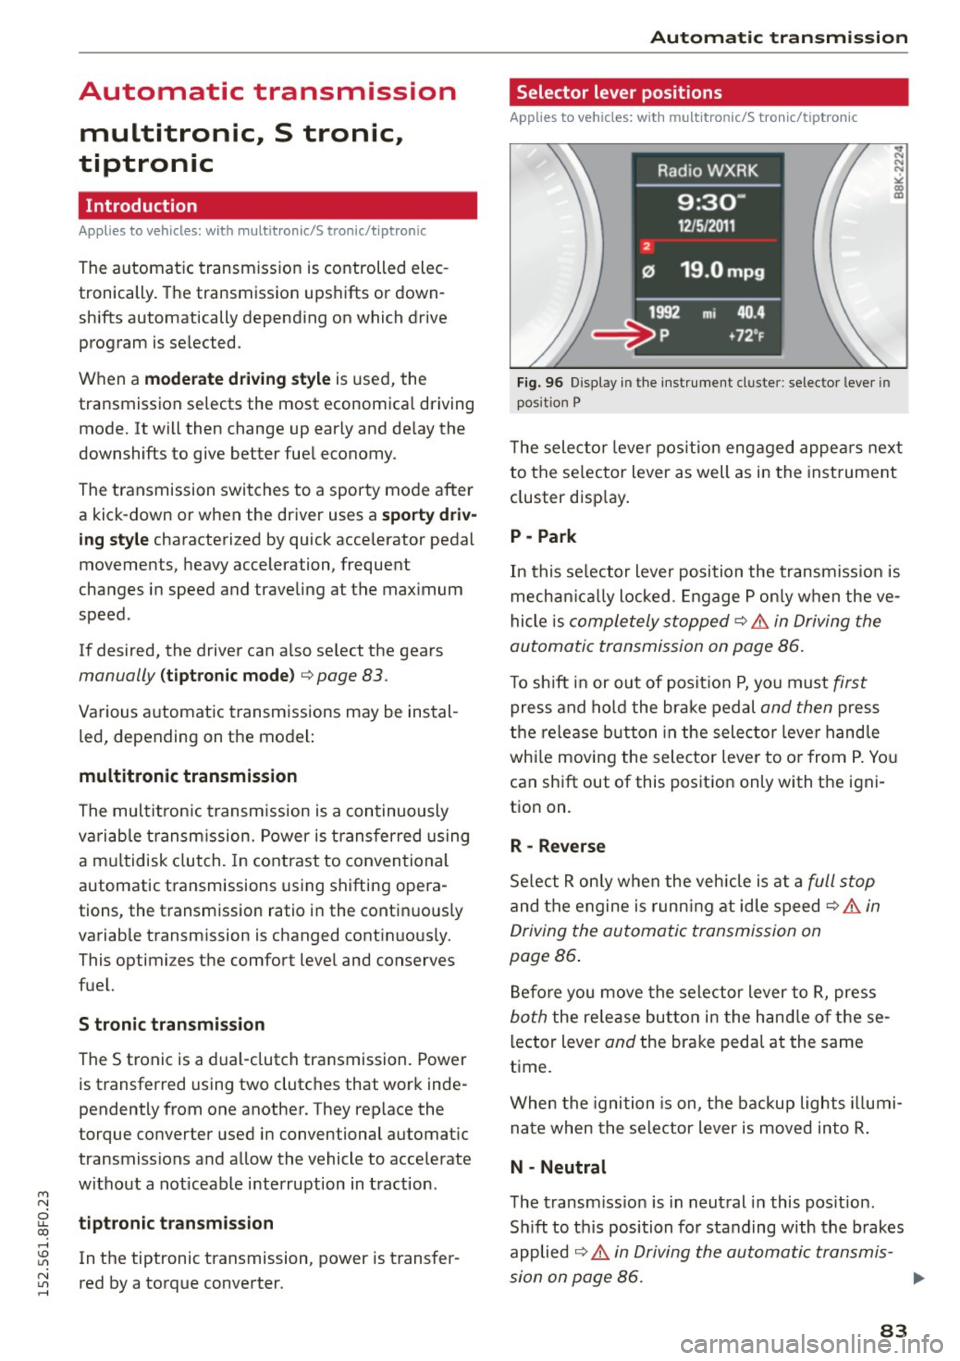
Fig. 96 Disp lay in the instrument cluster: selec tor lever in
position P
T he selector lever position engaged appears next
to the se lector lever as well as in the instrument
cluster display.
P -Park
In this se lector lever position the transmission is
mechanically locked . Engage P only when the ve
hicle is
completely stopped~.&. in Driving the
automatic transmission on page 86.
To shift in or out of posit ion P, you must first
press and hold the brake pedal and then press
the release button in the selector leve r handle
whi le moving the selector lever to or from P. You
can shift out of this position only with the igni
tion on.
R - Reverse
Select R only when the vehicle is at a full stop
and the engine is running at idle speed~ .&. in
Driving the automatic transmission on
page 86 .
Before you move the selector lever to R, press
both the release button in the hand le of these
lector lever
and the brake pedal at the same
time .
When the ignition is on, the backup lights illumi
nate when the selector lever is moved into R.
N -Neutral
The transmission is in neutral in this position .
Sh ift to this position for standing with the brakes
applied
~ .&. in Driving the automatic transmis-
sion on page 86. .,.
83
Page 86 of 268

Automatic transmission
When the vehicle is stationary or at speeds below
1 mph (2 km/h), you must always apply the foot
brake before and while moving the lever out of N.
DIS -Normal position for driving forward
In the D/S position, the transmission can be oper
ated either in the normal mode Dor in the sport
mode S . To select the sport mode S, pull these
lector lever back brief ly. Pulling the lever back
again will se lect the normal mode D . The inst ru
ment cluster display shows the selected driving
mode.
In the
normal mode D , the transmission auto
matically selects the suitable gear ratio . It de
pends on engine load, vehicle speed and driving
style.
Select the
sport mode S for sporty driving. The
vehicle makes full use of the engine 's power .
Shifting may become noticeable when accelerat
ing.
When the vehicle is stationary or at speeds below 1 mph (2 km/h), you must a lways apply the foot
brake before and while moving the lever to D/S
out of N.
A WARNING
Read and follow all WARNINGS¢.&. in Driv
ing the automatic transmission on
page 86.
(D Note
Coast ing downh ill with the transmission in N
and the engine not running will result in dam
age to the automatic transmission and possi
bly the catalytic converter.
@ Tips
- On vehicles with drive select* , you can ad
just the sporty sh ift characteristics in the
Dynamic driving mode .Swill appear in the
instrument cluster display instead of D.
-If you accidentally select N while driving,
take you r foot off the accelerator pedal im
mediately and wait for the engine to slow
down to idle before selecting D/S.
84
-If there is a power fai lure, the selector lever
wi ll not move out of the P position. The
emergency release can be used if this hap
pens ¢
page 89.
Automatic Shift Lock (ASL)
Applies to vehicles: with mult itronic/5 tronic/tiptron ic
The Automatic Shift Lock safeguards you against
occidentally shifting into a forward or the re
verse gear and causing the vehicle to move unin
tentionally.
Fig. 97 Sh ift gate: se lector lever lock pos it ions and re lease
button high lig hted
The selector lever lock is released as follows:
.,. Turn the ignition on.
.,. Step on the brake pedal.
At the some time
press and hold the release button on the side of
the gear selector knob¢
fig. 97 with your
thumb until you have moved the selector lever
to the desired position .
Automatic selector lever lock
The selector lever is locked in the P and N posi
tions when the ignition is turned on . You must
press the brake pedal and the release button to
select another posit ion. As a reminder to the
driver, the following warning appears in the in
strument cluster display when the selector is in P
and N:
When stationary apply brake pedal while select
ing gear
The Automatic Shift Lock only functions when the
vehicle is stat ionary or at speeds below 1 mph
(2 km/h).
Page 89 of 268
M N
ci LL co
rl I.O
"' N
"' rl
Hill descent control switches off once the decline
levels out or you press the accelerator pedal.
On vehicles w ith the cruise control system*
¢ page 81, hill descent control is also activated
when the speed is set.
&,_ WARNING
H ill descent control cannot overcome physical
limitations, so it may not be able to maintain
a constant speed under all conditions. Always
be ready to apply the brakes.
Manual shift program
A ppl ies to vehicles: w ith mul titr onic /S tronic/t iptronic
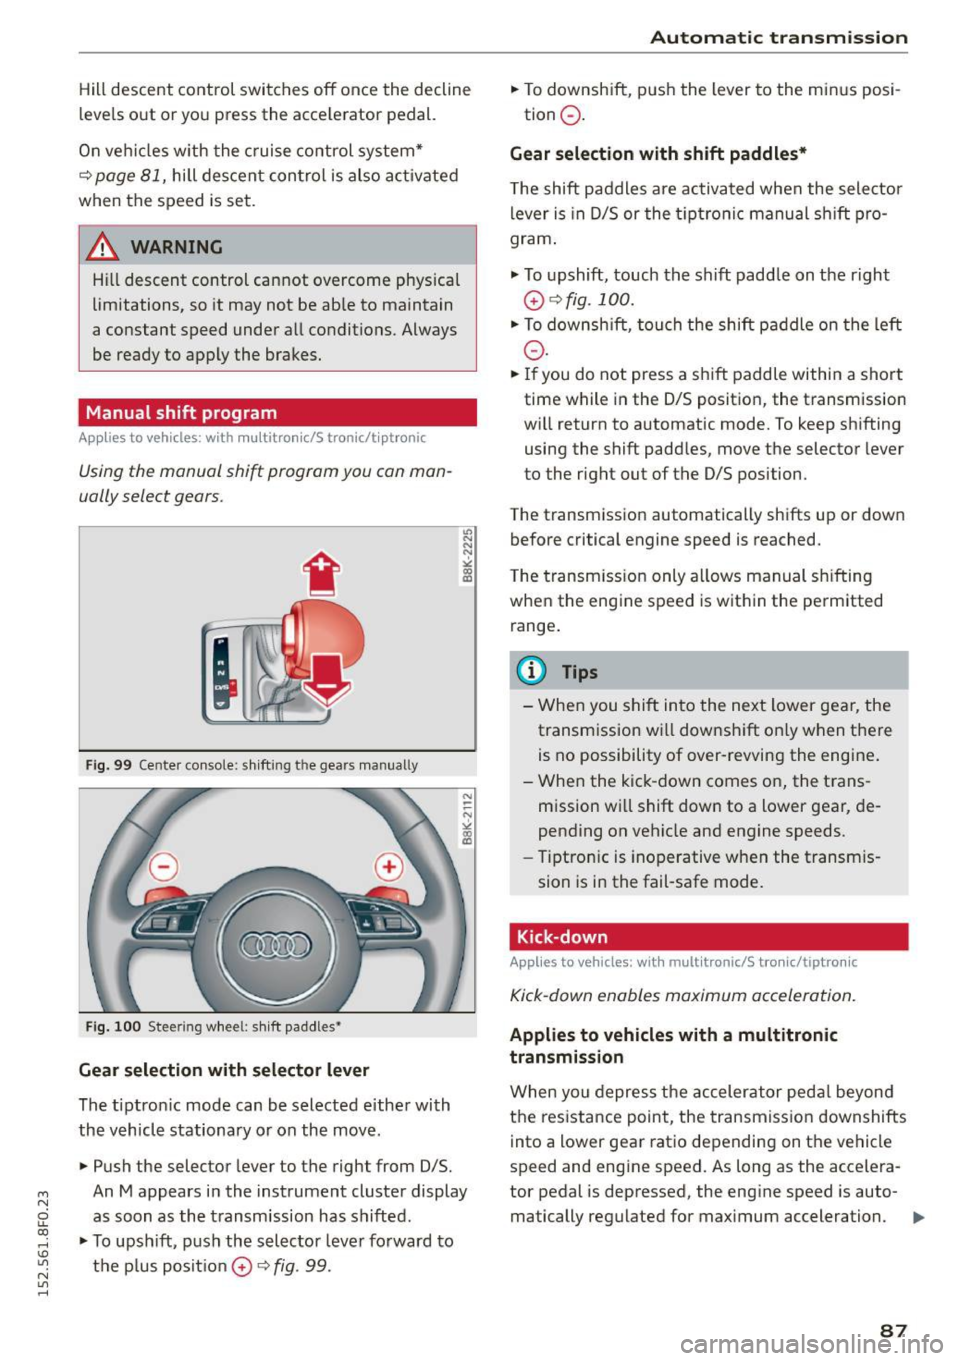
Using the manual shift program you can man
ually select gears.
Fig. 99 Center console: shift ing t he gears manually
Fig. 100 Steer ing wheel : sh ift paddles•
Gear selection with selector lever
The tiptronic mode can be selected either with
the vehicle stationary or on the move.
• Push the selector lever to the right from 0/5.
"' N N N ,.:i
~
An M appears in the instrument cluster display
as soon as the transmission has shifted .
• To upshift, push the selector lever forward to
the plus posit ion
0 ¢ fig . 99.
Automatic transmission
• To downshift, push the lever to the minus posi-
tion
0 .
Gear selection with shift paddles*
The shift paddles are activated when the selector
lever is in D/5 or the tiptronic manual sh ift pro
gram .
.,. To upshift, touch the shift padd le on the right
0 ¢ fig. 100.
• To downshift , touch the shift paddle on the left
0-
• If you do not press a shift paddle within a short
time while in the 0/5 position, the transmission
will return to automatic mode. To keep shifting using the shift paddles, move the selector lever
to the rig ht out of the 0/5 position.
The transmission automatically shifts up or down before critical engine speed is reached.
The transmission only allows manual shifting
when the engine speed is within the permitted
range.
@ Tips
- When you shift into the next lower gear, the
transm ission wi ll downshift on ly when there
is no possibility of over-revving the engine.
- When the kick -down comes on, the trans
mission will shift down to a lower gear, de
pending on vehicle and engine speeds.
- Tiptronic is inoperative when the transm is
sion is in the fail-safe mode.
Kick-down
Applies to vehicles: wit h mult itronic/S tro nic/tiptro nic
Kick-down enables maximum acceleration.
Applies to vehicles with a multitronic
transmission
When you depress the accelerator pedal beyond
the resistance point , the transmission downshifts
into a lower gear ratio depending on the vehicle
speed and engine speed. As long as the accelera
tor pedal is depressed, the engine speed is auto-
matically regulated for maximum acceleration.
1111>-
87
Page 90 of 268

Automatic transmi ssion
Appli es to v ehicle s w ith a S tronic- / tiptronic
t ra nsm ission
When you depress the acce lerator pedal beyond
the resistance po int, the automatic transmiss ion
downshifts into a lower gear, dependi ng o n ve hi
cle speed and engi ne speed. The ups hift into the
next h igher gea r tak es place once the max imum
specified engine speed is r eached.
A WARNING
Please note that the drive whee ls can spin if
kick-down is used on a smooth slippery road -
there is a r is k of s kidding.
Launch Control Program
Applies to vehicles: with S tronic
The Launch Control Program provides the best
acceleration possible when starting from a stop.
Requirement: The engine must be at operating
temperature and the steering wheel must not be
turned.
"' Press the
!.!1 O FF I button ¢ page 171 while the
engine is runn ing . The
II indicator light illumi
nates in the instrument cluste r and
Stabil iza
tion contr ol (ESC ): Sport . Warning ! Restricte d
s tabilit y
appears in the d river informat ion sys
tem display.
"' Move the selecto r lever to the D/S position to
select sport mode (S) or select the
d ynamic
driving mode in drive select * ¢page 104.
"'Press the brake peda l strongly with your left
foot and hold it down for at least 1 second.
"' At the same time, press the accelerator pedal
down completely with your right foot until the
engine reaches and maintains a h igh RPM .
"' Remove your foot from t he brake pedal wit hin 5
seconds¢
& -
A WARNING
-Always adapt you r driving to the traffic flow.
- Only use the La unch Control P rog ram when
road and t ra ffi c condi tions a llow i t and oth
er dr ivers will not be endangered or annoyed
by your driving and the vehicle's accelera
t ion .
88
-Please note that the driving wheels can spin
and the vehicle can b reak away when sport
mode is switched on, espec ially when the
road is slippery.
- Once you have accelerated, you should
sw itch sport mode
off by pressing the
I;-; OFFI button.
(D Tips
- The transmission temperature may increase
signif icant ly after using the Launch Control
Program. If that happens, the program may
not be availab le for a few minutes . It will be
available again after a cool-down per iod .
- When accelerating using the Launch Control
program, a ll vehicle parts are subject to
heavy loads. This can result in increased
wea r.
Transmission malfunction
Applies to vehicles: wi th mul titronic/ 5 tronic/t iptronic
rm Transmi ssion : Pres s brak e pedal and sele ct
gear again.
Press the brake peda l and select the desired se
l ector lever position again. You ca n then cont inue
driv ing.
rm Transmission overh eating : Plea se dri ve con
servativel y.
The transm ission temperature has increased s ig
nificantly due to the sporty driving manner . Drive
i n a less spo rty manne r unt il the temperatu re re
turns to the norma l range and the ind icator light
switches of.
rm Tran smission ma lfun ction: You can continue
driv ing
There is a system malfunct ion in the transmis
s ion. You may conti nue driving. Drive to your au
thorized Audi dea ler or qua lified repa ir facility
soon to have the malfunction corrected.
rm Transmission malfunction: Lim ited d riving
functional ity
There is a system malfunct ion i n the t ransmis-
s ion. The transm ission is switching to emergency
mode. This mode on ly shifts into certain gears or .,.