display AUDI A5 CABRIOLET 2017 User Guide
[x] Cancel search | Manufacturer: AUDI, Model Year: 2017, Model line: A5 CABRIOLET, Model: AUDI A5 CABRIOLET 2017Pages: 266, PDF Size: 66.64 MB
Page 23 of 266
a:,
a:,
...... N
" N ...... 0
0
LL co
Driver information
system
Introduction
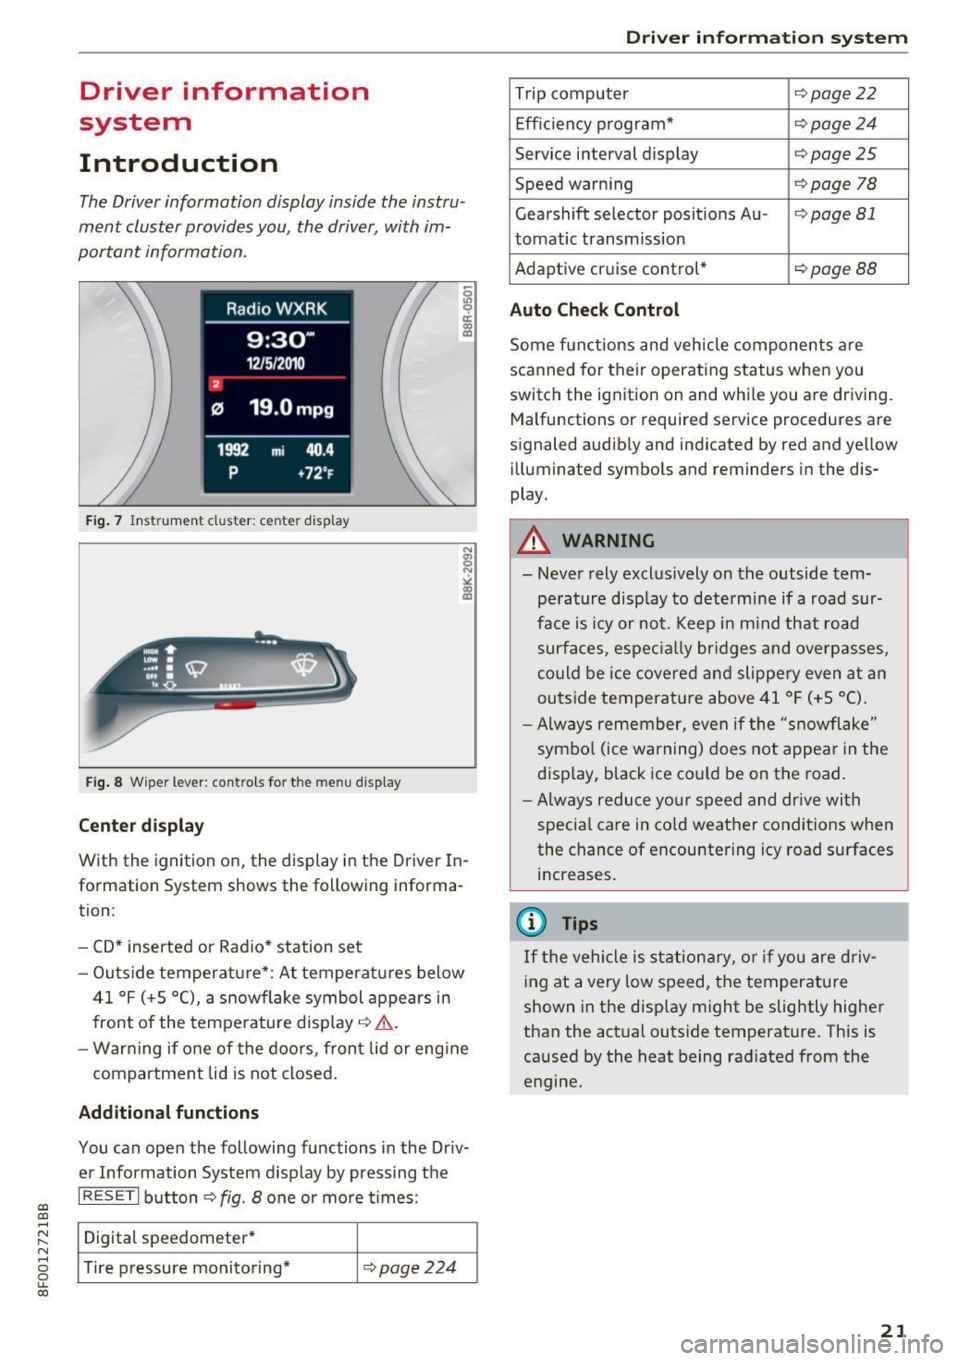
The Driver information display inside the instru
ment cluster provides you, the driver, with im
portant information.
Fig. 7 Instrument cluster: ce nter display
Fig. 8 Wipe r lever: contro ls for the menu display
Center display
With the ignition on, the display in th e Driver In
formation System shows the following informa
tion :
- CD* inserted or Radio* station set
- Outs ide temperature*: At temperatures below
41 °f (+S
0
(), a snowflake symbol appears in
front of the temperature display¢ ,1,. .
- Warning if one of the doors, front lid or engine
compartment lid is not closed.
Additional functions
You can open the following functions in the Driv
er Information System display by pressing the
I RESETI button¢ fig. 8 one or more t imes :
Digital speedometer*
Tire pressure monitoring*
¢pag e224
Driver in forma tion system
Trip computer ¢page22
Efficiency program* ¢page24
Service interval display ¢page25
Speed warning ¢page 78
Gearshift selector posit ions Au -i=>page 81
tomatic transm ission
Adaptive cruise control*
¢ page 88
Auto Check Control
Some functions and vehicle components are
scanned for their operating status when you
switch the ignition on and while you are driving. Malfunctions or required service procedures are
signaled audibly and indicated by red and yellow
illum inated symbols and reminders in the dis
play.
A WARNING
--
- Never rely exclus ively on the outside tem
pe rature display to determine if a road sur
face is icy or not. Keep in m ind that road
surfaces, especially bridges and overpasses,
could be ice covered and slippery even at an
outside temperat ure above 41 °f (+S °C).
- Always remember, even if the "snowflake"
symbol (ice warning) does not appear in the
display, black ice could be on the road.
- Always reduce your speed and dr ive with
specia l care in cold weather conditions when
the chance of encountering icy road surfaces
increases.
(j) Tips
If the vehicle is stationary, or if you are driv
ing at a very low speed, the temperature
shown in the disp lay might be slightly higher
than the actual outside temperature. This is
caused by the heat being radiated from the
engine.
21
Page 24 of 266
Driver information system
On-board computer
Introduction
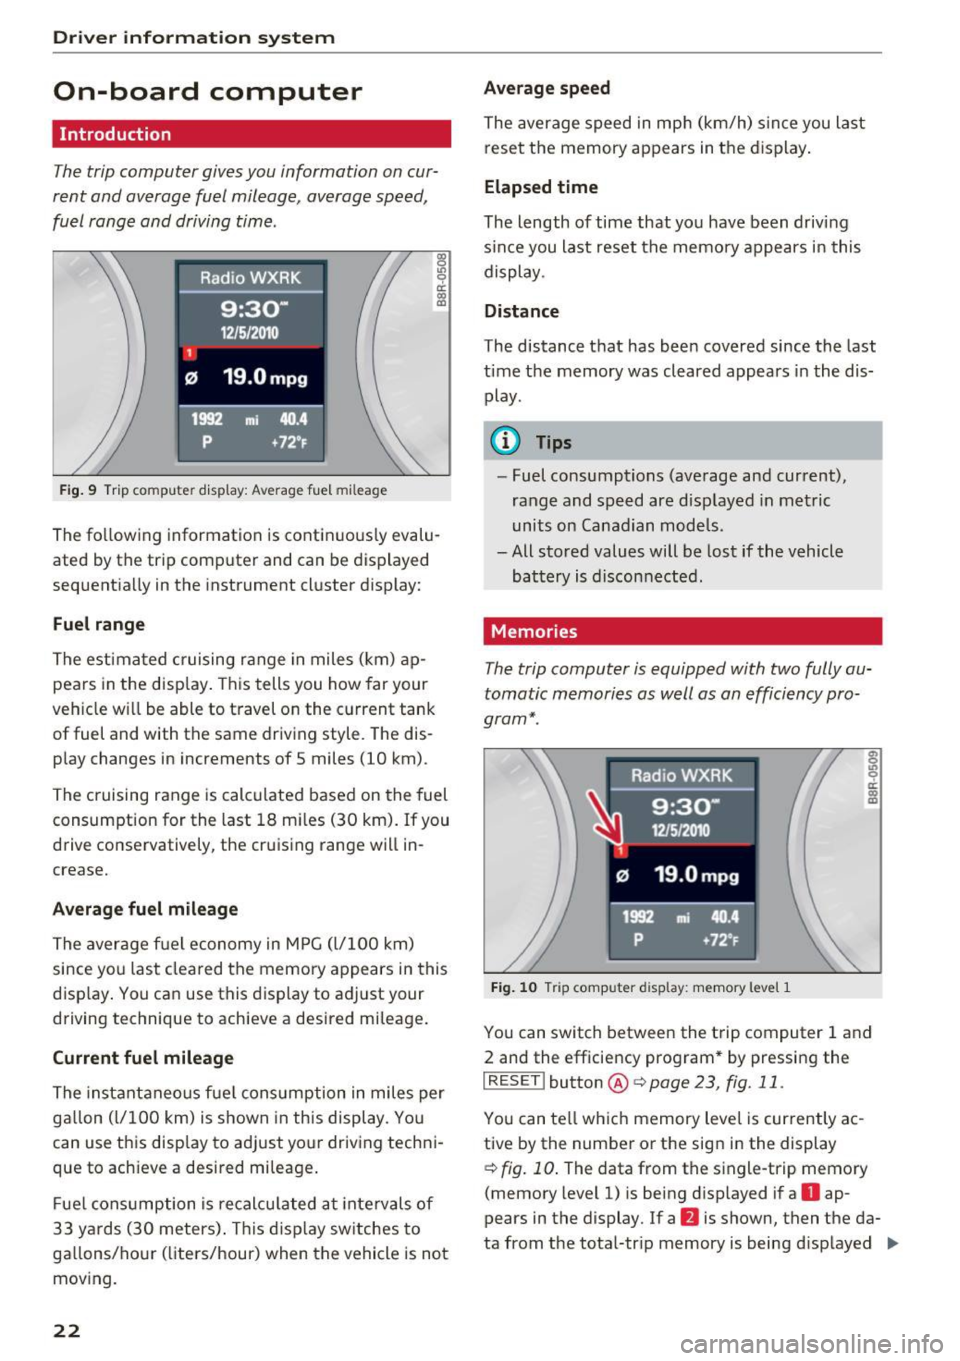
The trip computer gives you information on cur
rent and average fuel mileage, average speed,
fu el range and driving time.
F ig. 9 Tri p computer display: Average fu el mileage
~ 9 a: CX) m
The fo llow ing information is contin uously evalu
ated by the trip computer and can be displayed
sequent ia lly in the instrument cluster display:
Fuel range
The estima ted cruising range i n miles (km) ap
pea rs in the disp lay . Th is tells you how far your
veh icle w ill be able to travel on the c urrent tank
of fuel and with the same driv ing style. The dis
p lay changes in increments of 5 miles (10 km).
T he cruising range is calcu lated based on the fuel
consumption for the last 18 m iles (30 km). If you
drive conse rvatively, the cru is ing range will in
crease.
Average fuel mileage
T he avera ge f uel economy in M PG (l/ 100 k m)
since you last clea red the memory a ppears in this
d isp lay . You can use this display to adj ust your
driving technique to achieve a desired mileage .
Current fuel mileage
The instant aneous f ue l cons umption in miles per
ga llon (l/100 km) is shown in this display. Yo u
can use t his disp lay to adjust yo ur driving techni
que to ach ieve a desired mileage .
F ue l cons umption is recalcu lated at inte rv a ls of
33 y ards ( 30 meters) . T his d isp lay sw itches to
ga llons/ho ur ( liters/hour) when the vehicle is not
mov ing.
22
Average speed
The average s peed in mp h (km /h) s in ce you last
rese t the memory appears in t he d isplay .
Elapsed time
The length of time that yo u have been drivi ng
s ince you la st reset t he memory appears in this
display.
Distance
The distance that has been covered since the last
time the memory was cleared appears in the dis play.
0) Tips
- Fuel consumptio ns (ave rage and current),
range and speed are disp layed in metric
units on Canad ian mode ls.
- All stored values will be lost if the vehicle
bat tery is discon nect ed.
Memories
The trip computer is equipped with two fully au
tomatic memories as well as an efficiency pro
gram*.
Fig. 10 Trip com puter display: memory level 1
You can switch between the t rip computer 1 and
2 and the efficiency program* by pressing the
IRESET I button@c:>page 23, fig. 11.
You can te ll w hich memory leve l is cur rently a c-
tive by the number or the sig n in the display
¢fig. 10. The data from the single-trip memory
(memory leve l 1) is being d isp layed if a
D ap-
pears in the display. If a
fJ is shown, then the da
ta from the tota l-tr ip memory is being d isp layed .,..
Page 25 of 266
a:,
a:,
.... N r--. N .... 0
0
LL 00
(memory level 2). The fuel pump nozzle iii
indicates the efficiency program*¢ page 24.
Single-trip memory (Trip computer 1)
The single-trip memo ry stores the trip informa
tion from the tim e the igni tion is turned on until
it is turned
off. If the tr ip is continued within 2
hours from the time the ignition was turned off,
the new data will be included in the calculation of
the current trip information.
If the trip is inter
rupted for
more than 2 hours the memory is re
set automat ically.
Total -trip memory (Trip computer 2)
Unlike the single-trip memory, the tota l-trip
memory is not reset automatically. This permits
you to evaluate your driving data for the entire
period between manual resets.
Efficiency program*
The efficiency program can help you to use less
fuel¢
page 24.
Operation
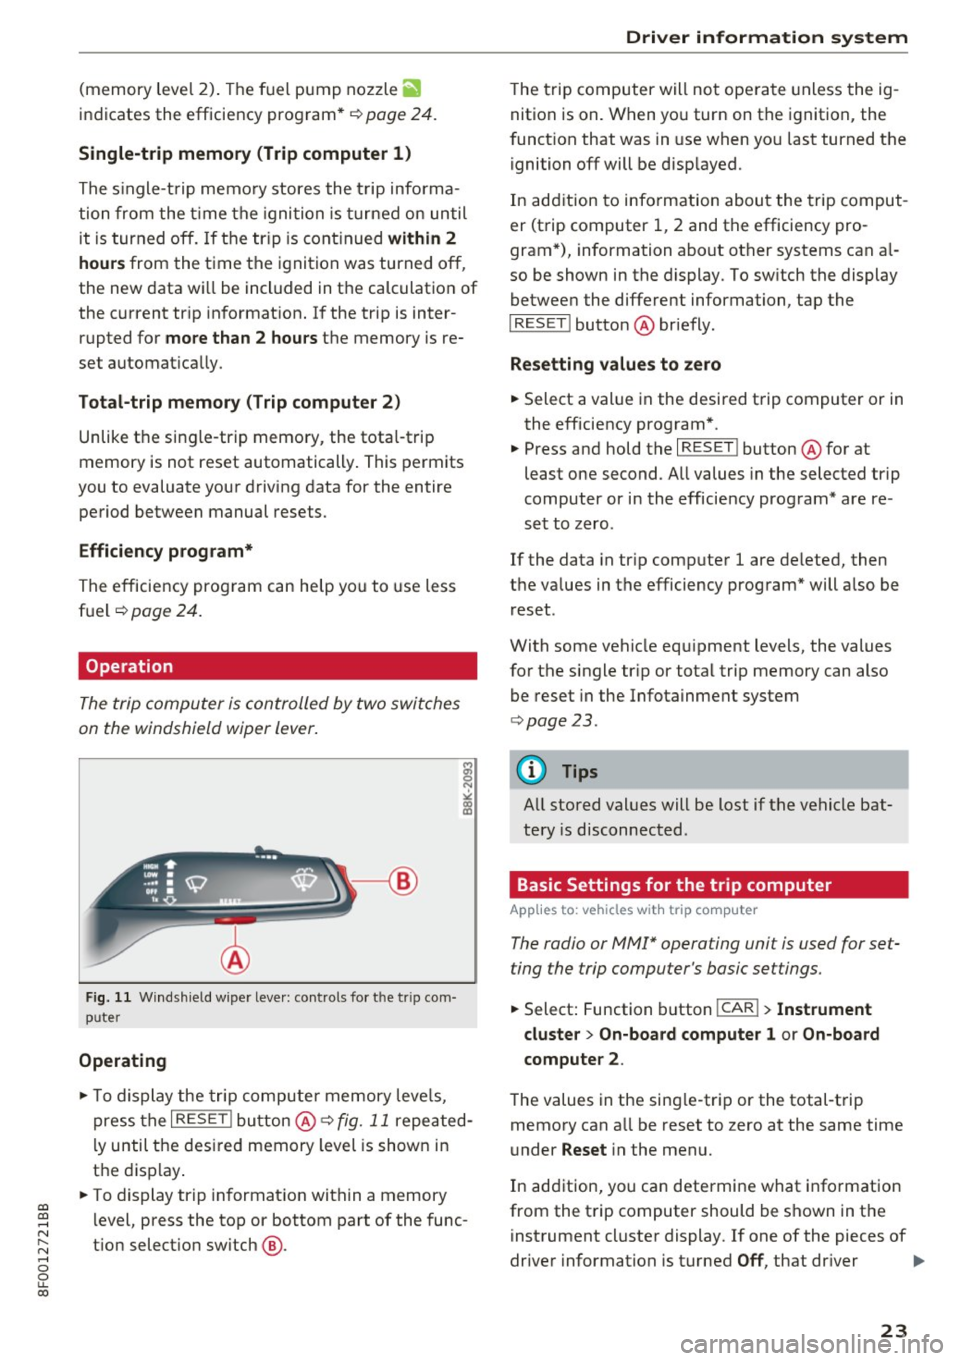
The trip computer is controlled by two switches
on the windshield wiper lever.
Fig. 11 Wind shield w iper leve r: controls fo r th e tr ip com
p u ter
Operating
"'To display the trip computer memory levels,
press the
I RESE T! button @¢ fig. 11 repeated
ly until the desired memory level is shown in
the display.
"' To display trip information within a memory
level, press the top or bottom part of the func
t ion selection switch @.
Driver information system
The trip computer will not operate unless the ig
nition is on. When you turn on the ignition, the
function that was in use when you last turned the
ignition off will be disp layed.
In addition to information about the trip comput
er (trip computer 1, 2 and the efficiency pro
gram*), information about other systems can al
so be shown in the display. To sw itch the display
between the different information, tap the
I RESET ! button@ briefly .
Resetting values to zero
.,. Select a value in the desired trip computer or in
the efficiency program* .
"' Press and hold the
I RESET ! button@ for at
least one second . All values in the selected trip
computer or in the efficiency program* are re
set to zero .
If the data in tr ip computer 1 are deleted, then
the values in the efficiency program* will also be
reset .
With some vehicle eq uipment levels, the values
for the single trip or total trip memory can also
be reset in the Infotainment system
¢page 23.
(D Tips
All stored values will be lost if the vehicle bat
tery is disconnected .
Basic Settings for the trip computer
Applies to: vehicles with trip computer
The radio or MM!* operating unit is used for set
ting the trip computer 's basic settings.
.,. Select: Function button !CAR !> Instrument
cluster
> On-board computer 1 or On-board
computer
2 .
The values in the sing le-trip or the total-trip
memory can all be reset to zero at the same time
under
Reset i n the menu.
In addition, you can determine what information
from the trip computer should be shown in the
instrument cluster display . If one of the pieces of
driver information is turned
Off , that dr iver 1111>
23
Page 26 of 266

Driver information system
information w ill not be shown in the display. The
information will continue to be calculated by the
tr ip computer and can be turned back
On at any
time.
(D Tips
- This function is not avai lable on all vehicles.
- The driving information in the efficiency
program is also reset to zero with the s in
gle-trip memory.
Efficiency program
Description
Applies to: vehicles with trip computer with efficiency pro
gram
F ig . 12 D isplay: eff ici en cy program
.. Press the I RESET I button @¢ page 23, fig. 11
repeatedly until the efficiency program appears
in the disp lay.
The efficiency program can help you to use less
fue l. It evaluates driving information in reference
to fuel consumption and shows other equipment
influencing consumption as well as shift recom
mendations . Fuel economy messages
¢
page 24 prov ide tips for effic ient driving .
The efficiency program uses distance and con sumption data from trip computer
l. If the data
are deleted in the efficiency program, those val
ues are also reset in trip computer
1.
24
Other equipment
Applies to: vehicles with trip computer with efficiency pro
gram
Fig. 13 D isp lay: ot her eq uipm en t
.. In the eff ic iency program, press the function
selection switch ¢
page 23, fig. 11 @ repeat
edly until the other equipment appears in the
display .
Other equipment that is current ly affecting fuel
consumption is listed in the efficiency program.
The display shows up to three other items of
equipment @. The equ ipment using the most
fuel is listed first. If more than three items using
fuel are switched on , the equipment that is cur
rently using the most fuel is disp layed.
A scale @ also shows the current total consump
t ion of all other equipment.
Fuel economy messages
Applies to: vehicles with trip computer with effic iency pro
gram
Fig. 14 Disp lay : fuel econo my m essage
"'
Fuel economy messages are displayed when fuel
consumption is increased by certa in cond itions. If
you follow these fuel economy messages, you can reduce your vehicle's consumption of fuel. The ..,_
Page 27 of 266
messages appear automatically and are only dis
p layed in the efficiency program. The fuel econo
my messages turn off a utomat ically after acer
tain period of time.
.. To turn a fuel economy message off immedi
ately after it appears, press the I RESE T I button
¢ page 23, fig. 11 @, or
.. Press the function select ion switch ¢
page 23,
fig. 11
@ .
(D Tips
-Once you have turned a fuel economy mes
sage off, it will on ly appear again after you
turn the ignit ion on again.
- The fuel economy messages are not dis
played in every instance, but rather in inter
vals over a period of t ime .
Service interval display
The service interval display reminds you when
your next service is due .
The schedule for the next oil change or inspec
tion is calculated automatically and displayed ac
cord ingly . The display works in two stages :
Service rem inder
30 days before the next service is due, a service
reminder appears in the d isp lay when you turn on
the ignition.
After about 5 seconds the display switches back
to normal. The distance and time remain ing are
updated each time the ignition is turned on until
the date due for service is reached.
Se rvi ce due
When the due date for service is reached, the
m essage
Ser vice due! appears in the instrument
cluster immediately after you turn on the igni
tion . Additionally, a warning tone sounds. After
about 5 seconds the d isplay sw itches back to nor
mal.
Call ing up the servic e schedules
a:,
a:,
...... If or when an oil change or inspection is due, can N
~ be shown in the radio or MM!* d isplay by select-,.....
8 ing the serv ice interval d isplay in the car menu. LL 00
Dri ver informa tion system
Select I CAR I funct ion but ton > Se rvice i nterval
di spla y
or ICARI function button > Car systems *
control button > Ser vicing & checks.
Resetting the service int erval display
Yo ur autho rized Aud i dea le r will reset the co rre
sponding serv ice schedu le after performing the
appropriate service on your vehicle . You also have
the possibility to reset the oi l change schedule
after having performed an oil change accord ing
to Audi specifications. SelectlCAR lfunction but
ton
> Ser vice inter val display > Re set oil change
int erval
or ICARI function button > C ar systems *
control button > Se rvi cing & checks > Re set oil
change inter val.
(D Note
- Only reset the oil change display when you
have completed an o il change.
- If you disconnect the battery term inals, no
calcu lations can be made for the se rvice in
terva l display dur ing th is time and no serv
i c e rem inder will appear. Remembe r that
observ ing the proper serv ice i ntervals is vi
t ally impo rtan t to ex tending the life o f your
vehicle, particular ly the engine, and ma in
taining its va lue . Even if the mileage driven
is low, the maximum period o f one yea r
from one service to the next must not be ex
ceeded.
(D Tips
The information in the Serv ice Reminder re
mains stored even when the vehicle battery is
disconnected.
On Board Diagnostic
System (OBD)
Malfunction Indicator Lamp (MIL)
The Malfunction Indicator Lamp (MIL) ¢4 in the
instrument cluster is part of the On-Board Diag
nostic (OBD II) system .
The warning/indicator light ill uminates when the
ignition is sw itched on and goes out after the en
gine starts and the idle has stab ilized . This indi-
cates that the MIL is working properly . ..,.
25
Page 28 of 266
Driver information system
If the light does not go out after the engine is
started, or illuminates whi le you are driving, a
malfunct ion may exist in the engine system. If
the light illuminates, the catalytic converter
could be damaged.
Continue driving
with reduced power (avoiding
sustained high speeds and/or rapid accelera
tions) and have the condition corrected. Contact
your authorized Audi dealer.
If the light illuminates, the electronic speed limiter may a lso be malfunctioning. For more infor
mation
c:> page 26, Electronic speed limiter.
An improperly closed fuel filler cap may also
cause the MIL light to illuminate
c:> page 190.
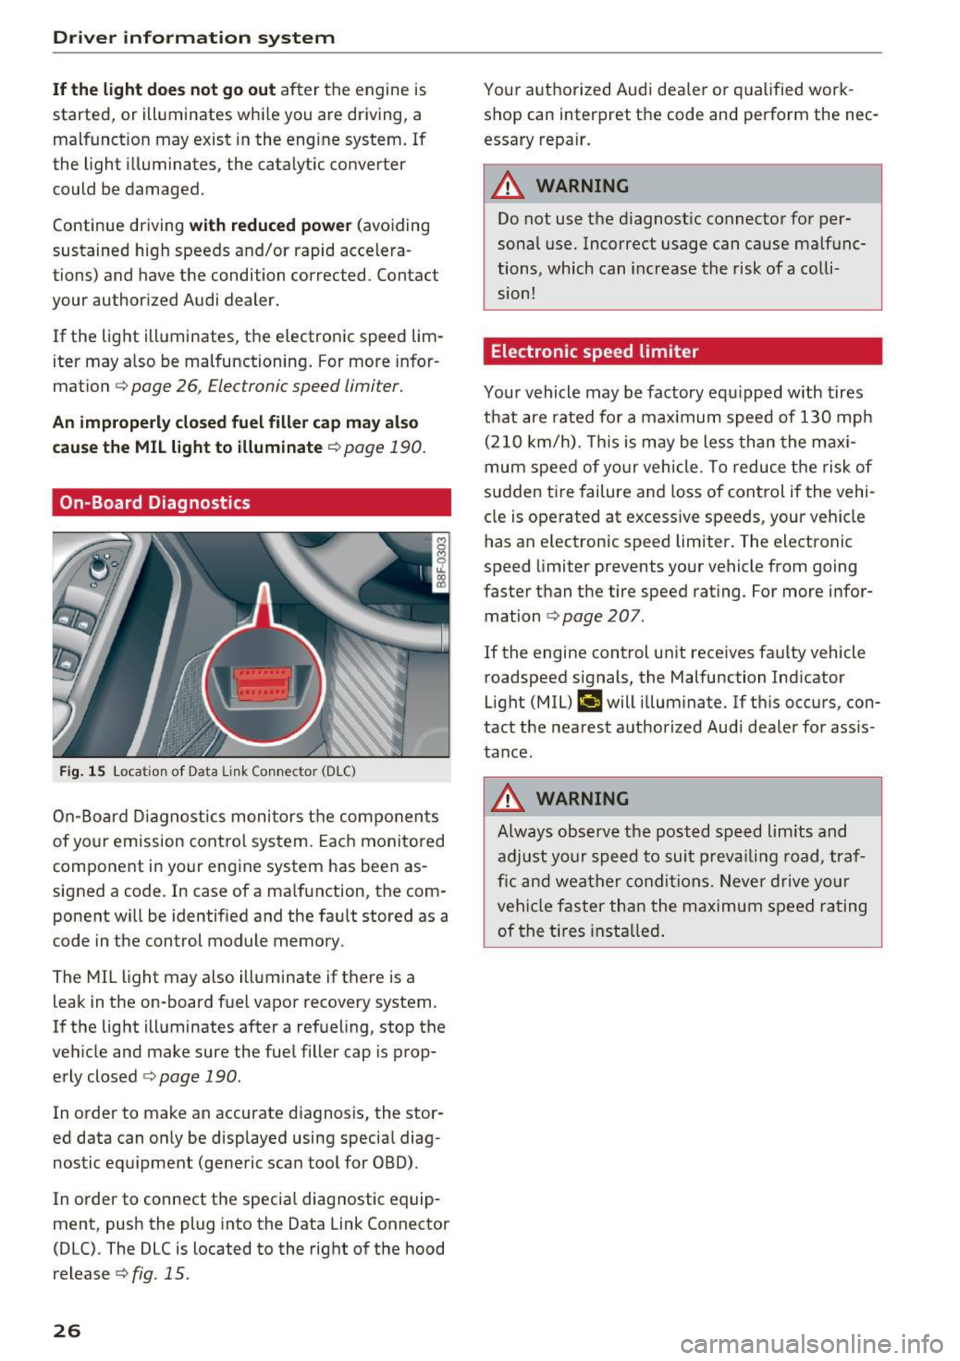
On-Board Diagnostics
Fig. 15 Loca tion of Data Li nk Connector (D LC)
On-Board Diagnostics monitors the components
of your emission control system. Each monitored
component in your engine system has been as
signed a code . In case of a malfunction, the com
ponent will be identif ied and the fau lt stored as a
code in the control module memory.
The MIL light may also illuminate if there is a
leak in the on-board fuel vapor recovery system .
If the light illuminates after a refueling, stop the
vehicle and make sure the fue l filler cap is prop
erly closed
c:> page 190 .
In order to make an accurate diagnosis, the stor
ed data can only be displayed using special diag
nostic equipment (generic scan tool for OBD).
In order to connect the specia l diagnostic equip
ment, push the plug into the Data Link Connector
(DLC). The DLC is located to the right of the hood
release
c:> fig. 15.
26
Your authorized Audi dea ler or qual ified work
shop can interpret the code and perform the nec
essary repair.
_& WARNING
Do not use the diagnostic connector for per
sonal use. Incorrect usage can cause malfunc
tions, which can increase the risk of a colli
sion!
Electronic speed limiter
-
Your vehicle may be factory equ ipped w ith tires
that are rated fo r a maximum speed of 130 mph
(210 km/h). This is may be less than the maxi
mum speed of your vehicle. To reduce the risk of
sudden tire failure and loss of control if the vehi
cle is operated at excessive speeds , your vehicle
has an e lectronic speed limiter. The electronic
speed limiter prevents your vehicle from going
faster than the tire speed rating . For more infor
mation
c:> page 207.
If the engine control unit receives faulty vehicle roadspeed signals, the Malfunction Indicator
Light (MIL)
II will illuminate. If this occurs, con
tact the nearest authorized Audi dealer for ass is
tance .
_& WARNING
Always observe the posted speed limits and
adjust your speed to suit prevailing road, traf
fic and weather conditions. Never drive your
vehicle faster than the maximum speed rating
of the tires insta lled .
-
Page 31 of 266
a:,
a:,
...... N
" N ...... 0
0
LL co
-Do not remove the key from the ignition
lock until the vehicle has come to a com
plete stop . Otherwise the steer ing column
lock could suddenly engage -causing the
risk of an accident .
(D Tips
-The operation of the remote control key can
be temporarily d isrupted by interference
from transmitters in the vicinity of the vehi
cle work ing in the same frequency range
(e .g. a cell phone, radio equipment).
- For security reasons, replacement keys are
only available from authorized Aud i dea ler .
- For Declaration of Compliance to Un ited
States FCC and Industry Canada regulations
<::;> page 2 49.
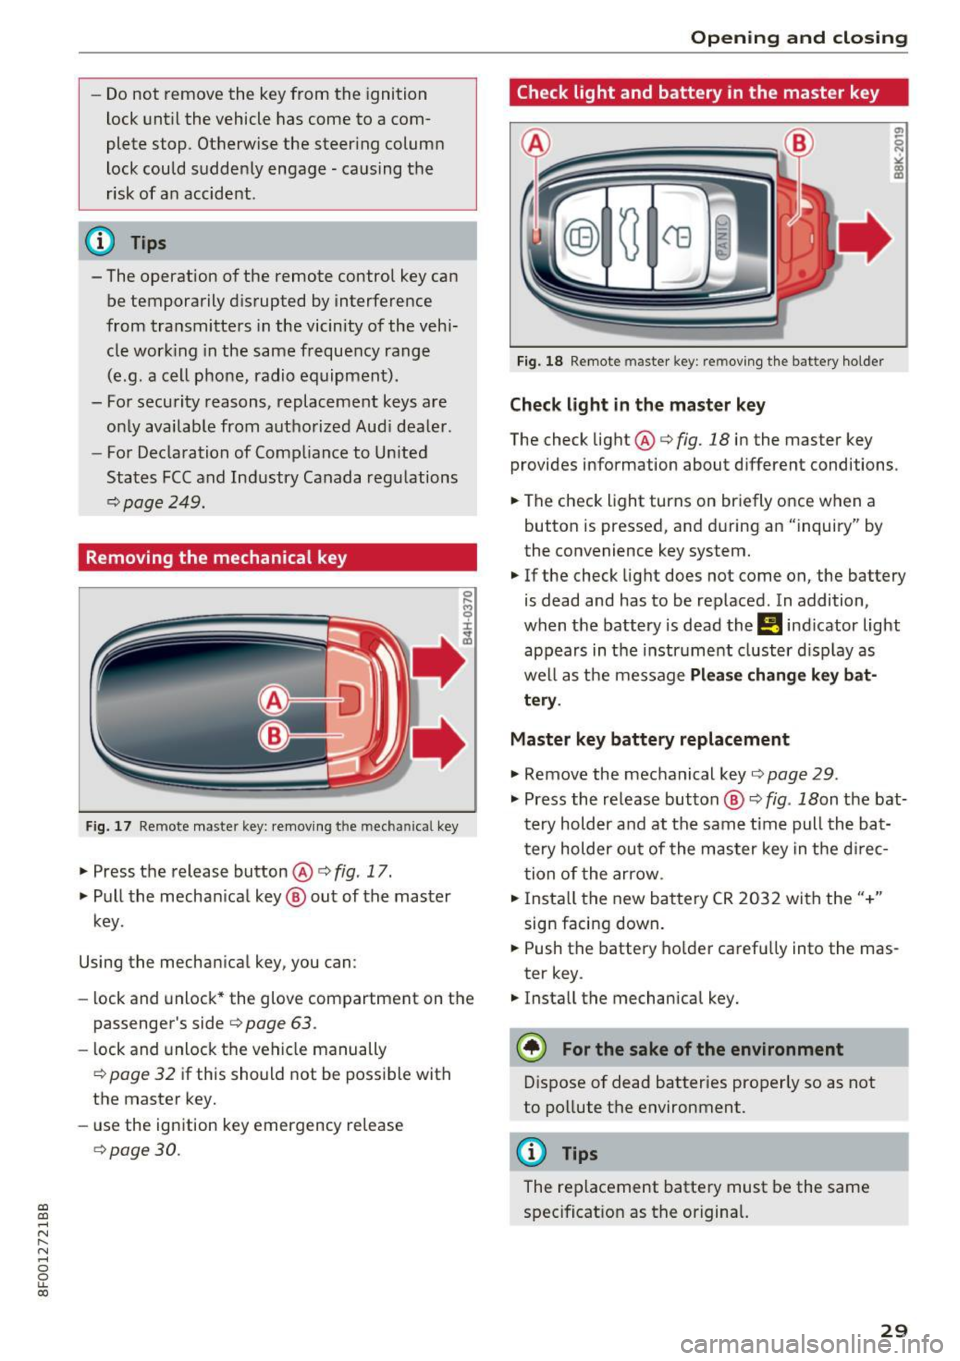
Removing the mechanical key
Fig. 17 Remote master key: removing t he m ec hani ca l key
.,. Press the release button @o fig. 17.
.,. Pull the mechan ical key ® out of the master
key.
Using the mechan ical key, you can :
- lock and unlock* the glove compartment on the
passenger's side
c> page 63 .
-lock and unlock the vehicle manually
opage 32 if this should not be poss ible with
the master key.
- use the ignition key emergency release
opage 30.
Open ing and closing
Check light and battery in the master key
Fig. 18 Remote master key: re moving the bat tery holder
Check light in the master key
The check light@o fig. 18 in the master key
provides information about d ifferent conditions .
.,. The check light turns on briefly once when a
button is pressed, and during an "inquiry" by
the convenience key system.
.,. If the check light does not come on, the battery
is dead and has to be replaced . In addition,
when the battery is dead the
Ill indicator light
appears in the instr ument cluster display as
well as the message
Please change key bat
tery .
Master key battery replacement
.,. Remove the mechanical key o page 29 .
.,. Press the re lease button ® o fig. 18on the bat
t ery holder and at the same time pull the ba t
tery holder out of the master key in the d irec
tion of the arrow .
.,. Insta ll the new battery CR 2032 with the"+"
sign facing down .
.,. Push the battery holder carefu lly into the mas
ter key .
.,. Install the mechanical key.
@) For the sake of the environment
Dispose of dead batteries properly so as not
to pollute the environment.
@ Tips
The replacement battery must be the same
specificat ion as the original.
29
Page 38 of 266
Opening and closing
• Turn the key to position c::> fig. 29@ until all
the windows have reached the desired position .
Convenience closing feature
• Use the emergency key or pu ll the mechanical
k ey out of the master key
c::> page 29.
• Turn the key in the lock of the d river 's door to
the lock pos ition @ unt il the windows are
closed
c::> A .
.&_ WARNING
- Never close the windows inattentively and
without checking -there is risk of injury.
- You must always watch when the windows
are being raised so that no one can be trap
ped. If you release the key, the closing ac
t ion is immediately canceled.
- Always read and heed WARN ING
c::> .&. in
General description on page 2
7 .
Correcting window regulator malfunction
-
After disconnect ing the vehicle battery, the one
t ou ch up and down feature mus t be ac tivated
again.
• Pull and hold the pow er window switch until
the window is completely closed.
• Release the switch and pull the sw itch again for
one second .
Valet parking
Applies to: ve hicles with valet parkin g fu nctio n
The valet parking feature protects the luggage
compartment from unauthorized access .
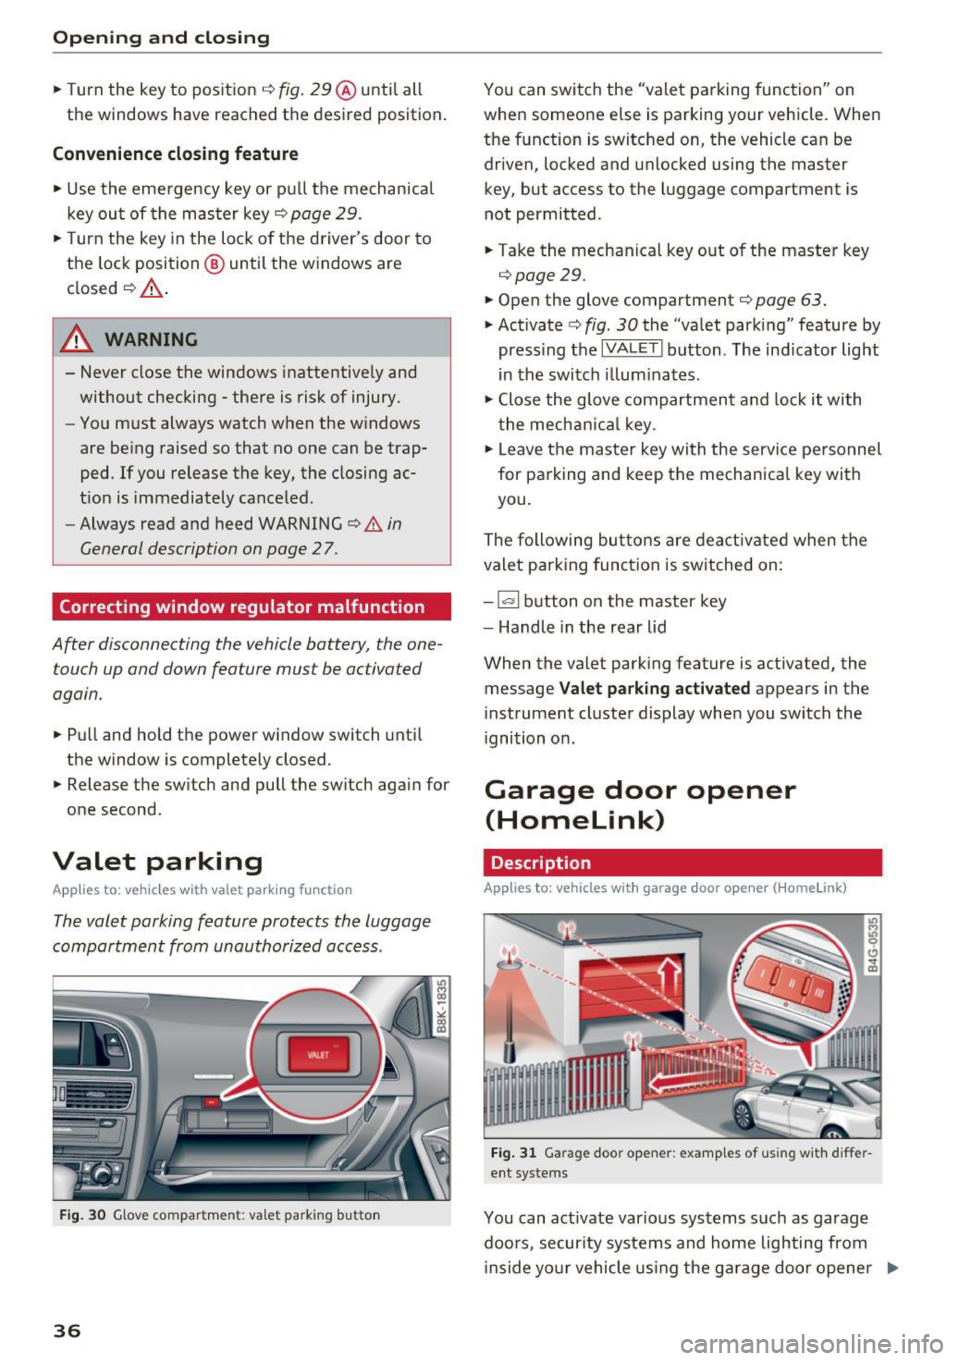
-
Fig. 30 Glove compar tmen t: valet park ing bu tton
36
You can switch the "valet parking function" on
when someone else is park ing your vehicle. When
the function is switched on, the vehicle can be
driven , locked and unlocked using the master
key, but access to the luggage compartment is
not permitted .
• Take the mechanical key out of the master key
c::> page 29.
• Open the glove compartment c::> page 63.
• Activate c::> fig . 30 the "valet parking" feature by
press ing the
I VA LET I button. The ind icator light
in the switch illuminates.
• Close the glove compartment and lock it with
the mechan ical key.
• Leave the master key with the service pe rsonnel
for parking and keep the mechanical key with
you.
The following buttons are deactivated when the
valet parking function is switched on :
-
~ button on the master key
- Handle in the rear lid
When the valet parking feature is activated, the message
Valet parking activated appears in the
instrument cluster display when you switch the
i gnition on.
Garage door opener
(Homelink)
Description
Applies to: vehicles with garage door opener (Homelink)
Fig. 31 Garag e doo r op ener: examp le s of using with diffe r
ent systems
You can act ivate various systems such as garage
doors , secur ity systems and home lighting from
i nside yo ur vehicle using the garage door opener .,..
Page 39 of 266
a:,
a:,
...... N
" N ...... 0
0
LL co
(Home link). There are three buttons for this in
the vehicle headliner that can be in used in p lace
of up to three hand-held transm itters.
To operate sys tems using the gar age door open
er, the three b uttons in the roof headliner must
be programmed first.
A WARNING
Make sure no people or objects are in the im
mediate v icin ity of the eq uipment when us ing
or programming the garage door opener. Peo
ple can be inju red and objects can be dam
aged if they ar e caught in the eq uipment.
{!) Tips
- Fo r secu rity reasons , we recommend that
you clear the programmed buttons before
se lling the vehicle .
- For additional in format ion about Homelink,
v is it www.homelink .com.
- Fo r Decla ration of Comp liance to Un ited
States FCC and Industry Canada regu lations
¢ page 249.
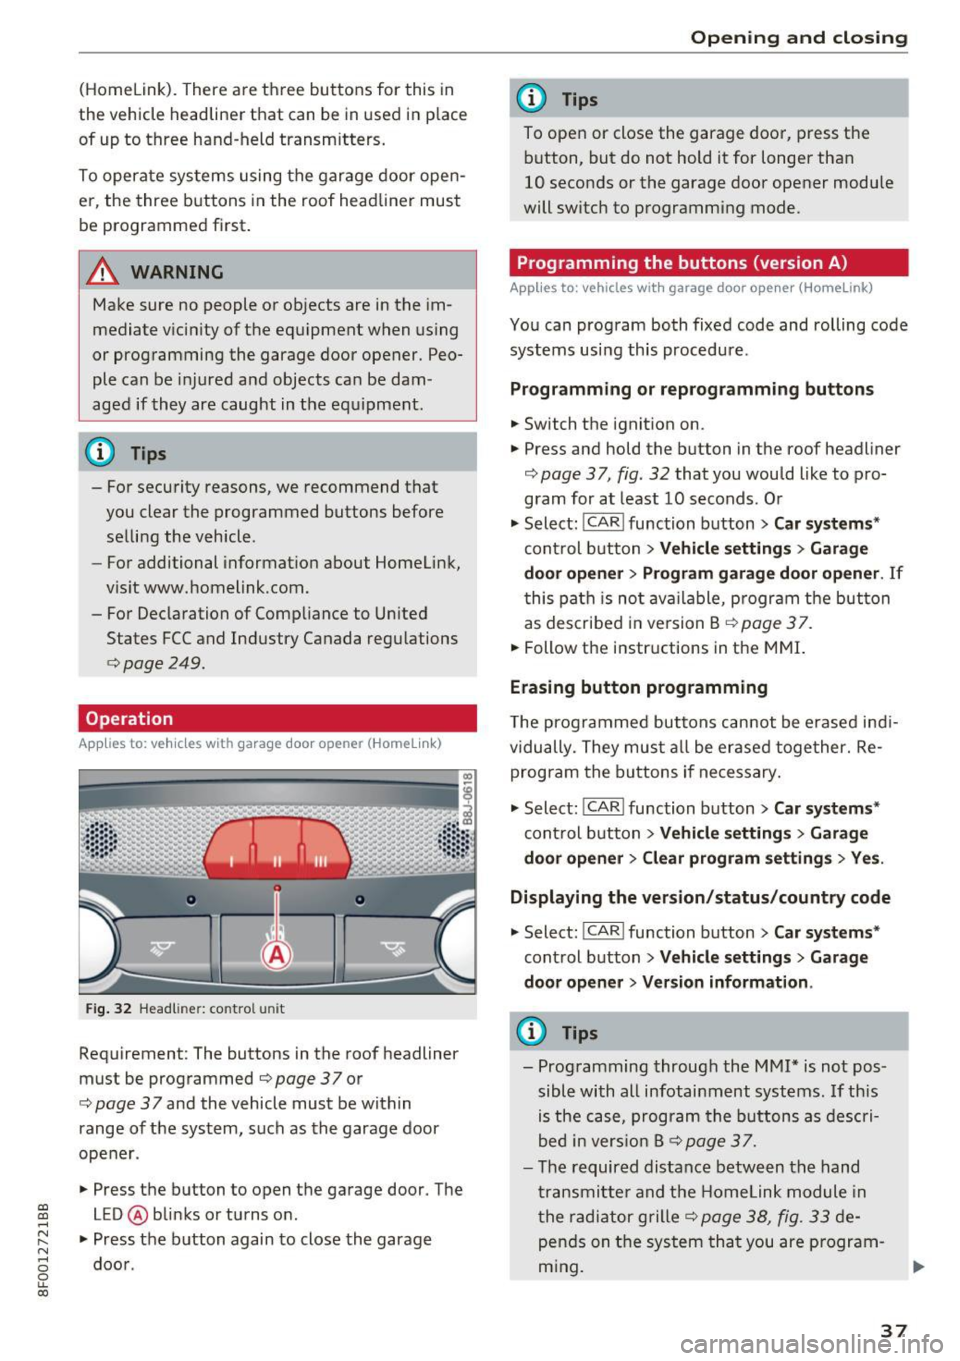
Operation
App lies to: vehicles with garage door opener (Homelink)
Fig. 32 Head liner: co ntro l uni t
Requirement : The buttons in the roof headliner
must be prog rammed
¢page 37 or
¢
page 37 and the vehicle must be within
range of the system, such as the garage door
ope ner .
.,. Press the button to open t he ga rage door. The
LED @ blinks or tu rns o n.
.,. Press the b utton again to close the garage
doo r.
Open ing and closing
(D Tips
To ope n or close the garage doo r, press the
b utton, but do not hold it for longer than
10 seconds or the garage door opener module
will sw itch to programming mode .
Programming the buttons (version A)
Applies to: vehicles wit h garage door opener (Home Link)
You can program both fixed code and rolling code
systems using this procedure .
Programming or reprogramming buttons
.,. Switch the ignit ion on.
.,. Press and hold the b utton in the roof headliner
¢
page 37, fig. 32 that you would like to p ro
gram for at least 10 seconds . Or
.,. Select:
!CAR I function b utton> Car systems*
con trol b utton > Vehicle settings > Garage
door opener > Program garage door opener .
If
this pa th is no t availab le, progr am t he but ton
as des cribe d in version B
¢ page 37 .
.,. Follow the i nstr uctions in the MMI.
Erasing button programming
T he prog ra m med butto ns can not be e rased ind i
vidually. They mu st all be erase d toge ther. Re
prog ram the b uttons if ne cessary .
.,. Select:
!CAR ! function b utto n> Car system s*
cont rol b utton > Vehicle settings > Garage
door opener > Clear program settings > Yes .
Displaying the version/status/country code
.,. Select : !CAR l function button> Car syst ems *
cont rol button > Vehicle settings > Garage
door opener > Version information .
(D Tips
-Prog ramming throug h the MMI* is no t pos
sible with all infotainm ent systems . If th is
is the c ase , p rogra m the button s as des cri
bed i n vers io n B ¢
page 3 7.
- The requir ed distance betwe en th e hand
tr an smitte r and the Homelink module in
t he radia tor grille ¢
page 38, fig . 33 de
p en ds on t he system tha t you are p rogram
m ing .
37
Page 43 of 266
a:,
a:,
...... N
" N ...... 0
0
LL co
(D Note
-To prevent damage to the power top:
- do not store any objects in the power top
compartment .
- make sure there is enough space above
the vehicle when opening or closing the power top.
- To reduce the risk of damage, make sure
there are no fragile objects within the stor
age bay's range of motion.
(D Tips
- To prevent the battery from draining, do not
open or close the power top repeatedly
when the engine is switched off.
- A message will appear in the instrument
cluster display if there is a power top mal
funct ion ¢
page 42.
-The power top can also be operated manual
l y if there is a malfunction
c:> page 44,
Power top emergency operation. The ca use
of the malfunction should be corrected by
an a uthorized Audi dea ler or authorized re
pair facility as soon as possible.
- The vehicle is not prote cted from the weath
er or from unauthorized entry if the vehicle
is left parked with the power top open. Lock
any objects you are leaving in the vehicle in
the luggage compartment. Close the power
top before leav ing the vehicle.
- The side windows lower slightly automati
cally when opening/closing the power top.
Power top convenience opening/closing
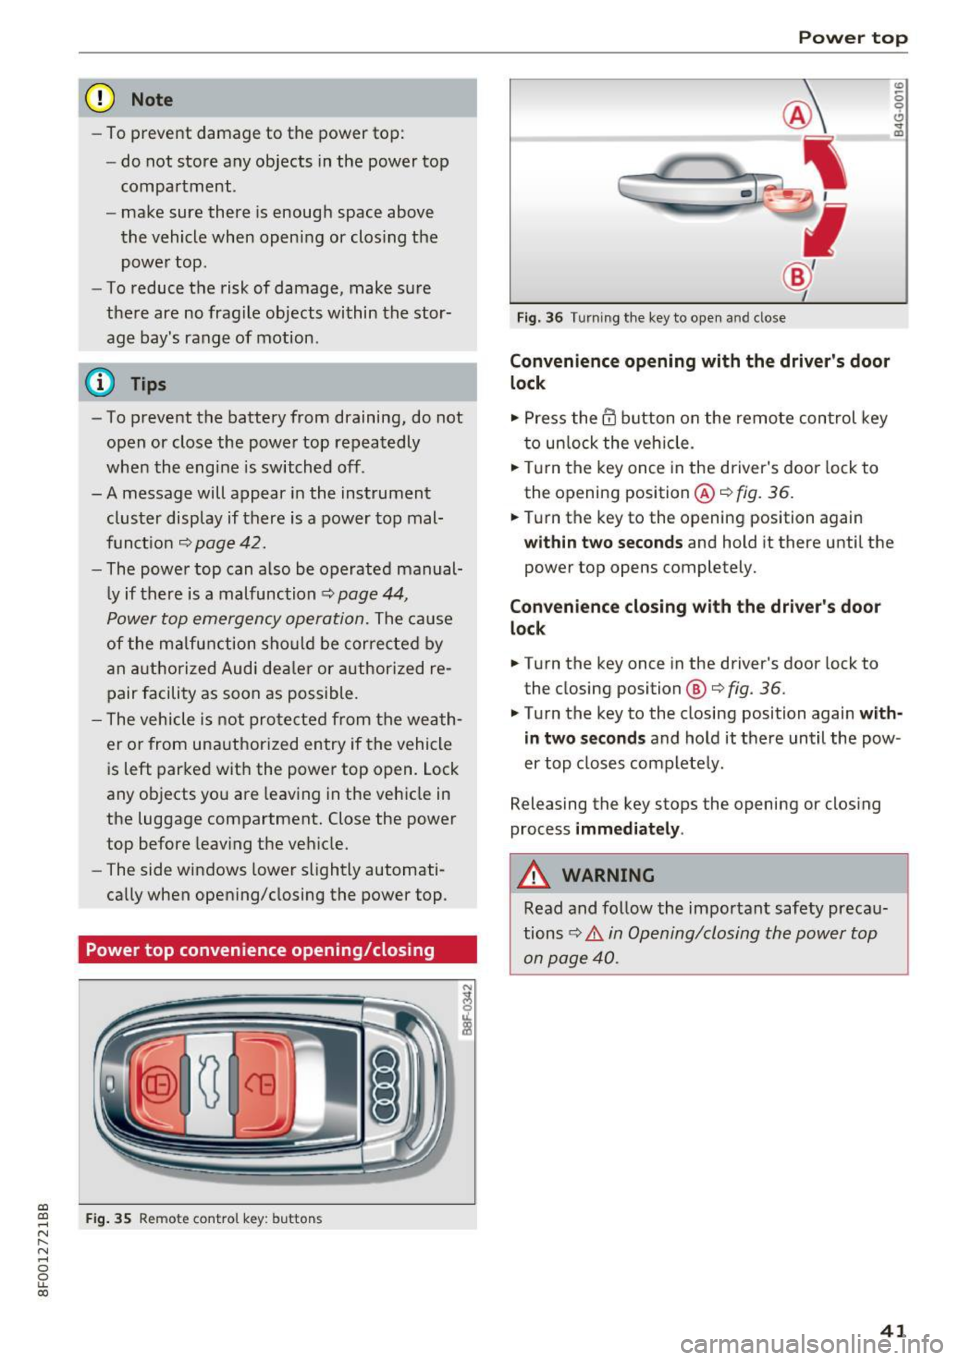
Fig . 35 Remote control key: buttons
Powe r top
Fig. 36 Turning the key to open and close
Conven ienc e opening with the driver's door
l o ck
.,. Press the @ button on the remote control key
to unlock the vehicle .
.,. Tu rn the key once in the driver's door lock to
the opening position @¢
fig. 36.
0
0 ... m
.,. Turn the key to the opening position again
within tw o second s and hold it there until the
power top opens completely.
Convenienc e closing with the dri ver's door
lock
.,. Turn the key once in the driver's door lock to
the closing position @¢
fig. 36.
.,. Turn the key to the closing position again with
in tw o second s
and hold it there until the pow
er top closes completely .
Releasing the key stops the opening or clos ing
process
imm edi ate ly .
A WARNING
Read and follow the important safety precau
tions~ .&.
in Opening/closing the power top
on page 40.
41