engine AUDI A5 COUPE 2010 Owners Manual
[x] Cancel search | Manufacturer: AUDI, Model Year: 2010, Model line: A5 COUPE, Model: AUDI A5 COUPE 2010Pages: 360, PDF Size: 84.39 MB
Page 328 of 360
lll'I.___E_ m_ e_r -=g :...e_ n _ c-=y _ s_ i_t _u _a _t_ i_o _n_ s _______________________________________________ _
Emergency situations
General
This chapter is intended for trained emergen cy crew s and working
personnel who have the necessary tools and equ ipment to perform
the se operations. •
Starting by pushing or towing
0 Note
Vehicles with an automatic tran smission cannot be started by
pushing or towing . •
Starting with jumper cables
If n ecess ary, the e ngin e c an b e starte d by conne ctin g it to
the ba ttery of anoth er vehicle .
If the engine shou ld fai l to start because of a discharged or weak
ba tte ry, the bat te ry can be connected t o the ba ttery of
another
vehic le, using a pair of jumper cables to start the engine.
Jumper cables
Use on/yjumper cables o f sufficient ly lar gecross section to carry the
s tarte r curre nt safe ly . Re fer to t he manu fac tur er's speci fica tions.
Use on ly jumper cables w ith
insulated terminal clamps w hich are
d istinct ly marked:
plus (+l cable in most cas es c olore d red
minus (-l cable in most cases co lored black .
& WARNING
Batteries contain electricity , acid , and gas . Any of these can cause
very serious or fatal injury. Follow the instructions below for safe
handling of your vehicle 's battery .
• Always shield your eyes and avoid leaning over the battery
whenever possible .
• A discharged battery can freeze at temperatures just below
32 °F (0 °C l. Before connecting a jumper cable , you must thaw the
frozen battery completely , otherwise it could explode.
• Do not allow battery a cid to contact eye s or skin . Flush any
contacted area with water immediately.
• Improper use of a booster battery to start a vehicle may cause
an explosion.
• Vehicle batteries generate e xplosive gases . Keep sparks, flame
and lighted cigarettes away from batteries.
• Do not try to jump start any vehicle with a low ac id level in the
battery.
• The voltage of the booster battery must also have a 12-Volt
rating . The capacity (Ahl of the booster battery should not be
lower than that of the discharged battery . Use of batteries of
different voltage or substantially different "Ah " rating may cause
an e xplosion and personal injury .
• Never charge a frozen battery. Gas trapped in the ice may cause
an explosion .
• Never charge or use a battery that has been frozen . The battery
case may have be weakened.
• Use of batteries of different voltage or substantially different
capacity (Ah ) rating may cause an explosion and injury . The
capacity (Ahl of the booster battery should not be lower than that
of the discharged battery . .,_
Page 329 of 360

________________________________________________ E_ m ___ e_r.::g ~e ___ n_c ~y:.- s;_ i_t _u :...:a:..:. t.:.: i...:o :...:n...:..:. s _ __,J_
& WARNING !continued)
• Before you check anything in the engine compartment, always
read and heed all WARNINGS~ page 263, "Engine compartment".
0 Note
• Applying a higher voltage booster battery will cause expensive
damage to sensitive electronic components, such as control units,
relays, radio, etc .
• There must be no electrical contact between the vehicles as
otherwise current could already start to flow as soon as the positive
(+) terminals are connected.
[ i) Tips
• The discharged battery must be properly connected to the
vehicle's electrical system. When jump starting or charging the
battery , never connect the negative ground cable to the battery
negative post because the battery manager system must be able to
detect the battery's state of charge. Always connect the negative
ground cable to the negative ground post of the battery manager
control unit .•
Use of jumper cables
Make sure to connect the jumper cable clamps in exactly
the order described below!
Fig. 251 Engine
compartment : Connec·
tors for jumper cables
and charger
Fig. 252 Jump starting
with the battery of
another vehicle: @
discharged vehicle
battery,
© booster
battery
The procedure described below for connecting jumper
cables is intended to provide a jump start for your vehicle.
Vehicle with discharged battery:
Turn off lights and accessories, move lever of automatic
transmission to
N (Neutral) or P (Park) and set parking
brake.
~
Vehicle care Do-it-yourself service irechnical data
Page 330 of 360

lllffl.___E_ m _ e _r-==g :...e_ n_ c...:y _ s_ i_t _u _a _t_ i_o _n_ s _______________________________________________ _
Conn ect POSITIVE
(+) to POSITIVE (+) (red )
- Remove the cover above the jump start connection.
- Open the red cover on the positive pole
~ page 327,
fig. 251.
1. Connect one end of the positive cable (red) on the
jump
start bolt~ page 327, fig. 252 G) (Bolts under red cover
= "positive") of the vehicle to be started @.
2. Connect the other end to the positive terminal @ of the
booster battery @.
Connect NEGATIVE (-) to NEGATIVE (-) (black)
3. Connect one end to the negat ive terminal 0 of the
booster battery ®·
4. Connect the other end of the negative cable (black) to the
jump start bolt@ (Bolts with hex head= "negative") of
the vehicle to be started @.
Starting the engine
- Start the engine of the vehicle with the booster battery.
Run the engine at a moderate speed.
- Start engine with discharged vehicle battery in the usual
manner.
- If the engine fails to start : do not keep the starter
cranking for longer than 10 seconds. Wait for about
30 seconds and then try again.
- With engine running, remove jumper cables from both
vehicles in the exact
reverse order .
- Close the red cover on the positive pole.
T he battery is vented to the outside to prevent gases from entering
th e vehicle interior. Make sure that the jumper clamps are well
connected with their
metal parts in full contact with the battery
terminals.
& WARNING
To avoid serious personal injury and damage to the vehicle , heed
all warnings and instructions of the jumper cable manufacturer.
If
in doubt, call for road service.
• Jumper cables must be long enough so that the vehicles do not
touch .
• When connecting jumper cables, make sure that they cannot
get caught in any moving parts in the engine compartment.
• Do not bend over the batteries -danger of chemical burns!
• The battery cell locking screws must be tightened securely.
• Before you check anything in the engine compartment , always
read and heed all WARNINGS ~ page 263, "Engine compartment".
0 Note
Improper hook-up of jumper cables can ruin the generator .
• Always connect POS ITIVE(+) to POS ITIVE(+), and NEGATIVE(-) to
NEGATIVE( -) ground post of the battery manager control unit .
• Check that all screw plugs on the battery cells are screwed in
firm ly. If not, tighten plugs prior to connecting clamp on negative
battery terminal.
• Please note that the procedure for connecting a jumper cable as
described above applies specifically to the case of your vehicle
being jump started . When you are giving a jump start to another
vehicle, do
not connect the negative(-) cable to the negative{-)
terminal on the discharged battery©~
page 327, fig. 252. Instead,
securely connect the negative(-) cable to either a solid metal
component that is firmly bolted to the engine block or to the engine ..
Page 331 of 360
________________________________________________ E_ m_ e_r ,,::g c..e_ n _ c..::y;._ s_ i_t _u _a_ t_ i_o _n_ s _ ___.ffllll
block itself. If the battery that is being charged does not vent to the
outside, escaping battery gas could ignite and explode! •
Emergency towing with commercial
tow truck
General hints
Your Audi requires special handling for towing.
The following information is to be used by commercial tow truck
operators who know how to operate their equipment safely.
• Never tow your Audi , towing will cause damage to the engine
and transmission.
• Never wrap the safety chains or winch cables around the brake
lines.
• To prevent unnecessary damage, your Audi must be transported
with a flat bed truck.
• To load the vehicle on to the flat bed, use the towing loop found
in the vehicle tools and attach to the front or rear anchorage
~ page 329 and ~ page 330.
& WARNING
A vehicle being towed is not safe for passengers. Never allow
anyone to ride in a vehicle being towed, for any reason. •
Front towing loop
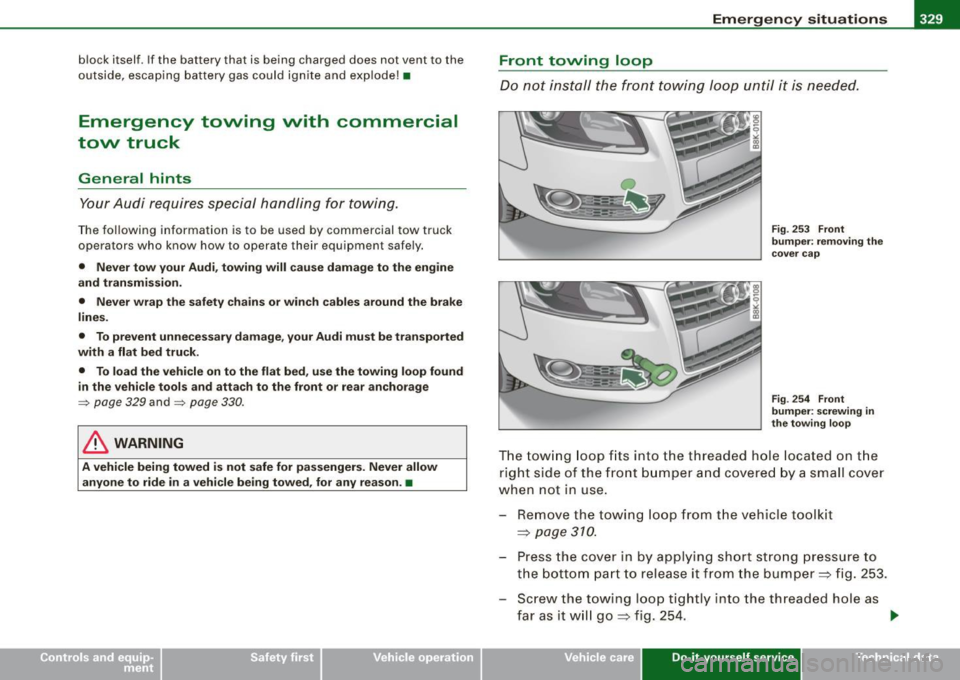
Do not install the front towing loop until it is needed.
Fig. 253 Front
bumper: removing the
cover cap
Fig . 254 Front
bumper: screwing in
the towing loop
The towing loop fi ts into the thread ed hole located on the
r ight side of the front bumper and covered by a small cover
when not in use.
- Remove the towing loop from the vehicle toolkit
~ page 310.
- Press the cover in by applying short strong pressure to
the bottom part to release it from the bumper~ fig. 253.
- Screw t he towing loop tightly into the threaded hole as
far as it will go
~ fig. 254. ~
Vehicle care Do-it-yourself service irechnical data
Page 334 of 360

-Emergency situations PW:f..._--=---=----------------
& WARNING
• To reduce the risk of serious injury and vehicle damage .
- Always lift the vehicle only at the special workshop hoist and
floor jack lift points illustrated~ page
331, fig. 257 and
~ page 331, fig. 258.
- Failure to lift the vehicle at these points could cause the
vehicle to tilt or fall from a lift if there is a change in vehicle
weight distribution and balance. This might happen, for
example, when heavy components such as the engine block or
transmission are removed.
• When removing heavy components like these, anchor vehicle
to hoist or add corresponding weights to maintain the center of
gravity. Otherwise, the vehicle might tilt or slip off the hoist,
causing serious personal injury.
0 Note
• Be aware of the following points before lifting the vehicle:
- The vehicle should never be lifted or jacked up from under
neath the engine oil pan, the transmission housing, the front or
rear axle or the body side members . This could lead to serious
damage.
- To avoid damage to the underbody or chassis frame, a rubber
pad must be inserted between the floor jack and the lift points.
- Before driving over a workshop hoist, check that the vehicle
weight does not exceed the permissible lifting capacity of the hoist .
- Before driving over a workshop hoist, ensure that there is sufficient clearance between the hoist and low parts of the
vehicle. •
Page 336 of 360

ffl,__ __ G_e_ n_e_ ra_ l_i_n _f _o _ r_ m_ a_ t_io _ n __________________________________________________ _
General information
Explanation of technical data
Some of the technical data listed in this manual requires
further explanation.
The technical data for your vehicle is listed in the charts starting on
~ page 337. This section provides general information, notes and
restrictions which apply to this data. •
Vehicle identification
The key data is given on the vehicle identification number
(VIN) plate and the vehicle data sticker.
Fig. 259 Vehicle Identi
fication Number (VIN)
plate: location on
driver's side dash
panel Fig
. 260 The vehicle
identification label -
inside the luggage
compartment
The Vehicle Identification Number (VIN)
is located on the driver's side so that it is visible from the outside
through the windshield~ fig. 259.
The vehicle identification label
is located in the luggage compartment near the battery .
The label ~ fig. 260 shows the following vehicle data:
© Production control No.
0 Vehicle identification No.
© Type code number
© Type designation/engine output in Kilowatts
© Engine and transmission code letter
© Paint No./lnterior
0 Optional equipment No.'s
Vehicle data 2 to 7 are also found in your Warranty
& Maintenance
booklet .
The safety compliance sticker
is your assurance that your new vehicle complies with all applicable
Federal Motor Vehicle Safety Standards which were in effect at the
time the vehicle was manufactured. You can find this sticker on the ._
Page 339 of 360

___________________________________________________ D_a_ t_ a __ PII
Data
App lies to v ehicles : with 2.0 lite r 4-cy l. engine
211 hp, 2.0 liter 4-cyl. engine
En gin e data
Maximum output SAE net
Maximum torque SAE net
No _ of cylinders
Displacement
Stroke
Bore
Compression ratio
Fuel
Dim ension s (app rox.)
Length (with licence plate bracket)
Width (with outside mirrors fo lded)
Height (unloaded)
Turning circle diameter (curb to curb)
Ca pac ities (a pprox.)
F u el t ank
-Total capacity
- Reserve (of total capacity)
Wind shi eld and he adli ght * was her fluid container
E ngine oil
with filter change hp@rpm
lb-ft@ rpm
CID (cm
3
)
in (mm)
in (mm)
211 @ 4300 -6000
258
@ 1500 -4200
4
1 21 (1984)
3.65 (92.8)
3.25 (82.5)
9.6 : 1
Premium unleaded (91 AKI) Recommended for maximum engine performance. Fur
ther details =>
page 265, "Gasoline"
in (mm)
in (mm)
in (mm)
ft (ml
182.0 (4625)
73.0 (185 4)
54.0 (1372)
37 .4 (11.4)
gal Oiters)
gal (liters)
quarts (liters)
quarts (liters) 16.9 (64.0)
2.1 (8)
4 .8 (4_5)
4 .9 (4 .6)
•
Controls and equip
ment Safety first Vehicle operation
Vehicle care Do-it-yourself service Tec hn ica l da ta
Page 340 of 360
llftl __ D_a_ t_ a ___________________________________________________ _
Applies to vehicles : wit h 3.2 li ter 6-c yl. en gine
265 hp , 3.2 liter 6-cyl. engine
Engine data
Max imum output SAE net
Maximum torque SAE net
No . of cy lin ders
Di spl ac eme nt
Stroke
Bo re
Comp ress ion rati o
Fuel
Dimensions (appro x.)
Lengt h (with licence plate brac ket)
Width (wit h ou ts ide mirrors folded)
Height (un loaded)
T urn ing c ircle diameter (curb to curb)
Capacities {approx .)
Fuel tank
-To tal capacity
- Rese rve (of total capacity)
Windshield and headlight* washer fluid container
Engine oil
with filter cha n ge h
p@ rpm
lb-ft@ rpm
CID (cm
3 )
in (mm)
in (m m) 265 @6500
243 @ 3000-5000
6 195 (3197)
3 .65 (92 .8)
3 .37 (85 .5)
1 2 .5: 1
Premium unleaded {91 AKll Recommended for maximum engine performance . Fur
t her deta ils =:>
pag e 265, "Gasoli ne"
i n (m m)
in (m m)
in (mm)
ft ( ml 1
82 .0 ( 4625)
73.0 (1854)
5 4 .0 ( 1372)
37 .4 (11.4 )
g al (l iters)
gal (li ters)
qua rts (liters)
q ua rts (l ite rs) 1
6.9 (64 .0)
2 .1 (8)
4. 8 ( 4.5)
6 .6 (6.2)
•
Page 341 of 360
_______________________________________________ C _o_ n _ s_u _ m_ e_ r_l_n _f_o _ r_ m_ a_ t _i _o _ n __ lllll
Consumer Information
Warranty coverages
Y o ur A udi i s covere d by the f ollowi ng wa rrant ie s:
• New Vehicle Limited Warranty
• Limited Warranty Against Corrosion Perforation
• Emissions Control System Warranty
• Emissions Performance Warranty
• California Emissions Control Warranty (USA vehicles only)
• California Emissions Performance Warranty (USA vehicles only)
Detai led information regarding your warrant ies can be found in
your
Warr anty & M aintenan ce book let .•
Operating your vehicle outside the
U.S .A. or Canada
Government regulations in the United States and Canada require
t hat automobiles meet specific emission regulations and safety
standards . T herefore, vehicles built for the U.S .A . and Canada differ
from vehicles so ld in other countries .
If you plan to take your vehic le outside the continental limits of the
United States or Canada, there is the possibi lity that
• unleaded fue ls for vehicles w ith catalytic converter may not be
avai lable;
• fue l may have a considerably lower octane rat ing . Improper fuel
may cause engine damage;
• serv ice may be inadequate due to lack of proper service faci lities ,
tools or testing equipment;
• replacement parts may not be readily available .
Controls and equip
ment Safety first Vehicle operation
•
Navigation systems for vehicles built for the U.S.A . and Canada
wil l not necessarily work in Europe, and may not work in other coun
tries outs ide o f North America.
0 Note
Audi cannot be responsible fo r mechanica l damage that could
resu lt from inadequate fuel, service or parts availability. •
Audi Service Repair Manuals and
literature
Audi Official Factory Service Manuals are published as soon as
poss ible after model introduction . Serv ice manuals are ava ilab le
from :
Audi Technical Literature Ordering Center
Call toll -free :
Te l.:
1 (800) 544-8021
(from 8:00 AM to 8 :00 PM, EST, Monday through Friday)
or access their website
www .audi .dd sltd .com on the Internet to
order repair manuals and other Aud i literature .•
Maintenance
Gen era l
Your vehicle has been designed to he lp keep maintenance require
ments to a minimum . However, a certain amount of regular mainte
nance is sti ll necessary to assure your veh ic le's safety, economy and .,
Vehicle care Do-it-yourself service Tec hn ica l da ta
Page 342 of 360
___ C_ o_n_ s_ u_m _ e_ r_ ln_ f_ o _r _m _ a_ t_ i_o _n ______________________________________________ _
reliability. For detailed vehicle maintenance consult your Warranty &
Maintenance book let.
Und er di ffi cult ope rating cond ition s, for example at extremely low
outside temperatures, in very dusty regions, when towing a trailer
very frequen tly, etc., some service work shou ld be performed
between the intervals specified. This applies particularly to:
• oil changes, and
• cleaning or replacing the air filter.
sion standards are maintained, thus minimizing adverse effects on
the environment. •
Important considerations for you and your
vehicle
The increasing use of electronics, sophisticated fuel injection and
emission control systems, and the general ly increasing technical
complexity of today's automobi les, have steadi ly reduced the scope
of maintenance and repa irs which can be carried out by vehicle
owners.
Al so, sa fety a nd e nvironment al concerns p lace very strict
limi ts on the na ture of repairs a nd adjustments to engine and trans
mission parts which an owner can perform.
Maintenance, adjustments and repairs usually require special tools,
testing dev ices and other equipment ava ilable to specially trained
workshop personnel in order to assure proper performance, reli
ability and safety of the vehicle and its many systems.
Improper maintenance, adjustments and repairs can impair the
ope ration and re liability of your vehic le and even void your vehic le
warranty. Therefore, proof of servicing in accordance with the main
tenance schedu le may be a condition for upholding a pos sible
warranty claim made within the warranty period. Above all, operational safety can be adversely affected, creating
unnecessary r isks for you and your passengers .
If in doubt about any servicing, have it done by your authorized Audi
dea ler or any other properly equipped and qualified workshop. We
strongly urge you to give your authorized Audi dealer the opportu
nity to perform all scheduled maintenance and necessary repairs.
Your dealer has the fac ilities, origina l parts and trained spec ial ists
to keep your vehicle running proper ly.
P e rforming limited maint ena nce your self
The following pages describe a lim ited number of procedures which
can be performed on your vehicle wi th ordinary too ls, should the
need arise and trained personnel be unavai lab le. Before performing
any of these procedures, a lways thoroughly read all of the appli
cable text and carefu lly follow the instructions given. Always rigor
ously observe the
WARNINGS provide d.
Before you che ck anything in th e eng ine compartment , always read
and heed all WARNINGS~
& and~ & in "Working in the engine
compartment" on
page 271.
& WARNING
• Serio us per sonal injur y may oc cur a s a re sult of improperly
performed maintenan ce , adjustment s or repair s.
• Alway s be e xtremely careful when working on the vehi cle .
Alway s follow commonly accepted s afety pra ctice s and general
c ommon sen se . Ne ver ri sk p ers onal injury .
• Do not attempt any of the maintenan ce , check s or repair s
de scr ibed on the follo wing page s if you are not full y familia r with
the se or other procedure s with respect t o the vehicle , or are uncer
tain ho w to pr oceed .
• Do not do any work without the proper tool s and equ ipment .
Ha ve the ne cessa ry work done by your authorized Audi deale r or
another properly equipped and qu alified work shop .
~