engine AUDI A5 COUPE 2010 Owners Manual
[x] Cancel search | Manufacturer: AUDI, Model Year: 2010, Model line: A5 COUPE, Model: AUDI A5 COUPE 2010Pages: 360, PDF Size: 84.39 MB
Page 285 of 360

Checking and filling 111111
---------------------------=----
•
®
No
-sparks
- flames
- smoking .
When a battery is charged, it produces hydrogen
gas which is explosive and could cause personal
injury .
Always keep the battery well out of reach of chil
dren .
_& WARNING
Whenever working on the battery or on the electrical system ,
there is the risk of injury , accident and even fire . Read and heed the
following WARNINGS:
• Always wear eye protection . Do not let battery acid or any lead
particles get on your skin or clothing. Shield your eyes. Explosive
gases can cause blindness or other injury.
• Battery acid contains sulfuric acid . Sulfuric acid can cause
blindness and severe burns .
- Always wear gloves and eye protection . Do not tilt the
battery because acid could leak out of the ventilation openings .
- If you get battery acid in your eyes or on your skin, immedi
ately rinse with cold water for several minutes and get medical
attention.
- If you should ingest any battery acid , seek medical attention
immediately.
• Do not expose the battery to an open flame, electric sparks or
an open light.
• Do not smoke .
• Do not interchange the positive and negative cables .
• When working on the battery , be sure not to short -circuit the
terminals with tools or other metal objects . This would cause the
& WARNING (continued)
battery to heat up very quickly, which could lead to damage or
explosion and personal injury.
• When a battery is charged , it produces hydrogen gas which is
explosive and could cause personal injury .
• Always keep the battery well out of the reach of children. • Before work is done on the electrical system, disconnect the
negative ground cable .
• Before performing any work on the electrical system , switch off
the engine and ignition as well as any electrical equipment. The negative cable on the battery must be disconnected. If you are just
going to replace a light bulb, then it is enough to switch off the
lights.
• Before disconnecting the battery , switch off the anti -theft
alarm system! Otherwise you will set off the alarm .
• When disconnecting the battery , first disconnect the negative
cable and then the positive cable .
• Before reconnecting the battery, make sure all electrical
consumers are switched off . Reconnect the positive cable first and
then the negative cable . Never interchange the cables -this could
start a fire !
• Never charge a frozen or a thawed -out battery. It could
explode! If a battery has frozen, then it must be replaced . A
discharged battery can freeze over at 32 °F (0 °CI.
• Make sure the vent hose is always attached to the opening on
the side of the battery.
• Never use batteries which are damaged . There is the danger of
an explosion! Always replace a damaged battery .
_& WARNING
California Proposition 65 Warning:
Vehicle care
I t •
Page 286 of 360
___ C_h_ e_ c_k _in --== g'-- a_n _d_ f_il _li _n ..:::g:::..- ___________________________________________ _
& WARNING (c ont in ued)
• Batte ry po sts, te rmi nals a nd re late d accessor ies c ontain l ead
and l ead co mp ound s, chem ica ls know n to the S ta te o f Ca liforni a
to cause c ancer and repr odu ctive prob lems. Wa sh hands after
h andling.
0 Note
• Do not disconnect the vehicle battery when the ignition is
sw itched on or when the engine is running , otherwise, you wi ll
damage e lectron ic components in the e lectrical system .
• If your vehic le is going to s tand for a long period of time withou t
being driven, protect the battery from "freez ing", otherwise it will
be damaged and will then have to be replaced . •
Battery charging
Starting the engine requires a well charged battery.
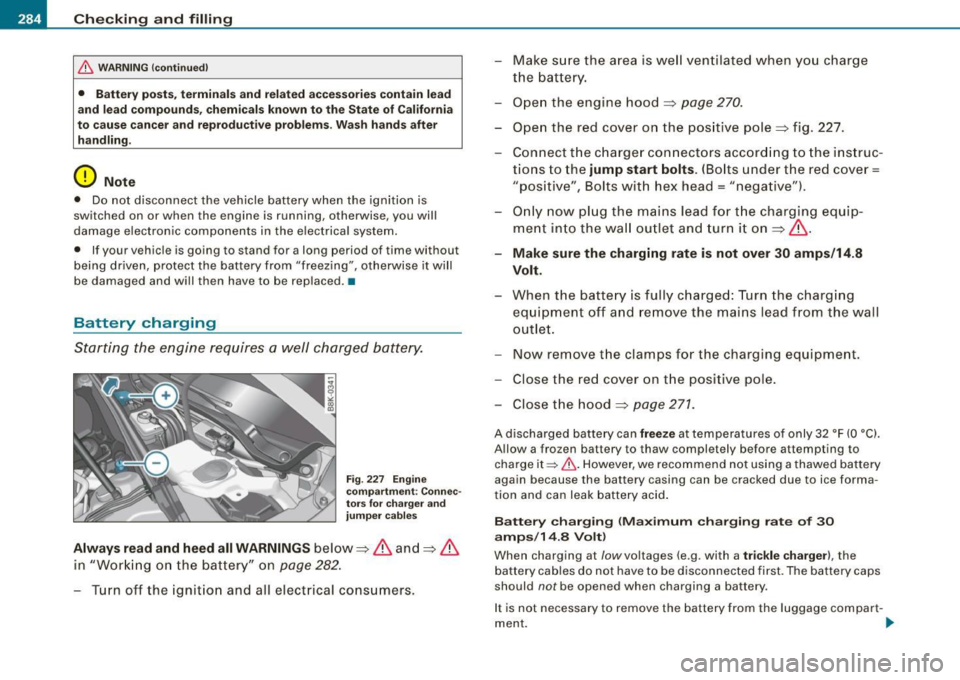
Fig . 227 E ngin e
co mp artm ent : Co nnec
tors for charger and
jump er cab les
Alw ay s re ad and h eed all WARNINGS below => & and=> &
in "Worki ng o n the batte ry" on
page 282 .
-Turn off the ign it io n and all electrical consumers . -
Make s ure the area is well ven tilated when y ou charge
the battery .
- Open the eng ine hood =>
page 270.
- Open the red cover on the pos itive pole => fig . 227.
- Connect the charger connectors accord ing to the ins truc-
t ions to the
jump start bolt s. (Bolts under the red cover=
"positive", Bolts with hex head= "negative").
- Only now pl ug the mains lead for t he charging equi p
me nt in to the wa ll ou tlet and turn i t on =>& .
-Make sure the ch arging rate is not over 30 amp s/14.8
Volt .
-When the battery is fully charged: Turn the charging
equipment off and remove the mains lead from the wall
outlet .
- Now remove the clamps for the charging equipment .
- Close the red cover on the positive pole.
- Close the hood
=> page 271 .
A d ischarged battery can freeze at temperatures of only 32 °F (0 °C).
Allow a fro zen bat tery to thaw completely befor e attempting to
cha rge it=> & . However , we recommend not using a thawed battery
again because the ba ttery c asing can be cra cked due to ice forma
tion and can leak battery acid .
Batt ery c harg ing ( Max imum cha rg ing r ate of 3 0
amp s/14.8 Volt )
When charging at
/ow voltages (e .g . with a trickle c harger ), the
battery cables do not have to be disconnected first . The battery caps
should
not be opened when cha rging a battery .
I t is not necessary to remove the battery from the luggage compart -
ment. _..
Page 287 of 360
___________________________________________ C_ h_e _c_ k_ i_n _g _ a_n _d_ f_il _li _n _g __ _
•
Fast charging the battery {charging rate above 14 .8
Volts )
For technical reasons do not use a battery charger that uses vo ltage
greater than 1 4.8 Vo lts to charge y our ve hic le 's battery.
& WARNING
Charging a battery can be dangerous .
• Always follow the operating instruct ions provided by the
battery charger manufacturer when charging your battery.
• Never charge a frozen battery. It may explode because of gas
trapped in the ice . Allow a frozen battery to thaw out first.
• Do not reuse batteries which were frozen. The battery housing
may have cracked and weakened when the battery froze .
• Charge the battery in a well ventilated area. Keep away from
open flame or electrical spark . Do not smoke . Hydrogen gas gener
ated by the battery is explosive.
• To redu ce the danger of e xplos ion , never connect or disconnect
charger cables while the charger i s operating.
• Fast charging a battery is dangerous and should only be
attempted by a competent technician with the proper equipment.
• Battery acid that may spill during charging should be washed
off with a solution of warm water and baking soda to neutralize
the acid .
0 Note
Never use a fast charger as a booster to start the engine . T his wil l
se rious ly da mage sen sit ive elec tronic componen ts, such a s control
un its, re lays, radio, etc., as well as the battery charger. •
Battery replacement
Th e ne w batt ery must hav e the sam e speci ficat ions and
d im en sions as t he o rigin al equi pmen t b att ery.
Intel ligent energy management in your vehicle is respons ib le for
d istr ibut ing t he e lectr ica l energy t hro ugh out your ve hicl e
~ page 241. The intelligent energy management syste m wil l keep
t h e eng ine ba ttery charge d better then veh icles without t his system .
T o make sure the additional electrical energy is available once again
af te r you hav e cha nged the battery, w e re co mmend tha t you in sta ll
batteries of the same type and manufacture on ly (the same as those
i nsta lled at t he time your vehic le was delive re d ). S pecifi cations a re
listed on the battery housing . Your authorized Audi dea ler wi ll then
code the batter y ma nageme nt control u nit.
If it is not poss ible to use a batt ery o f this ty pe, the new ba ttery must
have the same capacity, voltage (12 vo lts) , amperage, constr uction
and p lug sea lin g.
W hen installing the batter y, ma ke sure the ignition and all electrical
c o nsumers are tur ned off .
0 Note
Make sure the ven tilat io n hose on t he side o f the ba ttery is
conn ected, otherwise fumes or b att ery ac id can leak out .
<£' For the sake of the environment
Because of the proble m of proper d isposal o f a ba ttery, we recom
mend your authorized Audi dealer change the battery for you.
B at teri es co nt ain sulf uric acid a nd lead an d mu st alwa ys be
disposed of proper ly in comp liance with a ll environmental regula
t ions. Dispos ing o f v ehicle bat ter ie s i mproper ly is very danger ous to
the environment .•
Vehicle care I t •
Page 288 of 360
___ C_h_ e_ c_k _in --== g'-- a_n _d_ f_il _li _n ..:::g:::..- ___________________________________________ _
Windshield/headlight * washer
container
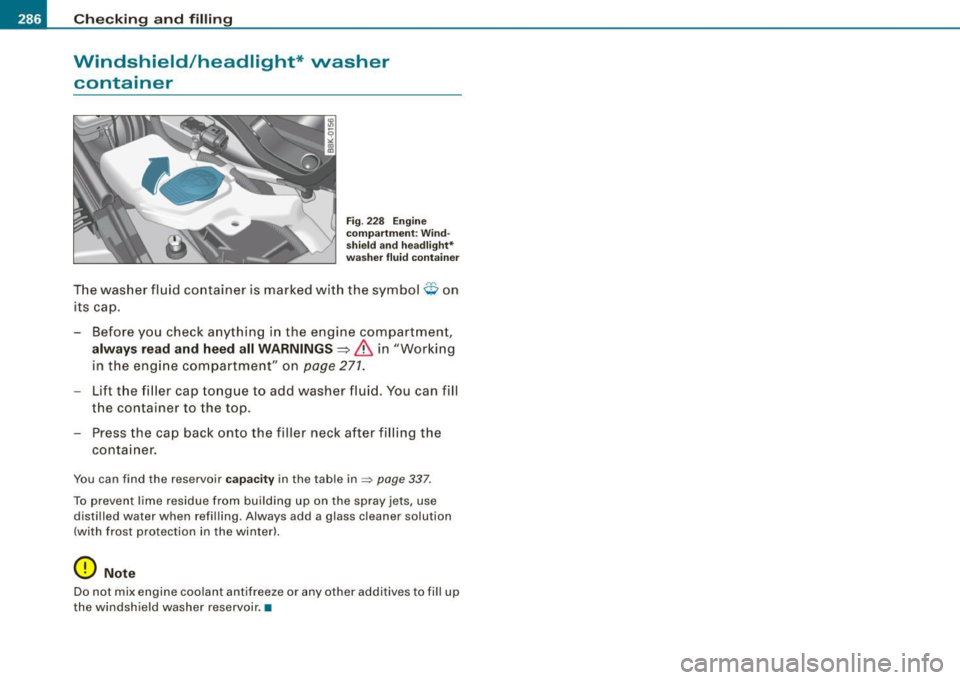
F ig . 228 Engi ne
co mpa rtm ent: Wi nd
s hiel d and hea dlight*
w ash er flui d cont ain er
The washer fluid containe r is marked with the symbol¢ on
its cap .
- Before you check anything in the engine compartment,
always r ead and heed all WARNINGS ~
& in "Working
in the engi ne compartment" on
page 271.
- Lift the filler cap tongue to add washer fluid. You can fill
the container to the top.
- Press the cap back onto the filler neck after filling the
container.
You can find the reservoir ca pacity in the table in=> page 337.
To prevent lime residue from building up on the spray jets, use
distilled water when refil ling . Always add a glass cleaner solution
(with frost protection in the winter).
(D N ote
Do not mix engine coolant antifreeze or any other additives to fill up
the windshield washer reservoir. •
Page 294 of 360

-~_T_ ir_e_ s_ a_ n_d _ w_ h_ e_e _l_s _________________________________________________ _
for the vehic le at its maximum capacity weight and tires that were
on your veh ic le at the time it was manufactu red .
If you wish to improve comfort when operating the vehicle at
normal load (up to 3 occupants) , you can adjust tire pressures to
those specified for normal vehicle load. Before operating the vehicle at maximum load, you must increase the tire pres sures to those
s pecified for maximum vehicle load =>
&.
Bear in mind that the tire pressure monitoring system* can on ly
m onito r the tir e pres sures you have stored. The sys tem does not
recognize the load condition of your veh ic le.
The effectiveness of the tire p ressure monitoring system* will be
impaired i f you store normal load pressures but then operate the
vehic le at its maximum load=>&. See
the illustrat ion=>
page 291, fig. 229 for the location of the label
ei ther on d river's s id e B-p illar or ins ide the fuel fille r fl ap (c olor of
the actual label and exact location on the vehicle w ill vary sl ight ly).
N ote that the fol lowing tab le is accurate at the time of going to
press and is subject to cha nge . In the eve nt of d iscrepa nc ies, t he tire
pressure label (On USA vehic les, the tire press ure labe l is located on
t he drive r's sid e B- pilla r. On Ca nada ve hicles, the tir e pressu re label
is located either on the driver's side B-pillar or inside the fuel fil ler
fl ap) always takes prece den ce.
T he tab le below l ists the recommended cold tire inflation pressures
f o r the A udi m odel co vered by your Owner's Litera ture at the
veh ic le 's capacity we ight and the ti re s izes installed on t he respec
tive mode ls as o rigi nal eq uipment, o r as a facto ry opti on.
Engine Tire designation Tire pressure front Tire pressure rear
(displace- normal load normal load
ment in condition (up to full load
condition (up full load
liter)
condition condition 2 occupants) to 2 occupants)
PSI PSI kPA kPA
4-cylinder 225/50 R17 94H All Season
32 2 20 33 23 0 29 200 33 230
2 .0
245/45 R17 95H All Season 32 220 33 230 29 200 33 230
245/40 R18 93H All Season 33 230
35 240 29 20
0 35 24 0
255 /35 R19 96V XL High Performance
32 220 33 230 32 220 33 230
265 /30 R20 94V XL High Performance 30 210 3 3 230 29 200 33 2 30
& -cylinder 225 /50 R17 94H All Season
33 230 35 240 29 200
33 230
3 .2
245/45 R17 95H All Season
33 230 35 240
29 200 33 230
245 /40 R18 93H All Season 33 230 36 250 29 200 35 240
255/35 R19 96V XL High Performance 32 220
35 24
0 32 22 0 33 23 0
265 /30 R20 94V XL High Performance
30 2
10
33 230 29 200 33 230
XL
= reinforced or extra load tire . It may also appear as xi , EXTRA LOAD, or RF on the tire sidewall.
Page 313 of 360

What do I do now? -
------------------
& WARNING
• Never use the screw driver hex head to tighten wheel bolts ,
si nce the bolts cannot attain the necessary tightening torque if
you u se the hex head , potentially causing an accident.
• The factory -supplied ja ck is intended only for your vehicle
model. Under no circumstances should it be used to lift heavy
vehicles or other loads ; you risk injuring yourself .
• Never start the engine when the vehicle is raised , which could
cau se an accident.
• Support the vehicle securely with appropriate stands if work is
to be performed underneath the vehi cle ; otherwise , there is a
potential ris k for injury . •
Ap plies to vehicles : w it h sp ac e-sa ving spare t ire
Space-saving spare tire (compact
spare tire)*
The spare tire/ wheel is located in the luggage compar t
ment u nder the cargo fl oo r cover. It is intended for s hort
te rm use onl y.
Fig . 2 39 Sp are tire
Removing the spare tire
Lift t he ca rgo floor by the p las tic ha ndle => fig. 239 .
Hook the han dle int o the lugg age compartment w eat he r
str ip.
Tu rn t he l arge screw => fig . 23 9 counte r-cloc kwis e.
Take out t he spa re tir e.
Unh ook the ca rgo floor befo re c losing the rear lid.
Securing the replaced tire
P lac e th e w heel with tir e in th e spare wheel well an d
sec ure t he whee l wi th the la rg e scr ew .
Unh ook the c argo floor bef or e c losing the re ar lid.
Using the spare tire (compact spare tire )
The compact spare tire is only intended fo r em ergencies until you
ca n r each a repa ir shop . Rep la ce it as quick ly as possible with a stan
dard whee l and tire.
T here are some restric tions on the use of the compact spa re tire .
The compact spare tire has been designed specifically for your type of vehic le. It must not be swapped with a compact spare tire from
another type of vehicle .
Snow chains
For technical reasons , the use of snow chains on th e compact spare
t ir e is
not permitted.
If you do have to drive with snow cha ins and a front t ire fails, mou nt
the spar e wheel with tir e instead of a rear tire. Install the snow
chains o n th e rear tire a nd use it to replace the defec tive fro nt tire . ._
Vehicle care Do-it-yourself service irechnical data
Page 314 of 360

-What do I do now?
...__ ______________
_
& WARNING
• Never use the spare tire if it is damaged or if it is worn down to
the tread wear indicators.
• If the spare tire is more than 6 years old, use it only in an emer
gency and with extreme caution and careful driving.
• The spare tire is intended only for temporary and short-term
use. It should be replaced as soon as possible with the normal
wheel and tire.
• After mounting the compact spare tire, the tire pressure must
be checked as soon as possible. The tire pressure of the compact
spare tire must be 4.2 bar; otherwise, you risk having an accident.
• Do not drive faster than 50 mph (80 km/h) . You risk having an
accident.
• Avoid full-throttle acceleration, heavy braking, and fast
cornering. You risk having an accident.
• Never drive using more than one spare wheel and tire. You risk
having an accident.
• Normal summer or winter tires must not be mounted on the
compact spare wheel rim.
• For technical reasons, the use of tire chains on the spare tire is
not permitted. If it is necessary to drive with tire chains, the spare
wheel must be mounted on the front axle in the event of a flat in a rear tire . The newly available front wheel must then be installed in
place of the rear wheel with the flat tire. Installing the tire chain
before mounting the wheel and tire is recommended.
• Loose items in the passenger compartment can cause serious
personal injury during hard braking or in an accident.
- Never store the inflatable spare tire or jack and tools in the
passenger compartment .
- Always store all jacking equipment, tools, and the inflatable spare tire in the luggage compartment.
- Tighten the knurled retaining screw for the inflatable spare
tire securely. •
Changing a wheel
Before changing a wheel
Observe the following precautions for your own and your
passenger's safety when changing a wheel.
After you experience a tire failure, pull the car well away
from moving traffic and try to reach level ground before
you stop :::;. & .
All passengers should leave the car and move to a safe
location (for instance, behind the guardrail) :::;,& .
- Engage the parking brake to prevent your vehicle from
rol ling unintentionally :::;.& .
Shift into 1st gear on vehicles with manual transmission,
or move the selector lever to the P position on vehicles
w ith automatic transm ission* .
If you are towing a trailer: unh itch the trailer from your
vehicle.
Take the jack :::;.
page 310 and the spare tire~ page 311
out of the luggage compartment.
& WARNING
You or your passengers could be injured while changing a wheel if
you do not follow these safety precautions:
• If you have a flat tire, move a safe distance off the road. Turn off
the engine, turn the emergency flashers on and use other warning
devices to alert other motorists.
• Make sure that passengers wait in a safe place away from the
vehicle and well away from the road and traffic.
~
Page 323 of 360
Fuses and bulbs -
------------------
Fuse Location, Instrument Panel left
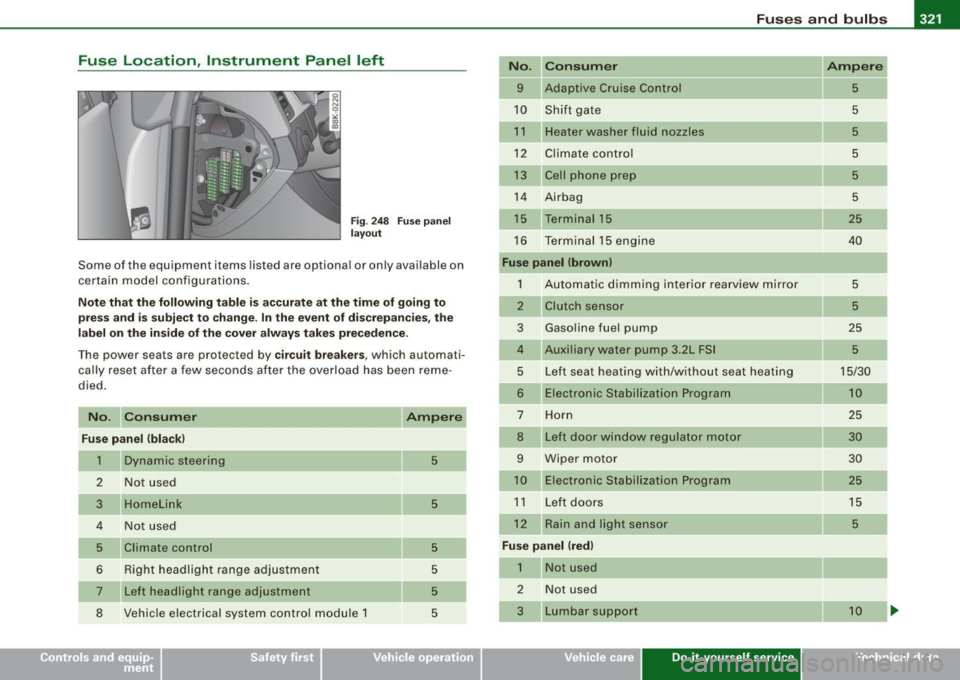
Fig . 248 Fuse panel
layout
Some of the equipment items listed are optional or only available on
certain model configurations.
Note that the following table is accurate at the time of going to
press and is subject to change. In the event of discrepancies, the
label on the inside of the cover always takes precedence.
The power seats are protected by circuit breakers , which automati
cally reset after a few seconds after the overload has been reme
died.
No. Consumer
Fuse panel (black)
1 Dynamic steering
2 Not used
3 Homelink
4 Not used
5 Climate control
6 Right headlight range adjustment
___ ,
7 Left headlight range adjustment
8 Vehicle electrical system control module 1
5
5
5
5
5
5
No.
9
10
11
12
13
14
16
Consumer
Adaptive Cruise Control
Shift gate
Heater washer fluid nozzles
Climate control
Cell phone prep
Airbag
Terminal 15
Te rminal 15 engine
Fuse panel (brown)
1 Automatic dimming interior rearview mirror
2
3
5
6
7
8
9
Clutch sensor
Gasoline fuel pump
Auxiliary water pump 3.2L FSI
Left seat heating with/without seat heating
Electronic Stabilization Program
Horn
Left door window regulator motor
Wiper motor Electronic Stabilization Program
11 Left doors
12 Rain and light sensor
Fuse panel Ired)
1
2
Not used
Not used
Lumbar support
Vehicle care Do-it-yourself service
Ampere
5
5
5
5
5
5
25
40
5
5
25
5
15/30 10
25
30 30
25
15
5
10
irechnical data
Page 326 of 360
11111.___F_ u_ s _ e_s _ a_n _ d_ b_ u_lb _ s _______________________________________________ _
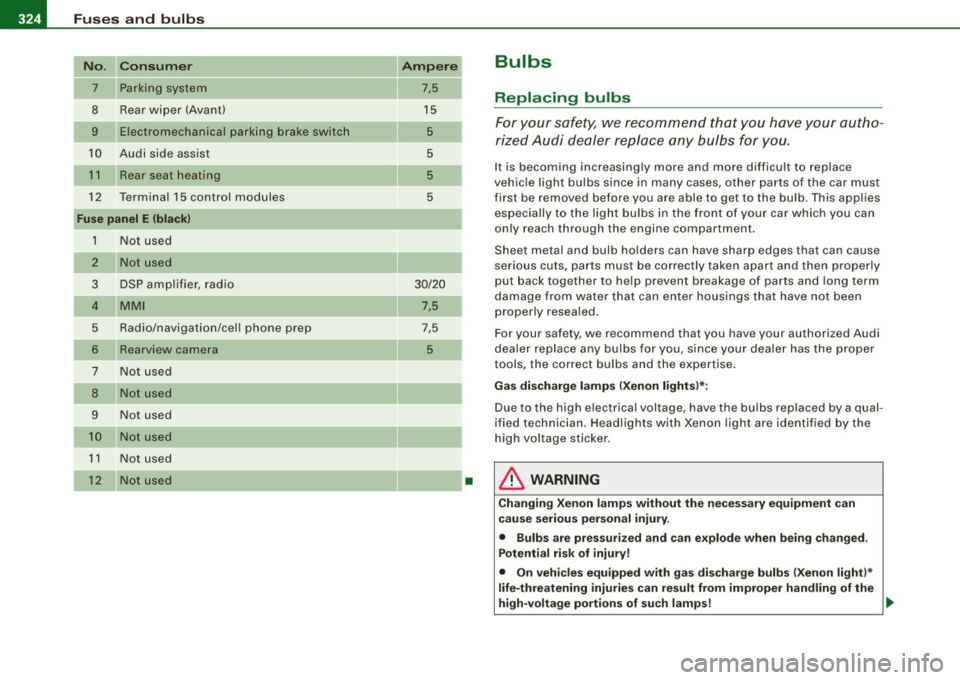
No. Consum er
7 Parking system
8 Rear wiper (Avant)
9 Electromechanical parking brake switch
10 Audi side assist
1 1 Rear seat heating
12 Terminal 15 control modu les
Fu se panel E (bla ck)
1 N ot used
2 Not used
3 DSP amp lifier, radio
4 MMI
5 Radio/navigation/cel l phone prep
6
Rearview camera
7 Not used
8 Not used
9 N ot used
10 Not us ed
1 1 Not used
12 Not used
Ampere
7,5
15 5
5
5
5
30/20
7,5
7,5
5
•
Bulbs
Replacing bulbs
For your s afety, we recommend th at you have your autho
ri zed Audi dealer replace any bulbs for you.
It is becoming increasingly more and more difficult to replace
vehic le light bulbs since in many cases, o ther parts of the car must
first be removed before you are able to get to the bu lb . This applies
especia lly to the light bu lbs in the front of your car which you can
only reach through the engine compartment .
Sheet metal and bulb holders can have sharp edges that can cause
serious cuts, parts must be correctly taken apart and then properly
put back together to help prevent breakage of parts and long term
damage from water that can enter housings that have not been
properly resealed.
Fo r your safety, we recommend that you have your authorized Audi
dea ler replace any bulbs for you, s ince your dealer has the proper
tools, the correct bulbs and the expertise.
Ga s di scharg e lamps (X enon ligh ts)*:
Due to the high electrical voltage, have the bulbs replaced by a qual
ified technician . Headlights with Xenon light are identified by the
high voltage sticker .
& WARNING
Changi ng Xeno n lamp s w ithout th e necess ary e quipm ent can
c a use se riou s pers on al injury .
• Bulb s are p ress urize d and can e xpl ode when being ch ange d.
Po tentia l ri sk of injury!
• On ve hic les equ ippe d with g as disc ha rg e bulb s (Xenon li ght )*
li fe -thre atening injuri es can re sult from impro per h andling of th e
hi gh-v olt age portion s of su ch lam ps! .,_
Page 327 of 360
Fuses and bulbs -
----------------
•
& WARNING (continu ed )
• Only your authorized Audi dealer or a qualified workshop
should change the bulbs in ga s discharge lamps. There are parts
with sharp edges on the openings and on the bu lb holders that
can cause seriou s cuts .
If you are uncertain about what to do ,
have the work performed by an authori zed Aud i dealer or other
qualified workshop. Serious personal injury may re sult from
improperly performed work .
[ i] Tips
• I f you sti ll prefer to replace the l ight bu lbs yourself, be aware that
t he engine compart ment is a ha zar do us area to w ork in =>
page 263,
"Engine compartment "=> & .
• I t is be st to as k yo ur aut ho rize d Audi d ealer wh enever you wa nt
to change a bulb .•
Do-it -yourself service