wheel AUDI A5 COUPE 2010 Owners Manual
[x] Cancel search | Manufacturer: AUDI, Model Year: 2010, Model line: A5 COUPE, Model: AUDI A5 COUPE 2010Pages: 360, PDF Size: 84.39 MB
Page 9 of 360
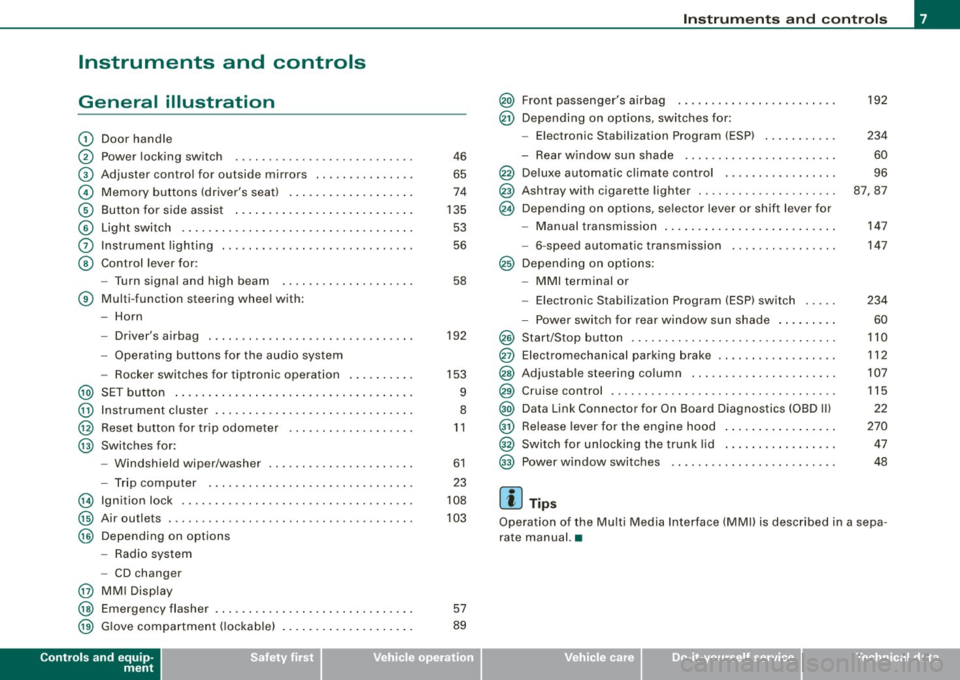
Instruments and controls
General illustration
G)
0
©
©
©
©
0
©
Door handle
Power locking switch
Adjuster contro l for outside mi rrors .. ...... ...... .
Memory buttons (driver's seat) .. ....... ...... ... .
Button for side assist ..... .... ... .. ...... ... ... .
Light switch .. ...... ....... ... ... .. .... ....... .
Instrument lighting ...... ..... .. .... .... ...... . .
Control lever for :
- Turn signal and high b eam
® Multi -function steering wheel with:
- Horn
-Driver's airbag .... ..... .. .... .... .... .... ... .
- Operating buttons for the audio system
- Rocker swi tches for tiptronic operation ...... ... .
@ SET button ..................... .... .......... .
@ Instrument cluster . ...... ........ .............. .
@ Reset button for trip odometer ... ...... ...... ... .
@ Swi tches for:
@
@
@
@
@
@
- Windshield wip er/washer ............. ... .. ... .
- Trip computer ..... .. .... .... ...... .... ... .. .
Ign ition lock .... .... .... ...... .... ... ... ... ... .
Air ou tlets ........... .... ..... ........... ... .. .
Depend ing on options
- Radio system
- CD changer
MM I Display
Emergency flasher
G love compartment ( lockab le)
Controls and equip
ment
46
65
74
135 53
56
58
192
153
9
8
11
61
23
108
103
57
89
Instruments and controls
@ Front passenger's airbag ......... ... .... .... ... .
@ Depending on options, switches for:
@
@
@
@
@
@
@
@
@
@
@
@
- Elect ron ic Stabilization Program (ESP) ..... .. .. . .
- Rear window sun shade ..... ... ... ... ... .. ... .
Deluxe automatic climate control . .... .... .... ... .
Ashtray with cigare tte lighter ..... ...... .. .... ... .
Depending on options, selector lever or shift l ever for
- Manual transmission ........ .... ....... .. . ... .
- 6-speed automatic transmission
Depending on options:
- MMI terminal or
- Electronic Stabil ization Program (ESP) switch
- Power switch for rear window sun shade ........ .
Start/Stop button .... .... ... .... .... .... .... ... .
Elect romechanical parking brake ... .... .... ...... .
Adjus tab le ste ering column .. ...... ...... ..... .. .
Cruise control .... ... .... .... .... .... .... ... ... .
Data Link Connector for On Board Diagnostics (OBD Ill
Release lever for the engine hood ........ ........ .
Switch for unlocking the trunk lid ...... .... .. .. .. .
Power window switches
[ i ] Tips
192
234
60
96
87,87
147
147
234
60
110
112
107
115
22
270 47
48
Operation of the Mu lti Media Interface (MMll is described in a sepa
rate manual. •
I • •
Page 15 of 360
& WARNING
• Failure to heed warning lights and other important vehicle
information may result in serious personal injury or vehicle
damage .
• Whenever stalled or stopped for repair, move the vehicle a safe
distance off the road, stop the engine, and turn on the emergency
flasher =>
page 57.
• The engine compartment of any motor vehicle is a potentially
hazardous area. Before you check anything in the engine compart
ment, stop the engine and let it cool down . Always exercise
extreme caution when working under the hood =>
page 263,
"Engine compartment ".
[ i] Tips
Many functions are monitored by the Auto-Check system
=>
page 27. Malfunctions or faults will be identified either with a red
symbol (priority 1 -Danger!) or with a yellow symbol (priority 2 -
Warning). •
Applies to vehic les: with Audi dr ive select
Dynamic steering c
If the indicator light illuminates when switching on the ignition
and goes out when the engine starts, dynamic steering is activated.
If the indicator light '.,,; illuminates after the engine starts, a system
malfunction has occurred. You can continue to drive carefully at a
reduced speed to a qualified workshop. Steering can be more diffi
cult or sensitive than usual. The steering wheel may also be at an
angle when driving straight.
Controls and equip
ment
Instruments and warning/indicator lights
& WARNING
Have the dynamic steering system malfunction repaired as soon
as possible by an authorized Audi dealer or any qualified work
shop -risk of accident!
[ i] Tips
• If the indicator light 6 flashes, dynamic steering is being re
initialized. The driver information system display shows the words
"Dynamic steering: initialization"=>
page 33.
• The dynamic steering stability systems are not available in the
event of a system malfunction. •
Electronic power control r.
This warning/indicator light monitors the electronic
power control.
The warning/indicator light (Electronic Power Control) illumi-
nates when you turn on the ignition as a function check.
[ i] Tips
If this warning/indicator light illuminates while you are driving, then
there is a malfunction in the engine electronics . Have the malfunc
tion corrected as soon as possible by your authorized Audi dealer or
qualified workshop. •
Electronic stabilization program (ESP)
If the ~ indicator lamp blinks while driving, the ESP or ASR (Anti
Slip Regulation) is actively regulating.
If the indicator lamp illuminates, the system has switched the
ESP off. In this case, you can switch the ignition off and then on to .,_
I • •
Page 18 of 360
Instruments and warning/indicator lights
Malfun cti on in the ele ctronic differ ential lo ck (EDL )
The
ED L works t oget her with the ABS. T he ABS warning light w ill
come on if there is a ma lfunction in the
ED L system=> page 235 . See
your au thorized A ud i dea ler as soon a s possible.
& WARNING
• If the ,..,1 (USA models )/;:_,,. (Canada models) warning light
does not go out , or if it comes on while driving , the ABS system is
not working properly. The vehicle can then be stopped only with
the standard b rake s (w ithout ABS ). You will not have the p rotec
tion ABS provides. Contact your authorized Audi dealer as soon as
po ssible .
• USA model s: If the BRAKE warning light and the l:i warning
light come on together, the rear wheel s could lock up first under
hard braking . Rear wheel lock-up can cause lo ss of vehicle control
and an ac cident. Have your vehicle repaired immediately by your
authori zed Audi dealer or a qualified workshop . Dr ive slowly and
avoid sudden , hard brake applications .
• Canada models : If the brake warning light «I» and the ABS
warning light
~ come on together , the rear wheels could lock up
first under hard braking . Rear wheel lock-up can cause loss of
vehicle control and an accident. Have your vehicle repaired imme
d iately by your authorized Audi dealer or a qualified workshop .
Drive slowly and avoid sudden , hard brake applications. •
Electromechanical parking brake
~[ (USA models) /(®) (Canada models)
The wa rning/in dic at or l ight m oni tors the elec tromechan
i c a l p arkin g bra ke.
With the parking brake applied and the ignit ion turned on, the
war ning/ ind icator lig ht illu min a te s. After the ig nition has been
turned off, the warning/indicator light continues to i llum inate for
abo ut 3 0 seconds. If the parking bra ke is applied with the ignition turned off, the warning/indicator light i
lluminates for about 30
s e co nd s.
Th e warning/ind icator light wi ll go out when the parking brake is
r eleased .
I f the warn ing/indica tor l ight flas hes con tinuously
after applying the
par king brake, bra king force is not sufficient to prevent the vehicle
from rol lin g uninten tiona lly . Please n ote the fo llowing:
• I f the slope of the ground is too steep to park the vehicle, the
additiona l drive message a ppea rs
Caution: Vehicle parked too
steep .
• In the event of a pa rking brake ma lfunction, the yel low symbol
appears in the instrument c luster display and the driver message
Parking brake malfunction! is displayed . Have the malfunction
r epaired as soon as possib le by an aut hor ized Audi dea ler or any
other qua lified workshop. •
Brake system BRAKE (USA models) /((D) (Canada
models)
The warning/indicator light fl ashes if bra ke fluid level is
low, if there is an A BS sys tem mal function or a parking
brake malfun ctio n.
T he li ght illu minates w hen t he ignitio n is tur ned on. It goes out afte r
the engine has been started . T his indicates that the brake warning
li ght is fu nctioni ng prope rly.
l9 If the brake warning l ight does not lig ht up when the eng ine is
cranking , there may be a malfunction in the electrical system. In this
case , contact an authori zed Audi dealer .
If the brake system warning/indicator light flashes, there is a brake
system ma lfunc tion . By press ing t he
[SE T) button, you ca n brin g up
a driver message which explains the ma lfunction in more detai l
=>
p age 29. ~
Page 19 of 360
If the ABS fai ls, the ABS warning/indicator light, ,., (USA
m odels)/ (Canada mode ls) flashes toge ther wit h the b rake system
warning/ind icator light=> &.
(USA models): If the warning light
BRAKE and the warning light
i llum inate toge ther, i mmediately co ntact your authorized Aud i
dea ler or qua lified workshop to have al l brake pads inspected
=>
page 34.
When the light comes on, an audible warning signal is also given .
& WARNING
• USA models : If the BRAKE warning light and the r,i:r warning
light come on together , the rear wheels could lock up first under
hard braking. Rear wheel lock -up can cause loss of veh icle control
and an ac cident. Have your vehicle repaired immediately by your
authorized Audi dealer o r a qualified workshop . Drive slowly and
avoid sudden, hard brake applications .
• Canada models : If the brake warning light ((D) and the ABS
warning light come on together, the rear wheels could lock up
first unde r hard braking . Rear wheel lock -up can cause lo ss of
vehicle control and an accident. Have your vehicle repaired imme
diately by your authorized Audi dealer or a qualified workshop .
Drive slowly and avoid sudden , hard brake applications.
• If the brake warning /indi cator light does not go out after a few
second s and the parking brake released, or lights up while you are
driving , the flu id level in the brake flu id reser voir is too low . If you
believe that it is safe to do so , proceed immediately at low speed
to the nearest authorized Audi dealer or qualified repair facility and have the brake system inspected.
• Always keep in mind that after several brake applications , you
will need greater pressure on the brake pedal to stop your vehi cle .
Do not rely on strained brakes to respond with ma ximum stopping
power in critical situations . You must allow for increased braking
distances . The extra di stance used up by fading brakes could lead
to an ac cident. •
Controls and equip
ment
Instruments and warning /indi cator lights
I • •
Page 32 of 360
Driver information display
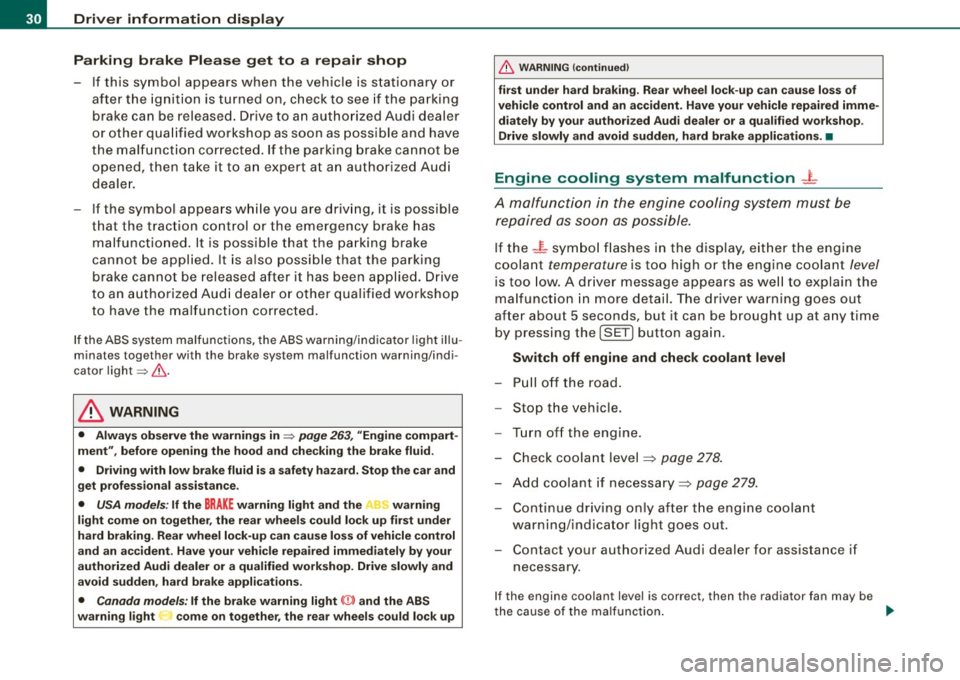
Parking brake Please get to a repair shop
-If this symbol appears when the vehicle is stationary or
after the ignition is turned on, check to see if the parking
brake can be released. Drive to an authorized Audi dealer
or other qualified workshop as soon as possible and have
the malfunction corrected. If the parking brake cannot be opened, then take it to an expert at an authorized Audi
dealer.
- If the symbol appears while you are driving, it is possible
that the traction control or the emergency brake has
malfunctioned. It is possible that the parking brake
cannot be applied. It is also possible that the parking
brake cannot be released after it has been applied. Drive
to an authorized Audi dealer or other qualified workshop
to have the malfunction corrected.
If the ABS system malfunctions, the ABS warning/indicator light illu
minates together with the brake system malfunction warning/indi
cator light=>& .
& WARNING
• Always observe the warnings in => page 263, "Engine compart
ment ", before opening the hood and checking the brake fluid.
• Driving with low brake fluid is a safety hazard. Stop the car and
get professional assistance.
• USA models: If the
BRAKE warning light and the warning
light come on together, the rear wheels could lock up first under
hard braking . Rear wheel lock-up can cause loss of vehicle control
and an accident. Have your vehicle repaired immediately by your
authorized Audi dealer or a qualified workshop. Drive slowly and
avoid sudden, hard brake applications.
• Canada models: If the brake warning light (Ci] and the ABS
warning light come on together, the rear wheels could lock up
& WARNING (continued)
first under hard braking. Rear wheel lock-up can cause loss of
vehicle control and an accident. Have your vehicle repaired imme
diately by your authorized Audi dealer or a qualified workshop.
Drive slowly and avoid sudden, hard brake applications. •
Engine cooling system malfunction _}_
A malfunction in the engine cooling system must be
repaired as soon as possible.
If the _p_ symbol flashes in the display, either the engine
coolant
temperature is too high or the engine coolant level
is too low. A driver message appears as well to explain the
malfunction in more detail. The driver warning goes out
after about 5 seconds, but it can be brought up at any time
by pressing the [ SET] button again.
Switch off engine and check coolant level
- Pull off the road.
- Stop the vehicle.
- Turn off the engine.
- Check coolant level~
page 278.
- Add coolant if necessary ~ page 279.
Continue driving only after the engine coolant
warning/indicator light goes out.
- Contact your authorized Audi dealer for assistance if
necessary.
If the engine coolant level is correct, then the radiator fan may be
the cause of the malfunction. ...
Page 36 of 360
Driver information display
more difficult or sensitive than usual. The steering wheel can also
be at an angle when driving straight.
Dynamic steering: initialization
If this driver message appears and the indicator light is flashing
on the instrument panel, dynamic steering is being reinitialized.
Once you start the engine after this is finished, the steering wheel
wi ll be easy to move. Re-initialization might be necessary if the
steering whee l was moved hard to the left and right while the
vehicle was not moving. The display goes out as soon as initializa
tion is complete .
& WARNING
Have the dynamic steering system malfunction repaired as soon
as possible by an authorized Audi dealer or any qualified work
shop -risk of accident!
[ i ] Tips
The dynamic steering stability systems are not available in the event
of a system malfunction. •
Applies to vehi cles: wit h conven ienc e key
Key not in vehicle
Key not in vehicle
This reminder appears along with the symbol if the master key is
removed from the vehicle with the engine running. It is intended to
remind you (e .g. when changing drivers) not to continue the journey
without the master key.
If the master key is no longer in the vehicle, you cannot switch off
the ignition after stopping the engine and you also cannot start the
engine again . You also cannot lock the vehicle from the outside .•
Ap plies to vehi cles : w it h li ght/ ra in sensor
Light /rain sensor defective C../1
...i-Automatic headlights /automatic wipers defective
If the symbo l il luminates, the light sensor has failed . For safety
reasons the low beams are turned on permanently with the switch
in
AUTO . However, you can continue to turn the lights on and off
using the light switch. In the case of a defect in the rain sensor, the
windshie ld wiper lever functions are still available. Have the
light/rain sensor checked as soon as possible by an authorized Audi
dea ler. •
Worn brake pads
Brake pads!
If the warning light illuminates, immediately contact your autho
rized Audi dealer or qualified workshop to have all brake pads
inspected . On USA models the warning light 't comes on together
with the warning light
BRAKE . Both sets of brake pads on an axle must
a lways be replaced at the same time .
& WARNING
Driving with bad brakes can cause a collision and serious personal
injury.
• If the warning light and the warning lig ht
BRAKE1
l with the
message Brake pads! comes on in the instrument cluster display ,
immediately contact your authorized Audi dealer or qualified
workshop to have all brake pads checked or replaced if
necessary .•
1 1 BRAK£ : USA models only
Page 59 of 360
Applies to veh icles : w ith ad aptive light
Adaptive light
When driving around bends, the relevant area of the road
is better illuminated.
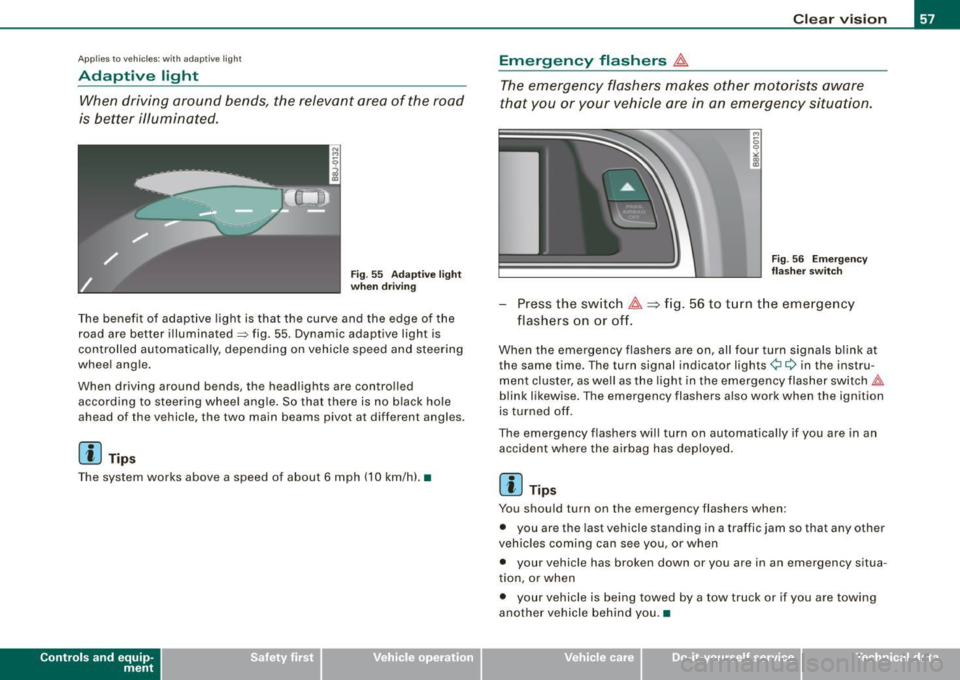
Fig. 55 Adaptive light
when driving
The benefit of adaptive light is that the curve and the edge of the
road are better illuminated~ fig. 55 . Dyna mic adaptive light is
controlled automatically, depending on vehicle speed and steering
wheel angle.
When driving around bends, the head lights are controlled
according to steering wheel angle . So that there is no black hole
ahead of the vehicle, the two main beams pivot at different angles.
[ i ] Tips
Th e system works above a speed of about 6 mph (10 km/hl. •
Contro ls and eq uip
ment
Clear vision
Emergency flashers
&.
The emergency flashers makes other motorists aware
that you or your vehicle are in an emergency situation.
Fig. 56 Emergency
flasher switch
Press the switch ~=>fig. 56 to turn the emergency
flashers on or off.
When the emergency flashers are on, all four turn signals blink at
the same time. The turn signal indicator lights¢¢ in the instru
ment cluster, as well as the light in the emergency flasher switch
fftt.
blink likewise. The emergency flashers also work when the ignition
is turned off.
The emergency flashers will tu rn on automatically if you are in an
accident where the airbag has deployed .
[ i ] Tips
You should turn on the emergency flashers when :
• you are the last vehicle standing in a traffic jam so that any other
vehicles coming can see you, or when
• your vehicle has broken down or you are in an emergency situa
t io n, or when
• your vehicle is being towed by a tow truck or if you are towing
another vehicle behind you.•
Vehicle care I I irechnical data
Page 60 of 360
Clear vision
Turn signals -
¢ ¢ and high beam j[D lever
The lever on the left side of the steering column is used to
operate the turn signals and the high beam as well as the
headlight flasher.
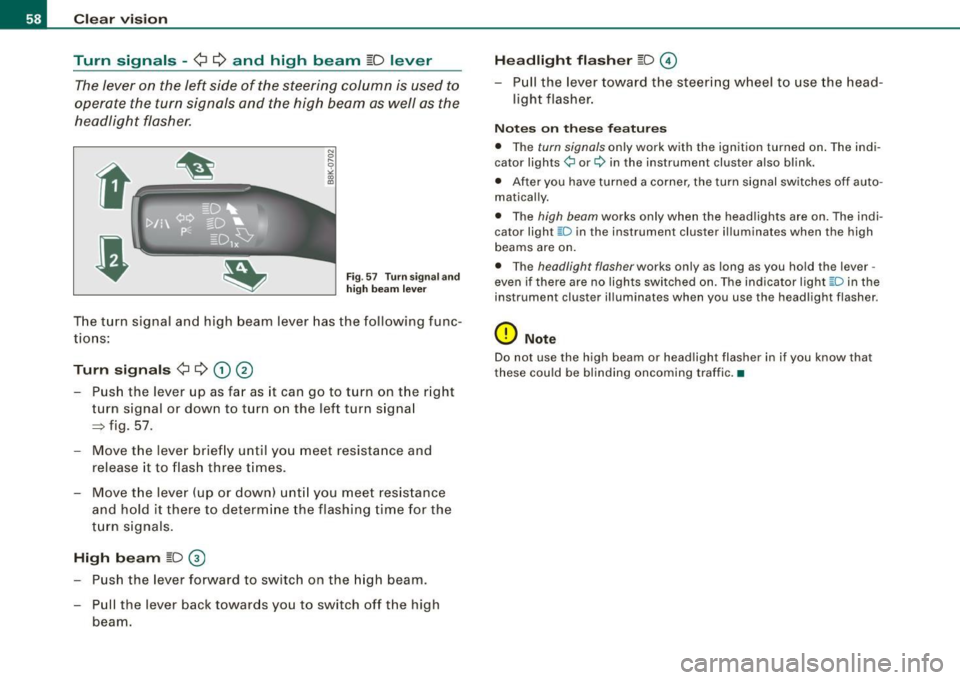
Fig . 57 Turn signal and
high beam lever
The turn signal and high beam lever has the following func
tions:
Turn signals ¢ Q G) ®
- Push the lever up as far as it can go to turn on the right
turn signal or down to turn on the left turn signal
=> fig. 57.
- Move the lever briefly until you meet resistance and
release it to flash three times.
- Move the lever (up or down) until you meet resistance
and hold it there to determine the flashing time for the
turn signals.
High beam ~D 0
- Push the lever forward to switch on the high beam.
- Pull the lever back towards you to switch off the high
beam.
Headlight flasher ~D ©
- Pull the lever toward the steering wheel to use the head
light flasher.
Notes on these features
• The turn signals only work with the ignition turned on. The indi
cator lights ¢ or¢ in the instrument cluster also blink.
• After you have turned a corner, the turn signal switches off auto
matically.
• The
high beam works only when the headlights are on. The indi
cator light [D in the instrument cluster illuminates when the high
beams are on.
• The
headlight flasher works only as long as you hold the lever -
even if there are no lights switched on. The indicator light [D in the
instrument cluster illuminates when you use the headlight flasher .
0 Note
Do not use the high beam or headlight flasher in if you know that
these could be blinding oncoming traffic. •
Page 71 of 360
Seats and storage
General recommendations
Why is your seat adjustment so important? The safety belts and the airbag system can only provide
maximum protection if the front seats are correctly
adjusted.
The re are various ways of adjusting the front seats to provide safe
and comfortable support for the driver and the front passenger.
Adjust your seat properly so that:
• you can easily and quickly reach all the switches and controls in
the instrument panel
• your body is properly supported thus reducing physical stress
and fatigue
• the safety belts and airbag system can offer maximum protec
tion
~ page 188.
In the follow ing sections, you will see exactly how you can best
adjust your seats.
There are special regulations and instructions for installing a child safety seat on the front passenger's seat. Always follow the informa
tion regarding child safety provided in~
page 213, "C hild Safety".
& WARNING
Incorrect seating position of the driver and all other passengers
can result in serious personal injury.
• Always keep your feet on the floor when the vehicle is in motion
- never put your feet on top of the instrument panel, out of the
window or on top of the seat cushion. This applies especially to
the passengers. If your seating position is incorrect, you increase
the risk of injury in the case of sudden braking or an accident. If
Controls and equip
ment
Seats and storage
& WARNING (continued)
the airbag inflates and the seating position is incorrect, this could
result in personal injury or even death.
• It is important for both the driver and front passenger to keep
a distance of at least 10 inches (25 cml between themselves and
the steering wheel and/or instrument panel. If you're sitting any closer than this, the airbag system cannot protect you properly. In
addition, the front seats and head restraints must be adjusted to
your body height so that they can give you maximum protection.
• Always try to keep as much distance as possible between your
self and the steering wheel or instrument panel.
• Do not adjust the driver's or front passenger's seat while the
vehicle is moving. Your seat may move unexpectedly, causing
sudden loss of vehicle control and personal injury . If you adjust
your seat while the vehicle is moving, you are out of position. •
Driver's seat
The correct seat position is important for safe and relaxed
driving.
We recommend that you adjust the driver's seat in the
following manner:
Adjust the seat in fore and aft direction so that you can
easily push the pedals to the floor while keeping your
knees slightly bent=>
& in "Why is your seat adjustment
so important?".
- Adjust the seatback so that when you sit with your back
against the seatback, you can still grasp the top of the
steering wheel. ..,
I • •
Page 73 of 360
Applies to vehicles : w it h manua lly adj ustab le seats
Adjusting the seat
Position and shape of the seat can be adjusted manually
to ensure safe and comfortable seating.
Read and follow the warning notices=> & before you
adjust your seat.
Fore-and-aft adjustment
- Pull the lever CD=> page 70, fig. 71 up and push the seat
to the desired position.
- Release the lever CD and continue to move the seat until
it locks into place.
Lengthening or shortening upper thigh support*
- Lift the button @ under the seat cushion. The front seat
cushion moves forward under spring force.
- Push the seat cushion back when you have finished using
it.
Adjusting seat cushion angle*
- Pull or push the lever ®=> page 70, fig. 71 up or down
(pumping motion).
Adjusting the curvature of the lumbar support*
- Push the switch plate @forward or backward to increase
or reduce the curvature.
Adjusting the height of the lumbar support*
- Push the switch plate© up or down to position the
curvature higher or lower.
Controls and equip
ment
Seats and storage
Raising or lowering seat height
- Pull or push the lever©=> page 70, fig. 71 up or down
(pumping motion) .
Adjusting seat back angle
-Remove weight from the seat back (do not lean against
it).
- Turn the hand wheel©=> page
70, fig. 71 to adjust the
angle of the seat back accordingly.
& WARNING
• Adjust the driver's seat only when the vehicle is stationary. You
risk an accident otherwise.
• Exercise caution when adjusting the seats. Adjusting the seat
carelessly or without checking can pinch hands and fingers.
• While the vehicle is moving, the seat backs of the front seats
must not be inclined too far to the rear because the effectiveness
of the safety belts and the airbag system is severely compromised
- there is a risk of injury. •
I • •