ECO mode AUDI A5 COUPE 2011 Owner's Guide
[x] Cancel search | Manufacturer: AUDI, Model Year: 2011, Model line: A5 COUPE, Model: AUDI A5 COUPE 2011Pages: 362, PDF Size: 84.88 MB
Page 169 of 362

_________________________________________________ H_ o_ m_ e_ L_in _ k_® _ __.fflll
App lies to veh icles : w ith Home link® un iversa l remote control
Progr amming the Homelink ® tr ansmitter
The transmitter is programmed in two phases . For rolling
code transmitters, a third phase is also necessary .
,,,,, r, o: o "'' '''"
Fig. 161 Ove rhead
console: Homelink ®
keypa d
Fig. 162 Rad iator
g rille
Phase 1: progr amming the overhe ad keyp ad
1. Make sure your vehicle is within operating range of the
r emote controlled garage door opener .
2 . Set the parking brake:::::>
& in "General information " on
page 166.
3. Turn the ignition on. Do not start the engine!
Con tro ls a nd e quip
m en t Vehicle
OP-eration
4. Press and hold the two outside Homelink ® buttons G)and
@ for approximately
20 seconds until indicator light@
:::::> fig. 161 begins to flash . Then release both buttons. Do
not hold the buttons for longer than
30 seconds .
- This procedure only needs to be performed
once. It erases
the factory-set default codes and does not have to be repeated to program additional remote controls.
5. Press and hold the Homelink ® button G), @ or@ until
the indicator light @starts flashing
slowly . Release the
button.
- The system will remain in programming mode for 5
minutes .
Co to the front of the vehicle and proceed with
phase
2 .
Phase 2: at the rad iator g rille
6. Point the o rigi nal r emote control to the m iddle of the
radiator grille of your vehicle=> fig.
162 .
7. Hold the original remote control at a distance between O
S in. (0-13 cm) (use the shortest distance possible) .
8 . Press and hold the activation button on the remote
control.
- May be different in Canada . If so, press and re-press
(cycle) the activation button on your remote control every
two seconds.
9. The emergency flashers will flash
three tim es (after about
15-60 seconds) when the programming is successful.
Release the button on the remote control.
- To program more devices , repeat steps 4 to 9.
Vehicle care Do-it-yourselt service iTechnical data
Page 171 of 362
___________________________________________________ H_o_ m_ e_L_ i_ n _ k_ ® __ _
Applies to vehicles : w ith Home link® un iversa l remote cont rol
Reprogramming a single button
A HomeLink ® button con be reprogrammed individually
without affecting the other button allocations .
Programming the overhead keypad
Press the appropriate Homelink® button until the indi
cator light begins flashing slowly.
At the radiator grille
1. Point the original remote control to the middle of the
radiator grille of your vehicle~
page 167, fig. 162.
2. Hold the original r emote control at a distance between O
S in . (0 -13 cm) (use the shortest distance poss ible) .
3 . Press and hold the activation button on the remote
control.
4. The emergency flashers will flash three times (after about
15-60 seconds) when the programming is successful.
Now release the button on the remote control.
- If the device utilizes a rolling code, please follow phase 3
of ~
page 167 , "Programming the Homelink® trans
mitter" for rolling code programming.
This procedure will cause the existing programming on the
Homelink ® button to be erased! •
Controls and equip
ment Safety first
App
lies to vehicles : w ith Home link® un iversa l remote cont rol
Erasing the programming of the
Homelink ® transmitter
When you erase the programming, the programming on
all three of the transmitter channels with be lost!
- Perform steps 1 to 4 as described on~ page 167, "Phase
1: programming the overhead keypad" .
When completed, the Homelink® system will b e in the programming
mode and is then ready to learn the codes for remote controlled
d evices.
[I] Tips
• Programm ed buttons canno t be e ras ed ind iv idually.
• For security reasons you are adv ised to erase the programming of
the Horne Link ® system befo re you sell your vehicle. •
Vehicle care Technical data
Page 207 of 362
______________________________________________ ___:.A:::::.:.: ir:....: b~ a~g !....= s:ly '..:s~ t~ e~ m~ ---
& WARNING (co ntinued )
• Always make sure that the side airbag can inflate without
interference:
-Never install se at covers or replacement upholstery over the
front seatbacks that have not been specifically approved by
Audi .
- Never use additional seat cushions that cover the areas
where the side airbags inflate .
- Damage to the original seat covers or to the seam in the area
of the side airbag module must always be repaired immedi
ately by an authorized Audi dealer.
• The airbag sy stem can be activated only once. After an airbag
has inflated, it must be replaced by an authorized Audi dealer or
qualified technician who has the technical information , training
and special equipment necessary.
• The airbag sy st e m can be deployed only onc e. After an airbag
has been deployed, it must be replaced w ith new replacement
parts de signed and approved es pecially for your Audi model
version . Replacement of complete airbag systems or airbag
components must be performed by qualified workshops only.
Make sure that any airbag service action is entered in your Audi
Warranty
& Maintenance booklet under AIRBAG REPLACEMENT
RECORD.
• In accidents when an airbag is deployed, the vehicle battery
separates the alternator and the starter from the vehicle electrical
system for safety reason s with a pyrotechnic circuit interrupter.
- Work on the pyrotechnic circu it interrupter must only be
performed by a qualified dealer -risk of an a ccident!
- If the vehicle or the circu it interrupter is scrapped, all appli
cable safety precautions must be followed .
Controls and equip ment Safety first Vehicle operation
'£' For the sake of the environment
U
ndeployed airbag modules and pretens io ners mig ht be classified as
Perch lorate Material -special handling may app ly, see
www.d ts c. ca.gov/ha za rdouswaste/pe rchlorate . W he n t he vehicle or
parts of the restraint system includi ng a irbag modules safety belts
w ith pretens io ners are s crappe d, all ap plic abl e laws and reg ulat ion s
must be observed. Your author ized Aud i dealer is familiar with these
req uir ements and we recommen d that yo u have yo ur dea le r pe rform
this service for you .•
Other things that can affect Advanced
Airbag performance
Chang ing the ve hicle's suspension system can change the way that
t he Adv anced Airbag System pe rforms in a crash . For example, using
tire-r im combinations not approved by Aud i, lower ing the veh icle,
c hang ing the st iffness o f the suspe nsio n, incl uding the s prings,
s u spension str uts, shoc k absorbe rs etc. can change the forces that
are meas ured by the airb ag sensors and sen t to the ele ctron ic con trol
uni t. Some suspension changes ca n, for examp le, increase the force
levels measu red by t he sensors and ma ke the airbag system dep loy in
crashes in which it wou ld not deploy if the changes had not bee n
made . Other kin ds of changes may re duce the force levels meas ured
by the senso rs and p revent the airbag from dep loyi ng when it should .
The sensors in the safety belt buckle for the d river and front
p assenger se at tell the e le ct ro nic co ntro l mo dule if the sa fe ty belt is
latc hed or not . If the safety be lt is be ing used, the fron t airbag w ill
dep loy at a s ligh tly hig her ra te o f ve hicl e decelerat io n t han if the
safety belt is not be ing used. T he refo re, in a part icular collis io n, it is
poss ible that an a irbag wi ll not deploy at a seating posit ion where the
safety belt is being used but wi ll inflate at the posi tion whe re the
safety belt is not bei ng used. It is important that not hing interfere
w ith the s afe ty be lt bu ckles so t hat th e sensor s can sen d the correct
information about safety belt use to the electronic contro l unit. ..
Vehicle care Do-it-yourself service Technical data
Page 219 of 362
_________________________________________ _:C~ h~il ~d ~ S~a ..!.:fe =. t SYL _lffll
and for the different models of the same kind of child restraint
offered by child restraint manufacturers.
The weight ranges for the individual types, makes and models of ch ild
restraints that the NHTSA has specified in the Safety Standard
together with the weight ranges of typical infants and typical 1 year
old child have been stored in the control unit of the Advanced Airbag
System. When a child restraint is being used on the front passenger
seat with a typical 1 year-old chi ld, the Advanced Airbag System
compares the weight meas ured by the weight sensing mat with the
information stored in the electronic control unit .
The electronic contro l unit a lso registers the tension on the front
passenger safety belt. The tension on the safety belt for the front
passenger seat will be different for an adult who is properly using the
safety belt as compared to the tension on the belt when it is used to
attach a child restraint to the seat . The sensor below the latch for the
safety belt for the front seat passenger measures the tension on the
belt. The input from this sensor is then used with the weight to
"decide", whether there is a child restraint with a typical 1 year-old
child on the front passenger seat and whether or not the airbag must
be turned off .•
Child restraints and Advanced Airbags
Regardless of the child restraint that you use, ma ke sure that it has
been certified to meet United States Federal Motor Vehicle Safety
Standards and has been ce rtified by its manufacturer for use with an
airbag . Always be sure that the child restraint is properly installed at
one of the rear seating positions. If in exceptional circumstances you
must use it on the front passenger seat, carefully read all of the infor
mation on ch ild safety and Advanced Airbags and heed all of the
app licab le WARNINGS. Make certain that the child restra int is
correctly recognized by the weight-sensing mat inside the front
passenger seat, that the front passenger airbag is turned off and that
the airbag status is always correctly signaled by the
PASSENGER AIR
BAG OFF
light.
Controls and equip ment Safety first Vehicle operation
Many types and models of child restra
ints have been available over
t he years, new models are introduced reg ularly incorpo rating new
and improved designs and older models are taken out of product ion.
Chi ld restraints are not standardized. Child restraints of the same
type typ ically have d ifferent weights and sizes and differe nt 'foot
prints,' the size and shape of the bottom of the child restraint that
sits on the seat, when they are installed on a vehicle seat . These
differences make it virtually impossib le to certify compliance with
t he requirements for advanced airbags with each and every chil d
restra int that has ever been sold in the past or will be sold over the
course of the useful life of your vehicle.
For this reason, the United States Nationa l Highway Traffic Safety
Administration has published a list of specific type, makes and
mode ls of child restra ints that must be used to cert ify compliance of
the Advanced Airbag System in yo ur vehicle with the suppression
requirements of Federal Motor Veh icle Safety Standard 208. These
child restraints are:
Subpart A - Car bed child restraints
Model
Angel Gua rd Angel Ride
AA2403 FOF
Manufactured on or
after
September 25, 2007
Subpart B -Rear-facing child restraints
Model
Century SmartF it 4543
Cosco Ar riva 22-013PAW and
base 22-999 WHO
Evenflo D iscovery Ad just Right
21 2
Evenflo First Cho ice 204
Manufactured on or
after
December 1, 1999
September 25, 20 07
December 1, 1999
December 1, 1999
Vehicle care Do-it-yourself service Technical data
Page 251 of 362
Driving and environment
------------------------------------------------'
depending upon vehicle load and speed, road and weather conditions,
trip length, etc. •
Drive smoothly and keep a lookout ahead
Vehicles use the most fuel when they are accelerating .
-Avoid unnecessary accelerating and braking.
Vehicles use the most fuel when they are accelerating. If you antici
pate what is going to happen next, you will need to brake less and,
thus, accelerate less. Let the vehicle coast whenever possible - for
example when you see that the next traffic light is red.
Avoid full throttle
Driving at moderate speeds saves fuel and improves your
mileage.
- Try and keep well below your car's maximum speed.
Accelerating gently reduces fuel consumption, engine wear, and does
not disturb the environment .
Fuel consumption, exhaust emissions and eng ine noise increase
disproportionately at high speeds . If you drive at approximately three
quarters of top speed, fuel consumption will be reduced by one half.
Never drive faster than the posted speed limit and weather condi
tions permit. •
Reducin~ unnecessary idling
Even when your car is just idling it burns up fuel.
-Shut the engine off when you are not driving the vehic le .
- Do not warm up the vehicle by letting the engine run at
idle.
Controls and equip ment Safety first Vehicle operation It makes sense to shut off the engine in traffic jams, when waiting for
trains to pass at railroad crossings, or at traffic lights that have long
waits on red. Turning the engine off for just 30 -40 seconds saves
more fuel than is burned starting the engine again .
It takes a long t ime for the engine to warm up fully when it is running
at idle. However, wear and noxious emissions are especia lly high
when the eng ine is warming up. So you should dr ive away as soon as
you start the engine and avoid running at high rpms while the engine
is still warming up.
0 Note
Do not leave engine idling unattended after starting . If warning
lights should come on to indicate improper operation, they would go
unheeded. Extended idling also produces heat, which could result in
overheat ing or other damage to the vehicle or other property. •
Regular maintenance
A badly tuned engine unnecessarily wastes a lot of fuel .
- Have your vehic le serviced at regular intervals .
By having your vehicle regularly serviced by an authorized Audi dealer
helps to ensure that it runs properly and economically . The condit ion
of your vehicle not on ly affects its safety and ability to hold its val ue,
it also affects fuel consumption.
Check your oil each time you fill your tank.
Th e amount of oil used is related to engine load and speed.
It is normal for the oil consumption of a new engine to reach its
lowest value after a certain mileage has been driven.
You must dr ive your veh icle about 3,000 miles (5,000 kilometers)
before you can properly assess oi l consumption .
Thi s also applies to fuel consumption and eng ine output.
Vehicle care Do-it-yourself service Technical data
Page 279 of 362
___________________________________________ C_ h_e _c _k_ i_n ~g_ a_n_ d_ f_ i_ll _i_n _g __ ,n
© Windshield/headlight* washer container (W ) . . . . . . . 290
(J) Power steering reservoir . . . . . . . . . . . . . . . . . . . . . . . . . 242
The position of the engine oil filling hole=:> fig. 205 (item@) can
differ depending on the engine design .
& WARNING
Before you check anything in the engine compartment, always
read and heed all WARNINGS=:>
& in "Working in the engine
compartment" on
page 275. •
Engine oil
Engine oil specifications
The engine oil used in your Audi needs the right kind of oil.
The engine in your Audi is a sophisticated power plant that was built
to exacting specifications. This engine needs the right kind of engine
oil that meets specifications regarding quality and viscosity so that it
can run smoothly and reliably. Choosing the right oil and changing oil
within the time and mileage intervals printed in your vehicle's
Warranty
& Maintenance booklet matters a lot more today than it did
years ago. Audi has developed a special quality standard for engine oil
that will help assure that your vehicle's engine will get the lubrication
it needs for proper operation.
Modern engine lubrication has taken a quantum leap in the last few
years. Many synthetic oils available today provide better engine lubri
cation that can outlast traditional petroleum-based oils, making
them a smart choice for use throughout the life of your Audi.
Whether you use synthetic or petroleum-based engine oil, the oil that
you use must conform to Audi's oil quality standard VW 502 00 to help keep your vehicle's engine running smoothly and help prevent
the formation of harmful deposits, sometimes called "sludge", that
over time can lead to expensive repairs.
Safety first
At the time of printing, engine oils available in the U.S. and Canada
that meet the exacting specifications of Audi oil standard VW 502 00
are synthetic engine oils. This does not mean, however, that every
synthetic engine oil will meet Audi oil standard VW 502 00. So always
be sure that you use an approved oil.
To help prevent the formation of harmful deposits use only oil with
the following specifications printed on the oil container:
Audi oil standard VW 502 00
Oil container labels may carry the specification singly or in combina
tion with other designations and oil quality standards.
Viscosity
Engine oils are graded according to their viscosity. The proper
viscosity grade oil for your engine depends on climactic or seasonal conditions where you drive. You can use oil with a viscosity grade of
SAE SW40 across all temperature ranges for normal driving condi
tions.
However, if engine oil viscosity grade SAE SW40 is not available, you
can also use viscosity grade SAE SW-30 or SAE OW-40 as long as it
meets Audi oil quality standard VW 502 00 specifications.
Because engine oil that meets the Audi oil standard may not be avail
able everywhere when you need it, we strongly recommend that you
always carry with you an extra quart (liter) of oil that expressly
conforms to the VW 502 00 specification, in case you have to top off
the oil while on the road.
Only if the level of the oil is at or below the minimum mark - and no
oil that expressly conforms to Audi oil standard VW 502 00 specifica
tions is available -may you top off with a high quality engine oil, pref
erably synthetic-based, that meets ACEA A3, ACEA AS or ACEA BS or
API SL specifications, but even then, only in viscosity grades SAE SW-
40, SAE SW-30, or SAE OW-40. However, during the entire time
between oil change intervals, never top off with more than a total of
0.5 qt/liter engine oil that does not conform to Audi oil specification
vw 502 00. ..
Vehicle care Technical data
Page 287 of 362
___________________________________________ C_ h_e _c _k_ i_n ~g_ a_n_ d_ f_ i_ll _i_n _g __ _
The fluid level may drop slightly after some time due to the auto
matic adjustment of the brake pads. This is not cause for alarm.
If the brake flu id level falls considerably below the "MIN " mark, the
brake warning/indicator light (U.S. models:
BRAKE , Canadian mode ls:
{(j)) ) will come on=> page 18 and=> page 33. Do not continue to
ope rate the vehicle. The complete brake system should be thorough ly
checked by an authorized Audi dealer or qualified workshop and the
cause corrected. If the brake fluid level is too low, the brake
wa rning/ind icator light will illuminate. Contact an authorized Aud i
dealer
immediately .
[I] Tips
The brake fluid reservoir is located undernea th the cover. •
Changing brake fluid
Hove the broke fluid changed by on experienced techni
Clon.
Brake fluid absorbs moisture from the air. If the water content in the
brake fl uid is too high, corrosion in the brake system may result after
a period of time. The boiling point of the brake fluid will also decrease
considerably and decrease braking performance.
Therefore, the brake flu id must be changed
every two years. Always
use new brake fluid which conforms to Federal Motor Vehicle Stan
dard "FMVSS 116 DOT 4".
The brake fluid reservoir can be difficult to reach, therefore, we
recommend that you have the brake fluid changed by your authorized
Audi dealer. Your dealer has the correct tools, the right brake fluid
and the know-how to do this for you .
& WARNING
• Brake fluid is poi sonous. It must be stored only in the closed
original container out of the reach of children!
Safety first
& WARNING (continued )
• Brake failure can result from old or inappropriate brake fluid.
Observe these precautions:
-Use only brake fluid that meets SAE specification
J 1703 and
conforms to Federal Motor Vehicle Standard 116. Always check
with your authorized Audi dealer to make sure you are using
the correct brake fluid . The correct type of brake fluid is also
indicated on the brake fluid reservoir.
- The brake fluid must be new. Heavy use of the brakes can
cause a vapor lock if the brake fluid is left in the system too
long. This can seriously affect the efficiency of the brakes as
well as your safety. This could result in an accident .
0 Note
Brake fluid will damage the paint of your vehicle.
ffi For the sake of the environment
Because of the prob lem of proper disposal of brake fluid as well as
th e special tools required and the necessary expertise, we recom
mend that you have the brake fluid changed by your author ized Audi
dealer. •
Battery
General information
Under normal operating conditions, the battery in your Audi does not
need any maintenance . With high outside temperatures or long daily
drives we recommend that you have the electro lyte level checked by
an authorized Audi dealer or qualified workshop . The electrolyte leve l
should also be checked each t ime the battery is charged=> page 288.
~
Vehicle care Technical data
Page 298 of 362
-~_T_ ir_e_ s_ a_ n_ d_ w_ h_e_ e_ ls _______________________________________________ _
vehicle at its maximum capacity weight and tires that were on your
vehicle at the tim e it was manufactured.
If you wish to improve comfort when operating the vehicle at
normal load (up to 3 occupants) , you can adjust tire pressures to
those specified for normal vehicle load. Before operating the
vehicle at maximum load, you must increase the tire pressures to
those specified for maximum vehicle load
=> &.
Bear in mind that the tire pressure monitoring system* ca n only
monitor the tire pressures you have stored. The system does not
recogn ize the load condit ion of your vehicle.
The effectiveness of the tire pressure monitoring system* wi ll be
impaired if you store normal load pressures but then operate the
vehicle at its maximum load
=> &.
See the illustration => page 295, fig. 212 for the locat ion of the label
either on driver's side B-pillar or inside the fuel filler flap (color of the
actual label and exact location on the vehicle will vary slightly).
Note that the following tab le is accurate at the time of going to press
and is subject to change. In the event of discrepancies, the tire pres
sure label (On USA vehicles, the tire pressure label is located on the
dr iver's side B-pillar. On Canada vehicles, the tire pressure label is
located e ither on the driver's s ide B-pillar or inside the fuel filler flap)
always takes precedence.
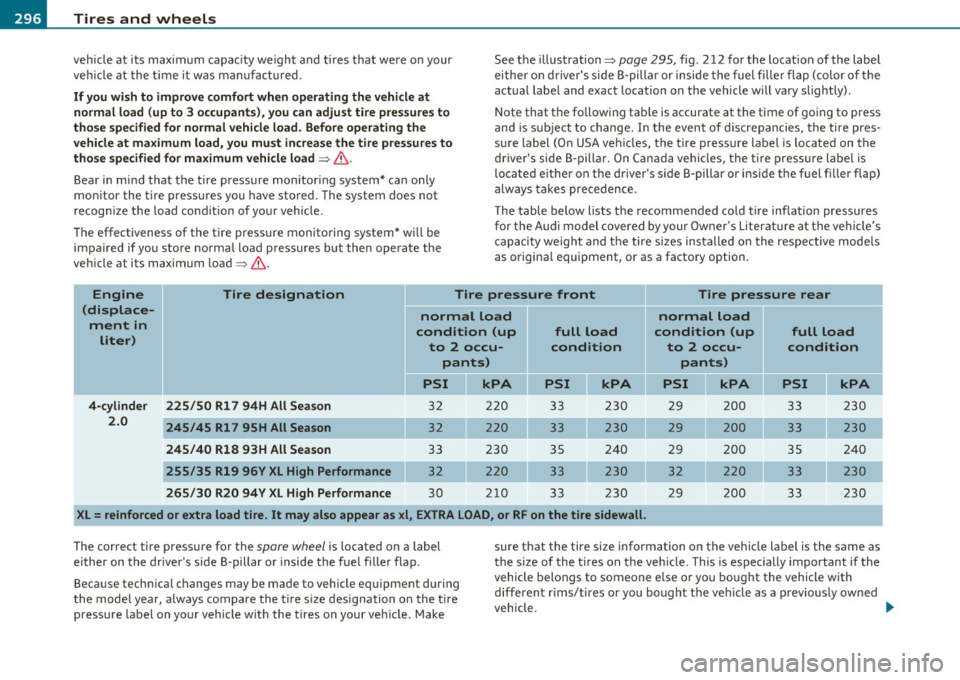
The table below lists the recommended cold tire inflation pressures
for the Audi model covered by your Owner's Literature at the vehicle's
capacity weight and the tire sizes installed on the respective models
as origina l equipment, or as a factory option.
Engine
(displace ment in liter) Tire designation
Tire pressure front Tire pressure rear
normal load normal load
condition (up full load condition
(up
full load
to 2 occu- condition to 2 occu- condition pants) pants)
PSI Jl kPA PSI kPA PSI kPA PSI II kPA
4-cylinder 225/50 Rl 7 94H All Season 32 220 33 230 29 200 33 230
2.0
245/45 Rl 7 95H All Season 32 220 33 230 29
200 33 230
245/40 R18
93H All Season 33 230 35 240 29 200 35 240
255/35 R19 96V XL High Performance 32 220 33 230 32 220 33 230
265/30 R20 94Y XL High Performance 30 210
33 230 29 200
33 230
XL=
reinforced or extra load tire. It may also appear as xi, EXTRA LOAD, or RF on the tire sidewall.
The correct tire pressure for the spare wheel is located on a label
either on the driver's s ide B-pillar or inside the fuel filler flap.
Beca use technica l changes may be made to vehicle equipment during
the model year, always compare the tir e s ize designation on the tir e
pressure label on your vehicle with the tires on your vehicle. Make sure that the tire size information on the vehicle label is the same as
the
size of the tires on the vehicle. This is especially important if the
vehicle belongs to someone e lse or you bought the vehicle with
different rims/tires or you bought the veh icle as a previous ly ow ned
vehicle. _.,,
Page 307 of 362
________________________________________________ T_i_re _ s_ a _ n_d_ w_ h_ e_ e_l_s __ _
numbers or letters indicate the plant where it was manufactured, and
t he last f our num be rs represen t the wee k an d ye ar of man ufacture.
For examp le, t he numbers 2209 mean that the t ire was prod uced in
the 2 2nd week of 2009. The ot her num bers are marketing co des that
may or may not be used by the t ire manufacturer . Th is information is
used to contact consumers if a tire defect requires a reca ll.
Audi Original tire
Tir es wi th the identifi cat io n "A O" or "RO" have bee n specially
matched w it h your Aud i. W e recommend using only these t ires
because t hey meet the hig hest standards regard ing safety and
driv ing c ha racteris tics when used correct ly . Yo ur aut ho rize d Aud i
dealer wi ll gladly p rovide you with more information.
Tire ply composition and materials used
T he num ber o f plies ind ica tes the numbe r of layers o f rubber -coa ted
fab ric in the tire. I n ge neral, th e greater the n umber of plies, the
more weight a tire can support . Tire manufacture rs a lso must in di
cate the mater ials in the t ire, which incl ude stee l, nylon, polyes ter,
and others .
Maximum Load Rating
This num ber indicates t he maximum load in kilog rams and pounds
tha t can be carr ied by the t ire.
Tire quality grading for treadwear, traction, and
temperature resistance
T read wea r, traction and tempe rat ure gra des => page 306 .
Maximum Permissible Inflation Pressure
This number is the g rea tes t a mou nt o f air pressure th at sh ould ever
be put in the t ire under normal driv ing cond itions.
Safety first
& WARNING
• Using incorrect or unmatched tires and/ or wheels or improper
tire and wheel combination s can lead to loss of control, collision
and serious personal injury.
• Always u se tire s, rim s and wheel bolts that meet the specifica
tions of original factory -installed tires or other combinations that
have been specifically approved by the vehicle manufacturer.
• Tires age even if they are not being used and can fail suddenly,
e specially at high speed s. Tires that are more than 6 years old can
only be used in an emergency and then with special care and at
lower speed s.
• Never mount used tires on your vehicle if you are not sure of
their "previous history ." Old u sed tires may have been damaged
eventhoughthedamage cannotbeseenthatcanleadtosudden
tire failure and loss of vehicle control.
• All four wheels must be fitted with radial t ires of the same
type , size (rolling circumference ) and the same tread pattern .
Driving with different tires reduces vehicle handling and can lead
to a loss of control.
• If the spare ti re is not the same as the t ires that are mounted
on the vehicle -for example with winter tires -only use the spare
tire for a short period of time and drive with extra care. Refit the
normal road wheel as soon as safely possible .
• Never drive faster than the ma ximum speed for which the tires
on your vehicle are rated becau se tire s that are driven faster than
their rated speed can fail suddenly .
• Overloading tire s cau se heat build-up, sudden tire failure,
including a blowout and sudden deflation and loss of control.
• Temperature grades apply to tires that are properly inflated
and not over or unde rinflated.
• For technical reasons it is not always possible to u se wheels
from other vehicles- in some cases not even wheels from the same
vehicle model. ..,_
Vehicle care Technical data
Page 311 of 362
________________________________________________ T_i_re _ s_ a _ n_d_ w_ h_ e_ e_l_s __ _
wheels are fitted secure ly and that the brake system func tions
cor rectly.
I n certa in circumsta nces, yo u may not use wheel bo lts from a
different vehicle -even if it is the same model =>
page 342 .
& WARNING
Improperly tightened or maintained wheel bolts can become
loose causing loss of control, a collision and serious personal
injury .
• Always keep the wheel bolts and the threads in the wheel hubs
clean so the wheel bolts can turn easily and be properly tightened.
• Never grease or oil the wheel bolts and the threads in the wheel
hubs. They can become loose while driving if greased or oiled, even
if tightened to the specified torque.
• Only use wheel bolts that belong to the rim being installed .
• Never use different wheels bolts on your vehicle.
• Always maintain the correct tightening torque for the wheel
bolts to reduce the risk of a wheel loss. If the tightening torque of
the wheel bolts is too low, they can loosen and come out when the
vehicle is moving. If the tightening torque is too high, the wheel
bolts and threads can be damaged and the wheel can become
loose.
0 Note
The specified torque for the wheel bolts is 90 ft lbs. (120 Nm) wit h a
tol eran ce o f± 7,4 ft lbs.( ± 10 Nm ). Tor qu e wheel bolts di ag on ally.
After chang ing a wheel, the to rque must be checked as soon as
p ossib le wi th a tor qu e wrench - prefer ably by an authorized Audi
dealer or qualified wo rkshop .•
Safety first
Low aspect ratio tires
Your Audi is factory-equipped with low aspect rat io tires. These tires
h ave bee n t horo ugh ly te st ed a nd bee n sele cted spe cifica lly for your
mode l for their supe rb performance, road fee l and hand ling u nder a
v ariety o f dr iv ing co ndi tio ns . Ask your author ized A udi d ealer for
more deta ils.
Th e low as pect rat io of these tires is indicated by a numera l o f
55 or
less
in t he ti re 's s ize des ig nation. The nu meral represen ts the ratio o f
the t ire's si dewall height in relat io n to its tread wi dth expressed in
per ce nta ge. Conve ntiona l t ires h ave a heigh t/w idt h rat io of 60 or
more.
The performance of low-aspect-ratio tires is particularly sensitive to
improper inflation pressure . It is therefore important that low
aspect ratio tires are inflated to the specified pressure and that the
inflation pressure is regularly checked and maintained. Tire pre s
sures should be checked at least once a month and always before a
long trip~ pag e 297, "Ch ecking tire pre ss ur e".
What you can do to avoid tire and rim damage
Low as pect ratio t ires ca n be damaged more easi ly by impact w ith
potholes, curbs, gullies or ridges on the road, pa rtic ularly if t he tire is
unde rinflated.
I n order to minim ize the occurrence of impact damage to the t ires of
your vehicle, we re co mmend that y ou o bserve the f ollowin g pre ca u
tions :
• Always maintai n recommen ded in flation p ressures. Chec k your
tire pressu re e very 2,0 00 m ile s (3,0 00 km) an d add air if n ecess ary .
• D rive ca refu lly on roads with potholes, deep gulli es o r ridges. The
impact from d riving thro ugh or over such obs tacles can damage your
tires. Im pact w it h a cu rb may also cause damage to your tires .
• After a ny impact , immediately inspect you r tir es o r have t hem
inspected by the nea rest author ized Aud i dealer . Replace a damage d
t ire as soon as possib le. _.,
Vehicle care Technical data