belt AUDI A5 COUPE 2013 Owners Manual
[x] Cancel search | Manufacturer: AUDI, Model Year: 2013, Model line: A5 COUPE, Model: AUDI A5 COUPE 2013Pages: 294, PDF Size: 73.84 MB
Page 5 of 294
Safety belts . . . . . . . . . . . . . . . . . . . 134
General notes . . . . . . . . . . . . . . . . . . . . 134
Why safety be lts? . . . . . . . . . . . . . . . . 135
Safety belts . . . . . . . . . . . . . . . . . . . . . 13 7
Safety belt pretens ioners . . . . . . . . . . 140
Airbag system . . . . . . . . . . . . . . . . . 142
Important things to know . . . . . . . . . . 142
Front airbags . . . . . . . . . . . . . . . . . . . . 146
Mon itor ing the Advanced Airbag
System . . . . . . . . . . . . . . . . . . . . . . . . . 153
Knee ai rbags . . . . . . . . . . . . . . . . . . . . . 157
Side airbags . . . . . . . . . . . . . . . . . . . . . 160
Side curta in a irbags . . . . . . . . . . . . . . . 162
Ch ild Safety . . . . . . . . . . . . . . . . . . . 166
I mpor tant things to know . . . . . . . . . . 166
C hil d safety seats. ..... ... .. .. .. .. 172
Install ing a child safety seat . . . . . . . . 176
L A T CH Lower ancho rages and tethe r
for children . . . . . . . . . . . . . . . . . . . . . . 180
Addit ional Information 184
Vehicle operation . . . . . . . . . . . . . 185
Intelligent technology . . . . . . . . 185
Not ice about data recorded by vehicle
control modules . . . . . . . . . . . . . . . . . . 185
E lect ron ic Stabilization Control (ESC) . 185
Braking . . . . . . . . . . . . . . . . . . . . . . . . . 188
E lect ro-me chanical power assist ,
dynam ic steering . . . . . . . . . . . . . . . . . 189
D riving w ith your quattro ® . . . . . . . . . 190
Energy management . . . . . . . . . . . . . . 191
Driving and environment . . . . . 193
The first 1,000 miles (1,500 km) and
afterwards . . . . . . . . . . . . . . . . . . . . . . 193
Avoid damaging the vehicle . . . . . . . . . 193
Driving through water on roads . . . . . 193
Cataly tic converter . . . . . . . . . . . . . . . . 194
Operate your vehicle econom ically and
minim ize pollution ............... . 195
Trailer towing . . . . . . . . . . . . . . . . . 197
Driving w ith a t ra iler . . . . . . . . . . . . . . 197
Trailer towing tips . . . . . . . . . . . . . . . . 199
Table of contents 3
Vehicle care . . . . . . . . . . . . . . . . . . .
200
Cleaning and protection . . . . . . 200
Genera l information . . . . . . . . . . . . . . 200
Care of exterior . . . . . . . . . . . . . . . . . . 200
Care of interior . . . . . . . . . . . . . . . . . . . 206
Fuel supply and filling your
fuel tank ... .. .. .. . .............
211
Gasoline . . . . . . . . . . . . . . . . . . . . . . . . 211
Fuel tank .. .. .. .. .. . .. .... ...... . 213
Checking and filling . . . . . . . . . . . 216
Engine hood . . . . . . . . . . . . . . . . . . . . . 216
Engine compartment .............. 218
E ngine oil . . . . . . . . . . . . . . . . . . . . . . . 218
En gine cooling system . . . . . . . . . . . . . 223
Br ake fluid . . . . . . . . . . . . . . . . . . . . . . 225
Battery . . . . . . . . . . . . . . . . . . . . . . . . . 226
Windshie ld/headlight* washer
container . . . . . . . . . . . . . . . . . . . . . . . 230
Tires and wheels ... ..... ... .. .
Tires ... .. .. .. .... . ... ...... ... . 231
231
Tire pressure monitoring system 249
Do-it-yourself service . . . . . . . . . 252
What do I do now? . . . . . . . . . . . . 252
Vehicle tool kit . . . . . . . . . . . . . . . . . . . 2S2
Space-saving spare tire (compact
spare tir e) . . . . . . . . . . . . . . . . . . . . . . . 252
Chang ing a wheel . . . . . . . . . . . . . . . . . 253
Fuses and bulbs . . . . . . . . . . . . . . . 2S9
Fuses ... .. .. .. .. .. . .. .... ...... . 259
Bulbs . . . . . . . . . . . . . . . . . . . . . . . . . . . 262
Emergency situations . . . . . . . . . 263
General . . . . . . . . . . . . . . . . . . . . . . . . . 263
Starting by pushing or towing . . . . . . . 263
Star ting with jumpe r cables . . . . . . . . 263
U se of jumpe r cables . . . . . . . . . . . . . . 264
E mergency towing with commercia l
tow truck . . . . . . . . . . . . . . . . . . . . . . . 265
Lifting vehicle . . . . . . . . . . . . . . . . . . . . 267
•
•
Page 19 of 294
Instruments and warning/indicator lights 17
malfunction. Drive to your autho rized Audi
dealer or qualified workshop immediately to
have the malfunction corrected.
~ Safety belts
This warning/indicator light reminds you to
put on your safety belt.
The . warning/ind icator light ill uminates
when the ignition is switched on to remind
the driver and any front passenger to put on
the safety belt. Additionally, an acoustic warn
ing (gong) will also sound.
For more Information ¢
page 134, Safety
belt warning light.
0 Battery
T he . warning/indicator light illuminates
when you switch on the ignition and must go
out after the engine has started.
• Alternator fault: Battery is not being
charged
If the indicator light turns on and the mes
sage appears, there is a malfunction in the
generator or vehicle e lectrica l system .
Drive to your autho rized Aud i dealer or quali
fied workshop immediately . Because the vehi
cle battery is discharging, turn
off all unnec
essary electrical equipment such as the radio .
Seek professional assistance if the battery
charge level is too low.
(•) Low battery: Battery will be charged
while driving
If the indicator light turns on and the mes
sage appears , there may be limited starting
ability .
If thi s message turns off after a litt le w hile,
the battery charged eno ugh wh ile driving.
If the message does not turn
off, have your
author ized Audi dealer or qualified workshop
correct the malfunction.
"l::;r: Engine oil pressure
The red engine oil pressure warning symbol
requires immediate service or repair . Driving
with a low-oil-pressure indication is likely to
inflict severe damage to the engine.
• Turn off engine! Oil pressure too low
If the indicator light turns on and the mes
sage appears, the oil pressure is too low.
.,. Pull
off the road .
.,. Stop the vehicle.
.,. Turn
off the engine.
.,. Check the engine oil level ¢ page 221.
.,. If the eng ine oil level is too low, add eng ine
oil
¢ page 221. Make sure that the oil pres
sure warning symbol. appears no longer
in the display before you start dr iv in g again .
.,. If the engine oil level is correct and the ind i
cator light still turns on, turn the engine
off
and do not continue driving. Seek professio
na l assistance .
(D Tips
- The engine oil pressure symbol. is
not an indicator for a low engine oil lev
el. Do not rely on it. Instead, check the
oil level in your engine at regular inter
vals, preferably each time you refuel,
and always before going on a long trip.
- The yellow oil level warning indication
l!I requires oil refill or workshop serv
ice without delay. Do not wait until the
red oil pressure warning. starts to
flash before you respond to the low oil
level warning
1!1-By then, your engine
may already have suffered serious dam
age.
~ .. Engine oil level
• WARNING: Please add oil immediately
If the indicator light and the message appear,
add engine oil immediately
¢ page 221.
Page 55 of 294
Seats and storage
General recommen
dations
Why is your seat adjustment so important?
The safety belts and the airbag system can
only provide maximum protection if the front
seats are correctly adjusted.
There are various ways of adjusting the front
seats to provide safe and comfortable support
for the driver and the front passenger. Adjust
your seat properly so that :
- you can easily and quick ly reach all the
switches and controls in the instrument
panel
- your body is properly supported thus reduc ing physical stress and fatigue
- the safety belts and airbag system can offe r
maximum protection
¢ page 142.
In the following sections, you will see exactly
how you can best adjust your seats .
There are special regulations and instructions
for installing a child safety seat on the front passenger's seat. Always follow the informa
tion regard ing child safety provided in
¢ page 166, Child Safety.
.&_ WARNING
-
Refer to ¢ page 124, Driving Safely for
important information, tips, suggestions
and warnings that you should read and fol
low for your own safety and the safety of
your passengers.
.&_ WARNING
Incorrect seating position of the driver and
all other passengers can result in serious
personal injury.
- Always keep your feet on the floor when
the vehicle is in motion -never put your
feet on top of the instrument panel, out of the w indow or on top of the seat cush
ion. This app lies especially to the passen-
S eat s an d sto rage 53
gers . If your seating position is incorrect,
you increase the risk of injury in the case
of sudden braking or an accident . If the
airbag inflates and the seating position
is incorrect, this cou ld result in pe rsonal
in jury or even death.
- It is important for both the driver and front passenger to keep a distance of at least 10 inches (25 cm) between them
selves and the steering wheel and/or in
strumen t panel. If you're s itting any
closer than th is, the airbag system can
not protect you properly. In addition, the
front seats and head restraints m ust be
adj usted to your body height so that they
can give you max imum protect ion.
- Always try to keep as much distance as
possible between yourself and the steer
ing wheel or instrument panel.
- Do not adjust the driver's or front pas senger's seat whi le the vehicle is moving.
Your seat may move unexpectedly, caus
ing sudden loss of veh icle control and
pe rsonal injury. If you adjust you r seat
while the veh icle is moving, you are ou t
of posit ion.
Driver's seat
The correct seat position is important for safe
and relaxed driving .
We recommend that you adjust the dr iver's
seat in the follow ing manner:
.., Adjust the seat in fore and aft direction so
that you can easily push the pedals to the
floor wh ile keeping your knees slightly bent
¢ .&, in Why is your seat adjustment so im
portant? on page 53.
"" Adjust the seatback so that when you sit
w ith your back against the seatback , you can
s ti ll grasp the top of t he steering wheel.
... App lies to vehicles with adjustable head re
straints: Adjust the head restraint so the up
per edge is as even as possible wit h the top
of your head. If that is not possib le, try to
adjust the head restraint so that it is as .,.
Page 56 of 294
54 Seats and storage
close to this position as possible
¢page 56.
A WARNING
Never place any objects in the driver's foot
well. An object could get into the pedal area and interfere with pedal function. In
case of sudden braking or an accident, you
would not be able to brake or accelerate .
Front passenger's seat
Always move the front passenger seat into
the rearmost position .
To avoid contact with the airbag while it is de
ploying, do not sit any closer to the instru
ment panel than necessary and always wear
the three-point safety belt provided adjusted correctly . We recommend that you adjust the
passenger's seat in the following manner:
• Bring the backrest up to an (almost) upright
position. Do not ride with the seat reclined .
• Applies to vehicles with adjustable head re
straints: Adjust the head restraint so the up
per edge is as even as possible with the top
of your head . If that is not possible, try to
adjust the head restraint so that it is as
close to this position as possible
¢ page 56.
• Place your feet on the floor in front of the
passenger's seat.
Front seats
Power seat adjustment
Applies to vehicles: with power adjustab le seats
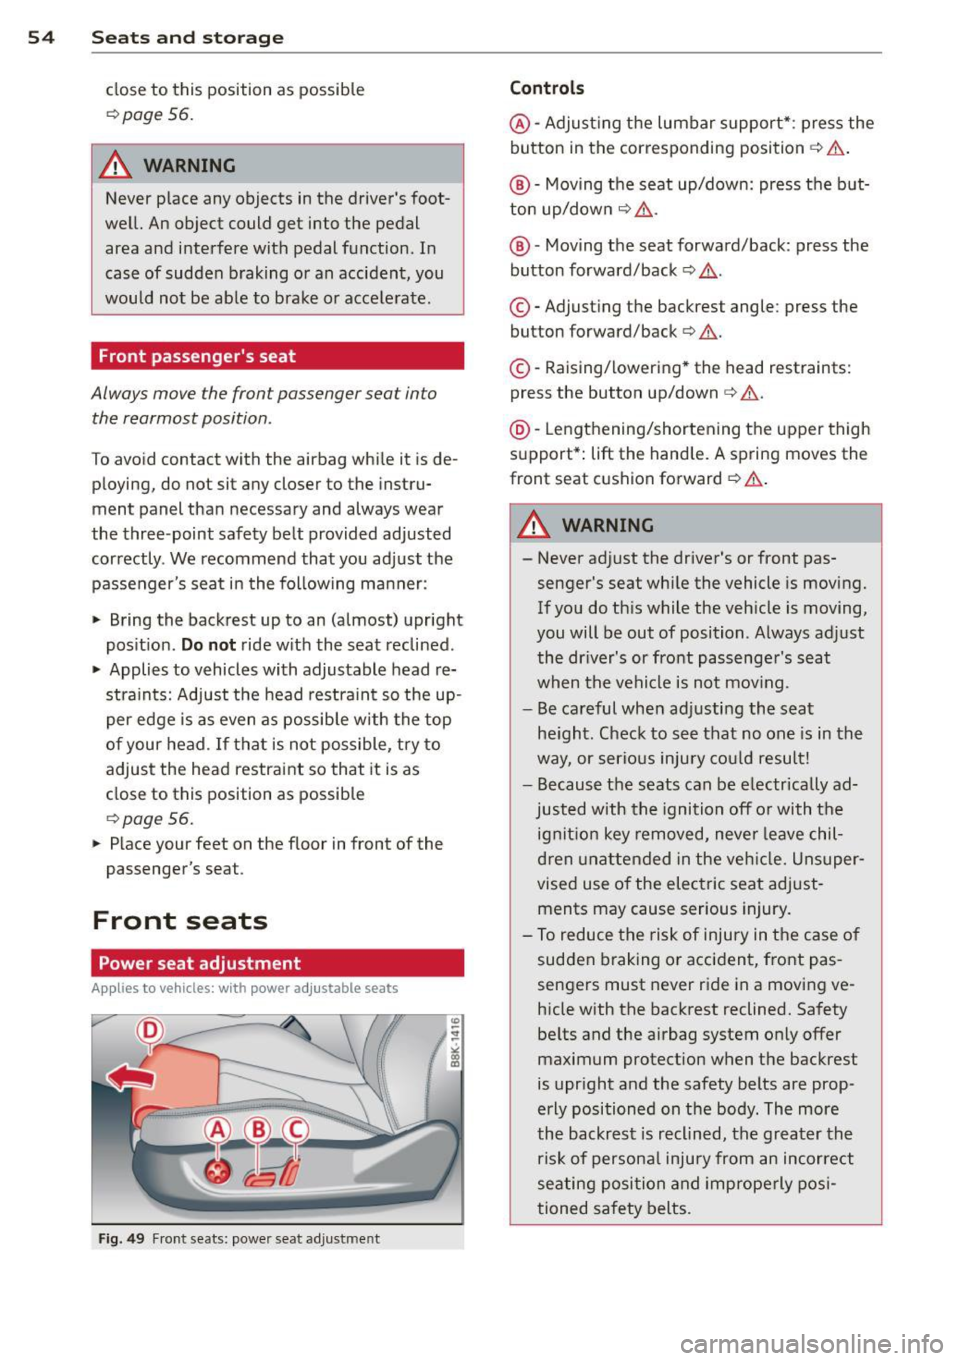
Fig. 49 Front seats: powe r seat adjustme nt
Controls
@ -Adjusting the lumbar support* : press the
button in the corresponding position ¢ .&, .
@ -Moving the seat up/down: press the but
ton up/down ¢ .&, .
@ -Moving the seat forward/back : press the
button forward/back ¢.&, .
©-Adjusting the backrest angle: press the
button forward/back ¢.&, .
©-Raising/lowering * the head restraints:
press the button up/down¢.&, .
@ -Lengthening/shortening the upper thigh
support* : lift the handle. A spring moves the
front seat cushion forward ¢ .&, .
A WARNING
---Never adjust the driver's or front pas
senger's seat while the vehicle is moving.
If you do this while the vehicle is moving,
you will be out of position . Always adjust
the driver's or front passenger's seat
when the vehicle is not mov ing.
- Be careful when adjusting the seat
height . Check to see that no one is in the
way, or serious injury could result!
- Because the seats can be electrically ad
justed with the ignition off or with the
ignition key removed, never leave chil
dren unattended in the vehicle. Unsuper
vised use of the electric seat adjust
ments may cause serious injury.
- To reduce the risk of injury in the case of
sudden braking or accident, front pas
sengers must never ride in a moving ve hicle with the backrest reclined. Safety
belts and the airbag system only offer maximum protection when the backrest
is upright and the safety belts are prop
erly positioned on the body. The more
the backrest is reclined, the greater the
risk of personal injury from an incorrect
seating position and improperly posi
tioned safety belts.
Page 58 of 294
56 Seats and storage
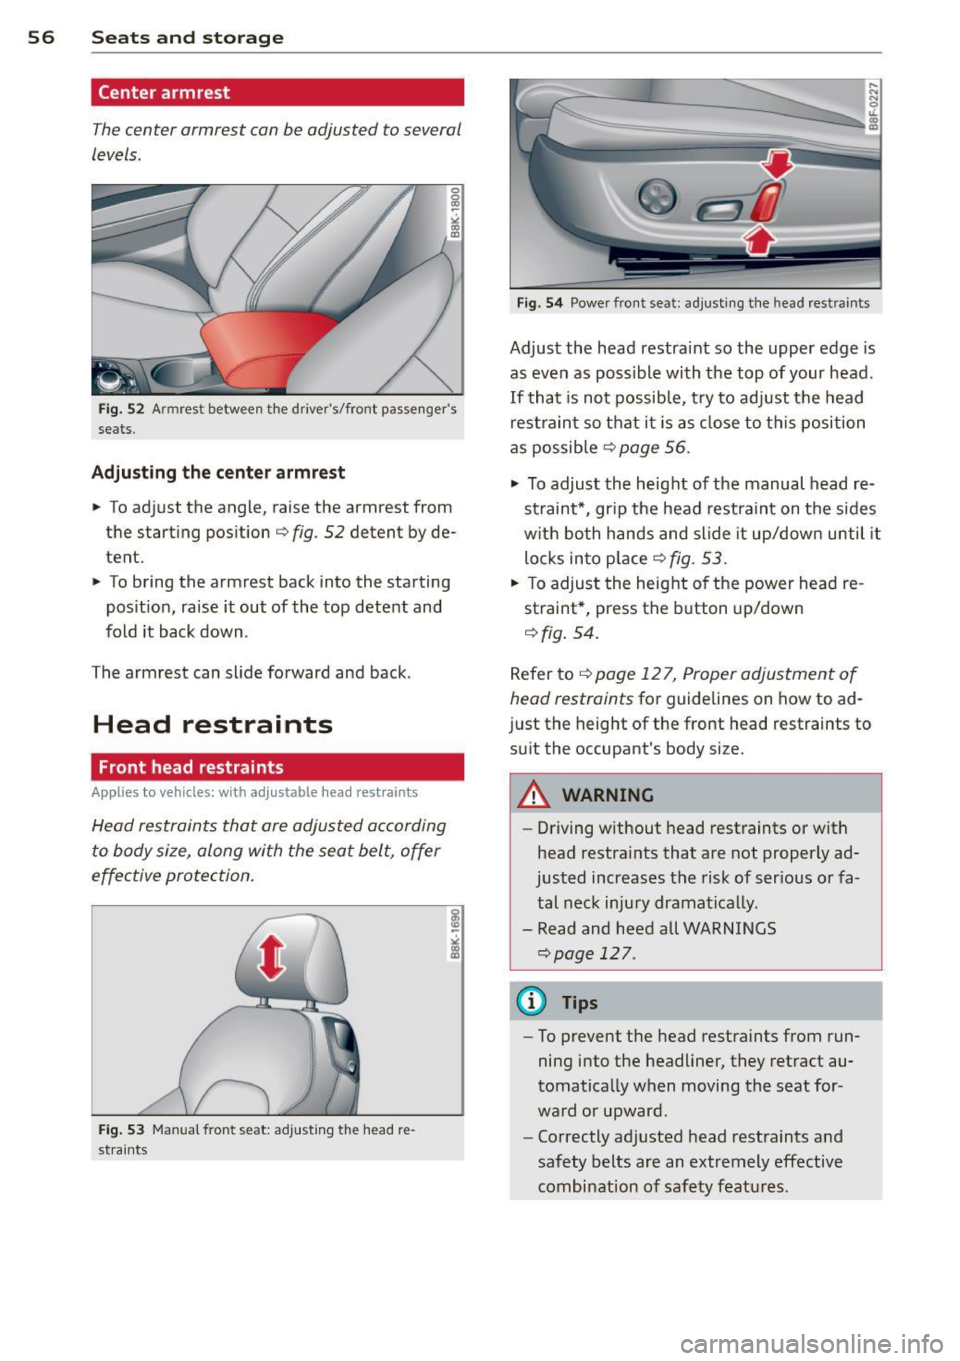
Center armrest
The center armrest can be adjusted to several
levels.
Fi g. 52 Armrest between t he driver's/front passe nger's
seats .
Adju sting th e ce nter armr est
.. To adjust the angle, raise the armrest from
the start ing pos ition
¢ fig . 52 detent by de
tent.
" To bring the armrest back into the starting
pos ition, raise it out of the top detent and
fold it back down .
The armrest can sl ide forward and back .
Head restraints
Front head restraints
Applies to vehicles: with a djustable head restrain ts
Head restraints that are adjusted according
to body size, along with the seat belt , offer
effective protection.
F ig . 53 Ma nua l front seat : adjusting the head re
st raints
Fig. 54 Power front seat: adjusting the head restraints
Adjust the head restraint so the upper edge is
as even as possible with the top of your head.
If that is not possible, t ry to adjust the head
rest raint so that it is as close to this position
as possib le
¢ page 56 .
.,. To adjust the height of the manual head re
straint*, grip the head rest raint on the sides
w ith both hands and slide it up/down until it
locks in to p lace
¢fig. 53.
"' To adjust the height of the power head re
straint*, press the button up/down
¢ fig. 54.
Refer to¢ page 12 7, Proper adjustment of
head restraints
for guidelines on how to ad
just the height of the front head restraints to suit the occupant's body size.
A WARNING
- Driving without head restraints or with
head restra ints that are not properly ad
justed increases the risk of ser ious or fa
tal neck inju ry dramatica lly.
- Read and heed all WARNINGS
¢page 127.
@ Tips
-To prevent the head restra ints from run
ning into the headliner, they retract au
tomatically when moving the seat for
ward or upward .
- Correctly adjusted head restraints and
safety belts are an extremely effective
combination of safety featu res.
Page 59 of 294
Rear head restraints
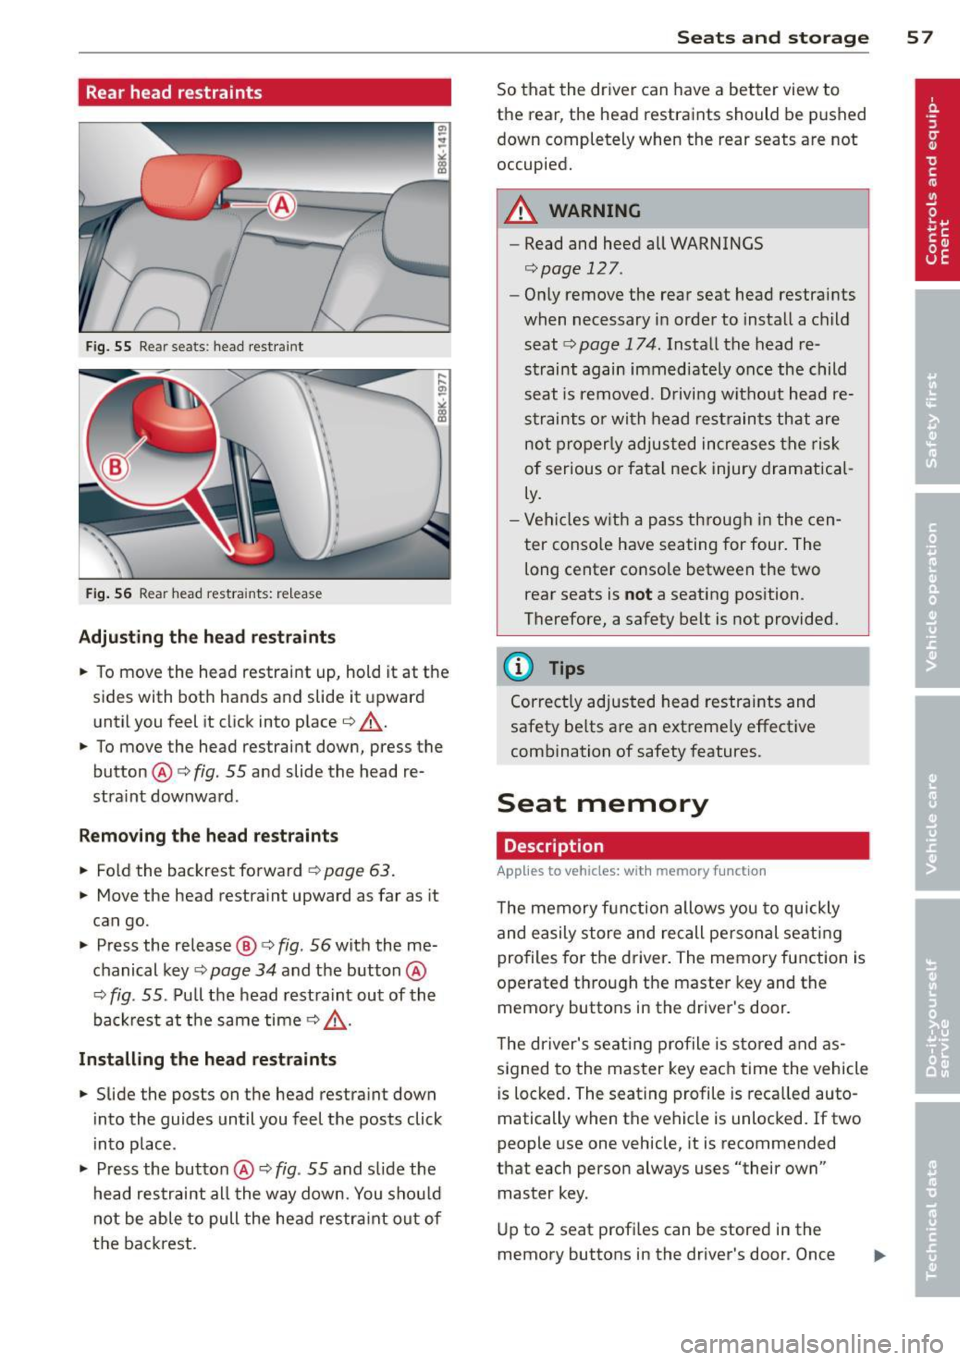
Fig. 55 Rear seats : head restraint
Fig. 56 Rear head restra ints: re lease
Adjusting the head restraints
• To move the head restraint up, hold it at the
s ides with both hands and slide it upward
until you feel it click into place¢.,&.
• To move the head restraint down , press the
button @¢
fig. 55 and slide the head re
stra int downward .
Removing the head restraints
• Fo ld the backrest forward ¢ page 63.
• Move the head restraint upward as far as it
can go.
• Press the release@¢
fig. 56 with the me
chanical key¢
page 34 and the button @
¢
fig . 55 . Pull the head restraint out of the
backrest at the same time¢.,& .
Installing the head restraints
• Slide the posts on the head restra int down
into the guides until you feel the posts click
into place .
• Press the button @ ¢
fig. 55 and slide the
head restraint al l the way down. You shou ld
not be able to pull the head restra int o ut of
the backrest.
Seats and storage 57
So that the driver can have a better view to
the rear, the head restraints should be pushed
down completely when the rear seats are not
occupied.
A WARNING
- Read and heed all WARNINGS
¢page 127.
-On ly remove the rear seat head restraints
when necessary in order to install a child
seat ¢
page 174. Install the head re
straint again immediately once the child
seat is removed. Driving without head re
straints or with head restraints that are
not properly adjusted increases the risk
of serious or fatal neck injury dramatical
ly.
- Vehicles with a pass through in the cen
ter conso le have seating for four. The
long center conso le between the two
rear seats is
not a seating position .
Therefore, a safety belt is not provided.
@ Tips
Correctly adjusted head restraints and
safety be lts are an extreme ly effective
combination of safety features.
Seat memory
Description
Applies to vehicles : with memory fun ctio n
The memory function allows you to quickly
and easily store and recall personal seati ng
profiles for the driver. The memory function is
operated through the master key and the
memory buttons in the driver's door.
The driver's seating profile is stored and as
signed to the master key each time the vehicle
is locked. The seating profile is recalled auto
matically when the vehicle is unlocked.
If two
people use one vehicle, it is recommended
that each person always uses "their own" master key.
Up to 2 seat profi les can be stored in the
memory buttons in the driver's door. Once
Page 65 of 294
-The use of a roof rack can negative ly af
fect the way a vehicle handles. Cargo
that is large, heavy, bulky, long or flat
will have a greater negative influence on
the vehicle's aerodynamics, center of
gravity and overall handling . Always
dr ive slowly, avo id sudden braking and
maneuvers when transporting cargo on
the roof of your vehicle.
- Never exceed the max imum permissible
load carry ing capacity of the roof of your
vehicle, the perm issib le axle weights and
the permissible total weight of your vehi
cle
c::> page 269, Weights.
@) For the sake of the environment
As a result of the increased w ind resist
ance created by a roof rack, your vehicle is
using fue l unnecessarily . So remove the
roof rack after using it .
Luggage compartment
General information
A WARNING
Read and follow the important safety pre
cautions on c:>
page 130, Stowing lug
gage.
Enlarging the luggage compartment
App lies to vehicles: with fold ing rear seatback
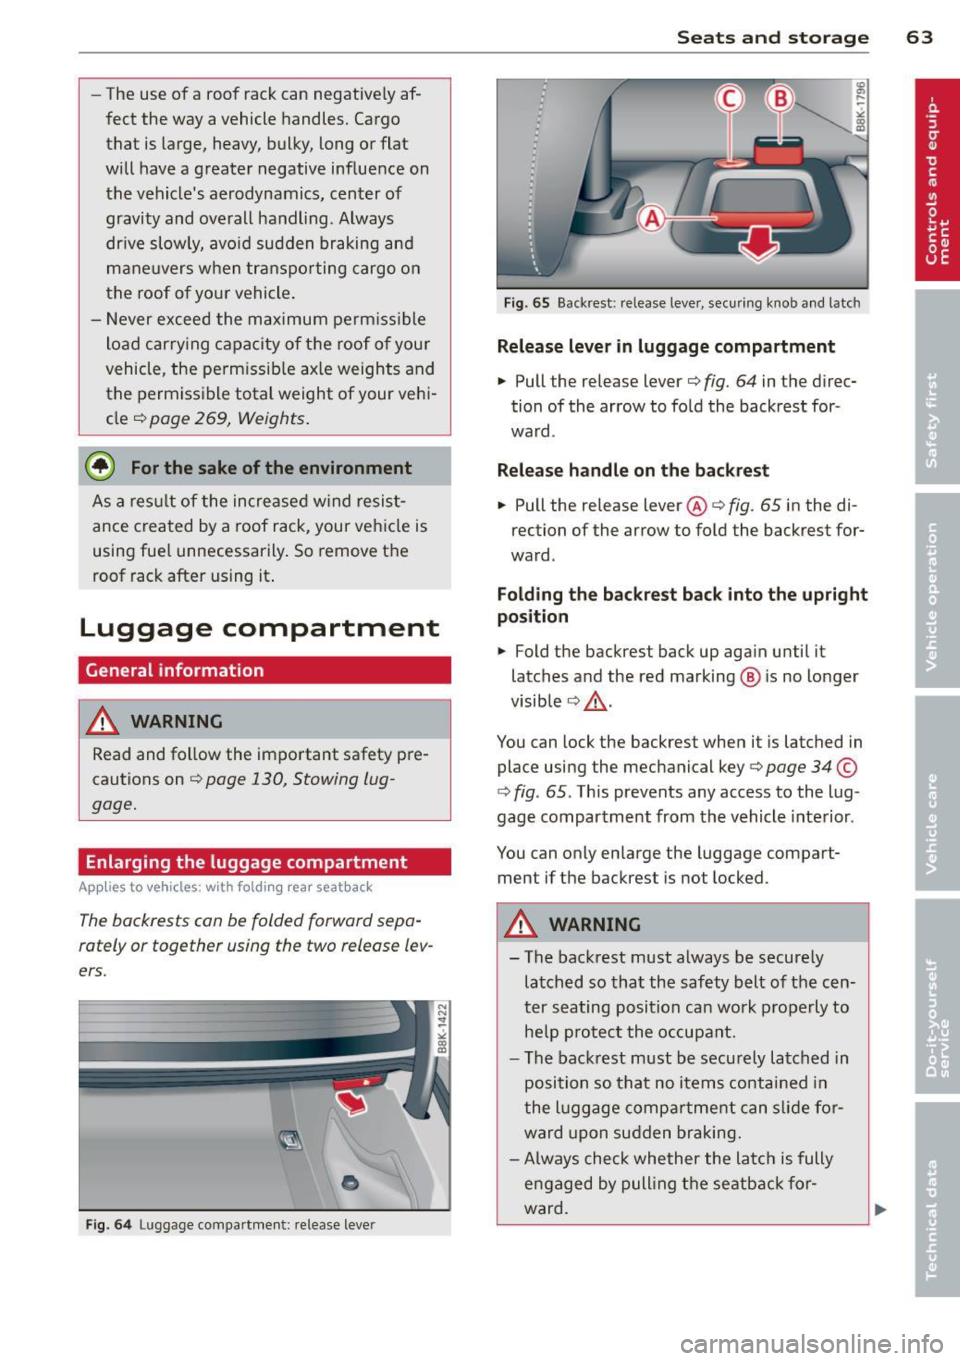
The backrests can be folded forward sepa
rately or together using the two release lev
ers .
0
Fig. 64 Luggage compartment: re lease leve r
Seats and storage 63
Fig. 65 Backrest: release lever, securing knob and latc h
Release lever in luggage compartment
... Pull the release lever c:> fig. 64 in the direc
tion of the arrow to fo ld the backrest for
ward .
Release handle on the backrest
... Pull the release lever@c:> fig. 65 in the di
rection of the arrow to fold the backrest for
ward .
Folding the backrest b ack into the upright
position
... Fold the backrest back up again until it
latches and the red marking @ is no longer
visible
c:> .&_ .
You can lock the backrest when it is latched in
place using the mechanical key
c:> page 34 ©
c:> fig . 65 . This prevents any access to the lug
gage compartment from the vehicle interior.
You can only enlarge the luggage compart ment if the backrest is not locked.
A WARNING
-
- The backrest must always be securely
latched so that the safety belt of the cen
ter seating position can work properly to
he lp protect the occupant.
- The backrest must be securely latched in
position so that no items contained in
the lu ggage compa rtment can slide for
ward upon sudden braking.
- Always check whether the latch is fully
e ngag ed by pull ing the seatback for
ward .
Page 66 of 294
64 Seats and storage
-Never allow safety belts to become dam
aged by being caught in door or seat
hardware.
- Torn or frayed safety belts can tear and
damaged belt hardware can break in a
crash. Inspect the belts periodically.
Belts showing damage to webbing, bind
ings, buckles, or retractors must be re
placed.
(D Note
- If you move the front seat back when the
rear seat backrest is folded forward, you
could damage the head restraints on the
rear seat.
- Slide the belt guide on the outside safety
belt all the way up before folding the
backrest back forward. Make sure the
seat belt is not pinched or damaged
when the rear seat backrest if folded
back. Other objects should be removed
from the rear seat bench to protect the
seatback from damage.
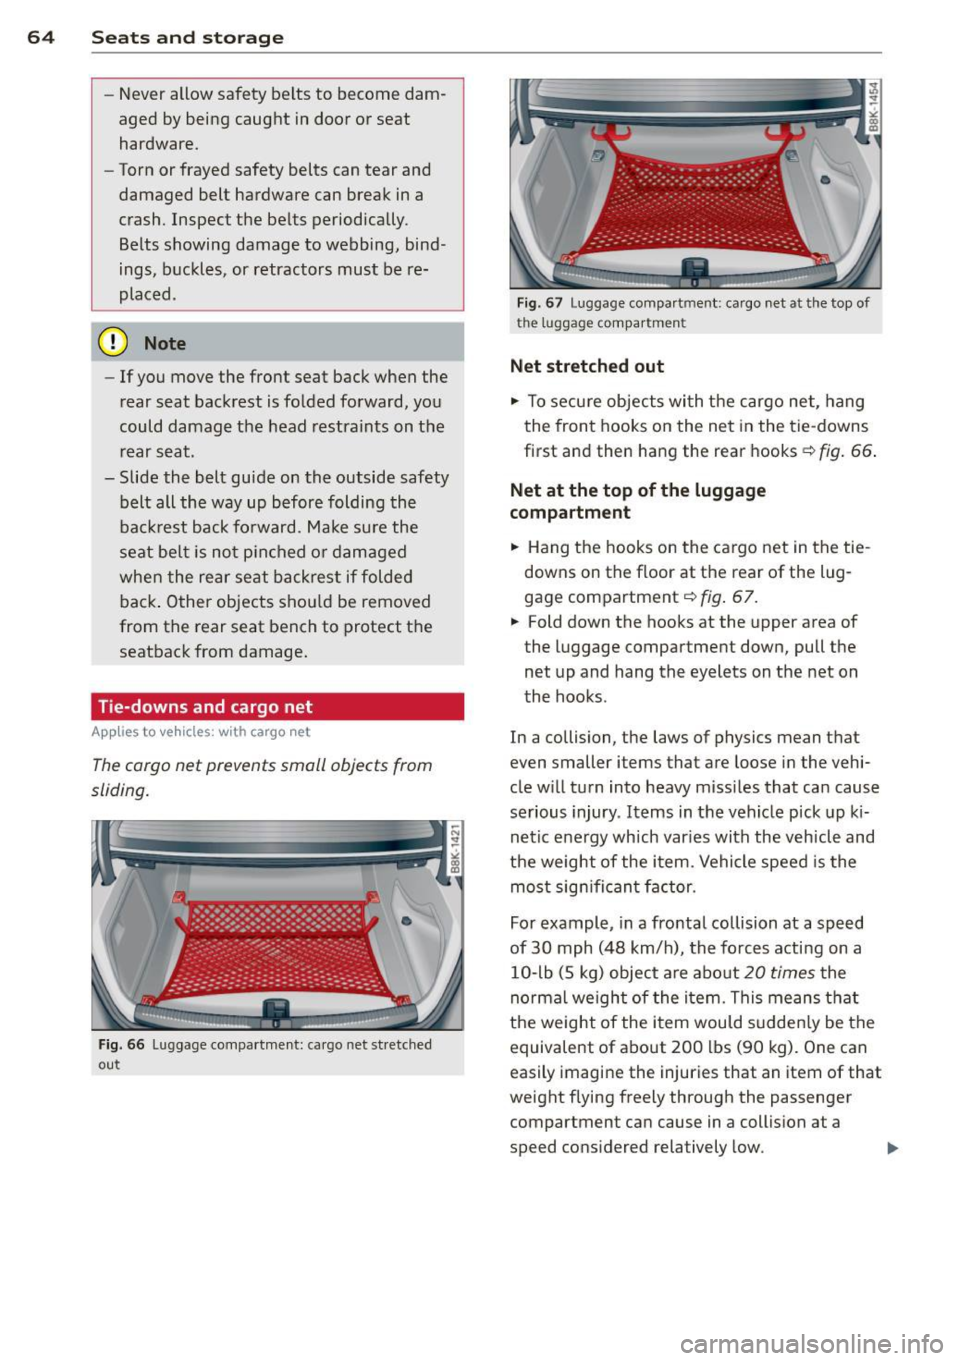
Tie-downs and cargo net
Applies to vehicles: with cargo net
The cargo net prevents small objects from
sliding.
Fig. 66 Luggage compartment: cargo net stretched
ou t
Fig. 67 Luggage compart ment : cargo net at the top of
t he lu ggage compar tmen t
Net stretched out
.. To secure objects with the cargo net, hang
the front hooks on the net in the tie-downs
first and then hang the rear hooks~
fig. 66.
Net at the top of the luggage
compartment
.. Hang the hooks on the cargo net in the tie
downs on the floor at the rear of the lug
gage compartment ~
fig. 67.
.. Fold down the hooks at the upper area of
the luggage compartment down, pull the
net up and hang the eyelets on the net on
the hooks .
In a collision, the laws of physics mean that
even smaller items that are loose in the vehi
cle will turn into heavy missiles that can cause
serious injury. Items in the vehicle pick up ki
netic energy which varies with the vehicle and
the weight of the item. Vehicle speed is the
most significant factor.
For example, in a frontal collision at a speed
of 30 mph (48 km/h), the forces acting on a
10-lb (S kg) object are about
20 times the
normal weight of the item. This means that
the weight of the item would suddenly be the
equivalent of about 200 lbs (90 kg). One can
easily imagine the injuries that an item of that
weight flying freely through the passenger compartment can cause in a collision at a
speed considered relatively low.
Page 68 of 294
66 Seat s a nd s tor ag e
8_ WARNING
-
- The ski sack is intended only for the
transportation of skis and other light ob
jects . To reduce the risk of serious per
sonal injury, never transport heavy or
pointed objects in the ski sack.
- When brak ing rapidly or during an acci
dent, the load could be displaced and
ca use injury to occupants.
- Sharp edges on the load must be covered
for protect ion. Always fasten the belt
t ightly around the sack and its contents
¢ fig. 70.
-For safety reasons, do not transport
more than two pairs of skis in the ski
sack .
- You must sec ure the ski sac k with the
st rap after loading.
- Make su re a ll objects that you are t rans
porting in the pass-through are secured.
Otherwise they cou ld slide around during
sudden braking maneuvers and cause in
jury.
(D Tips
- Never stow the sk i sack away when it is
still wet or damp (for examp le, snow
melting from skis). Allow it to dry com
plete ly before stowing it away.
- When transporting skis or snowboards, tighten the securing strap between the bindings.
- Position skis in the ski sack wit h the
pointed ends facing the front and ski
po les with the pointed ends facing the
rear.
- You can lock or un lock the pass-through
u sing the mechanical key. This prevents
any access to the luggage compartment
from the vehicle interior .
Parcel shelf
The parcel shelf behind the rear seatback can
be used to car ry light items of cloth ing .
8_ WARNING
No heavy or hard objects should be p laced
on the parcel shelf. They are a hazard to
the veh icle occupants during s udden brak
i ng . The is a risk of injury .
(D Note
Please make sure that the heating w ires
for the rear window defogger are not dam
age by abrasive objects .
(D Tips
To ensure problem-free ven tilation , the
vent ilation slots between the rear window
and the pa rcel she lf must not be covered .
Page 80 of 294
78 On the road
Startin g and automati cally r ele a s ing the
p ark ing b rake
.. When you start to drive as usua l, the park
ing brake is automatically released and your
vehicle begins to move.
When stopping at a traffic signal or stopping
in city traffic on vehicles with an automatic
transmission, the parking brake can be ap
plied. The vehicle does not have to be held
with the footbrake. The park ing brake elimi
nates the tendency to creep with a drive range
engaged. As soon as you dr ive off as usual,
the park ing brake is released automatically
and the veh icle starts to move .
Starting on slopes
When starting on inclines, the start ing ass ist
prevents the vehicle from unintentionally roll
ing back. The braking force of the parking
b rake is not released until sufficient dr iving
fo rce has been bu ilt up at the whee ls.
(D Tips
For safety reasons, the park ing brake is re
leased automatically only when the dr iv
er 's sa fety belt is engaged in the bu ck le.
Starting off with a trailer
To prevent rolling back unintentionally on an
incline, do the following:
.. Keep the switch@c::> page 76, fig. 78
pulled and depress the accelerator . The
parking b rake stays applied and prevents
the vehi cle from rolling backward.
.. You can release the switch @once you are
s u re that yo u are developing enough driving
force at the wheels by depressing the accel
erator.
Depending on the weight o f the rig (vehicle
and trai ler) and the severity of the incline, you
may roll backwards as you start . Yo u can pre
vent roll ing backwards by holding the parking
brake switch @pulled out and accelerating -
just as you would when starting on a hill with
a conventional hand brake.
Emergency braking
In the event that the conventional brake sys
tem fails or locks .
.. In an emergency, pull the switch@
c::> page 76, fig. 78 and continue to pull it to
slow your vehicle down with the parking brake .
.. As soon as you release the switch @or ac-
celerate, t he b ra ki ng pro cess stops.
If you pull the switch @and hold it above a
speed of about 5 mph (8 km/h), the emergen
cy bra king funct ion is initiated. The ve hicl e is
braked at all fou r whee ls by activating the hy
draulic brake sys tem. The brake performance
is similar to making an emergency stop
c::> ,&.
In order not to a ct ivate the eme rgency brak
ing by mis take, an audib le warning tone (buz
zer) so unds when the switch @is pulled. As
soon as the switch @ is released, or the acce l
erator pedal is depressed, emergency braking
stops.
A WARNING ,-
Emergency braking should only be used in
an emergency, when the normal foot brake
has fa iled or the brake pedal is obstructed .
Using the par king brake to pe rform eme r
gency b raking will s low your veh icle down
as if you had made a full brake application.
The laws of phys ics cannot be suspended
even with ESC and its associated compo
nents (ABS, ASR, EDS). In corners and
when road or weathe r cond itions are bad,
a full brake application can cause the vehi
cle to skid or the rear end to break away
risking an accident.
Speed warning system
Overview
The speed warning system helps you to keep
your driving speed below a set speed limit.
T he speed warn ing system warns if the driver
exceeds a p reviously sto red max imum speed.
A warning tone w ill sound as soon as the
Ill-