key battery AUDI A5 COUPE 2013 Owners Manual
[x] Cancel search | Manufacturer: AUDI, Model Year: 2013, Model line: A5 COUPE, Model: AUDI A5 COUPE 2013Pages: 294, PDF Size: 73.84 MB
Page 16 of 294
14 Instrum ent s and w arn ing /indic ato r light s
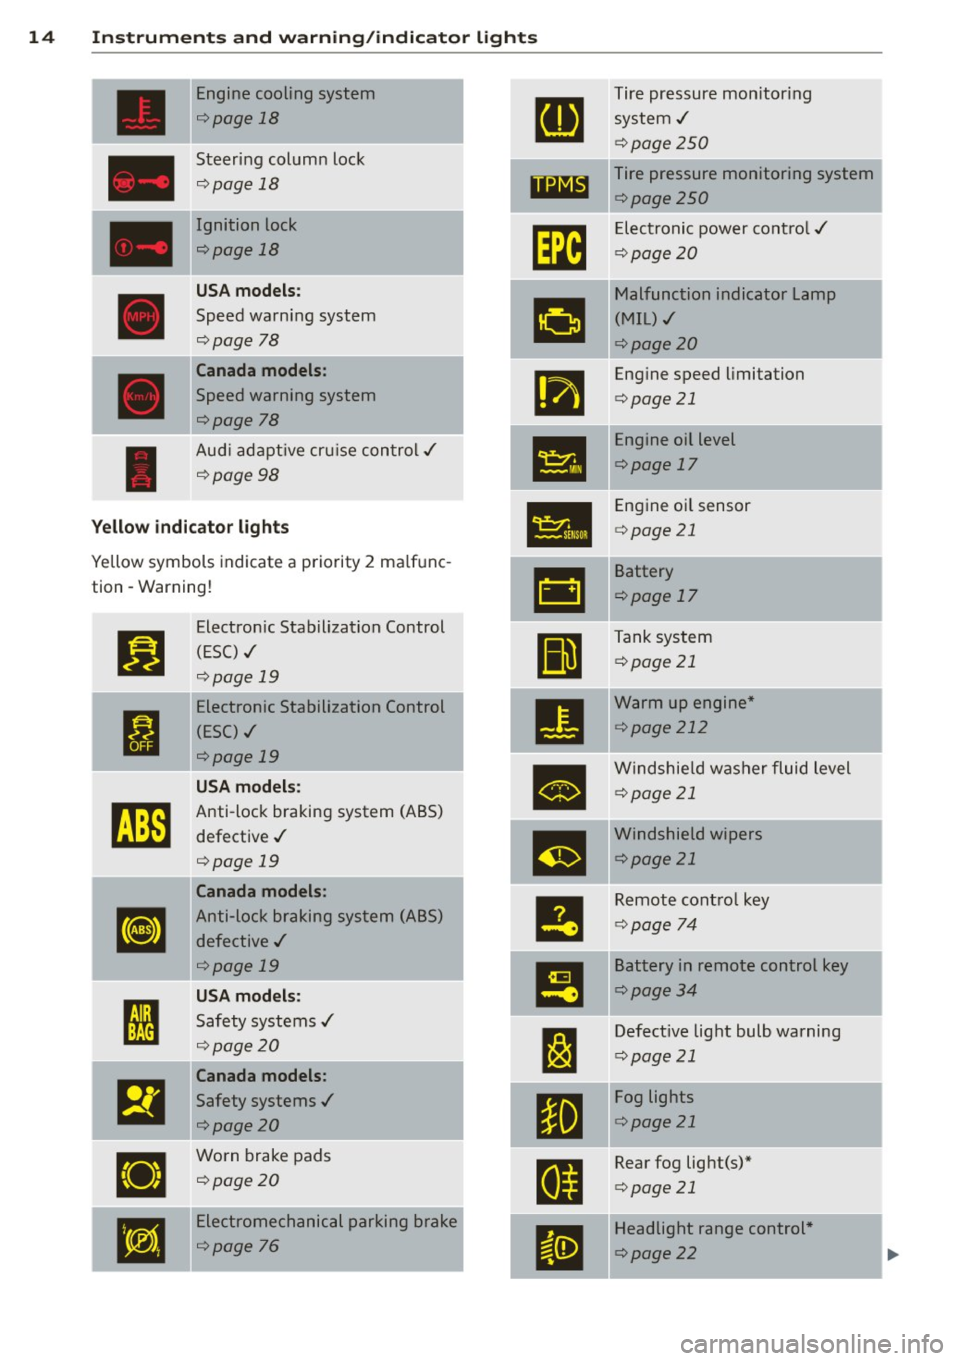
Engine cooling system Tire pressure monitor ing
¢ page 18
system,/
¢page250
Steering column lock Tire pressure monitoring system
¢ page 18
1181~1 ¢page250
Ignition lock
Im
Electronic power cont ro l ,/
r:::;,page 18
c:>page20
U SA mod els:
•
Malfunction indicator Lamp
Speed warning system (MIL),/
r:::;, page 78
c:> page 20
Canada models :
•
Engine speed limitation
Speed warning system c:>page 21
r:::;, page 78
Engine oil level
Aud i adapt ive cru ise control./
•
c:>page 17
¢ page 98
•
Engine o il sensor
Yellow indic ato r lights c:> page 21
Yellow symbols indicate a priority 2 ma lfunc-
-
&1
Battery
tion -Warning!
c:>page 17
Jj]
Electron ic Stabilization Control
Ill
Tank system
(ESC) ,/
c:>page 21
r:::;, page 19
-Electronic Stabilization Control
•
Warm up engine *
ti
(ESC) ./ c:>
page 212
r:::;, page 19
•
Windshie ld washer fluid level
U SA m odel s: c:>page 21
~
Anti-lock braking system (ABS)
defective ,/
m
Windshield wipers
r:::;, page 19 c:>page
21
Canada models :
le
Remote control key
[I]
Anti-lock braking system (ABS)
c:>page 74
defective ,/
r:::;, page 19
I!
Battery in remote control key
USA models: c:>page 34
I
Safety systems ,/ --
l:J
Defective light bulb warning ' r:::;, page 20
c:>page 21
Canada models :
El
Safety systems ,/
•
Fog lights
<=>page20 c:>
page 21
•
Worn brake pads
E
Rear fog light(s)*
<=> page 20
c:>page 21
•
Electromechanical parking brake
II
Headlight range control *
<=>page
76 c:> page 22
Page 36 of 294
34 Openin g and clo sing
keys. Unguarded access to the keys pro
vides children the opportunity to start the engine and/or act ivate vehicle sys
tems such as the power w indows etc . Un
supervised operation of any veh icle sys
tem by ch ildren can res ult in serious in
Jury.
- Do not remove the key from the ignition
lock until the vehicle has come to a com
plete stop. Otherwise the steering col
um n loc k co uld suddenly e ngage -caus
ing the risk of an accident.
@ Tips
- The operation of the remote contro l key
c a n be tempo rarily disrupted by in terfer
ence from tran smi tters in t he v ici nity of
the veh icle work ing in the same frequen
cy ra nge (e.g . a ce ll phone, radio equip
ment).
- Fo r security reasons, replacement keys
are on ly available from Aud i dea le rs .
- Fo r De clarat ion o f Compliance to United
States FCC and Industry Canada regu la
tions ¢
page 2 76.
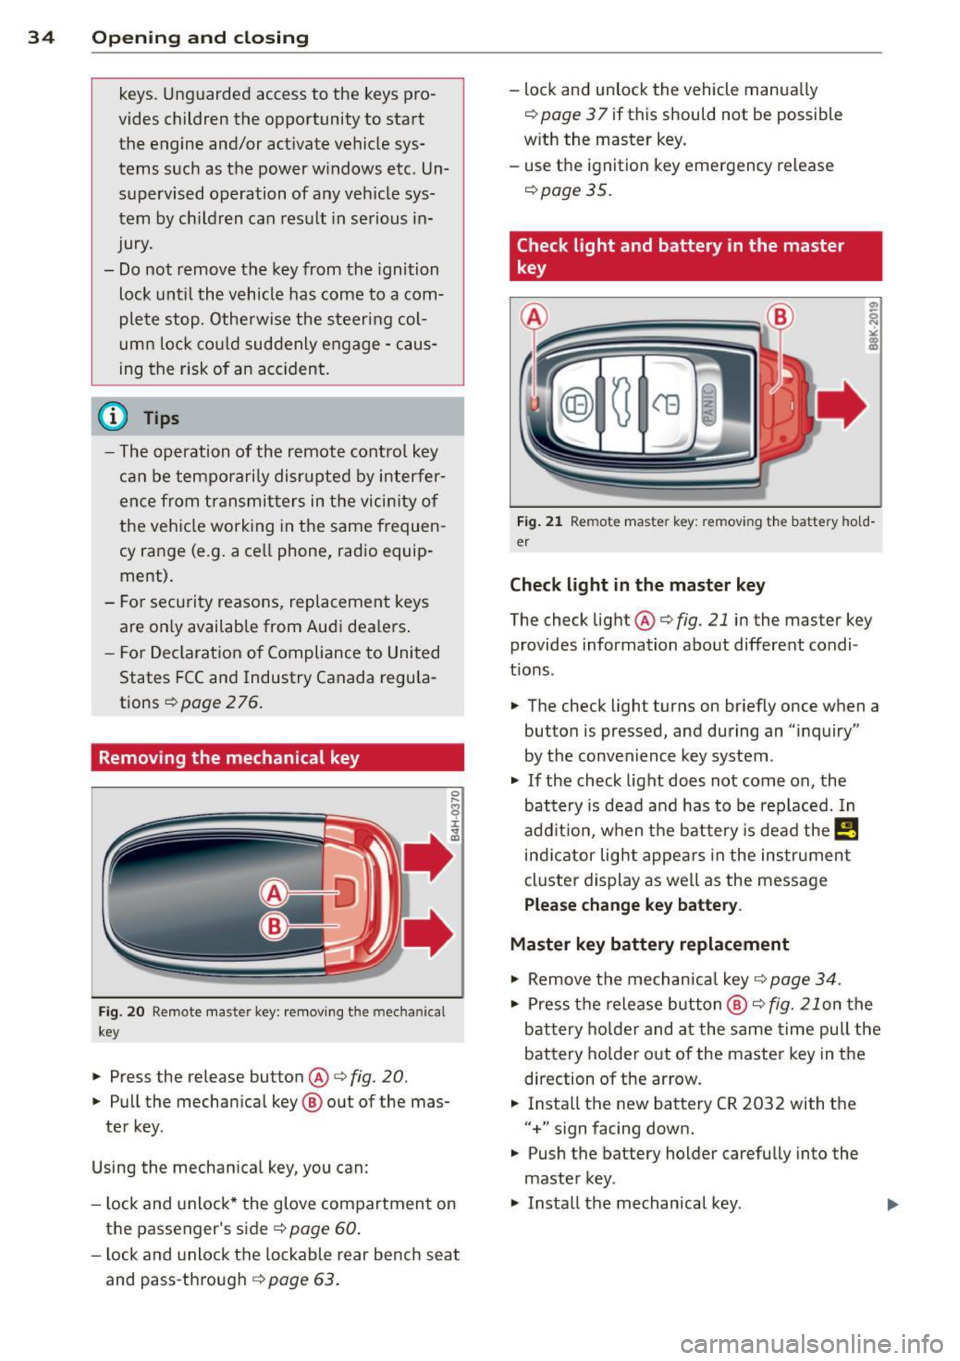
Remov ing the mechanic al key
Fig . 20 Remot e mas ter key: re mov ing the mec hanic al
key
.. Press the release button@¢ fig. 20.
.. Pu ll the mecha nical key @ out of the mas
te r key .
Using the mechan ica l key, you can :
- l ock and unlock* the glove compartmen t on
the passenger's side ¢
page 60.
-lock and unlock t he lockable rear bench seat
and pass -th ro ugh ¢
page 63.
-lock and unlock the vehicle manua lly
¢
page 3 7 if this should not be possible
w ith the master key.
- use the ignition key emergency release
¢ page 35.
Check light and battery in the master
key
•
Fig. 21 Re mote mas ter key: re m ov ing th e bat te ry h old
er
Check light in the master key
The check light@¢ fig. 21 in the mas ter key
provides information about different condi
t ions .
.. The check light turns on br iefly once when a
button is pressed , and during an " inquiry"
by the convenience key system .
.. If the check light does not come on , the
battery is dead and has to be replaced. In
add it ion, when the battery is dead the
!,I
ind icator light appe ars in the instrument
cl uster display as we ll as the message
Plea se change key battery.
Master key battery replacement
.. Remove the mechan ica l key ¢ page 34 .
.. Press t he re lease button @¢ fig. 21on the
bat tery ho lde r and at the same time pu ll the
battery ho lder out of the maste r key in the
d irection of the ar row .
.. Insta ll the new battery CR
2032 with the
"+ " sign facing down .
.. Push the battery holder carefully into the
master key.
.,. Install the mechanical key .
Page 37 of 294
@ For the sake of the environment
Dispose of dead batteries properly so as
not to pollute the environment.
@ Tips
The replacement battery must be the
same specification as the original.
Emergency unlocking of the ignition key
In the event of malfunctions in the electrical
system, it may happen that you cannot re move the ignition key .
• Remove the mechanical key<:? page 34.
• Lock the vehicle using the mechanical key
<:?page 37.
• Have the e lectrica l system inspected by an
authori zed Audi dealership .
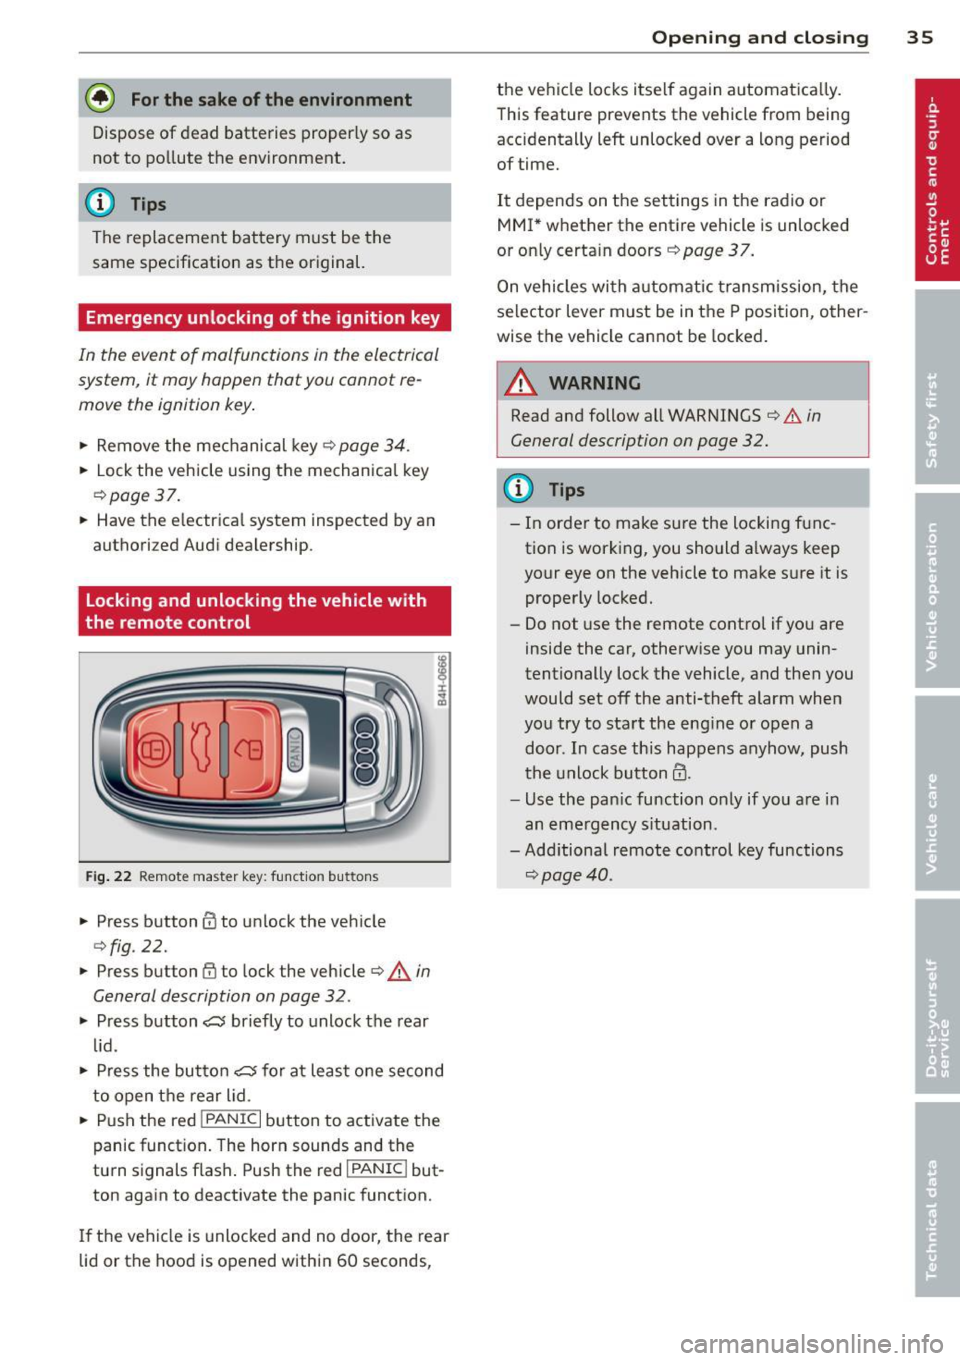
Locking and unlocking the vehicle with
the remote control
Fig. 22 Remote master key: function but tons
• Press button @to unlock the vehicle
Qfig . 22.
• Press button fij to lock the vehicle QA in
General description on page
32 .
• Press button ,c:;5 briefly to unlock the rear
lid .
• Press the button
,c:;5 for at least one second
to open the rear lid .
• Push the red
I PANIC I button to activate the
panic function. The horn sounds and the
turn s ignals flash . Push the red
I PANIC ! but
ton again to deactivate the panic function.
If the vehicle is unlocked and no door, the rear
lid or the hood is opened within 60 seconds,
Opening and closing 35
the vehicle locks itself again automat ica lly.
This feature prevents the vehicle from being
accidentally left unlocked over a long period of time.
It depends on the settings in the radio or
MMI* whether the entire vehicle is unlocked
or only certain doors <:?
page 37.
On vehicles with automatic transmission, the
selector lever must be in the P position, other
wise the vehicle cannot be locked.
A WARNING
Read and follow all WARNINGS ¢.&. in
General description on page
32.
(D Tips
- In order to make sure the locking func
tion is working, you should a lways keep
your eye on the vehicle to make sure it is properly locked.
- Do not use the remote control if you are
inside the car, otherwise you may unin
tentionally lock the vehicle, and then you
would set off the anti-theft alarm when
you try to start the eng ine or open a
door . In case this happens anyhow, push
t he unlock button@.
- Use the pan ic function only if you are in
an emergency s ituation.
-Add itional remote control key functions
¢page 40 .
Page 38 of 294
36 Opening and clo sing
locking and unlocking with convenience
key
Appl ies t o vehicles : wit h convenience key
The doors ond the rear lid can be unlocked
and locked without operating the master key.
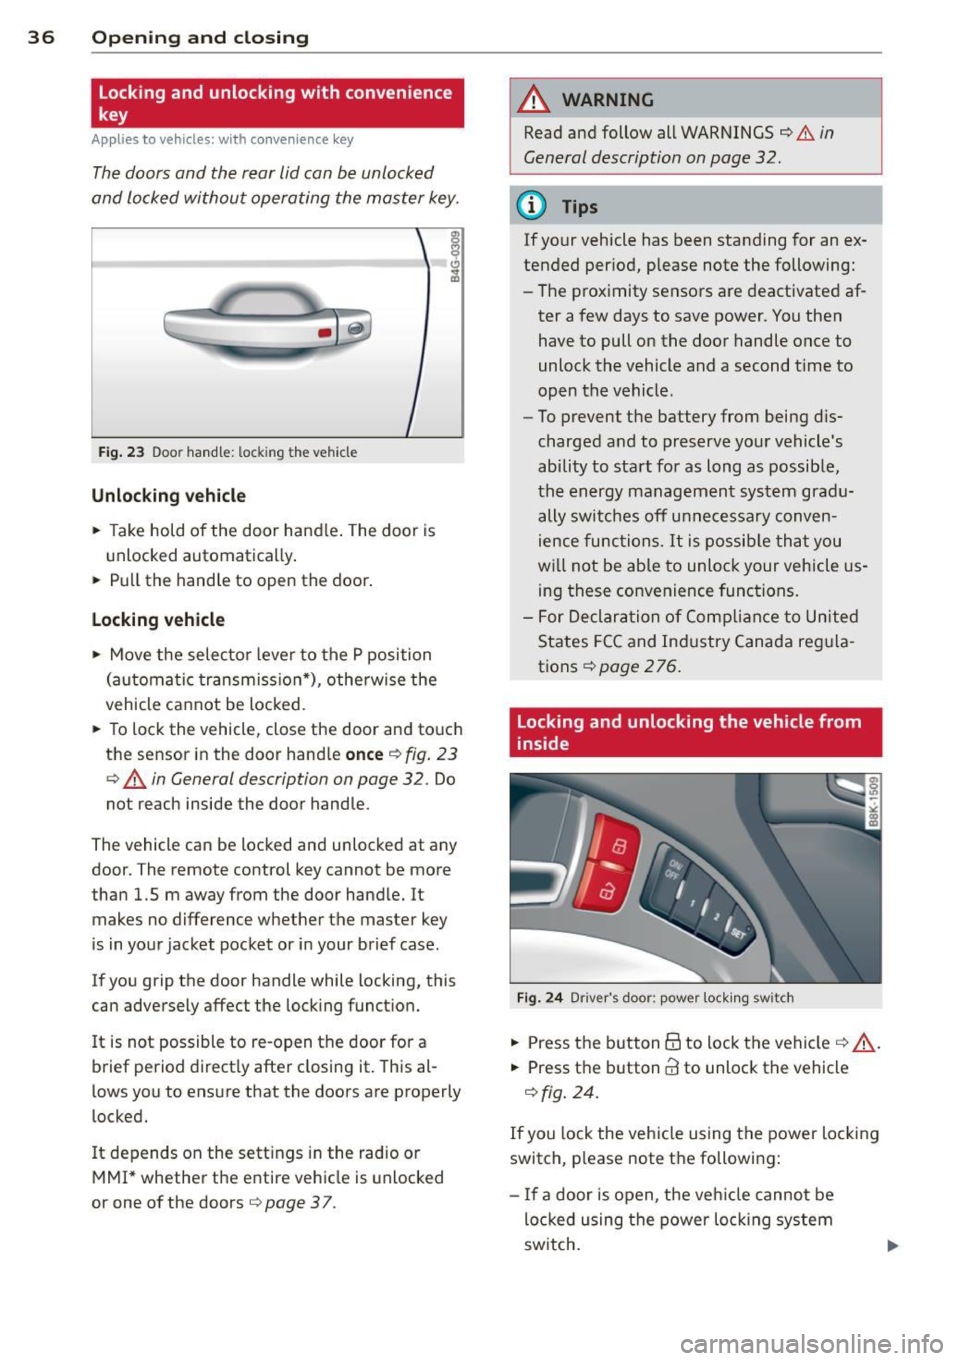
Fig . 23 Door hand le: lock ing the v ehi cle
Unlocking vehicl e
.. Take hold of the door hand le . The door is
unlocked automatically .
.. Pull the handle to open th e door .
locking vehicle
.. Move the selecto r lever to the P position
(a ut oma tic transmiss ion *) , othe rwi se the
vehicle cannot be locked.
.. To lock the vehicle , close the door and touch
the sensor in th e door hand le
onc e¢ fig. 23
c:> A in General description on page 32 . Do
not reach inside the door handle .
The vehicle ca n be locked and unlocked at any
door. The remote control key cannot be more
t han 1.5 m away from the door hand le. It
makes no difference whether the m aster key
is in your jacket pocket or i n your brief ca se .
If you grip the door handle while lo cking, th is
can adversely affect the lock ing funct ion.
I t is not possible to re-open the door for a
brief period direct ly after closing it. This al
l ows you to ensure that the doors are properly
locked.
I t depends on the sett ings in the radio or
MMI* whether the e ntire vehicle is unlocked
or one of the doors
c:> page 3 7 .
A WARNING
-
Read and follow all WARNINGS c:> .&. in
General description on page
32 .
(D Tips
If your vehicle has been standing for an ex
tended per iod, please note the following:
- The proximity sensors are deactivated af-
ter a few days to save power. You then
have to pull on the door handle once to
unlock the vehicle and a second t ime to
open the vehicle .
- To prevent the battery from being d is
charged and to preserve yo ur vehicle 's
ability to start for as long as possib le,
the energy managemen t system gra du
ally switches off u nnecessa ry c onven
ience func tions.
It is possib le th at you
w ill not be able to unloc k your veh icle us
ing these convenience func tions.
- F or Declar ation of Comp lian ce to Unite d
States FC C and Ind ustry Canada reg ula
tions
¢ page 276.
locking and unlocking the vehicle from
inside
Fi g. 24 Drive r's doo r: pow er lock ing sw it c h
.. Press the b utton B to lock the vehicle c::> ,& .
.. Press the button @ to unlock the vehicle
c::> fig. 24.
If you lock the veh icle using the power loc king
switch, p lease note the followi ng:
- I f a door is open, the veh icle canno t be
loc ked u sing the power loc king system
sw itch.
Page 43 of 294
.. Insert the key into the lock of the driver's
door.
.. Turn the key to position ~
fig. 31 @ until a ll
the windows have reached the desired posi
tion and the panoramic tilting sunroof is tilt
ed .
Con venie nce clo sing f eature
.. Use the emergency key or pull the mechani
ca l key out of the master key¢
page 34.
.,. Turn the key in the lock of the driver's door
to the lock position ® until the windows
and the panoram ic tilting sunroof are closed
~A .
When the panoramic tilting sunroof is tilted/
closed , the electric sun shade* is also opened/
closed .
A WARNING
-Never close the windows and thepanor
amic t ilting sunroof inatten tively and
without checking -there is r is k of injury .
- You must always watch when the win
dows are being ra ised so that no one can
be trapped. If you release the key, the
closing action is immediately canceled.
- Always read and heed WARNING
¢ &. in
General description on page
32 .
Correcting window regulator
malfunction
After disconnecting the vehicle battery, the
one-touch up and down feature must be acti
vated again.
.. Pull and hold t he power w indow switch un
ti l the window is completely closed .
.. Re lease the switch and pull the switch again
for one second.
Openin g an d clos ing 41
Panoramic tilting
sunroof
Operation
=r.;-;-1= _..::__:J_
B ([j' G
o .. o
l
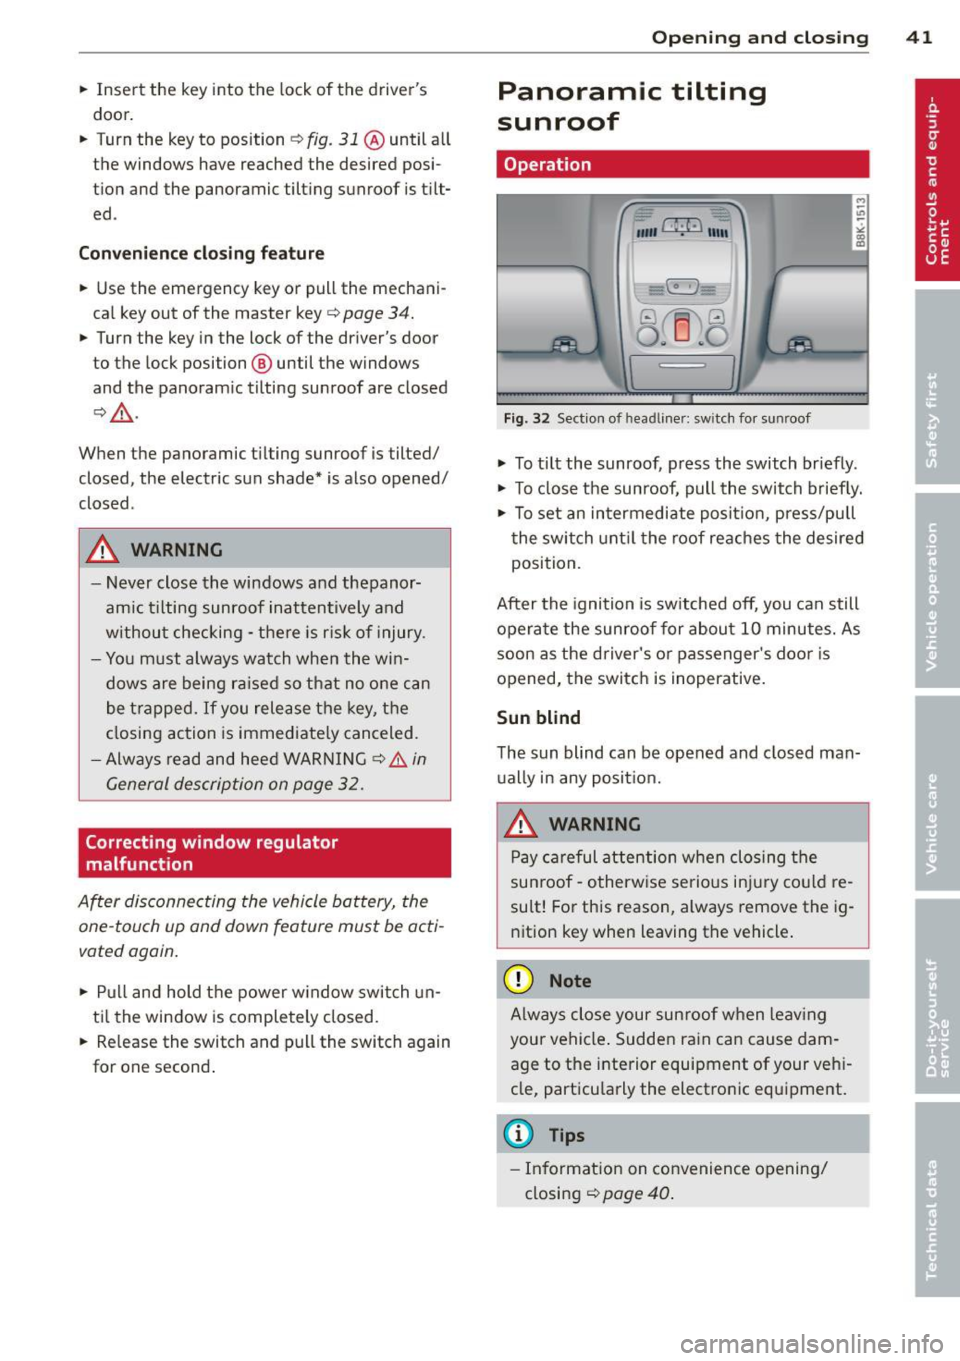
Fig. 32 Section of hea dline r: sw it c h for su nroof
.,. To ti lt the sunroof, press the switch briefly .
.. To close the sunroof, pull the switch briefly.
.,. To set an intermediate position, press/pull
the switch unt il the roof reaches the desired
position.
After the ignition is switched off, you can still
operate the sunroof for about 10 minutes. As
soon as the driver's o r passenger's doo r is
opened, the switch is inoperative.
Sun blind
The sun blind can be opened and closed man
ually in any posit ion.
A WARNING
Pay careful attention when closing the
sunroof -otherw ise serio us in jury could re
sult! For this reason, always remove the ig
nition key when leaving the vehicle .
(D Note
Always close your sun roof when leav ing
your vehicle . Sudden rain can cause dam
age to the interior equipment of your vehi
cle, particu larly the electronic equipment.
(D Tips
-In format ion on convenience opening/
closing
¢ page 40 .
Page 90 of 294
88 Transmission
Emergency release of the selector lever
App lies to vehicles: with tiptronic
If the vehicle's power supply foils, the selec
tor lever con be released in on emergency.
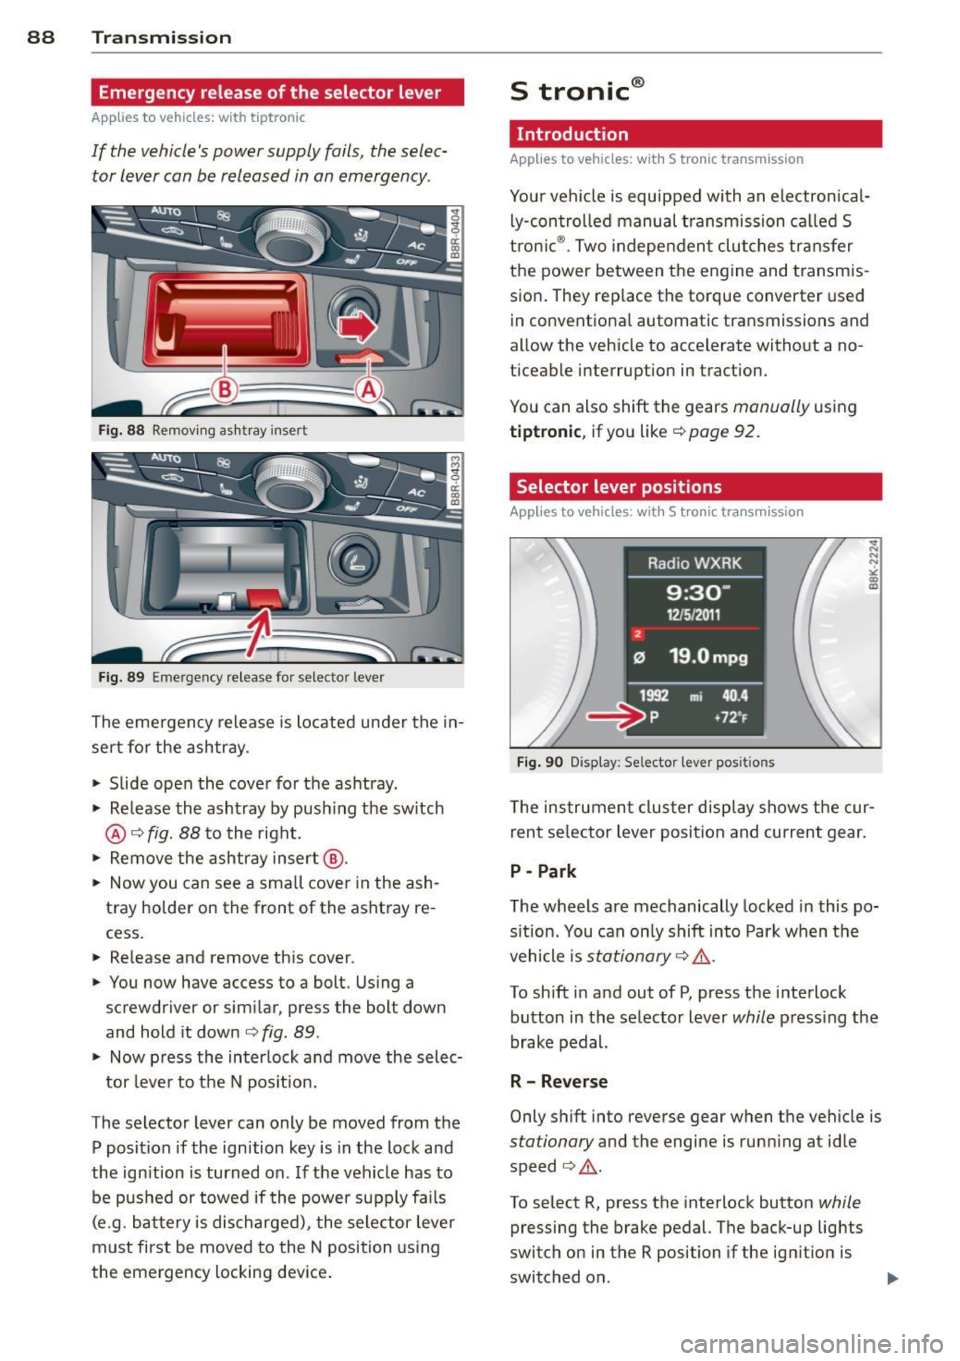
Fig. 88 Removing ashtray insert
Fig. 89 Emergency release for selector lever
The emergency release is located under the in
sert for the ashtray.
.. Slide open the cover for the ashtray.
.. Release the ashtray by push ing the switch
@¢fig. 88 to the right.
.. Remove the ashtray insert@.
.. Now you can see a small cover in the ash
tray holder on the front of the ashtray re
cess.
.. Re lease and remove this cover .
.. You now have access to a bolt. Using a
screwdriver or similar, press the bolt down
and hold it down ¢
fig. 89.
.. Now press the interlock and move the selec-
tor lever to the N pos ition .
The selector lever can only be moved from the
P position if the ignition key is in the lock and
the ignition is turned on. If the vehicle has to
be pushed or towed if the power supply fa ils
(e.g. battery is discharged), the selector lever
must first be moved to the N position using
the emergency locking device.
S tronic ®
Introduction
Applies to vehicles: with S tronic transm ission
Your vehicle is equipped with an electronical
ly-controlled manual transmission called S
tronic ®. Two independent clutches transfer
the power between the engine and transmis
sion . They rep lace the torque converter used
in conventional automatic transmissions and
allow the vehicle to accelerate without a no
ticeable interruption in traction.
You can also shift the gears
manually using
tiptronic , if you like ¢ page 92.
Selector lever positions
Applies to vehicles: wit h S t ronic tra nsmi ssio n
Fig. 90 Display: Se lector lever posit ions
The instrument cluster display shows the cur
rent se lector lever position and current gear .
P -Park
The wheels are mechanically locked in this po
sition. You can only shift into Park when the
vehicle is
stationary ¢ /1. .
To shift in and out of P, press the interlock
button in the selector lever
while press ing the
brake pedal.
R - Reverse
Only shift into reverse gear when the vehicle is
stationary and the engine is running at idle
speed ¢
/1..
To select R, press the interlock button while
pressing the brake pedal. The back-up lights
switch on in the R position if the ignition is
switched on .
Page 96 of 294
94 Transmi ssion
There is a syste m ma lf un ction in t he tr ansmis
sion. The transm ission is switching to emer
gency mode. Th is mode only sh ifts into cer
tain gears or will no longer shift at all. The en
gine may stall. Drive to your authorized Audi
dealer o r qualified repair facility immediately
to have the malfunction co rrected .
[O] Ii) Transmi ssion malfunct ion: No re verse
You can conti nue d riving
There is a system ma lf u nction in the transmis
sion. The transmission is sw itching to emer
gency mode. Th is mode only shifts into cer
tain gears or will no longer shift at a ll. The en
g ine may stall. You cannot engage the reve rse
gear . D rive to your authorized A udi dealer or
qua lified r epai r faci lity immediate ly to have
the ma lf u nction co rrec ted .
[O] Tran smission malfunct ion : Stop veh icle
and shift to park .
Do not continue driving. Select the P se lector
lever pos ition and see your authorized Audi
dealer o r qualified repair facility for assis
tance.
({D Note
If the transmiss io n sw itches to emergency
mode, you sho uld take the vehicle to an
author ized Audi dealersh ip as soon as pos
sib le to have the cond ition co rrected.
Selector lever emergency release
App lies to vehicles: with S tronic tr ansmiss ion
If the vehicle's power supply fails , the selec
tor lever can be released in an emergency .
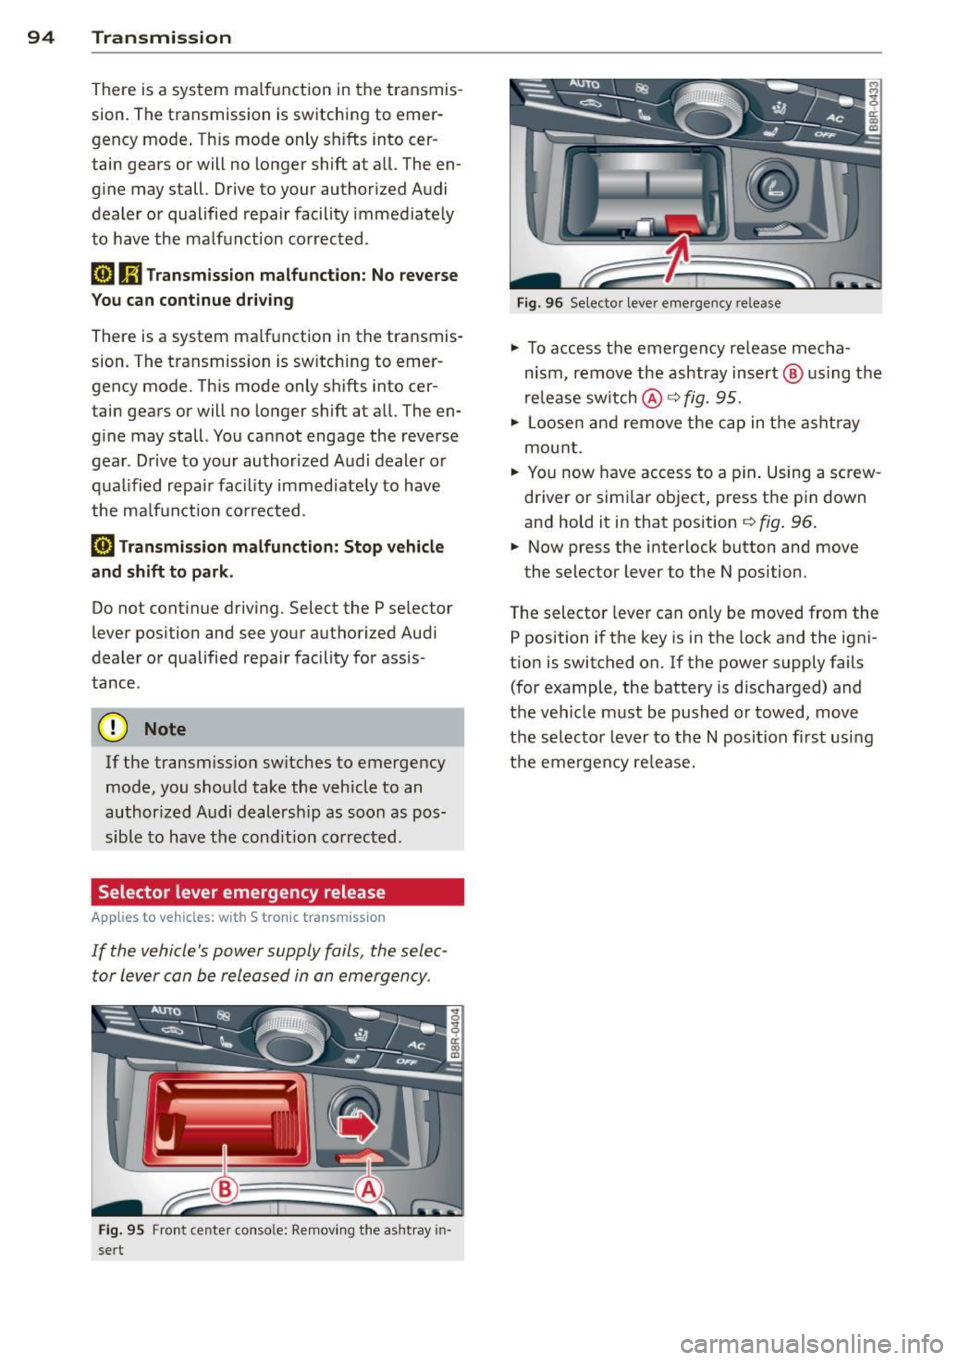
Fig. 95 Fron t cen te r con so le: Remov ing the ashtray in
sert
F ig. 96 Selec to r lever eme rge ncy re lease
"' To access the emergency re lease mecha
n ism , remove the ashtray insert @ us ing the
release switch @q
fig. 95.
"' Loosen an d remove the cap in t he asht ray
mou nt.
"' Yo u n ow have access to a p in . Using a sc rew
driver or simi la r object, press the pin down
and hold it in that position
¢ fig . 96.
"' Now press the i nterlock button and move
the selector lever to the N posi tion .
T he selector lever can only be moved from the
P position i f the key is in the lock and the igni
t ion is switched on. If the power supply fails
(for example, the battery is discharged) and
t h e veh icle must be pushed or towed, move
the selecto r lever to th e N position fi rst usi ng
the emergency re lease.
Page 110 of 294
108 Audi side assist
- Side assist is not active while you are
making the adjustment.
- Your settings are automatically stored
and assigned to the remote control key
being used.
Driver messages
App lies to vehicles: with side assist
If side assist switches off by itself, the LED in
the button turns off and a message will ap
pear in the instrument cluster display:
Audi side assist unavailable: Sensors blocked
The radar sensors' vision is affected. Do not
cover the area in front of the sensors with bike
wheels, stickers, dirt or other objects. Clean
the area in front of the sensors, if necessary
c:::;,page 106, fig. 111.
Audi side assist: Currently unavailable
Side assist cannot be switched on temporarily
because there is a malfunction (for example,
the battery charge level may be too low) .
Audi side assist: System fault!
The system cannot guarantee that it will de
tect vehicles correctly and it is switched off .
The sensors have been displaced or are faulty .
Have the system checked by an authorized
Aud i dealer or authorized Audi Service Facility
soon .
Audi side assist: Unavailable when towing
Side assist switches off automatically when a
factory-installed trailer hitch is connected to
the electrical connector on the trailer . There is
no guarantee the system will switch off when
using a retrofitted trailer hitch. Do not use
side assist when towing a trailer.
Page 271 of 294
General information Explanation of
technical data
Som e of t he technical data listed in this man
ual requires further explanation .
The technical data for your vehicle is listed in
the charts starting on
c:> page 2 71. This sec
tion provides general information, notes and
r estr ictions wh ich app ly to this data.
Vehicle identification
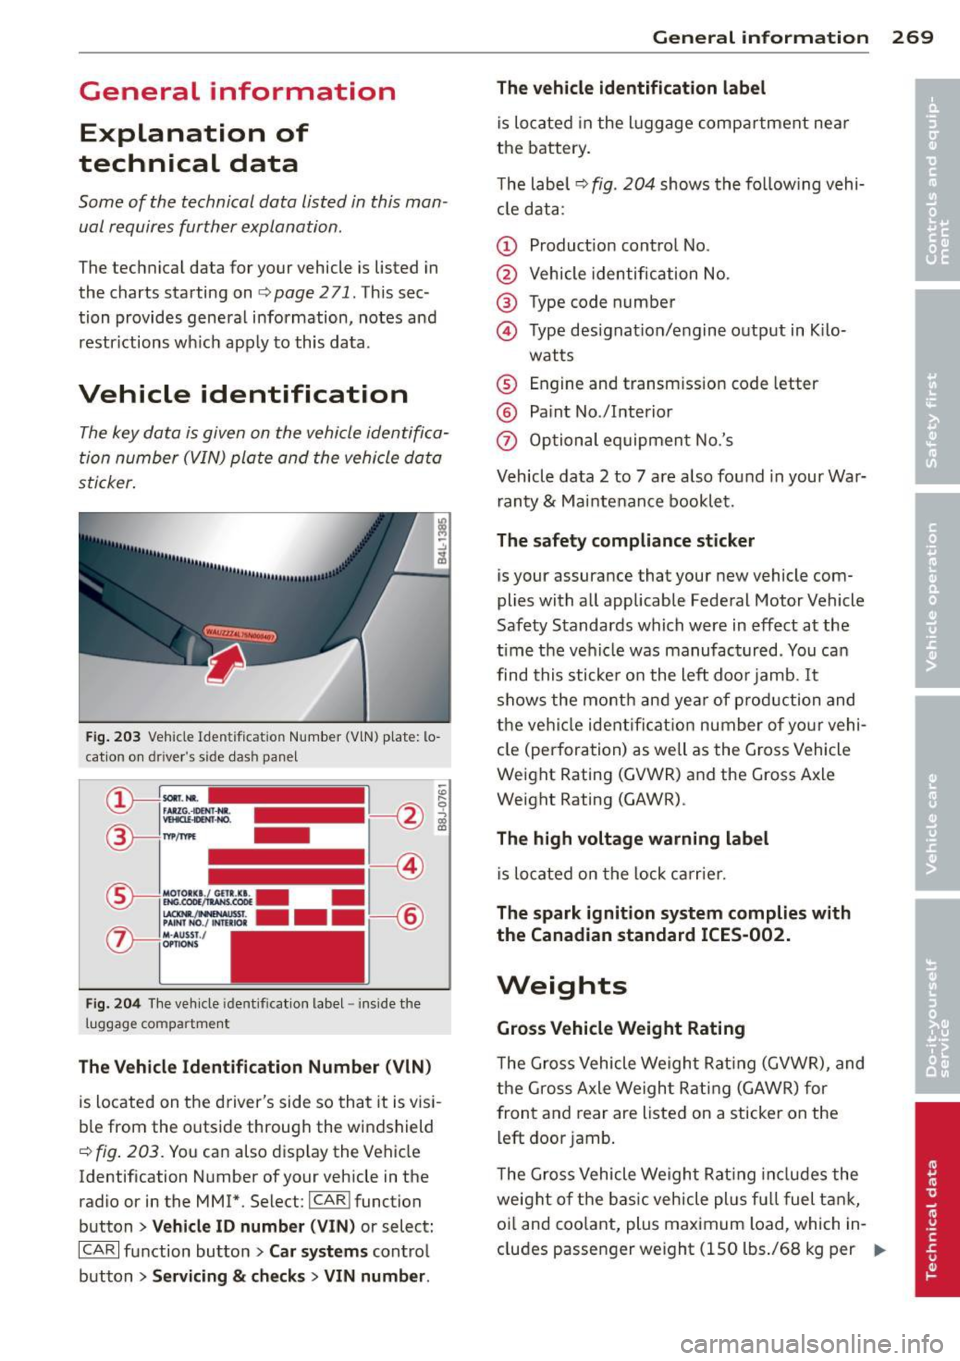
The key data is given on the vehicle identifi ca
tion number ( VIN) plate and the vehicle data
sti cker .
Fig. 20 3 Vehicle Ident ificat ion Num ber (VlN) p la te: lo
cation o n drive r"s side dash pa nel
Fi g. 2 04 The ve hicle ident ification label -in side the
l u ggage compartme nt
The Vehicle Identification Number (VlN)
is located on the d river's side so tha t it is v is i
b le from the outside throug h the windshield
c:> fig . 203. You can also d isplay the Vehicle
Identification N umber of your vehicle in the
radio or in the MM!*. Select: ICAR !function
button
> Vehicle ID number (VIN) or select :
I CA R
I function butto n > Car systems contro l
button
> Servicing & checks > VIN number .
General inform ation 269
The vehicle identification label
is lo cated in the l uggage comp artment near
the battery.
T he label ~
fig. 204 shows th e fo llow ing vehi
cl e d ata :
(D Product ion cont ro l No .
@ Vehicle identific ation No.
@ Type code number
© Type designat ion/e ngine o utput in K ilo-
wat ts
® Engine and transm ission code letter
® Pa int No./lnterior
0 Option al eq uipmen t No.'s
Vehicle data 2 to 7 are a lso fo und in your War
ranty
& Mai nte nance bookle t.
The safety compliance sticker
is your assurance that your new vehicle com
plies wi th a ll applicable Fede ral Motor Vehicle
Safety S tandards which were in effect at the
tim e the ve hicle was manufactur ed . You ca n
find this sticke r o n the left doo r jamb.
It
sh ows the m onth and ye ar of pro duction and
t h e ve hicl e ident ifi cat io n number of yo ur vehi
cle (perfora tion) as well as the G ross Vehicle
Weight Rating (GVW R) and the Gross Axle
Weight Rating (GAWR) .
The high voltage warning label
is lo cated on the l ock ca rrie r.
The spark ignition system complies with
the Canadian standard ICES-002.
Weights
Gross Vehicle Weight Rating
T he Gro ss Vehicle Weigh t Rat ing (GVWR), and
the Gross Axle We igh t Ra tin g (GAWR) for
fron t and rear are listed on a sticker on the
l eft door jamb .
T he Gro ss Vehicle Weigh t Rat ing incl udes the
weig ht o f the bas ic vehicle plus f ull fuel t ank,
oi l and coo lant, p lus maximum load, which in
cludes passen ger we ight (150 lbs./68 kg per ..,.
Page 281 of 294
Automatic climate control Air vents ... ................ ... .... 69
Operation . . . . . . . . . . . . . . . . . . . . . . . . . 68
Setup ... .. ................. .. .... 70
Automatic Shift Lock (ASL) . . . . . . . . . . . . 85
Automatic transmission . . . . . . . . . . . 82, 88
Automatic Shift Lock (ASL) . . . . . . . . . . . 85
Driving .. .. ............. .... .. .. .. 82
Dynamic shift program . . . . . . . . . . . . . . 86
Emergency mode . . . . . . . . . . . . . . . . . . . 87
Emergency release . . . . . . . . . . . . . . 88, 94
Kick -down . . . . . . . . . . . . . . . . . . . . . . . . . 85
Manual shift program . . . . . . . . . . . . . . . 86
Removal lock (ignition key) . .. .. .. .. .. 71
Selector lever . . . . . . . . . . . . . . . . . . . . . .
84
S tronic .. ..... ........... ... ... ... 88
also refer to S tronic transmission ..... 88
Automatic wipers ................ .. .. 49
Auto Safety Hotline ........ .. .. .. .. . 132
Average speed . . . . . . . . . . . . . . . . . . . . . . . 25
Avoid damaging the vehicle ... ... .. .. . 193
B
Battery . . . . . . . . . . . . . . . . . . . . . . . 17,226
Battery location inside the luggage com-
partment .. ................ ... ... 227
Charging ... ................ ... ... 229
Important warnings when working on
the battery . ............. .... .. ... 227
Jump starting ............ .... .. ... 263
Low ..... ... ...... ............. .. 191
Replacing the battery ..... .. .. .. .. . 230
State of charge ........... .... .. .. . 191
W inter operation ......... .. .. .. .. . 226
Working on the battery .... .. .. .. .. . 227
Before driving . . . . . . . . . . . . . . . . . . . . . . 124
Bio-ethanol (Fuel) ................ .. . 212
Blended gasoline .......... .. .. .. .. . 211
Blower (automatic climate control) . . . . . . 69
Body cavity sealing ............ ... .. . 205
Booster seats .............. ... ... .. 174
Brake fluid Changing the brake fluid ... .. .. .. .. . 226
Checking the brake fluid level ... .. .. . 225
Reservoir .. ... .. .. ...... .. .. .. .. . 225
Index 279
What is the correct brake fluid level? . . 225
What should I do if the brake fluid warn- ing light comes on? ............... . 225
B rake system .. .. .. .... ........... .. 225
Anti- lock b raking system ........ .. .. . 19
Brake assist system ............... . 185
Brake fluid . ..... ................. 225
Brake fluid specifications for refill and re-
placement .. .. .. .... ........... .. 226
Brake light defective ............... . 21
Brake power assist unit ............. 188
Brakes .. .. .. .. .. .. . .. .... ........ 188
Ceramic brakes ... .. ............... 188
Electromechanical parking brake ..... . 76
Warning/ind icator lights ........ .. .. . 15
Worn brake pads symbol . . . . . . . . . . . . . 20
Braking Emergency braking function .......... 78
braking guard . .. .. .... ............. . 95
Messages . .. .. .. .. ............... 103
Settings .. .. .. .. .... ... .... .... .. 102
Break-in period . ..... ............... 193
Tires ........... .. ............... 193
Bu lbs .......... .... ............... 262
C
California Proposition 65 Warning ... .. 217
Battery specific ...... ......... .. .. 228
Capacities .. .. .. .. .... ........... .. 271
Car care ..... ... .... ............... 200
Interior ..... .... .. ............... 206
Plastic and vinyl .... .............. . 203
Care of exterior .. .. .... ........... .. 200
Cargo area
refer to Luggage compartment. . . 63, 130
Catalytic converter . . . . . . . . . . . . . . . . . . 194
Center armrest . . . . . . . . . . . . . . . . . . . . . . 56
Central locking .. .. ............... .. . 32
Central locking switch .......... .... . 36
Convenience key . . . . . . . . . . . . . . . . . . . . 36
Remote control key .... ....... .... .. 35
Ceramic brake rotors New brake pads .. ................. 188
Certification .. .. .. ... ............ .. 276
Changing a flat tire ................. . 253
Changing a wheel .... .............. . 253
•
•