display AUDI A5 COUPE 2016 User Guide
[x] Cancel search | Manufacturer: AUDI, Model Year: 2016, Model line: A5 COUPE, Model: AUDI A5 COUPE 2016Pages: 264, PDF Size: 66.92 MB
Page 26 of 264
Driver information system
Trip computer
Introduction
The trip computer gives you information on cur
rent and average fuel mileage , average speed ,
fu el range and driving time .
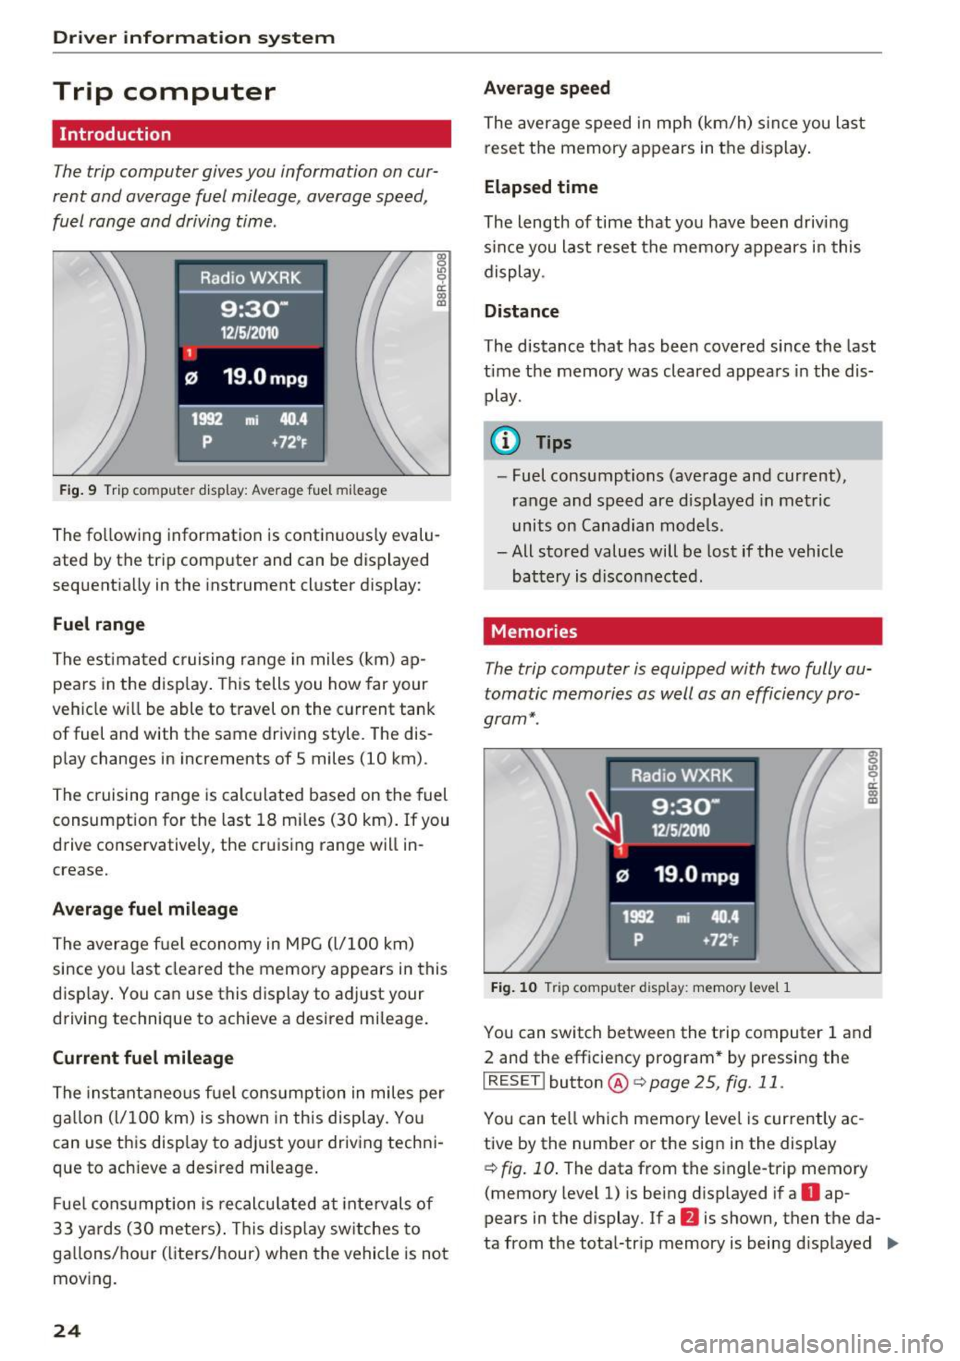
Fig. 9 Tri p computer display: Average fu el mile age
~ 9 a: CX) m
The fo llow ing information is contin uously evalu
ated by the trip computer and can be displayed
sequent ia lly in the instrument cluster display:
Fuel range
The estima ted cruising range i n miles (km) ap
pea rs in the disp lay . Th is tells you how far your
veh icle w ill be able to travel on the c urrent tank
of fuel and with the same driv ing style. The dis
p lay changes in increments of 5 miles (10 km).
T he cruising range is calcu lated based on the fuel
consumption for the last 18 m iles (30 km). If you
drive conse rvatively, the cru is ing range will in
crease.
Average fuel mileage
T he avera ge f uel economy in M PG (l/ 100 k m)
since you last clea red the memory a ppears in this
d isp lay . You can use this display to adj ust your
driving technique to achieve a desired mileage .
Current fuel mileage
The instant aneous f ue l cons umption in miles per
ga llon (l/100 km) is shown in this display. Yo u
can use t his disp lay to adjust yo ur driving techni
que to ach ieve a desired mileage .
F ue l cons umption is recalcu lated at inte rv a ls of
33 y ards ( 30 meters) . T his d isp lay sw itches to
ga llons/ho ur ( liters/hour) when the vehicle is not
mov ing.
24
Average speed
The average s peed in mp h (km /h) s in ce you last
rese t the memory appears in t he d isplay .
Elapsed time
The length of time that yo u have been drivi ng
s ince you la st reset t he memory appears in this
display .
Distance
The distance that has been covered since the last
time the memory was cleared appears in the dis play .
0) Tips
-Fuel consumptio ns (ave rage and current),
range and speed are disp layed in metric
units on Canad ian mode ls .
- All stored values will be lost if the vehicle
bat tery is discon nect ed.
Memories
The trip computer is equipped with two fully au
tomatic memories as well as an efficiency pro
gram* .
Fig. 10 Trip computer display: memory level 1
You can sw itch between the t rip computer 1 and
2 and the efficiency program* by pressing the
IRESET I button@c:>page 25, fig. 11.
You can te ll w hich memory leve l is cur rently a c-
tive by the number or the sig n in the display
¢fig. 10 . The data from the single-trip memory
(memory leve l 1) is being d isp layed if a
D ap-
pears in the display. If a
fJ is shown, then the da
ta from the tota l-tr ip memory is being d isp layed .,..
Page 27 of 264
..... N
0 I-co .....
indicates the efficiency program*¢ page 26.
Single-trip memory (Trip computer 1)
The single-trip memo ry stores the trip informa
tion from the time the igni tion is turned on until
it is turned
off. If the tr ip is continued within 2
hours from the time the ignition was turned off,
the new data will be included in the calculation of
the current trip information.
If the trip is inter
rupted for
more than 2 hours the memory is re
set automat ically.
Total -trip memory (Trip computer 2)
Unlike the single-trip memory, the tota l-trip
memory is not reset automatically. This permits
you to evaluate your driving data for the entire
period between manual resets.
Efficiency program*
The efficiency program can help you to use less
fuel¢
page 26.
Operation
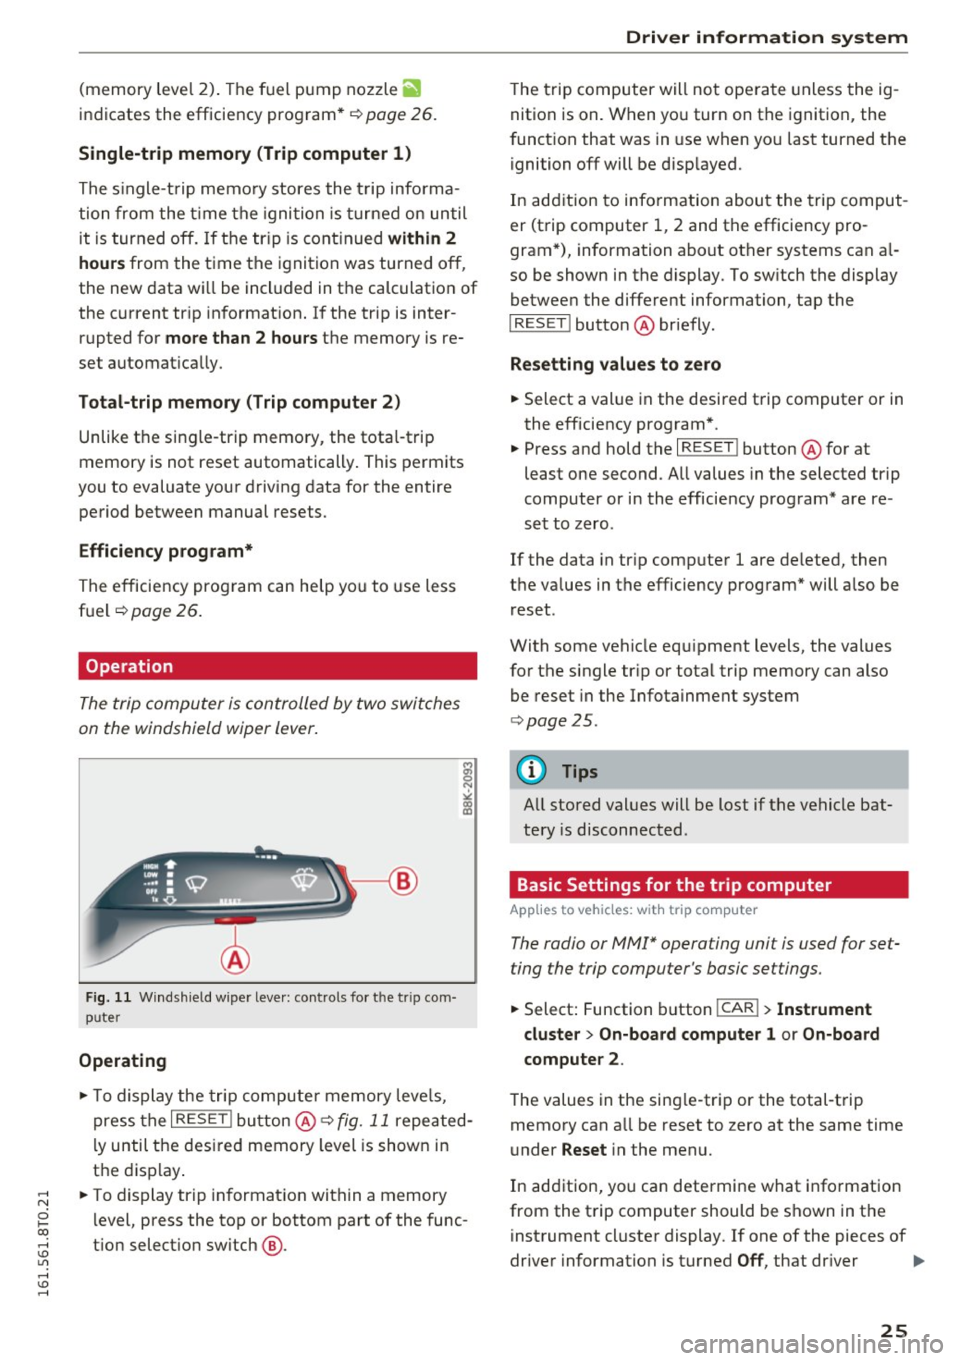
The trip computer is controlled by two switches
on the windshield wiper lever.
Fig. 11 Wind shield w iper leve r: controls fo r th e tr ip com
p u ter
Operating
"'To display the trip computer memory levels,
press the
I RESE T! button @¢ fig. 11 repeated
ly until the desired memory level is shown in
the display.
"' To display trip information within a memory
level, press the top or bottom part of the func
t ion selection switch @ .
Driver information system
The trip computer will not operate unless the ig
nition is on. When you turn on the ignition, the
function that was in use when you last turned the
ignition off will be disp layed.
In addition to information about the trip comput
er (trip computer 1, 2 and the efficiency pro
gram*), information about other systems can al
so be shown in the display. To sw itch the display
between the different information, tap the
I RESET ! button@ briefly .
Resetting values to zero
.,. Select a value in the desired trip computer or in
the efficiency program* .
"' Press and hold the
I RESET ! button@ for at
least one second . All values in the selected trip
computer or in the efficiency program* are re
set to zero .
If the data in tr ip computer 1 are deleted, then
the values in the efficiency program* will also be
reset .
With some vehicle eq uipment levels, the values
for the single trip or total trip memory can also
be reset in the Infotainment system
¢page 25.
(D Tips
All stored values will be lost if the vehicle bat
tery is disconnected .
Basic Settings for the trip computer
Applies to vehicles: with trip computer
The radio or MM!* operating unit is used for set
ting the trip computer 's basic settings.
.,. Select: Function button !CAR !> Instrument
cluster
> On-board computer 1 or On-board
computer
2 .
The values in the sing le-trip or the total-trip
memory can all be reset to zero at the same time
under
Reset i n the menu.
In addition, you can determine what information
from the trip computer should be shown in the
instrument cluster display . If one of the pieces of
driver information is turned
Off , that dr iver 1111>
25
Page 28 of 264
Driver i nf orm ati on sy stem
information w ill not be shown in the display. The
information will continue to be calculated by the
tr ip computer and can be turned back
On at any
time.
(D Tips
- This function is not avai lable on all vehicles.
- The driving information in the efficiency
program is a lso reset to zero with the s in
gle-tr ip memory.
Gearshift Indicator
Applies to vehicles: with manual transmiss ion and gearshift
i n dica tor
This indicator con help conserve fuel.
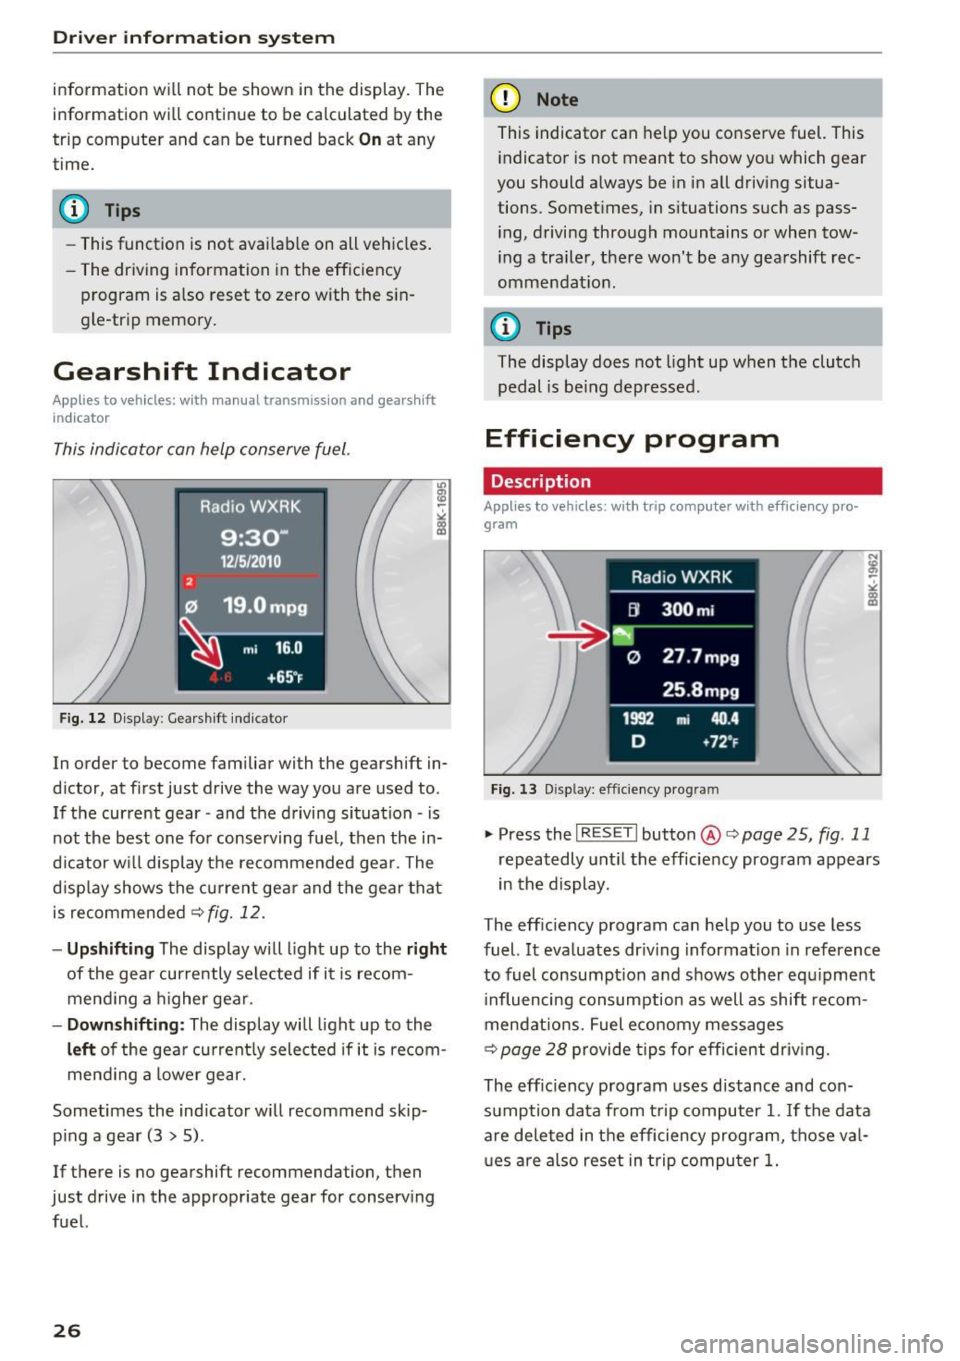
Fig. 12 Display : Gearshift indicator
In order to become familiar with the gearshift in
d icter, at first just drive the way you are used to .
If the current gear -and the driving situation -is
not the best one for conserving fuel, then the in
dicator wi ll display the recommended gea r. The
d isplay shows the current gea r and the gea r that
is recommended
¢fig. 12.
-Up shifting The display w ill light up to the ri ght
of the gear currently selected if it is recom
mend ing a h igher gear.
- Dow nshifting : The display will light up to the
left of the gear cu rrent ly selected if it is recom
mend ing a lower gear.
Sometimes the indicator w ill recommend skip
p ing a gear (3
> 5).
If there is no gearshift recommendation, then
just drive in the appropriate gear for conserving fuel.
26
(D Note
This indicator can help you conserve fuel. This i ndicator is not meant to show you which gear
you should always be in in all driving situa
tions. Somet imes, in situations such as pass
i ng, driving through mountains or when tow
i ng a tra ile r, there won't be any gearshift rec
ommendat ion.
(0 Tips
The display does not l ight up when the clutch
pedal is be ing depressed .
Efficiency program
Description
Applies to vehicles : with trip computer with efficiency pro·
gram
Fig. 13 Display : effic ie ncy program
.,. PressthelRESETlbutton @c>page25, fig .11
repeatedly unt il the efficiency program appears
in the display.
The effic iency program can help you to use less
fuel.
It eva luates dr iv ing information in reference
to fuel consumpt ion and shows other equ ipment
i nfluencing consumption as well as shift recom
mendat ions. Fuel e conomy messages
¢ page 28 provide tips for efficient driv ing.
The eff ic iency p rogram uses distance and con
sumption data from trip computer
1. If the data
a re de leted in the efficiency program, those va l
u es are also reset in trip computer
1.
Page 29 of 264

,-1 N
0 1-CX)
rl I.Cl U"I
,-1 I.Cl ......
Enhanced shift indicator
Applies to vehicles: with manual transmiss ion and tr ip com
p uter with eff iciency program
F ig. 14 Display: enhanced s hift i ndicator
• In the efficiency program, press the function
selection switch¢
page 25, fig. 11@ repeat
edly until the enhanced shift indicator appears
in the display.
The efficiency program also has an enhanced
shift ind icator. This enhanced shift indicator fol
lows the same concept as the "standard" shift in
dicator¢
page 26. The selected and the recom
mended gears are highlighted in colors like a
traffic light .
The color of the circle indicates if the most suita b le gear is engaged or if you should shift up or
down.
Green circle w ithout or No gear or the most
with a gear suitable gear is engag-
ed
Yellow circle¢
fig. 14 Shift up or down one
gear
Red circle Shift up two gears
(D Note
This enhanced shift indicator can help you
conserve fuel. It is not designed to recom
mend the correct gear in all driving situa
tions . Only the dr iver can decide which gear is
correct in certain dr iving situations such as
when passing another veh icle, dr iving on hill s
or towing a trailer.
Driver in forma tion system
(D Tips
-The enhanced shift indicator display is dif
ferent in vehicles with a monochrome dis
play.
- The "standard" shift indicator* disappears
when the enhanced shift indicator is dis
played.
Other equipment
Applies to vehicles: with trip computer with eff ic ie n cy pro
gram
Fig. 15 Display : other equ ipment
• In the effic iency program, press the function
select ion switch ¢
page 25, fig. 11 @ repeat
ed ly until the other equipment appears in the
disp lay.
Other equipment that is currently affecting fuel
consumption is listed in the eff ic iency program.
T he display shows up to three other items of
equipment @. T he equipment using the most
fuel is listed first. If more than three items using
fuel are switched on, the equipment that is cur rently using the most fuel is displayed.
A scale @also shows the current total consump
tion of all other equipment .
27
Page 30 of 264
Driver information s ystem
Fuel economy messages
Applies to vehicles: with trip computer with efficiency pro
gram
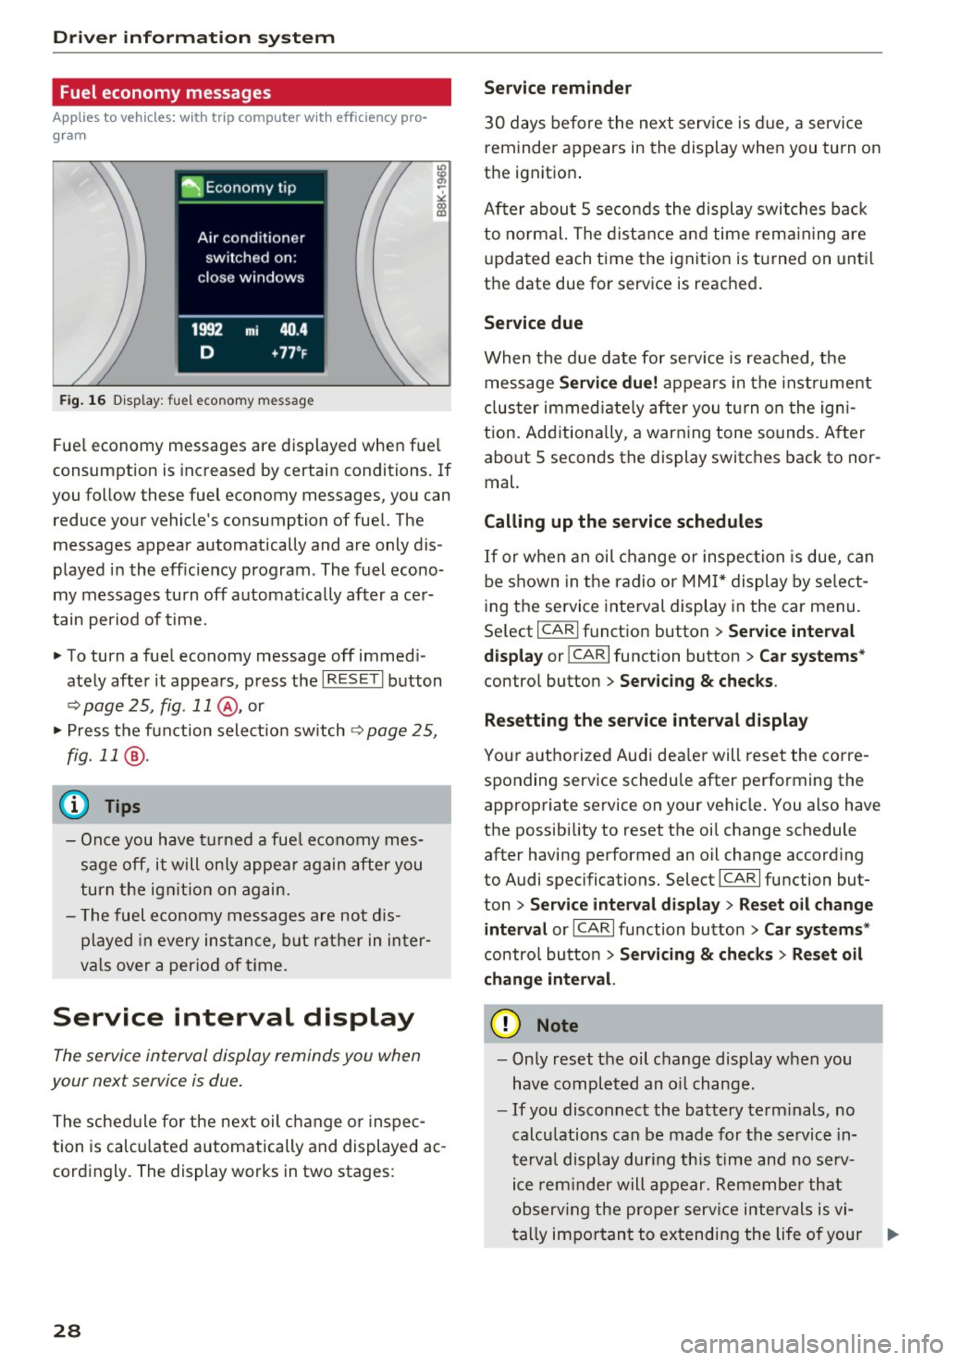
F ig. 16 D isplay: fuel eco nomy message
Fue l economy messages are displayed when fue l
consumption is inc reased by certain conditions. If
you follow these fuel economy messages, you can reduce your vehicle's consumption of fuel. The
messages appear automatically and are only dis
p layed in the eff iciency program . The fuel econo
my messages turn off automat ica lly afte r ace r
tain period of t ime.
"' To turn a fuel economy message off immed i
ate ly after it appears , press t he I R ESE T I button
¢ page 25, fig. 11 @ , or
"' Press t he f unct ion sele ct io n sw itch
~ page 2 5,
fig. 11
® ·
(D Tips
- Once you have t urned a fue l economy mes
sage off, it will on ly appea r again after you
turn the ig nition on ag ain.
- T he fuel economy messages a re not d is
p layed in every ins tance, but rather in in ter
v al s over a per io d of t ime.
Service interval display
The service interval display reminds you when
your next service is due .
The schedule for the next oil change o r inspec
tion is calc ulated a utomatically and displayed ac
cord ingly. The display works in two stages:
28
Service reminder
3 0 days before the next service is due , a servi ce
r eminder appears in the display when you turn on
the ignition .
After abou t
5 seconds the display swit ches bac k
to normal. The dist ance a nd time rem aining are
u pda ted each time the ignit ion is turned on unt il
the date due for service is reached.
Service due
Whe n the d ue date for se rvice is rea ched, the
message
Service due! appears in the inst rument
cl uster immed iate ly after you tu rn o n the igni
tion . Add itiona lly, a warn ing tone sounds. A fter
about
5 seconds the display switches back to nor
mal.
Calling up the service schedules
I f or w hen an oil change o r inspec tion is due, can
be shown in the radio or MMI * display by se lect
i ng the service interval display in the car menu.
Se lect
I CAR I fu nction button > Se rvice interval
display
or ! CAR I function button > Car systems *
control button > Ser vicing & checks .
Resetting the s ervice interval display
Yo ur a utho rized Aud i dea ler will rese t the corre
sponding service schedu le after performing the
approp riate service on your vehicle . You also have
the possibility to reset t he oi l change schedule
after having pe rformed an oil change accord ing
to Audi specifications. Select
I CA R I fu nction but
ton
> Service interval display > Re set oil change
interval
or ICA RI fu nction button > Car systems *
control button > Servicing & check s > Reset oil
change interval.
(D Note
- Only reset the oil c hange display when you
h ave completed an o il change.
- If you disconnect the battery term inals, no
calcu lations can be made for the se rvice in
te rv al display dur ing th is time and no se rv
i c e rem inder will appear. Remembe r th at
ob serv ing the pro per serv ice intervals is vi-
ta lly im po rt an t to extending the life o f your .,.
Page 31 of 264
,-1 N
0 1-CX)
rl I.Cl U"I
,-1 I.Cl ......
vehicle, particularly the engine, and main
taining its value. Even if the mileage driven
is low, the maximum period of one year
from one service to the next must not be ex
ceeded.
@ Tips
The informat ion in the Service Rem inder re
mains stored even when the vehicle battery is
disconnected.
On Board Diagnostic
System (OBD)
Malfunction Indicator Lamp (MIL)
The Malfunction Indicator Lamp (MIL) ¢..ift in the
instrument cluster is part of the On-Board Diag
nostic (OBD II) system .
The warning/indicator light illuminates when the
ignition is switched on and goes out after the en
gine starts and the idle has stabilized. This indi
cates that the MIL is working properly .
If the light does not go out after the engine is
started, or illuminates while you are driving, a malfunction may exist in the engine system.
If
the light illuminates, the catalytic converter
could be damaged.
Continue driving
with reduced power (avoiding
sustained high speeds and/or rapid accelera
tions) and have the condition corrected. Contact
your authorized Audi dealer.
If the light illuminates, the electronic speed limiter may also be malfunctioning. For more infor
mation
¢ page 29, Electronic speed limiter.
An improperly closed fuel filler cap may also
cause the MIL light to illuminate ¢
page 188.
Driver in forma tion system
On-Board Diagnostics
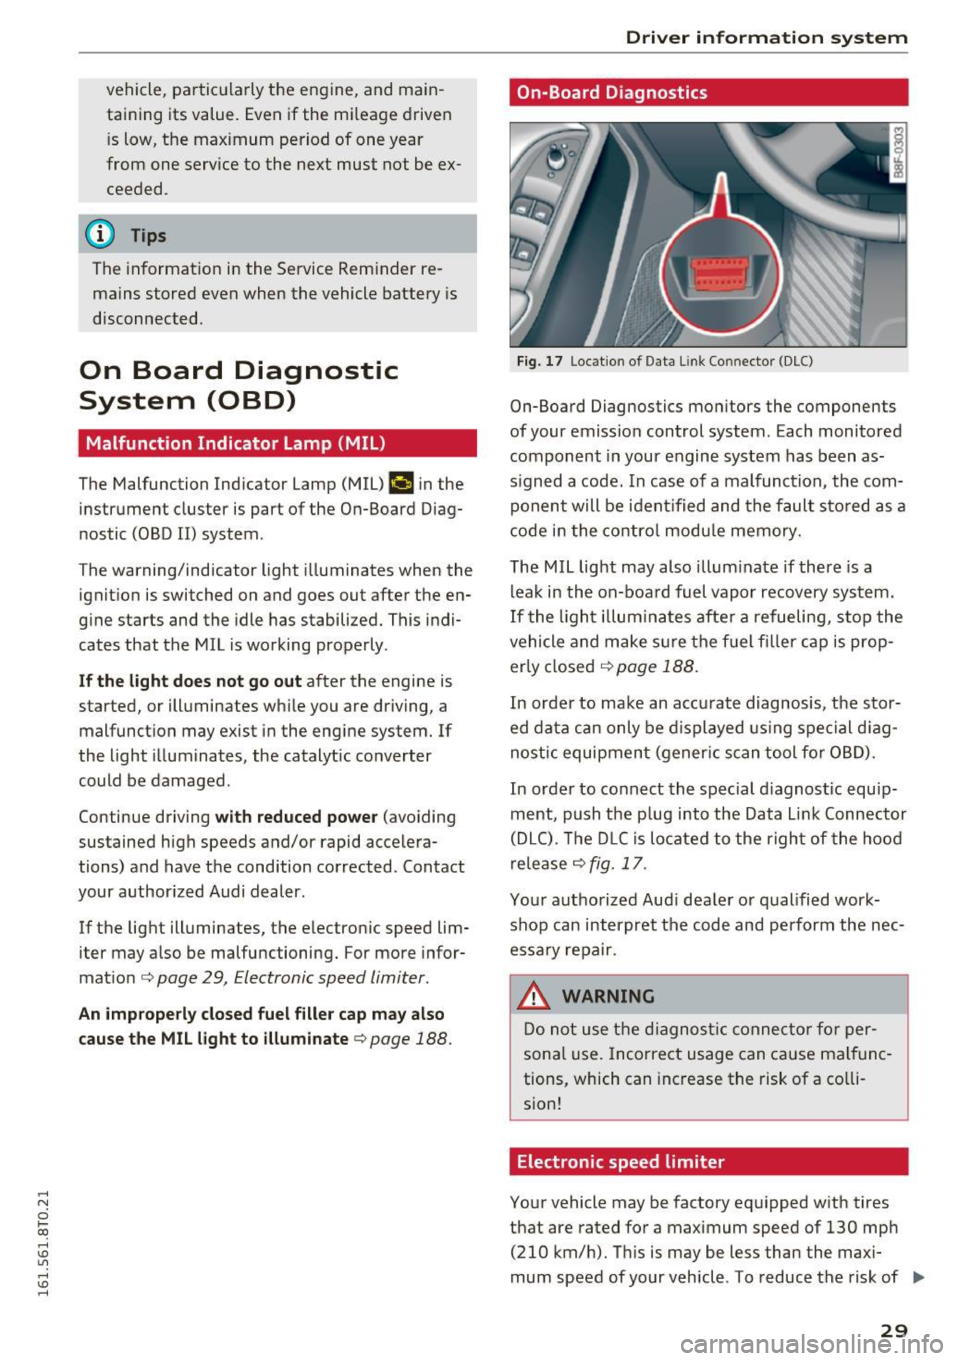
Fig. 17 Loca tion of Data Link Connector (DLC)
On-Board Diagnostics monitors the components
of your emission control system. Each monitored
component in your engine system has been as
s igned a code. In case of a malfunction, the com
ponent will be identified and the fault stored as a
code in the control module memory.
The MIL light may also illuminate if there is a
leak in the on-board fuel vapor recovery system.
If the light illuminates after a refueling, stop the
vehicle and make sure the fuel f iller cap is prop
erly closed
¢ page 188.
In order to make an accurate diagnosis, the stor
ed data can only be displayed using special diag
nostic equipment (gener ic scan tool for OBD).
In order to connect the special d iagnost ic equip
ment, push the p lug into the Data L ink Connector
(DLC). The DLC is located to the right of the hood
release
¢ fig. 17.
Your authorized Audi dealer or qualified work
shop can interpret the code and perform the nec
essary repair.
.&, WARNING
Do not use the diagnostic connector for per
sonal use. Incorrect usage can cause malfunc
tions, which can increase the risk of a co lli
sion!
Electronic speed limiter
Your vehicle may be factory equipped with tires
that are rated for a maximum speed of 130 mph (210 km/h). This is may be less than the maxi
mum speed of your vehicle . To reduce the risk of .,.
29
Page 35 of 264
-Do not remove the key from the ignition
lock until the vehicle has come to a com
plete stop . Otherwise the steer ing column
lock could suddenly engage -causing the
risk of an accident .
(D Tips
-The operation of the remote control key can
be temporarily d isrupted by interference
from transmitters in the vicinity of the vehi
cle work ing in the same frequency range
(e .g. a cell phone, radio equipment).
- For security reasons, replacement keys are
only available from authorized Aud i dea ler .
- For Declaration of Compliance to Un ited
States FCC and Industry Canada regulations
<::>page 247.
Removing the mechanical key
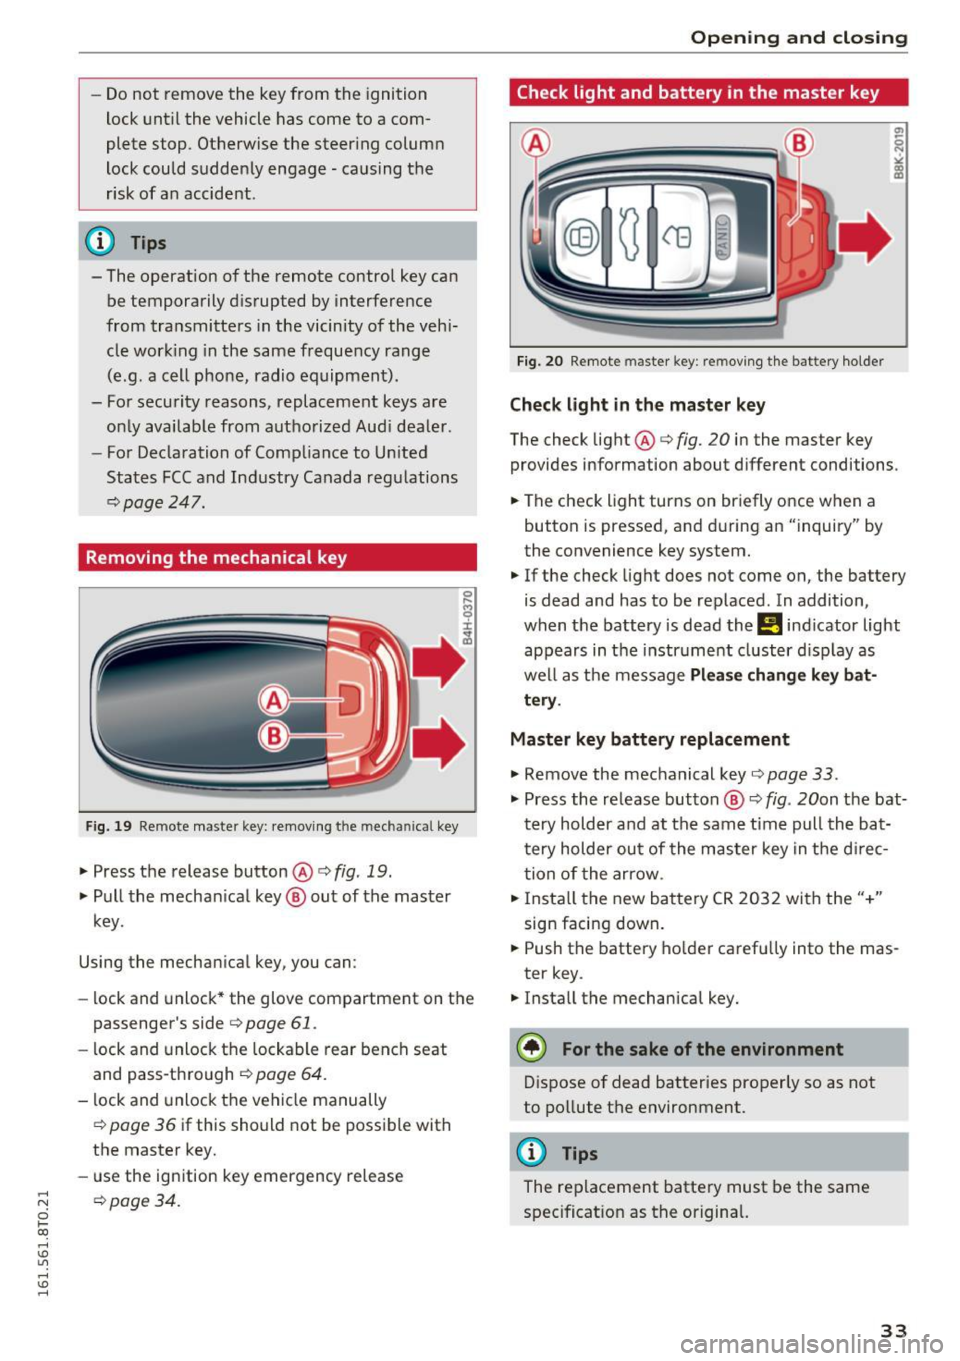
F ig. 19 Remote master key: removing t he m ec hani ca l key
.,. Press the release button @r=> fig. 19.
.,. Pull the mechan ical key ® out of the master
key.
Using the mechan ical key, you can :
- lock and unlock* the glove compartment on the
passenger's side
c> page 61 .
-lock and unlock the lockable rear bench seat
and pass-through
c> page 64.
- lock and unlock the vehicle manually
c> page 36 if this should not be possible with
the master key.
- use the ign ition key emergency release
;::; opage 34.
0 1-CX)
rl I.Cl U"I
rl I.Cl rl
Open ing and closing
Check light and battery in the master key
Fig. 20 Remote master key: re moving the bat tery holder
Check light in the master key
The check light @r=> fig. 20 in the master key
provides information about d ifferent conditions .
.,. The check light turns on briefly once when a
button is pressed, and during an "inquiry" by
the convenience key system.
.,. If the check light does not come on, the battery
is dead and has to be replaced . In addition,
when the battery is dead the
Ill indicator light
appears in the instr ument cluster display as
well as the message
Please change key bat
tery .
Master key battery replacement
.,. Remove the mechanical key o page 33 .
.,. Press the re lease button ® o fig. 20on the bat
t ery holder and at the same time pull the ba t
tery holder out of the master key in the d irec
tion of the arrow .
.,. Insta ll the new battery CR 2032 with the"+"
sign facing down .
.,. Push the battery holder carefully into the mas
ter key .
.,. Install the mechanical key.
@) For the sake of the environment
Dispose of dead batteries properly so as not
to pollute the environment.
@ Tips
The replacement battery must be the same
specificat ion as the original.
33
Page 44 of 264
Opening and closing
Programming or reprogramming buttons
.. Swi tch t he ignition on .
.. Press and h old the but ton in the roo f headliner
¢ page 41, fig. 34 that you would like to pro
gram fo r at least 10 seconds. Or
.. Se lect :
I CARI funct ion button> Car systems*
contro l button > Vehicle sett ings > Garage
door opener > Program garage door opener .
If
this path is not availab le, program the button
as describ ed in v ers ion B
<::;, pag e 42 .
.. Fo llow the ins truc tio ns i n t he MM I.
Erasing button programming
The programmed buttons cannot be erased indi
vid ually. They must all be erased toget her . Re
p rogram the but tons if necessary .
.. Select:
ICARI funct ion button> Car systems*
contro l button > Vehicle settings > Garage
door opener > Clear program settings > Yes .
Displaying the version/status/country code
.. Se lect: ICARI funct io n button > Car systems*
contro l button > Vehicle settings > Garage
door opener > Version information .
@ Tips
-Programming th rough the MMI* is not pos
s ible w it h all infotainment systems. If this
i s the case, program the buttons as descri
bed in ve rsion Br::;,
page 42.
- The re quired distance between the ha nd
transmitter and the Homelink mod ule in
the radiato r gri lle r::;,
page 42, fig. 35 de
pends o n the system that you a re prog ram
ming.
- Dep end ing on th e model of the system, you
may n eed to r eleas e the bu tton on the re
mote con trol du ring progra mming an d
pr ess it ag ain . H old each posi tion yo u try for
at least 15 second s before try ing ano ther
p osition . Keep t he tur n sig na ls on yo ur vehi
cle in view w hen do ing t his.
- Aft er progra mming the gar ag e door ope ner,
i t may be necessary to sy nch ronize the mo
tor with the system . Refer to the ma nufac
turer's i nstructions.
42
Programming the buttons (version B)
Applies to vehicles: with garage door opener (Horne link)
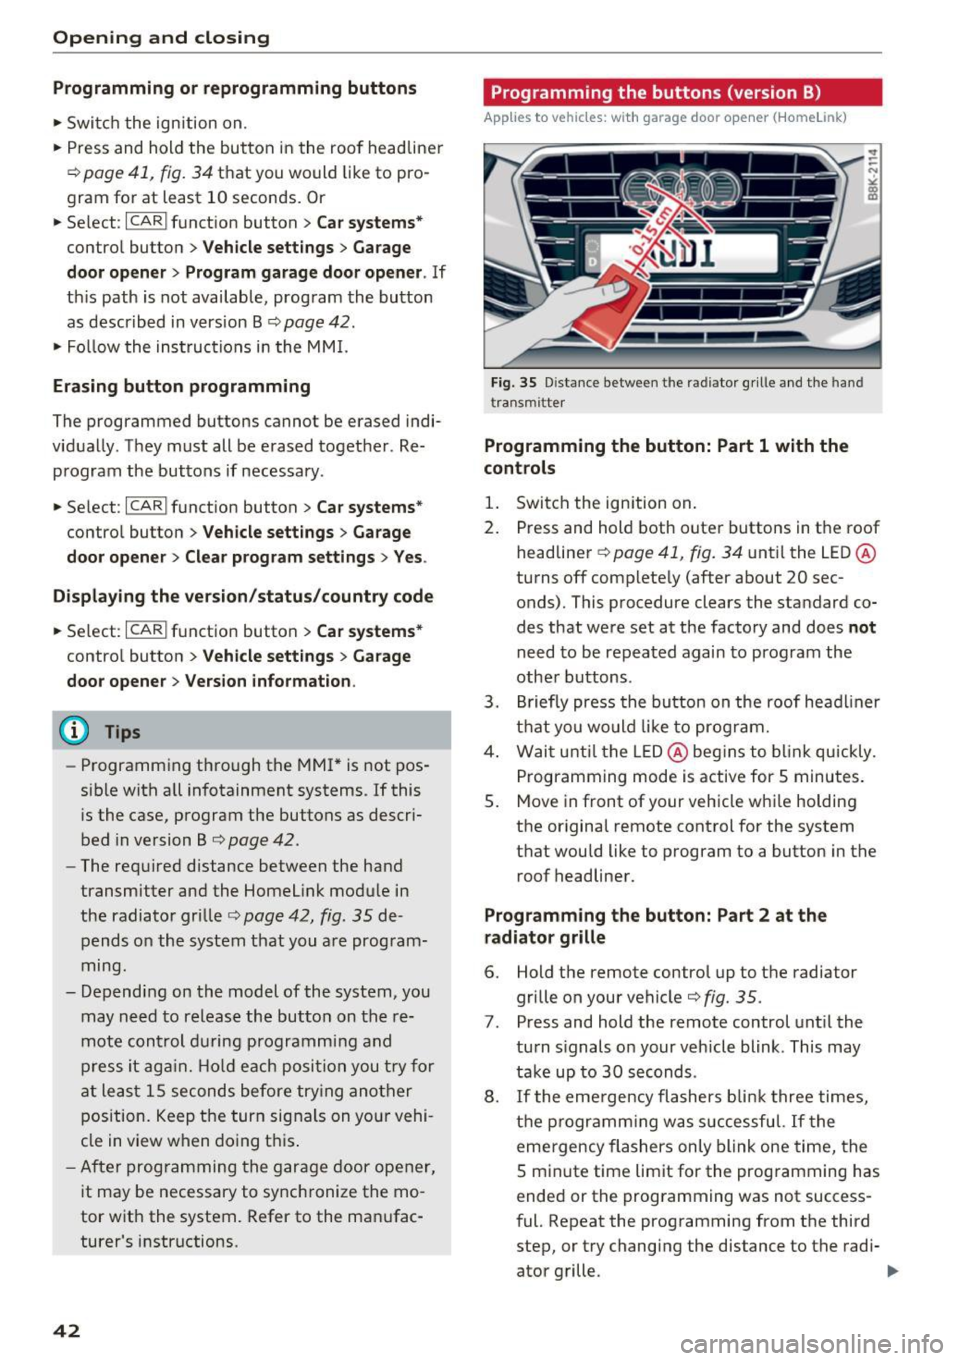
Fi g. 35 Dis ta nce between the radiator gril le and the hand
t ransmitter
Programming the button: Part 1 with the
controls
1. S wi tch the ign ition on .
2 . Press and hold both outer buttons in t he roof
headline r
r::;, page 41, fig. 34 unt il the LE D ®
turns off complete ly (after about 20 sec
onds). This p rocedure clears the standard co
des that were set at the facto ry and does
not
need to be repea ted again to prog ram the
othe r bu ttons .
3. Briefly press the bu tton on the roof head liner
t h at y ou wo uld like to progra m.
4 . Wai t until th e LE D@ begins to bli nk qu ickly.
P rogramming mode is active for 5 minutes.
5 . Move in front of your veh icle w hile ho lding
t h e or igina l remote cont rol for the system
t h at wou ld like to program to a button in the
roof headliner.
Programming the button: Part 2 at the
radiator grille
6. Hold the remote control up to t he radiator
grille on your vehicle
¢fig. 35.
7. Press and hold the remote control unt il the
tu rn s ignals on your veh icle blink . This may
t ake up to 30 s econds .
8 .
If the eme rge ncy flashers b link t hree ti mes,
t h e pr ogr amm ing w as s uccessfu l.
If the
emergency fl ashers only blink one time, the
5 m in ute time limit f or the prog ramming has
ended or the prog ramming was not success
f ul. Repeat the prog ramming from t he third
step, or try chang ing the distance to the radi-
ator g rille. ..,_
Page 47 of 264

,-1 N
0 1-CX)
,-1 I.Cl U"I
,-1 I.Cl ......
the windshield in this a rea in o rder to
prevent ma lf u nctions or failures .
- Some exterior lighting functions can be ad
ju sted
c:, pa ge 45 .
-When yo u remove yo ur key from the igni
tion wh ile the vehicle's lights are turne d on,
a buzzer sounds as long as the driver's door
is open .
- In coo l or damp weather, the inside of the
headlights, turn s ignals and tai l lights can
fog over d ue to the temperature d ifference
between the inside and outs ide. They will
clear s hort ly after switch ing them on. This
does not affect the serv ice life o f th e light
i ng.
- In the event of a light sensor malfunction,
t h e d river is not ified in the instr ument clus
te r display
c:, page 21.
Turn signals and high beam lever
The lever operates the turn signals, the high
beams and the headlight flasher.
Fi g. 37 Turn signal and high beam lever
Turn signals ¢¢
g N
0
~ CD
The turn s ignals activate when you move the lev
er into a tu rn s ignal position w hen the ignition is
switched on.
@ -righ t tur n signal
@-left tu rn s ignal
The turn s ignal b links three times if you just tap
the lever .
High beams and headlight flasher ~D
Move the lever to the corresponding positio n:
@-hig h b eams o n
Light and V ision
@ -high beams off or he adlig ht flasher
T he in dicator light
II in t he inst rument cl uste r
tu rns o n.
Notes on these features
- The turn signals on ly wor k w ith the ignition
tur ned on. The indicator lig hts . or
II in the
ins trument clus ter also b link.
- After you have t urned a co rner, the t urn signa l
sw itches off automatica lly.
- The
high beam works only when the headlights
are on. The indicator lig ht
II in the ins trument
cl uste r illumina tes whe n the high beams a re
on.
- The
headlight flash er works only as lo ng as yo u
hold t he leve r - even if there a re no lights
sw itche d on . T he ind ic a tor light
II in the in
s tr umen t clu ster ill umin ates when you use t he
he ad ligh t fla sher.
WARNING
Do not use t he high beam or hea dlight flas her
i f you know that these could blind oncoming
tra ffic.
Adjusting exterior lighting
The func tions are selected in the radio or MMI* .
.,. Select: !CAR I function button> Exterior light
ing .
Or
.,. Sele ct: 1-C~A ~ R-.l func tion button > Car systems *
control button > Vehicle settings > Exterior
lighting .
Coming home (light when leaving car)*,
Leaving home (light when unlocking car)*
The coming home fu nction ill uminates the area
around the vehicle whe n the ignition is switched
off and the d river's door is opened. Depending on
vehicle equipment, the function can be switched o n and off or the length of time the lights rema in
on* can be a djusted .
The
leaving home function illuminates th e a rea
around the vehicle whe n unlock ing it. T his func-
t io n can be switched on and off.
ll>
45
Page 49 of 264
,-1 N
0 1-CX)
,-1 I.Cl U"I
,-1 I.Cl ......
Interior Lighting
Front/rear interior lights
(• ' .,;,I
~~~
8 8
O. ~O
l
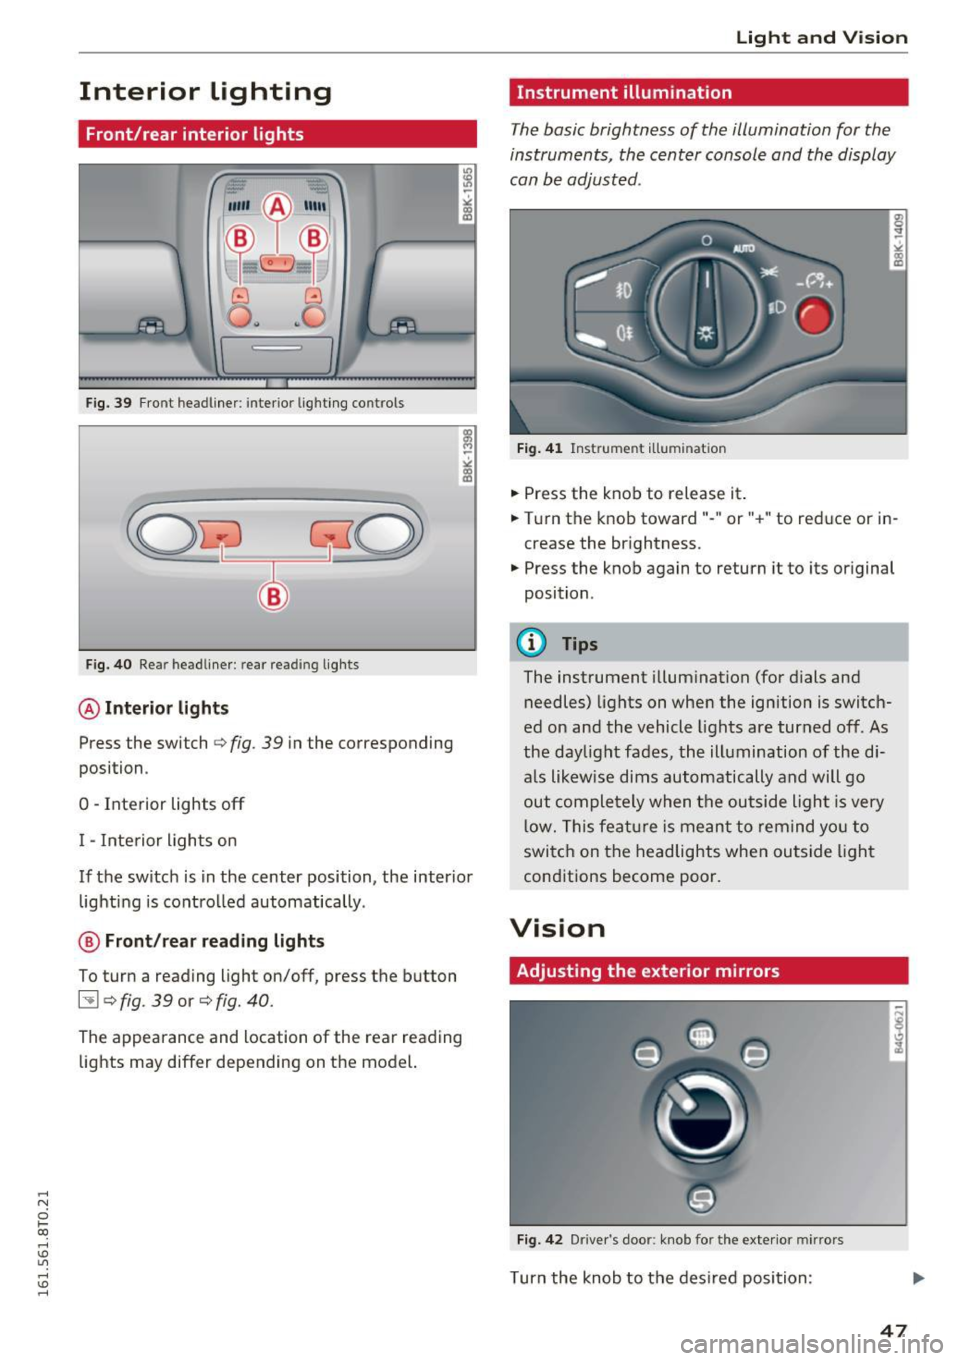
Fig. 39 Front headl iner : interio r lighting co ntrols
Fig. 40 Rear headliner : rear re ading lights
@Interior lights
Press the switch Qfig . 39 in the corresponding
position .
0 -Interior lights off
I - Interior lights on
If the switch is in the center position, the interior
lighting is controlled automatically .
@ Front/rear reading lights
To turn a reading light on/off, press the button
~ Q fig . 39 or Q fig. 40.
The appearance and location of the rear reading
lights may differ depending on the model.
Light and Vision
Instrument illumination
The basic brightness of the illumination for the
instruments, the center console and the display
can be adjusted .
Fig. 41 Instrume nt illumin atio n
• Press the knob to release it .
• Turn the knob toward"- " or"+" to reduce or in
crease the brightness .
• Press the knob again to return it to its original
position .
@ Tips
The instrument illumination (for dials and
needles) lights on when the ignition is switch
ed on and the vehicle lights are turned off. As
the daylight fades, the illumination of the di
a ls likewise dims automatically and will go
out completely when the outside light is very
low. This feature is meant to remind you to
switch on the headlights when outside light
conditions become poor.
Vision
Adjusting the exterior mirrors
Fig. 42 Driver 's doo r: kno b fo r the exterio r mirrors
Turn the knob to the desired position :
47