display AUDI A5 COUPE 2018 Owner's Manual
[x] Cancel search | Manufacturer: AUDI, Model Year: 2018, Model line: A5 COUPE, Model: AUDI A5 COUPE 2018Pages: 409, PDF Size: 67.63 MB
Page 64 of 409
Lights and Vi sion
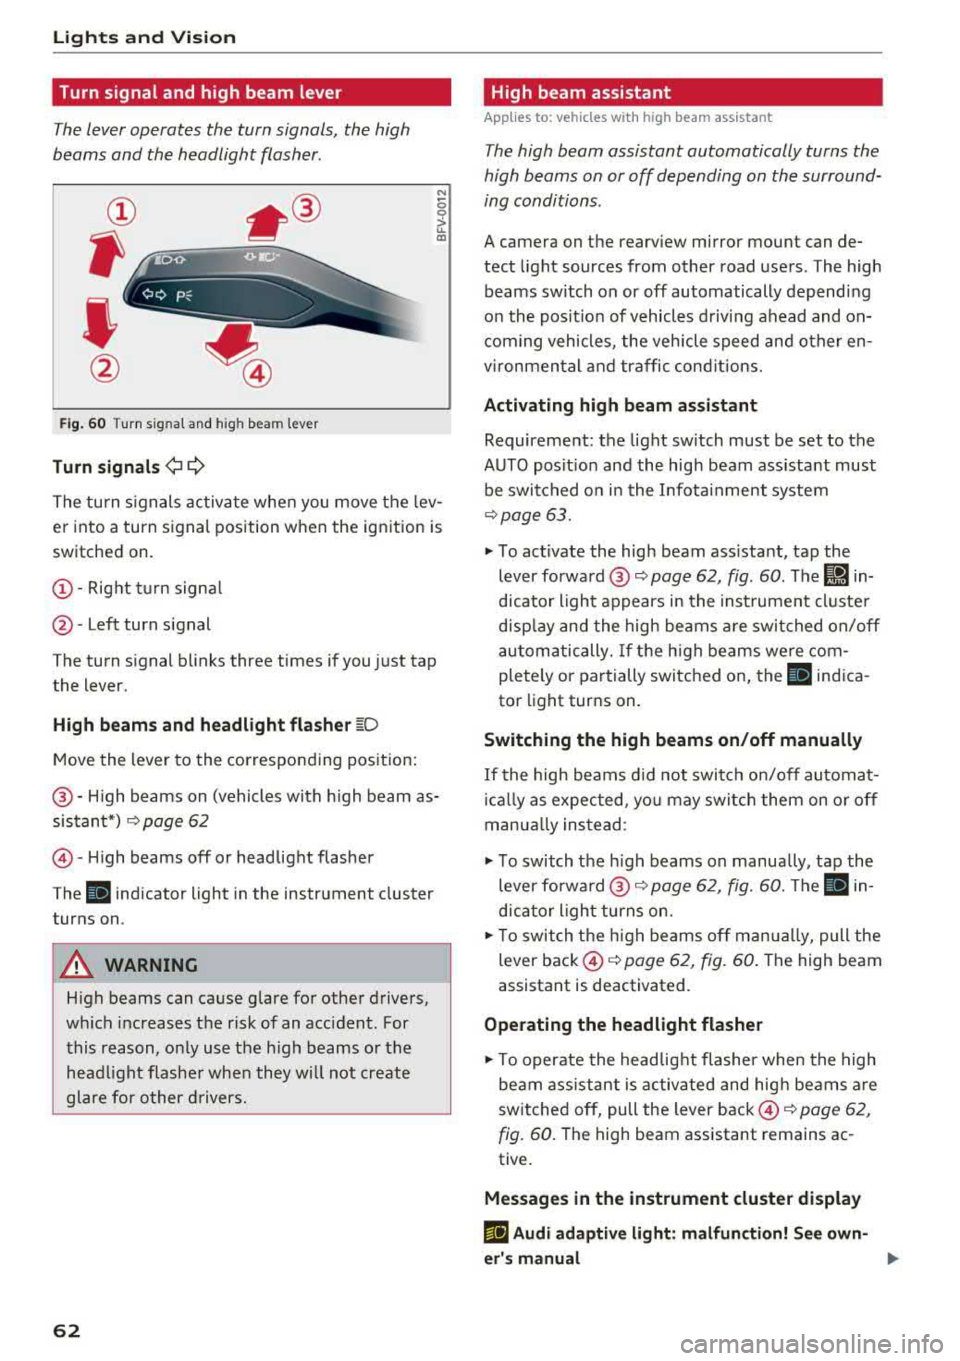
Turn signal and high beam lever
The lever operates the turn signals, the high
beams and the headlight flasher.
®
,
I
@
F ig . 60 Turn s ignal and high beam lever
Tu rn signals ¢ 9
N
0 0
> u. a,
The turn s ignals activate when you move the lev
er into a turn signal position when the ignition is
switched on.
@ -Right tu rn signa l
@-Left turn signal
The turn signal blinks three times if you just tap
the lever.
High b eams and h eadlight fl ash er ~D
Move the lever to the corresponding pos ition:
@ -High beams on (vehicles with h igh beam as
sistant*)
Q page 62
© -High beams off or headlight flasher
The
II indicator light in the instrument cluster
turns on.
A WARNING
High beams can cause glare for other drivers,
wh ich increases the risk of an accident. For
this reason, only use the h igh beams or the
head light f lasher when they will not create
glare for other d rivers.
62
· High beam assistant
Applies to: vehicles with high beam assistant
The high beam assistant automatically turns the
high beams on or off depending on the surround
ing conditions.
A camera on the rearview mirror mount can de
tect light sources from other road users. The high
beams switch on or off automatically depending
on the posit ion of vehicles d riving ahead and on
com ing vehicles, the veh icle speed and other en
vironmental and traffic cond itions.
Activ ating high b eam assistant
Requirement: the light sw itch must be set to the
AUTO posit ion and the high beam ass istant must
be switched o n in the Infota inment system
¢page 63.
~ To activate the high beam ass istant, tap the
lever forward @
c:> page 62, fig. 60 . The I!) in
dicator light appears in the inst rument cluste r
disp lay and the high beams a re swit ched on/off
automatically. If the h igh beams we re com
pletely or partially switched on, the II indica
tor light turns on.
Switching the high beams on /off manually
If the high beams d id not switch on/off automat
i ca lly as expected, yo u may switch them on or off
manua lly ins tead:
~ T o switch the h igh beams on manually, tap the
lever forward @
Q page 62, fig. 60. The Ill in
dicator light turns on.
~ T o switch the h igh beams off man ua lly, pull the
lever back ©
c:> page 62, fig. 60 . The high beam
assistant is deactivated.
Ope rating the headlight flasher
~ To operate the head lig ht flashe r when the high
beam ass istant is activated and hig h beams are
switched off, pull the lever back ©
c:> page 62,
fig. 60 .
The high beam assistant remains ac
tive.
Message s in the instrument cluster display
rlJ Audi adaptiv e light : malfun ction! See own
e r's manual
...
Page 67 of 409
@ Tips
The setting is automatica lly stored and as
signed to the remote control key that is be ing
used.
Instrument illumination
The brightness of the illumination for the instru
ments, display and head-up display* con be ad
justed.
Fig. 64 Instrument illum inatio n
~ Press the knob to release it.
~ Turn the knob toward "-" or"+" to reduce o r in
crease the brightness.
~ Press the knob again to return it to its original
position .
(D Tips
Depending on vehicle equ ipment, the instru
ment illumination (needles and gauges) may
turn on when the lights are off and the igni
tion is sw itched on. The illumination for the
gauges reduces automat ica lly and eventually
turns off as brightness outside increases. This
function reminds the driver to turn the low
beams on at the appropr iate time .
Lights and V ision
Vision
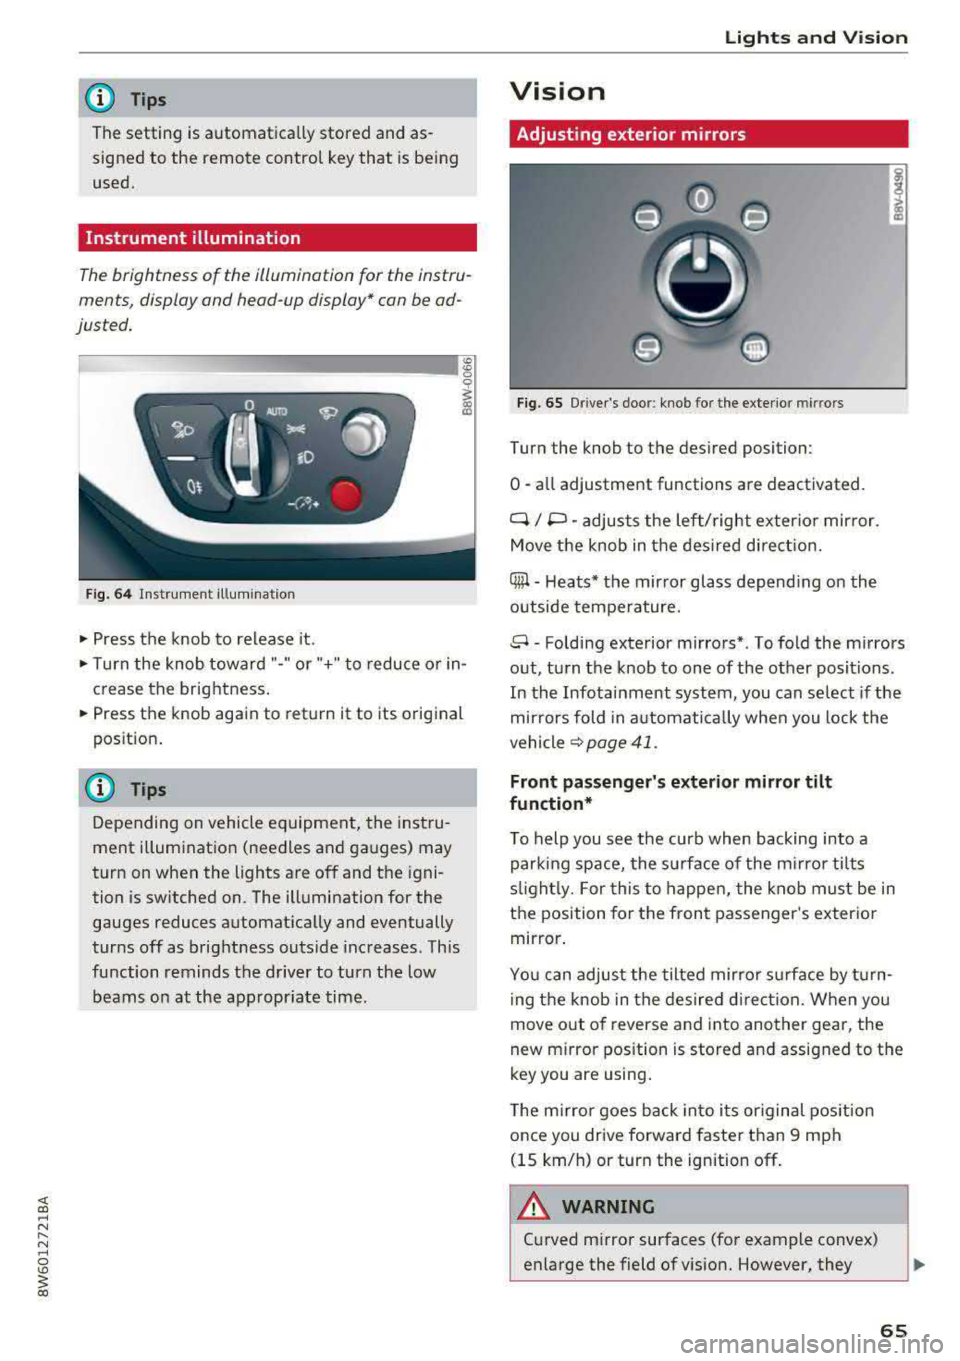
Adjusting exterior mirrors
Fig. 65 Driver's door: knob for the exterior mirrors
Turn the knob to the des ired position:
0
-a ll adjustment functions are deactivated.
q / P -adjusts the left/ right exter io r mirror.
Move the knob in the des ired direct ion.
Qiµ -Heats* the mirror glass depend ing on the
outside tempe rature.
8 -Folding exterior mirrors*. To fold the mirrors
out, turn the knob to one of the other positions.
In the Infotainment system, you can se lect if the
mir rors fold in a utomat ically when you lock the
vehicle
~ page 41.
Front passenger's exterior mirror tilt
function*
T o help you see the curb when backing into a
parking space, the surface of the mi rro r tilts
s lightl y. For this to happen, the knob must be in
the position for the front passenger 's exterio r
mirror .
You can adjust the tilted mirror s urfa ce by turn
i ng the knob in the desired direct ion. When you
move out of reverse and into another gear, the
new m irror pos ition is stored and assigned to the
key you are using .
The mirror goes back into i ts or iginal pos ition
once you drive forward faster than 9 mph
(15 km/h) or turn the ignition off .
.&_ WARNING
-C urved mirror surfaces (for example convex)
enlarge the field of vision. However, they
65
Page 72 of 409
Lights and Vision
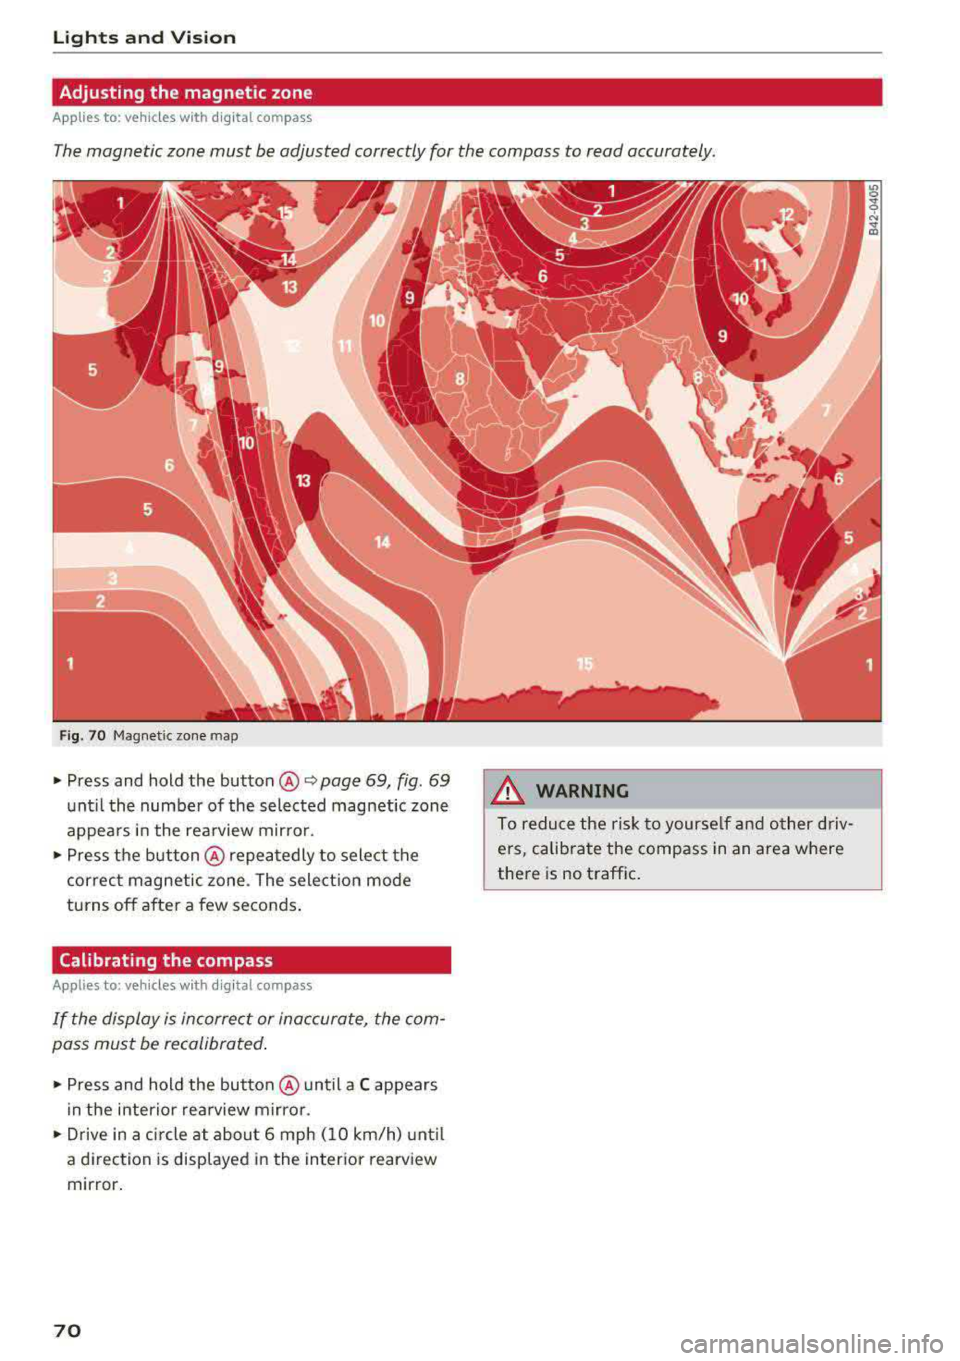
Adjusting the magnetic zone
Applies to: ve hicles w ith d ig ital compass
The magnetic zone must be adjusted correctly for the compass to read accurately.
Fig. 70 Magnetic zone map
• Press and hold the button@~ page 69, fig. 69
unt il the number of the selected magnetic zone
appears in the rea rview mir ror .
• Press the b utton @repeatedly to select the
correc t magnetic zone . The sele ct ion mode
turns off after a few seconds .
Calibrating the compass
App lies to: ve hicles with d ig ital compass
If the display is incorrect or inaccurate, the com
pass must be recalibrated .
• Press and hold the button @ until a C appears
in the inte rio r re arview mir ro r.
• Drive in a circle at about 6 mph ( 10 km/h) unt il
a d irec tion is displayed i n the in ter ior rearv iew
mir ror .
70
A WARNING
To reduce the ris k to yourse lf and o ther driv·
e rs, calibra te the compass in an area where
there is no traffic .
Page 85 of 409

<( a, .... N ,....
N .... 0 \0
3 a,
system operates most efficiently in eco cooling
mode.
A/C MAX Cooling mode*
You can switch the maximum cooling mode on or
off using the rocker switch@. Th e air is not
cooled and humidity is not removed when coo ling
mode is switched off. This can cause fog on the
windows. Cooling mode switches off automati
cally when the outside temperature is below
zero. When the cooling mode is switched on, the
vehicle interior is cooled as quickly as possible and dehumidified.
c:E) Recirculation mode
In recirculation mode, the air inside the vehicle is
circulated and fi ltered. This prevents the unfil
tered air outside the vehicle from entering the
vehicle interior. Switching recirculation mode on
when dr iving through a tunnel or when sitting in
traffic is recommended
~ ,&. .
You can switch the recirculation mode on or off
using
the~ button. You can also switch the re
circulation mode off by pressing the knob (Dor
the~ button.
AUTO
automatic mode
Automatic mode maintains a constant tempera
ture inside the veh icle. Air temperature, airflow
and a ir distribution are controlled automatically .
You can switch automatic mode on or off by pressing the
knob @.
Temperature
You can adjust the temperature between 60°F
(+16°()
and 84°F (+28°() by turning the knob
(D . Outside of this range, LO or HI will appear in
the cl imate control system display. In both set
tings, the climate cont rol runs constantly at the
maximum cooling or heating leve l. The tempera
ture is not regulated.
The temperature can be adjusted in the rear
us
ing the rear contro ls~ fig. 95.
86'~ Blower
You can adjust the vo lume of air generated by the
blower to your preference using the rocker sw itch
@ . The blower should always run at a low setting
Warm and cold
to prevent the windows from fogging and to en
sure a continuous exchange of air inside the vehi
cle. To have the blower regulated automatically,
press one of the knobs
(D .
Air distribution
You can use the rocker sw itches @to adjust the
vents where the air wi ll flow out of. Press the
rocker switches @repeatedly until the desired
air distribution sett ing is disp layed in the climate
control system controls. To have the air distribu
t ion regulated automat ically, press one of the
knobs
(D .
"'11\2' OPEN/CLOSE the wide vent
You can open and close the wide vent in the cock
pit using the rocker switch ®·
JI j Seat/neck heating*
If you press the JI j button when the engine is
running, the seat o r neck heating will switch on
at the highest level (3). The LEDs indicate the
temperature level. To reduce the temperature, press the button again. To switch the seat or
neck heat ing
off, press the respective button re
peatedly until the LED turns off.
~ Seat ventilation*
Pressing the~ button switches the seat ventila
tion on at the highest level (3). The LEDs indicate
the temperature level. To reduce the ventilation
level, press the button again. To sw itch the seat
ventilat ion off, press the button repeatedly until
the LED turns off.
I Seat heating/ventilation*
If you press the lo button, you can turn either the
seat ventilation or the seat heating on or off.
- If you turn the knob clockwise, you wi ll turn the
seat heating down to the lowest level (1). The
red LED in the button turns on. To increase the
temperature, keep turn ing clockwise to the
highest level (3).
- If you turn the knob counterclockwise, you will
turn the seat ventilation down to the lowest
level (1). The b lue LED in the button turns on .
To increase the ventilation, keep turning coun-
terclockwise to the highest level (3).
.,..
83
Page 93 of 409
you stop it. You also cannot lock the vehicle from
the outside .
Applies to: vehicles with au tomatic transm issions
Shift to P , otherwise vehicle can roll away.
Doors do not lock if gearshift is not in P
This message appears for safety reasons if the
selector lever is in the N position when you
sw itch the ignition off. Move the selector leve r to
the P position. Otherwise the vehicle is not pro
tected from ro lling and it cannot be locked .
DJ Remote control key: hold back of key
against the designated area . See owner 's man
ual
If the indicator light turns on and th is message
appears, there is a malfunction
c> page 91 .
Applies to: vehicles with automatic transmissions
Shift to P before leaving car, otherwise vehicle
can roll away
This message appears if the driver's door is
opened while the ignition is switched on and the
transmission has not been shifted to the P posi
tion . Sh ift the transmiss ion into the P position
and turn off the ignition if you are leaving the ve
hicle . Otherwise the vehicle could roll. Also see
c::> page93 .
Starting the engine when there is a
malfunction
It may not be possible to start the engine under
certain circumstances, for example if the battery
in the vehicle key is drained, if interference is af
fected the key or if there is a system malfunc
tion .
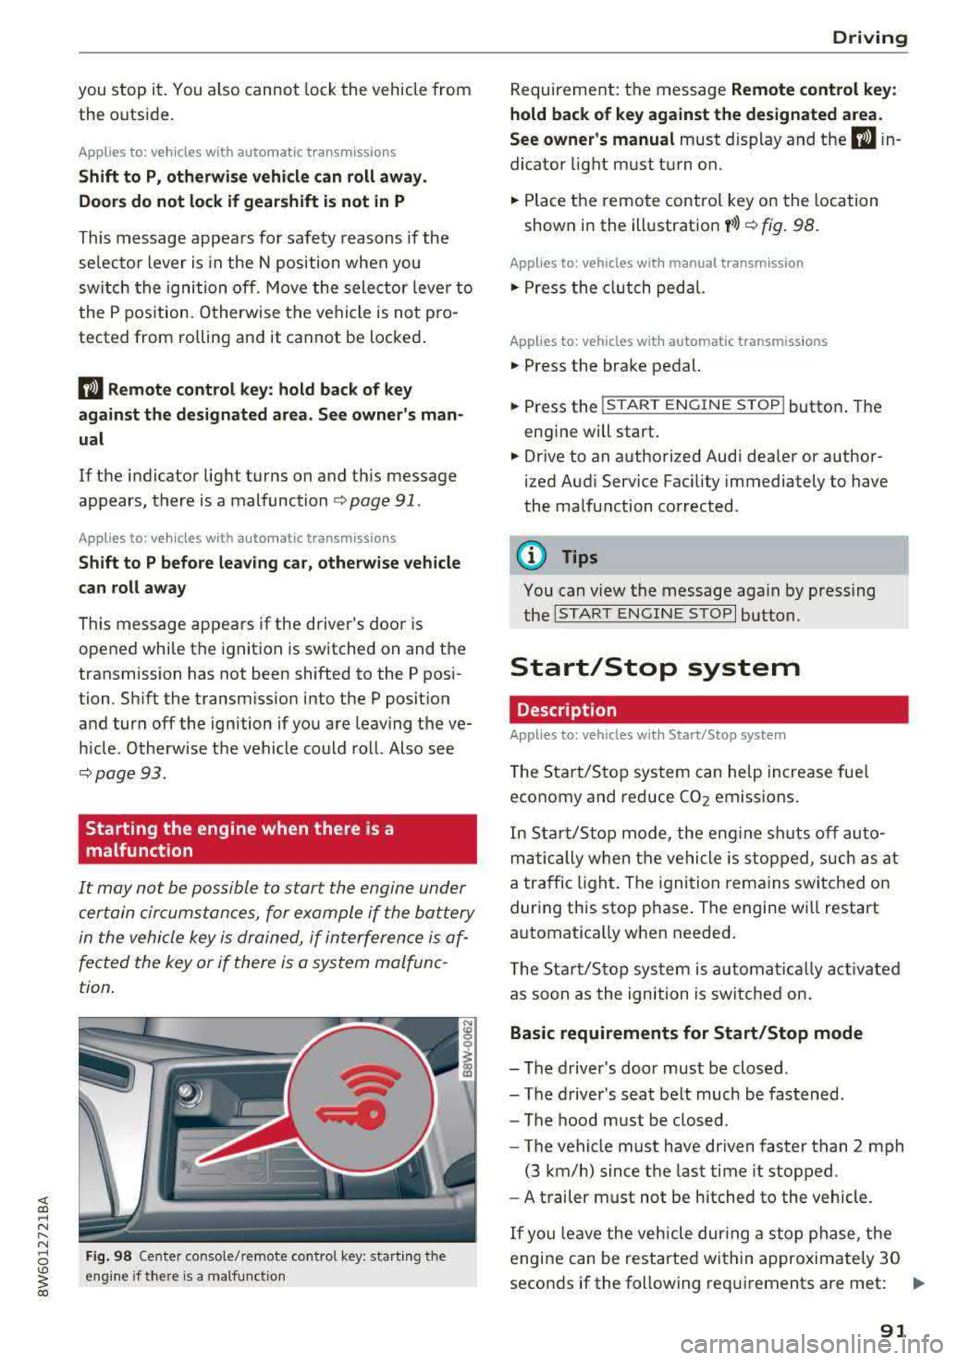
Fig. 98 Cente r console/ remote contro l key: starting t he
eng ine if there is a malfunc tion
Driving
Requirement: the message Remote control key:
hold back of key against the designated area .
See owner's manual
must display and the DJ i n
dicator light must turn on.
.,. Place the remote control key on the location
shown in the illustration
y >l) c::> fig . 98.
Applies to: vehicles with manual transmission
.,. Press the clutch pedal.
Applies to: vehicles with automatic transmissions
• Press the brake pedal.
.. Press the !START ENGINE STOP ! button. The
engine will start.
.,. Drive to an authorized Audi dea ler or author
ized Aud i Service Facility immediately to have
the malfunction corrected.
@ Tips
You can view the message again by pressing
the
I S TART ENGINE STOP I button.
Start/Stop system
Description
Applies to: vehicles with Start/Stop system
The Start/Stop system can help increase fue l
economy and reduce CO2 emissions.
In Sta rt/Stop mode, the engine shuts off auto
matically when the vehicle is stopped, such as at
a traffic light. The ignition remains switched on
during this stop phase . The engine wi ll restart
automatica lly when needed .
Th e Start/Stop system is a utomaticall y activated
as soon as the ignition is switched on.
Basic requirements for Start/Stop mode
-The driver's door must be closed .
-The driver's seat belt much be fastened.
- The hood must be closed.
- The vehicle must have driven faster than
2 mph
(3 km/h) since the last time it stopped .
- A trailer must not be hitched to the vehicle.
If you leave the vehicle during a stop phase, the
engine can be restarted within approximately 30
seconds if the following requi rements are met:
IJ>
91
Page 94 of 409
Driving
-The driver's door must be closed, the driver's
safety belt must be fastened, and the brake peda l (automat ic transmission) or the clutch
pedal (manua l transmission) must be pressed.
Or:
-The driver's door must be closed, the brake
pedal (automat ic transmission) or the clutch
pedal (manua l transmission) must be pressed,
and a gear must be engaged.
(D Note
Always sw itch the Start/Stop system off when
driving through water
q page 91.
@ Tips
The engine stops shortly before the vehicle
comes to a stop
1) .
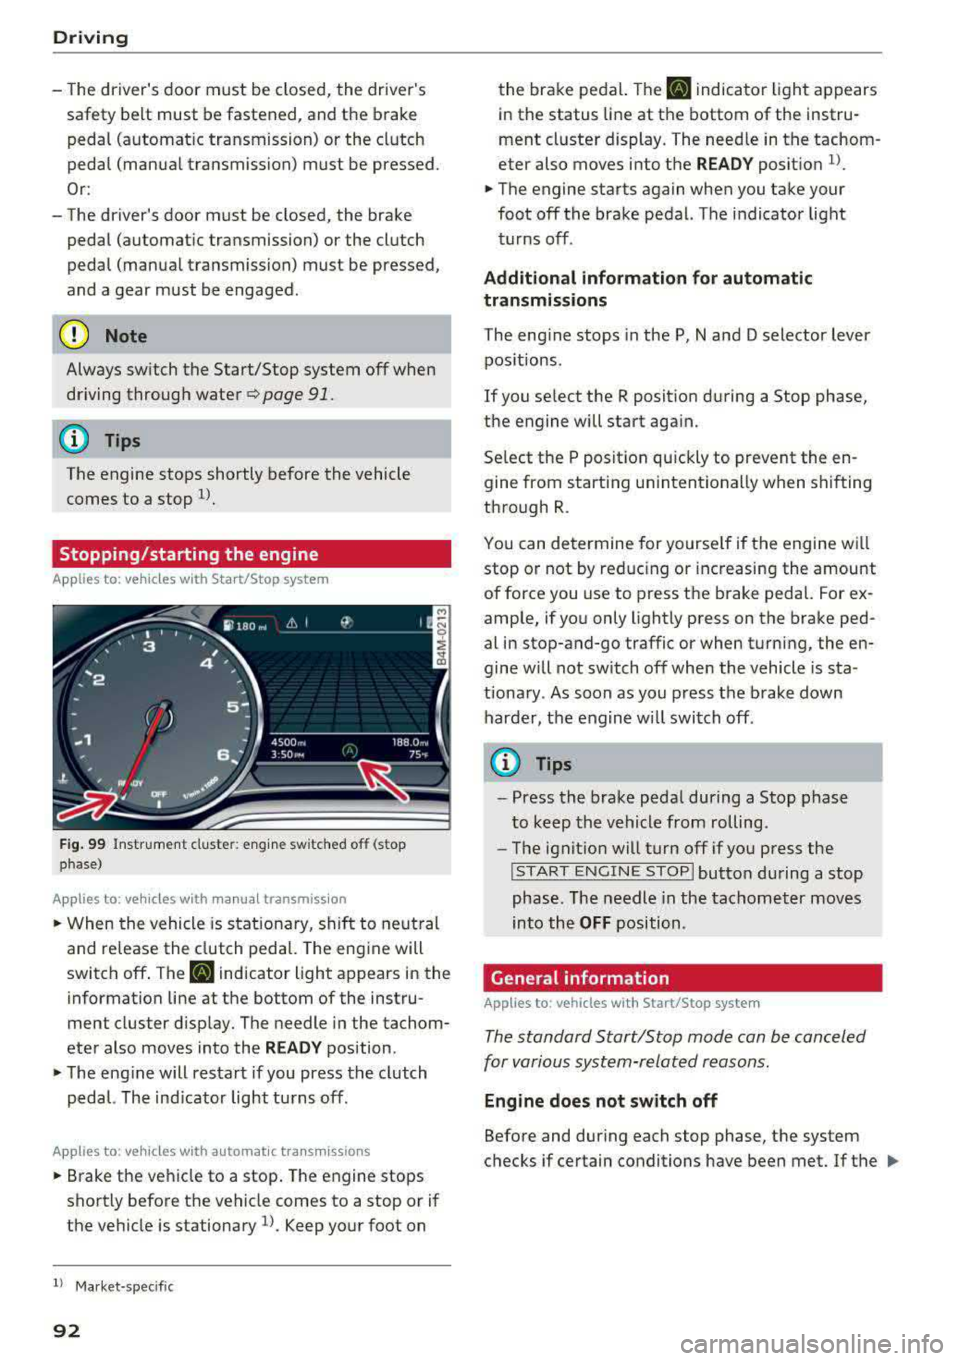
Stopping/starting the engine
Appl ies to: ve hicl es w ith Sta rt/Stop system
F ig . 99 Instrument cluste r: e ng ine sw itched off (stop
phase)
A ppl ies to: ve hicles w ith manu al transmiss ion
• When the vehicle is stat ionary, shift to neut ral
and release the clutch pedal. The eng ine will
switch off . The
II indicator light appears in the
information line at the bottom of the instru
ment cluster d isp lay. The needle in the tachom
eter also moves into the
R EADY position .
• The engine will resta rt if you press the clutch
pedal. The ind icator light turns off.
A ppl ies to: ve hicles w ith a uto mat ic t ra nsmi ssio ns
• B rake the vehicle to a stop . The engine stops
shortly before the vehicle comes to a stop or if
the ve hicle is stationary
l). Keep yo ur foot on
l) Ma rket -spe cifi c
92
the brake peda l. The II indica tor light appears
in the status line at the bottom of the instru
ment cluste r display. The need le in the tachom
eter also moves into the
READY position 1>.
• The engine starts again when you take your
foot off the brake pedal. The i ndicator light
turns off .
Additional information for automatic
transmissions
The eng ine stops in the P, N and D selector lever
pos itions.
If you se lect the R posit ion d uring a Stop phase,
the engine will start aga in.
Se lect t he P position qu ickly to prevent the en
gine from starting u nintent ionally when shifting
through R .
You can determine for yourse lf if the engine wi ll
stop or not by red ucing or inc reasing the amount
of force you use to press t he brake peda l. For ex
ample, if yo u only lightly press on the brake ped
al in stop-and-go traffic or when turning, the en
gine w ill not switch off when the vehicle is sta
tiona ry . A s soon as you press the b rake down
harder, the engine wi ll switch off .
(0 Tips
-Press the brake peda l during a Stop phase
to keep the vehicle from rolling.
-The ignit io n wi ll turn off if yo u press the
!START ENGINE STOPI butto n du ring a stop
phase. The needle in the tachomet er moves
into the
OFF position.
General information
App lies to: vehicles wi th Start/S top sys te m
The standard Start/Stop mode can be canceled
for various system-related reasons.
Engine does not switch off
Before and dur ing each stop phase, the system
checks if certain conditions have been met. If the
lilJ.
Page 96 of 409

Driving
(D Tips
If you switch the system off during a stop
phase, the engine will start again automati
cally .
Messages in the instrument cluster display
App lies to: ve hicles w ith S tart/Stop system
Automatic start /stop deact ivated: Please
restart engine manually
This message appea rs whe n specific conditions
are not met dur ing a s top phase . The Sta rt/Stop
system w ill not be ab le to restart the eng ine. The
e n gine mus t b e starte d wit h the
I START ENGI NE STOP I butt on .
Automatic start/stop system: malfunction!
Function unavailable. Please contact Service
T here is a malfunc tion in the Sta rt/S top system.
D rive t he ve hicle to an author ized A udi dealer or
author ized Se rvice Facility as soon as poss ible to
have the ma lf u nction co rrected .
Electromechanical
parking brake
Fig. 10 1 Center conso le : pa rk in g b rake
r- r--
0
~ a, a,
Your veh icle is equippe d with an e lec tromechani
cal parking
b rake @ q fig. 101. The par king
b rake is designed to prevent the vehicle from
ro lling un intent iona lly and replaces the hand
brake.
Setting /manually releasing the parking
brake
.. P ull the(®) switch to set the pa rking brake. The
LED in the sw itch turns on. The
-(USA mod-
94
els)/ . (Canada mo dels) indicator light also
turns on in the instrument cluster disp lay.
.. To re lease the park ing bra ke man ually, press
the bra ke or accelerator peda l w hile the igni
tion is sw itched on and press
the(®) switch at
the same t ime . The LED in the button and the
i n d icator light in t he d isp lay tur n
off.
Releasing the parking brake automatically
Requirement: the d river 's door must be closed .
.. To start driving and r elease the parking brake
automatically, p ress the accelerator peda l as
usual.
I n add ition to releas ing t he pa rking brake auto
ma tic ally, o ther convenien ce an d safety func tion s
are avai lab le when you s tart
d riving ¢ page 95,
Starting to drive.
Preventing the automatic parking brake
release
The vehicle cou ld begin ro ll ing uninten tionally,
depending on the hill or if towi ng a tra ile r .
.. T o preven t the p arking br ake fr om rele asing au
t oma tic ally, pull and ho ld the (®) swi tch and
press the a cce lerator peda l. The pa rking brake
remains set and p revents the ve hicle from roll
ing backward.
.. You can release the<® > switch again once you
are sure that yo u are giving enoug h driving
force to the wheels by press ing the accelerator
pedal.
Emergency braking function
Yo u can use the emergency braking function in an
emergency situat ion, o r if the standa rd brake op
eration ma lfu nctions or is disab led.
.. Pull and hold the(®) switc h.
.. As soon as you re lease the (®) switch or acceler-
ate, the braking stops.
P ulli ng and ho ld ing
the(® ) switch wh ile driving
t h e ve hicle activates the eme rgency brak ing func
tion. The ve hicle is bra ked at a ll four wheels by
activating the hydraulic brake system. The brak
i ng effect is sim ilar to heavy
brak ing ¢ A-
To reduce the risk of act ivat ing the emergency
bra king by m ista ke, a warning tone (b uzzer)
Page 98 of 409
Driving
release automatically until the wheels build up
enough driving force .
Starting on hills with hill hold assist
Hill hold ass ist makes it eas ier to start on hills.
Requirement: the driver 's door must be closed
and the eng ine must be running .
.,. To activate hill hold assist, press and hold the
brake pedal for several seconds. The vehicle
must be in an uph ill direction of travel.
After releasing the brake pedal, the braking pow
er is maintained for a brief moment
c;, .&. to pre
vent the vehicle from rolling back when starting. During this time, you can eas ily begin to move
your veh icle .
.&_ WARNING
-If you do not begin driving immediately or
the engine stalls after releas ing the b rake
pedal, your vehicle may begin to roll back
ward. Press the brake pedal or set the park
ing brake immediate ly.
- The intelligent technology of hill hold assist
cannot overcome the limitations imposed by
natural physical laws. The increased comfort
offered by hill hold assist should not cause
you to take safety risks.
-Hill hold assist cannot hold the vehicle in
place on all h ills (for example, if the ground
is slippery or icy).
-To reduce the risk of an accident, always make sure the vehicle is situated safely
wh ile stat ionary.
Automatic transmission
Introduction
Applies to: vehicles with automatic transmissions
.
The aut omat ic transmission is controlled elec
tronica lly. The transmission shifts up or down au
tomatically depending on which drive prog ram is
selected.
When a
moderate driving style is used, the
transmission se lects the most economical driving
mode. The transmission upshifts at a lower RPM
96
and downshifts at a higher RPM to improve fue l
effic iency.
The transmission switches to a sporty mode after
a kick-down or when the driver uses a
sporty
driving style
characterized by quick accelerator
pedal movements, heavy acceleration, frequent
changes in speed and traveling at the maximum
speed .
If desired, the driver can also select the gears
manually (tiptronic mode) c:;, page 99.
S tronic transmission
The S tron ic is a dual-clutch transmission. Power
i s transferred using two clutches that work inde
pendently from one another. They replace the
torque converter used in conventional automatic
transmissions and allow the vehicle to accelerate
without a noticeable interruption in traction .
tiptronic transmission
In the tiptronic transmission, power is transfer
red by a torque converter.
Selecting a selector lever position
Applies to: vehicles with auto matic transmissions
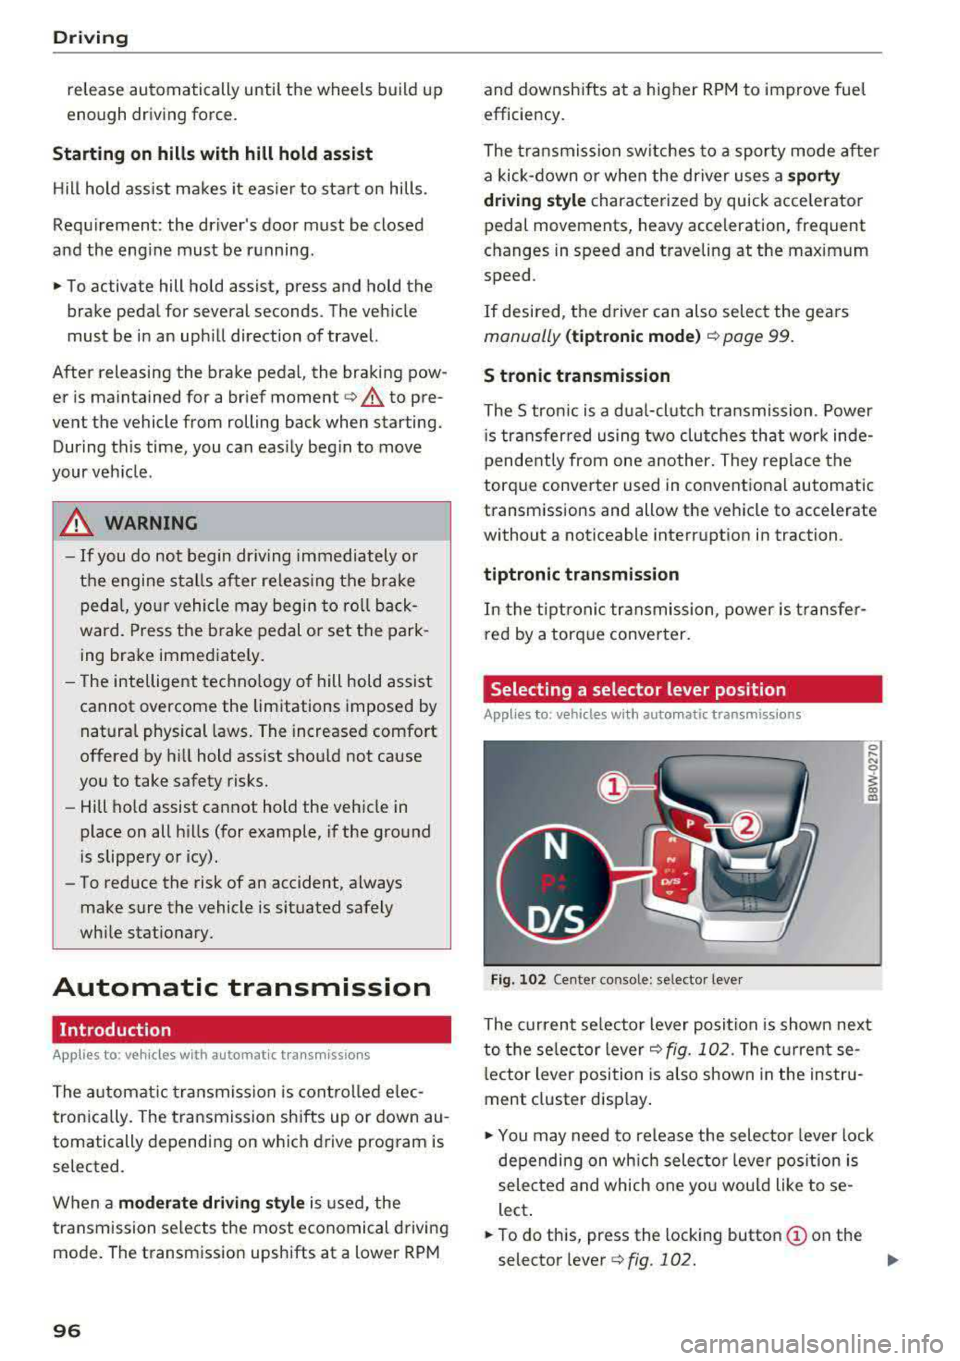
Fig. 102 Cente r console: se lector lever
The current se lecto r lever position is shown next
to the selector lever
c:;, fig. 102 . The current se
l ector lever position is also shown in the instru
ment cluster display .
.,. You may need to release the selector lever lock
depending on wh ich selector lever position is
selected and which one you would like to se
lect .
.,. To do this, press the locking button (!) on the
selector
l ever ¢fig .102. ..,_
Page 101 of 409
too much stress from being placed on the locking
mechanism .
A WARNING
-The vehicle can roll even when the engine is
switched off.
-U nintended vehicle movement can lead to
serious injuries.
-To reduce the risk of an accident, do not press the acce lerator pedal when changing
the selector lever position while the vehicle
is stationary and the engine is running.
-To reduce the risk of an accident, never se
lect the R or P posit ions while driving.
-Do not inadvertent ly press the acce le rator
peda l when the veh icle is stationary. Other
wise the risk of an accident increases be
cause the vehicle will start to move immed i
ately, eve n if the par king brake is set.
@ Tips
For safety reasons , the parking b rake on ly re
leases automatically when the driver's door is
closed.
Hill descent control
A ppl ies to: ve hicles with a utomat ic t ra nsmi ssio ns
The hill descent control system assists the driver
when driving down hills.
Hill descent control act ivates when the transmis
sion is in the Dor S posit ion and you press the
brake pedal. The t ransmission automat ically se
lects a gear that is suitab le for the hill . H ill de
scent contro l tries to ma inta in the speed ach
i eved at the time of braking, withi n phys ica l and
techn ica l limita tions. If may st ill be necessary to
a dj ust the speed wi th t he b rake pedal.
H ill descent control switches off once the hill lev
e ls out o r yo u press the accelerator pedal.
W hen operating the c ruise contro l system*
¢ page 10 7, hill descent contro l is also act ivated
when the speed is set .
Drivi ng
A WARNING
-Hill descent control cannot overcome physical
limitat io ns, so it may not be able to ma intain
a constant speed under all conditions. Always
b e ready to app ly the brakes.
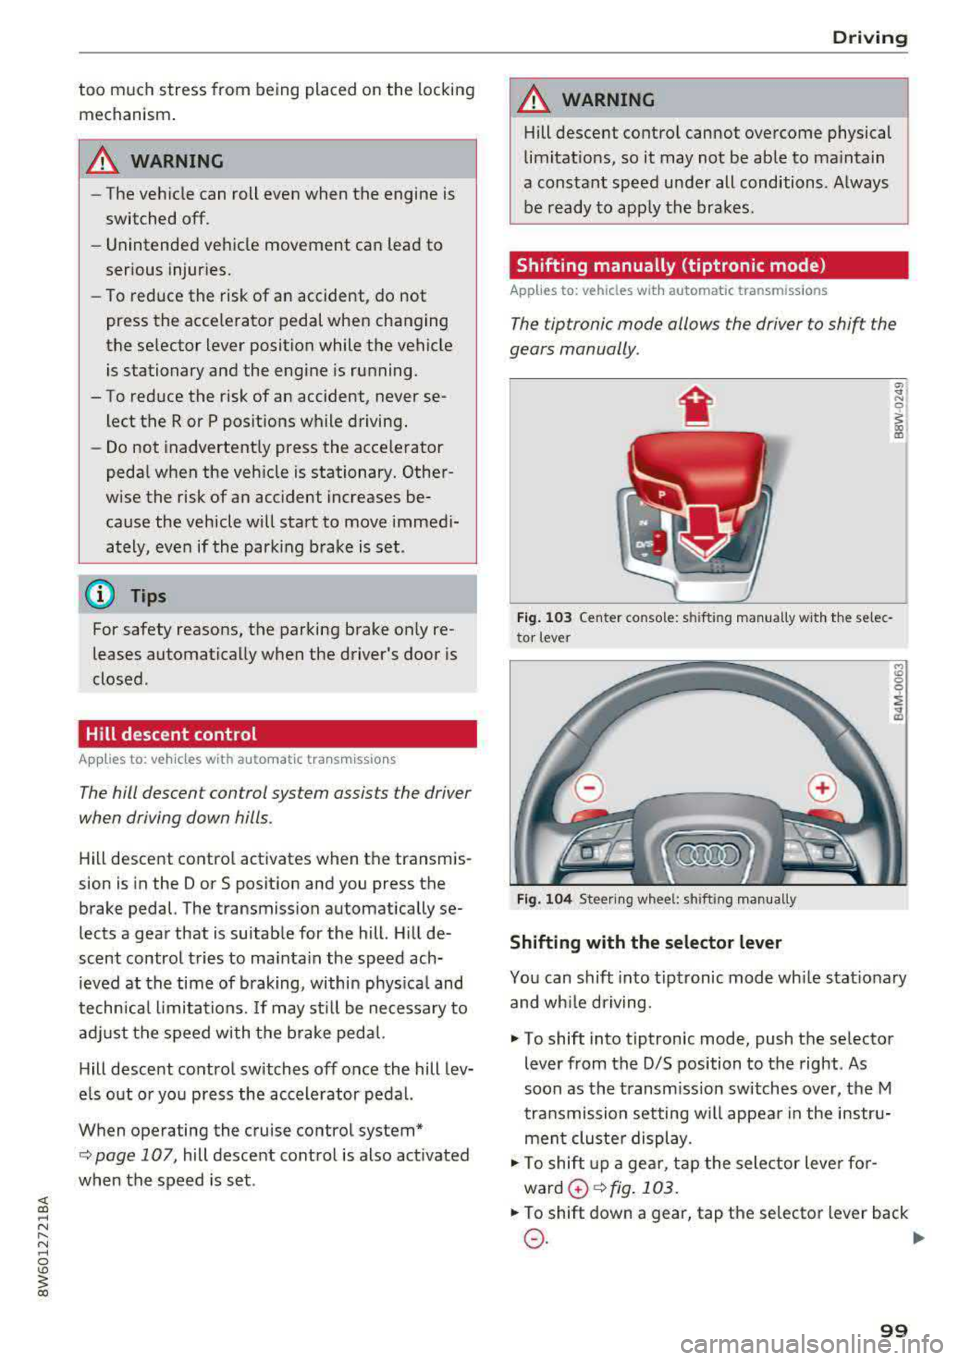
Shifting manually (tiptronic mode)
A pp lies to : vehicles wi th automatic transmiss ions
The tiptronic mode allows the driver to shift the
gears manually .
Fig. 103 Center console: s hiftin g man ually w it h th e se lec
to r lever
Fig. 1 04 Stee ring w hee l: sh ift ing man ually
Shifting with the selector lever
9 ~ ... CD
You can shift into tip tronic mode wh ile stat iona ry
and wh ile driving.
.,. To shift into tiptronic mode, push the selector
lever from the D/S position to the right . As
soon as the transm ission switches over, the M
tra nsmission setting w ill appear in the instr u
men t cluste r display .
.,. To shift up a gea r, t ap the sele ctor leve r fo r
ward
0 ¢ fig . 103 .
.,. To shift down a gear, tap the se lector lever back
0 -~
99
Page 102 of 409
Driving
"'T o switch tiptronic mode off, push the se lector
lever back into the D/S position.
Shifting with th e shift paddle s
You can operate the shift padd les in the D/S or M
selector lever posit ions.
"' To sh ift up a gear, tap the sh ift paddle 0
~ fig . 104.
"'T o shift down a gea r, tap the 0 sh ift paddle.
"'T o engage the lowest gear, ho ld the 0 shift
padd le.
"' If you do not press a shift button within a short
time whi le in the D/S position, the transmission
will return to automatic mode. To keep shifting
us ing the shift paddles, move the selector lever
to the right out of the D/S position.
"' When you want to shift out of tiptronic mode,
press and hold the
0 shift paddle for a longer
per iod of t i me or move the se lector lever back
and release it.
The transm ission automatically shifts up or down
before critical engine speed is reached .
The transm ission only allows manual shifting
when the engine speed is within the permitted
range.
@ Tips
- If you shift to the next lowest gear, the
transmission will only shift if the engine w ill
not be over-rewed .
- With kick-down, the transmission shifts to a
lower gear, depending on vehicle speed and
engine speed.
- tiptronic does not work if the transmiss ion
i s running in emergency mode.
Kick-down
A pp lies to: ve hicles w ith a utomat ic tra nsmi ssio ns
Kick-down enables maximum acceleration.
When you press the accele rator peda l down be
yond the resistance point, the automatic trans
miss ion downshifts into a lower gear and the en
g ine utilizes its full power, depending on vehicle
speed and engine RPM. It shifts up into the next
100
higher gear once the maximum specified engine
RPM is reached.
A WARNING
P lease note that the whee ls cou ld spin on
slick or slippery roads when kick-down is ac
tive.
Launch control program
App lies to : vehicles wi th S tron ic transmiss ion
-
The launch control program provides the best
possible acceleration when starting from a stop .
Requirement: the engine must be at operating
temperature and the steering wheel must not be
turned.
"' Deactivate the Star t/Stop system* ~ page 93.
T he LED in the l(A) "'I button turns on .
"'With the engine running, press the ,...
I .I' -
, O ..,...,,. F=F I but
ton
brief ly ~ page 152. The . indicator light
turns on and the message
Stabil ization cont rol
( E SC) : sport. Warning ! Re st ri ct ed stab ility
ap
pears in the instrument cluster display .
"' Pull the selector lever back out of the D/S pos i
tion briefly to select the S position or se lect the
D ynamic driving mode i n drive se lect*
~ page 139 .
"'Press the brake pedal firm ly with yo ur left foot
and hold it all the way down for at least one
second.
"' At the same time, press the gas peda l all the
way down with your right foot until the eng ine
reaches and stays at a high RPM level.
"' Remove your foot from the brake pedal w ith in
five
seconds ~,& .
A WARNING
-Always adapt your driving to the t raff ic flow.
- Only use the Launch cont rol program when
road and traffic condit ions allow it and oth
er d rivers will not be endange red or both
ered by your driving and the veh icle's accel
erat ion .
- Please note that the d rive wheels can spin
and the vehicle can b reak away when spo rt
mode is switched on, especially when the
road is slippery .