display AUDI A5 COUPE 2018 Repair Manual
[x] Cancel search | Manufacturer: AUDI, Model Year: 2018, Model line: A5 COUPE, Model: AUDI A5 COUPE 2018Pages: 409, PDF Size: 67.63 MB
Page 158 of 409
Intelligent Technology
greater than the amount being generated in or
der to maintain an optimal vehicle battery charge
level.
(D Tips
- Energy management cannot overcome the laws of physics. Note that the charge level
and length of the vehicle battery life are
limited.
- When the starting ability is endangered, the
(•j indicator light turns on ¢ page 30.
What you should know
Maintaining the starting ability is the highest
priority.
A lot of stress is placed on the vehicle battery
when driving short distances, during city driving,
and at cold times of the year. A lot of energy is
used but little is generated. It is also critical
when the engine is not running but electrical
equipment is switched on. In this case, energy is used but none is generated .
In situations like this, energy management will
actively regulate the distribution of energy.
Long periods without use
If you do not drive your vehicle for several days or
weeks, electrical equipment is gradually scaled
back or switched off. This reduces energy use and
ensures the vehicle will be able to start after long
periods of time. Some convenience functions,
such as interior lighting or power seat adjust
ment, may not be available under certain circum
stances . These convenience functions will be
available again once you switch the ignition on
and start the engine.
With the engine switched off
The vehicle battery will drain if you use Infotain
ment functions such as listening to the radio
while the engine is switched off .
If the vehicle's ability to start may be impaired by
the energy use, a message will appear in the In
fotainment system display. The message indi
cates that the system will switch off automatical-
156
ly soon. If you would like to continue using the
functions, you must start the engine.
With the engine running
Although electrical energy is generated while
driving , the vehicle battery can drain. This can
happen if little energy is generated but much is
used, and the charge level of the vehicle battery
is not optimal.
To restore the balance of energy, components
that require large amounts of energy are tempo
rarily scaled back or switched off . Heating sys
tems in particular require a great deal of energy. If you notice, for example, that the seat heating*
or rear window defogger is not working, then it
has been temporarily reduced or switched off.
T hese systems are available again as soon as the
energy supply has been restored.
In addition, you may notice that the idle speed has slightly increased. That is normal and no
cause for concern . By increasing the idling speed,
the additional required energy will be generated
and the vehicle battery will be charged.
Notice about data
recorded by the Event
Data Recorder and
vehicle control modules
Event Data Recorder
This vehicle is equipped with an Event Data Re
corder (EDR). The main purpose of an EDR is to
record, in certain crash or near crash-like situa
tions, such as an airbag deployment or hitting a
road obstacle, data that will assist in understand
ing how a vehicle's systems performed. The EDR
is designed to record data related to vehicle dy
namics and safety systems for a short period of
time , typically 30 seconds or less. The EDR in this
vehicle is designed to record such data as:
- How various systems in your vehicle were oper ating;
- Whether or not the driver and passenger safety
belts were buckled/fastened;
- How far (if at all) the driver was depressing the
accelerator and/or brake pedal; and,
.,_
Page 161 of 409
Switching the MMI on/off: the MMI can be
switched on/off manua lly.
-Switching on manually : press the On/Off knob
(f)c:> fig . 162 briefly . Or: press the I MENU I but
ton @
c:>page 158, fig. 160 or c:>page 158,
fig. 161,
or one of the buttons to open the me
nus
directly @.
-Switching off manually : press and hold the
On/Off knob
(f) c::> fig. 162 until the MMI
switches off . If the MMI has been switched off
ma nually, it does
not sw itch on again automati
ca lly the next time the ignit ion is switched on .
Additional functions:
- Adjusting the volume:
turn the On/Off knob (f)
c::>fig. 162.
- Muting : press the On/Off knob (f) c:> fig. 162
briefly.
-Selecting the previous /next function (for ex
ample, a radio station/track) :
press the On/Off
knob
(f) c::> fig . 162 briefly toward the left l<3
t>l>I.
-Fast forwarding /rewinding (for example
songs):
press and hold the On/Off knob (f)
c::> fig. 162 toward the left l<3
A WARNING
Adjust the volume of the audio system so that
signa ls from outside the vehicle, such as po
lice and fire sirens, can be heard easily at all
times.
@ Tips
The M MI switches off automatically if the en
gine is not running and the vehicle battery is
low.
Infotainment system
display
Switching on and off
- Switching on and off manually :
press the l('.)J
button @ c> page 8, fig. 2.
When the MMI is switched on and the display is
switched off, you can operate certain functions
using the On/Off knob with the MMI joystick
function
c> page 158 .
Multi Media Interface
Information on display images
The display version depends on vehicle equip
ment.
Fig . 163 D isp lay ve rs io n A
Fig. 164 Disp lay ve rs io n B
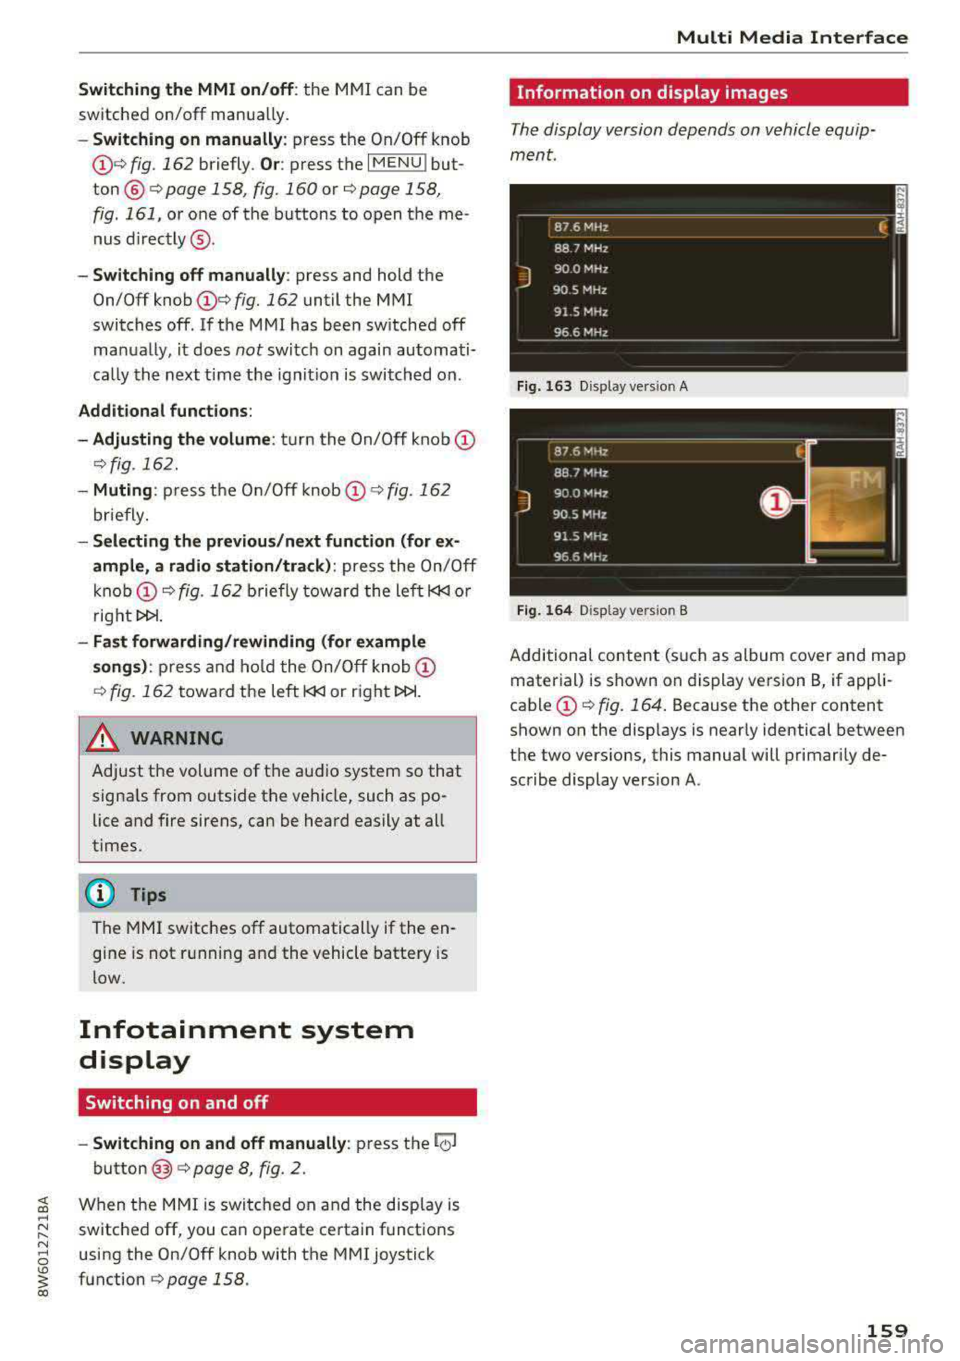
Additional content (such as album cover and map
material) is shown on display version B, if appli
cable
(f) ~ fig. 164. Because the other content
shown on the disp lays is nearly identical between
the two vers ions, this manual will primarily de
scribe display version A .
159
Page 162 of 409
Multi Media Interface
MMI operation
Selecting and confirming a function
F ig . 16 5 Ope rat ing the cont ro l knob
Selecting and confirming a function in a
menu /li st
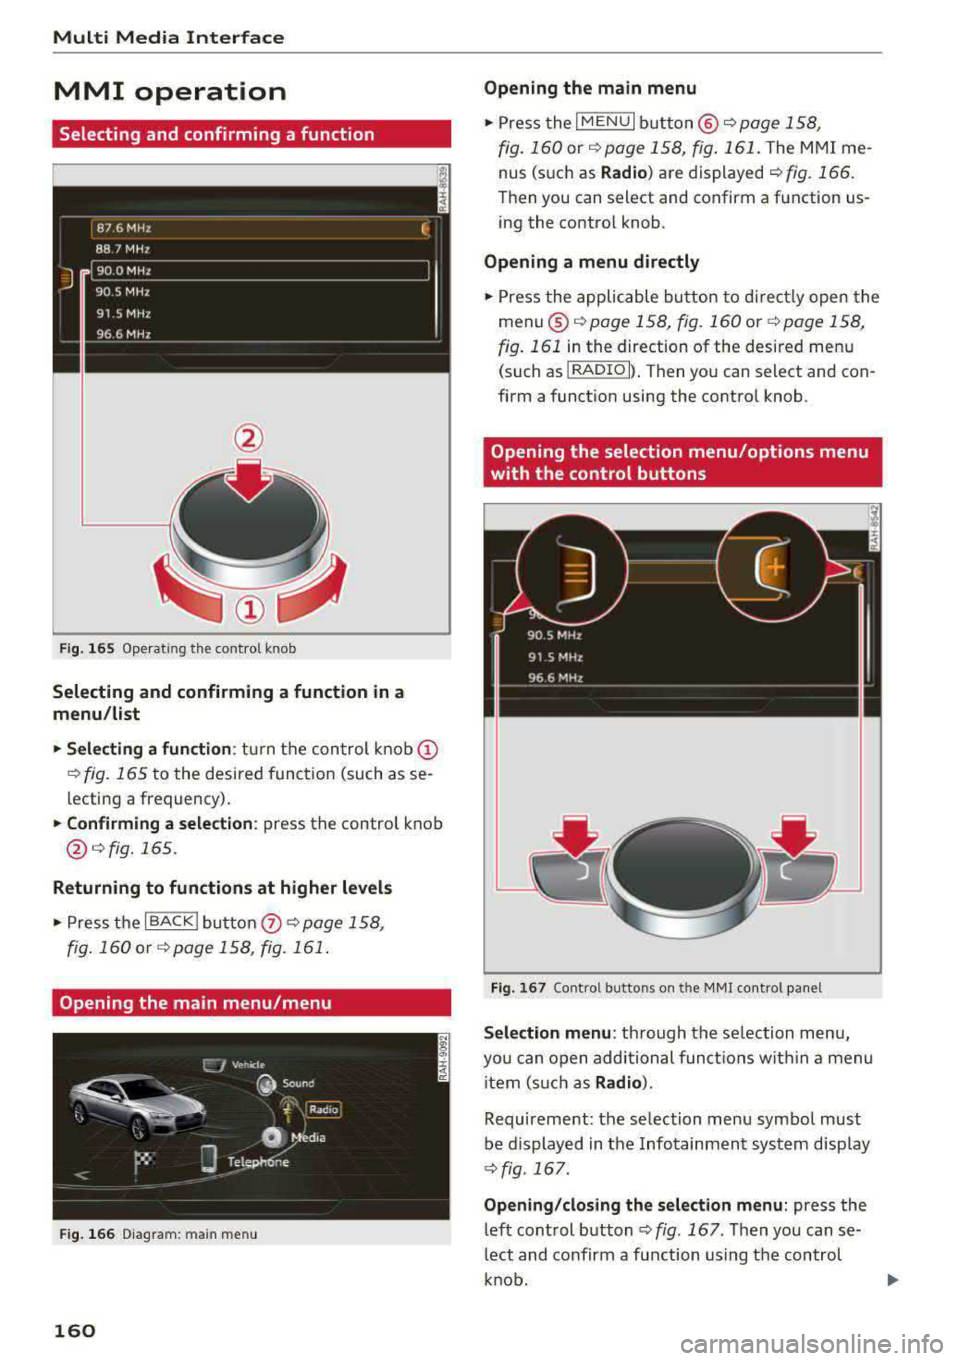
• Selecting a fun ction : turn t he con trol knob (D
¢ fig. 165 t o the desired functio n (such as se
lecting a frequency).
• Confi rming a selection : press the control knob
@¢fig.165 .
Returning to functions at higher levels
• Press the I BACK j butto n 0 ¢ page 158,
fig . 160
o r ¢ page 158 , fig. 161 .
Opening the main menu/menu
Fig. 1 66 Diagram : main menu
160
Opening the main menu
• Press the I MENU I bu tton @~ page 158,
fig. 160
or ~ page 158 , fig . 161 . The MMI me
nus (s uch as
Radio ) are displayed ~ fig. 166 .
Then you can s elect and confirm a function us
i ng the control knob .
Opening a menu directly
• Press the applicable bu tton to di rec tly open the
menu ®
~pag e 158, fig. 160 or ¢page 158,
fig. 161
in the direction of the desired menu
(such as
I RADIO l l. T hen you can s ele ct and con
firm a function using the control knob .
Opening the selection menu/options menu
with the control buttons
Fig. 167 Co n trol b utto ns on t he MM I co ntro l pa ne l
Sele ction menu : through the se lection menu,
yo u can open additional funct io ns w it hi n a menu
i tem (s uch as
Radio ).
Requireme nt: the se lection menu symbol must
be d isplayed in the Infotainment system disp lay
~ fig . 167.
Opening /clos ing the selection menu : press the
left cont rol
button ¢ fig. 167 . Then you can se
l ect and confirm a function using the control
k nob.
Page 163 of 409
Options menu: using the opt ions menu, you can
select and confirm context-dependent tu nctions
as well as settings within a menu item (such as
Radio ).
Requirement: the options menu symbol G must
be disp layed in the Infotainment system display
r::!) fig. 167 .
Opening/closing the options menu : press the
right control button
r::!) fig. 167.
Information about paths
This guide shows you at a glance the paths for
opening a desired menu and its settings and
functions.
Example of a path
"' Se lect: I RADIO I button > left cont rol button >
FM .
Following the path
"'Press the I RADIO I button.
"' Press the left control button.
"'Turn the control knob to the FM menu item to
select i t.
"'Press the control knob to confirm the selected
FM men u item.
"'The selected and confirmed function is execut
ed. In this example, the
FM frequency band is
set.
Multi Media Interface
MMI touch
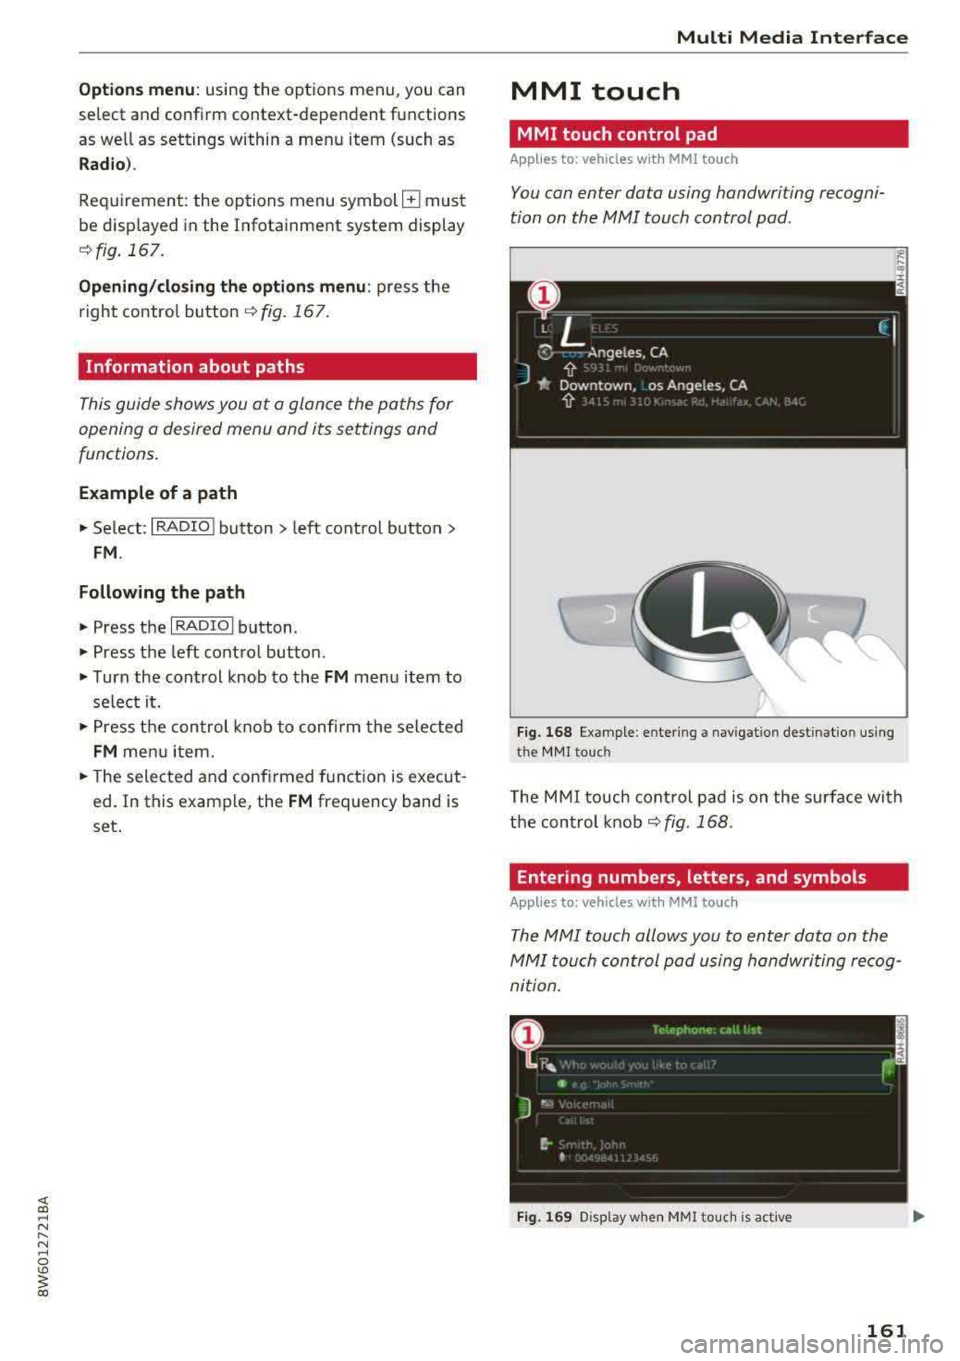
MMI touch control pad
App lies to: veh icles w it h MMI to uch
You can enter data using handwriting recogni
tion on the
MMI touch control pad.
Fig. 168 Examp le: en te ring a navigatio n dest inatio n using
the MMI touch
The MMI touch control pad is on the surface with
the control knob
r::!) fig. 168.
Entering numbers , letters , and symbols
App lies to : vehicles wi th MMI to uch
The MMI touch allows you to enter data on the
MMI touch control pad using handwriting recog
nition.
Fig. 169 Display when MMitouc h is active
161
Page 164 of 409
Multi Media Interface
R eq uiremen t: it must be possib le to enter text or
numbers and the symbol
CD c::> fig . 169 must ap
pea r in t he Infotainment system display.
- Initial entry : writ e an individ ual uppe r ca se or
lower case letter or number/ symbo l on the
M M I touch contro l pad u sing yo ur fin ger . A
symbol that is recognize d clear ly by the system
is d isp layed in the Infota inment system display
CD c::> page 161, fig. 168, co nfirmed with an au
dible s ignal if necessa ry, and t ransferred to the
i npu t field.
- Entering spaces : move your finger ac ross the
MM I touch control pad from left to r igh t.
- Deleting characters : move your finger across
the MMI to uch control pad from r ight to left .
-Selecting the input suggestion : press the con
trol knob .
-Switching directly to the results list : turn the
contro l knob to the right
-Opening the speller : select the right control
button>
Open speller . Text or numbe rs are en
tered using the spelle r
c::> page 165.
-MMI touch volume : press the right contro l but
ton. See
c:> page 256.
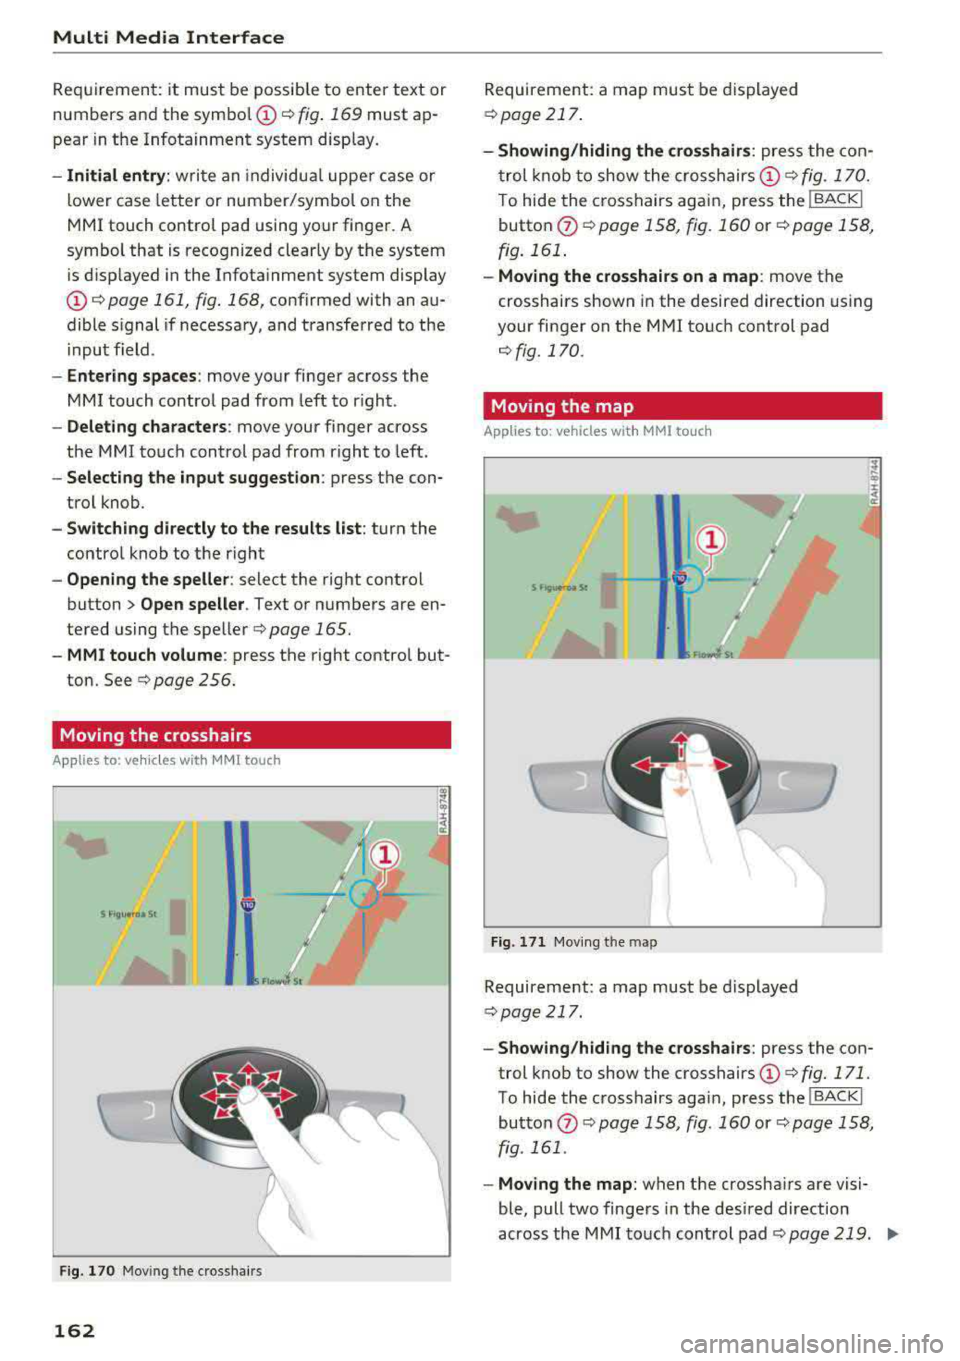
Moving the crosshairs
A ppl ies to : ve hicles w ith MM I touch
S flgu 1<0a St I
Fig. 170 Moving the c ross hair s
162
Requireme nt: a map mus t be displayed
c:> page 217 .
-Showing /hiding the crosshairs : press the co n
t rol knob to show the crosshairs
CD c:> fig. 170.
To hide the cross hairs a gai n, press the !BACKI
button (J) <=:> page 158, fig . 160 or <=:>page 158,
fig. 161 .
-Moving the crosshairs on a map : move the
crosshai rs shown in the desired direct ion us ing
your finger on the M MI to uch cont rol pad
c::> fig. 170.
Moving the map
App lies to : vehicles wit h MMI to uch
Fig . 171 Mov ing the map
Requireme nt: a map must be displayed
c:> page 217.
-Showing /hiding the crosshairs : press the con
trol k nob to show the c rosshairs
CD c:> fig. 171.
To hide the c rosshairs agai n, press th e I BACK I
butto n (J) c::> page 158, fig . 160 or c::> page 158 ,
fig. 161 .
-Moving the map: when the crossha irs a re visi
ble, pull two finge rs in the des ired direction
across t he MMI to u ch con trol pad
c::> pag e 219. .,..
Page 165 of 409
-Moving the map quickly : when the crosshairs
are visible, pull two fingers across the MMI
touch contro l pad quickly in the desired direc
tion. The map will come to a stop after several
seconds.
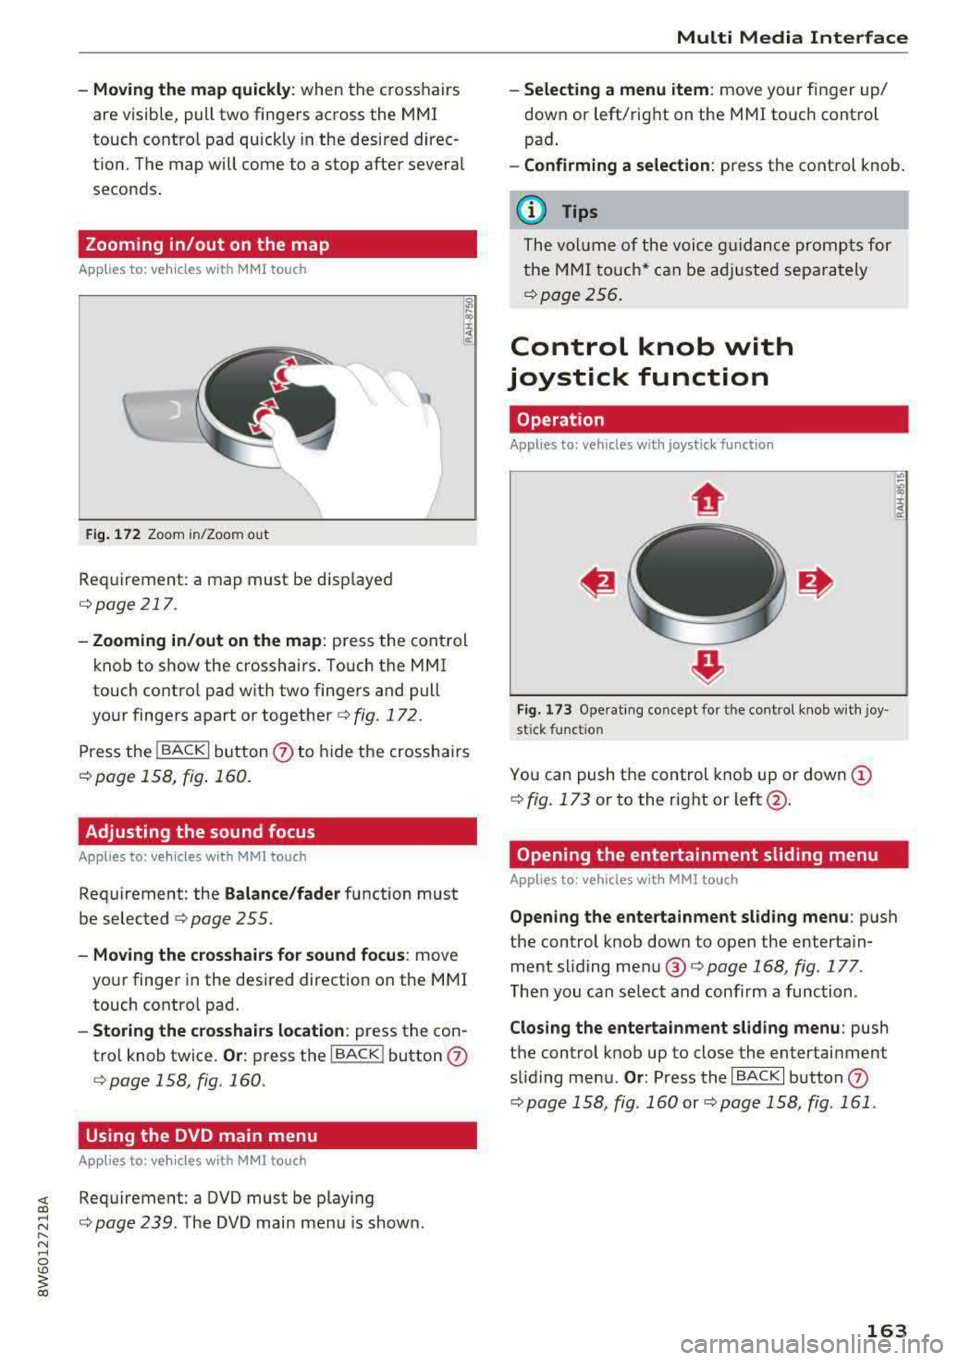
Zooming in/out on the map
App lies to: veh icles with MMI touch
Fig. 172 Zoom in/Zoo m ou t
Requirement : a map must be displayed
c:> page 217 .
-Zooming in/out on the map : press the control
knob to show the crosshairs . Touch the MMI
touch contro l pad with two fingers and pull
your fingers apart or together
c:> fig. 172.
Press the !BACK I button 0 to hide the crosshairs
c:>page 158, fig . 160.
Adjusting the sound focus
Applies to: veh icles with MMI touch
Requirement: the Balance/fader function must
be selected
c:> page 255.
- Moving the crosshairs for sound focus: move
your finger in the desired direction on the MMI
touch contro l pad.
- Storing the crosshairs location : press the con
trol knob twice.
Or : press the I BACK ! button 0
Qpage 158, fig. 160.
Using the DVD main menu
Applies to: veh icles with MMI touch
~ Requirement : a DVD must be play ing
;:::: c:> page 239. The DVD main menu is shown . ...... N ..... 0
'° ~ co
Multi Media Interface
- Selecting a menu item : move your finger up/
down or left/r ight on the MMI touch control
pad .
-Confirming a selection: press the control knob.
(D Tips
The volume of the voice guidance prompts for
the MMI
touch* can be adjusted separately
c:> page 256.
Control knob with
joystick function
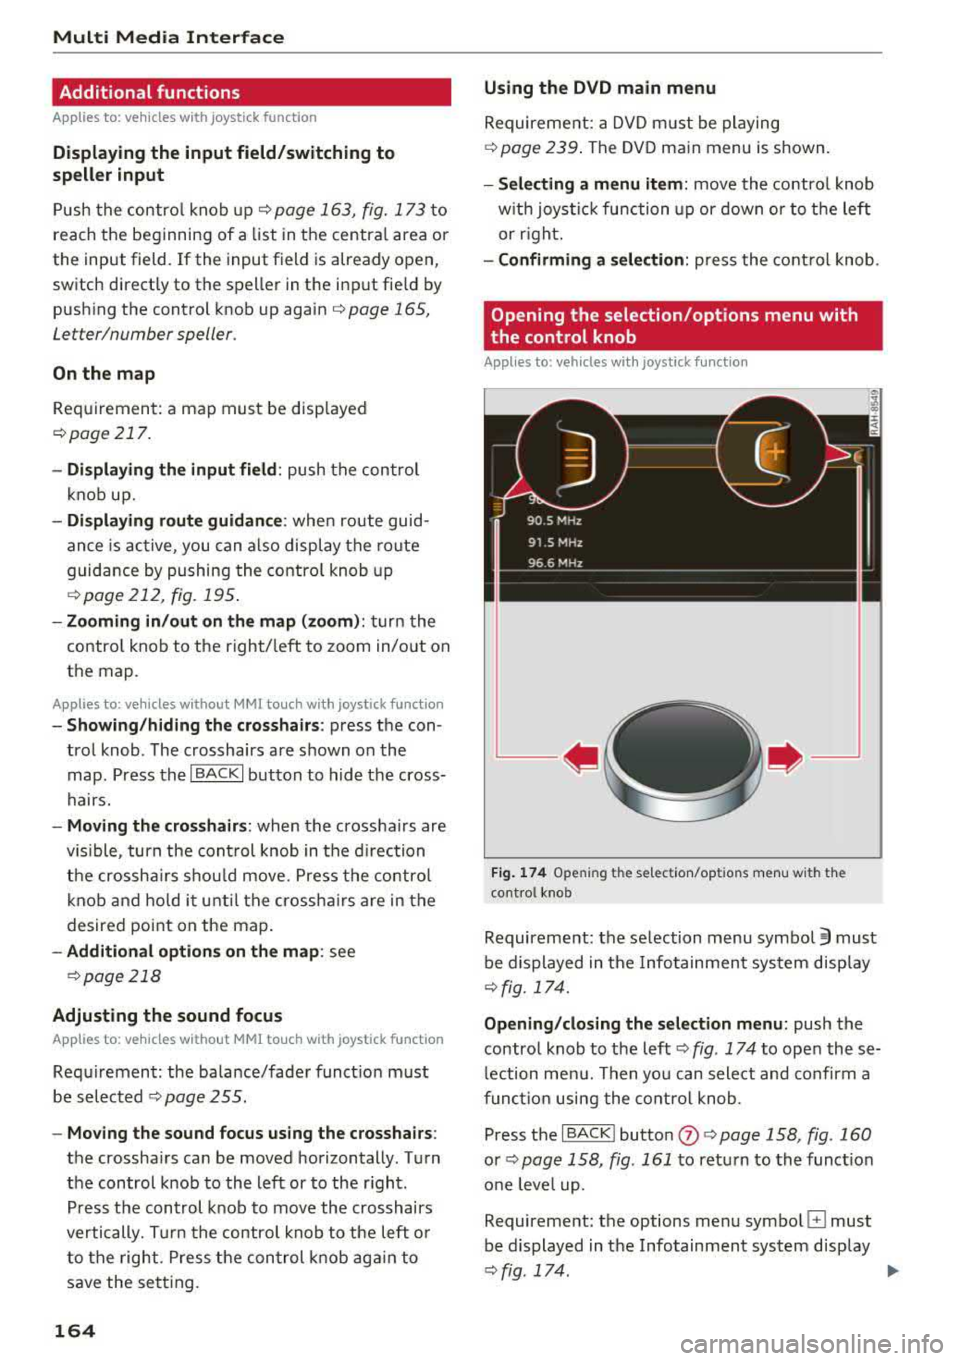
Operation
Appl ies to: vehicles wi th joys tick func tion
Fig. 173 Ope rat ing concept fo r the cont ro l knob with joy ·
s ti ck fun ctio n
You can push t he control knob up or down (!)
¢fig. 173 or to the r ight or left @.
Opening the entertainment sliding menu
Applies to : vehicles wit h MMI touch
Opening the entertainment sliding menu: push
the control knob down to open the entertain ment sliding menu ®¢
page 168 , fig. 177 .
Then you can select and confirm a function.
Closing the entertainment sliding menu: push
the control knob up to close the entertainment
sliding menu .
Or: Press the I BACK I button 0
¢page 158, fig . 160 or c:>page 158, fig. 161 .
163
Page 166 of 409
Multi Media Interface
Additional functions
Applies to: vehicles with joystick function
Displaying the input field /switching to
speller input
P ush the contro l kno b up c:;, page 163, fig. 173 to
reach the beginning of a list in t he centra l area or
the input field . If the input field is already open,
switch directly to the speller in the inp ut fie ld by
push ing the control knob up again
c:;, page 165,
Le tter/number speller.
On the map
Req uiremen t: a map must be disp layed
¢ page 217.
- Displaying the input field : push the control
k no b up.
- Di splaying route guidan ce : when rou te guid
an ce is acti ve , you can also display the route
guidance by pushing the contro l knob up
¢ page 212 , fig. 195 .
-Zooming in /out on the map (zoom) : turn t he
contro l knob to t he righ t/left to zoom in/o ut on
the map .
Applies to: vehicles without MMI touch with joystick function
-Show ing /h iding the cro sshairs : press the con
tro l knob . The crosshairs are shown o n the
map . Press th e
I BACK I button to h ide t he cross
hairs.
- Moving the crosshairs : when the crossha irs are
vis ible , turn the cont rol knob in t he d irec tion
th e crossh airs shou ld mo ve. Pre ss the contro l
k no b a nd ho ld i t unt il the cross hairs are in the
desired point on the map.
- Additional options on the map : see
c:;,page 218
Adjusting the sound focus
Applies to: vehicles without MMI touch with joystick function
Requiremen t: the ba la nce/fa der funct io n must
be s ele cted
c:;, page 255.
- Moving the sound focus using the crosshairs :
the crosshairs ca n be moved horizontally. Turn
the con trol knob to the left or to the r ight .
P ress t he con trol knob to move the crosshairs
vertically. Turn the contro l knob to the left o r
to the right. P ress the con trol knob ag ai n to
save the se tting.
164
Using the DVD main menu
Requireme nt: a DV D m ust be playing
¢ page 239 . The DV D ma in menu is shown.
- Selecting a menu item : move the contro l knob
w it h joys tick func tion up or down o r to t he left
or r ight.
- Confirming a selection : press the cont ro l knob .
Opening the selection/options menu with
. the control knob
Applies to: vehicles with joystick function
Fig. 174 Opening th e selec tion/op tions me nu w ith t he
cont ro l knob
Requireme nt: the se lec tion menu symbo l §I must
be d isplayed in t he Info tai nmen t sys tem disp lay
¢ fig. 174.
Opening/clos ing the selection menu: push the
contro l knob to t he left
c:;, fig . 174 to ope n these
l ection me nu. Then yo u can select a nd confirm a
funct io n using the co ntro l knob .
P ress the
I BACK I button 0 c:;, page 158, fig. 160
or c:;, page 158, fig . 161 to ret urn to the funct io n
o ne leve l up .
Requireme nt: the options me nu symbo l
G must
be d isplayed in t he Infotainmen t sys tem display
¢ fig . 174 . 1111-
Page 167 of 409
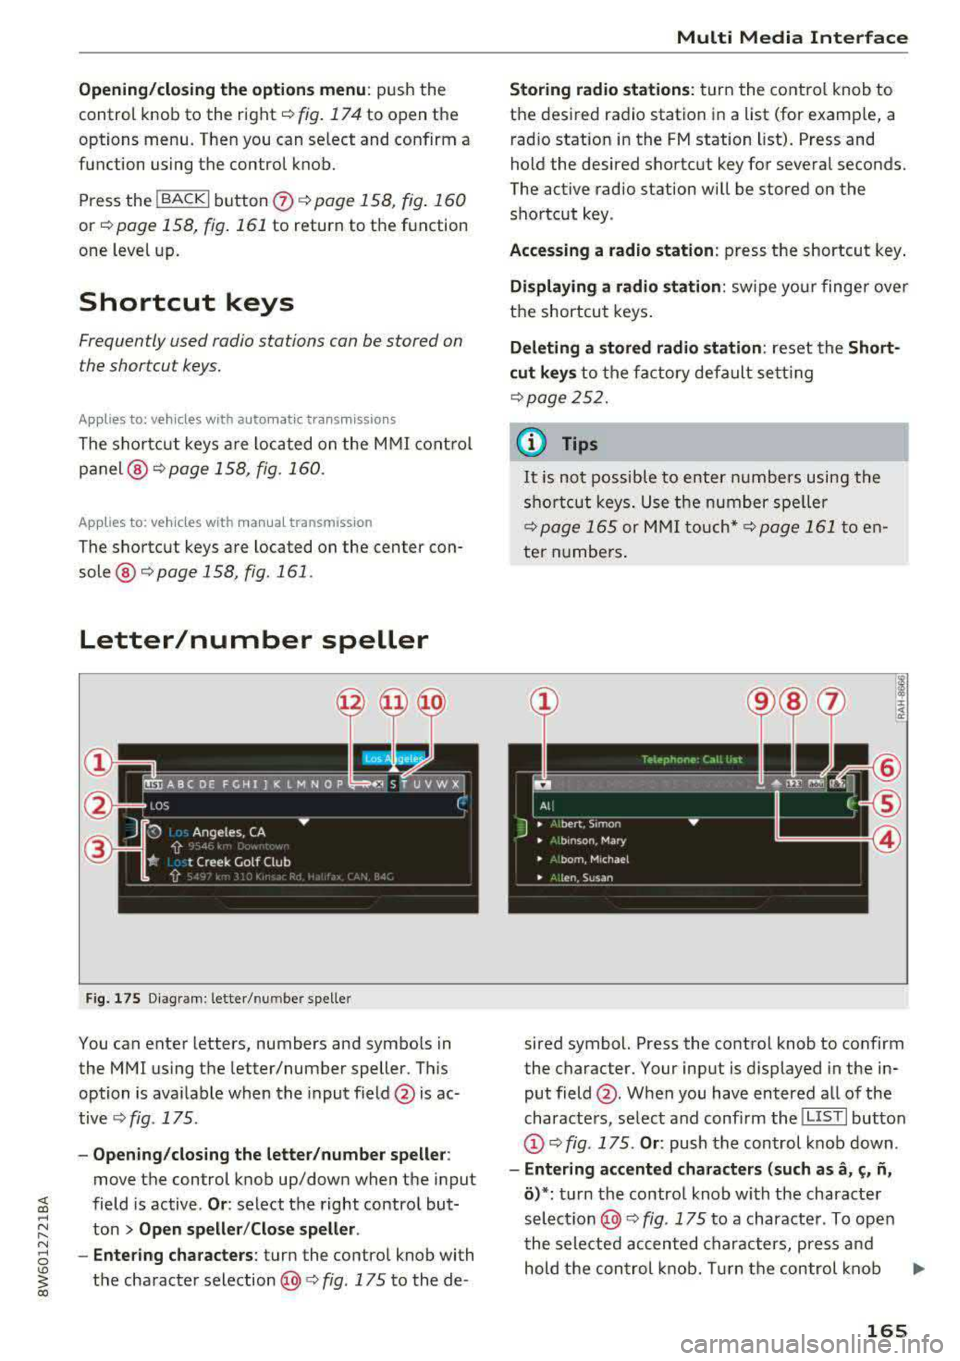
Opening/closing the options menu : push the
control knob to the right
c::> fig. 174 to open the
options menu. Then you can se lect and confirm a
function using the control knob.
Press the
I BACK I button (z) c::> page 158, fig. 160
or c::> page 158, fig . 161 to return to the function
one level up.
Shortcut keys
Frequently used radio stations can be stored on
the shortcut keys.
Applies to: veh icles with auto mat ic tra nsmi ssio ns
The sho rtcut keys are located on the MMI control
panel @c::>page 158, fig .160.
Applies to: veh icles with manual transmiss ion
The shortcut keys are located on the center con
sole ®
c::> page 158, fig . 161 .
Letter/number speller
Fig. 175 Diagram: letter/ num be r spe ller
You can enter letters, numbers and symbo ls in
the MMI using the letter/number speller. Th is
option is ava ilable when the input field
@ is ac
tive
c::> fig . 175.
- Opening/closing the letter/number speller :
move the control knob up/down when the input
field is active .
Or: select the right control but
ton >
Open speller/Close speller .
- Entering characters:
turn the control knob with
the character
selection @<=:> fig . 175 to the de-
Multi Media Interface
Storing radio stations: turn the control knob to
the desired radio station in a list (for examp le, a
radio station in the FM station list). Press and
hold the desired shortcut key for several seconds.
The active radio station wi ll be stored on the
shortcut key.
Accessing a radio station: press the shortcut key.
Displaying a radio station: swipe your finger over
the shortcut keys.
Deleting a stored radio station: reset the Short
cut keys
to the factory default setting
<=:>page 252.
a) Tips
It is not possib le to enter numbers using the
shortcut keys. Use the number speller
<=:> page 165 or MMI touch* <=:>page 161 to en
ter numbers.
sired symbol. Press the control knob to confirm
the character. Your input is displayed in the in put
field @. When you have entered all of the
characters, select and confirm the
I LISTI button
(D c::> fig . 175. Or : push the control knob down .
-Entering accented characters (such as a, ~. n,
o)*: turn the control knob with the character
selection @c::>fig . 175 to a character. To open
the selected accented characters, press and
hold the control knob. T urn the control knob
.,.
165
Page 168 of 409
Multi Media Interface
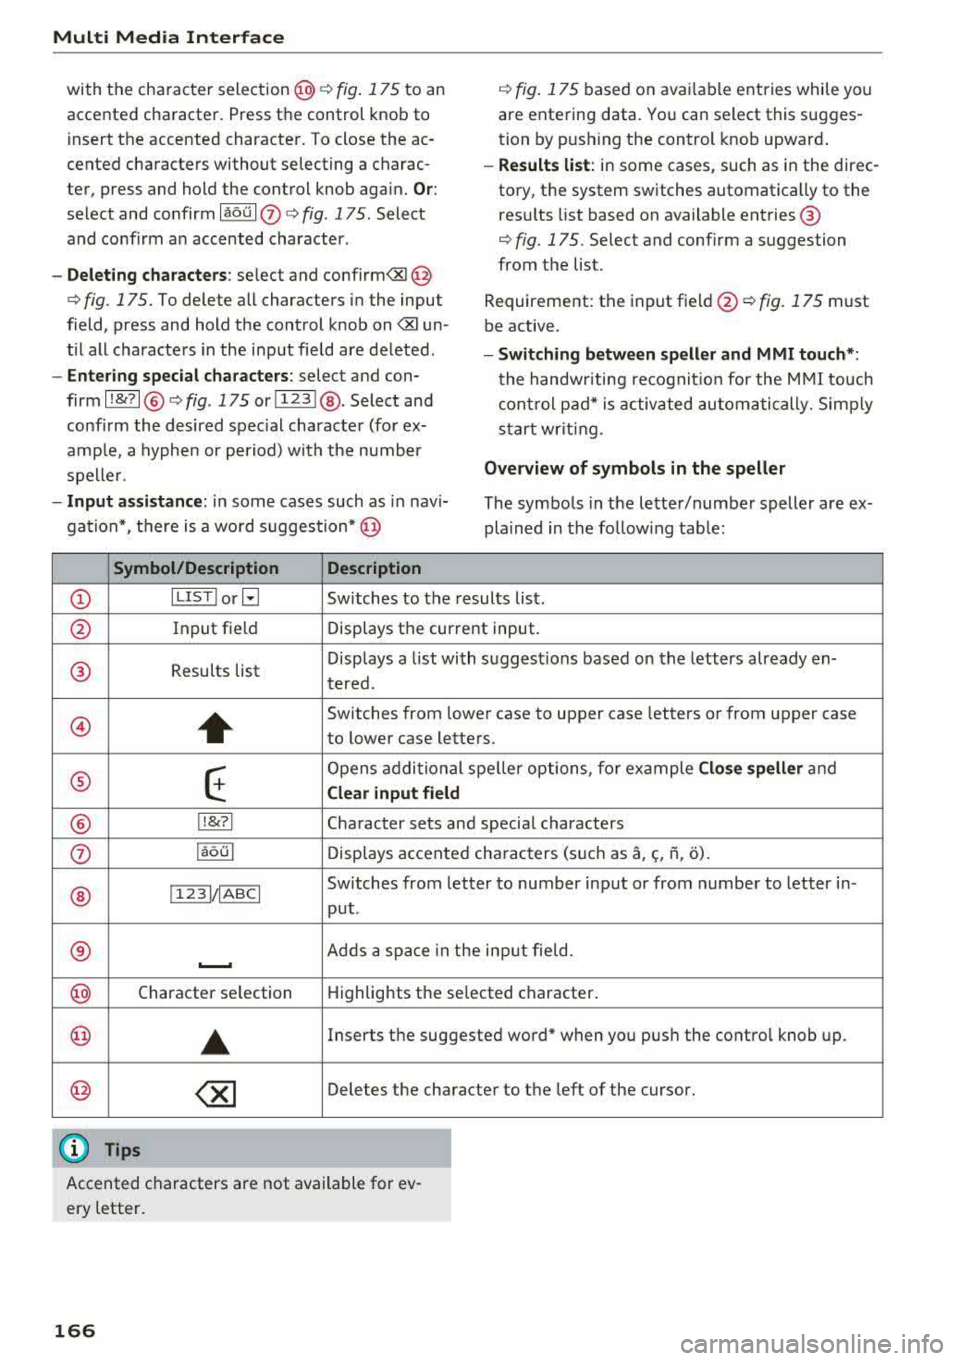
with the character selection @<=> fig. 175 to an
accented character. Press the control knob to
insert the accented character. To close the ac
cented characters without selecting a charac
ter, press and hold the control knob again.
Or :
select and confirm laou I (z) <=> fig . 175. Select
and confirm an accented character.
- Deleting characters: select and confirm<&l @
<=>fig. 175. To delete all characters in the input
field, press and hold the control knob on
<&l un
ti l all characters in the input field are deleted .
-Entering special characters : select and con
firm
l !&? l@ <=>fig . 175 orll23 I@ . Select and
confirm the desired spec ial character (for ex
amp le, a hyphen or period) with the number
spelle r.
- Input assistance: in some cases such as in navi
gation*, there is a wo rd suggestion* @
Symbol/Description Description
<=> fig. 175 based on avai lable entries while you
are entering data. You can select this sugges
tion by push ing the control knob upward .
-Results list: in some cases, such as in the direc
tory, the system switches automatically to the
res ults list based on ava ilable entries @
<=>
fig. 175. Select and conf irm a suggestion
from the list.
Requirement: the input field
@Q fig. 175 must
be active.
- Switching between speller and MMI touch *:
the handwriting recognit io n for the MMI touch
control pad* is activated automatically. Simp ly
start wr iting.
Overview of symbols in the speller
The symbols in the letter/number speller are ex
plained in the follow ing tab le:
CD ILIST lorB Switches to the results list.
@ Input field Displays the current input.
@ Results list Displays
a list with suggestions based on the letters already en-
tered.
@
+
Switches from lower case to upper case letters or from upper case
to lower case letters .
® E
Opens additional speller options, for example Close speller and
Clear input field
® 11&71 Character sets and special characters
0 laoul Displays accented characters (such as a,<;, fi, o).
Switches from letter to number input or from number to letter in-
® 11 231/IABCI
put .
® ,___, Adds a space in the input fie ld.
@ Character se lection Highlights the selected character .
@
•
Inserts the suggested word* when you push the control knob up .
@ ~ Deletes the character to the left of the cursor.
@ Tips
Accented characters are not available for ev
ery letter.
166
Page 169 of 409
<( a, .... N ,....
N .... 0 \0
3 a,
Free text search
Appl ies to: ve hicles wit h free text search
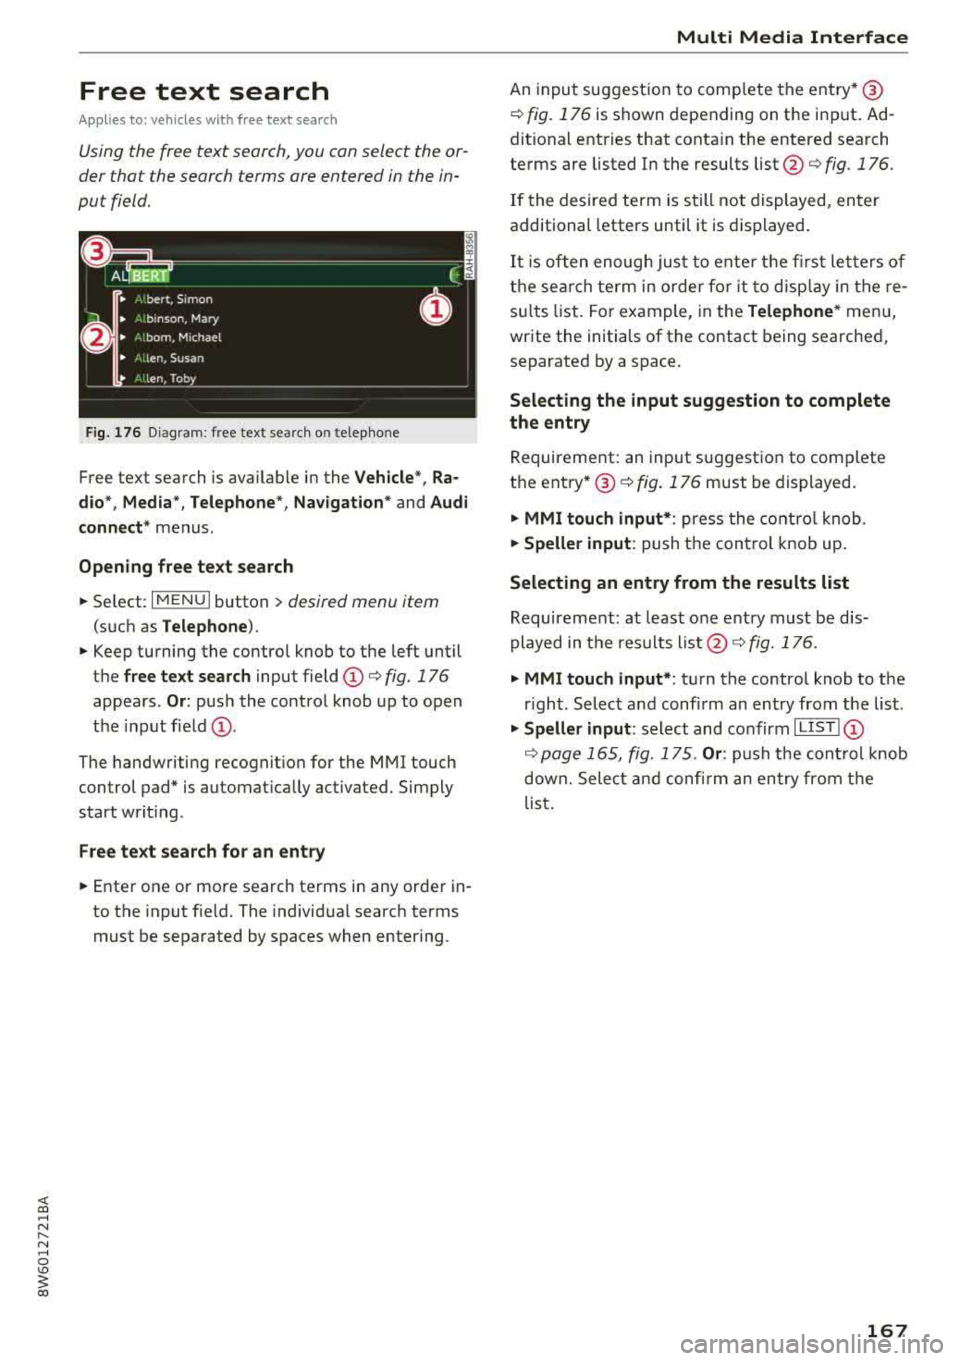
Using the free text search, you can select the or
der that the search terms are entered in the in
put field.
Fig. 176 Diagram : free text search o n telephone
Free text search is ava ilable in the Vehicle *, Ra
dio* , Media *, Telephone *, Navigation *
and Audi
connect*
menus .
Opening free text search
"'Se lect: I MENU I button > desired menu item
(such as Telephone ).
"' Keep turning the contro l knob to the left until
the free text search input field (D c::> fig. 176
appears. Or: push the control knob up to open
the input
field @.
The handwriting recognition for the MMI touch
control pad* is automat ically act ivated. Simply
start writ ing.
Free text search for an entry
"' Enter one or more search terms in any orde r in
to the input f ie ld. The individua l search terms
must be separated by spaces when enter ing.
Multi Media Interface
An input suggestion to comp lete the ent ry* @
¢ fig. 176 is shown depending on the input . Ad
ditional entries that conta in the entered search
terms are listed In the results
list@¢ fig. 176.
If the desired term is still not displayed, enter
additional letters until it is displayed.
It is often enough just to ente r the first letters of
the search term in order for it to display in the re
su lts list. For example, in the
Telephone* menu,
write the initials of the contact being searched,
separated by a space.
Selecting the input suggestion to complete
the entry
Requirement: an input suggestion to comp lete
the
entry *@ ¢ fig. 176 must be displayed.
"' MMI touch input* : press the control knob.
"'Speller input: push the control knob up.
Selecting an entry from the results list
Requirement: at least one entry must be dis
played in the results
list @¢ fig. 176.
"'MMI touch input* : turn the control knob to the
right . Select and confirm an entry from the list .
"' Speller input: select and confirm I LIST! (D
¢ page 165, fig. 175 . Or: push the control knob
down. Select and confirm an entry from the
list .
167