four wheel drive AUDI A5 COUPE 2018 Owners Manual
[x] Cancel search | Manufacturer: AUDI, Model Year: 2018, Model line: A5 COUPE, Model: AUDI A5 COUPE 2018Pages: 409, PDF Size: 67.63 MB
Page 15 of 409
Malfunction indicator
If there is a malfunction in the instrument clus
ter,
DEF wi ll appear in the trip odometer display.
Have the malfunction corrected as soon as possi
b le.
@ Tips
The units of measurement can be set in the
I nfotainment system
Q page 251.
Multifunction steering
wheel plus
Operating
Applies to: vehicles with multifunction steering wheel plus
You can use the multifunction steering wheel
plus to operate the driver information system
and the
MMI functions, adjust the volume and
switch the voice recognition system on and off.
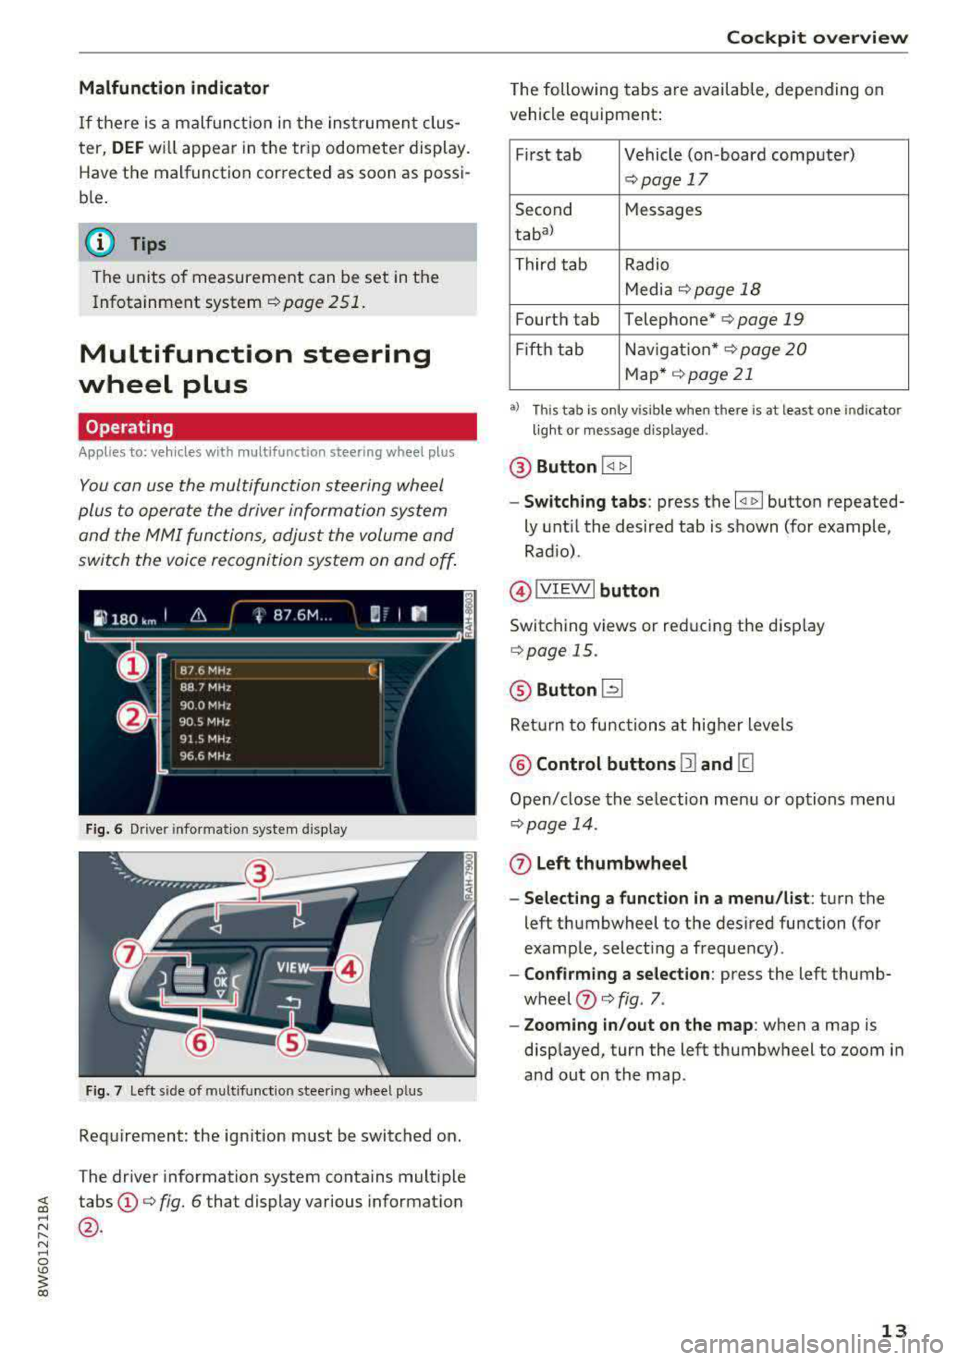
Fig. 6 Driver informat ion system d isplay
Fig. 7 left s ide of multifunc tion stee ring wheel p lus
Requirement: the ign ition must be switched on.
The driver information system contains multiple
~ tabs©¢ fig. 6 that display various information
~ @.
N ..... 0
'° ~ co
Cockpit overview
The following tabs are available, depending on
vehicle equipment:
First tab Vehicle (on-board computer)
Q page 17
Second Messages
tabal
Third tab Radio
Media
¢ page 18
Fourth tab Telephone* ¢ page 19
Fift h tab Navigation* ¢ page
20
Map* ¢page21
a) Thi s ta b is on ly vis ib le when t here is at leas t one indicato r
li ght o r m essag e disp layed .
@ Button I <1 1> I
-Switching tabs: press the ~ button repeated
ly until the desired tab is shown (for example ,
Radio) .
@IVIEWI button
Switching views or reducing the display
Q page 15.
@ Button [2l
Return to functions at higher levels
@ Control buttons 12) and [g
Open/close the selection menu or options menu
Qpage 14.
(z) Left thumbwheel
- Selecting a function in a menu/list:
turn the
left thumbwheel to the desired function (for
example, selecting a frequency) .
-Confirming a selection: press the left thumb
wheel
(J) ¢ fig . 7.
- Zooming in/out on the map: when a map is
displayed, turn the left thumbwheel to zoom in
and out on the map.
13
Page 19 of 409

<( a, .... N ,....
N .... 0 \0
3 a,
Third tab Rad io ¢page 18
Media ¢ page 18
Fourth tab Telephone ¢
page 19
a) This tab is only v isible when there is at least one ind icato r
l ight or mess age disp layed.
- Switching tabs : press the !MODE ! button
<=> fig. 12 on the mult ifunction steering wheel
repeatedly unti l the des ired tab is d isp layed .
-Se lect ing a function in the m enu /list : turn the
left thumbwheel on the mult ifunct ion steer ing
whee l to the desired funct ion.
- Confirming a sel ection : press the left thumb
wheel on the multifunction steer ing wheel to
confirm your se lec tion.
- Scrolling within th e lists: turn the left thumb
wheel on the mult if u nction steer ing wheel
quick ly to scroll wi thin the lists.
@ button @;]
- Switching the voice recogn it ion sy stem on :
briefly press the 51 button¢ fig. 13 . Say the
desired command after the
B eep .
- Switching th e vo ice recogn ition sy stem off :
press and hold the 51 button. Or: say the com
ma nd
Cancel.
For more information about the vo ice recognit ion
system, see
<=> page 171, Voice recognition sys
tem
or ¢ page 251.
@ Right thumbwheel
The volume of an audio source or a system mes
sage (such as traffic announcements) can be di
rectly adjusted dur ing the aud io output.
- Inc rea sin g o r decrea sing the volume : turn the
rig ht thumbwhee l
¢ fig. 13 up or down.
- Muting or pausing : turn the right thumbwheel
down.
Or : press the right thumbwhee l.
-Unmuting or resuming : turn the right thumb
whee l up.
Or : press the right thumbwhee l.
Cockpit o ve rv iew
Driver information
system
On-board computer
F ig. 14 Instrument cluster: fuel co nsumpt io n display
Resetting values to zero
Requirement: the Fue l consumption , Short -term
memory or Long-t erm mem ory
d isplay must be
selected.
.. To reset the value for the respective memory to
zero, press and hold the left thumbwheel
(i)
¢ page 13, fig. 7 or @ <=> page 16, fig. 12 on
the multifunction stee ring wheel for one sec
ond. Or
.,. On the multifunction stee ring wheel, select:
the right control button>
Re set value s*.
Ad justing additional displays (Audi virtual
c ockpit)*
.,. Select on the multif unction steering whee l:
right control button >
Additional di splay .
.. Select the desired additional display .
In the first tab (on -board comp ute r), you can c all
u p the following disp lays one after the other by
turning the left thumbwheel on the multifunc
tion steer ing wheel.
- Time and da te
<=>page 251
- Dig ita l speedomete r*
- Average consumption
- Remaining range*
- Ad Blue
range*<=> page 326
- Short-term memory overview
- Long-term memory overview
- Energy consumers
r=> page 18
- Dr iver assistan ce* ¢ page 113
-Traff ic sign recog nition* ¢ page 109
17
Page 96 of 409

Driving
(D Tips
If you switch the system off during a stop
phase, the engine will start again automati
cally .
Messages in the instrument cluster display
App lies to: ve hicles w ith S tart/Stop system
Automatic start /stop deact ivated: Please
restart engine manually
This message appea rs whe n specific conditions
are not met dur ing a s top phase . The Sta rt/Stop
system w ill not be ab le to restart the eng ine. The
e n gine mus t b e starte d wit h the
I START ENGI NE STOP I butt on .
Automatic start/stop system: malfunction!
Function unavailable. Please contact Service
T here is a malfunc tion in the Sta rt/S top system.
D rive t he ve hicle to an author ized A udi dealer or
author ized Se rvice Facility as soon as poss ible to
have the ma lf u nction co rrected .
Electromechanical
parking brake
Fig. 10 1 Center conso le : pa rk in g b rake
r- r--
0
~ a, a,
Your veh icle is equippe d with an e lec tromechani
cal parking
b rake @ q fig. 101. The par king
b rake is designed to prevent the vehicle from
ro lling un intent iona lly and replaces the hand
brake.
Setting /manually releasing the parking
brake
.. P ull the(®) switch to set the pa rking brake. The
LED in the sw itch turns on. The
-(USA mod-
94
els)/ . (Canada mo dels) indicator light also
turns on in the instrument cluster disp lay.
.. To re lease the park ing bra ke man ually, press
the bra ke or accelerator peda l w hile the igni
tion is sw itched on and press
the(®) switch at
the same t ime . The LED in the button and the
i n d icator light in t he d isp lay tur n
off.
Releasing the parking brake automatically
Requirement: the d river 's door must be closed .
.. To start driving and r elease the parking brake
automatically, p ress the accelerator peda l as
usual.
I n add ition to releas ing t he pa rking brake auto
ma tic ally, o ther convenien ce an d safety func tion s
are avai lab le when you s tart
d riving ¢ page 95,
Starting to drive.
Preventing the automatic parking brake
release
The vehicle cou ld begin ro ll ing uninten tionally,
depending on the hill or if towi ng a tra ile r .
.. T o preven t the p arking br ake fr om rele asing au
t oma tic ally, pull and ho ld the (®) swi tch and
press the a cce lerator peda l. The pa rking brake
remains set and p revents the ve hicle from roll
ing backward.
.. You can release the<® > switch again once you
are sure that yo u are giving enoug h driving
force to the wheels by press ing the accelerator
pedal.
Emergency braking function
Yo u can use the emergency braking function in an
emergency situat ion, o r if the standa rd brake op
eration ma lfu nctions or is disab led.
.. Pull and hold the(®) switc h.
.. As soon as you re lease the (®) switch or acceler-
ate, the braking stops.
P ulli ng and ho ld ing
the(® ) switch wh ile driving
t h e ve hicle activates the eme rgency brak ing func
tion. The ve hicle is bra ked at a ll four wheels by
activating the hydraulic brake system. The brak
i ng effect is sim ilar to heavy
brak ing ¢ A-
To reduce the risk of act ivat ing the emergency
bra king by m ista ke, a warning tone (b uzzer)
Page 147 of 409
Switching off
• Drive faster than 6 mph (10 km/h), or
• Press the p,,,A button, or
• Switch the ignition off.
(D Tips
-The visual display in the r ight part of the
display should help you detect the critica l
vehicle area.
- You can change the volume of the signals
and the display
c:!) page 148.
Perpendicular parking
Applies to: vehicles with rearview came ra
This view may be used when parking in a garage
or in a parking space.
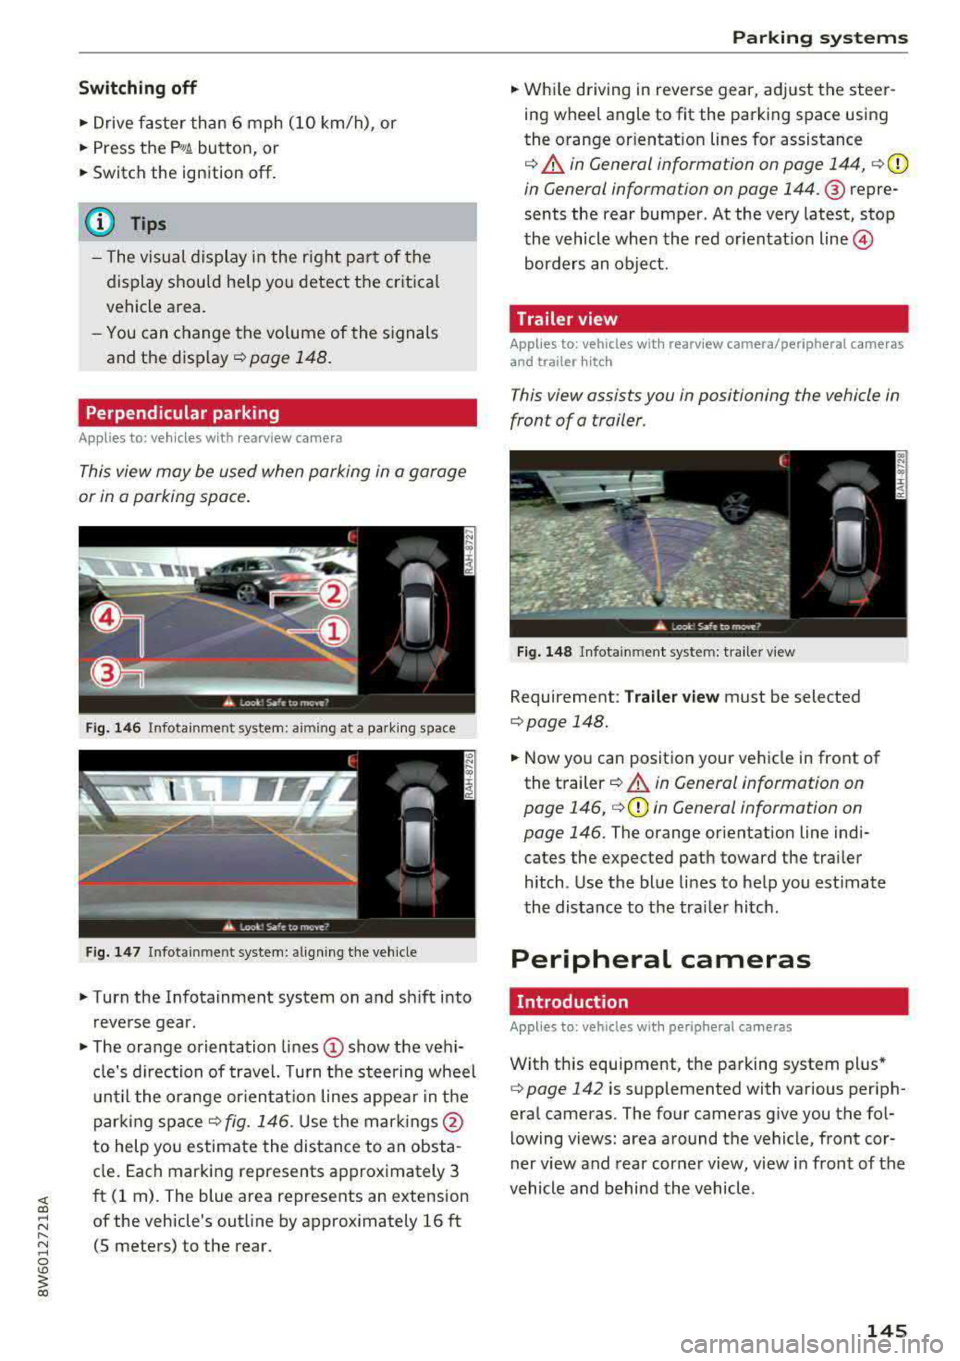
Fig. 146 Infotainment system: aiming at a parking space
Fig . 147 Infotainment sys tem: aligning th e vehicle
• Turn the Infotainment system on and sh ift into
reverse gear.
• The orange orientation lines (D show the vehi
cl e's direction of travel. Turn the steering wheel
until the orange orientat ion lines appear in the
parking
space ¢ fig. 146. Use the marking s@
to help you estimate the distance to an obsta
cle. Each marking represents approximately 3
ft (1 rn). The blue area represents an extension
of the vehicle's outline by approx imately 16 ft
(5 meters) to the rear.
Parking systems
• While driving in reverse gear, adjust the steer
ing wheel angle to fit the parking space using
the orange or ientation lines for assistance
¢ &. in General information on page 144, ¢(D
in General information on page 144. ® repre
sents the rear bumper. At the very latest, stop
the vehicle when the red or ientat io n
line ©
borders an object.
Trailer view
Applies to: vehicles with rearview camera/peripheral cameras
and trailer hitch
This view assists you in positioning the vehicle in
front of a trailer.
Fig. 148 Infota inment system: trailer view
Requirement: Trailer view must be selected
¢page 148.
• Now you can position your vehicle in front of
the trailer
c:!) &. in General information on
page 146,
¢ (D in General information on
page 146.
The orange orientation line indi
cates the expected path toward the trai ler
h itch. Use the blue lines to help you estimate
the distance to the tra iler hitch.
Peripheral cameras
Introduction
Applies to: vehicles wit h periph eral cameras
With this equipment, the parking system plus*
c:> page 142 is supplemented with various periph
eral cameras. The four cameras give you the fo l
lowing views: area around the vehicle, front cor
ner view and rear corner view, view in front of the
vehicle and behind the vehicle.
145
Page 148 of 409
Parking systems
General information
Applies to: ve hicles w ith per ip heral cameras
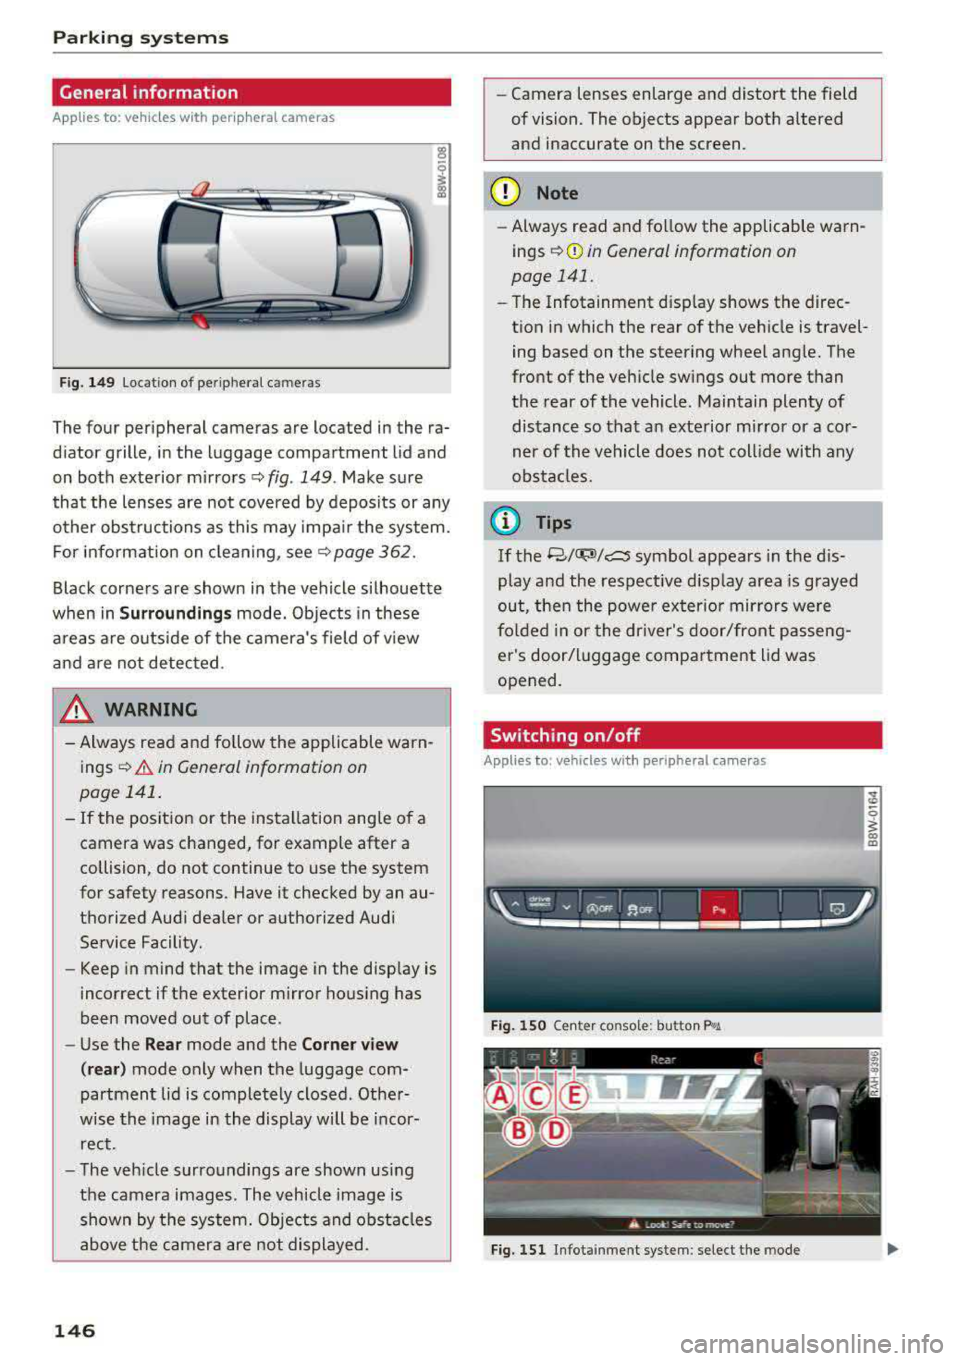
Fig . 149 Location of peripheral cam eras
The four periphe ral cameras are located in the ra
diator grille , in the luggage compartment lid and
on both exterior mirrors
Q fig . 149 . Make sure
that the lenses are not covered by deposits or any
other obstructions as this may impair the system.
For information on cleaning, see
Q page 362.
Black corners are shown in the vehicle silhouette
when in
Surroundings mode. Objects in these
areas are outside of the camera's field of view
and are not detected.
& WARNING
- Always read and follow the applicable warn
ings
Q .&. in General information on
page 141.
- If the position or the installation angle of a camera was changed, for example after a
collision, do not continue to use the system
for safety reasons. Have it checked by an au
thorized Audi dealer or authorized Audi
Service Facility.
- Keep in mind that the image in the display is
incorrect if the exterior mirror housing has
been moved out of place .
- Use the
Rear mode and the Corner view
(rear)
mode only when the luggage com
partment lid is completely closed . Other
wise the image in the display will be incor
rect.
- The vehicle surroundings are shown using
the camera images . The vehicle image is
shown by the system. Objects and obstacles above the camera are not displayed.
146
- Camera lenses enlarge and distort the field
of vision. The objects appear both altered
and inaccurate on the screen.
(D Note
-Always read and follow the applicable warn
ings
Q (i) in General information on
page 141.
- The Infotainment disp lay shows the direc
tion in which the rear of the vehicle is travel ing based on the steering wheel angle. The
front of the vehicle swings out more than
the rear of the vehicle. Maintain plenty of
distance so that an exterior mirror or a cor
ner of the vehicle does not collide with any
obstacles.
@ Tips
If the 8/~/c:s symbol appears in the dis
play and the respective display area is grayed
out, then the power exterior mirrors
were
folded in or the driver's door/front passeng
er's door/luggage compartment lid was
opened.
Switching on/off
Applies to: vehicles wit h peripheral ca meras
Fig. 150 Ce nte r console: butto n ~i
Fig. 151 Infot ainment system : select the mode
Page 157 of 409
<( a, .... N ,....
N .... 0 \0
3 a,
snow and ice. Always read and follow safety
precautions¢.&. .
Winter tires
By using all wheel drive, your vehicle has good
forward motion with standard tires in winter con
ditions. However, using winter or all season tires
on
all four wheels in the winter is recommended,
because this will improve the
braking effect.
Snow chains
If there are snow chain laws, snow chains must
also be used on vehicles with all wheel drive
¢ page 358, Snow chains.
Replacing tires
For vehicles with all wheel drive, only wheels with
the same rolling circumference should be used.
Avoid using tires with different tread depths
¢ page 348, New tires or wheels.
Offroad vehicle?
Your Audi is not an offroad vehicle -there is not
enough ground clearance. For this reason, avoid
difficult terrain .
A WARNING
-Also, in vehicles with all wheel drive, adapt
your driving style to the current road and
traffic conditions. Do not let the increased
safety provided tempt you into taking risks,
because this increases the risk of an acci
dent .
- The braking ability of your vehicle is limited
to the traction of the wheels. In this way, it
is not different from a two wheel drive vehi
cle. Do not be tempted to accelerate to a
high speed when the road is slippery, be
cause this increases the risk of an accident .
- Note that on wet streets, the front wheels
can "hydroplane" if driving at speeds that
are too high. Unlike front wheel drive
vehicles, the engine does not rev higher sud
denly when the vehicle begins hydroplaning.
For this reason, adapt your speed to the
road conditions to reduce the risk of an acci
dent.
Intelligent Technology
Energy management
The starting ability is optimized
T he energy management system manages the
electrical energy distribution and optimizes the
availability of electrical energy for starting the
engtne.
When a vehicle with a conventional energy sys
tem is not driven for a long time, the vehicle bat
tery is drained by equipment (for example, the
immobilizer). In certain circumstances , there
could may not be enough energy to start the en
gine.
Your vehicle is equipped with an intelligent ener
gy management system for distributing electrici
ty. This significantly improves the starting ability
and increases the vehicle battery life.
The energy management system Is made up of
battery diagnosis, idling current management,
and dynamic energy management.
Battery diagnosis
The battery diagnosis determines the vehicle bat
tery charge level. The sensors determine the bat
tery voltage, the battery current, and the battery
temperature. The current charge level and the
performance of the vehicle battery are deter
mined based on this.
Idling current management
The idling current management decreases the
energy used while parked. With the engine
switched off, it manages the energy distribution
to the different electrical components . Data from
the battery diagnosis is taken into account for
this.
Depending on the vehicle battery charge level,
electrical equipment is switched off one item af
ter the other to prevent the vehicle battery from draining and to maintain the starting ability.
Dynamic energy management
While driving, dynamic energy management dis
tributes the appropriate amount of energy to the
electrical equipment.
It controls the battery
charge level so that the amount of energy is not
..,.
155
Page 349 of 409
Wheels
for the number of seating positions. Refer to the table ¢
table
on page 353
for the number of
people that correspond to the ve
hicle normal load.
New tires or wheels
Audi recommends having all work
on tires or wheels performed by
an authorized Audi dealer or au
thorized Audi Service Facility.
These facilities have the proper
knowledge and are equipped with
the required tools and replace ment parts.
.. New tires do not yet have the
optimum gripping properties.
Drive carefully and at moderate
speeds for the first 350 miles
(500 km) with new tires.
.. use tires of the same construc
tion, size (rolling circumference)
and as close to the same tread pattern as possible on all four
wheels.
11>D0 not replace tires individually.
At least replace both tires on the
same axle at the same time.
11>Audi recommends that you use
Audi Original Tires. If you would like to use different tires, please
note that the tires may perform
348
differently even if they are the
same size ¢
&.-
.,. If you would like to equip your
vehicle with a tire/rim combina
tion that is different from what
was installed at the factory, con
sult with an authorized Audi
dealer or authorized Audi Service Facility before making a pur
chase¢ &,.
If the spare tire is different from
the regular tires installed on the
vehicle - for example, if winter
tires or wide tires are installed -
then only use the spare tire tem porarily in case of emergency and
drive carefully while it is in use. It
should be replaced with a regular
tire as soon as possible .
On
all wheel drive vehicles , all
four wheels must be equipped
with tires that are the same brand
and have the same construction
and tread pattern so that the
drive system is not damaged by
different tire speeds . For this rea
son, in case of emergency, only
use a spare tire that has the same
circumference as the regular
tires .
""
Page 358 of 409
<( a, .... N ,....
N .... 0 \0
3 a,
(1400-750 (5 X 150) = 650
lbs.)
5 . De termin e the combined
w eig ht of lugg age and carg o
b eing load ed on the vehicle .
Th at w eight ma y not safel y ex
c e e d th e ava ilabl e c argo and
lu ggag e load ca pacit y ca lculat
ed in Step 4 .
6 . I f you r veh ic le will b e tow ing a
tr aile r, load from your tr ailer
will be tran sferred to y our ve
hi cle . Con sult thi s manual to
de te rmin e how this redu ces
th e av ailabl e car go and lug
ga ge load capa cit y o f your vehi
cle.
..,. Chec k the tire s idewall
(¢ page 34 1, fig . 282) to de ter
min e the de sign ated load r ating
for a speci fic tire.
Wheel bolts and rims
Wheel bolts
Wheel bolts must be clean and loosen/t ighten
eas ily.
Rims
Rims with a bolted rim ring " or with bolted wheel
covers* consist of m ultip le pieces . These compo
n ents were bolted together using specia l bolts
a nd a special procedure . You must not repair or
d isassemble
t h em ¢.&. .
_& WARNING
Wheel bolts tha t are t igh tened or re paired in
c orrectly can be come loose and result in loss
Wh eel s
of vehicle contro l, wh ich increases the risk of
an accident. For the cor rect tighten ing spec ifi
cation, see
c:> page 374, Finishing.
- Always keep the wheel bolts and the
threads in the wheel h ub clean and free of
grease.
- Only use wheel bolts that fit the rim.
- Always have damaged rims repaired by an
author ized Audi dealer or author ized Audi
Serv ice Facility. Never repair o r disassemb le
rims yourself, because th is increases the r isk
of an acc ident .
Winter tires
Winter tires significantly imp rove the vehicle 's
handling when dr iv ing in winter conditions . Be
ca use of their const ruct ion (w idth , compou nd,
t read pattern), s ummer tires prov ide less t rac
t ion on i ce and snow.
.,. Use winter tires on all four wheels .
.,. Only use winter tires that are app roved for yo ur
ve hicle.
.,. Please no te that the max imum permi tted
speed may be lowe r with winter tires
c:> .&_ . An
authoriz ed Audi dealer or authorized A udi Serv
ice Facility can inform yo u about the maximum
permitted speed for your tires .
.,. Check the tire pressure after insta lling wheels
c=> page351 .
The effectiveness of winter tires is reduced great
ly when the tread is worn down to a depth of
0.16 in (4 mm). The characteristics of w inter
tires also decrease greatly as the tire ages, re
gardless of the rema ining t read .
_& WARNING
-
- Never d rive fa ster than the max imum pe r
mitted spee d for your tires. This could c ause
the t ires to he at up too mu ch. This inc reases
the risk of an accident because it can cause
the tire to burst.
- Always adapt your driving to the road and
traffic conditions. Drive carefully and reduce
your spee d on icy or slippery roads . Even
winter t ires can lose t ract ion on black ice.
..,..
357
Page 362 of 409
<( a, .... N ,....
N .... 0 \0
3 a,
A WARNING ,~
- If the tire pressure indicator appears in the
display, reduce your speed immediately and
avoid any hard steering or braking maneu
vers. Stop as soon as possible and check the
tires and their pressure.
- The driver is responsible for maintaining the
correct tire pressure. You must check the
tire pressure regularly.
- Under certain conditions (such as a sporty
driving style, winter conditions or unpaved
roads), the tire pressure monitoring system
indicator may be delayed.
@ Tips
- The tire pressure monitoring system can al
so stop working when there is an ESC mal
function.
- Using snow chains may result in a system
malfunction.
- The tire pressure monitoring system in your
Audi was calibrated with "Audi Original
Tires"
¢page 348. Using these tires is rec
ommended.
Storing tire pressures
If the tire pressure changes or a tire is replaced,
it must be confirmed in the Infotainment sys tem.
"'Make sure before storing that the tire pressures
of all four tires meet the specified values and
are adapted to the load ¢
page 351.
"'Switch the ignition on.
"'Select in the Infotainment system: !MENUI but
ton
> Vehicle > Service & checks > Tire pres
sure monitoring
> Store tire pressure > Yes,
store now .
Do not store the tire pressures if snow chains
are installed.
Wheels
361