roof AUDI A6 2011 Owners Manual
[x] Cancel search | Manufacturer: AUDI, Model Year: 2011, Model line: A6, Model: AUDI A6 2011Pages: 370, PDF Size: 87.15 MB
Page 4 of 370
Table of contents
Table of contents
Vehicle literature ..... .
About this Owner's Manual .......... ....... .. .
Controls and
equipment .............. .
Instruments and controls ... .
General illustration ........... .
Instruments and
warning/indicator Lights ..... . Instruments ... ... .......... .
Warning/indicator ligh ts ..... . .
Driver information display ... .
Introduction ...... ......... . .
On-Board Diagno stic sy ste m
(OBD) . ..... ....... .......... .
Auto Ch eck Control ........... .
Speed warning system ........ .
Tr ip computer ............ ... .
Opening and closing ......... . Keys ............ ............ .
Power locking system
Rear lid .... ..... ............ .
Child safety Lock ............. .
Convenience key ............. .
Anti-theft alarm sys tem ...... .
Power windows .............. .
Sliding/tilting power sunroof .. .
Clear vision .. .... ............ .
L ights ... .. ........ ......... .
Interior ligh ts ... ... .. ....... .
4
5
6
7
7
8
8
12
19
19
23
24
32
34
37
3 7
41
46
47
47
49
so
53
58
58
63 Vi
sion .................... .. .
Wiper and washer system Mirrors ... ............... ... .
Digital compass ............ .
Seats and storage ........ ... .
General recommendations .... .
Power seat . ................. .
S eat m emory ............... . .
Rear sea ts ... ... .. .......... .
Head res train ts ........... ... .
Armrest .. .. ................ .
Luggage compar tm en t ..... .. .
Roof ra ck . .... .... .......... .
Cupholder .................. .
Ashtray .. ................... .
Cigarette Lighter/socket ...... .
S torag e ................ .. .. .
Warm and cold .... .......... .
Cl imate control ........ .. .... .
Ba sic se tt ings ............... .
On the road ... .... .......... .
S tee ring .................... .
Igni tion lock and ignition swi tch
Start ing and stopp ing the engine
Start ing and stopping the engine
with Convenience key ......... .
E lectromechanical parking brake
Cru ise control ............... .
Adaptive Cruise Control ..... . Speed and distance con trol
sys tem .............. ....... .
Dr iver information ........... .
Syst em Limitations ........... .
Audi Lane assist .......... .. .
Lane ass ist .... .. ............ . 64
66
69
73
75
75
76
79
80
81
82
83
87
89
91
92
93
96
96
104
106
106
108
109
110
113
116
119
119
12 7
131
134
134 Audi
side assist ............... 137
Lane Change Assistant ......... 137
No tes ....... .... ............. 144
Automatic transmission 146
tiptronic ® (6-sp eed au toma tic
tr ansmission) . . . . . . . . . . . . . . . . . 146
multitronic ® ............ ...... 152
Park assist . . . . . . . . . . . . . . . . . . . . 160
Park ing sys tem ......... .... .. . 160
Park ing syst em (r ear) . . . . . . . . . . 160
Park ing sy ste m (r ear, w ith r ear
view camera) . . . . . . . . . . . . . . . . . 162
Adaptive Air Suspension . . . . . . 168
Adap tive Air Suspens ion and
Damping . . . . . . . . . . . . . . . . . . . .. . 168
Homelink ® ............. .... .. 171
Universal remote control 171
Safety first . . . . . . . . . . . . . . . 17 6
Driving Safely ................. 176
General notes . . . . . . . . . . . . . . . . . 176
Proper occupant seating
posi tions . . . . . . . . . . . . . . . . . . . . . 17 8
Pedal area . . . . . . . . . . . . . . . . . . . . 182
Stowing Luggag e . . . . . . . . . . . . . . 183
Reporting Safe ty Defe cts . . . . . . . 185
Safety belts . . . . . . . . . . . . . . . . . . . 187
G eneral not es ................. 187
Why safe ty be lt s ? ........... .. 188
Safety belts . . . . . . . . . . . . . . . . . . . 191
Safe ty belt pretensio ners . . . . . . . 195
Page 42 of 370
Open ing and closing
- Place the cover w ith th e new battery on the key base and
press both parts together.
c£> For the s ake of the environment
Dispose of dead batteries proper ly so as not to po llute the envi ron
me nt.
00 Tips
The replacement battery must be the same specification as the
orig inal. •
Electronic immobilizer
The immobilizer helps to prevent unauthorized use of
your vehicle.
A compu ter chip inside you r key au tomatically deactivates the e lec
tron ic immob ilizer when you insert the key in the ignition lock, or on
vehicles with Convenience key*, when the key is inside the vehicle.
When you remove the key from the ign ition lock, or on veh icles with
Conven ience key, when you remove the key from the vehicle, the elec
tron ic immobil izer is a utomat ica lly activated once again.
& WARNING
A lway s ta ke the ke y w ith you when you l eav e the vehicle . Th e key
can di sa rm the e lect roni c engine immobilizer and pe rmit an un au
thori zed p erso n t o start the eng ine a nd enable operation of the
v ehi cle sy stems su ch a s pow er w indo w or p ow er sunroof* l eading
to seriou s per sonal injur y.
00 Tips
• The veh icle cannot be started if an unauthori zed key is used. The
vehicle may not start if another radio device su ch as a key for another
vehicle o r a transponder is located on the key ring .
• For Declaration of Compliance to United S tat es FCC and Industry
Canada regulations =>
page 349. •
Valet key function
The valet key function prevents unauthorized persons
from opening the glove compartment or rear lid.
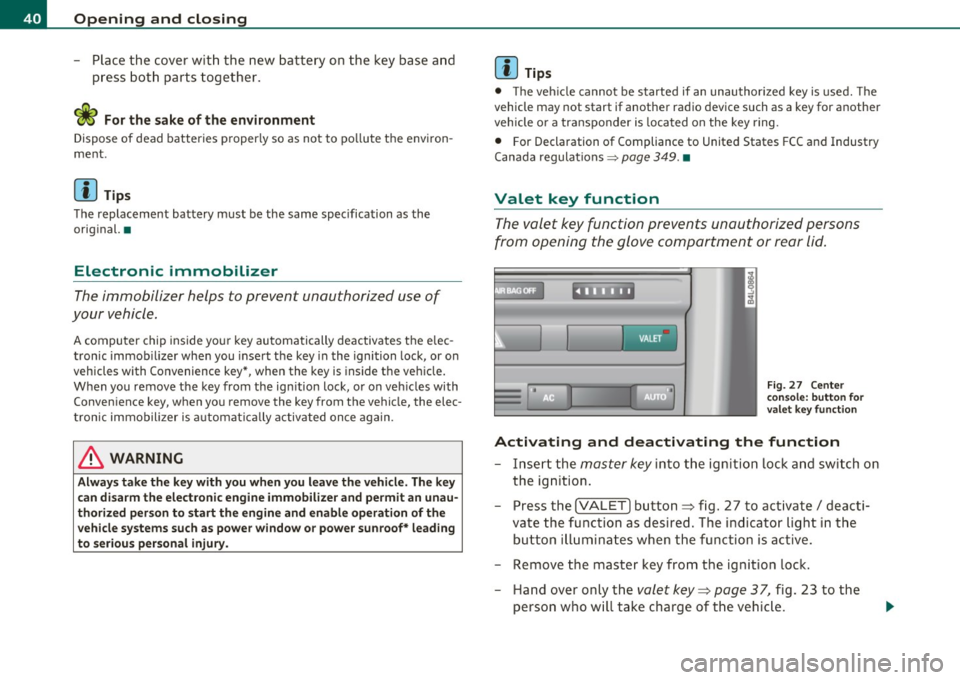
,~ • F ig. 27 Ce nter
co nsole: button for
valet key functio n
Activating and deactivating th e function
- Insert the master key into the igni tion lock and switch on
the ignition.
- Press the
!VALET] button ~ fig. 27 to activate/ deacti
vate the function as desired. The in dicator light in the
button il luminates whe n the funct ion is ac tive.
- Remove the master key from the ignition lock. - Hand over only the
valet key~ page 37, fig. 23 to the
person who will take charge of the vehicle .
Page 55 of 370

-Turn and hold the k ey in the lock posit ion®~ page 52,
fig. 40 until t he windows and th e power roof * are
comple tely closed .
Opening windows
-Inse rt the key into the lock o f th e driver's door.
Turn and hold the key in t he open posit ion @.
The a utomat ic close/open fu nction will cease if the key is returned to
i t s or iginal pos it io n.
& WARNING
• Be careful when closing the windows . Check to see that no one
is in the way, or serious injury could re sult!
• Always read and heed WARNING=>
& in "General des cription "
on
page 41 . •
Reactivating the system after battery
disconnection
If the vehicle battery is disco nnected and t hen reconnected ,
the automatic closing and opening function will not work
u nti l it is reactivated. To reactivate th is featu re, perform the
fo llowing steps:
Reactivating close /open feature
- Pull and hol d th e power w indow sw itc h until t he window is
comp letely closed .
- Release the switch.
- Pull the swi tch again for one second. The automat ic
closi ng/opening is now reactivated. •
Contro ls a nd e quip
m en t Vehicle
OP-eration
Opening and closing
Sliding/tilting power sunroof
Applies to veh icles: with slid ing/t ilting powe r sunroof
How the power sunroof works
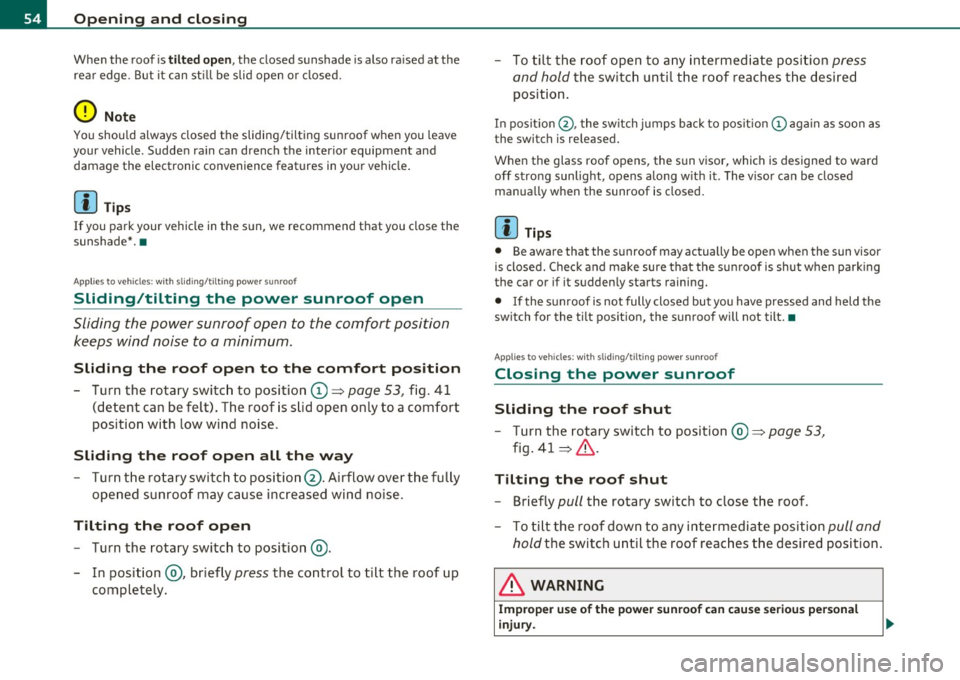
Fig . 41 Section of th e
h eadliner : su nroo f
s wit ch pos itio ns
The roof will slide open or ti lt up at the rear as required. When the
ignition is on, yo u can slide the roof open or close it to the des ired
position by turning the rotary control sw itch located overhead next to
the inte rior light. The roof is tilted open o r closed by p ressing or
pulling the control switch at posit ion ®=>fig. 41.
You can s till close or open the sunroof for up to ten minutes after you
have switched off the ignition with the key remaining in the ignition
lock. If either door is opened, powe red operation of the sun roo f will
be deact ivated.
Solar protection with sliding glass sun roof*
The sliding glass sun roof is equipped with an ad justable sunshade to
reduce the effects of strong sunlight. The so lar protection can be
moved at the recessed hand le to open and close it. To p revent the
vehicle interior f rom heat ing up, you should close the solar protection
when you park yo ur vehicle in the s un .
When the roof is
slid open , the sunshade is opened automat ica lly.
Whe n the roof is closed, the sunshade can be closed man ua lly. .,
Vehicle care Do-it-yourselt service iTechnical data
Page 56 of 370
Opening and closing
When the roof is tilted open, the closed sunshade is also raised at the
rear edge . But it can still be slid open or closed.
0 Note
You should always closed the sliding/tilting sunroof when you leave
your vehicle . Sudden rain can drench the interior equipment and
damag e the electronic convenienc e features in your v ehicle .
[ i ] Tips
If you park your vehicle in the sun , we recommend that you close the
sunshade*. •
Applies to vehicles : with slid ing/t il t ing po wer sunroof
Sliding/tilting the power sunroof open
Sliding the power sunroof open to the comfort position
keeps wind noise to a minimum .
Sliding the roof open to the comfort position
- Turn the rotary switch to position (D ~ page 53, fig. 41
(detent can be felt) . The roof is slid open only to a comfort
position with low wind noise .
Sliding the roof open all the way
-Turn the rotary switch to position@. Airflow over the fully
opened sunroof may cause increased wind noise .
Tilting the roof open
-Turn the rotary switch to position @.
- In position @, briefly
press the control to tilt the roof up
completely. -
To tilt the roof open to any intermediate position
press
and hold the switch until the roof reaches the desired
position.
In positio n@ , the switch jumps back to pos it ion © again as soon as
the swit ch is released.
When the glass roof opens, the s un visor, which is designed to ward
off strong sunlight, opens a long w ith it . The v isor can be closed
manually when the sunroof is closed.
[I) Tips
• Be aware that the sunroof may actually be open when the sun visor
is closed. Chec k and make sure that the sunroof is shut when park ing
the car or if it suddenly st art s raining.
• If the sunroof is not fully closed but you have pressed and held the
switch for the tilt pos ition, the sunroof will not tilt. •
App lies to veh icles: w ith sli ding/ tilting power sunroof
Closing the power sunroof
Sliding the roof shut
-Turn the rotary switch to position @~ page 53,
fig. 41 ~& -
Tilting the roof shut
- Briefly pull the rotary switch to close the roof .
- To tilt the roof down to any intermediate position
pull and
hold
the switch until the roof reaches the desired position.
& WARNING
Improper use of the power sunroof can cause serious personal
injury.
Page 57 of 370

& WARNING (continued)
• Be careful when closing the power sunroof. Not paying atten
tion could cause you or others to be trapped and injured as the roof
closes.
• Always take the key with you when you leave the vehicle to
prevent injuries caused by the roof closing.
• Never leave children or persons requiring assistance alone in
the vehicle, especially when they could access the vehicle keys.
Unsupervised use of the keys can result in the engine being started
or use of vehicle systems such as the power windows, etc. which
could result in serious injury. The doors could be locked with the
remote key, delaying help in an emergency.
• The power sunroof will continue to operate until the ignition
key has been removed and one of the front doors has been
opened. •
Applies to veh icl es: w ith s lid in g/ti lt ing powe r sunroof
Convenience closing feature
The power sunroof can be closed from outside with the
key in the driver 's door lock.
- Insert the key into the d river 's door lock .
- Turn and hold th e ke y in the lock position®=:>
page 43,
fig. 29 until the sunroof is completely closed=:>&, in
"Closing the power sunroof " on
page 54.
& WARNING
Be careful when closing the power sunroof. Not paying attention
could cause you or others to be trapped and injured as the roof
closes. •
Controls and equip
ment Safety first Opening and closing
App
lies to vehicles : w ith sliding/tilting power sunroof
Power emergency closing
The sunroof can still be closed electrically if for some
reason the overload protection function becomes acti
vated.
The power sunroof is equipped with an overload protection
feature. If, under normal conditions, the power sunroof will
not close, you can close it using this feature .
- Turn the rotary switch to position@=:>
page 53, fig. 41.
- Now pull the switch
and hold it in this position until the
power sunroof closes completely .
& WARNING
Improper use of the power sunroof can cause serious personal
injury.
• Be careful when closing the power sunroof. Not paying atten
tion could cause you or others to be trapped and injured as the roof
closes.
• Always take the key with you when you leave the vehicle to
prevent injuries caused by the roof closing.
• Never leave children or persons requiring assistance alone in
the vehicle, especially when they could access the vehicle keys.
Unsupervised use of the keys can result in the engine being started
or use of vehicle systems such as the power windows, etc. which
could result in serious injury. The doors could be locked with the
remote key, delaying help in an emergency.
• The power sunroof will continue to operate until the ignition
key has been removed and one of the front doors has been
opened. •
Vehicle care Technical data
Page 58 of 370
Open ing and closing
App lies to veh icles : w ith sliding/tilting power sunroof
Emergency closing by hand (Step 1)
The sunroof can be closed by hand in case of a power
failure .
0
-Open the compartment.
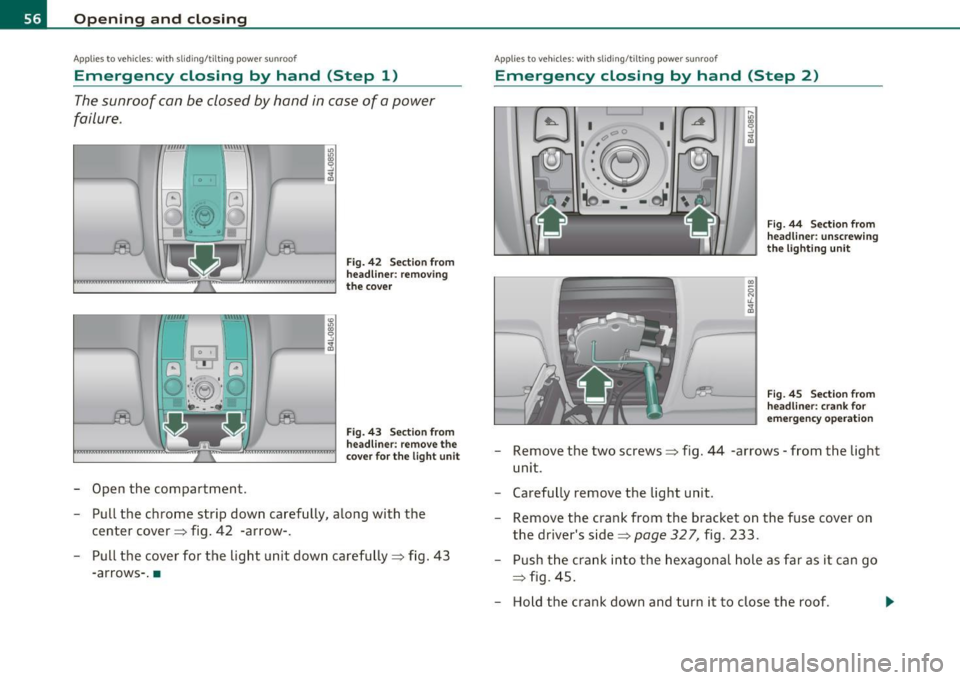
Fig. 42 Sect ion from
head lin er: removing
the cover
Fig. 43 Section from
headli ner: remove the
cove r fo r th e light u nit
- Pull the chrome strip down carefully, along with the
center cover ::::, fig . 42 -arrow-.
- Pull the cover for the light unit down carefully::::, fig .
43
-arrows- .•
App lies to veh icles: w ith slid ing/t ilting power sunroof
Emergency closing by hand (Step 2)
I I C' C
•:~ I
I',.~ I
.• \o -·: -t)J ,_,,
J
F ig . 44 Sect ion from
head line r: unscrew ing
t h e lig hti ng u nit
Fi g. 45 Sect ion from
head line r: crank for
e m ergency ope ration
Remove the two screws::::, fig. 44 -arrows -from the light
unit .
Carefully remove the light unit .
Remove the crank from the b racket on the fuse cover on
the driver's side::::,
page 327, fig. 233.
Push the crank into the hexagonal hole as far as it can go
=> fig. 45 .
- Hold the crank down and turn it to close the roof . ...
Page 67 of 370
Make-up mirrors
The vani ty m irrors in the sun visors are equ ipped with lids . When the
lid is open end@, the mirror light in the roof lin ing tu rns on au toma t
ically . It t urns off when the lid is closed or the visor is folded up
agai n.•
App lies to vehicles: wit h sun sha de
Sun shade
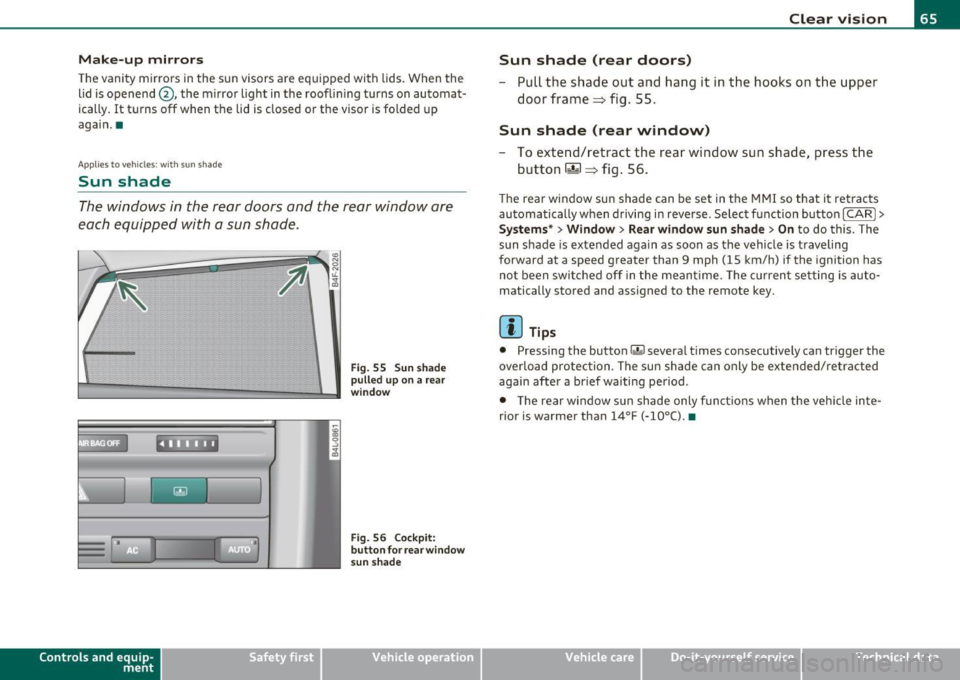
The windows in the rear doors and the rea r window are
each equipped with a sun shade.
Con tro ls a nd e quip
m en t
. l
F ig . 55 S un sh ad e
p ulled up on a rear
w in dow
Fi g. 56 Co ckpit:
b utt on f or rea r wind ow
s un sh a de
Vehicle OP-eration
Clear vision
Sun shade (rear doors)
- Pull the shade out and hang it in the hooks on the upper
doo r frame=> fig. 55.
Sun shade (rear window)
-To extend/retract the rear window sun shade, press the
button
rn => fig. 56.
T he rear window sun shade can be set in t he M MI so that it retracts
au tomatically w hen driving in reve rse . Selec t fu nction bu tton
[CARI >
Systems* > Window > Rear window sun shade > On to do this. The
s u n shade is extended again as soon as the vehi cle is traveling
forward at a speed greater than 9 mph (15 km/h) if the ignition has
no t b een swi tched off in the meant ime . T he c urren t se tting is auto
matically stored and assigned to the remote key.
[ i ] Tips
• Pressing the button r.&I severa l times co nsecutive ly can tr igger the
overlo ad protec tion. The su n shade can only be exte nded/ re tra cted
again after a brief waiting period .
• T he rear window sun sh ade only fun ct io ns when t he ve hicle in te
rior is warmer than
14°F (-10°() . •
Vehicle care Do-it-yourselt service iTechnical data
Page 89 of 370
- Pull out and unfold the ski sack.
- Load skis or similar objects through the luggage compart-
ment into the interior of the vehicle~&.
Securing ski sack
- Insert the ski sack strap@~ page 86, fig. 80 in the
center buckle
® ·
- Pull the safety belt taut on the free end of the belt @.
Stowing ski sack
- Pull the ski sack through the rear backrest to the rear.
- In the passenger compartment, close the ski sack flap.
- Fold the ski sack carefully.
& WARNING
• The ski sack is intended only for the transportation of skis and
other light objects. To reduce the risk of serious personal injury
never transport heavy or pointed objects in the ski sack.
• When braking rapidly or during an accident the load could be
displaced and cause injury to occupants.
• Sharp edges on the load must be covered for protection.
Always fasten the belt tightly around the sack and its contents
=> page 86, fig. 80.
[ i] Tips
Never stow the ski sack away if it's wet or damp (for example, snow
melting from skis). Let it dry completely before you stow it away. •
Controls and equip
ment Safety first
Seats and storage
Roof rack
First things first
A roof
rack can be fitted to carry additional luggage on
the roof
-Always read and follow the instructions provided by the
roof rack manufacturer when the roof rack system must
be installed.
If you are transporting luggage or other objects on the roof, please
note the following:
• Your vehicle has specially designed aerodynamic roof rails. Only
install a roof rack specifically designed for your model. Contact the
nearest Audi dealer for information on approved modular roof racks
for your vehicle .
• These approved roof racks are the basis for a complete roof rack
system. Additional attachments for the basic roof rack are necessary
to safely transport luggage, bicycles, surf boards, skis or small boats.
All necessary hardware for these systems is available at your autho
ri zed Audi dealer .
• We recommend that you keep the installation instructions for
your roof rack system together with your Owner's literature in the
vehicle.
When should the roof rack be removed?
• Before going through an automatic car wash (it is best to ask the
car wash operator for advice).
• When not in use, to reduce fuel consumption, wind noise and to
guard against theft. _,,,
Vehicle care Technical data
Page 90 of 370

Seats and storage
& WARNING
• Use of an unapproved roof rack or incorrect mounting of an
appro ved ro of rack can cause the roof ra ck or the i tems attached
to it to fall off the roof onto the road .
• Obje ct s falling from the roof of a vehicle can cause a cra sh and
personal injury .
• Only mount the sy stem between the marking s shown in
~ fig. 81 .
• The roof rack sy stem must be installed exactly according to the
instructions provided.
0 Note
• Your vehicle warranty does not cover any damages to the vehicle
caused by using roof ra cks or mounti ng struc tures not app roved by
Audi for your vehicle . The same applies to damage resulting from
incorrect roof rack insta llation.
• Always check the roof rack mountings and hardware before each
t rip a nd dur ing a tri p t o ma ke sure everything is sec ure ly tightened . If
necessary, retig hten t he mountings and check the ent ire system from
ti me to time.
• After mounting a roof rack system, or when yo u transport objects
on t he roo f of your veh icle, t he he igh t of the vehicle is n atur ally
increased . Be ca reful whe n driving under low bridges or in parking
garages fo r ex amp le. This could c ause dama ge to t he lo ad and even
the vehicle itself. •
Mounting locations
Safe ins tall atio n o f a r oof ra ck requires th at the rack
s up ports a re m ounted b etw een the s mall arrow s ma rked
insid e the door frames on all four doors .
Mounting
Fig. 81 Front and rear
m arking s
The roof ra ck system mu st be installed exactly according to the
i nstructions provided.
M ount the roo f racks supports in t he side roo f mo ldings. Make sure
to position th e sup po rt s on
all four doors between the points ma rked
by small arrows ~ fig. 81. The ma rkings can only be seen when the
doors are open .•
Loading the roof rack
A lw ays distr ibute loads evenly. Make sure anythi ng on
t he roo f ra ck is securely tie d do wn.
- Always dis tri but e the loads o n th e roo f rack evenly .
- Always a ttach items to the roof ra ck se curely bef ore y ou
d rive off. _,,
Page 91 of 370

The maxim um permiss ible roof we ight is 220 lb (100 kg). T he roof
we ight is mad e up of the wei ght of th e ro of ra ck sy stem and the
we ight of the ob ject b eing trans ported .
Wh en usin g a roof rack system whic h has a lower load carry ing
capac it y, you mus t not use up the t otal ma ximum permi ssible load
carrying ca pac ity spe cified above. Instead, you s hould lo ad t he roof
r ack s yst em o nly to t he ma ximum c apacity speci fied by the man ufa c
turer of the roof rack system.
& WARNING
Weak, damaged or improper straps used to secure items to the
roof rack can fail during hard braking or in a collision and cause
serious personal injury.
• Make
sure the roof rack is installed exactly as specified above
=> page 88.
• Always use suitable mounting straps for securing items to the
roof rack to help prevent items from shifting or flying forward.
• Items on the roof rack must always be securely mounted.
• The use of a roof rack can negatively affect the way a vehicle
handles . Cargo that is large, heavy, bulky , long or flat will have a
greater negative influence on the vehicle's aerodynamics , center
of gravity and overall handling. Always drive slowly, avoid sudden
braking and maneuvers when transporting cargo on the roof of
your vehicle.
• Never exceed the maximum permissible load carrying capacity
of the roof of your vehicle, the permissible axle weights and the
permissible total weight of your vehicle=>
page 341, "Weights ".
• Always drive slowly, avoid sudden braking and maneuvers
when transporting cargo on the roof of your vehicle.
'£> For the sake of the environment
Some times i t may be eas ie r t o le ave a roof ra ck in sta lled even though
you a re not using i t. Due to th e increased air resistanc e your veh icle
Con trol s and equ ip
m ent Vehicle
OP-eration
Seats and storage
will unnecessa rily use more f ue l. Remove t he roo f rack if you a re not
g oing to use it. •
Cupholder
Cupholder in center console
The c up hold er is located un der a co ve r.
.. .. . .
' .
' '
' .
. . . . ' '
'
' . '
'
'
' . ' '
' '
.. . ' . ' ' . ..
'• N ' • Lil : : ~ : : tL : : ~ ' • a,
.. . .
' . "' '. 0 : : ~ : : tL '' ... : : G:l
' ' . '
'
. . ' ..
Fig. 82 Center
co nso le: (upholder
Fig . 83 Cente r
c on sole: Adap ter for
c upholder
- To open the c upholde r, p re ss the fo rward e dge of th e
cove r.
- Ins ert or re mov e the ada pter in to th e cu phold er, a s ne ces-
s ar y. .,
Vehicle care Do-it-yourselt service iTechnical data