ad blue AUDI A6 2016 Owners Manual
[x] Cancel search | Manufacturer: AUDI, Model Year: 2016, Model line: A6, Model: AUDI A6 2016Pages: 294, PDF Size: 73.88 MB
Page 14 of 294
Instruments and indicator lights
-The engine compartment of any motor vehi
cle is a potentially hazardous area. Before
you check anything in the engine compart ment, stop the engine and let it cool down.
Always exercise extreme caution when work ing under the hood~
page 216.
Central indicator light
Applies to vehicles: w ith monochrome display
If a message appea rs together with a centra l in
d icator light . or
n. the cent ral indica to r li gh t
w ill ind icate the prior ity of the warn ing . If a
white indicato r light also appears, the cent ral in
d icator light will have its own co lor . For examp le,
if l!!JI appears together with. , read the desc rip
tion for •.
Overview
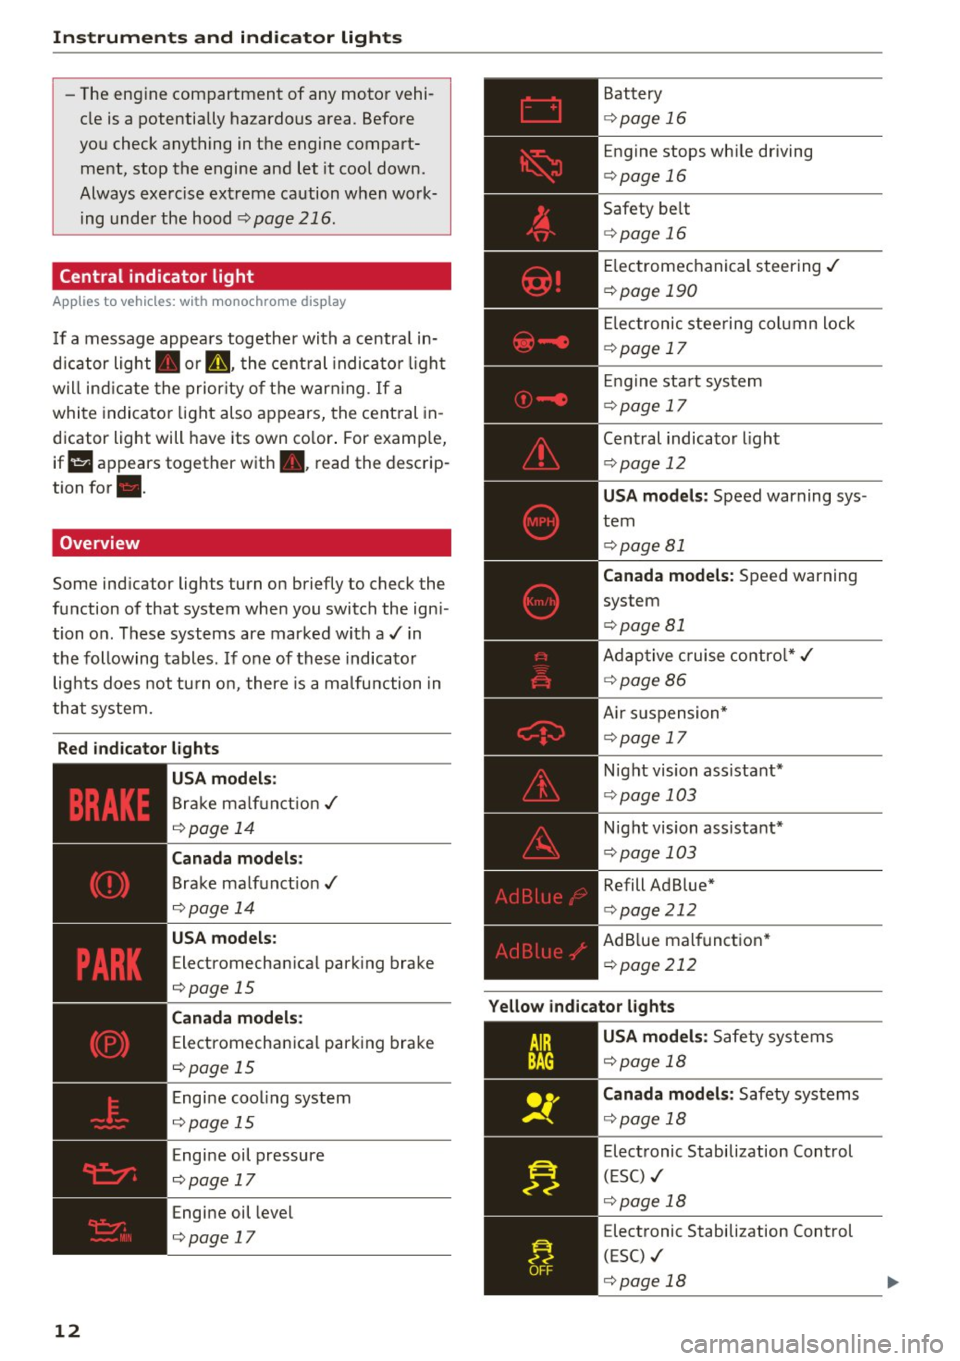
Some ind icator lights turn on briefly to check the
function of that system when you switch the ign i
tion on. These systems are marked with a ./ in
the following tables. If one of these indicator
lig hts does not tu rn o n, there is a ma lfu nction in
that system.
Red indic ator lights
12
-------------
US A mode ls:
Brake malf u nct ion./
¢ page 14
Canada models :
Brake malfunct io n ./
¢page 14
USA models:
Electromechan ica l park ing brake
¢page 15
Canada models :
Electromechanica l park ing bra ke
¢ page 15
Engine coo ling system
¢ page 15
Engine oil pressure
¢page 17
Engine oil level
¢page 17
Battery
¢ page 16
Engine stops wh ile driving
¢ page 16
Safety be lt
¢ page 16
Elec tromechanical steering ./
¢page 190
Elec tronic steering col umn lock
¢ page 17
En gine sta rt system
¢ page 17
Cent ral indicator light
¢ page 12
USA models : Speed warning sys
tem
¢ page 81
Can ada model s: Speed warning
system
¢ page 81
Adap tive cruise contro l* ./
~ page 86
Air su spension*
¢ page 17
Night vision assistant*
¢page 103
Night vision assistant*
¢ page 103
Refill Ad Blue*
¢page 212
AdB lue malfunct ion *
¢ page 212
Yellow ind icator l ights
AIR
BAG
r--------------
U SA m odels : Safety systems
¢page 18
Canada models : Safety systems
¢page 18
Electronic Stabilization Control
(ESC) ./
¢page 18
Electronic Stabilization Control
(ESC) ./
¢page 18
Page 15 of 294
USA models:
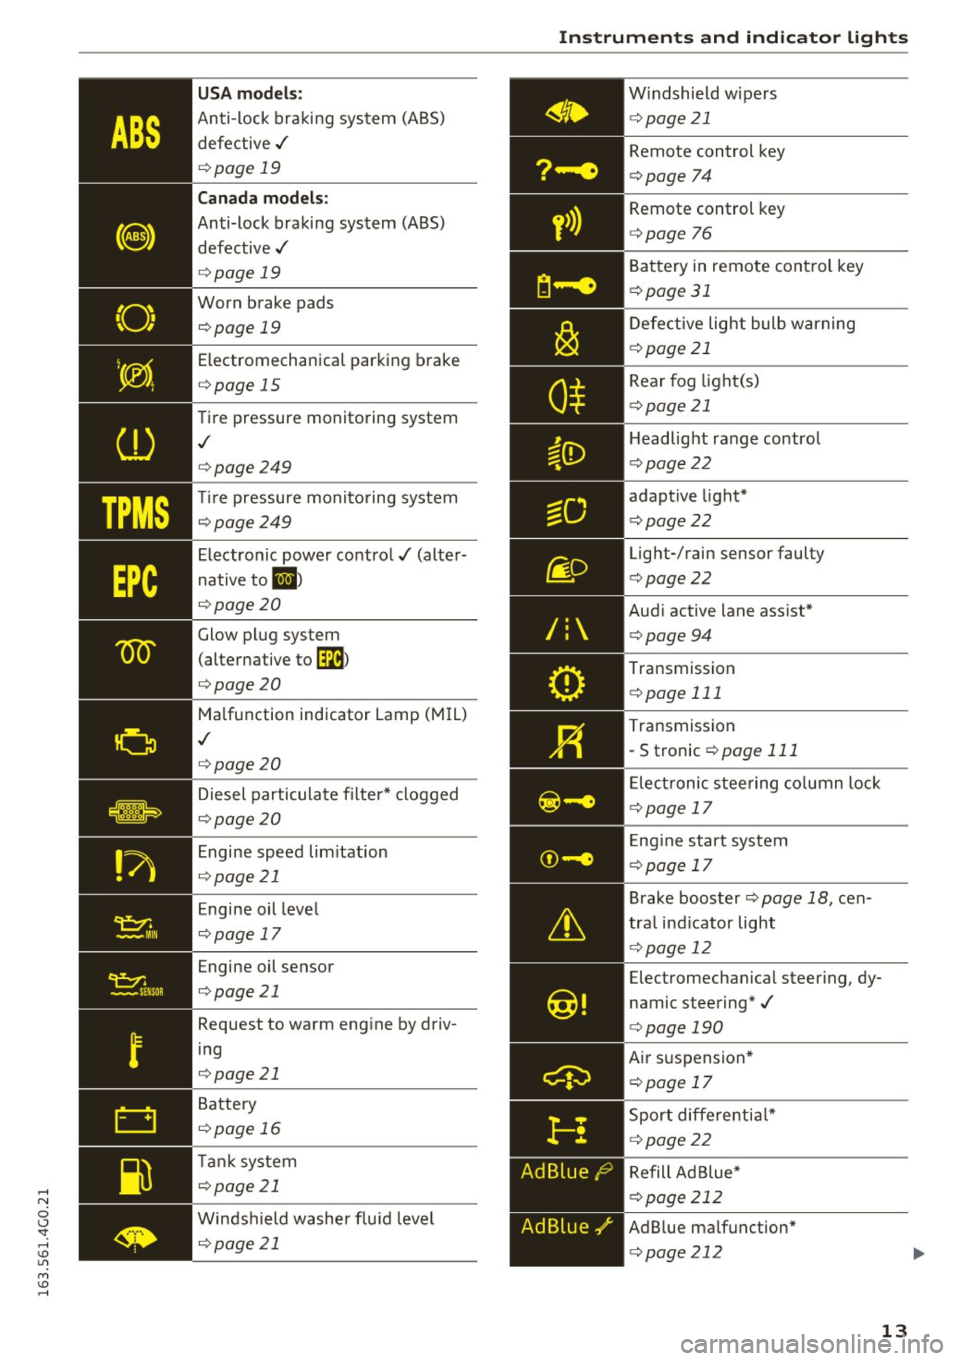
Anti-lock braking system (ABS)
defective ./
¢page 19
Canada models:
Anti-lock braking system (ABS)
defective ./
¢page 19
Worn brake pads
¢page 19
Electromechanical parking brake
¢page 15
Tire pressure monitoring system
,I
¢page 249
Tire pressure monito ring system
¢page249
Electronic power control./ (alter
native to
II )
¢page20
Glow plug system
(alternative
tom
¢page20
Malfunction indicator Lamp (M IL)
,I
¢page 20
Diesel particulate filter* clogged
¢page20
Engine speed lim itation
¢page 21
Engine oil level
¢page 17
Engine oil sensor
¢page 21
Request to warm eng ine by driv
ing
¢page 21
Battery
¢page 16
Tank system
¢page 21
Windshield washer flu id leve l
¢page 21
Instruments and indicator lights
/:
Ad Blue,/'
Windshield wipers
¢p age 21
Remote control key
¢page 74
Remote control key
¢page 76
Battery in remote control key
¢page 31
Defective light bulb warning
¢page 21
Rear fog light(s)
¢ page 21
Headlig ht range control
¢pag e22
adaptive light*
¢page22
Light-/rain sensor faulty
¢page22
Audi active lane assist*
¢page94
Transmission
¢page 111
Transmission
-S tronic
¢page 111
Elect ronic steering column lock
¢page 17
Eng ine start system
¢p age 17
Brake booster¢ page 18, cen
tra l ind icator light
¢page 12
Electromechanical steer ing, dy
namic steering*./
¢page 190
Air suspension *
¢page 17
Sport differential*
¢page 22
Refill Ad Blue*
¢page 212
AdBlue ma lfunction*
¢page212
13
Page 117 of 294
.... N
0 CJ '
Rearview camera
Introduction
Applies to vehicles: with rearv iew camera
...
F ig. 122 Illustrat ion : Cross parking
Fig. 123 Illustrat ion : Pa rallel park ing
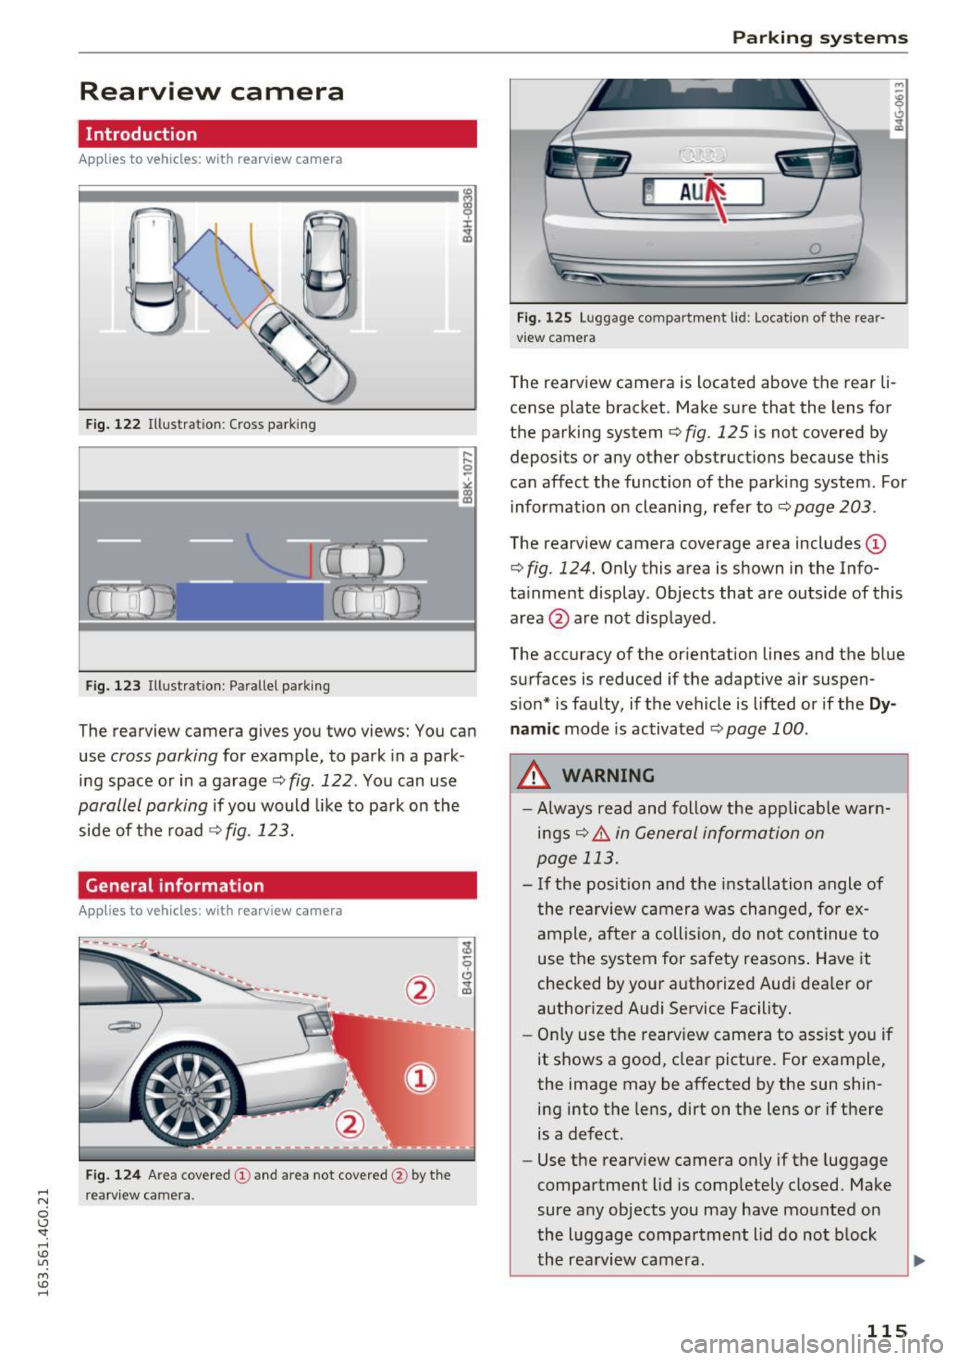
The rearview camera gives you two views: You can
use
cross parking for example , to park in a park
ing space or in a garage
r:::;, fig . 122 . You can use
parallel parking if you would like to park on the
side of the road
r:::;, fig. 123.
General information
Appl ies to vehicles : wit h rearv iew camera
--------
F ig. 124 A re a covered (!) and area not covered @ by the
r ea rv iew ca mera.
Parking systems
Fig. 12S Lu ggage compar tmen t lid : Locatio n of th e rea r
v iew camera
T he rearview camera is located above the rear li
cense plate bracket. Make sure that the lens for
the parking system
r:::;, fig. 125 is not covered by
deposits or any other obstructions because this
can affect the function of the parking system . For
information on cleaning, refer to
c::> page 203 .
The rearview came ra coverage area includes ©
r:::;, fig. 124. Only this area is shown in the Info
ta inment display . Objects that are outs ide of this
area @are not displayed .
The accuracy of the orientation lines and the blue
surfaces is reduced if the adaptive air suspen
s ion* is faulty, if the vehicle is lifted or if the
D y
nam ic mode is activated c::> page 100.
A WARNING ~
- Always read and follow the applicab le warn-
ings
c::> & in General information on
page 113.
- I f the position and the i nstalla tion angle of
the rearview camera was changed, fo r ex
ample, after a collision, do not continue to
use the system for safety reasons . Have it
checked by yo ur autho rized Audi dealer or
author ized Audi Service Facility.
- Only use the rearv iew camera to ass ist you if
it shows a good, clear pictu re. For example,
the image may be affected by the sun shin
ing into the lens, dirt on the lens o r if there
is a defect .
- Use the rearv iew camera on ly if the luggage
compartment lid is comp letely closed. Make
sure any objects you may have mounted on
the luggage compartment l id do not block
the rea rview camera.
115
Page 118 of 294
Parking systems
-The camera lens enlarges and distorts the
field of vision. The object appears both al
tered and inaccurate on the screen.
- In certain situations, people or objects in
the display appear closer or farther away:
- For objects that do not touch the ground,
such as the bumper of a parked vehicle, a
trailer hitch or the rear of a truck. Do not
use the help lines in this case.
- If driven from a level surface onto an in
cline, or a downward slope.
- If driven toward protruding objects.
- If the vehicle is carrying too much load in
the rear.
(D Note
- Always read and follow the applicable warn
ings r::!>(D
in General information on
page 113 .
-The orange colored orientation lines in the
Infotainment display show the vehicle path
depending on the steering wheel angle. The
front of the vehicle front swings out more
than the rear of the vehicle . Maintain plenty
of distance so that your outside mirror or a
corner of your vehicle does not collide with
any obstacles.
Switching on/off
Applies to vehicles: with rearview camera
Switching on
.,. Shift into reverse, or
.,. Press the
P,,, A button in the center console
r:=> page 114, fig. 121. A short confirmation
tone sounds and the LED in the button turns
on.
Switching between the rearview camera and
optical display
.,. Press the Graphic control button ®
r:=> page 116, fig. 126 to see the optical display .
.,. Press the
Rear view control button to see the
. . rearv1ew camera image.
Switching off
.,. Drive forward faster than 10 km/h, or
.,. press the
P,1
1.A button, or
116
.,. Switch the ignition off.
@ Tips
- The visual display in the left part of the dis
play should help you detect the critical vehi
cle areas.
- You can change the volume and pitch of the
signals as well as the dis play
r:=> page 123.
Cross parking
Applies to vehicles: with rearview camera
This view may be used when parking in a garage
or in a parking space.
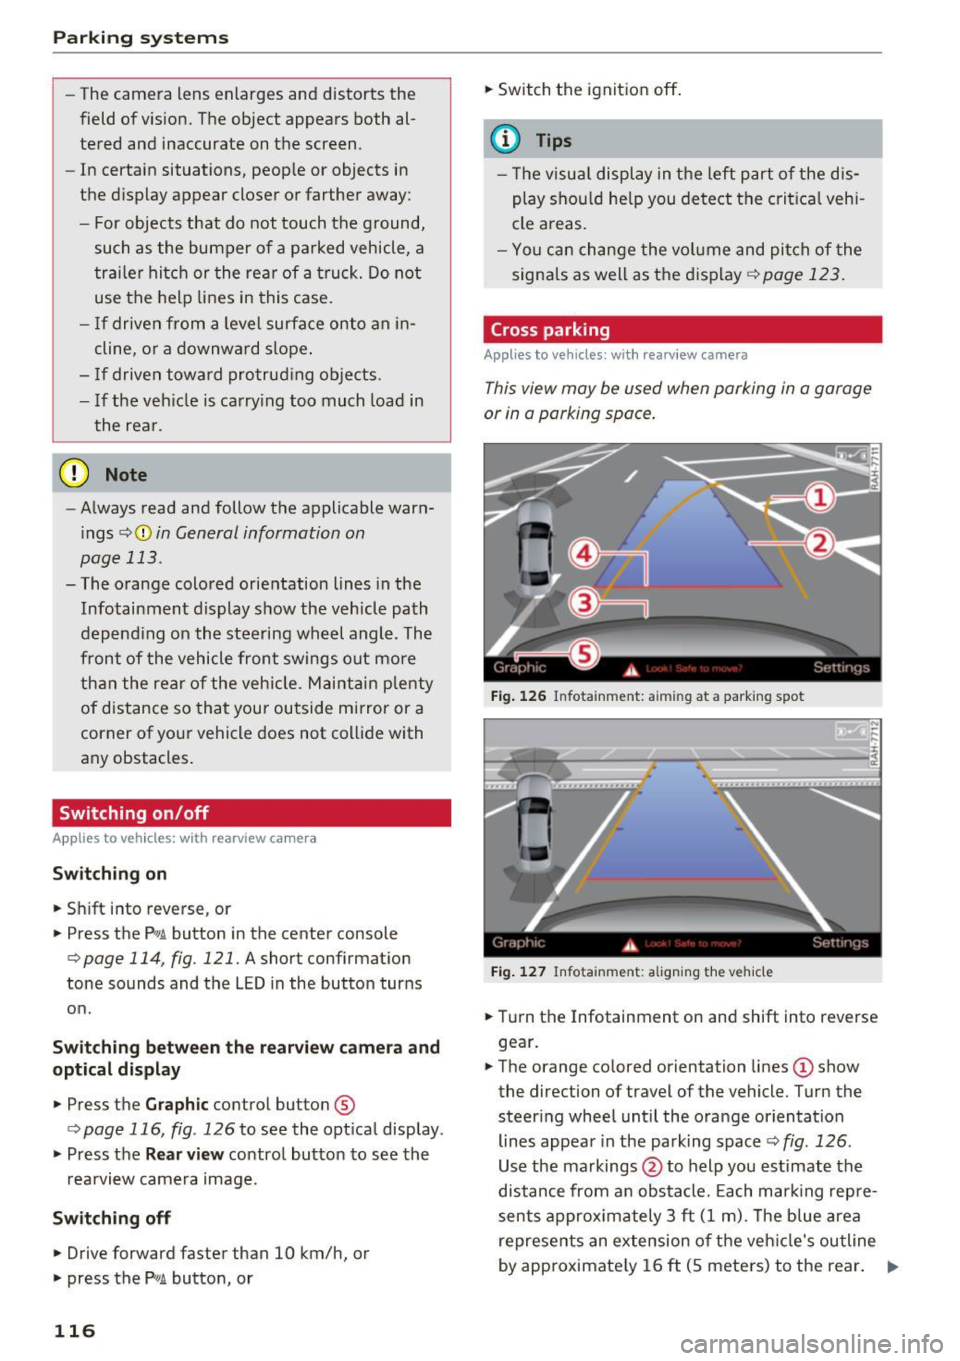
Fig. 126 Infotainment: aiming at a parking spot
Fig. 127 Infota inment: aligning the vehicle
.,. Turn the Infotainment on and shift into reverse
gear.
.,. The orange colored orientation lines
(D show
the direction of travel of the vehicle. Turn the
steer ing wheel until the orange orientation
lines appear in the parking space r::!>
fig. 126 .
Use the markings @to help you estimate the
distance from an obstacle. Each marking repre
sents approximately 3 ft
(1 m). The blue area
represents an extension of the vehicle's outline
by approximately
16 ft (5 meters) to the rear. .,._
Page 119 of 294
.... N
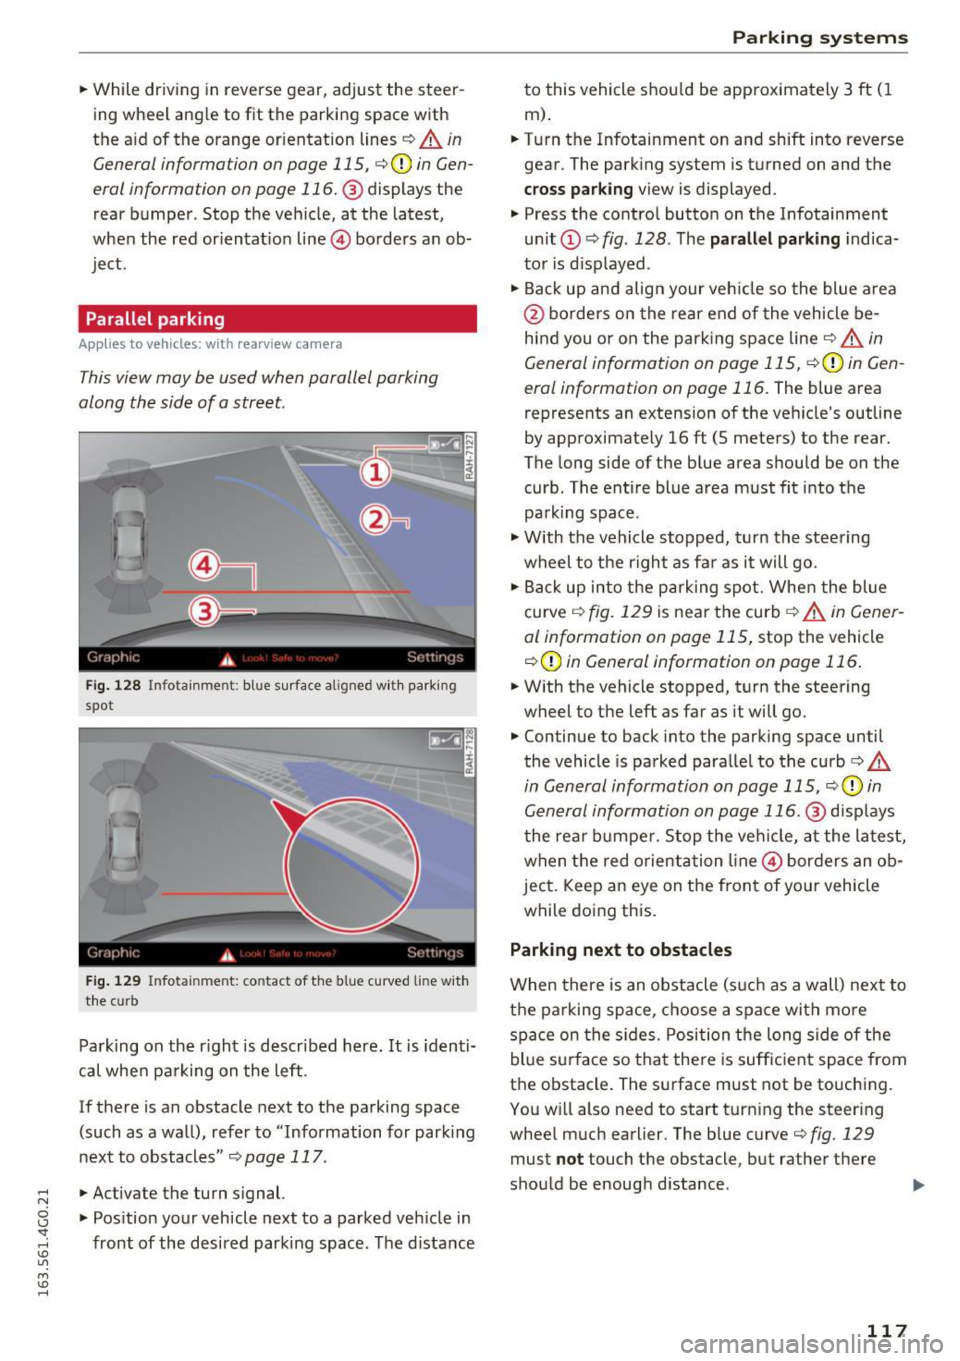
0 CJ '
.. While driving in reverse gear, adjust the steer
ing wheel ang le to fit the parkin g space with
the a id of the orange orientation lines
c::> A in
General information on page 115,
c:> (D in Gen
eral information on page 116. @
displays the
rear bumper . Stop the veh icle, at the latest,
when the red or ientat io n line @ borders an ob
ject.
Parallel parking
App lies to vehicles : wit h re arv iew camera
This view may be used when parallel parking
along the side of a street.
Fi g. 128 Infotai nmen t: b lue surface a lig ned w it h park ing
spot
F ig . 12 9 In fota inmen t: co ntac t of t he blue curved li ne w it h
t h e cu rb
Pa rk ing on the r ight is descr ibed here. It is iden ti
cal whe n pa rking on the left .
If there is an obstacle next to the pa rking space
(such as a wall), refe r to "Information for park ing
nex t to obstacles"
c:> page 117 .
.. Activate the turn s ignal.
.. Pos ition your vehicle next to a parked veh icle in
front of the desired parking space. The d istance
Parking systems
to this vehicle shou ld be app roximately 3 ft ( 1
m).
.. Turn the Infotainment on and shift into reverse
gear . The park ing system is turned on and the
cross parking view is displayed .
.,. Press the contro l button on the Infotainment
unit
(D c:> fig . 128 . The parallel parking indica
to r is d isp layed .
.,. Back up and align your veh icle so the blue a rea
@ bo rde rs on the re a r end of the vehicle be
hind you o r on the park ing spa ce line
c::> A in
General information on page 115,
c::> (D in Gen
eral information on page 116.
The blue area
represents an extension of the ve hicle's outline
by approximate ly 16 ft (5 meters) to the rear.
The long side of the b lue area should be on the
curb . The ent ire blue area must fit into the
pa rk ing space .
.,. With the vehicle s topped, t urn the stee ring
wheel to the r ight as far as it will go .
.,. Back up into the park ing spot. Whe n the blue
curve
c::> fig . 129 is near the curb c::> A in Gen er
al information on page 115,
stop the vehicle
c::> (D in General information on page 116 .
.. W ith the vehicle stopped, t urn the steering
wheel to the left as far as it will go .
.. Continue to back into the parking space until
the vehicle is parked para llel to the curb
c:> .&.
in General information on page 115, c::> (D in
Gen eral information on page 116. @
disp lays
t he rea r bu mpe r. Stop the ve hicle, at the la test,
w hen t he red o rient ation line @ bor ders an o b
ject. Keep a n eye on the fron t of yo ur vehicle
while do ing this.
Parking next to obstacles
When there is an obstacle (suc h as a wall) next to
t h e pa rking space, c hoose a spa ce with mo re
spa ce on the s ides. Posi tion t he long side of the
bl ue su rface so that the re is suff ic ient space from
the obstacle . The su rface must not be touching.
Yo u w ill also need to start t urn ing the steer ing
whee l much earlier. The b lue curve
c:> fig. 129
must not touch the obstacle, but rathe r the re
sho uld be enough d istance .
117
Page 123 of 294
.... N
0 CJ '
.. Se lect the @symbol with the control knob .
You can choose between three different v iews in
this mode. .. To c ross park, pa rallel park or position the vehi
cle in front o f a trailer*, press the control but
ton ® on the contro l pane l repeatedly unti l the
symbol for the des ired mode is selected .
Cross parking
Applies to vehicles: with peripheral cameras
This view may be used when parking in a garage
or in a parking space.
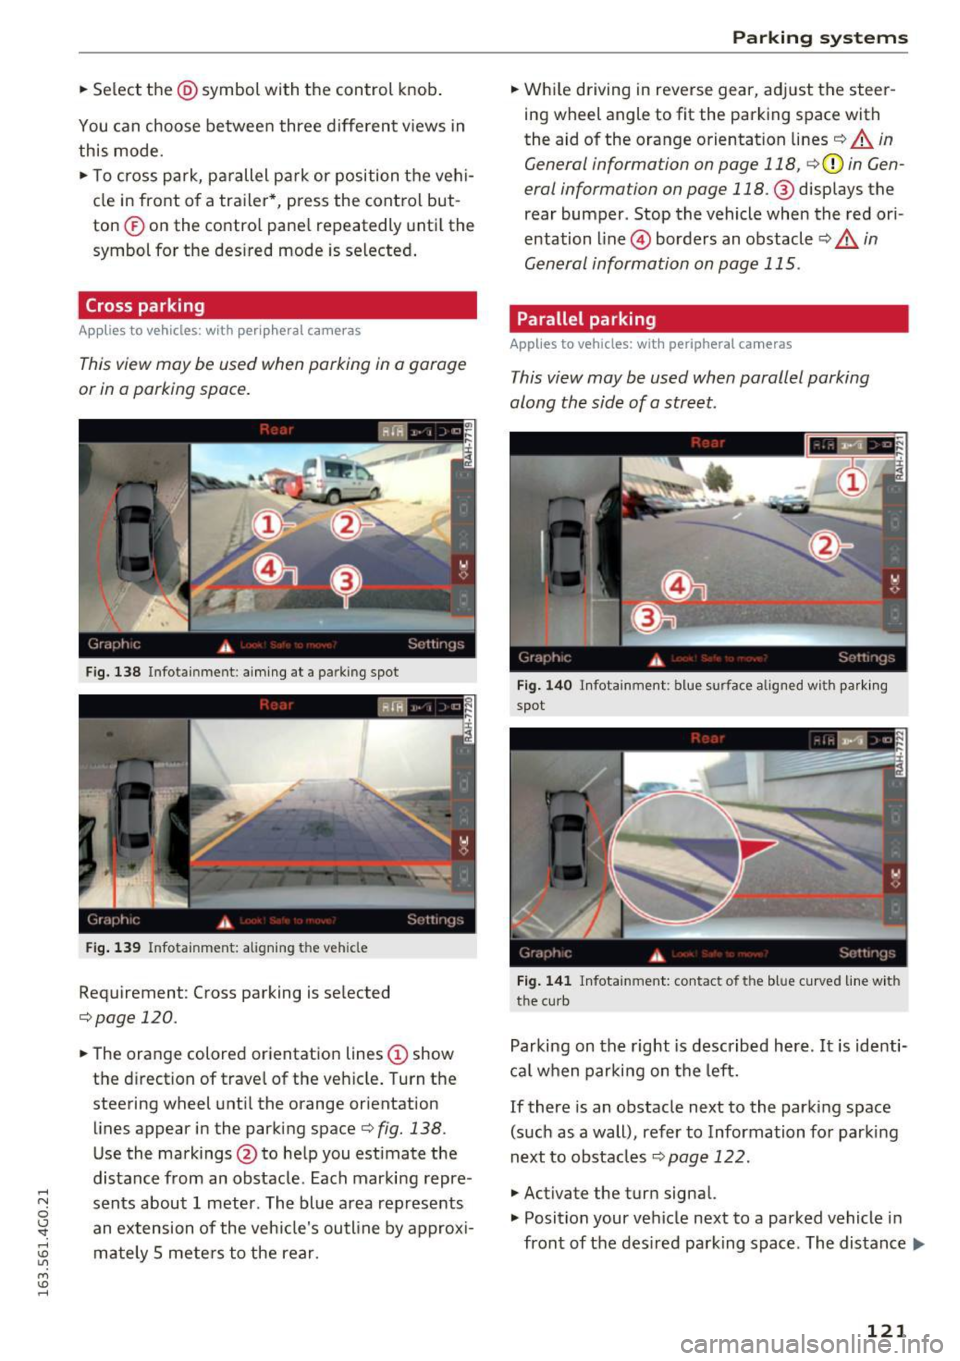
Fig. 138 Infotainment: aiming at a parking spot
Fig . 139 Infotainment: aligning the veh icle
Requirement: Cross parking is se lected
,=;,page 120.
.. The orange colored orientation lines (D show
the d irection of trave l of the veh icle. Turn the
steering wheel unt il the orange orientation
lines appear in the parking space¢
fig. 138.
Use the markings@to help you estimate the
distance from an obstacle. Each marking repre
sents about 1 meter. The blue area represents an extension of the vehicle's outline by approx i
mately 5 mete rs to the rear.
Parking systems
.. Wh ile driving in reverse gear, adj ust the steer
ing wheel angle to fit the parking space with
the aid of the orange orientation lines¢
A in
General information on page 118,
c;, (D in Gen
eral information on page
118. @displays the
rear bumper . Stop the vehicle when the red ori
entation line@) borders an obstacle¢
A in
General information on page 115 .
Parallel parking
Applies to vehicles: with peripheral cameras
This view may be used when parallel parking
along the side of a street.
Fig. 14 0 Infotainment: blue surface a lig ned w ith parki ng
spot
F ig. 14 1 Infotainment: contact of the blue curved line with
the curb
Parking on the right is described here. It is identi
cal when parking on the left.
If there is an obstacle next to the parking space
(such as a wall), refer to Information for parking
next to obstacles¢
page 122.
.,. Activate the turn signal.
.,. Position your ve hicle next to a parked vehicle in
front of the des ired parking space. The distance..,.
121
Page 124 of 294
Parking system s
to this vehicle should be approximately 3 ft (1
m).
.. Turn the Infota inment on and shift into reverse
gear. The parking system is turned on and the
cro ss park ing view is disp layed .
.. Press the control button on the Infotainment
unit (D
¢page 117, fig . 128 . The par all el park
ing
ind icator is displayed .
.,. Back up and align yo ur vehicle so the b lue area
@ borders on the rear end of the ve hicle be
hind you or on the parking space line
¢ ..&. in
General information on page 118, ¢(D in Gen
eral information on page 118 .
The blue area
represents an extension of the vehicle's out line
by approximately
16 ft (5 meters) to the rear .
The long side of the blue area should be on the
curb . The entire blue area must f it into the
parking space .
.,. With the veh icle stopped, turn the steer ing
whee l to the right as far as it w ill go .
.,. Back in to the par king space until the b lue curve
¢
page 117, fig. 129 touches the curb¢..&. in
General information on page 118, ¢(D in Gen
eral information on page 118 .
Stop the vehicle.
.. With the veh icle stopped, turn the steering
whee l to the left as far as it will go.
.. Cont inue to back into the parking space unt il
the ve hicle is parked parallel to the curb¢
&
in General information on page 118, ¢(D in
General information on page 118. @
displays
the rear bumper. Stop the vehicle, at the latest ,
whe n the re d or ien ta ti on line @ borders an ob
ject. Keep an eye on the front of your vehicle
whi le doing this.
Parking next to obstacles
When the re is an obs tacle (such as a wa ll) next to
the par king space, choose a space with more
space on the sides. Posit ion the long side of the
b lue area so t hat there is sufficient space from
the object . The area must not be on the curb . You
will also need to start turn ing the steer ing whee l
much earlier. The b lue curve¢
page 117,
fig . 129
must not touch the obstacle, but rather
there should be enough distance.
122
@ Tips
The left or right orientation lines and surfaces
will be d isp layed, depend ing on the tu rn s ig
nal be ing used.
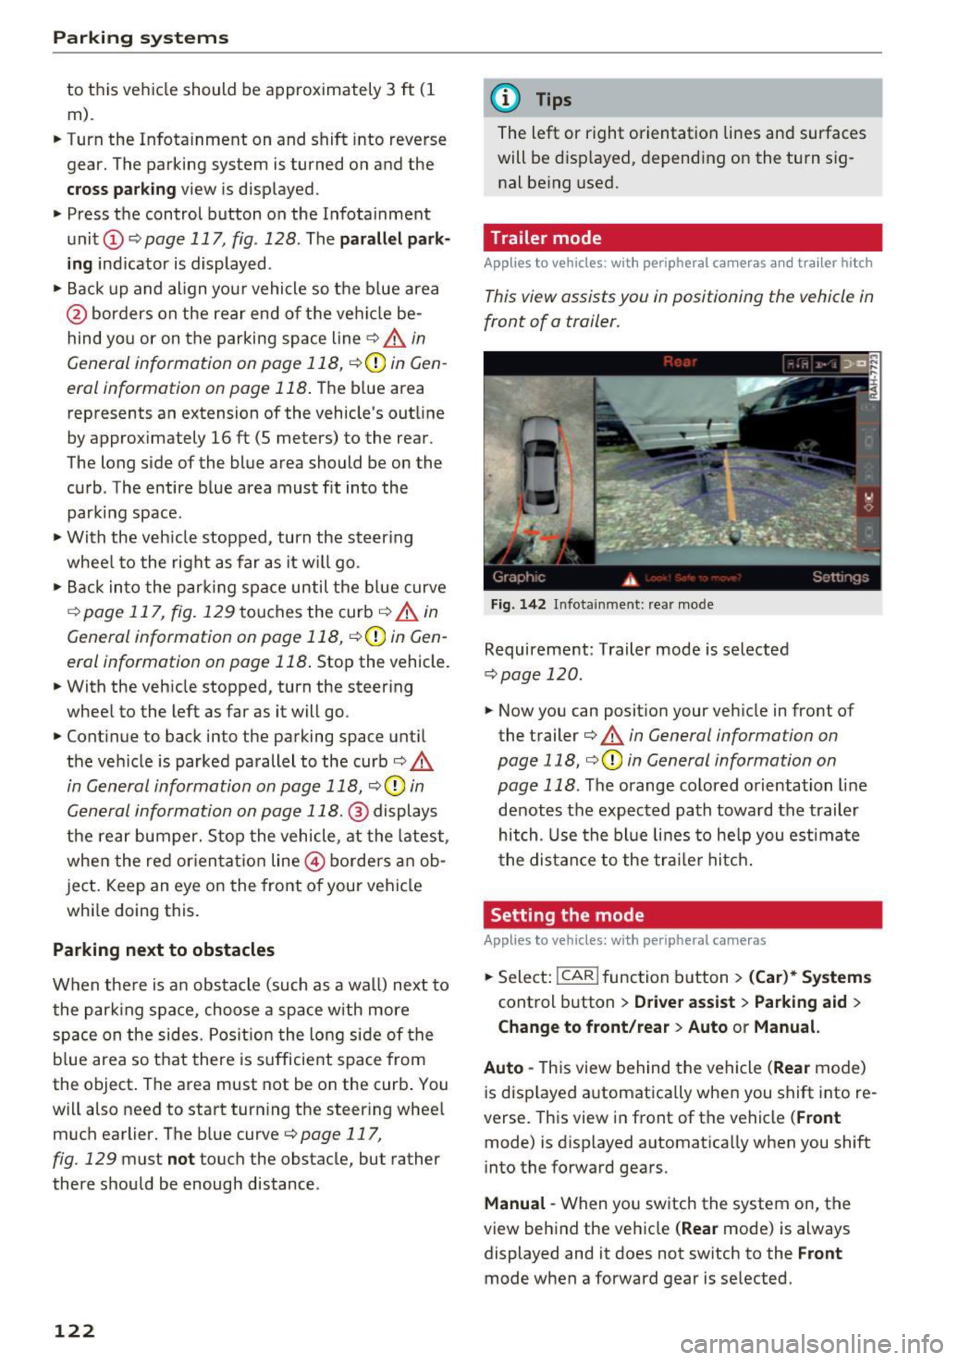
Trailer mode
App lies to vehicles: wit h peripheral ca meras a nd trailer hitch
This view assists you in positioning the vehicle in
front of a trailer.
F ig. 142 I n fota inment: rea r mode
Requirement: Trailer mode is selected
¢ page 120 .
.. Now you can posit ion your veh icle in front of
the trailer
¢ & in General information on
page 118, ¢(D in General information on
page 118 .
The orange colored orientation line
denotes the expected path towa rd the trailer
hitch. Use the bl ue lines to he lp you est ima te
the distance to the tra ile r hitc h.
Setting the mode
App lies to vehicles : wit h peripheral ca meras
.. Select: !CAR ! function b utton> (Car )* System s
control button > Driver assi st > Parking aid >
Change to front/rear > Auto or Manual.
Auto -
This view behind the vehicle (Rear mode)
i s disp layed automatica lly when you shift into re
verse. This view in front of the vehicle
( Front
mode) is displayed automat ica lly when you shift
i nto the forward gears.
Manu al -When yo u sw itch the system on, the
view beh ind the veh icle
( Rear mode) is always
displayed and it does not switch to the
Front
mode when a forward gear is se lected.
Page 214 of 294
Fuel and Refueling
case, try turning the nozzle before inserting
it in the fuel fi ller neck, use a different fue l
pump or see your authorized Audi dea ler or
authorized repair facility for ass istance.
- The fuel filler flap of your vehicle is not
locked when you lock the vehicle from the
inside.
Fuel filler door emergency release
If the central locking system is faulty, the fuel
filler door can be unlocked manually.
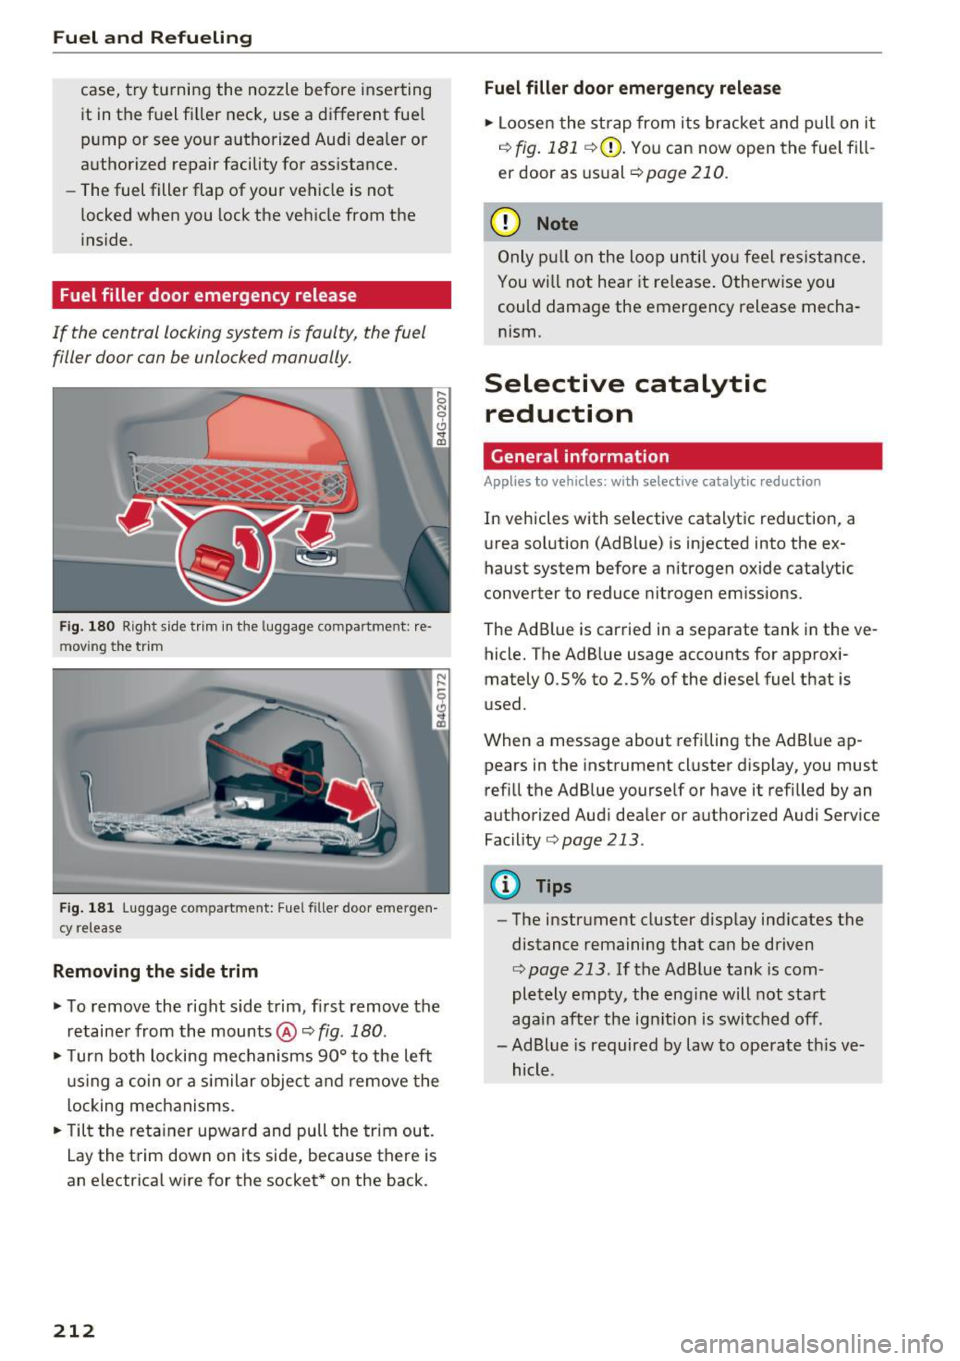
F ig. 180 Right side t rim in the luggage compartme nt: re ·
m ov ing the trim
Fig. 181 Luggage co mpa rtment: Fue l filler door emergen
cy release
Removing the side trim
• To remove the right side trim, first remove the
retainer from the mounts @¢
fig. 180.
• Turn both locking mechanisms 90° to the left
usi ng a coin or a similar object and remove the
locking mechanisms.
• Tilt the retainer upward and pull the trim out.
Lay the trim down on its side, because there is
an electrical wire for the socket * on the back.
212
Fuel filler door emergency release
• Loosen the strap from its bracket and pull on it
r:!.>fig. 181 ¢(2) . You can now open the fuel fill
er door as usual ¢
page 210.
(D Note
Only pull on the loop until you feel resistance .
You wi ll not hear it release . Otherwise you
could damage the emergency release mecha nism.
Selective catalytic reduction
General information
Applies to vehicles: with selective catalytic reduction
In vehicles with selective catalytic reduction, a
urea solution (AdBlue) is injected into the ex
haust system before a nitrogen oxide catalytic
converter to reduce nitrogen emissions.
The Ad Blue is carried in a separate tank in the ve
hicle. The AdBlue usage accounts for approxi
mately 0.5% to 2.5% of the diesel fuel that is
used.
When a message about refilling the AdBlue ap
pears in the instrument cluster display, you must
refill the Ad Blue yourself or have it refilled by an
authorized Audi dealer or authorized Audi Service
Facility
r:!.>page 213 .
{!) Tips
-The instrument cluster display ind icates the
distance remaining that can be driven
¢ page 213. If the AdBlue tank is com
pletely empty, the engine will not start
again after the ign ition is switched off.
- Ad Blue is required by law to operate th is ve
hicle.
Page 215 of 294
... N
0 CJ '
Messages in the instrument cluster display
Applies to vehicles: with selective catalytic reduction
The display indicates if the Ad Blue level is low or
if there is a system malfunction .
AdBlue le vel low
You will be informed if the Ad Blue in the tank
drops below a certa in level.
Plea se refill Ad Blue. Range 1500 mi (2400 km )
This message appears whe n there is only eno ugh
Ad B lue lef t to d rive the distance indicated in the
d river i nformation system. Fill the AdBl ue.
AdBlue ,0 Refill AdBlue! No re start in 600 mi
( 1000 km )! See owner 's manual
This message appea rs when there is only eno ugh
Ad Blue left to drive the distance indicated in the
driver info rmation system . Fill the Ad Blue . Ot her
wise the eng ine will not sta rt aga in if you s top it
once the d ist anc e in dicate d ha s been d riven. Yo u
can also check t he remai ning dis tan ce in the on
board com puter* .
Refill Ad Blue! No restart! See own-
er's manual
This message appears whe n the AdBlue ta nk is
empty. F ill the AdB lue. Otherwise you will not be
ab le to s tart the engine aga in once yo u stop it.
The AdBlue must be refilled when t he amount in
the tank has reached the minimum level
q page 213, Filling Ad Blue.
Incorrect filling /system malfunction
A message appears if the AdBlue tank was filled
with a fluid other than AdBlue and the system
has detected that the tan k was fi lled incor rect ly,
or if there is a system malfunction .
Ad Blue -I' Ad Blue: System fault! No restart in
600 mi (1000 km ). See owner's manual.
This message appears when it is only poss ible to
drive the d istance indicated in the dr iver informa
tion system. Drive to the nearest authorized Audi
dealer or authorized Audi Serv ice Facility to have
the ma lfunction co rrected. Otherwise the engine
w ill not start agai n if you stop it once the d is
tance ind icated has been driven .
Fuel and Refueling
AdBlue: System fault No re start!
See owner's manual
T his mess age app ea rs if the sy stem ha s detec ted
t h at the t ank was fi lled incor rec tly or tha t there
is a ma lf u nction . Drive immediate ly to the near
est authorized A udi dealer or authorized A udi
Se rvice Facility to have the ma lf u nction co rrect
ed. Ot herwise you wi ll not be able to start the en
gine again once you stop it .
Filling AdBlue
Applies to vehicles: with selective catalytic reduction
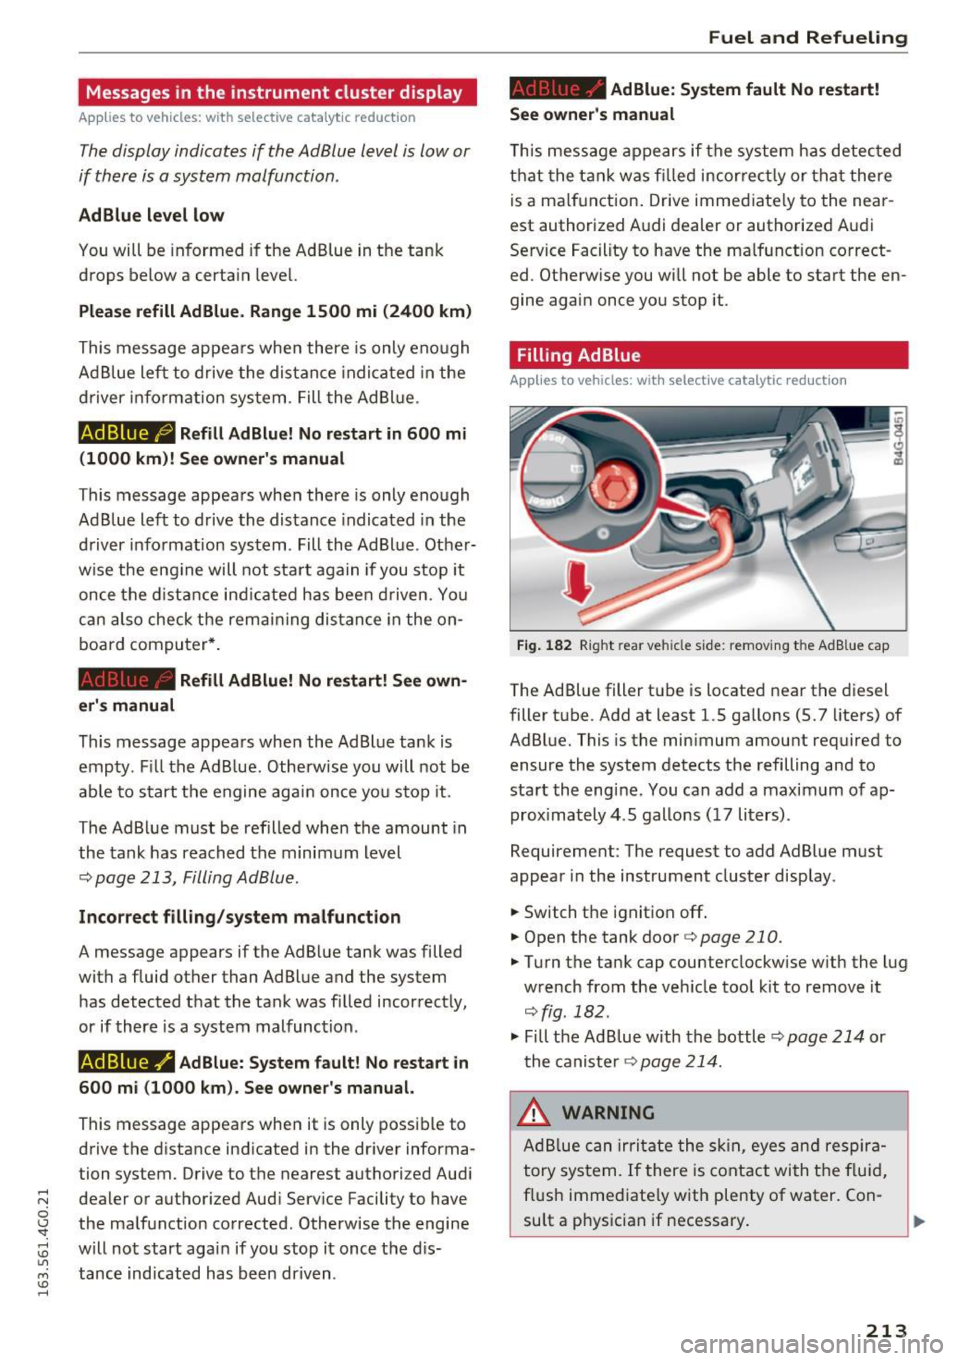
Fig. 182 Right rear vehicle side: removing the Ad Bl ue cap
The Ad Blue filler t ube is located near the d iesel
filler t ube. Add at least 1.5 gallons (5.7 lite rs) of
AdBl ue. This is the min imum amount required to
ensure the system detects the refilling and to
sta rt the eng ine . You can add a maxim um of ap
prox imately 4 . 5 gallons ( 17 li ters) .
Requirement: The request to add Ad Blue must
appear in the instrument cluster display.
.. Switch th e ignition off .
.. Open the tank door
q page 210.
.. Tu rn the ta nk cap counterclockw ise w it h the l ug
w rench from the veh icle tool k it to remove it
qfig. 182.
.,. Fill the Ad Blue with the bottle ~ page 214 or
t he ca nister ~
page 21 4.
.&_ WARNING
Ad Bl ue can ir rit a te the s kin, eyes an d respir a
tory sy stem.
If there is co nta ct wi th t he f lu id ,
f lus h imme diate ly w ith plenty of water . Con-
su lt a p hys ician if necessary .
IJII>
213
Page 216 of 294
Fuel and Refueling
CJ) Note
-Only use Ad Blue that conforms to the
standard ISO 22241-1. Do not mix any addi
tives with the AdBlue and do not dilute it
with water.
- Do not add Ad Blue to the diesel tank or add diesel fuel to the AdBlue tank. Mixing can
lead to damage to the engine and the Ad Bl
ue tank system .
- AdBlue attacks surfaces such as painted ve
hicle components, plastic and carpet. Re
move the fluid as quickly as poss ible with a
damp cloth and plenty of cold water . If the
Ad Blue has already crysta llized, use warm
water and a sponge. Ad Blue residue that is
not removed will crysta llize and can damage
the affected surface.
- Do not store refill bott les or canisters per
manently in the vehicle. If the container
l eaks, the escaping AdBlue could damage
the vehicle interior.
- Do not allow Ad Blue to come into contact
with clothing. If there is contact with the
fluid, flush immediately with plenty of wa
ter.
{D) Tips
Follow the Ad Blue manufacturer's instruc
tions for use and storage .
Refilling Ad Blue with a bottle
Applies to veh icles: w ith selective catalytic reduction
"' Remove the cap from the refill bottle c> A in
Filling AdB/ue on page
213, c> Q) in Filling
AdB/ue on page
214.
"' Pos ition the bottle on the filler tube and turn
the bottle clockwise until it stops turning.
"' Press lightly against the bottom of the bottle
to empty it. Continue pressing the bottom of
the bottle until it is empty or until fluid stops
flowing into the tank.
"'T urn the bott le to the left without pressing on
the bottom.
"' Close the filler neck
c> page 215, Completing
AdBlue refill .
214
(D Tips
-You can obtain refi ll bott les from an author
ized Audi dea ler or authorized Audi Service
Facility.
- A refill bottle contains approximately 0.5
gallon (1.9 liters) of AdBlue.
· Refilling Ad Blue with a canister
App lies to vehicles : with selective cata lyt ic r educt ion
®
+®
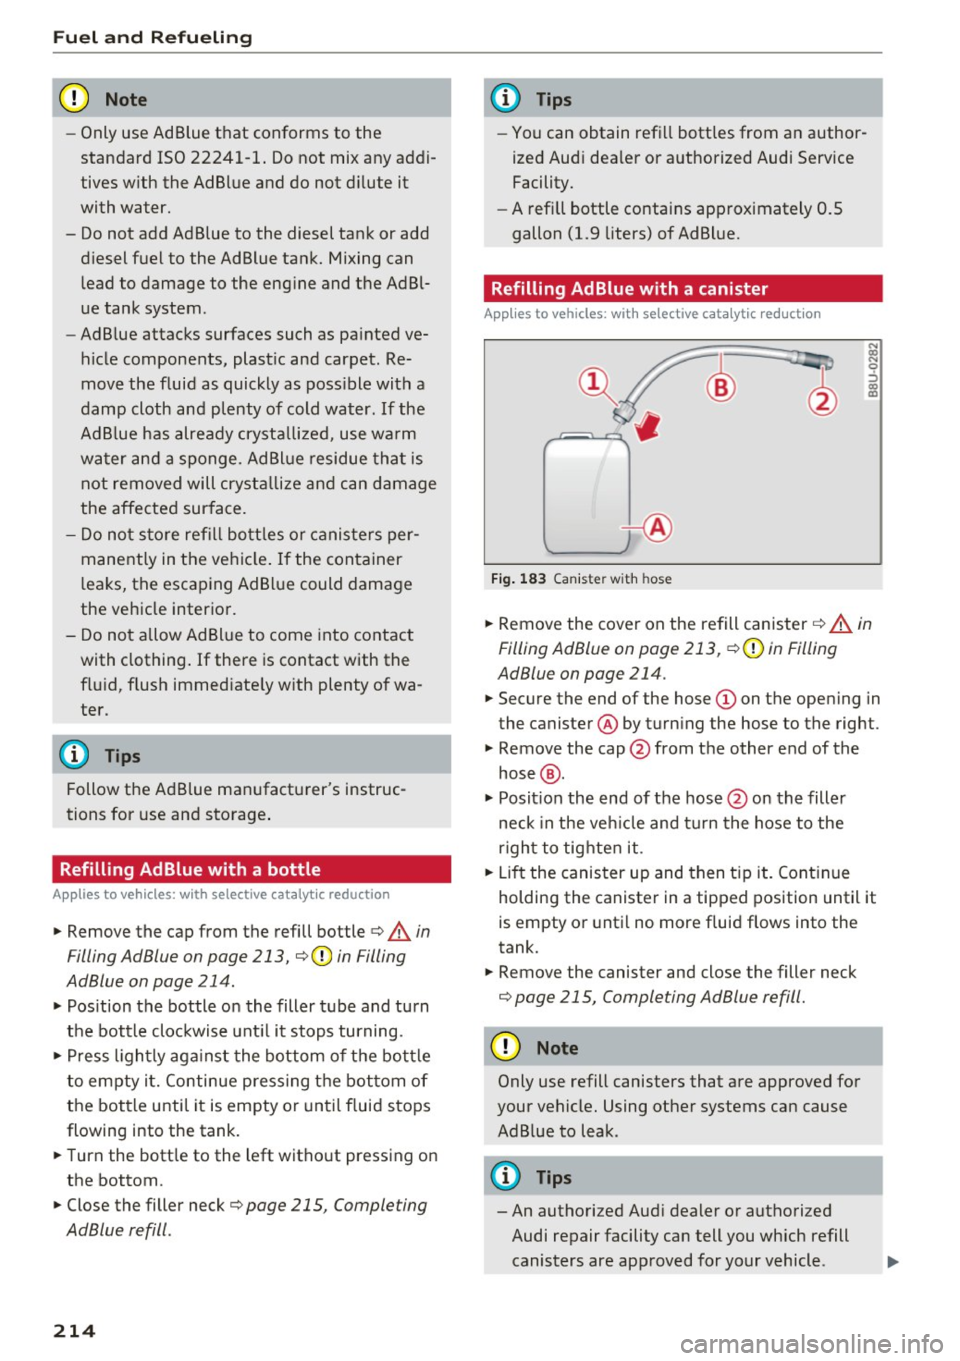
Fig. 183 Canis te r w ith hose
N
Filling AdBlue on page
213, c> Q) in Filling
AdBlue on page 214.
"'Secure the end of the hose (Don the opening in
the canister @by turning the hose to the right .
"' Remove the cap @from the other end of the
hose @.
"' Posit ion the end of the hose @on the filler
neck in the vehicle and turn the hose to the
r ig ht to tighten it.
"' Lift the canister up and then tip it. Continue
holding the canister in a tipped position until it
is empty or until no more fluid flows into the
tank.
"' Remove the canister and close the filler neck
c> page 215, Completing AdBlue refill.
(D Note
Only use refill canisters that are approved for
your vehicle. Using other systems can cause Ad Blue to leak .
0) Tips
-An authorized Aud i dealer or authorized
Audi repair facility can tell you which refill canisters are approved for your vehicle .