start stop button AUDI A6 2017 User Guide
[x] Cancel search | Manufacturer: AUDI, Model Year: 2017, Model line: A6, Model: AUDI A6 2017Pages: 280, PDF Size: 70.24 MB
Page 81 of 280
co
co
.... N
" N .... 0 0 <..:l -
pressed.
Interlock button
The in terlo ck button i n the selector lever handle
p revents yo u from moving the selector lever i n
advertently while in some se lector lever posi
tions. The positions that require the interlock button to be pressed are marked in co lor i n the il
lustration
c:> fig . 84.
Driving tips
Starting the engine
.. The selector lever must be in the P or the N po
s it ion.
Starting from a stop
.. Press and hold the brake pedal.
.. Press and hold the lock button in the selector
lever hand le, select the desired se lector lever
pos ition such as 0/5 and release the lock but
ton .
.. Wait a moment unt il the transm ission shifts .
You w ill no tice a slight movement when t he
gear e ngages .
.. Release t he b rake pedal and press the acce le ra
tor pedal
c:> &_ .
Stopping temporarily
.. Keep the veh icle stat ionary using the braking
peda l, for example at traffic lights .
.. Do no t press t he accelerator pedal when doing
t hi s.
.. To p revent the vehicle from rolling when yo u
sta rt driving, se t the park ing brake when stop
ping on steep i nclines
c:> _&. .
.. The parking bra ke wi ll re lease automatically
and the vehicle will start moving once you press
the accelerator pedal.
Stopping /parking
If the se lec to r l ever is not in the P posi tion when
you open the driver's door, the vehicle could rol l.
The message
Transmission: selector lever in
drive position!
appears . A warn ing tone wi ll also
sound.
.. Press and hold the brake pedal
c:> _&. .
Driving
.. Se t the par king brake.
.. Select the P selector lever posit ion .
U nder certain circumst ances, su ch as driving in
t h e mo unta ins, i t may be useful to swi tch tempo
ra rily to the manual s hift program in order to
man ua lly adjust the gea rs to the driving condi
tions
c:> poge 80.
On inclines, activate the parking brake fi rs t a nd
t h en move the selector lever to t he P position
c:> page 75. This prevents the locking mechanism
from be ing loaded too heavily and will make it
easier to move the selector lever out of the P po
s ition .
A WARNING
- The vehicle ca n roll even if the ignit ion is
sw itched off .
- Never leave your ve hicle w ith the engine
r u nning while in gear .
- Do not press the acce le rator peda l when
changing the se lector lever posi tion while
the vehicle is s ta tionary and the engi ne is
r u nning .
-
-Please no te that a small amo unt of power is
transmi tted if the veh icle is stopped tern po
r a rily w hile in t he D/S or R select or leve r po
si tion. To reduce t he risk of an a cc iden t, y ou
m ust cont in ue pressing firmly on the brake
pedal whi le t he veh icle is stoppe d so that i t
does not ro ll.
- Never engage the R or P sele ctor leve l pos i
tions while dr iv ing. It could ca use a crash .
- Before driving down a steep slope, reduce
your speed and sh ift into a lowe r gear w ith
"t i pt ronic" .
- Do not r ide the brakes or p ress the brake
pedal too often or too lon g when dr iving
downhill . Constant bra king causes the
brakes to overheat and s ubstant ially re
duces brak ing performance, increases b rak
ing d istance or causes comp lete fai lure of
the bra ke system.
- If you must stop on an incline, a lways hold
the vehicle in place wit h the foot brake or
pa rking bra ke to p reve nt i t from rolling
back.
79
Page 83 of 280
co
co
.... N
" N .... 0 0 <..:l '
¢fig. 86.
~ To shift down one gear, tap the 0 shift paddle.
The transmission automatically shifts up or down before critical engine speed is reached.
The transmission only allows manual shifting
when the engine speed is within the permitted
range.
Kick-down
Kick-down enables maximum acceleration.
When you press the accelerator pedal down be
yond the resistance point, the automatic trans
mission downshifts into a lower gear, depending
on vehicle speed and engine RPM.
It shifts up in
to the next higher gear once the maximum speci
fied engine RPM is reached.
A WARNING
Please note that the wheels could spin on
slick or slippery roads when kick-down is ac
tive.
Launch control program
A ppl ies to: ve hicles wit h S tro nic
-
The launch control program provides the best
possible acceleration when starting from a stop.
Requirement: the engine must be at operating
temperature and the steering wheel must not be
turned .
~ Deactivate the Start/Stop system*¢ page 74.
The LED in the l0 u•I button turns on.
~ Switch the Electronic Stabilization Control
(ESC) sport mode on ¢
page 121. The II i ndi
cator light turns on.
~ Pull the selector lever back out of the D/S posi
tion briefly to select the S position or select the
DYNAMIC driving mode in drive select
¢page 106.
~ Press the brake pedal firmly with your left foot
and hold it all the way down for at least one
second .
Driving
~ At the same time, press the gas pedal all the
way down with your right foot until the engine reaches and stays at a high RPM level.
~ Remove your foot from the brake pedal within
five seconds ¢_& .
A WARNING
-Always adapt your driving to the traffic flow.
- Only use the Launch control program when
road and traffic conditions allow it and oth
er drivers will not be endangered or both
ered by your driving and the vehicle's accel
eration.
- Please note that the drive wheels can spin
and the vehicle can break away when sport
mode is switched on, especially when the
road is slippery.
- Once the vehicle has started moving, press
the
I.P-O FFI button briefly to turn the sport
mode off.
@ Tips
- The transmission temperature may increase
significantly after using the launch control
program. If that happens, the program may
not be available for a few minutes.
It will be
available again after a cool-down period.
- When accelerating using the launch control
program, all vehicle parts are subject to
heavy loads. This can lead to increased
wear.
Transmission malfunction
DD Transmission: please press brake pedal and
select gear again
Press the brake pedal and select the desired se
lector lever position again. You can then continue
driving.
DD Transmission overheating: Please drive con
servatively.
The transmission temperature has increased sig
nificantly due to the sporty driving manner. Drive
in a less sporty manner until the temperature re
turns to the normal range and the indicator light switches of. .,..
81
Page 88 of 280
Assist
Assist Speed warning system
Applies to: vehicles with speed warning system
The speed warning system helps you to stay un
der a specified maximum speed.
The speed warning system warns you if you are
exceeding the maximum speed that you have set.
A warning tone will sound as soon as your speed
exceeds the stored value slightly.
The . (USA models)/ . (Canada models) indi
cator light and a message appear in the instru
ment cluster display at the same time. The •
• indicator light and the message turn off if the
speed falls back below the stored maximum
speed .
Setting a threshold is recommended if you would
like to be reminded when you reach a certain
maximum speed. Situations where you may want
to do so include driving in a country with a gener
al speed limit or if there is a specified maximum
speed for winter tires.
Setting the warning threshold
The warning threshold is set in the Infotainment
system.
.. Select: the
ICARI function button > (Car)* Sys
tems
control button > Driver assistance >
Speed warning.
(D Tips
Regardless of the speed warning system, you
should always monitor your speed using the
speedometer and make sure you are following
the legal speed limit.
86
Cruise control system
Switching on
Applies to: vehicles with cruise control system
The cruise control system makes it possible to
drive at a constant speed starting at 20 mph (30
km/h) .
0
f
~
0
Fig. 88 Operat ing lever: cruise co ntro l syste m
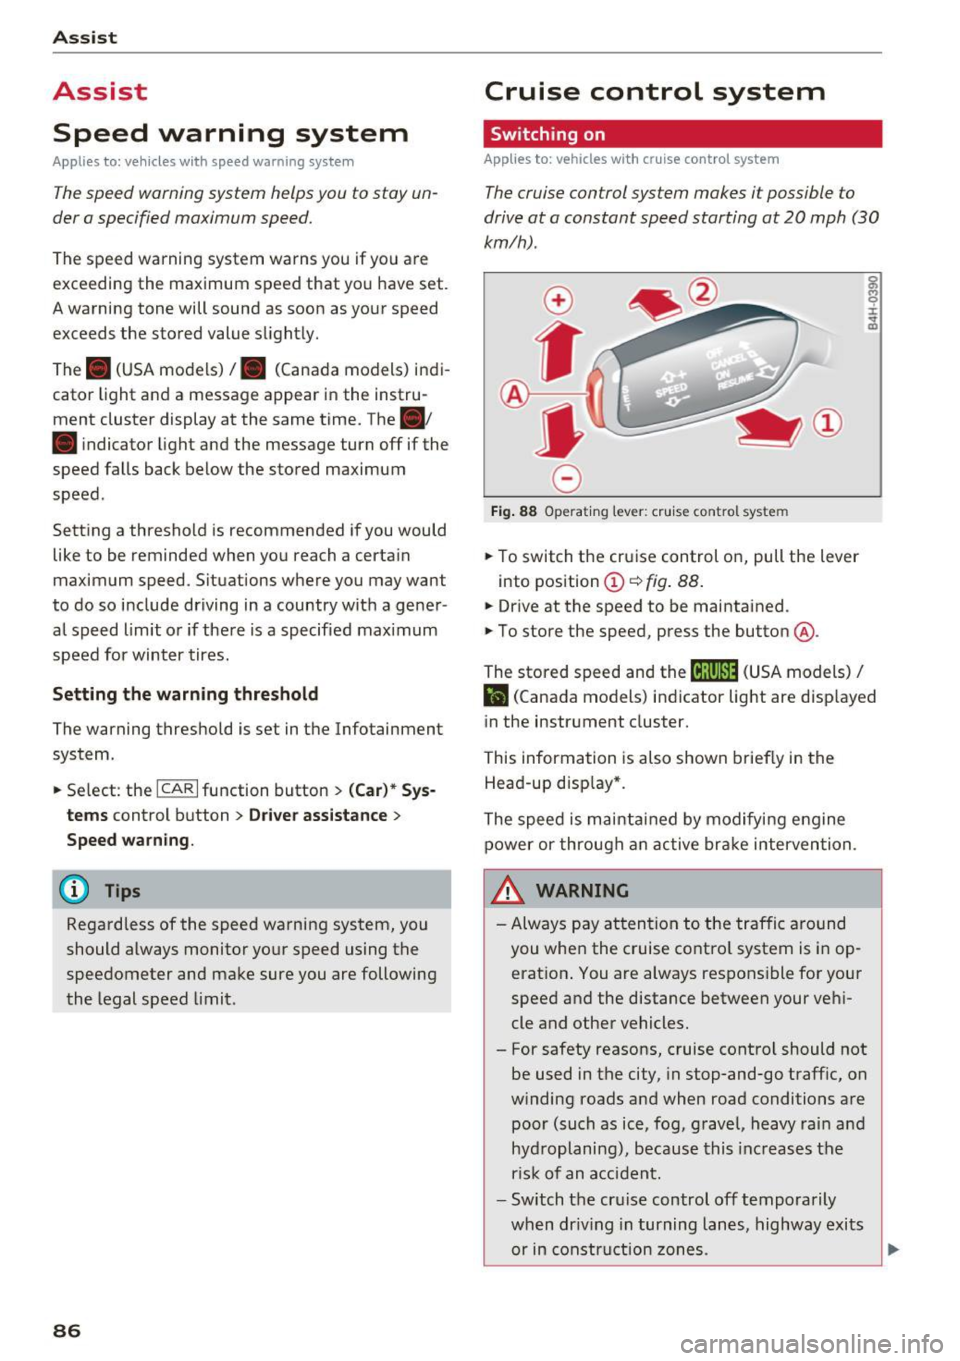
.,. To switch the cruise control on, pull the lever
into posit ion
(D ~ fig . 88.
.,. Drive at the speed to be maintained .
.,. To store the speed, press the button @.
~ M 0 :i:
;;i;
The stored speed and the (ij;\1)~14 (USA models) /
l'I (Canada models) indicator light are disp layed
in the instrument cluster.
This information is also shown briefly in the
Head-up disp lay* .
The speed is maintained by modifying engine
power or through an active brake intervention.
~ WARNING
-Always pay attention to the traffic around
you when the cruise control system is in op
eration . You are always responsible for your
speed and the distance between your vehi
cle and other vehicles.
- For safety reasons, cruise control should not be used in the city, in stop-and-go traffic, on
winding roads and when road conditions are poor (such as ice, fog, gravel, heavy rain and
hydroplaning), because this increases the
r isk of an accident.
- Switch the cruise control off temporarily
when dr iv in g in turning lanes, highway exits
or in construction zones.
-
Page 92 of 280
Ass is t
When driving into a curve ~ fig. 91 and out of a
curve, the adaptive cruise control may react to an
object in the neighbor ing lane and apply the
brakes. You can prevent that by pressing the ac
celerator pedal brief ly .
Stationary objects
App lies to: vehicles with Audi adaptive cruise contro l
Fig . 92 Examp le: ob ject changin g lanes and stationary o b
j ect
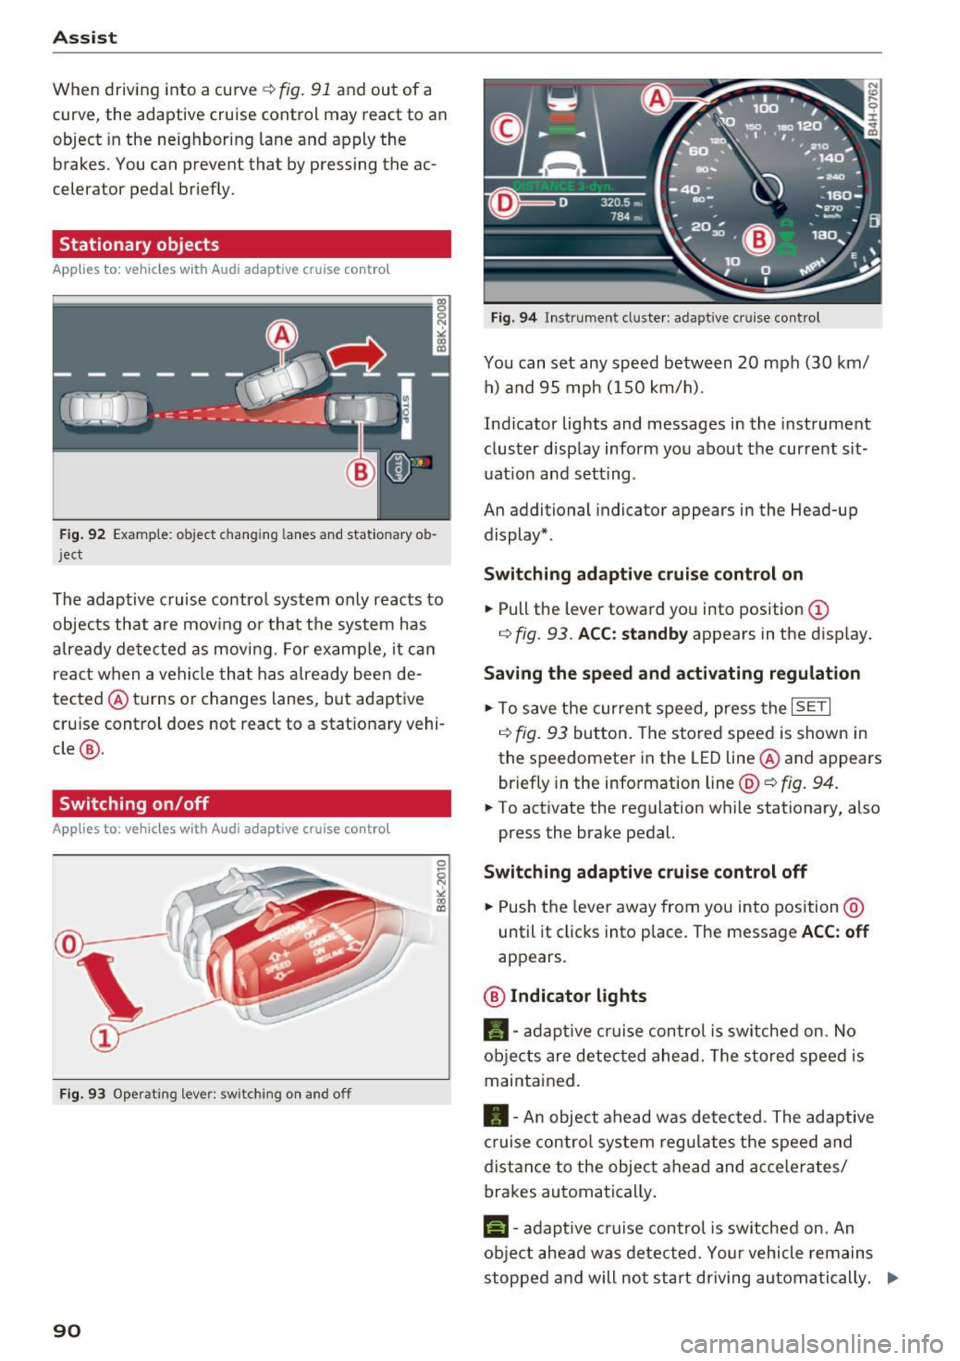
The adaptive cruise contro l system only reacts to
objects that are mov ing or that the system has
a lready detected as moving. For examp le, it can
react when a vehicle that has a lready been de
tected @turns or changes lanes, but adaptive
cru ise control does not react to a stat ionary vehi
cle @.
Switching on /off
Applies to: vehicles with Audi adaptive cruise control
Fig. 9 3 Operat ing leve r: sw itching on a nd o ff
90
F ig. 94 In str umen t cl uste r: ad ap tive cr uise cont rol
You can set any speed between 20 mph (30 km/
h) a nd 95 mph ( 150 km/h).
Ind icator lights and messages in the instrument
cluster display inform you about the current sit
uat ion and setting .
An additional indicator appears in the Head-up display* .
Switching ad apti ve c ruise control on
.,. Pull the lever toward you into position (D
r=> fig. 93 . ACC: standb y appears in the disp lay.
Saving the speed and activating regulat ion
.,. To save the current speed, press the ISETI
r=> fig . 93 button . The stored speed is shown in
the speedomete r in the LED line @and appears
briefly in the info rmation line @'=>
fig. 94.
.,. To activate the regu lation while stationary, also
press the brake pedal.
Switching adaptive crui se control off
.,. Push the lever away from you into position @
until it clicks into place. The message
ACC : off
appears .
@ Indicator lights
fll-adap tive cr uise contro l is sw itched on. No
objects are detec ted ahead. The s tored speed is
maintained.
• -A n object ahead was detected . The adaptive
cruise contro l sys tem regu lates the speed and
d istance to the objec t ahead and ac ce lera tes/
brakes automatically .
f:i-adaptive cruise control is switched on. An
object ahead was detected . Yo ur vehicle remains
stopped and will not start driving au toma tically. ..,.
Page 93 of 280
co
co
.... N
" N .... 0 0 <..:l 'SI'
•-T he automatic braking is not enough to
maintain a sufficient distance to an object ahead.
You must intervene ¢
page 93, Request for
driver intervention.
© In str um ent clust er dis pla y
If adaptive cruise control is not shown in the in
strument cluster display, you can call it up using
the multifunction steering wheel b uttons
¢ page 21.
Based on the graphics in the d isp lay, you can de
termine if the system is maintaining a distance to
the object ahead and what that distance is.
No v ehi cle -No object ahead was detected .
Whit e v ehicle -An object ahead was detected .
Red veh icle -Request for driver intervention
¢page 93.
Both arro ws on the scale© indicate the distance
to the object ahead. No arrow appears when the
vehicle is on an open road and there is no object
ahead .
If an object is detected ahead, the arrow
moves on the scale .
The green zone on the scale indicates the store
distance. For information on changing the dis
tance, refer to ¢
page 92 . If the distance se
lected is exceeded or not reached, the arrow
moves into the red zone on the scale.
A WARNING
If you press the !SETI button when driving at
speeds below 20 mph (30 km/h), the vehicle
accelerates automatically up to 20 mph (30
km/h), which is the minimum speed that can
be set .
(}) Tips
-If yo u switch the ignition or the adapt ive
cruise control system off, the set speed is
erased for safety reasons .
- The elect ronic stabi lization cont rol (ESC)
and the anti-slip-regulation (ASR) are au to
matically sw itched on when the adaptive
cruise control is switched on .
Ass ist
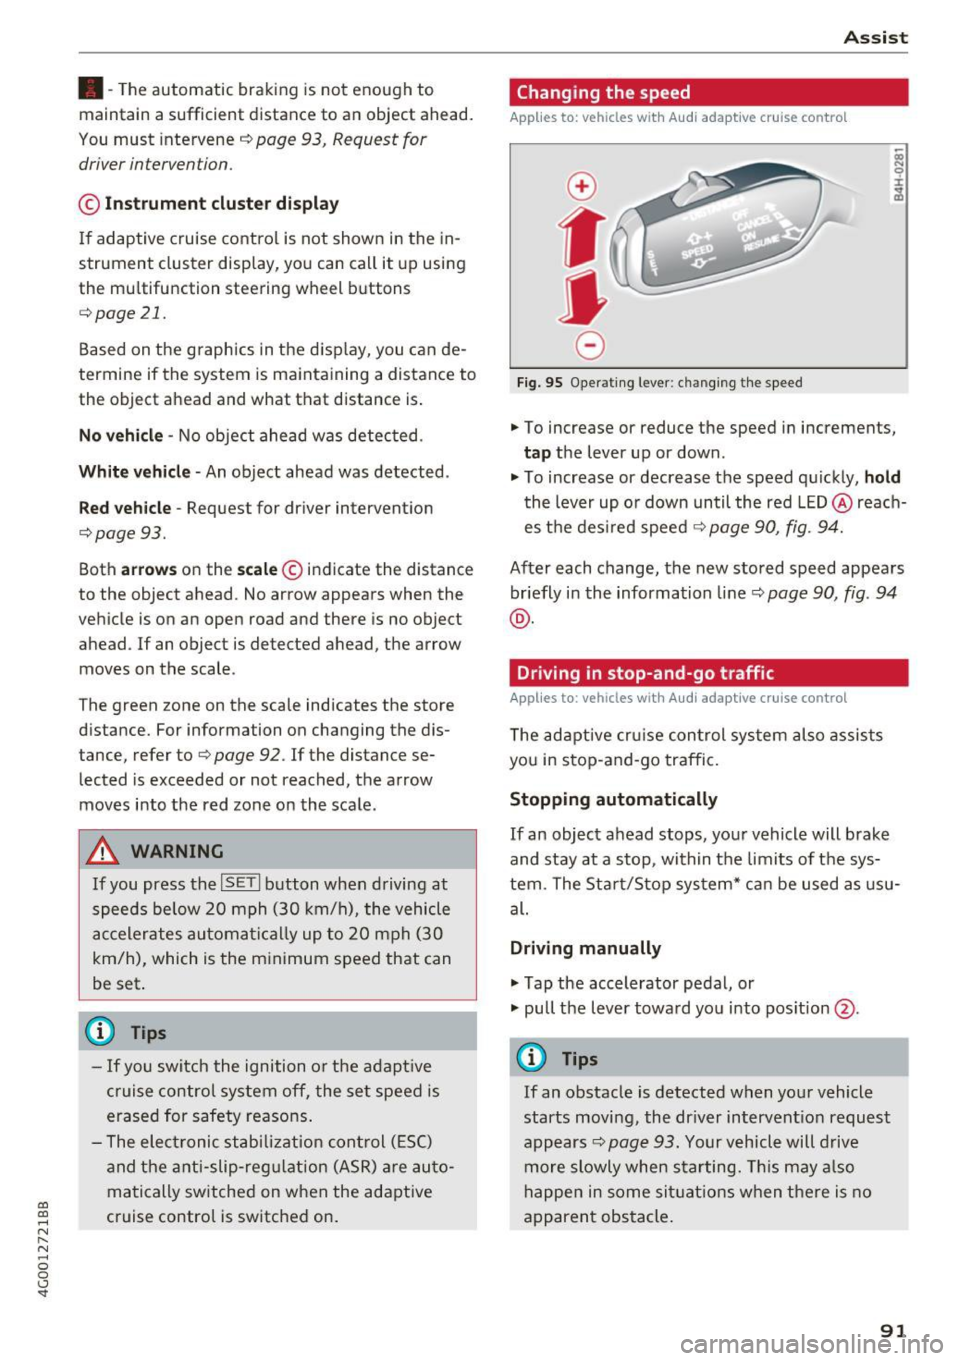
Changing the speed
Applies to: vehicles with Audi adaptive cruise control
0
f
•
0
Fig. 95 Operating lever: changing the speed
.,. To increase or reduce the speed in increments,
tap the lever up or down .
.. To increase or decrease the speed quickly,
ho ld
the lever up or down until the red LED @reach
es the des ired speed ¢
page 90, fig. 94.
After each change, the new stored speed appears
briefly in the information line¢
page 90, fig. 94
@ .
Driving in stop-and-go traffic
Applies to: vehicles with Audi adaptive cruise control
The adaptive cru ise con trol system also assists
you in stop-and-go traffic.
Stopping automatically
If an object ahead stops, your vehicle will brake
and stay at a stop, within the limits of the sys
tem. The Sta rt/Stop system* can be used as usu
al.
Dri ving manu ally
.,. Tap the accelerator pedal, or
.,. pull the lever toward you into pos ition @.
(D Tips
If an obstacle is detected when your vehicle
starts moving, the dr iver intervent ion request
appears¢
page 93. Your vehicle will drive
more slowly when starting. Th is may a lso
happen in some sit uat ions when there is no
apparent obstacle.
91
Page 97 of 280
co
co
.... N
" N .... 0 0 <..:l '
Appl ies to: ve hicles with Audi adaptive cruise co ntro l
.,. Se lect: t he ICAR I fu nction bu tton > ( Car) *Sys
tem s
control button > Driver as sis tance > Audi
braking guard .
System -
Switch the bra kin g g ua rd On/ Off. When
you swit ch the ig nition on, the message
Braking
guard: Off
appears if t he sys tem is switched o ff.
Early warning -The distance and approac h warn
i ngs i n the display can be sw itched
On/ Off.
@ Tips
- Your settings are automatically stored and
ass igned to the remote cont rol key bei ng
used.
- If you restric t or sw itch off the ESC, the
braking gua rd also sw itches itself off
¢ page 12 1.
- Switch braking guard off when yo u are load
i ng t he ve hicle on to a vehicle ca rr ier, t rain,
shi p or other type o f transportation. This
c a n p reven t undesired w arnings from the
br akin g guard system.
Messages
App lies to: ve hicles with Audi adaptive cruise co ntro l
Braking guard: Off
This message appea rs if the sys tem is switc hed
off through the In fota inme nt system . Otherwise ,
if the system is tur ned off, the informa tion ap
pears every time shortly after the start of t he
tr ip.
The message also appears if the system is not
avai la bl e d ue to a ma lfunction or if the ESC is
switched off~
page 121. If this is the case, the
system w ill not prov ide warnings about a possi
b le co llision.
Braking guard : engaged
This message appea rs if a sha rp bra ke press ure
was applied due to an ac ute wa rn ing.
ACC: unavailable
ACC and Audi braking guard: Unavailable
Assist
T he system cannot gua rantee that it will detect
objects co rrectly and is sw itched off . The sensors
have been moved or are faulty. The p re sense
funct ions may a lso be affected . D rive to an au
t h orized Audi dea ler or authorized Audi Service
Facility immed iate ly to have the malfunction cor
rected .
ACC: Currently unavailable. No sensor vis ion
ACC and Audi braking guard: Cu rrently unavail
able. No sensor vision
Th is mess age appears if the senso r view i s ob
str ucted, for examp le by leaves, snow , heavy
spray or dirt. Clean the sensors¢
page 88,
fig. 90 .
ACC : Currently unavailabl e. Gradient too steep
The road exceeds the maximum poss ible angle
fo r safe adaptive c ruise cont rol operat io n. Adap
t ive cr uise control is sw itched off.
ACC: only available in D, Sor M
Se lect the D/S or M selector lever position.
ACC : Currently unavailable. Parking brake ap •
plied
The ad apt ive cr uise cont rol system sw itches off
a utoma tica lly if the parking brake is se t.
ACC: Currently unavailable . Stability control
( ESC) input .
This message appears if the Electronic Stab iliza
t ion Control (ESC) is taking action to stab ilize the
vehicle . In t his case, adaptive cruise control
switches off automatically .
ACC off: Manual control!
This message appears when adaptive cruise con
trol cannot set the parking brake. P ress the brake
pedal to prevent the vehicle from ro lling.
• ••
T h ree white do ts appear if a setting canno t be se
l ecte d w it h t he oper ati ng leve r. For ex ample, this
h appens if a daptive cr uise con trol c annot sta rt
driv ing a utomat ica lly in stop -and -go traff ic be
ca use the dr iver has not fastene d their safety
belt . ..,.
95
Page 119 of 280
co
co
.... N
" N .... 0 0 <.,;) 'SI"
.. Turn the Infotainment system on and shift into
reverse gear. The parking system must be
turned on and the
Cro ss pa rking view must be
displayed .
.. Press the control button on the Infotainment
unit @¢
page 112, fig . 124. The Parall el park
ing
view is displayed .
.. Back up and align your vehicle so the blue area
@ borders on the rear end of the vehicle be
hind yo u or on the parking space line
¢ ,&. in
General information an page 113, ¢(Din Gen
eral information on page 113 .
The blue area
represents an extens ion of the vehicle's out line
by approximately 16 ft (5 mete rs) to the rear .
The long side of the blue area should be on the
curb . The entire blue area must f it into the
parking space .
.,. With the ve hicle stopped, turn the steer ing
wheel to the right as far as it will go .
.. Back into the park ing space until the b lue curve
¢
page 112, fig . 125 tou ches the curb¢,&. in
General information on pag e 113, ¢(Din Gen
eral information on page 113 .
Stop the vehicle.
.. With the vehicle stopped, tu rn the steering
whee l to the left as far as it will go .
.. Cont inue to back into the parking space unt il
the vehicle is parked parallel to the curb¢.&.
in General information on page 113, ¢(Din
General information on page 113.@
repre
sents the rea r bumpe r. At the very latest, stop
the vehicle when the red orientation line @
borde rs an object. Keep an eye on t he front of
your vehicle while doing this .
Parking next to obstacles
If
there is an obstacle (such as a wall) next to the
parking space, pos ition the vehicle so t here is
mo re spa ce on that side. Posi tion the long s ide of
the blue area so th at there is s ufficient space
from the object. The area must not be on the
curb . You will also need to start turning the
steer ing whee l earlier. The blue curve
¢
page 112, fig. 125 must not touch the obsta
cle, but rather there should be enough distance.
Parking systems
(D Tips
The left or right orientation lines and surfaces
will be d isp layed, depend ing on the turn sig
nal be ing used .
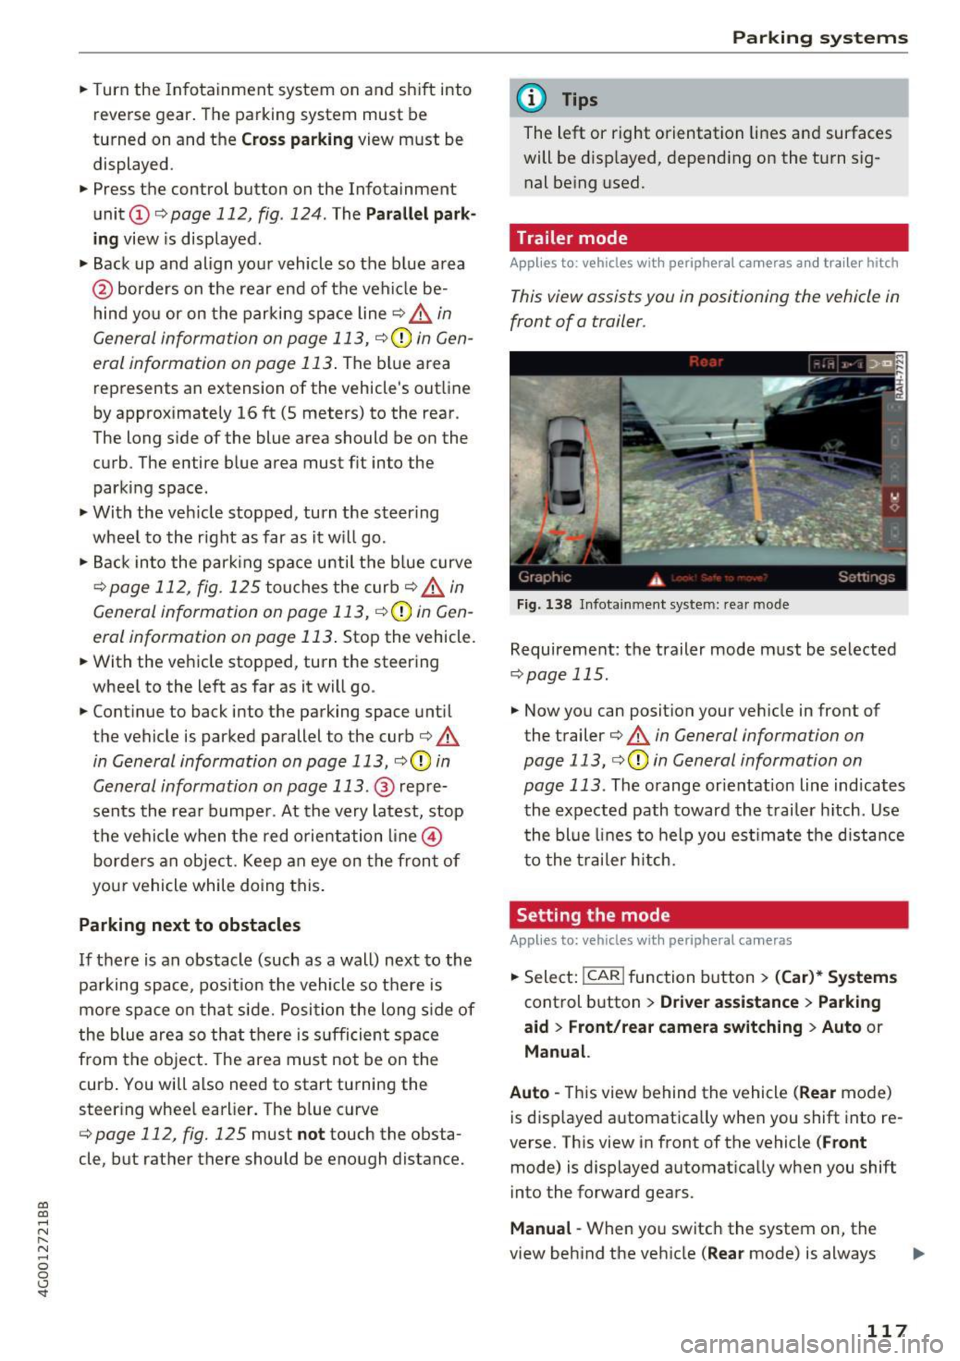
Trailer mode
Appl ies to : vehicles with peripheral cameras a nd trai le r hitch
This view assists you in positioning the vehicle in
front of a trailer .
Fig. 1 38 Infot ainme nt syste m: rear mode
Requireme nt: the trailer mode must be selected
¢ page 115 .
.. Now you can posit ion you r ve hicle in front of
the trailer
¢ &. in General information on
page 113, ¢(Din General information on
page 113 .
The orange orientat ion line indicates
th e expected path toward the trailer h itch . Use
t he bl ue lines to help you es timate the d istance
t o the trai ler hitch.
Setting the mode
Appl ies to : vehicles wit h peripheral cameras
.. Sele ct: !CAR ! function button> (Car )* Sy stem s
control button > Driver assistance > Pa rking
aid
> Front /re ar camera swit ching > Auto or
M anual.
Auto -
This view behind the vehicle (Rear mode)
is disp layed automatically when you shift into re
verse. This view in front of the vehicle
( Front
mode) is d isplayed automat ica lly when you shift
into the forward gears.
Manu al -When you switch the system on, the
view beh ind the veh icle
(Rear mode) is always
117
Page 267 of 280
co
co
.... N
" N .... 0 0 <..:l '
Sunroof. . . . . . . . . . . . . . . . . . . . . . . . . . . . . 37
Ceram ic brake rotors
New brake pads . . . . . . . . . . . . . . . . . . . . . 122
Certification . . . . . . . . . . . . . . . . . . . . . . . . . 262
Changing engine oil . . . . . . . . . . . . . . . . . . . 204
Child restraints Danger of using child restraints in the front
seat. .. .. .. .. ............... .. .. .. . 148
Where can I get additional information
about child restraints and their use? . . . . 189
Ch ild restraint system anchors . . . . . . . . . . 185
Child safety .. .. ............... .. .... . 171
Important safety instructions for using child
safety seats . . . . . . . . . . . . . . . . . . . . . . . . 17 5
Important things to know when driv ing with
children . . . . . . . . . . . . . . . . . . . . . . . . . . . 171
Tether anchors . . . . . . . . . . . . . . . . . . . . . . 188
Tether straps . . . . . . . . . . . . . . . . . . . . . . . 188
Child safety lock Power windows . . . . . . . . . . . . . . . . . . . . . . 36
Rear doors . . . . . . . . . . . . . . . . . . . . . . . . . . 36
Child safety seats
Booster seats . . . . . . . . . . . . . . . . . . . . . . . 181
Convertible child seats . . . . . . . . . . . . . . . 179
Convertible locking retractor . . . . . . . . . . 184
H ow do I properly install a child safety seat
in my vehicle? . . . . . . . . . . . . . . . . . . . . . . . 175
I nfant seats .. .. ............. .. .. .. . 177
I nstall ing a chi ld restraint using the LA TC H
system . . . . . . . . . . . . . . . . . . . . . . . . . . . . 187
LATCH system . . . . . . . . . . . . . . . . . . . . . . 187
Lower anchorages . . . . . . . . . . . . . . . . . . . 186
Mounting and releasing the anchorage
hook . . . . . . . . . . . . . . . . . . . . . . . . . . . . . . 187
Safety instructions . . . . . . . . . . . . . . . . . . . 17 5
Unused safety belts on the rear seat . . . . 177
Child seats .. .. ................ ..... . 177
Securing . . . . . . . . . . . . . . . . . . . . . . . . . . . 182
C igarette lighter . . . . . . . . . . . . . . . . . . . . . . . 54
Cleaning . . . . . . . . . . . . . . . . . . . . . . . . . . . . 231
Cleaning/removing ice from windows . . . . . 233
C leaning Alcantara . . . . . . . . . . . . . . . . . . . . 234
Cleaning artificial leather . . . . . . . . . . . . . . . 234
C leaning carbon parts . . . . . . . . . . . . . 233, 234
Cleaning controls . . . . . . . . . . . . . . . . . . . . . 233
Cleaning decorative parts/trim . . . . . . . . . . 233
Index
Cleaning displays . . . . . . . . . . . . . . . . . . . . . 233
Cleaning exhaust tail pipes . . . . . . . . . . . . . 232
Cleaning plastic parts . . . . . . . . . . . . . . . . . . 233
Cleaning rims . . . . . . . . . . . . . . . . . . . . . . . . 232
Cleaning textiles . . . . . . . . . . . . . . . . . . . . . . 234
Climate contro l system . . . . . . . . . . . . . . . . . 60
Automatic auxiliary heater . . . . . . . . . . . . . 64
Automatic recirculation . . . . . . . . . . . . . . . . 64
Basic settings . . . . . . . . . . . . . . . . . . . . . . . . 64
Drive select . . . . . . . . . . . . . . . . . . . . . . . . . 104
Closing Hood . . . . . . . . . . . . . . . . . . . . . . . . . . . . . . 200
Sunroof. . . . . . . . . . . . . . . . . . . . . . . . . . . . . 38
Windows . .. .. . ... ............... .. . 37
Closing/opening By remote control . . . . . . . . . . . . . . . . . . . . 30
With the central locking switch . . . . . . . . . 31
With the convenience key . . . . . . . . . . . . . . 30
Closing aid (doors) . . . . . . . . . . . . . . . . . . . . . 27
Closing and opening With the door lock . . . . . . . . . . . . . . . . . . . . 32
Clutch (manual transmission) Indicator light . . . . . . . . . . . . . . . . . . . . . . . 16
Cockpit (overview) . . . . . . . . . . . . . . . . . . . . . . 6
Color code . . . . . . . . . . . . . . . . . . . . . . . . . . . 255
Coming home . . . . . . . . . . . . . . . . . . . . . . . . . 43
Compartments . . . . . . . . . . . . . . . . . . . . . . . . 55
Compliance . . . . . . . . . . . . . . . . . . . . . . . . . . 262
Consumer information . . . . . . . . . . . . . . . . . 259
Consumer Information . . . . . . . . . . . . . . . . . 135
Consumption (fuel) . . . . . . . . . . . . . . . . . . . . 22
Contacting NHTSA . . . . . . . . . . . . . . . . . . . . 135
Convenience key Start ing the eng ine (START ENGINE STOP
button) . . . . . . . . . . . . . . . . . . . . . . . . . . . . . 70
Stopping the eng ine (STAR T ENGINE STOP
button) . . . . . . . . . . . . . . . . . . . . . . . . . . . . . 71
Switching the ignition on . . . . . . . . . . . . . . 70
Unlocking/locking . . . . . . . . . . . . . . . . . . . . 30
Convenience opening . . . . . . . . . . . . . . . . . . . 37
Convertible child safety seats . . . . . . . . . . . 179
Convertible locking retractor
Activating . . . . . . . . . . . . . . . . . . . . . . . . . . 184
Deactivating . . . . . . . . . . . . . . . . . . . . . . . . 185
Using to secure a child safety seat . . . . . . 184
Cooling down . . . . . . . . . . . . . . . . . . . . . . . . . 66
265
Page 275 of 280
co
co
.... N
" N .... 0 0 <..:l '
Speed warning system . . . . . . . . . . . . . . . . . . 86
Sport differential . . . . . . . . . . . . . . . . . . . . . 104
Indicator light . . . . . . . . . . . . . . . . . . . . . . . 19
Star button . . . . . . . . . . . . . . . . . . . . . . . . . . . 22
Start-Stop system . . . . . . . . . . . . . . . . . . . . . . 72
Start/Stop system Engine does not switch off . . . . . . . . . . . . . 73
Engine starts automatically . . . . . . . . . . . . 73
Indicator lights . . . . . . . . . . . . . . . . . . . . . . 73
Messages . . . . . . . . . . . . . . . . . . . . . . . . . . . 74
Starting/stopping the engine . . . . . . . . . . . 73
Switching off/on . . . . . . . . . . . . . . . . . . . . . 74
START ENGINE STOP button . . . . . . . . . . . . . 70
Starting (engine) . . . . . . . . . . . . . . . . . . . 70, 73
Steering Electromechanical steering ..... .. ... 123, 0
I ndicator light .. ............. .. .. 15 , 123
L ock ing . . . . . . . . . . . . . . . . . . . . . . . . . . . . . 71
also refer to Electromechanical steering . 123
Steering wheel Buttons .. .. .. .. .. .. .... ... .. .. .. .. .. 22
Easy seat entry . . . . . . . . . . . . . . . . . . . . . . . 70
Manual adjustment . . . . . . . . . . . . . . . . . . . 68
Power adjustment . . . . . . . . . . . . . . . . . . . . 69
Shift padd les (automatic transmission) . . . 80
Steering wheel heating . . . . . . . . . . . . . . . . 65
Steps for determining correct load limit . . . 224
Stopping (engine) . . . . . . . . . . . . . . . . . . . 71, 73
Storage compartments . . . . . . . . . . . . . . . . . 55
Storage hooks . . . . . . . . . . . . . . . . . . . . . . . . . 59
S tronic (automatic transmission) . . . . . . . . . 77
Launch control program . . . . . . . . . . . . . . . 81
Sunroof . . . . . . . . . . . . . . . . . . . . . . . . . . . . . . 38
Convenience opening . . . . . . . . . . . . . . . . . . 37
Emergency closing . . . . . . . . . . . . . . . . . . . . 38
Sunshade . . . . . . . . . . . . . . . . . . . . . . . . . 46, 47
Sun visors . . . . . . . . . . . . . . . . . . . . . . . . . . . . 46
Symbo ls
refer to Indicator lights . . . . . . . . . . . . . . . . 10
T
Tachometer .... ............... .. . 9, 10, 21
Tail lights Cleaning . . . . . . . . . . . . . . . . . . . . . . . . . . . 232
Index
TOI clean diesel
refer to Ad Blue . . . . . . . . . . . . . . . . . . . . . . 194
Technical data . . . . . . . . . . . . . . . . . . . . . . . . 255
Technical modifications . . . . . . . . . . . . . . . . 261
Temperature display
Coo lant . . . . . . . . . . . . . . . . . . . . . . . . . . . . . . 9
Exterior temperature . . . . . . . . . . . . . . . . . . 21
T ether anchors . . . . . . . . . . . . . . . . . . . . . . . 188
Tether strap . . . . . . . . . . . . . . . . . . . . . . . . . 188
Tie-downs . . . . . . . . . . . . . . . . . . . . . . . . 58, 135
Time ......... ... .. .................. 24
tiptronic mode (automatic transmission) . . . 80
t iptronic (automatic transm iss ion) . . . . . . . . 77
Tire pressure (tire pressure monitoring sys ·
tern) .. ... ... .. .. .. ...... ....... .. .. 229
Tires........ ... .. .. ................ . 210
All wheel drive . . . . . . . . . . . . . . . . . . . . . . 124
Low aspect ratio tires . . . . . . . . . . . . . . . . 226
Replacing . . . . . . . . . . . . . . . . . . . . . . . . . . 237
Service life . . . . . . . . . . . . . . . . . . . . . . . . . 218
Tire pressure . . . . . . . . . . . . . . . . . . . . . . . 220
T ire pressure monitoring system . . . 228, 229
Tire pressure table . . . . . . . . . . . . . . . . . . . 221
Treadwear indicators . . . . . . . . . . . . . . . . . 218
Unidirectional....................... 212
Uniform tire quality grading . . . . . . . . . . . 227
T ires and wheels
Glossary of tire and loading terminology . 212
T ires and vehicle load limits . . . . . . . . . . . 223
Tool kit . . . . . . . . . . . . . . . . . . . . . . . . . . . . . 236
Torn or frayed safety belts . . . . . . . . . . . . . . 141
T owing
Tow trucks . . . . . . . . . . . . . . . . . . . . . . . . . 251
Towing loop .. .. .. .. ............. 251,252
TPMS (tire pressure monitoring system) . . . 229
T railer towing . . . . . . . . . . . . . . . . . . . . . . . . . 83
Information . . . . . . . . . . . . . . . . . . . . . . . . . 85
Operat ing instruct ions . . . . . . . . . . . . . . . . . 83
Parking system... .. ................ . 118
Technical requirements . . . . . . . . . . . . . 83 , 84
T ransmission malfunction (indicator light) . . 81
Transport Canada . . . . . . . . . . . . . . . . . . . . . 136
Turn signals . . . . . . . . . . . . . . . . . . . . . . . . . . 42
u
ULSD No . 2 (Diesel fuel) . . . . . . . . . . . . . . . . 191
273