tow AUDI A6 2017 Owner's Manual
[x] Cancel search | Manufacturer: AUDI, Model Year: 2017, Model line: A6, Model: AUDI A6 2017Pages: 280, PDF Size: 70.24 MB
Page 107 of 280
The adjustment depends on the driving mode se
l ected, steering movements, the driver's brak ing
and accelerat ion, and as the road su rface, vehicle
speed and load.
The vehicle ground clearance depends on the mode se lected and the speed . When you are in
the
auto , the highway setting is act ivated when
you dr ive above 75 mph (120 km/h) for more
than 30 seconds. The g round clearance is in
creased automat ica lly if the speed drops below
44 mph (70 km/h) for more than 120 seconds .
Steering
The power steering adapts. Ind irect steering that
moves easily as in comfort mode is especially
sui ted to long drives on a h ighway. The Dynamic
mode provides sporty, direct steering .
Applie s to: vehicles with dynamic steering
The steering ratio changes based on vehicle
speed in order to maintain optimum steering ef
fort for the dr iver at a ll times. This sets the steer
i ng to be less sensit ive at higher speeds in order
to p rovide imp roved vehicle contro l. At reduced
speeds, steer ing is mo re direct in order to keep
t he s teering effo rt as m inima l as poss ib le when
t he dr iver is maneuvering the vehicle . At low and
ave rage speeds, dynamic steering* additionally
p rovides more responsive stee ring performance.
Sport differential *
As a component of the all wheel d rive system
(quattro)
<=? page 124 , the sport diffe rential dis
tr ib utes the dr iv ing power to the rear ax le de
pending on the situation. The distribution o f
power varies from balanced (comfort) to sporty
(dynamic) depending on the selected mode . The
goa l is a high leve l of agility and ab ility to accel
erate on curves. The ve hicle is very respons ive to
steer ing.
Cornering light*
The cornering light adapts the high beams to the
direction of the curve depending on the speed.
The pivot ing action and the light ing also adapt to
~ t he mode . .... N
" N .... 0 0 <..:l -
Adaptive cruise control*
T he behavio r whe n accelerating ca n be adjusted
from comfortable to sporty, depending on the
drive select mode. Adaptive cruise control also
responds to the driving behavior of the vehicle
ahead in a more conservative or sporty manner.
Engine sound *
The eng ine sound adapts to the c urren t mode
and can be subtle to sporty.
(D Note
Applies to: vehicles with adaptive ai r suspension
- Make sure there is enough clearance above
and be low the vehicle when parking. The
height of the vehicle (gro und clearance) can
change once it is parked due to temperature
fluctuations, changes to the load conditions
and changes to the dr iving modes .
- When transporting the vehicle on a car car
r ie r, train, ship or by other means, o nly tie
the vehicle down at the run ning s urface of
the t ires , which is the outer c ircumference.
Se cur ing the vehicle at the axle compo
nents, sus pen sion str uts o r towing eyes is
no t perm itted because the pressure in the
air suspens ion struts can change d uring
transport . The vehicle may not be secured
sufficiently if th is happens .
(D Tips
-In some models, the maximum vehicle
speed can only be reached in the auto and
dynamic modes.
- The S selector lever position automatica lly
engages if the dynamic mode is selected.
- Applies to: vehicles with dynamic steering:
operating noise is heard when starting or
stopping the engine. Th is does not ind icate
a problem.
105
Page 110 of 280
Parking systems
Parking systems
General information
Applies to: vehicles with parking system plus/rearview cam
era/peripheral camera
Depending on your vehicle's equipment , various
parking aids will help you when parking and ma
neuvering.
The
parking system plus assists you when park
ing by audibly and visually indicating objects de
tected
in front of and behind the vehicle
¢page 109.
The
rearview camera shows the area behind the
vehicle in the Infotainment system display. This
display assists you when you are cross or parallel parking
¢ page 110. The parking system plus
functions are also available
¢ page 109.
The
peripheral cameras assist you with parking
and maneuvering. You are aided by various cam
eras depending on the vehicle equipment level
¢ page 113. The parking system plus functions
are also available
¢ page 109.
A WARNING
-Always look for traffic and check the area
around your vehicle by looking at it directly
as well. The parking system cannot replace
the driver's attention. The driver is always responsible when entering or leaving a park
ing space and during similar maneuvers.
- Please note that some surfaces, such as
clothing, are not detected by the system .
-
-Sensors and cameras have blind spots in
which people and objects cannot be detect ed . Be especially cautious of small children
and animals.
- The sensors can be displaced by impacts or
damage to the radiator grille, bumper,
wheel housing and the underbody . The park
ing system may be impaired as a result.
Have an authorized Audi dealer or author
ized Audi Service Facility check their func
tion .
- Make sure the sensors are not obstructed by stickers, deposits or other materials. If they
are, the sensor function could be impaired.
108
For additional information on cleaning, see
¢page 231.
(D Note
-Some objects are not detected or displayed
by the system under certain circumstances:
- Objects such as barrier chains, trailer draw
bars, vertical poles or fences
- Objects above the sensors such as wall ex
tensions
- Objects with certain surfaces or structures
such as chain link fences or powder snow
- If you continue driving closer to a low ob
ject, it may disappear from the sensor range. Note that you will no longer be
warned about th is obstacle .
- Keep enough distance from the curb to re
duce the risk of damage to the rims .
(D Tips
-The system may provide a warning even
though there are no obstacles in the cover
age area in some situations, such as :
- certa in road surfaces or when there is tall
grass.
- external ultrasonic sources such as from
cleaning vehicles .
- in heavy rain, snow, or thick vehicle ex
haust.
- We recommend that you practice parking in
a traffic-free location or parking lot to be
come familiar with the system . When doing
this, there should be good light and weath
er conditions.
- You can change the volume and pitch of the
signals as well as the display
¢ page 118.
- Please refer to the instructions for towing a
trailer located in
¢page 118.
- What appears in the infotainment d isplay is
somewhat time-delayed.
- Th e sensors must be kept clean and free of
snow and ice for park aid to operate .
Page 113 of 280
co
co
.... N
" N .... 0 0 <.,;) 'SI"
-For objects that do not touch the ground,
such as the bumper of a parked vehicle, a
tra iler hitch or the rear of a truck. Do not
use the orientation lines in this case .
- If driven from a level surface onto an in
cline, or a downward slope.
- If driven toward protrud ing objects .
- If the vehicle is carrying too much load in
the rear.
- Applies to: vehicles with air s uspension: the
accuracy of the orientation lines and bl ue
surfaces decreases when the vehicle is raised/lowered
Q page 104.
(D Note
- Always read and follow the applicable warn
ings
Q 0 in General information on
page 108 .
-The orange-colored orientation lines in the
Infotainment display show the vehicle path
based on the steering wheel angle . The
front of the vehicle swings out more than
the rear of the veh icle . Mainta in plenty of
distance so that an exterio r mirror or a cor
ner of t he ve hicle does not co llide w it h any
obstacles.
Switching on/off
Applies to : vehicles wit h rearv iew came ra
Switching on
.,. Shift into reve rse , or
.,. Press t he
P' #A bu tton in the cente r console
Q page 109, fig . 117 . A short conf irmation
tone sounds and the LED in the button turns
on.
Switching between the r earview camera and
optical di splay
.,. Press t he Graphic control button ®
Q page 111, fig. 122 to see the opt ica l display.
.,. Press the
Rear view contro l button to see the
rearview camera image.
Switching off
.,. Drive faster than 6 mph ( 10 km/h), or
.,. Press the P•
11A button, or
.,. Switch the ign ition off .
Parking systems
(D Tips
-The visua l display in the left part of the d is
play sho uld he lp you detect the critical veh i-
cle areas.
- You can change the vol ume and pitch of the
signa ls as well as the d isplay
Q page 118.
Perpendicular parking
Applies to : veh icles w it h rearv iew camera
This view may be used when parking in a garage
or in a parking space .
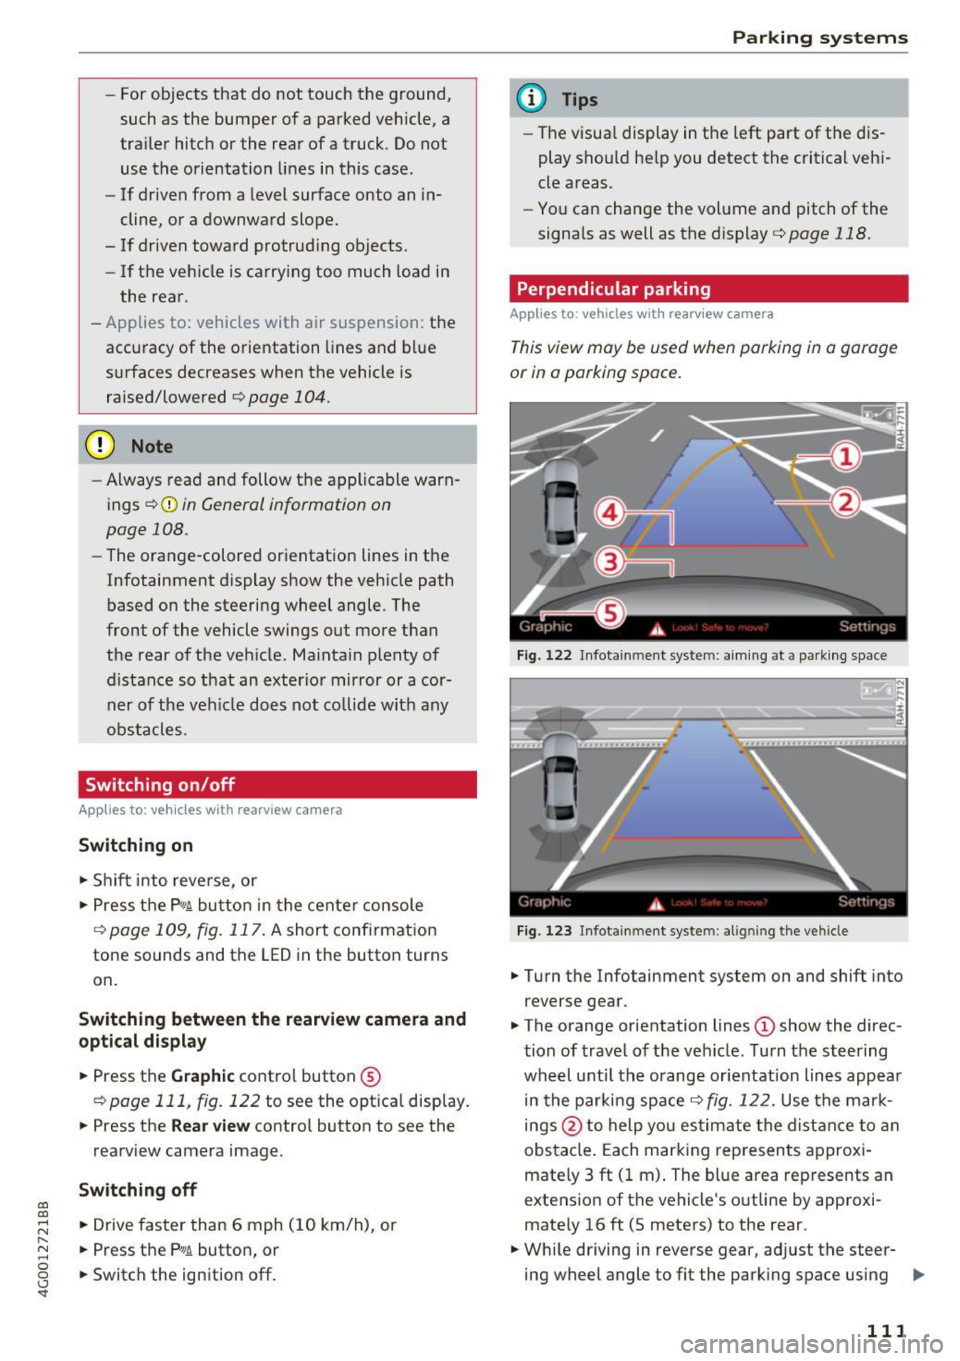
Fig. 1 22 In fota inme nt syste m: a im ing at a park in g space
Fi g. 123 Infot ainment syste m: alig ning t he vehicl e
.,. Turn the Infotainment system on and shift into
reverse gear .
.,. The orange orientation lines
(D show the direc
tion of trave l of the vehicle . Turn the steering
whe el unti l the orange orientation lines appear
in the parking space
Q fig. 122. Use the mark
ings @to help you es timate the distance to an
obs ta cl e. Each mar king represen ts approxi
mately 3 ft ( 1 m) . The blue area represents an
extens ion of the vehicle 's o utline by app roxi
mately 16 ft (5 meters) to the rear .
.,. Wh ile driving in reverse gear , adjust the steer-
ing wheel angle to fit the park ing space using ..,_
111
Page 117 of 280

co
co
.... N
" N .... 0 0 <..:l 'SI"
Corner view (front)/Corner view (rear)
Applies to: vehicles with peripheral cameras
Fig . 130 Infotainment system: Corner view (front)
Fig . 131 Infotainment system: Corner view (rear)
This view can assist you for examp le, when you
are exiting from an area w ith poor visibility. The
area at the front and rear s ides of the vehicles is
displayed .
.. To show the side view toward the front, select
the symbol ®
9 fig. 130 with the contro l knob
and press the control knob .
.. To show the side view toward the rear, select
the symbol ®
q fig. 131 with the control knob
and press the control knob .
Parking systems
Front
Applies to: vehicles with peripheral cameras
Fig. 132 Infot ainme nt system: front mode
This view assists you for example, in using the
full maneuvering range in front of the vehicle.
The area in front of the vehicle is displayed. The
vehicle surround ings are shown in the left area of
the display . You can switch between the optical
display and camera image
q page 114 .
.. Select the © symbol with the control knob. The
orange orientation lines mark the expected
path of the vehicle. Stop the vehicle when the
red orientation line* borde rs an object
q & in
General information on page 113.
Rear
Applies to: vehicles with peripheral cameras
Fig. 133 Infotainmen t system: rea r mo de
This view assists you for example, in using the
full maneuvering range behind the vehicle. The
area be hind t he vehicle is displayed. The vehicle
s ur rou ndings are shown in the left area of the
display. You can switch between the optical dis
play and ca mera image
9page 114.
.. Select the symbol @with the contro l knob . Ill>-
115
Page 119 of 280
co
co
.... N
" N .... 0 0 <.,;) 'SI"
.. Turn the Infotainment system on and shift into
reverse gear. The parking system must be
turned on and the
Cro ss pa rking view must be
displayed .
.. Press the control button on the Infotainment
unit @¢
page 112, fig . 124. The Parall el park
ing
view is displayed .
.. Back up and align your vehicle so the blue area
@ borders on the rear end of the vehicle be
hind yo u or on the parking space line
¢ ,&. in
General information an page 113, ¢(Din Gen
eral information on page 113 .
The blue area
represents an extens ion of the vehicle's out line
by approximately 16 ft (5 mete rs) to the rear .
The long side of the blue area should be on the
curb . The entire blue area must f it into the
parking space .
.,. With the ve hicle stopped, turn the steer ing
wheel to the right as far as it will go .
.. Back into the park ing space until the b lue curve
¢
page 112, fig . 125 tou ches the curb¢,&. in
General information on pag e 113, ¢(Din Gen
eral information on page 113 .
Stop the vehicle.
.. With the vehicle stopped, tu rn the steering
whee l to the left as far as it will go .
.. Cont inue to back into the parking space unt il
the vehicle is parked parallel to the curb¢.&.
in General information on page 113, ¢(Din
General information on page 113.@
repre
sents the rea r bumpe r. At the very latest, stop
the vehicle when the red orientation line @
borde rs an object. Keep an eye on t he front of
your vehicle while doing this .
Parking next to obstacles
If
there is an obstacle (such as a wall) next to the
parking space, pos ition the vehicle so t here is
mo re spa ce on that side. Posi tion the long s ide of
the blue area so th at there is s ufficient space
from the object. The area must not be on the
curb . You will also need to start turning the
steer ing whee l earlier. The blue curve
¢
page 112, fig. 125 must not touch the obsta
cle, but rather there should be enough distance.
Parking systems
(D Tips
The left or right orientation lines and surfaces
will be d isp layed, depend ing on the turn sig
nal be ing used .
Trailer mode
Appl ies to : vehicles with peripheral cameras a nd trai le r hitch
This view assists you in positioning the vehicle in
front of a trailer .
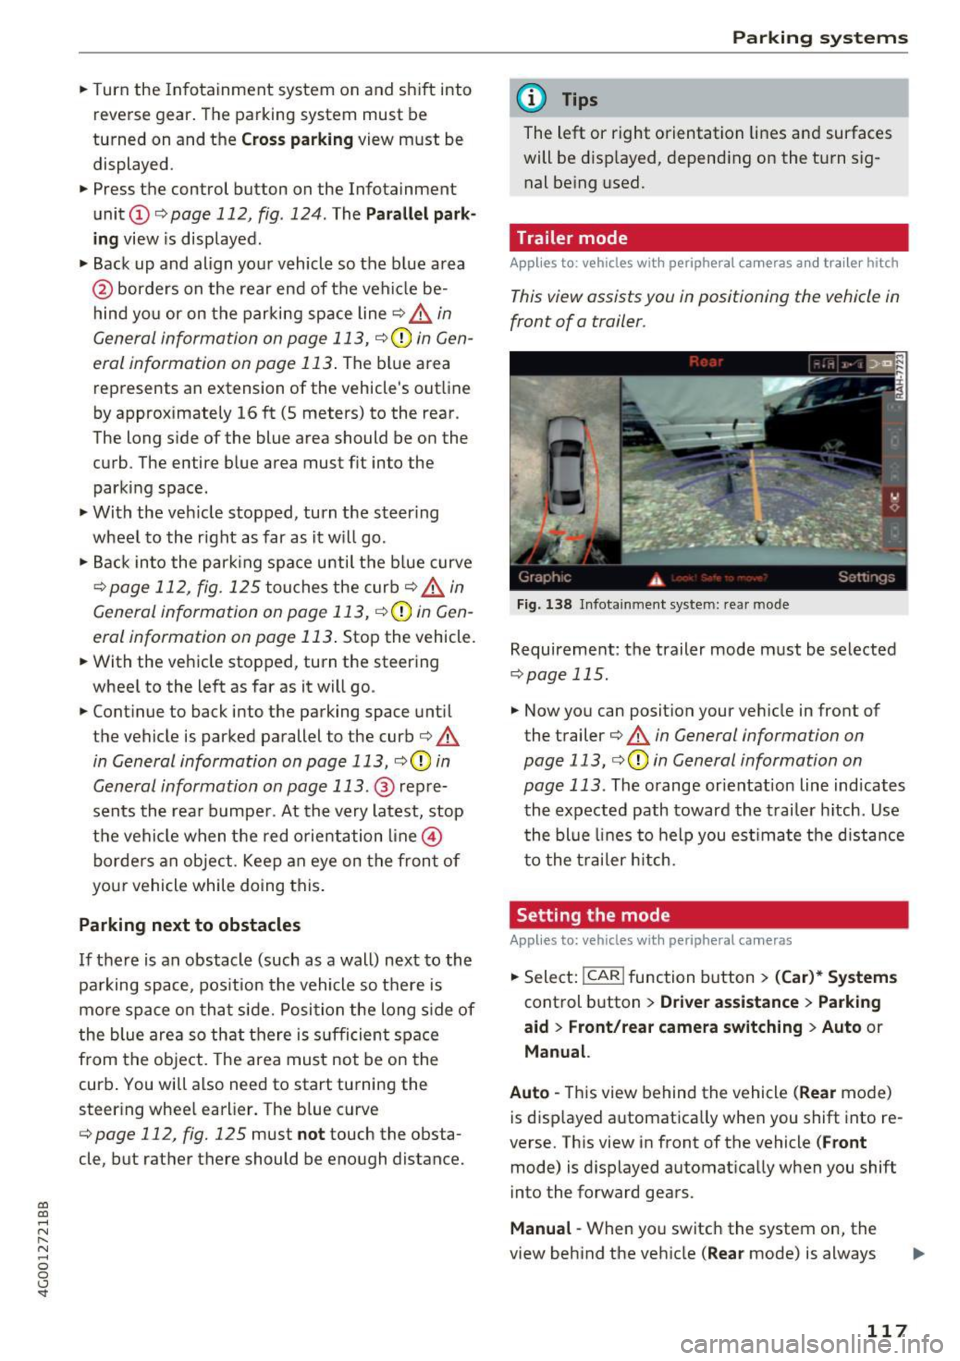
Fig. 1 38 Infot ainme nt syste m: rear mode
Requireme nt: the trailer mode must be selected
¢ page 115 .
.. Now you can posit ion you r ve hicle in front of
the trailer
¢ &. in General information on
page 113, ¢(Din General information on
page 113 .
The orange orientat ion line indicates
th e expected path toward the trailer h itch . Use
t he bl ue lines to help you es timate the d istance
t o the trai ler hitch.
Setting the mode
Appl ies to : vehicles wit h peripheral cameras
.. Sele ct: !CAR ! function button> (Car )* Sy stem s
control button > Driver assistance > Pa rking
aid
> Front /re ar camera swit ching > Auto or
M anual.
Auto -
This view behind the vehicle (Rear mode)
is disp layed automatically when you shift into re
verse. This view in front of the vehicle
( Front
mode) is d isplayed automat ica lly when you shift
into the forward gears.
Manu al -When you switch the system on, the
view beh ind the veh icle
(Rear mode) is always
117
Page 125 of 280
co
co
.... N
" N .... 0 0 <..:l '
plying the brakes carefully several times
dries the brakes and removes ice bui ld-up.
- The effic iency of the brakes can also be im
paired by driving for long stretches on roads
covered w ith salt without using the brakes.
You can remove salt deposits from the brake rotors and pads by ca ref ull y applyi ng
the brakes severa l t imes.
- If the front spo iler is damaged or you install
another spoiler, ma ke sure the front w heel
bra kes are vent ilated p roperly. O therwise,
t h e brake syste m could ove rheat, wh ic h re
duces the ir effec tiveness.
- Failure of a bra ke circuit impai rs b raking
performan ce, which incre ases bra king dis
tance . Avoid driving the vehicle and have it
towed it to the nearest authorized A udi
dealer or author ized Audi Service Facility .
- If the brake booste r is not working, you wi ll
have to press m uch ha rder on the bra ke
peda l to compensate for the lac k of the
booster.
(D Note
- Never let the brakes "rub" by pressing the
p edal light ly when bra king is not actually
necessa ry. This causes the brakes to over
heat and increases bra king d istance and
causes wear.
- Befo re driving downh ill a long distance on a
steep h ill, decrease your speed and select a
l ower gear. This makes use of the engine
braking effect and relieves the brakes. If
you need to b rake additionally, brake in in
te rvals and not cont inuous ly .
(0 Tips
- If the brake booster is not working, you
must p ress the brake pedal with much mor e
fo rc e th an norma l.
-If you re trofit your vehicle wi th a front spoil
er, whee l covers o r similar items, ma ke sure
t h at t he ai r flow to the front whee ls is not
i nte rru pted. Ot he rw ise the brake sys tem
c a n become too hot.
Intellig ent Technology
Electromechanical
steering, dynamic
steering
The ele ctromechanical s teering supports the
driver's steering movements.
P ower s teer ing adapts electroni cally based on
the ve hicle spee d.
Indicator lights and messages
• Do not dr iv e vehicle: steering defective
If this indicator light turns on and stays on and
t hi s message appears, the power steering may
have failed.
Stop the vehicle in a safe location as soon as pos
s ible. Do
not cont inue driving. See an authorized
Audi dealer or authorized A udi Service Fac ility for
ass istance.
,~n Stee ring: System fault You can continue
driving
If the indicator light turns on and the message
appea rs, the steering whee l may be more diffi
cul t to move o r more sensitive than us ual. The
steering wheel may also be at an ang le when
driv ing straight.
Drive slowly to an a uth orized Audi dea ler or a u
t h orized Audi Service Facility to have the mal
f unct ion corrected.
,Ion Dynamic steering: Initiali zing
If the indicator light is blinking and this message
appea rs, dynam ic steering* is be ing ini tialized.
T he s teer ing whee l will be easy to move a fter
sta rt ing the engine. Re -ini tialization mig ht be
necessary if the steering w heel was moved hard
to the left and right while the ve hicle was not
moving. The d isp lay turns off if the init ialization
was s uccessful.
(D Tips
- If the . or
,Ion indicato r light only stays on
for a short time, you may continue driving.
- The dynamic steering stability systems
¢ page 120 are not ava ilable in the event of
a system mal function.
IJJ,
123
Page 132 of 280
Driving safety
"' Always keep both feet in the footwell so that
you are in control of the vehicle at all times.
For detailed information on how to adjust the
driver's seat, see
c;, page SO.
A WARNING
Drivers who are unbelted, out of position or
too close to the airbag can be seriously in
jured by an airbag as it unfolds . To help re
duce the risk of serious personal injury:
- Always adjust the driver's seat and the
steering wheel so that there are at least
10 inches (25 cm) between your breastbone
and the steering wheel.
- Always adjust the driver's seat and the
steering wheel so that there are at least
4 inches (10 cm) between the knees and the
lower part of the instrument panel.
- Always hold the steering wheel on the out
side of the steering wheel rim with your
hands at the 9 o'clock and 3 o'clock posi
tions to help reduce the risk of personal in
jury if the driver's airbag inflates.
- Never hold the steering wheel at the
12 o'clock position or with your hands at
other positions inside the steering wheel
rim or on the steering wheel hub. Holding
the steering wheel the wrong way can cause
serious injuries to the hands, arms and head if the driver's airbag inflates.
- Pointing the steering wheel toward your
face decreases the ability of the su pplemen
tal driver's airbag to protect you in a colli
sion.
- Always sit in an upright position and never lean against or place any part of your body
too close to the area where the airbags are
located .
- Before driving, always adjust the front seats
properly and make sure that all passengers
are properly restrained .
- For adjustable head restraints: before driv
ing, always also adjust the head restraints
properly .
- Never adjust the seats while the vehicle is
moving. Your seat may move unexpectedly
and you could lose control of the vehicle.
130
-
-Never drive with the backrest reclined or
tilted far back! The farther the backrests are
tilted back, the greater the risk of injury due
to incorrect positioning of the safety belt
and improper seating position .
- Children must always ride in child seats
c;,page 171. Special precautions apply
when installing a child seat on the front
passenger seat
c:;, page 147.
Proper seating position for the front
passenger
The proper front passenger seating position is
important for safe, relaxed driving.
For your own safety and to reduce the risk of in
jury in the event of an accident , we recommend
that you adjust the seat for the front passenger
to the following position:
"'Adjust the angle of the seatback so that it is in
an upright position and your back comes in full
contact with it whenever the vehicle is moving.
"'For adjustable head restraints: adjust the head
restraint so the upper edge is as even as possi
ble with the top of your head. If that is not pos
sible, try to adjust the head restraint so that it
is as close to this position as possible
c:;, page 131 . Move the head restraint so that it
is as close to the back of the head as possible.
"' Keep both feet flat on the floor in front of the
front passenger seat .
"' Fasten and wear safety belts correctly
c;,page 142.
For detailed information on how to adjust the
front passenger's seat, see
c:;, page SO .
A WARNING
Front seat passengers who are unbelted, out
of position or too close to the airbag can be
seriously injured or killed by the airbag as it
unfolds. To help reduce the risk of serious
personal injury:
- Passengers must always sit in an upright po
sition and never lean against or place any part of their body too close to the area
where the airbags are located.
Ill-
Page 136 of 280
Driving safety
-Never place or install floor mats or other
floor coverings on top of already installed
floor mats. Additional floor mats and other
coverings will reduce the size of the pedal
area and interfere with the pedals.
- Always properly reinstall and secure floor
mats that have been taken out for cleaning.
- Always make sure that objects cannot fall
into the driver footwell while the vehicle is
moving. Objects can become trapped under
the brake pedal and accelerator pedal caus ing a loss of vehicle control.
Storing cargo correctly
Loading the luggage compartment
All luggage and other objects must be properly
stowed and secured in the luggage compart
ment.
Loose items in the luggage compartment can
shift suddenly, changing vehicle handling charac
teristics. Loose items can also increase t he risk of
serious personal injury in a sudden vehicle ma
neuver or in a collision.
.. Distribute the load evenly in the luggage com
partment.
.. Always place and properly secure heavy items in
the luggage compartment as far forward as
possible.
.. Secure luggage using the tie-downs provided
¢ page 57 .
.,. Make sure that the rear seatback is securely
latched in place .
_& WARNING
Improperly stored luggage or other items can
fly through the vehicle causing serious per
sonal injury in the event of hard braking or an
accident. To help reduce the risk of serious
personal injury:
- Always put objects, for example, luggage or
other heavy items in the luggage compart
ment.
- Always secure objects in the luggage com
partment using the tie-down hooks and
suitable straps.
134
_& WARNING ~ -
Heavy loads will influence the way your vehi
cle handles. To help reduce the risk of a loss
of control leading to serious personal injury:
- Always keep in mind when transporting
heavy objects, that a change in the center of
gravity can also cause changes in vehicle handling:
- Always distribute the load as evenly as
possible.
- Place heavy objects as far forward in the luggage compartment as possible.
- Never exceed the Gross Axle Weight Rating or the Gross Vehicle Weight Rating specified
on the safety compliance sticker on the left
door jamb. Exceeding permissible weight
standards can cause the vehicle to slide and
handle differently.
- Please observe information on safe driving
¢page 128.
_& WARNING
To help prevent poisonous exhaust gas from
being drawn into the vehicle, always keep the
rear lid closed while driving .
- Never transport objects larger than those
fitting completely into the luggage area be
cause the rear lid cannot be fully closed.
- If you absolutely must drive with the rear lid open, observe the following notes to reduce
the risk of poisoning:
- Close all windows,
- Close the power roof*,
- Open all air outlets in the instrument pan-
el,
- Switch off the air recirculation,
- Set the fresh air fan to the highest speed.
_& WARNING
Always make sure that the doors, all win
dows, the power roof* and the rear lid are se
curely closed and locked to reduce the risk of
injury when the vehicle is not being used.
- After closing the rear lid, always make sure
-
that it is properly closed and locked . ..,.
Page 146 of 280
Safe ty belts
Pregnant women must also be correctly
restrained
The best way to protect the fetus is to make sure
that expectant mothers always wear safety belts
corre ctly -throughout the pregnancy.
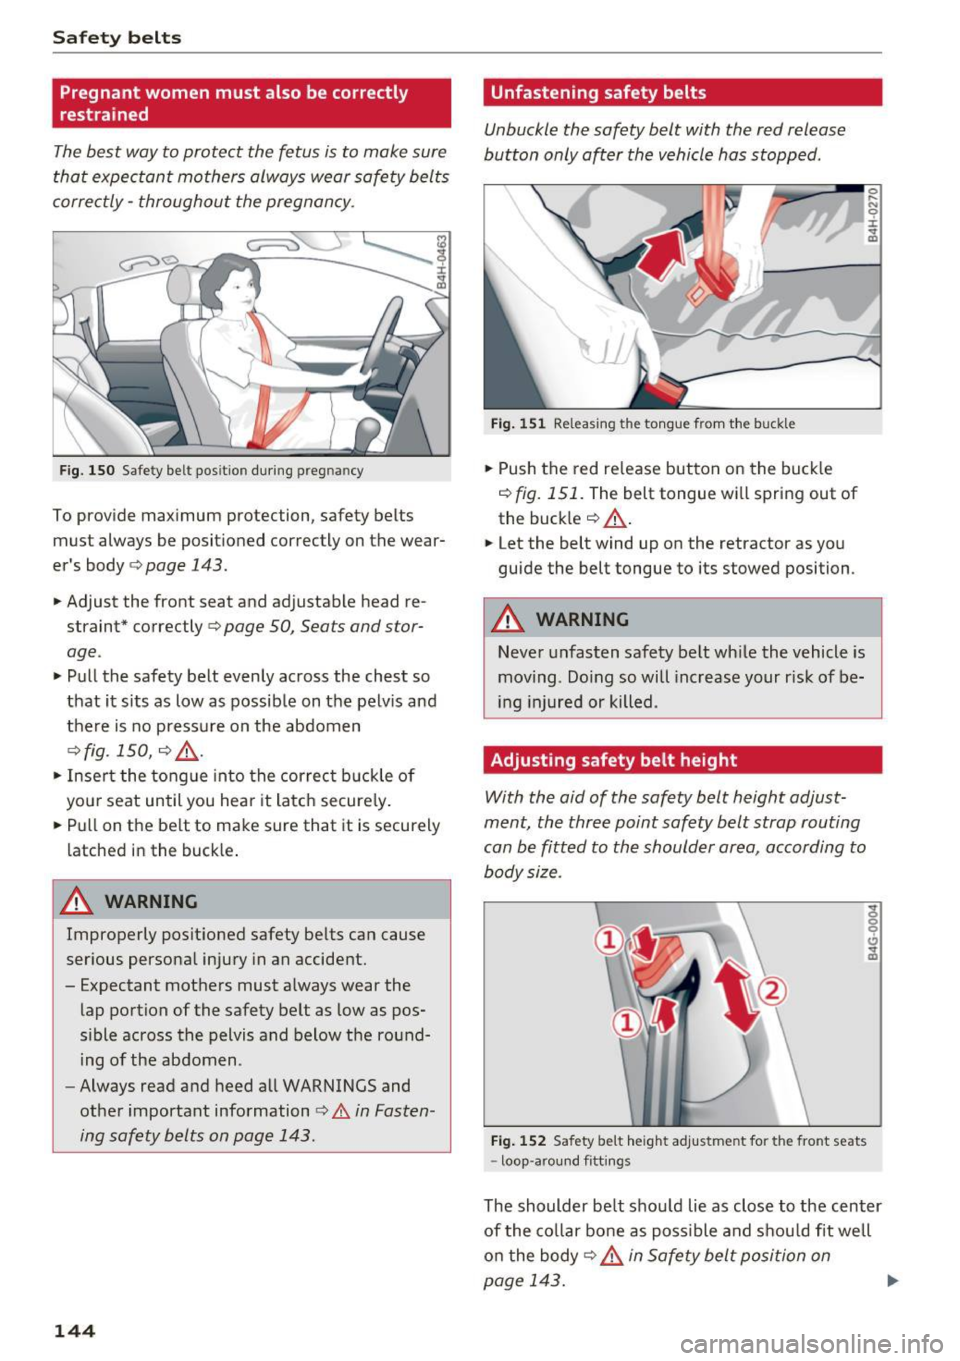
Fig. 150 Safety be lt pos itio n during preg nan cy
To prov ide maximum protection , safety belts
must always be posit ioned correctly on the wear
er's body
¢ page 143.
... Adjust the front seat and ad justable head re
straint* correctly ¢
page SO, Seats and stor
age .
... Pull the safety belt even ly across the chest so
that it s its as low as possible on the pelv is and
there is no pressure on the abdomen
9 fig. 150, 9 .&,.
... Inser t the tong ue into the cor rec t buckle of
you r seat until you hea r it latch secure ly .
... Pull on the be lt to make sure that it is securely
latched in the buck le .
A WARNING
Improperly pos itioned safety be lts can cause
ser ious persona l injury in an accident.
- Expectant mothers must a lways wear the
lap portion of the safety belt as low as pos
sible across the pelvis and below the ro und
ing of the abdomen .
- Always read and heed all WARNINGS and
other important information¢.&.
in Fasten
ing safety belts on page 143 .
144
Unfastening safety belts
Unbuckle the safety belt with the red release
button only after the vehicle has stopped.
.,,
Fig . 151 Releasing the tongue from the buckle
... Push the red re lease button on the buck le
9 fig. 151. The belt tongue wi ll spring out of
the buck le
9 A .
... Let the belt wind up on the retractor as yo u
guide the belt tongue to its stowed position .
A WARNING
Never unfasten safety belt while the vehicle is
moving . Do ing so will increase your r isk of be
ing inj ured or killed .
Adjusting safety belt he ight
With the aid of the safety belt height adjust
ment, the three point safety belt strap routing
can be fitted to the shoulder area, according to
body size .
Fig . 15 2 Safety belt height adj ustme nt fo r the front seats
- loop -a rou nd f ittings
0 ,-. N 0 :i: .. m
The shoulder be lt shou ld lie as close to the center
of the co llar bo ne as poss ible and s hou ld fit well
o n the body
9 .&. in Safe ty belt posi tion on
page 143.
~
Page 158 of 280
Airbag syste m
-If a seat heater has been retrofitted or oth
erwise added to the front passenger seat,
never install any child restraint system on
this seat .
- Never use cushions, pillows, blankets, or
similar items on the front passenger seat.
The additional layers prevent the capacitive
passenger detection system from accurately
measuring the capac itance of the ch ild safe
ty seat and/or the person on the seat and
th us keep the Advanced Airbag System from
working properly .
- Never place or use any electrical device
(such as a laptop, CD player, electronic
games device, power inverter or seat heater
for child seats) on the front passenger seat if the device is connected to the 12-volt
socket or the cigarette lighter socket. Such devices can influence the capacitance reg is
tered by the capac itive passenger detection
system, so that incorrect information is pro
vided to the airbag control unit.
- If you must use a child restraint on the front passenger seat and the child restraint man
ufacturer's instructions require the use of a
towel, foam cushion or something else to properly position the ch ild rest raint, make
certain that the
PASSENGER AIR BAG OFF
light comes on and stays on whenever the
child restraint is insta lled on the front pas
senger seat.
- If the
PASSENGER AIR BAG OFF light does
not come on and stay on, immediately in
stall child restraint in a rear seating position
and have the airbag system inspected by
your Audi dealer.
A WARNING
If the front passenger seat gets wet, dry it im
mediately.
- If liquid soaks into the front passenger seat,
this can keep the a irbag system from work
ing properly and may, for instance, deact i
vate the passenger frontal airbag. If this
happens, the
PASSENGER AIR BAG OFF
ligh t will come on and stay on togethe r with
the airbag indicator light
II (USA models) I
156
E,I (Canada mode ls) in the instr ument clus
ter.
- If liq uid is pooled on the seat, but has not
soaked in, th is may also keep the airbag sys
tem from working proper ly and cause the
passenger frontal airbag to be enabled
(turned on), even though there is a p roperly
installed child restraint system on the seat.
Wet towels or other wet things on the seat
cushion can have the same effect. If the
front p assenger front al airbag is turned on,
the
PASSENGER AIR BAG OFF light ligh t
wi ll go out.
How the Advanced Airbag System
components work together
The front Advanced A irbag System and the side
airbags supp lement the protection offered by the
front th ree-point safety belts with pretens ioners
and load lim ite rs and the adj ustab le head re
straints* to help reduce the risk of i njury in a
wide range of accident and cras h situations. Be
s ur e to read the impo rtant informat ion about
sa fety and heed the WARNINGS in this chapter.
Deployment of the Advanced A irbag System and
the activa tion of the safety belt pretens ioners de
pend on the dece lera tion measured by the crash
senso rs and registered by the electronic contro l
unit . Crash severity depends on speed and decel
eration as well as the mass and stiffness of the
vehicle or object involved in the crash.
On the passenger side, regard less o f safety be lt
use, the front passenger frontal airbag will be
turned off if the e lectrica l capacitance measured
by the capacitive passenger detection system on
the front passenger seat is less than the amount
programmed in t he e lectronic contro l unit . The
front passenger frontal a irbag w ill also be tur ned
off if the capacitance measured by the system for
t h e front passenger seat equals that of an infant
of about o ne yea r of age in one o f the ch ild sea ts
that was used to certify the Advanced Airbag Sys
tem under Federa l Motor Vehicle Safety Standard
208. The
PASSENGER AIR BAG OFF light comes
on and stays on to tell you when the front Ad
vanced Airbag System on the passenger side has been turned off¢
page 159. ..,.