ABS AUDI A6 2017 Owners Manual
[x] Cancel search | Manufacturer: AUDI, Model Year: 2017, Model line: A6, Model: AUDI A6 2017Pages: 280, PDF Size: 70.24 MB
Page 13 of 280
co
co
.... N
" N .... 0 0 <..:l '
description for •.
Overview
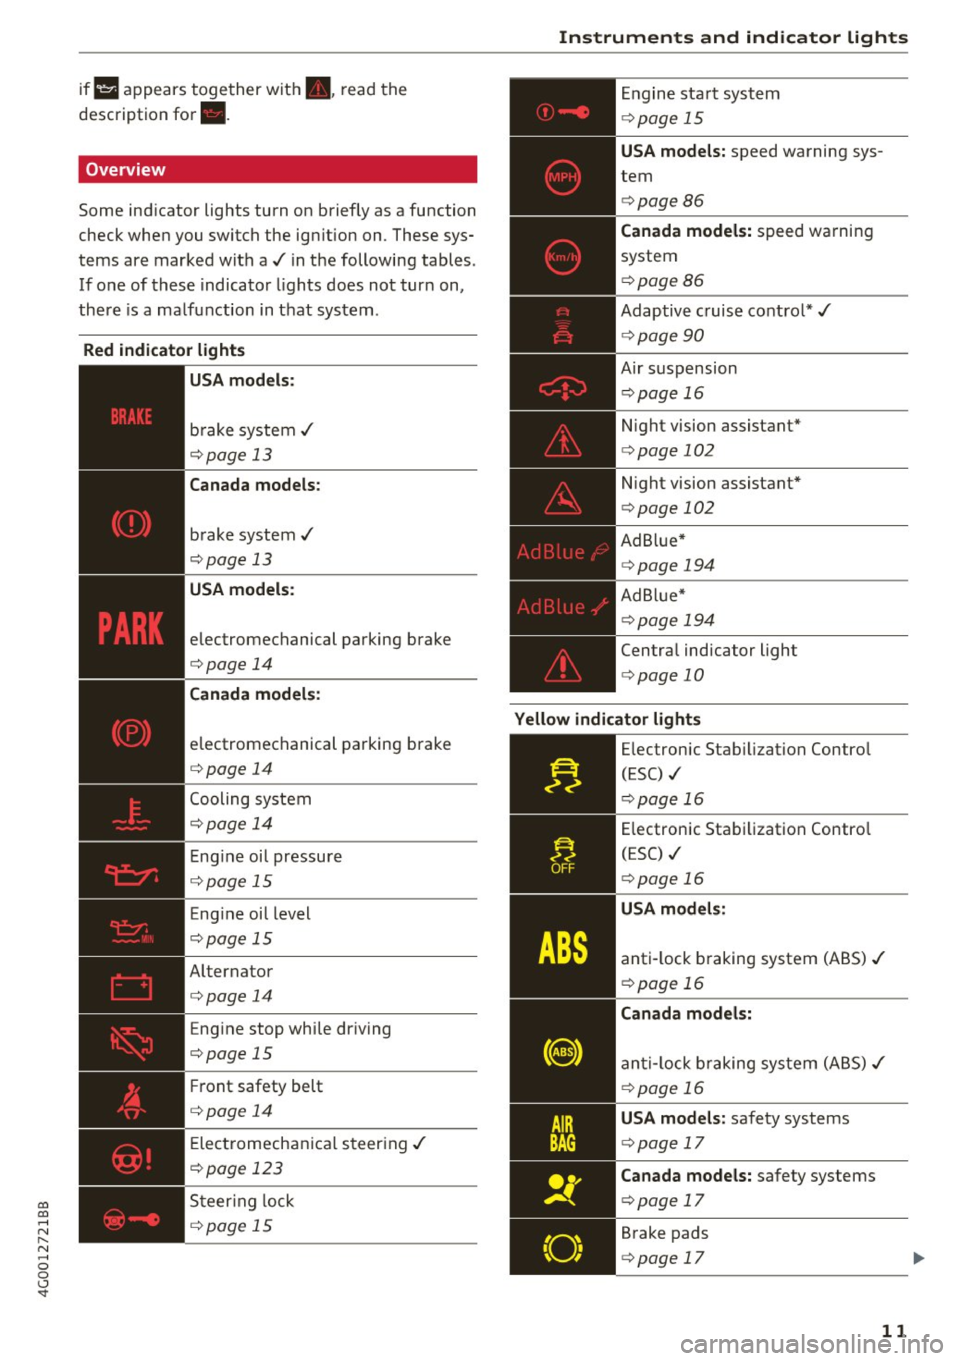
Some ind icator lights turn on briefly as a function
check whe n you switch the ig nition on . These sys
tems are marked with a../ in the following tables .
If o ne of these indicator lights does not turn on,
there is a ma lfu nction in t hat sys tem .
Red indicator lights
--------------
US A models:
brake syste m ../
¢page 13
Canada models:
brake system ../
¢pag e 13
USA models:
electromechanical parking brake
¢page 14
Canada models:
electromechanical parking brake
¢ page 14
Cooling system
¢page 1 4
Eng ine oi l pressure
¢ page 15
Eng ine oil level
¢ page 15
Alternator
¢page 14
Eng ine stop while dr iv ing
¢page 15
Fr ont safety belt
¢page 14
Ele ct romechani ca l st eer ing ../
¢page 123
Steer ing lock
¢ page 15
Instruments and ind icator lights
En gine sta rt syste m
¢page 15
USA models: speed warning sys
tem
¢ page 86
Canada model s: spee d wa rni ng
system
¢ page 86
Adap tive c ruise contro l* ../
¢ page 90
A ir suspension
¢ page 16
Night vision assistant*
¢ page 102
Night vision assistant *
¢page 102
Ad B lue*
¢ page 194
Ad Blu e*
¢page 19 4
Centra l indicator light
i=> page 10
Yellow indicator lights
.....
.,.I._
"O~ I I
" 1
--------------
Electronic Stab ilization Contro l
(ESC) ./
¢page 16
Electronic Sta bilization Contro l
(ESC) ../
¢page 16
USA models :
anti-lock braking system (ABS) ../
¢page 16
Canada models:
an ti-lock braking sys tem (A BS) ../
¢page 16
USA models: safety systems
¢ page 17
Canada models: safety systems
¢page 17
Brake pads
¢ page 17
11
Page 15 of 280
D
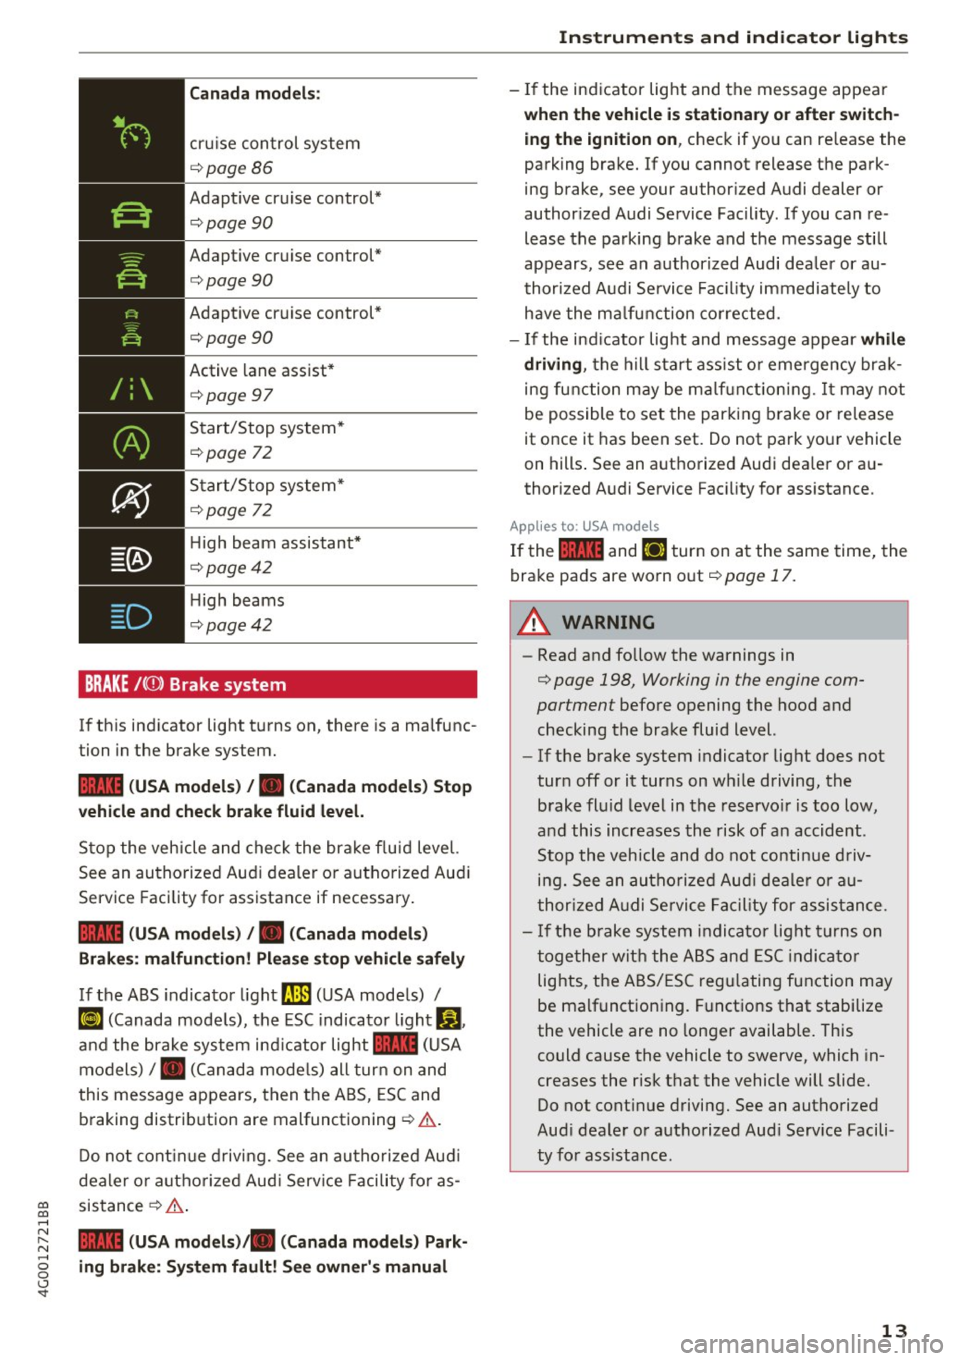
Canada models:
cruise control system
c:::>page86
Adaptive cruise control*
c:::>page90
Adaptive cruise control*
c:::> page 90
Adaptive cruise control*
c:::> page 90
Active lane assist*
c:::>page 97
Start/Stop system*
c:::> page 7 2
Start/Stop system*
c:::> page 72
High beam assistant*
c:::> page 42
High beams
c:::> page 42
BRAKE /(0 ) Brake system
If this indicator light turns on, there is a malfunc
tion in the brake system.
1111 (USA models) /. (Canada models) Stop
vehicle and check brake fluid level.
Stop the vehicle and check the brake fluid level.
See an authorized Audi dealer or authorized Audi
Service Facility for assistance if necessary.
1111 (USA models) /. (Canada models)
Brakes: malfunction! Please stop vehicle safely
If the ABS indicator light
rJ]l (USA models) /
Ke) (Canada models), the ESC indicator light Dl.
and the brake system indicator light 1111 (USA
models) /. (Canada models) all turn on and
this message appears, then the ABS, ESC and
braking distribution are malfunctioning
c:::> ,& .
Do not continue driving. See an authorized Audi
dealer or authorized Audi Service Facility for as-
~ sistance c:::> ,& .
.....
~ 1111 (USA models)/ . (Canada models) Park· .....
g ing brake: System fault! See owner's manual
<..:l '
- If the indicator light and the message appear
when the vehicle is stationary or after switch
ing the ignition on, check if you can release the
parking brake. If you cannot release the park
ing brake, see your authorized Audi dealer or
authorized Audi Service Facility . If you can re
lease the parking brake and the message still
appears, see an authorized Audi dealer or au
thorized Audi Service Facility immediately to
have the malfunction corrected.
- If the indicator light and message appear while
driving, the hill start assist or emergency brak
ing function may be malfunctioning.
It may not
be possible to set the parking brake or release
it once it has been set. Do not park your vehicle
on hills. See an authorized Audi dealer or au
thorized Audi Service Facility for assistance.
Applies to USA mode ls
If the 1111 and l'IJ turn on at the same time, the
brake pads are worn out
c:::> poge 17.
_8 WARNING
-Read and follow the warnings in
~ page 198, Working in the engine com
partment before opening the hood and
checking the brake fluid level.
- If the brake system indicator light does not
turn off or it turns on while driving, the brake fluid level in the reservoir is too low,
and this increases the risk of an accident.
Stop the vehicle and do not continue driv
ing. See an authorized Audi dealer or au
thorized Audi Service Facility for assistance.
- If the brake system indicator light turns on
together with the ABS and ESC indicator
lights, the ABS/ESC regulating function may
be malfunctioning. Functions that stabilize
the vehicle are no longer available. This
could cause the vehicle to swerve, which in
creases the risk that the vehicle will slide.
Do not continue driving. See an authorized
Audi dealer or authorized Audi Service Facili
ty for assistance.
13
Page 19 of 280
co
co
.... N
" N .... 0 0 <..:l '
See owne r's manual
I f the
G1 indicato r light and the ABS indicator
l ight ~ (USA models)
I (c a (C anada models)
turn on and this message appears, the re is a ma l
function in the ABS system or electronic differen
tial lock. This also causes the ESC to malfunct ion .
The brakes st ill function with their normal power,
but ABS is not act ive.
Drive to an authorized Audi dea ler or authorized
Aud i Service Facility immediately to have the
malfunction corrected.
_&. WARNING
If the 1111 (USA models)/ . (Canada mod
els) brake system indicator light turns on to
gether with the ABS and ESC indicator lights,
the ABS and ESC regulating function may
have malf uncti oned. Functions that stabilize
the vehicle are no longer available . This could
cause the vehicle to swerve, which increases
the risk that the vehicle will slide. Drive care
fully to the nearest authorized Audi dealer or
authorized Audi Service Facility and have the
ma lfunction corrected.
@ Tips
For additional information on ESC and ABS,
see
~page 120.
~/ !f Safety systems
The
II (USA models) / m (Canada mode ls) indi
cator light monitors the safety systems.
If the
II (USA mode ls)/ m (Canada models) in
dicator light turns on or blinks, there is a mal
function in a safety system such as the airbag or be lt tensioner system .
Drive to an authorized Audi dea ler or authorized
Audi Service Facility immediately to have the
malfunction corrected.
_&. WARNING
Have the malfunction in the safety systems
inspected immediately . Otherwise, there is a
r isk that the systems may not activate during
-
Instruments and indicator lights
a collision, which increases the risk of serious
injury or death.
(0) Brake pads
EiJ Brake pads!
The brake pads are worn .
Drive to an authorized Audi dealer or authorized
A udi Service Facility immediate ly to have the
brake pads checked.
Applies to: USA models
T he EiJ ind icator light turns on together with the
1111 indicator light
EPC Engine control (gasoline engine)
If the~ indicator light turns on if there is a
malfunction in the engine contro l.
Drive slowly to an authorized Audi dealer or au
thorized Aud i Serv ice Facility to have the engine
checked.
W Engine control (die sel engine )
T he engine is preheating if the
II indicator light
turns on when the ignition is switched on .
If the indicator light does not turn on or blinks
whi le driving, there is an engine control malfunc
tion .
Immediately drive slow ly to an authorized Audi
dealer or authorized Audi Service Facility to have
the malfunction cor rected.
a Malfunction indicato r lamp (MIL)
The malfunction indicator lamp (MIL) is part of
the On Board Diagnostic system (080 II) . The
('4 c;ymbol turns on when the ignition is switched
on and turns off aga in once the engine is started
and running at a steady idle speed . This indicates
that the MIL is function ing correctly.
The ind icator light turns on if there is a malfunc
t ion in the engine electronics . See an authorized
Audi dealer or authorized Audi Service Fac ility to
have the malfunction corrected. For additional
information, see~
page 25.
17
Page 23 of 280
co
co
.... N
" N .... 0 0 <.,;) 'SI"
Driver information
system
Overview
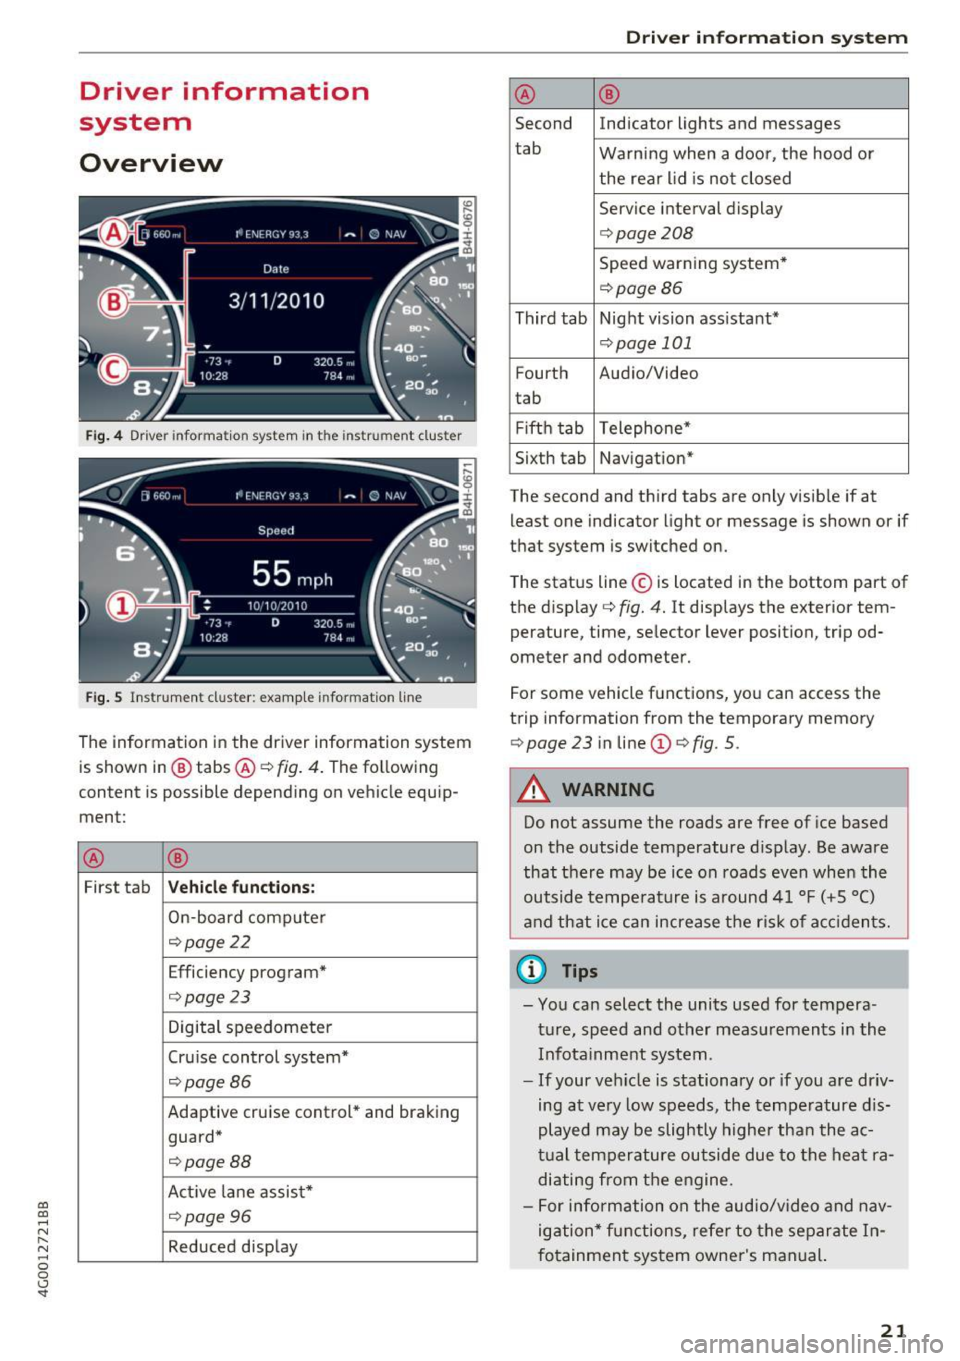
Fig . 4 Dr iver informa tion system in t he inst rum ent clus ter
Fig . S Ins trum ent cl uster: examp le in formation line
The information in the driver information system
is shown in @ tabs @¢
fig. 4. The following
content is possible depending on vehicle equip
ment:
® ®
First tab Vehicle functions :
On-board computer
¢page22
Efficiency program*
¢page 23
Digital speedometer
Cru ise control system*
¢ page86
Adaptive cruise control* and braking
guard*
¢ page88
Act ive lane assist*
¢page96
Reduced display
Driver in forma tion system
® ®
Second Indicator lights and messages
tab Warning when a door, the hood or
the rear lid is not closed
Service interval display
¢ page208
Speed warning system*
¢page86
Third tab Night vision assistant*
¢page 101
Fourth Audio/Video
t ab
Fifth tab Telephone*
Sixth tab Navigation*
The second and third tabs are only visible if at least one indicator light or message is shown or if
that system is switched on.
The status line © is located in the bottom part of
the display ¢
fig. 4. It displays the exterior tem
perature, time, selector lever position, tripod
ometer and odometer.
For some vehicle functions, you can access the
trip information from the temporary memory
¢
page 23 in line @¢ fig. 5 .
A WARNING
Do not assume the roads are free of ice based
on the outside temperature display. Be aware
that there may be ice on roads even when the
outside temperature is around 41 °F ( +5 °C)
and that ice can increase the risk of accidents.
(i} Tips
-You can select the units used for tempera
ture, speed and other measurements in the
Infotainment system .
- If your vehicle is stationary or if you are driv
ing at very low speeds , the temperature dis
played may be slightly higher than the ac
tual temperature outside due to the heat ra
diating from the eng ine.
- For info rmation on the audio/video and nav
igation* functions, refer to the separate In
fotainment system owner's manual.
21
Page 24 of 280
Driver information system
Operation
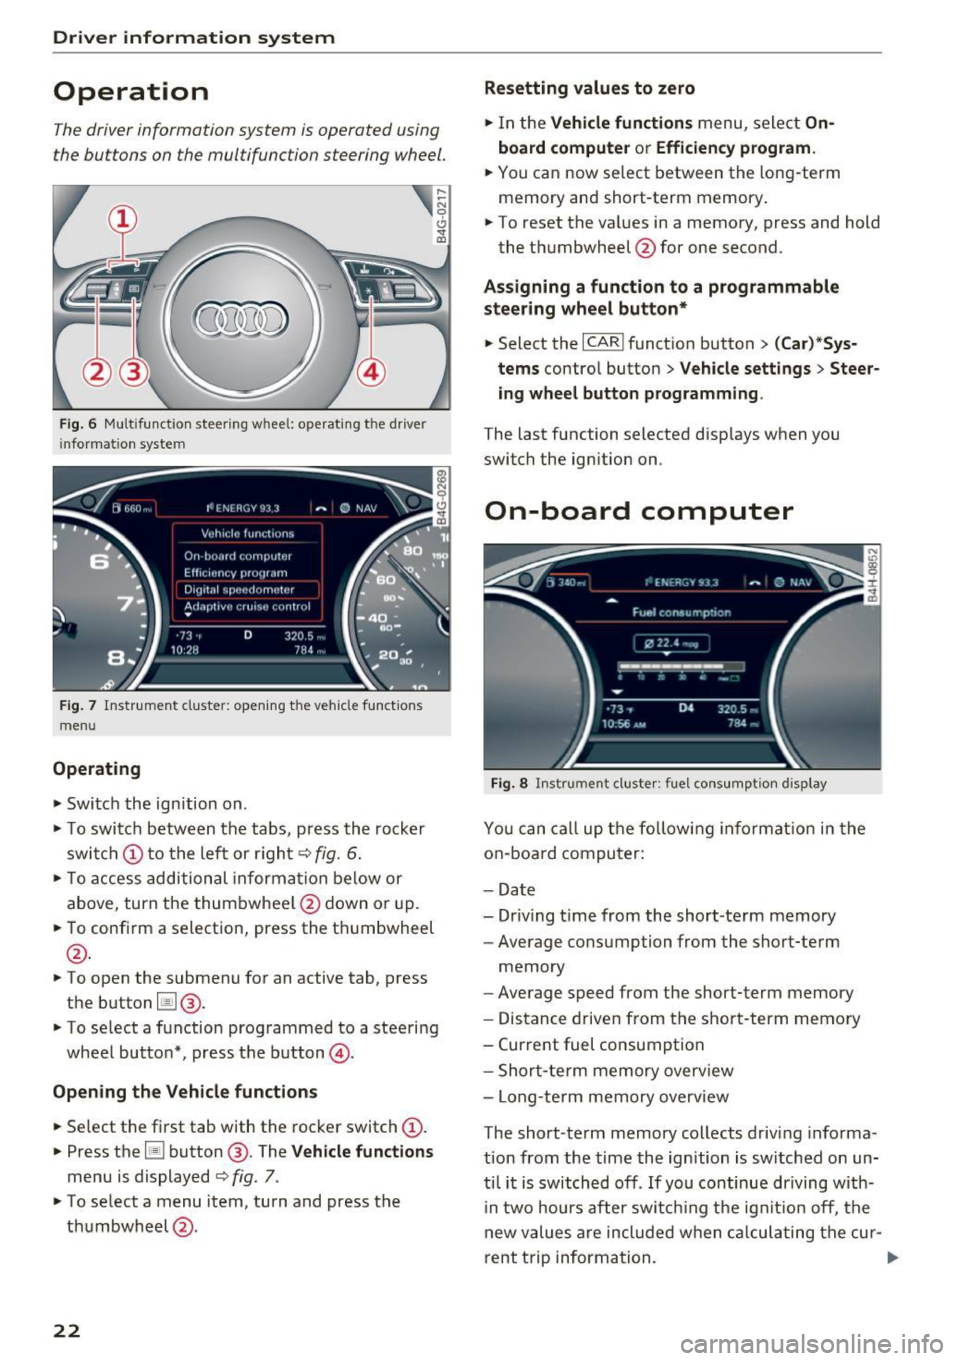
The driver information system is operated using
the buttons on the multifunction steering wheel.
Fig . 6 Mult ifunctio n steerin g wheel: operating the driver
i nfor matio n system
Fig. 7 Instr ume nt cluster : ope ning the vehicle functions
menu
Operating
• Switch the ign ition on.
• To swi tch betwe en the tabs, press the rocker
swi tch @to the left or r igh t
c::> fig. 6.
• To acce ss addition al in form ation be low or
above, turn the thum bwhee l@ down o r up.
• To confi rm a selection, press the t humbwheel
@.
• To open the submenu fo r an active tab, press
the b utton
l:il @.
• To select a function prog rammed to a steering
wheel butto n*, press t he bu tton @.
Opening the Vehicle functions
• Se lect t he fir st tab with the rocker switch (D .
• Press t he [ii button @ . The Vehicle functions
menu is displayed c::> fig. 7.
• To se lect a menu item, turn and press t he
th umbwheel @.
22
Resetting values to zero
• In the Vehicle functions menu, sele ct On
board computer or Efficien cy program .
• You ca n now select between the long -term
memory a nd short -term memory .
• To reset the va lues in a memo ry , press and hold
the t humbwh eel @ for one second.
Assigning a function to a programmable
steering wheel button*
• Select the I CAR ! funct ion button > (Car )*Sys
tems
contro l butto n > Vehicle settings > Steer
ing wheel button programming .
The last function selected disp lays when you
switch the ignition on.
On-board computer
Fig. 8 Instrument cluster: fu el cons umptio n display
You can ca ll up t he fo llowi ng in fo rmat io n in the
o n-board compu ter:
- Da te
- Driv ing t ime from the short-te rm memory
- Average consumption from the short-term
memory
- Averag e speed from the short -term memory
- Distance d rive n from the short-term memo ry
- Curre nt fuel consumption
- Shor t-te rm memory overv iew
- Lo ng-te rm memory o verv iew
The short-te rm memory collects driving informa
tion from the time the ig nition is switched on un
ti l it is switch ed off . If you continue driving w ith
i n two hours after sw itchi ng t he ig nition off, t he
new values are include d w hen c alcula ting t he cu r-
rent t rip inform ation.
Ill>-
Page 73 of 280
co
co
.... N ,..._
N .... 0 0 <..:l '
~ Bring the vehicle to a full stop.
~ Move the selector lever to the P or N position.
~ Press the I START ENGINE STOPI ~page 70,
fig. 78 button.
Steering lock1
)
The steering locks when you turn the engine off
using the
I START ENGINE STOPI button and
open the driver's door. The locked steering helps
prevent vehicle theft.
Emergency off function*
If it is absolutely necessary, the engine can also
be turned off while driving in the R or D/S selec
tor lever position at speeds below 6 mph (10 km/
h). To stop the engine, press and hold the
I START ENGINE STOPI button and also press the
brake pedal.
~ WARNING
- Never turn off the engine before the vehicle
has come to a complete stop. The full func
tion of the brake booster and the power
steering is not guaranteed. You may need to
use more force when braking or steering.
Because you cannot brake and steer as you
usually would, this could lead to accidents
and serious injuries.
- Always take the key with you whenever you
leave your vehicle. Otherwise, the engine
could be started or electrical equipment
such as the power windows could be operat
ed. This can lead to serious injury.
- For safety reasons, always park the vehicle
with the selector lever in the P position.
Otherwise, there is the risk that the vehicle
could roll unintentionally.
(D Note
If the engine has been under heavy load for
an extended period of time, heat builds up in
the engine compartment after the engine is
switched off and there is a risk of damaging
the engine. For this reason, let the engine run
l ) This function is not available in all countr ies.
Driving
at idle for approximately two minutes before
shutting it off.
(D Tips
After the engine has been switched off, the
radiator fan can continue to run for up to 10
minutes -even with the ignition switched off.
It can also switch on again after some time if
the coolant temperature rises as the result of
heat buildup or if the engine is already warm
and the engine compartment is also heated
by the sun's rays.
Messages
Turn off ignition before leaving car
This message appears and a warning tone sounds
if you open the driver's door when the ignition is
switched on.
Press brake pedal to start engine
This message appears if you do not press the brake pedal when starting the engine.
II Key not in vehicle?
This indicator light turns on and this message ap·
pears if the ignition key was removed from the
vehicle when the engine was running.
If the igni
tion key is no longer in the vehicle, you cannot
switch on the ignition or start the engine once
you stop it. You also cannot lock the vehicle from
the outside.
Shift to P, otherwise vehicle can roll away.
Doors do not lock if lever is not in P.
This message appears for safety reasons if the
transmission is not in the P position when you
switch the ignition off. Move the selector lever to
the P position. Otherwise the vehicle is not pro
tected from rolling and it cannot be locked.
II Key is not recognized. Hold back of key
against marked area. See owner's manual
If the indicator light turns on and this message
appears, there is a malfunction
~page 72. .,..
71
Page 78 of 280
Driving
During emergency braking, your vehicle will
brake similar to heavy braking. ESC and the
associated components (ABS, ASR, EDL)
cannot overcome the laws of physics. In cor
ners and when road or weather conditions
are bad, a full brake application can cause
the vehicle to skid or the rear end to swerve,
which increases the risk of an accident.
- If the power supply fails, you cannot set the
parking brake if it is released. In this case,
park the vehicle on level ground and secure
it by placing the selector lever in the P posi
tion. See an authorized Audi dealer or au
thorized Audi Service Facility for assistance.
- Always take the vehicle key with you when leaving your vehicle, even for a short period
of time. This applies particularly when chil
dren remain in the vehicle . Otherwise chil
dren could start the engine, release the
parking brake or operate electrical equip
ment such as power windows, which in
creases the risk of an accident.
- No one should remain in the vehicle when it is locked -especially children. Locked doors
make it more difficult for emergency work
ers to get into the vehicle, which puts lives
at risk.
(D Tips
When stopping at a traffic signal or stopping in city traffic, you can set the parking brake
manually. The vehicle does not have to be
held with the brake pedal. The parking brake
eliminates the tendency to creep when a se
lector lever position is engaged. As soon as
you press the accelerator pedal, the parking brake releases automatically and your vehicle
starts to move ¢
page 76.
(D} Tips
-Occasional noises when the parking brake is
set and released are normal and are not a
cause for concern.
- The parking brake goes through a self-test
cycle at regular intervals when the vehicle is
stopped. Any noises associated with this are normal.
76
- If there is a power failure, the parking brake
will not set if it is released, and it will not release if it is set ¢&. . See an authorized
Audi dealer or authorized Audi Service Fa cility for assistance .
Starting from a stop
Various convenience and safety functions may be
available when the vehicle begins driving, de
pending on vehicle equipment .
Starting on hills with the parking brake set
Requirement: the driver's door must be closed
and the driver's safety belt must be fastened.
.,. To start driving comfortably when on a hill, set
the parking brake and begin driving as usual.
The braking force of the parking brake does not
release automatically until the wheels build up
enough driving force.
Starting on hills with hill hold assist
Hill hold assist makes it easier to start on hills.
Requirement: the driver's door must be closed
and the engine must be running.
.,. To activate hill hold assist, press and hold the
brake pedal for several seconds. The vehicle
must be in an uphill direction of travel.
After releasing the brake pedal, the braking pow er is maintained for a brief moment¢&. to pre
vent the vehicle from rolling back when starting.
During this time, you can easily begin to move
your vehicle.
&_ WARNING
- If you do not begin driving immediately or
the engine stalls after releasing the brake
pedal, your vehicle may begin to roll back-
ward. Press the brake pedal or set the park- ing brake immediately.
- The intelligent technology of hill hold assist
cannot overcome the limitations imposed by
natural physical laws. The increased comfort
offered by hill hold assist should not cause
.
you to take safety risks . ~
Page 85 of 280
co
co
.... N
" N .... 0 0 <..:l '
General information
Your Audi was designed primarily for passenger
transportation .
If you plan to tow a trailer, please remember that
the additional load will affect durability, econo
my and performance.
Trailer towing not only places more stress on the
vehicle, it also calls for more concentration from
the driver.
For this reason, always follow the operating and
driving instructions provided and use common
sense.
(D Note
If you are going to tow a trailer, you must ac
tivate the trai ler operation mode
c::> page 83, Operating instructions.
Technical requirements
Trailer hitch
Use a weight-carrying hitch conforming to the
gross trailer weight. The hitch must be suitable
for your vehicle and trailer and must be mounted
securely on the vehicle's chassis at a
technically
sound
location . Use only a trailer hitch with a re
movable ball mount. Always check with the trail
er hitch manufacturer to make sure that you are
using the correct hitch.
Do not use a bumper hitch.
The hitch must be installed in such a way that it
does not interfere with the impact -absorbing
bumper system . No modifications should be
made to the vehicle exhaust and brake systems .
From time to time, check that all hitch mounting
bolts remain securely fastened.
When you are not towing a trailer,
remove the
trailer hitch ball mount . This prevents the hitch
from causing damage shou ld your vehicle be
struck from behind
c::> .&, .
Tra iler towing
Trailer brakes
If your trailer is equipped with a braking system,
check to be sure that it conforms to all regu la
tions.
T he trailer hydraulic brake system must not be
directly connected to the vehicle's hydraulic
brake system.
Safety chains
Always use safety chains between your vehicle
and the tra iler .
Trailer lights
Trailer lights must meet all regulations. Be sure
to check with your Audi dealer for correct wiring,
switches and relays.
Mirrors
If you are unable to see the traffic behind you us
ing the regular outside mirrors, then you
must in
stall extended mirrors . It is important that you
always have clear vision to the rear .
A WARNING
--
After removing the trailer hitch, do not store
it in your vehicle. In case of sudden braking,
the hitch could fly forward and injure you or
your passengers.
Operating instructions
Maximum trailer weight
A trailer for your vehicle is lim ited to a typical
class 1 or class 2 trailer.
Trailer load distribution
Be sure the load in the trailer is held securely in
place to prevent it from shifting forward, back
ward or s ideways.
Never allow a passenger to ride in a trailer c::> .&.
in Driving instructions on page 85 .
Engine cooling system
Towing a trailer makes the engine work harder. It
is important that the cooling system's perform
ance is up to the additional load. Make sure that
the cooling system has enough fluid . ..,.
83
Page 87 of 280
co
co
.... N
" N .... 0 0 <..:l '
The coolant temperature gauge c::> page 9 must
be observed carefu lly . The coolant temperature
can increase if you drive on long inclines in a low
gear at high engine speeds. Reduce your speed immediately if the LEDs in the top part of the dis
play turn on.
F or more information about ind icator lights, re
fer to.
c::> page 14.
A WARNING
Anyone not proper ly restrained in a moving
vehicle is at a much greater risk in an acci
dent. Never let anyone ride in your car who is
not properly wearing the restraints provided
by Audi.
Trailer towing information
Important to know
Your vehicle handles differently when towing a
tra iler because of the additional weight and dif
ferent weight distribut ion . Safety, performance
and economy will greatly depend on how careful
ly you load your trailer and operate your rig.
Before you actually tow your trailer, practice
turning, stopp ing and back ing up in an area away
from traff ic. Keep practicing until you have be
come completely fam iliar with the way your vehi
cle-trailer combination behaves and responds.
Backing up is difficult and requires pract ice.
Backing up with a trailer generally requires steer
ing action opposite to that when backing up your
vehicle without a trailer.
Maintain a greater d istance between your vehicle
and the one in front of you. You w ill need more
r oom to stop. To compensate for the trailer, you
will need a larger than normal turning radius.
When passing, remember that you cannot accel
erate as fast as you normally wou ld because of
the added load. Make s ure you have enough room
to pass. After passing, a llow plenty of room for
your tra iler before changing lanes again.
Trailer towing
Avoid jerky starts, sharp turns or rapid lane
changes.
(D Tips
- Do not tow a trailer during the break-in peri
od of your vehicle.
- If you tow a trailer, your Audi may require
more frequent maintenance due to the ex
tra load
c::> page 259 .
Parking on a slope
Do not pork on a slope with a trailer. If it cannot
be avoided, do so only after doing the following:
When parking:
• Apply the foot brake.
• Have someone place chocks under both the ve
hicle and the trailer wheels.
• With chocks in place, slowly release the brakes
until the wheel chocks absorb the load.
• Turn the whee ls towards the curb.
• App ly the parking brake.
• Select the P selector lever position.
When restarting after parking:
• App ly the foot brake.
• Start the engine.
• Select the D/S se lector lever position.
• Release the parking brake and slowly pull out
and away from the wheel chocks.
• Stop and have someone retrieve the wheel
chocks.
(D Tips
If you move the selector lever of the automat
i c transmission to P before applying the park
i ng brake and before blocking the wheels, you
may have to use more force later to move the
l ever out of the P position.
85
Page 122 of 280
Intelligent Technology
Intelligent Technology
Electronic Stabilization
Control (ESC)
Description
Elect ronic Stabilization Control (ESC) suppo rts
driver safety.
It red uces the risk of slipping and
improves dr iving stability. ESC detects crit ica l sit
uations such as the veh icle oversteering and un
dersteering or the wheels are sp inning. The vehi
cle is stabilized by app lying the brakes or reduc
ing engine torque. As soon as the ESC is active ly
regulat ing, the
D.1 indicato r light blin ks in the in
s trumen t clus ter.
The fo llow ing systems are integrated in the ESC :
Ant i-lock braking system (ABS)
ABS p revents the whee ls from locking whe n brak
ing. The vehicle can sti ll be steered even during
hard brak ing. Apply steady press ure to the brake
pedal. Do not pump the pedal. A puls ing in t he
b rake pedal indicates that the system is acting to
s tabilize the vehicle .
Br ake assist system
The brake assist system can decrease brak ing dis
tance . It increases brak ing power when the driver
presses the brake pedal q uick ly in emergency sit
uations . You must press and hold t he b rake pedal
until the dangerous sit uat io n is over . In veh icles
with adapt ive c ruise control*, the bra ke as sist
sy stem is more sensitive if t he di sta nce detec ted
t o the vehicle dr iv ing ahead is too small. On
ve hicl es with act ivated and f unct io ni ng night vi
sion assist*, the brake assist system can respond mo re sensit ively if there is a warning .
Anti-slip regulation (ASR)
ASR red uces eng ine power when the drive w heels
be gin sp inning an d adapts the force to the road
conditions. This makes it easie r to sta rt, acceler
ate and dr ive up h ills.
Electronic differential lock (EDL)
T he EDL applies the b rakes to a whee l t h at s tarts
sp inning and tra nsfe rs t he dr ive powe r to t he
o ther driving wheel or wheels (if the veh icle is
120
equipped with a ll w hee l drive*) . T h is f unction is
not avai lab le at higher speeds .
I n extreme cases , EDL automat ic al ly swi tches off
to keep t he b rake o n the br aked wheel from ove r
heating. The ve hicle is still working correct ly. ED L
will switc h on again automatically when condi
tions have returned to normal.
Steering recommendation
The ESC he lps to s tabili ze th e vehicle by ch ang ing
t h e s teer ing torque.
I n veh icles with dynamic s teer ing*, ESC a lso
helps to stab ilize the s teeri ng in cr it ic al situ a
tions.
Selective wheel torque control
Se lective wheel to rque control is used when d riv
i ng on curves . The front whee l on the ins ide of
t h e curve or both whe els on the i nside of th e
cu rve are braked se lectively as needed. This al
l ows mo re pre cise driving in curves .
Automatic post -collision braking system
The "a utomat ic post -coll is io n braking system"
can help to reduce the risk of sl iding and of addi
tiona l co llisions after an acc iden t. If the a irbag
c on tro l modu le dete cts a collision above a cer tain
vehicle speed, the veh icle is braked by t he ESC.
The veh icle does not brake automatically if:
- the drive r presses the accelerator pedal, or
- the bra king force generate d by the pressed
brake pedal is greater than the b raking force
that would be in itiated by the system, or
- the ESC, the bra ke system or the vehicle elect ri
cal system are not functioning.
A WARNING
- The ESC and its integ rated systems can not
overcome the lim its imposed by natura l
p hys ica l laws. Th is is es pec ially i mpo rtan t
on s lippery or we t roads. If the system s be
g in a cting to s tabili ze yo ur vehicle, you
should immedi ately alte r your speed to
match the road and tra ffi c conditions. Do
not let the inc reased safety provided tempt