stop start AUDI A6 2021 Owner´s Manual
[x] Cancel search | Manufacturer: AUDI, Model Year: 2021, Model line: A6, Model: AUDI A6 2021Pages: 332, PDF Size: 119.45 MB
Page 205 of 332
4K0012721BE
Navigation
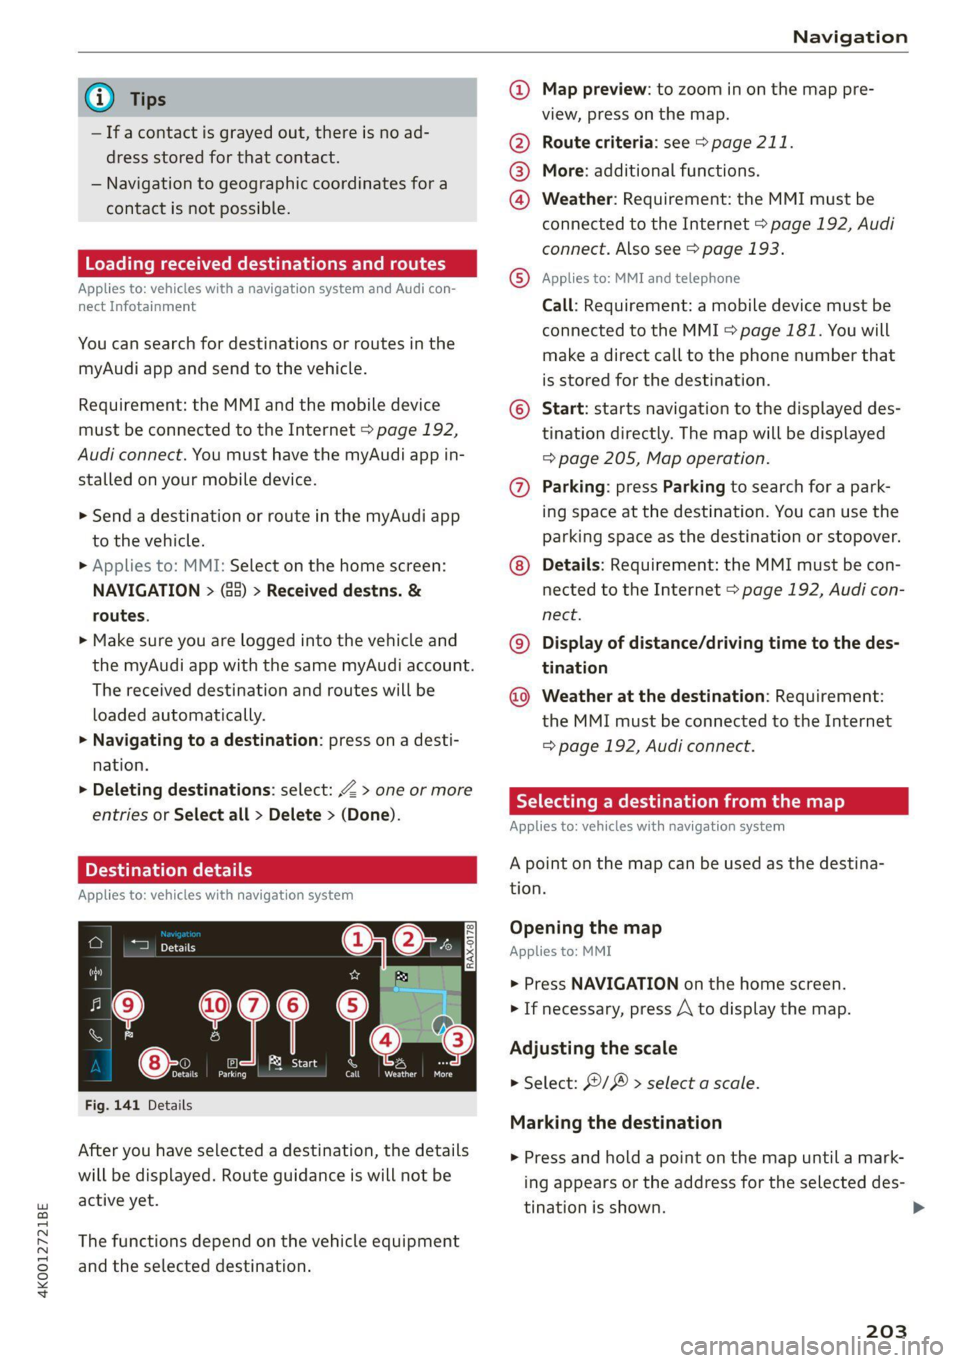
@) Tips @ Map preview: to zoom in on the map pre-
; ; view, press on the map.
— Ifa contact is grayed out, there is no ad- @ Route criteria: see © page 211.
dress stored for that contact.
— Navigation to geographic coordinates for a
contact is not possible. @
®
More: additional functions.
Weather: Requirement: the MMI must be
connected to the Internet > page 192, Audi
connect. Also see > page 193.
Loading received destinations and routes
Applies to: MMI and teleph:
Applies to: vehicles with a navigation system and Audi con- © PRES? STS EBON
nect Infotainment Call: Requirement: a mobile device must be
connected to the MMI > page 181. You will
make a direct call to the phone number that
is stored for the destination.
You can search for destinations or routes in the
myAudi app and send to the vehicle.
Requirement: the MMI and the mobile device © Start: starts navigation to the displayed des-
must be connected to the Internet > page 192, tination directly. The map will be displayed
Audi connect. You must have the myAudi app in- => page 205, Map operation.
stalled on your mobile device. @ Parking: press Parking to search for a park-
> Send a destination or route in the myAudi app ing space at the destination. You can use the
to the vehicle. parking space as the destination or stopover.
> Applies to: MMI: Select on the home screen: Details: Requirement: the MMI must be con-
NAVIGATION > (a5) > Received destns. & nected to the Internet > page 192, Audi con-
routes. nect.
» Make sure you are logged into the vehicle and © Display of distance/driving time to the des-
the myAudi app with the same myAudi account. tination
The received destination and routes will be Weather at the destination: Requirement:
loaded automatically. the MMI must be connected to the Internet
> Navigating to a destination: press on a desti- > page 192, Audi connect.
nation.
> Deleting destinations: select: Z > one or more 7 Eh
: RY a date Meld Le MLL] 2)
entries or Select all > Delete > (Done).
Applies to: vehicles with navigation system
Applies to: vehicles with navigation system tion.
0|6:. Opening the map
om Applies to: MMI
> Press NAVIGATION on the home screen
aa 7 > If necessary, press A to display the map.
Adjusting the scale
eases
er a A
> Select: ©/ > select a scale.
Fig. 141 Details
Marking the destination
After you have selected a destination, the details
will be displayed. Route guidance is will not be
active yet.
> Press and hold a point on the map until a mark-
ing appears or the address for the selected des-
tination is shown. >
The functions depend on the vehicle equipment
and the selected destination.
203
Page 206 of 332
Navigation
Selecting map content (such as POIs) as the
destination
Requirement: map content must be displayed
=> page 210.
> Press on map content on the map (for example,
ii).
Selecting the destination
> Select: F2 > Start.
Route guidance will be activated and the map will
be displayed > page 204, fig. 142.
Stopovers and route plan
Applies to: vehicles with navigation system
You can enter additional destinations during ac-
tive route guidance.
Entering a stopover
Requirement: route guidance must be active.
> Enter a destination > page 201.
Displaying stopovers or the route plan
All destinations are listed in the route plan.
> Press on fin the side menu on the map
=> page 204, fig. 142.
Editing stopovers
> Press on Pin the side menu on the map
=> page 204, fig. 142.
> Adding a stopover: Select: Add destination >
select a destination > Add to route.
> Moving a stopover: press Z. Touch the > sym-
bol and move the entry to the desired position.
Press Done.
> Deleting a stopover: Select: Z > one or more
entries or Select all > Delete > (Done).
Stopping route guidance
Applies to: vehicles with navigation system
Requirement: route guidance must be active and
the map must be displayed.
> Applies to: MMI: Press B( > page 204, fig. 142.
> Applies to: multifunction steering wheel: Select
in the instrument cluster: Navigation tab >
button > Cancel route guidance.
204
Map
Map functions
Applies to: vehicles with navigation system
yn >] 13:51 | E53 Dreshertown Rd
py pe Dee aay a ae LE
- oF ‘a € “epio
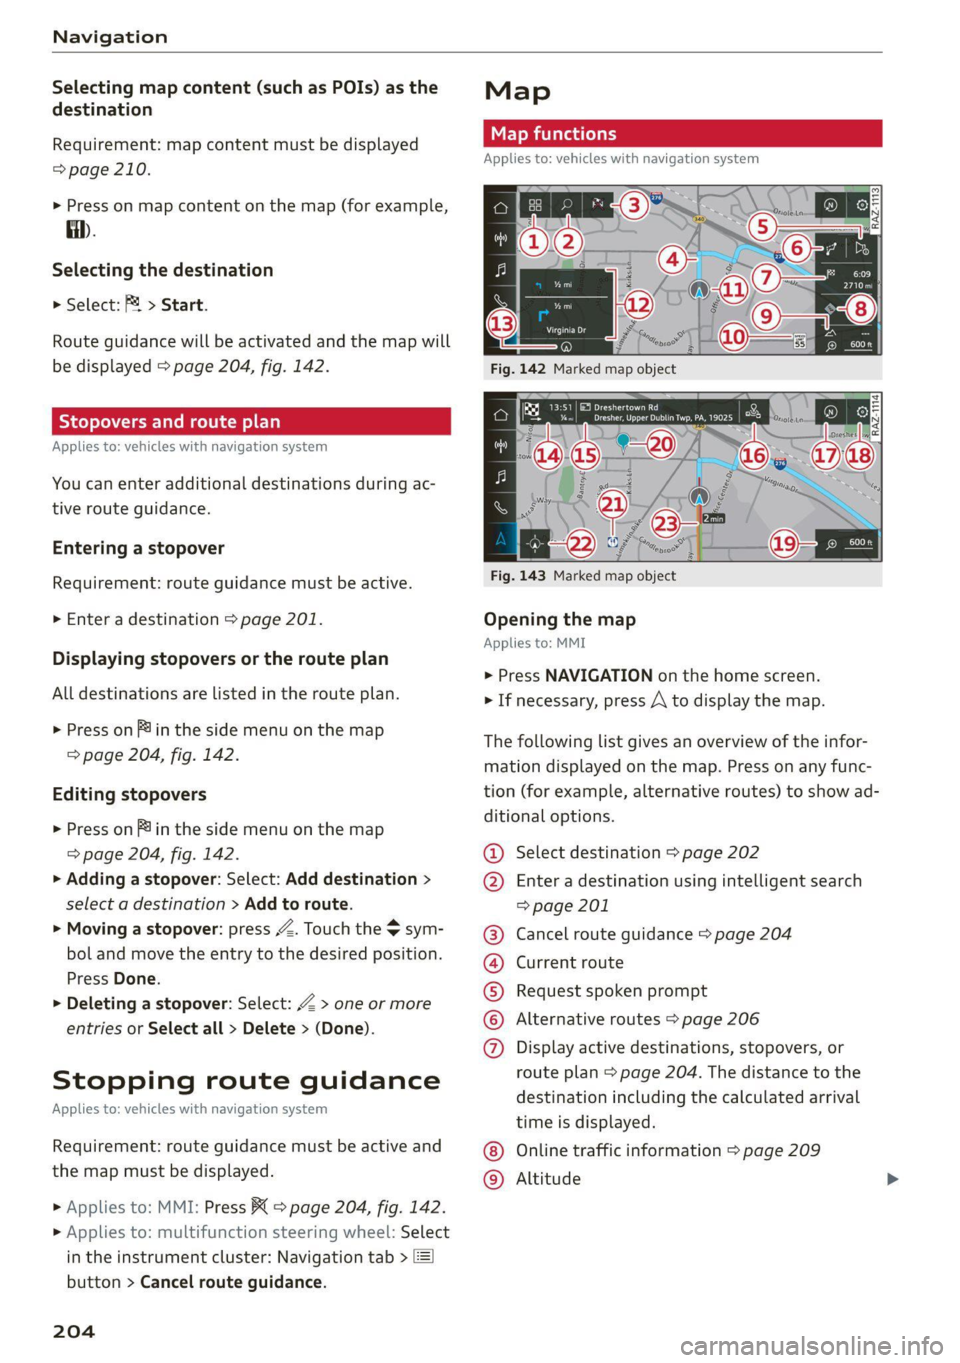
Fig. 143 Marked map object
Opening the map
Applies to: MMI
> Press NAVIGATION on the home screen.
> If necessary, press A to display the map.
The following list gives an overview of the infor-
mation displayed on the map. Press on any func-
tion (for example, alternative routes) to show ad-
ditional options.
Select destination > page 202
Enter a destination using intelligent search
=> page 201
Cancel route guidance > page 204
Current route
Request spoken prompt
Alternative routes > page 206
COOH
OO
Display active destinations, stopovers, or
route plan > page 204. The distance to the
destination including the calculated arrival
time is displayed.
Online traffic information > page 209
Altitude ©®
Page 207 of 332
4K0012721BE
Navigation
@ Displays the maximum permitted speed): Symbol Description
within city limits, on expressways, and on se Favorites > page 206
highways. S TT :
. . Bi Previous destinations display
@) Current vehicle position
@ Route information > page 211 Traffic information
© Name of the street on which you are current- —__ Colored warning symbols: traffic incidents
ly driving ahead that are on your route.
@ Start route guidance for a marked destina- — Grayed out warning symbols: traffic incidents
tion
> page 203, Selecting a destination that are not on your route.
from the map — All traffic incidents will display in color when
@®) Display details for the destination route guidance is inactive.
=> page 203 — Warning symbols with arrow: traffic incident
@ Intelligent search nearby that you have been routed around, for example
@ Adjust the map orientation. See also .
=> page 210
@ Navigation settings > page 210 Map operation
® Adjust the scale. Press the magnifying glass Applies to: vehicles with navigation system
to switch automatic zoom > page 210 on or You can operate the map > page 204, fig. 142
off directly on the map. The © symbol ap- with the movements described in the following
pears when this function is switched on. information.
® Marked destination. See > page 203, Select-
ing a destination from the map
Map contents (points of interest, favorites). > Drag your finger across the map in the desired
When there are multiple map contents in the direction.
immediate vicinity, the symbols are shown
stacked on the map. To display a list of indi-
vidual symbols, press a’: > fig. 143. Press on > Swipe your finger across the map in the desired
a POT in the list. direction and lift your finger off the map.
Moving the map
®
Moving the map quickly
@ — the map to the current vehicle posi- Zooming in on the map
ion
>» Place two fingers on the map and pull your fin-
gers apart, or
> Double-tap on the map with one finger.
@3) Traffic incidents and display of estimated
losses of time on the route.
— Green: traffic is flowing freely.
— Orange: stop-and-go traffic Zooming out on the map
Red: traffic jaitior traffic obstructions. » Place two fingers on the map and pull your fin-
Additional possible symbols on the map gers together, or
> Double-tap on the map with two fingers.
Symbol Description
@ Home address > page 206, Favor- Rotating the map
ites > Rotate the map using two fingers.
Business address > page 206, Fa-
vorites
Tilting the map
> Drag upward or downward with two fingers. >
D_ Only applies to vehicles without camera-based speed limit
display.
205
Page 208 of 332
Navigation
@) Tips
Certain gestures may not be available on all
touch displays or in every menu.
ALL) Naviga te guidance
started
Applies to: vehicles with navigation system and Audi virtual
cockpit
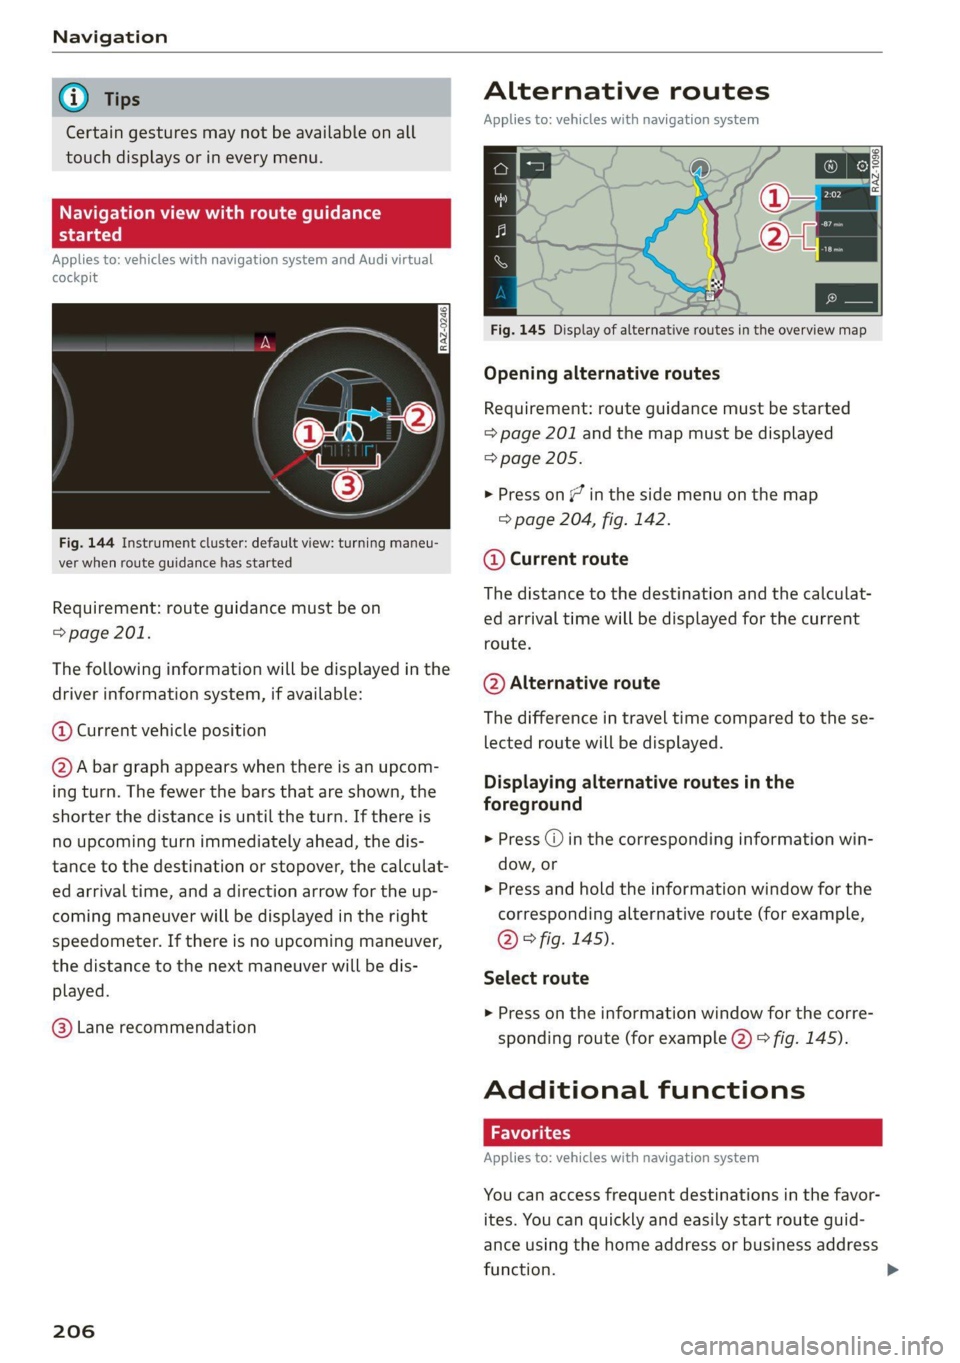
Fig. 144 Instrument cluster: default view: turning maneu-
ver when route guidance has started
Requirement: route guidance must be on
= page 201.
The following information will be displayed in the
driver information system, if available:
@ Current vehicle position
@A bar graph appears when there is an upcom-
ing turn. The fewer the bars that are shown, the
shorter the distance is until the turn. If there is
no upcoming turn immediately ahead, the dis-
tance to the destination or stopover, the calculat-
ed arrival time, and a direction arrow for the up-
coming maneuver will be displayed in the right
speedometer. If there is no upcoming maneuver,
the distance to the next maneuver will be dis-
played.
@® Lane recommendation
206
Alternative routes
Applies to: vehicles with navigation system
3 | SI
ny < ec
Fig. 145 Display of alternative routes in the overview map
Opening alternative routes
Requirement: route guidance must be started
= page 201 and the map must be displayed
=> page 205.
> Press on / in the side menu on the map
=> page 204, fig. 142.
@ Current route
The distance to the destination and the calculat-
ed arrival time will be displayed for the current
route.
@ Alternative route
The difference in travel time compared to the se-
lected route will be displayed.
Displaying alternative routes in the
foreground
> Press @ in the corresponding information win-
dow, or
> Press and hold the information window for the
corresponding alternative route (for example,
@° fig. 145).
Select route
> Press on the information window for the corre-
sponding route (for example @) 9 fig. 145).
Additional functions
Applies to: vehicles with navigation system
You can access frequent destinations in the favor-
ites. You can quickly and easily start route guid-
ance using the home address or business address
function.
Page 216 of 332
Radio
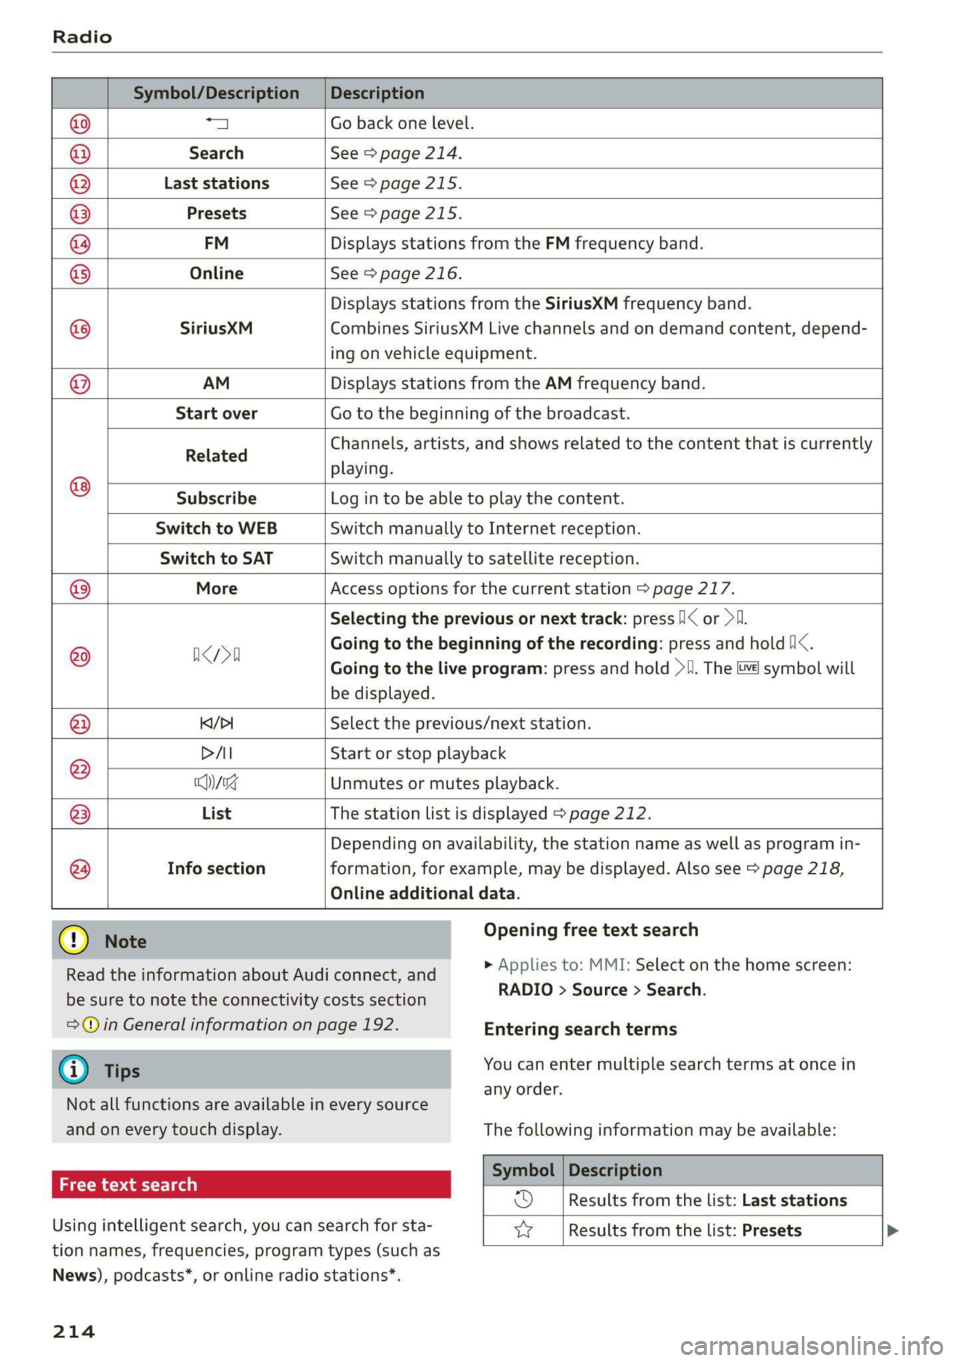
Symbol/Description | Description
a Go back one level.
Search See > page 214.
Last stations See > page 215.
Depending on availability, the station name as well as program in-
© @
@
® Presets See > page 215.
FM Displays stations from the FM frequency band.
® Online See > page 216.
Displays stations from the SiriusXM frequency band.
@ SiriusXM Combines SiriusXM Live channels and on demand content, depend-
ing on vehicle equipment.
@ AM Displays stations from the AM frequency band.
Start over Go to the beginning of the broadcast.
Related Channels, artists, and shows related to the content that is currently
playing.
® Subscribe Log in to be able to play the content.
Switch to WEB Switch manually to Internet reception.
Switch to SAT Switch manually to satellite reception.
@® More Access options for the current station > page 217.
Selecting the previous or next track: press /I< or >I.
@ aca Going to the beginning of the recording: press and hold Ni<.
Going to the live program: press and hold >I. The i symbol will
be displayed.
@ K/>I Select the previous/next station.
DAI Start or stop playback
® Msg Unmutes or mutes playback.
@ List The station list is displayed > page 212.
@
Info section
formation, for example, may be displayed. Also see > page 218,
Online additional data.
Read the information about Audi connect, and
be sure to note the connectivity costs section
=@ in General information on page 192.
@) Tips
Not all functions are available in every source
and on every touch display.
Free text search 2
Using intelligent search, you can search for sta- vy
tion names, frequencies, program types (such as
Opening free text search
> Applies to: MMI: Select on the home screen:
RADIO > Source > Search.
Entering search terms
You can enter multiple search terms at once in
any order.
The following information may be available:
Symbol | Description
Results from the list: Last stations
Results from the list: Presets
News), podcasts*, or online radio stations*.
214
Page 219 of 332
4K0012721BE
Radio
Applies to: vehicles with Audi connect Infotainment and on-
line radio
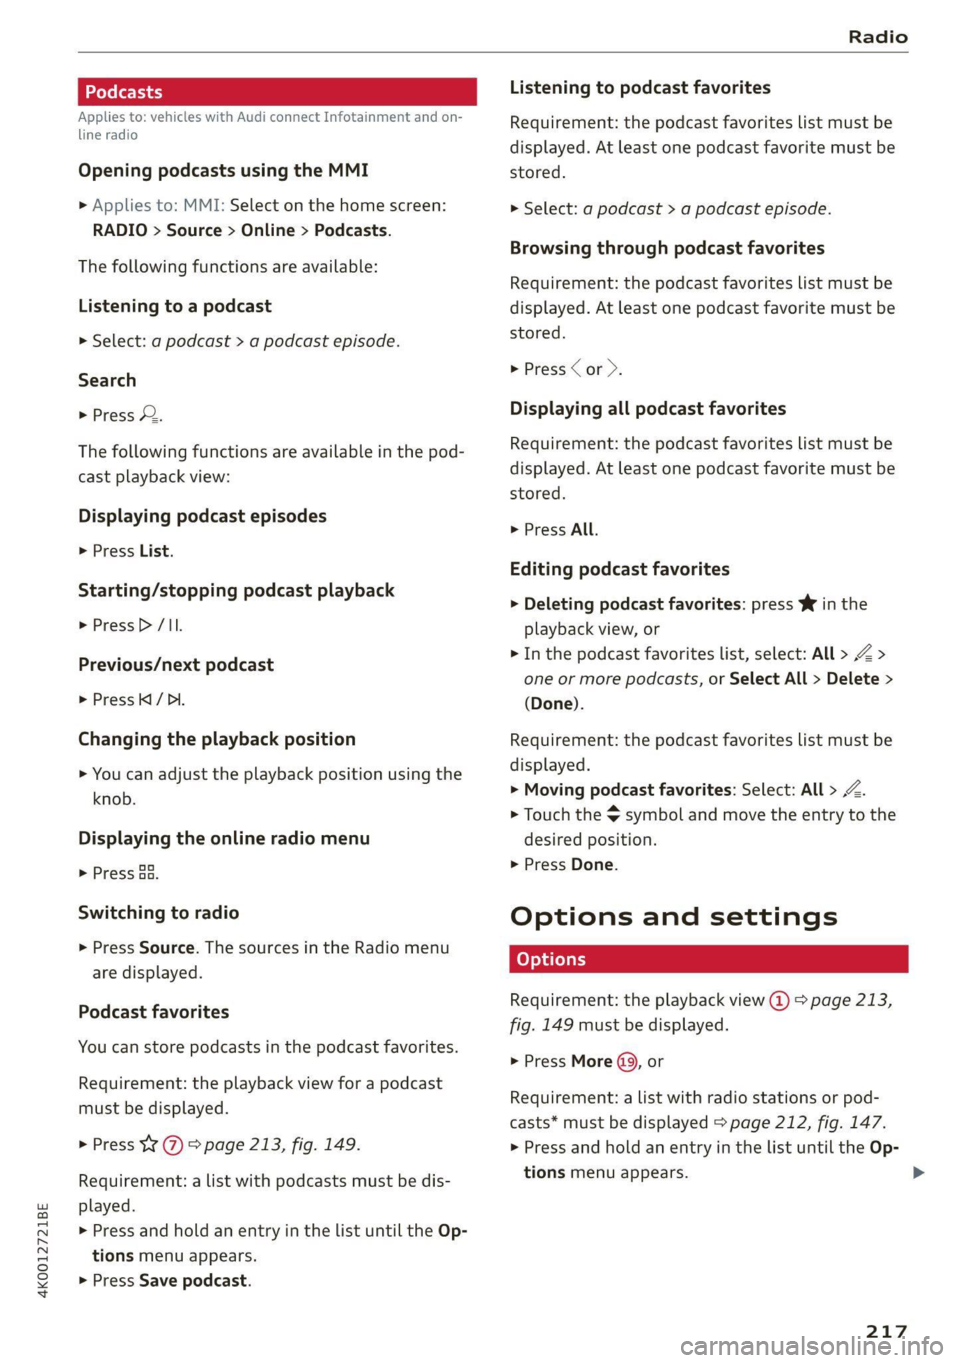
Opening podcasts using the MMI
» Applies to: MMI: Select on the home screen:
RADIO > Source > Online > Podcasts.
The following functions are available:
Listening to a podcast
> Select: a podcast > a podcast episode.
Search
> Press 2.
The following functions are available in the pod-
cast playback view:
Displaying podcast episodes
> Press List.
Starting/stopping podcast playback
> Press D /II.
Previous/next podcast
> PressKI/ DI.
Changing the playback position
> You can adjust the playback position using the
knob.
Displaying the online radio menu
> Press Ba.
Switching to radio
> Press Source. The sources in the Radio menu
are displayed.
Podcast favorites
You can store podcasts in the podcast favorites.
Requirement: the playback view for a podcast
must be displayed.
> Press Y @ © page 213, fig. 149.
Requirement: a list with podcasts must be dis-
played.
> Press and hold an entry in the list until the Op-
tions menu appears.
> Press Save podcast.
Listening to podcast favorites
Requirement: the podcast favorites list must be
displayed. At least one podcast favorite must be
stored.
> Select: a podcast > a podcast episode.
Browsing through podcast favorites
Requirement: the podcast favorites list must be
displayed. At least one podcast favorite must be
stored.
> Press or >.
Displaying all podcast favorites
Requirement: the podcast favorites list must be
displayed. At least one podcast favorite must be
stored.
> Press All.
Editing podcast favorites
> Deleting podcast favorites: press W in the
playback view, or
> In the podcast favorites list, select: All > Z >
one or more podcasts, or Select All > Delete >
(Done).
Requirement: the podcast favorites list must be
displayed.
> Moving podcast favorites: Select: All > Z.
> Touch the $ symbol and move the entry to the
desired position.
> Press Done.
Options and settings
Requirement: the playback view @) > page 213,
fig. 149 must be displayed.
> Press More (9, or
Requirement: a list with radio stations or pod-
casts* must be displayed > page 212, fig. 147.
> Press and hold an entry in the list until the Op-
tions menu appears.
217
>
Page 221 of 332
4KE012721BE
Radio
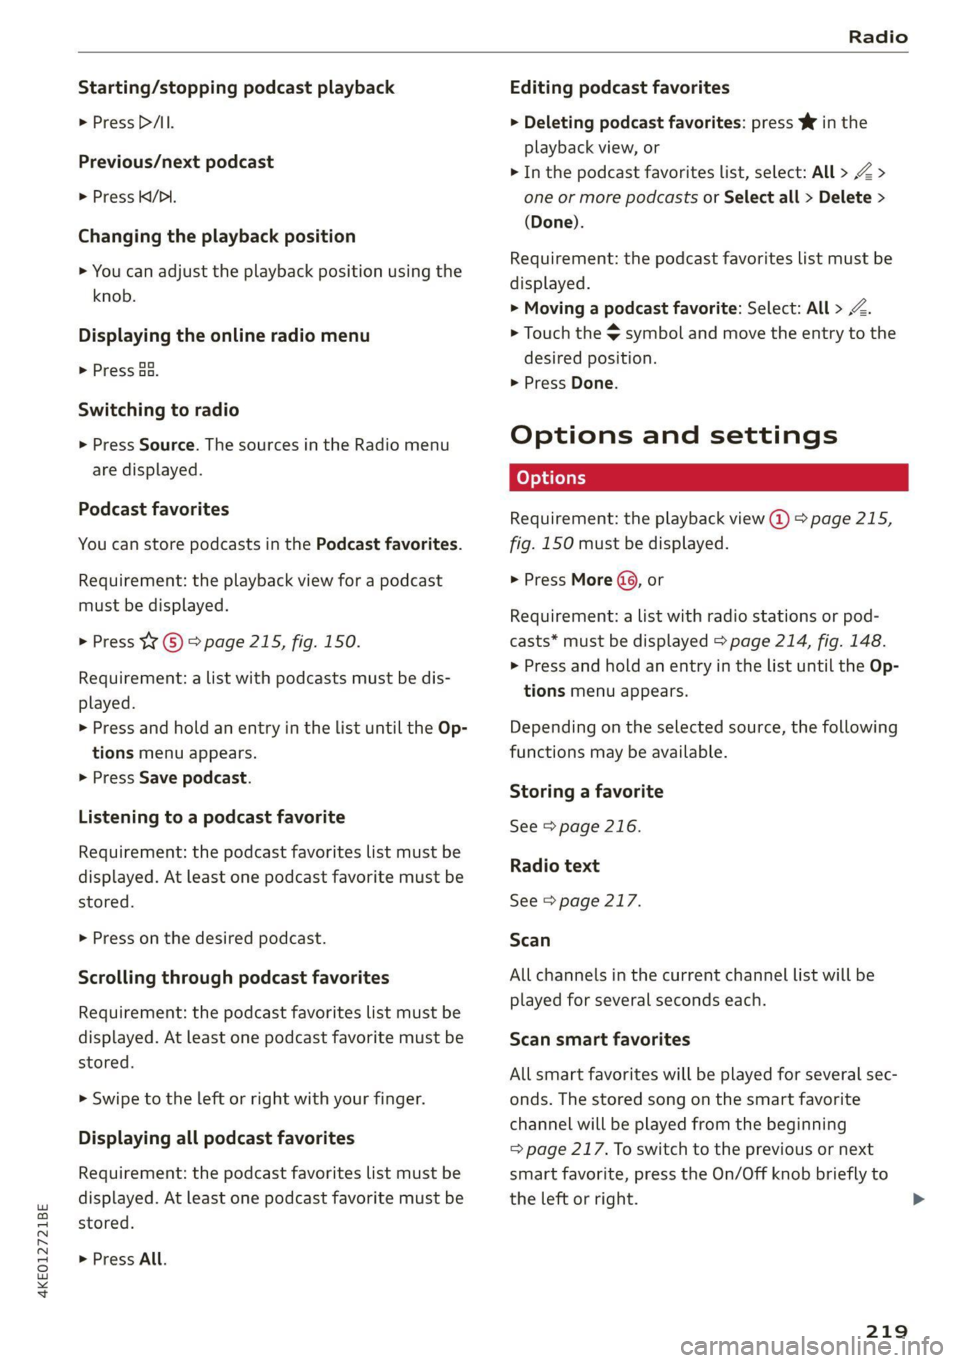
Starting/stopping podcast playback
> Press P/Il.
Previous/next podcast
> Press Ki/DI.
Changing the playback position
> You can adjust the playback position using the
knob.
Displaying the online radio menu
> Press oa.
Switching to radio
> Press Source. The sources in the Radio menu
are displayed.
Podcast favorites
You can store podcasts in the Podcast favorites.
Requirement: the playback view for a podcast
must be displayed.
> Press ¥ © > page 215, fig. 150.
Requirement: a list with podcasts must be dis-
played.
> Press and hold an entry in the list until the Op-
tions menu appears.
> Press Save podcast.
Listening to a podcast favorite
Requirement: the podcast favorites list must be
displayed. At least one podcast favorite must be
stored.
> Press on the desired podcast.
Scrolling through podcast favorites
Requirement: the podcast favorites list must be
displayed. At least one podcast favorite must be
stored.
> Swipe to the left or right with your finger.
Displaying all podcast favorites
Requirement: the podcast favorites list must be
displayed. At least one podcast favorite must be
stored.
> Press All.
Editing podcast favorites
> Deleting podcast favorites: press W in the
playback view, or
> In the podcast favorites list, select: All > Z >
one or more podcasts or Select all > Delete >
(Done).
Requirement: the podcast favorites list must be
displayed.
> Moving a podcast favorite: Select: All > Z.
> Touch the $ symbol and move the entry to the
desired position.
> Press Done.
Options and settings
Requirement: the playback view @) > page 215,
fig. 150 must be displayed.
> Press More (9, or
Requirement: a list with radio stations or pod-
casts* must be displayed > page 214, fig. 148.
>» Press and hold an entry in the list until the Op-
tions menu appears.
Depending on the selected source, the following
functions
may be available.
Storing a favorite
See > page 216.
Radio text
See > page 217.
Scan
All channels in the current channel list will be
played for several seconds each.
Scan smart favorites
All smart favorites will be played for several sec-
onds. The stored song on the smart favorite
channel will be played from the beginning
= page 217. To switch to the previous or next
smart favorite, press the On/Off knob briefly to
the left or right.
219
>
Page 228 of 332

Media
Symbol/Description Description
Source/device name
Applies to: playback view: Device name of the source that is current-
ly playing.
Applies to: media center view: Source that you are currently brows-
ing > page 224.
©
Album cover in the play-
Requirement: a media source with album covers must be selected
or the covers must be available online > page 228, Online addition-
al data.
same Displays the current album cover.
Display the playlist: press on the cover.
@ & Settings > page 227.
Current track informa- | Display of Track and Artist. Highlights the track that is currently
tion playing.
List Browsing in the list: drag your finger upward or downward.
Album cover in the play-
Requirement: a media source with album covers must be selected
or the covers must be available online > page 228, Online addition-
Playback position The bar shows the current playback position in the track.
Info section
©
© list al data.
Displays the current album cover.
@ More Opens options > page 227.
O Off Switching between off/playlist/track: press @..
() O Playlist The tracks in the current playlist will repeat continuously in a loop.
© Track The current track will repeat continuously in a loop.
Selecting the previous/next track (or station/chapter): press Ki or
Di.
@ ‘aii Fast forward/rewind: to fast forward or rewind within a track, press
and hold Dior K.
Jumping to the beginning of a track: press on K after the first
three seconds of play time.
@ PAI Start or stop playback
@ og When this function is switched on, all files in the playlist will play in
random order.
@ List The playlist @ is displayed.
@
® Display of Track, Artist, and Album.
DVD functions
Applies to: vehicles with a DVD drive
— Using the DVD main menu: press the desired
function.
— Switching to the media functions: press on the
Requirement: the vehicle must be stationary and
a DVD must be playing.
The following functions are available in the play-
back view:
— Display the DVD main menu: press on the up-
per display. Press DVD menu.
226
upper display. Select: *1 > select a chapter, or
start the movie in the DVD main menu and
press on the upper display.
— Adjusting the aspect ratio: press on the upper
display. Select: Aspect ratio > an aspect ratio >
OK > table on page 227.
Page 236 of 332

Additional settings
Bluetooth
> Applies to MMI: Select on the home screen:
SETTINGS > Connection settings > Bluetooth
Bluetooth
You can select a setting for visibility of the MMI
to other Bluetooth devices. To connect a new
Bluetooth device, the Visible setting must be se-
lected. If Invisible is selected, a Bluetooth con-
nection will only be possible with paired devices.
If Off is selected, no Bluetooth device can be con-
nected.
Bluetooth audio player
When this function is switched on, the profile
will load automatically when your Bluetooth au-
dio player is within range.
Bluetooth name
The MMI’s Bluetooth name is displayed and can
be changed.
Factory default settings
Requirement: the ignition must be switched on.
> Applies to MMI: Select on the home screen:
SETTINGS > System maintenance > Restore
factory settings.
> Follow the system instructions.
The settings will be reset. The system will re-
start. This may take some time.
@ Tips
Make sure that not only the settings were de-
leted but also the stored data, if necessary.
Software update
Introduction
Applies to: vehicles with software update
You can update your vehicle’s software.
The functions depend on the country and vehicle
equipment:
— Update through the online system update
=> page 234.
234
— Map material update for the navigation system
=> page 208.
— Have the software update performed by an au-
thorized Audi dealer or authorized Audi Service
Facility. This can result in additional costs.
ZA\ WARNING
— Perform the installation only when the vehi-
cle is stationary. Otherwise, this increases
the risk of an accident
— If the installation fails, contact an author-
ized Audi dealer or authorized Audi Service
Facility immediately to have the malfunction
corrected.
Online system update
Applies to: vehicles with online system update
With the online system update, you can update
the software directly in the vehicle.
Requirement: the MMI must be connected to the
Internet > page 192, Audi connect.
Downloading updates
Requirement: notification for an online system
update will appear in the upper display.
> Press on the notification, or
> Open the notification in the notification center
on page 23 and press on the notification.
> Follow the system instructions.
You can also check manually if an update is avail-
able.
> Applies to: MMI: Select on the home screen:
SETTINGS > System maintenance > Software
update > Search for updates > desired update
> Continue.
> Follow the system instructions.
The
MMI will start the download. You can check
the status of the download process in the notifi-
cation center > page 23.
Installing updates
Requirement: an online system update must be
downloaded and a notification must be shown in
the upper display.
> Stop the vehicle safely.
Page 243 of 332

4K0012721BE
Checking and Filling
@ Tips
The fuel filler door on your vehicle does not
lock if you lock the vehicle from the inside us-
ing
the central locking switch.
Fuel filler door emergency release
Applies to: vehicles with manual fuel filler door release
If the central locking system malfunctions, the
fuel filler door can be unlocked manually.
Fig. 156 Version @)/ version @) Right cover in the luggage
compartment: removing the cover
Fig. 157 Luggage compartment: fuel filler door emergency
release
The emergency opening mechanism is located
behind the right cover in the luggage compart-
ment.
> Remove the screwdriver from the vehicle tool
kit > page 286.
> Insert the flat side of the screwdriver carefully
into the slot between the side trim panel and
the cover > fig. 156 (arrows) and pry out the
cover. Keep in mind that a power cable for the
socket is located on the rear side.
> To unlock the fuel filler door, loosen the red
loop from the retainer and then pull on the
loop carefully > fig. 1579@©.
> Press on the left side of the fuel filler door to
open it > page 2339, fig. 154.
® Note
Only pull on the loop until you feel resistance.
You
will not hear it release. If you continue to
pull, you could damage the emergency re-
lease mechanism.
Emissions control
system
General information
ZA WARNING
The temperature of the exhaust system is
high, both when driving and after stopping
the engine.
— Never touch the exhaust tail pipes once they
have become hot. This could result in burns.
— Do not park your vehicle over flammable
materials such as grass or leaves because
the high temperature of the emissions sys-
tem could start a fire.
— Do not apply underbody protectant in the
exhaust system area, because this increases
the risk of fire.
Catalytic converter
Observe the safety precautions > page 241, Gen-
eral information.
The vehicle may only be driven with unleaded
gasoline, or the catalytic converter will be de-
stroyed.
Never drive until the tank is completely empty.
The irregular supply of fuel that results from that >
241