towing AUDI A7 2013 User Guide
[x] Cancel search | Manufacturer: AUDI, Model Year: 2013, Model line: A7, Model: AUDI A7 2013Pages: 310, PDF Size: 77.45 MB
Page 203 of 310
-If the brake booster is not working, for
example when towing your vehicle, or
because the brake booster has somehow
been damaged, the brake pedal must be
pressed considerably harder to make up
for the lack of booster assistance.
Electro-mechanical
power assist
The electro-mechanical power assist helps
the driver when steering.
Power steering adapts electronically based o n
the vehicle speed.
Ind icator light s and messages
• Steering d efecti ve ! Stop the vehicl e
If this ind icator lig ht turns on and stays on
and this message appears, the power steering
may have fa iled.
Do
not continue driving. See yo ur authorized
Aud i dealer or other qualified repa ir facility
for assistance .
'y. ij Steering: System mal function! You m ay
c ont in ue drivi ng
If the indicator lig ht turns on and the mes
sage appears, the steering may be more diffi
cult to move or more sensitive than usual.
Drive s low ly to your author ized Audi dealer or
qua lified workshop to have the malfunction
corrected.
(D Tips
If the . or 'I aj indicato r light only stays
on for a sho rt time, you may contin ue driv
ing .
Int ellig ent technolog y 201
Driving with your
quattro ®
Applies to vehicles : with all-wheel drive
With all-wheel drive, all four wheels are driv
en .
General info rmation
With all Wheel Drive, power is distributed to
all four wheels. This happens automatically
depending on your driving style and the road
cond it ions at the time . See also ¢
page 196 .
With the sport different ia l*, power dist ribu
tion to the rear wheels is variable and can be
adjus ted with A udi drive select*
¢ page 102.
Always read and follow safety precautions
¢ ,0. .
Winter tires
When dr iving in the winter, your vehicle with
all-wheel drive has an advantage, even w it h
regular tires. In winter ro ad conditions it may
be advisable to mount winter tires (or all -sea
son tires) for improved driveability and brak
ing: these tires must be mo unted on
all fou r
whee ls.
See also ¢ page 261, Winter tires.
Tire chains
Where tire chains are mandatory on certain
roads, this norma lly also applies to veh icles
with all-wheel drive¢
page 262, Snow
chains.
Replacing wheels /tires
Vehicles with al l-wheel d rive must always
have tires of the same s ize. A lso avoid tires
with different tread depths . For detai ls see
page ¢
page 2 5 7, New tires and replacing
tires and wheels .
Off-Road driving?
You r A ud i does not have enough gro und clea r
ance to be used as an off-road vehicle .
It is
therefore best to avoid rough tracks and un
even terra in as much as possib le . Also refer to
¢ page 205. ll>
•
•
Page 211 of 310
Trailer towing Driving with a trailer
General information
Your Audi was designed primarily for passen
ger transportation .
If you plan to tow a tra iler, p lease remember
that the addit ional load will affect durab ility,
economy and performance .
Trailer towing not on ly places more stress on
the vehicle, it also calls for more concentra
tion from the driver.
F or this reason, a lways fo llow the operating
and driving instructions provided and use
common sense.
(D Note
If you are going to tow a trai ler, you must
ac tivate the trailer operation mode
c::> page 209, Operating instructions.
Technical requirements
Traile r hitch
Use a weig ht-carrying hitch conforming to the
gross trailer we ight. The hitch must be suita
b le for your veh icle and trailer and must be
mounted securely on t he ve hicle's chassis at a
technically sound location . Use only a trail er
hi tch w ith a removab le ball moun t. A lways
check wi th t he tra ile r hi tch man ufa ctur er to
make sure that you are using the cor rect
h itch.
Do not us e a bumper hitch .
The hitch m ust be installed in such a way that
i t does not interfe re with the impac t-absorb
i ng bumper syst em. No mod ificat ions should
b e made to the vehi cle e xhaus t and br ake sys
tems . From t ime to time, check th at a ll hitc h
mo unt ing bo lts rem ain securely fas tened.
When you are not towing a trail er, remove the
tra ile r hi tch ball moun t. T h is prevents the
hi tch from causing damage sho uld your ve hi
cle be str uck from behind~ .&.
Trailer towin g 209
Trailer brakes
If your trailer is equippe d wi th a bra king sys
tem, check to be s ure that i t conforms to all
regulations .
T he trailer hyd ra u lic bra ke sys tem mus t not be
d irec tly connec ted to the vehicle's hydraulic
brake system .
Safety chains
Always use safety chains be tween your ve hicle
and t he tra ile r.
Trailer lights
Trai ler lights must meet all reg ulations. Be
su re to c heck with your Audi dea ler for correct
wir ing, switches and relays .
Mirrors
If you a re unable to see the traffic behind you
u sing the regula r outside mirrors, then you
must insta ll extended mir rors. It is important
t h at you
always have clea r vis io n to the rear.
_&. WARNING
-
Afte r removi ng the trailer hitch , do no t
s tor e i t in yo ur v ehicl e. In case of sudden
b raki ng, the hi tch co uld fly forwar d and in
j ur e you o r yo ur pass enge rs.
Operating instructions
Maximum trailer weight
A tra ile r fo r you r vehi cle is l imited to a typi cal
cla ss 1 o r class 2 tr ailer.
Trailer load distribution
Be sure the load in the tra ile r is held secure ly
in place to p revent it from shift ing fo rward,
ba ckward or sideways.
Never allow a passenger to ride in a trailer
c::> .& in Driving instructions on page 211 .
Engine cooling sy stem
Towing a t railer ma kes the engine wor k hard
er . It is impo rtant that the cooling system's
performance is up to the additional load.
•
•
Page 212 of 310
210 Trailer towing
Make sure that the cooling system has eno ugh
fluid .
Tire p res sure
When tow ing a trai le r, inflate the t ires of your
vehi cle to the co ld tire pressure listed under
"Full load" on the label located on the driver's
side B-pillar (visible when the door is open) .
Inflate trailer t ires to trai ler and tire manufac
turers' specifications.
Lights
Chec k to make s ure both veh icle and trailer
lights are working properly.
Safety chains
Be sure tra iler safety cha ins are properly con
nected from the trailer to the hitch on the ve
h icle. Leave enough slack in the chains to per
mit turn ing corners . When you install safety
cha ins, make su re they wi ll not drag on the
road when yo u are driving.
The chains shou ld cross under the tra iler
tongue to prevent it from dropping in case of
separation from the hitch.
Adjusting the Audi drive select
Make sure the vehicle is on a level su rface be
for e
hitching up the tra ile r and b efor e adjust
ing the tongue weight. The vehicle must be in
auto or comfort dr iving mode and no t raised
qpage 102, q(D _
Make sure that the vehicle is lowered. In Info
tainment , se lect:
ICARI f u nction button> Low
e r
control b utton .
I f you m ust dr ive under poor road co ndit ions,
you can raise the veh icle
aft er coup ling the
tra iler or
after adjusting the tong ue weig ht
q page 104.
-Changes in tempe ratu re or load can af
fect the heig ht of the veh icle.
- Always se lect
auto or comfort mode.
Otherwise, the tongue load spec ified for
your vehicle will no longer be applicable.
Driving instructions
Driving with a trailer always requires extra
care and consideration .
To obtain the best possible handling of vehicle
and trailer, please note the fo llow ing:
.,. Do not tow a loaded trailer when your car it
self is not loaded.
.,. Be especially carefu l when passing other
veh icles.
.,. Observe speed lim its .
.,. Do not dr ive at the maximum permissible
speed.
.,. Always app ly brakes early .
.,. Monitor the temperatu re ga uge.
Weight distribut ion
T owing a loaded trailer with an empty car re
su lts in a highly unstab le distribution of
we ight. If this cannot be avoided, drive at very
low speeds on ly to avoid t he risk of losing
steering con trol.
A "ba lanced " rig is easier to operate and con
tro l. This means that the tow vehicle should
be loaded to the exten t possible and permissi
ble, while keep ing the trai ler as light as possi
ble under the c ircumstances . Whenever poss i
ble, transfer some cargo to the luggage com
partment of the tow veh icle while observing
tong ue load requirements and vehicle load ing
considerations.
Speed
The higher the speed, the more difficu lt it be
comes for the driver to control the rig . Do not
drive at the maximum permissible speed. Re
duce your speed even more if load, weather or
wind conditions are unfavorable -particularly
whe n going downhill.
Red uce veh icle speed
immediately if the trail
er shows the slightest s ign of sway ing .
Do not
try to stop the swa ying b y accelerating .
Observe speed limits . In some a reas, speeds
for vehicles tow ing trai lers are lower than for
regular veh icles . .,.
Page 213 of 310
Always apply brakes early. When driving
downhill, shift into a lower gear to use the en
g ine braking effect to slow the vehicle . Use of
the brakes a lone can cause them to overheat
and fail.
Coolant temperature
The coolant temperature gauge ¢ page 11
must be observed carefully. The coo lant tem
perature can increase if you drive on long in
clines in a low gear at high engine speeds. Re
duce your speed immediately if the LEDs in
the top part of the display turn on .
For more information about indicator lights,
refer to.
c> page 16.
A WARNING
Anyone not properly restrained in a mov
ing vehicle is at a much greater risk in an
accident . Never let anyone r ide in your car
who is not properly wearing the restra ints
provided by Aud i.
Trailer towing tips
Important to know
Your vehicle hand les different ly when towing
-
a trailer because of the additional weight and
d ifferent weight distribution . Safety, perform
ance and economy w ill greatly depend on how
carefully you load your trailer and operate
your rig .
Before you actually tow your trailer, practice
turning, stopp ing and backing up in an area
away from traffic . Keep practicing until you
have become completely familiar with the way
your veh icle-trailer comb ination behaves and
responds .
Backing up is diff icult and requires practice .
Backing up with a tra iler genera lly requires
steer ing action opposite to that when backing
up your vehicle without a trailer.
Maintain a greater distance between your ve
hicle and the one in front of you. You will need
more room to stop. To compensate for the
Trailer towing 211
trailer, you wi ll need a larger than normal
turning radius.
When passing, remember that you cannot ac
ce lerate as fast as you norma lly would be
cause of the added load. Make sure you have
enough room to pass. After passing, allow
plenty of room for your trailer before chang
ing lanes again.
Avoid jerky starts, sharp turns or rapid lane
changes.
(0 Tips
- Do not tow a trailer during the break-in
period of your vehicle.
- If you tow a trailer, your Audi may re
quire more frequent maintenance due to
the extra load¢
page 289.
Parking on a slope
Do not pork on a slope with a trailer . If it can
not be avoided, do so only after doing the fol
lowing:
When parking:
"' App ly the foot brake .
.,. Have someo ne p lace chocks under both the
veh icle and the trailer wheels.
"' With chocks in place, slowly release the
brakes until the wheel chocks absorb the
load .
.,. Turn the wheels towards the curb .
.,. Apply the parking brake.
.,. Select the P selector lever posit ion .
When restarting after parking:
.,. Apply the foot brake.
.,. Start the engine .
.,. Select the D/S se lector lever position .
.,. Release the parking brake and slowly pull
out and away from the wheel chocks.
.,. Stop and have someone retr ieve the wheel
chocks .
111>
•
•
Page 214 of 310
212 Trailertowing
If you move the selector lever of the auto
mat ic transm ission to P before app lying
the park ing brake and before blocking the
wheels, you may have to use mo re force
later to move the lever out of the P posi
tion .
Page 258 of 310
256 Tires and wheels
6. If your vehicle will be towing
a trailer, load from your trail
er will be transferred to your
vehi cle. Consult thi s manual
to determine how this re
duces the available car go
and luggage lo ad capacity of
yo ur vehicle .
.,. Check the tire sidewall
(9 fig . 200 ) to de termine the
de signated load rating for a
s pe cifi c tir e.
Tire service life
The s ervi ce life of tires dep ends on a lot of
different things including proper installation
and balancing, correc t tire pressu re and driv
ing style.
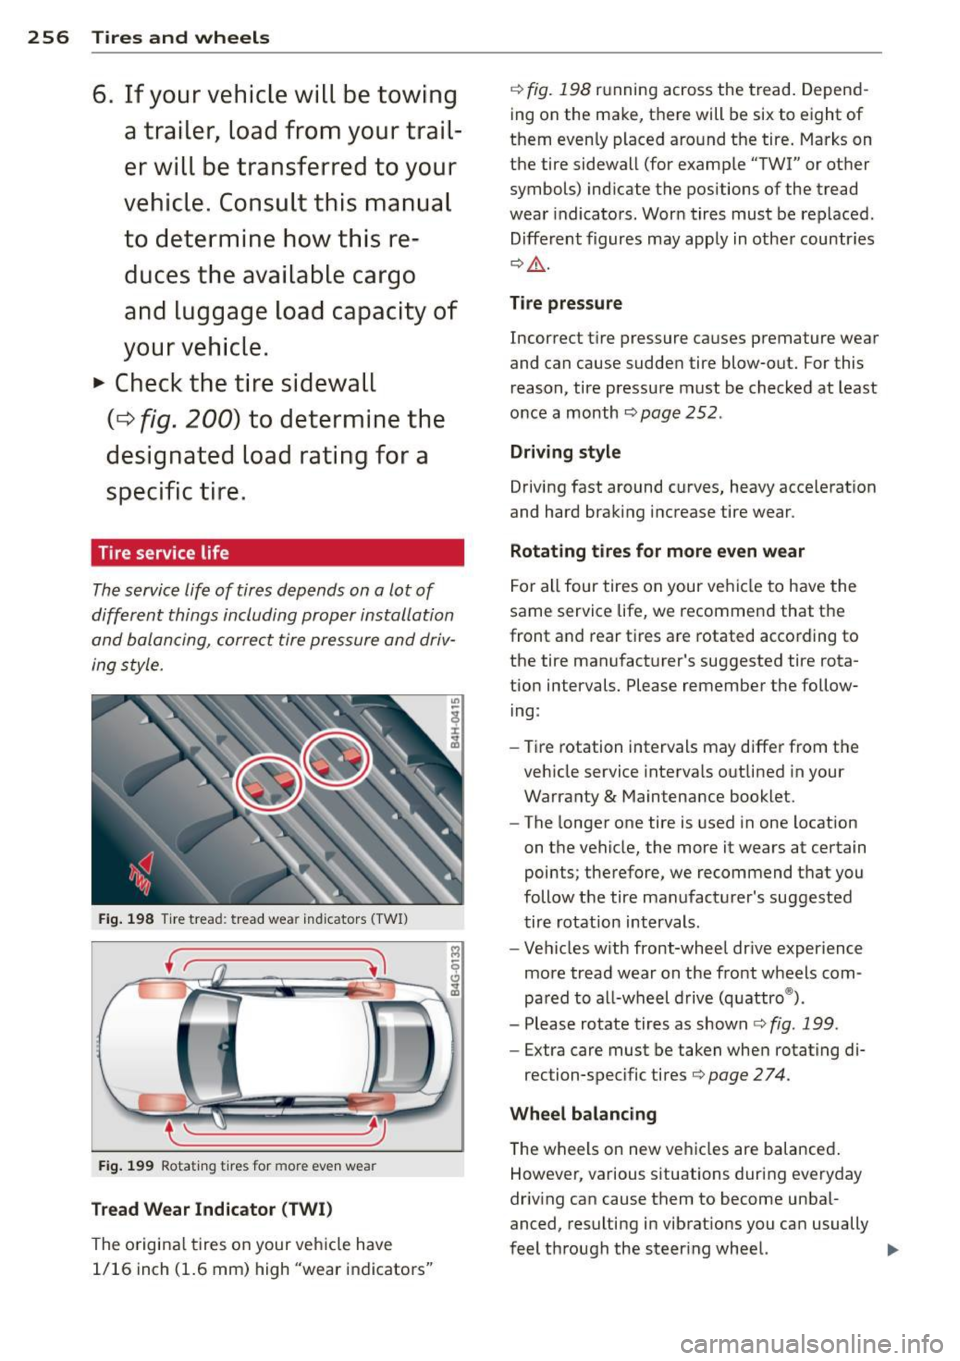
Fig. 198 Tire tread: tread wea r ind icators ( TWI)
Fi g. 1 99 Rotat ing t ires fo r m ore eve n wear
Tread W ear Indicator (TWI)
The o rigi na l t ires on your ve hicle have
1/16 inch (1.6 mm) high "wear indicators" ¢
fig. 198 r
u nning across the tread. Depend
ing on the make, t here will be six to eight of
them even ly placed aro und the tire. Marks on
the tire sidewall (for examp le "TWI" or other
symbols) ind icate the positions of the tread
wear indicato rs . Wor n tires must be rep laced.
D iffere nt f igures may apply in othe r countr ies
Q ,&. .
Tire pressure
Incorrect t ire pressure ca uses premature wear
and can cause sudde n tire blow-out. For this
reason, tire pressure must be checked at least
o nce a month ¢
page 2 52.
Driving style
Driving fast around c urves, heavy acce lerat ion
and hard braking increase tire wear .
Rotating tires for more even wear
Fo r all four tires on your ve hicle to have the
same service life, we recommend that the
front and rear t ires a re rotated according to
the tire manu fact urer's suggested tire rota
tion intervals. Please remember the follow
ing :
- Tire rotation intervals may differ from t he
veh icle service interva ls outlined in your
Warranty
& M aintenance booklet.
- The longer one tire is used in one location
o n t he vehicle, the more it wears at certain
points; theref ore, we recommend t hat y ou
follow the tire manufacturer's suggested
tire rotation int ervals .
- Veh icles w ith front-wheel dr ive experience
more tread wear on the fro nt wheels com
pa red to a ll-wheel drive ( quattro ®).
- Please rotate tires as shown¢
fig. 199.
- Extra care must be taken when rotating di-
rection-specific tires ¢
page 274.
Wheel balancing
The wheels on new ve hicles are balance d.
Howeve r, various s ituations during everyday
dr iv ing can cause them to become unba l
anced, resulti ng in vibrations you can usually
feel th rough the steer ing wheel.
liJJ,-
Page 281 of 310
Emergency situations
General
This chapter i s intended for trained emer
gency crews and working personnel who have the necessary tools and equipment to
perform these operations.
Starting by pushing or
towing
CD Note
Ve hicles w ith an au tomatic tra nsmission
cannot be started by pus hing o r tow ing.
Starting with jumper
cables
If necessary, the engine can be started by
connecting it to the battery of another vehi
cle.
If the engine shou ld fail to start because of a
discha rged o r wea k battery, the battery can be
connected to the battery o f
another vehicle,
using a
pair of jumper cables to start the en
g ine.
Jumper cables
Use only jumper cables of sufficiently la rge
c ross section to carry the starter c urrent safe
l y. Refer to the man ufacturer's specifications.
Use only jumper cables with
insulated te rm i
na l clamps wh ic h are d istinctly marked:
plus(+) cable i n mos t cases co lore d red
minu s(-) cable
in most cases colored black .
A WARNING
Batterie s contain e lec tricity, ac id, an d gas.
A ny of these can cause ve ry ser io us or fatal
inju ry. Follow the instructions below f or
safe han dling of your veh icle's b attery .
- Alway s shield you r eyes and avoid lean
ing over the bat te ry whenever possib le.
- A dis ch arged battery c an free ze at tem
peratures ju st be low 3 2 °F ( 0 °C ). Befo re
Emergency situations 2 79
connecting a jumpe r cab le, you must
thaw the fr ozen battery c omp lete ly, ot h
erwise it could explode.
- Do not allow battery acid to contact eyes
or skin. Fl ush any contacted area with
wate r immediately.
- Improper use of a booster battery to start a vehicle may cause an explosion.
- Vehicle batter ies genera te exp losive gas
es. Keep spar ks, flame and lighted c iga
rettes away from batte ries.
- Do not try to jump start any ve hicle w ith
a low ac id leve l in the battery.
- The vo ltage of the booste r batte ry m ust
a lso have a 12-volt rating. The capacity
(Ah) of the booster battery sho uld not be
lowe r tha n that of the discharged bat
tery . U se of batte rie s of d iffe ren t voltage
or substantially diffe rent "Ah" rat ing
may c au se an exp losion and persona l in
JU ry.
- N ever cha rge a fro zen batte ry. Gas tr ap
pe d in t he ice may c ause an explosion.
- Never cha rge or use a batte ry tha t h as
been fr ozen. T he battery case may have
be weakened.
- Us e of b atter ies of differe nt voltage or
sub stant ia lly diff eren t ca pa city (Ah) ra t
i ng may c ause an ex plosion an d injury .
Th e capac ity (Ah) of the booster bat tery
should not be l ower than that of the dis
charged batte ry .
- Before you chec k any thing in the engine
compa rtment, always read an d hee d all
WARNINGS¢
page 224, Engine com
partment.
CD Note
- App lying a higher voltage booster ba t
tery will cause expens ive damage to se n
sit ive e lectronic components, such as
cont rol units, relays, rad io , etc.
- The re must be no electrical contact be
tween the vehicles as otherwise current
cou ld already start to f low as soon as the
posit ive(+) te rm inals a re c onnected. ..,. •
•
Page 283 of 310
-When connecting jumper cables, make
sure that they cannot get caught in any
moving parts in the eng ine compart
ment .
- Before you check anything in the engine
compartment, always read and heed all
WARNINGS ¢
page 224, Engine com
partment.
(D Note
Improper hook-up of jumper cables can r u
in the generator.
- Always connect POSITIVE(+) to POSI
TIVE(+), and NEGA TIVE( -) to NEGATIVE
( - ) ground post of the battery manager
control u nit .
- Check that all sc rew plugs on the battery
cells are screwed in firmly. If not, tighten
pl ugs p rior to connecting clamp on nega
tive batt ery terminal.
- P lease note that the procedure for con
nect ing a jump er cable as describe d
above applies spec ifically to the case of
your vehi cle be ing j ump s tarted. When
you are giving a jump star t to anothe r ve
hicle, do
not connec t the negative( -) ca
b le to the negat ive (-) term inal on the
discharged battery@¢
fig. 219. In
stead, securely connect the negative(-)
cable to e ither a solid metal component
that is firmly bolted to the engine block
or to the engine block itself.
If the bat
te ry tha t is being charged does not vent
to the ou tside, es ca ping b attery gas
could ignite and ex plode!
Emergency towing
with commercial tow
truck
General hints
Your Audi requires special handling for tow
ing .
The fo llow ing informa tion is to be used by
commercia l tow tr uck operators who know
how to ope rate thei r equipmen t sa fe ly.
Emergenc y situ ation s 281
-Ne ver tow your Audi. Towing will cau se
damage to the engine and tran smission.
- Never wrap the safety chain s or w inch ca
ble s around the brake lines.
- To prevent unnece ssary damage , your Audi
must be transported with a flat bed tru ck.
- To load the vehicle on to the fl at bed , use
the towing loop found in the vehicle tools
a nd attach to the front or rear anchora ge
¢page 281 and ¢page 282 .
_& WARNING
A vehicle being towed is not safe for pas
sengers. Never allow anyo ne to ride in a
vehicle be ing towed, for any reason.
Front towing loop
Only install the front towing loop when it is
needed.
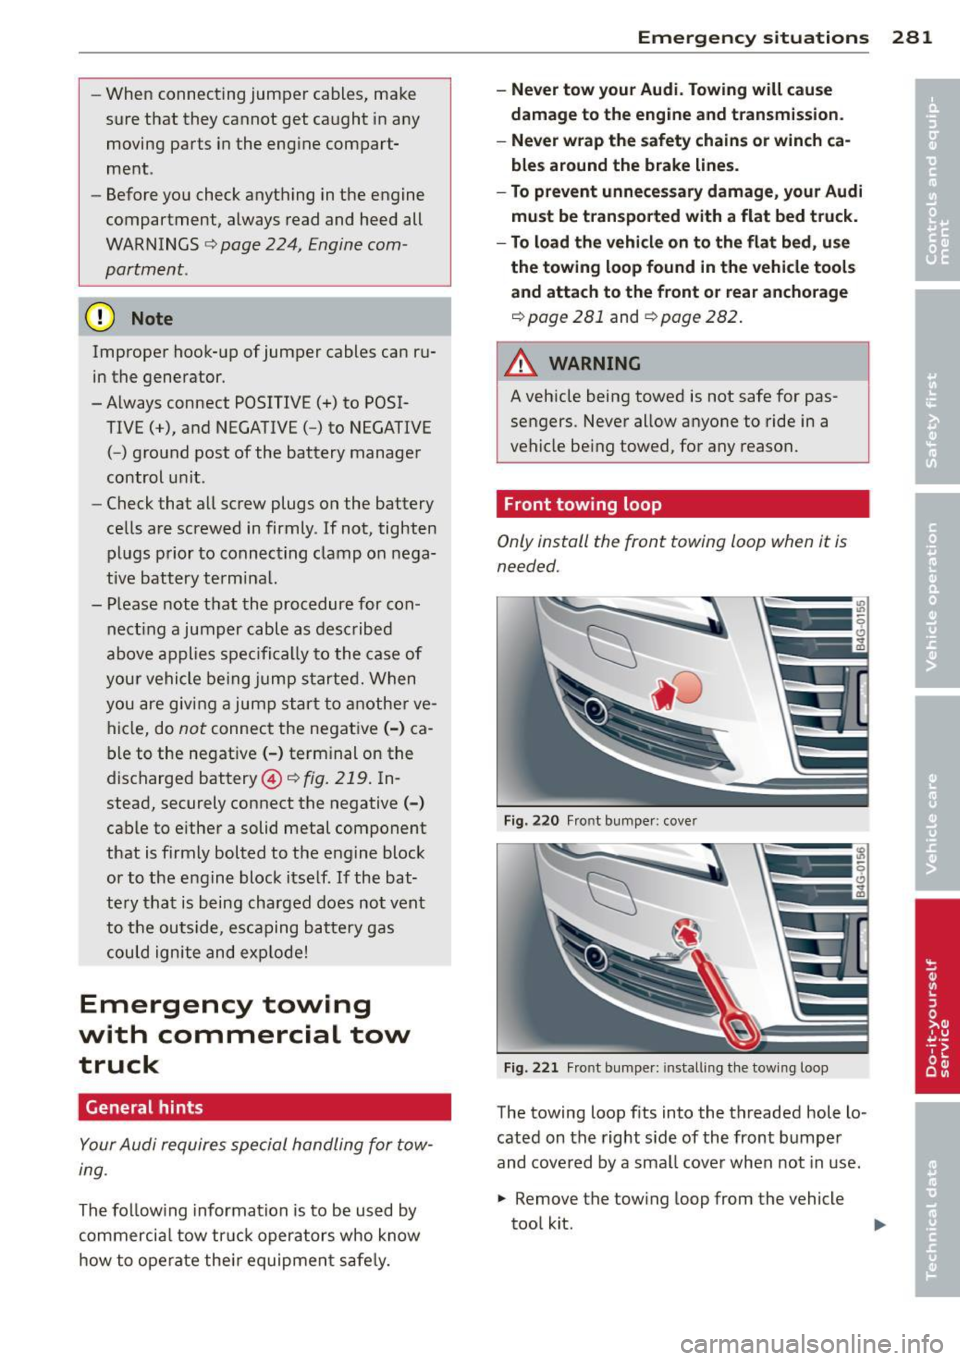
Fig. 22 0 Front bumpe r: cove r
Fig. 22 1 Front bu mpe r: in stall ing t he tow ing loop
-
The towing loop fits into the threaded hole lo
cated on the right s ide of the front bumpe r
and cove red by a sma ll cover when not in use.
.. Remove the tow ing loop from the vehicle
too l kit .
Page 284 of 310
282 Emergency situations
• Press inward strongly on the left side of the
cap to remove it from the bumper
¢ fig . 220 .
• Screw the towing loop in the threaded
opening and tighten it until it s tops
¢ fig . 221.
Remove the towing loop when you are done
using it and place it back in the vehicle tool
kit . Install the cover in the bumper. Always
keep the towing loop in the vehicle.
A WARNING
If you do not screw the tow ing loop com
pletely, it could come out of the threaded
hole while the vehicle is being towed caus
ing damage to the vehicle and possible se
rious personal injury.
Rear towing loop
Only install the rear towing loop when it is
needed.
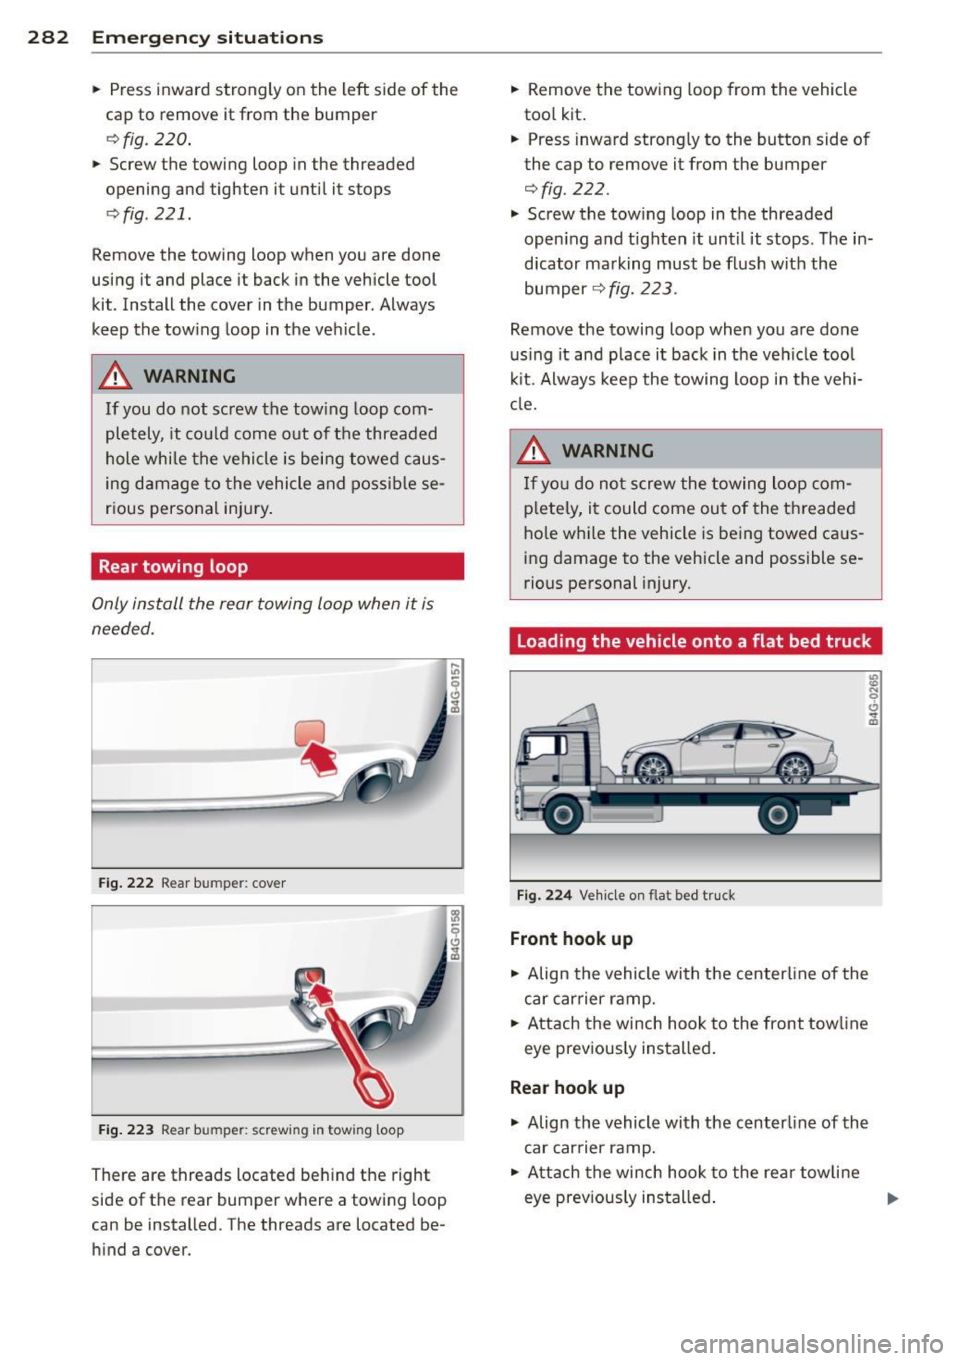
Fig . 222 Rear bum per: cover
Fig. 223 R ear bum per: scr ew in g in tow ing loop
There are threads located behind the right
side of the rear bumper where a towing loop
can be installed . The threads are located be
hind a cover.
-
• Remove the towing loop from the vehicle
tool kit.
• Press inward strong ly to the button side of
the cap to remove it from the bumper
¢fig. 222.
.,. Screw the tow ing loop in the threaded
open ing and t ighten it until it stops. The in
dicator marking must be flush with the
bumper
c::> fig. 223 .
Remove the towing loop when you are done
using it and place it back in the veh icle tool
kit. Always keep the towing loop in the vehi
cl e.
A WARNING
If you do not screw the towing loop com
pletely, it could come out of the threaded
hole while the vehicle is being towed caus
ing damage to the vehicle and possible se
rious personal injury.
Loading the vehicle onto a flat bed truck
Fig. 224 Vehicle on flat bed tr uck
Front hook up
.,. Align the vehicle with the centerline of the
car carrier ramp .
.,. Attach the winch hook to the front tow line
eye previously installed.
Rear hook up
.,. Align the vehicle with the centerline of the
car earner ramp.
• Attach the winch hook to the rear towline
eye previous ly installed .
-
Page 291 of 310
Consumer Information
Warranty coverages
Your Audi is covered by the following war
ranties :
- New Vehicle Limited Warranty
- Limited Warranty Against Corrosion Perfo-
ration
- Emissions Control System Warranty
- Emissions Performance Warranty
- California Emissions Con trol Warranty (USA
vehicles only)
- California Emissions Performance Warranty
(USA vehicles only)
Detailed information regarding your warran
ties can be found in your
Warranty & Mainte
nance booklet .
Operating your vehicle
outside the U.S.A. or
Canada
Government regulations in the United States
and Canada require that automobiles meet
specific emission regulations and safety
standards. Therefore, veh icles built for the
U.S.A. and Canada differ from vehicles sold in
other countries .
If you p lan to take your vehicle outside the
continental limits of the United States or Can
ada, there is the possibility that:
- unleaded fuels for vehicles with cata lytic
converter may not be available;
- fuel may have a considerably lower octane
rating . Improper fuel may cause engine
damage ;
- service may be inadequate due to lack of
proper service facilities, tools or testing
equipment ;
- replacement parts may not be readily availa
ble.
- Navigation systems for vehicles built for the
U.S.A. and Canada will not necessari ly work
in Europe, and may not work in other coun
tries outside North America .
Consumer Information 289
@ Note
Audi cannot be responsible for mechanical
damage that could result from inadequate
fuel, service or parts availab ility.
Audi Service Repair
Manuals and Literature
Audi Offic ial Factory Service Manuals and Lit
erature are published as soon as possible after
model introduction. Service manuals and lit
erat ure are available to order from the Audi
T echnical Literature Ordering Center at:
www.audi.techliterature.com
Maintenance
' General
Your vehicle has been designed to help keep
maintenance requirements to a minimum.
However, a certain amount of regular mainte
nance is still necessary to assure your vehicle's
safety, economy and reliability . For detailed
vehicle maintenance consult your Warranty
&
Maintenance booklet.
Under difficult operating conditions , for ex
ample at extremely low outside temperatures ,
in very dusty regions, when towing a tra iler
very frequently, etc., some serv ice work
shou ld be pe rformed between the intervals
specified. This applies particularly to:
- oil changes, and
- cleaning or replacing the air filter .
® For the sake of the environment
By regularly maintaining your vehicle, you
help make sure that emission standards
are maintained, thus min imizi ng adverse
effects on the environment .
Important considerations for you and
your vehicle
The increasing use of electronics , sophisticat
ed fuel injection and emission contro l sys-
tems, and the genera lly increasing technica l ..,_
•
•