display AUDI A7 2016 Workshop Manual
[x] Cancel search | Manufacturer: AUDI, Model Year: 2016, Model line: A7, Model: AUDI A7 2016Pages: 294, PDF Size: 73.82 MB
Page 194 of 294
Intelligent Technology
Electromechanical
steering, dynamic
steering
The electromechanical steering supports the
driver's steering movements .
Powe r stee ring adapts electroni cally based o n
the vehicle speed.
Indicator lights and messages
• Do not dr ive v ehicle: steering d efecti ve
If th is ind icator light turns on and stays on and
this message appears, the power steering may have fa iled.
Stop the vehicle in a safe locatio n as soon as pos
sib le. Do
not continue driving. See an author iz ed
Aud i dealer or authori zed Aud i Service Facility for
assistance.
,Ton Steering: Sy stem fault You can continue
driving
If the indicator lig ht t urns on and the message
appears, t he steering may be more diffic ult to
move or more sensitive than usual. The steering
wheel may a lso be at an ang le when dr iv ing
straight.
D rive s low ly to your authorized A udi dealer or
qualified wor kshop to have the malfunction cor
rected.
,Ton Dynamic steering: Initializing
If the indi cator lig ht ls b linki ng and th is message
appears, dynam ic s teeri ng* is being ini tialized.
Once you st art the eng ine a fter this is finished,
the steering wheel will be easy to move . Re -initi
alization might be necessary if the steering whee l
was moved hard to the left and right wh ile the
veh icle was not moving . The display turns off if
the initiali zation was successfu l.
(D Tips
-If th e . or ,Ton indicator light only stays on
for a short time, you may continue driving.
- The dynamic steering sta bility systems
r=> page 188 are not ava ila ble in the event of
a system ma lf u nction.
192
- For add itiona l information on dynamic
steerin g, refer to
r=> page 101.
All wheel drive (quattro)
App lies to vehicles : with all wheel drive
In all wheel drive, all four wheels are powered .
General information
In all whee l dr ive, the dr iv ing power is divide d be
tween all four whee ls. Th is happens automat ic al
l y depending on yo ur driv ing behavior as well as
the cur rent roa d conditions . Refer to r=>
page 188,
Electronic Stabilization Control (ESC).
A cente r d iff eren tial distribu tes the d riving power
variably to the fron t and rear ax le . I t works to
gether w it h select ive whee l torq ue control, which
activates when driving throug h curves
<=> page 189. With the sport differential*, power
distribution to the rear wheels is variable a nd can
be adjusted with drive select<=>
page 101 .
The all whee l drive concept is designed for high
engine power . Yo ur vehicle is exceptionally pow
erfu l and has excellent driving characterist ics
bot h under normal driving conditions and on
snow and ice . Always read a nd follow safety pre
ca utions
<=> ,& .
Winter tires
By using all whee l dr ive, your ve hicle has good
forward motion with sta ndard t ires in winter con
dit ions . However, in winter we recommend usi ng
winter or all seaso n tires on a ll fou r wheels, be
cause this will improve the braking eff ect.
Snow chains
If there are snow chain laws, snow chai ns m ust
also be used o n ve hicles with all wheel drive
r=> page 248 , Snow chains .
Replacing tires
For vehicles with a ll wheel drive, o nly wheels with
the same rolling circum ference should be used.
Avoid w heels with d ifferent tread dept hs
<=> page 240, New tires or wheels. ..,.
Page 209 of 294
M N <( (.J
'SI: ,...., \!) 1.1'1
N \!) ,....,
Care and cleaning
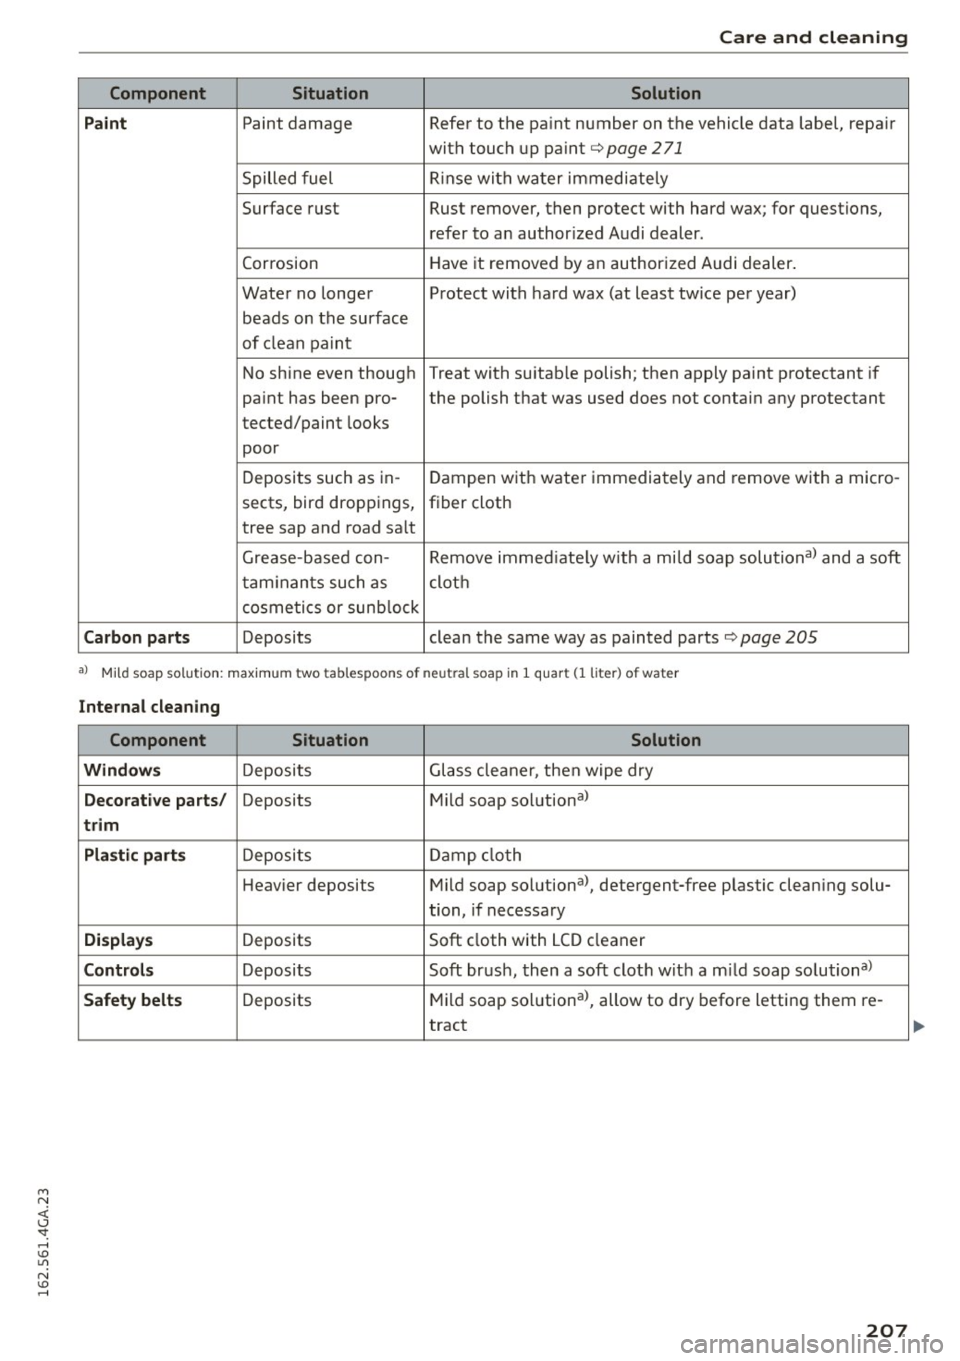
Component Situation Solution
Paint
Paint damage Refer to the paint number on the vehicle data label, repair
with touch up paint
c> page 271
Spilled fuel Rinse with water immediately
Surface rust Rust remover, then protect with hard wax; for questions,
refer to an author ized Audi dealer.
Corrosion Ha
ve it removed by an authorized Audi dealer.
Water no longer Protect with hard wax (at least tw ice per year)
beads on the surface
of clean paint
No shine even though Treat with suitab le polish; then apply paint protectant if
paint has been pro- the polish that was used does not contain any protectant
tected/paint looks
poor
Deposits such as in- Dampen with water immediately and remove with a micro-
sects, bird droppings, fiber cloth
tree sap and road sa lt
Grease-based con-Remove immediately with a mild soap solutional and a soft
taminants such as cloth
cosmetics or sunb lock
Carbon parts Deposits clean the same way as painted parts c> page 205
al Mild soap solu tion: maximu m two ta ble spoon s of neu tral soap in 1 quart (1 lit er) of water
Internal cleaning
Component Situation Solution
Windows
Deposits Glass cleaner, then wipe dry
Decorative parts/ Deposits Mild soap so lutiona>
trim
Plastic parts
Deposits Damp cloth
Heavier deposits Mild soap solutiona>, detergent-free plastic clean ing solu-
tion, if necessary
Displays Deposits
Soft cloth with LCD cleaner
Controls Deposits Soft brush, then a soft clot h with a m ild soap solutional
Safety belts Deposits Mild soap solutiona>, allow to dry before letting them re-
tract
207
Page 211 of 294
M N <( (.J
'SI: ,...., \!) 1.1'1
N \!) ,....,
avoid scratches, move the scraper only in
one direction and not back and forth.
- Never remove snow or ice from door win
dows and mirrors using warm or hot water
because this could cause cracks to form.
- To avoid damage to the rear window de
fogger, do not apply any stickers on the
heating wires on the inside of the window.
- Decorative parts/trim
- Never use chrome care or cleaning prod-
ucts .
- Paint
- To reduce the risk of scratches, the vehicle
must be free of dirt and dust before pol
ishing or waxing.
- To prevent paint damage, do not polish or
wax the vehicle in direct sunlight.
- To reduce the risk of paint damage, do not
polish away rust spots.
- Remove cosmetics and sunscreen immedi
ately -these could damage the paint.
- Displays
- To avoid scratches, do not use dry cleaning
methods on displays.
- Controls
- Make sure that no fluids enter the con-
trols, because this could cause damage.
- Safety belts
- Do not remove the safety belts to clean
them.
- Never clean safety belts or their compo
nents chemically or with corrosive fluids
or solvents and never allow sharp objects
to come into contact with the safety belts.
This could cause damage to the belt web
bing.
- If there is damage to the webbing, the
connections, the retractors or the buckles,
have them replaced by an authorized deal
er.
- Textiles/artificial leather/Alcantara
- Never treat artificial leather/Alcantara
with leather care products, solvents, floor polish, shoe polish, spot remove or similar
products.
- Have a specialist remove stubborn stains
to prevent damage.
Care and cleaning
- Never use steam cleaners, brushes, hard
sponges, etc. when cleaning.
- Do not turn on the seat heating* to dry
the seat.
- Objects with sharp edges such as zippers,
rivets on clothing or belts can cause dam
age to the surface.
- Open hook and loop fasteners, for exam
ple on clothing, can damage seat covers.
Make sure hook and loop fasteners are
closed.
- Natural leather
- Never treat leather with solvents, floor
polish, shoe polish, spot remover or simi
lar products.
- Objects with sharp edges such as zippers, rivets on clothing or belts can cause dam
age to the surface .
- Never use steam cleaners, brushes, hard
sponges, etc. when cleaning .
- Do not turn on the seat heating* to dry the seat.
- To help prevent the leather from fading,
do not leave the vehicle in direct sunlight
for long periods of time. If leaving the ve
hicle parked for long periods of time, you
should cover the leather to protect it from
direct sunlight.
(D Tips
- Insects are easier to remove from paint that
has been freshly waxed .
- Regular waxing can prevent rust spots from
forming.
209
Page 216 of 294
Fuel and Refueling
case, try turning the nozzle before inserting
it in the fuel fi ller neck, use a different fuel
pump or see your authorized Audi dea ler or
authorized repair facility for assistance.
- The fuel filler flap of your vehicle is not
l ocked when you lock the vehicle from the
inside .
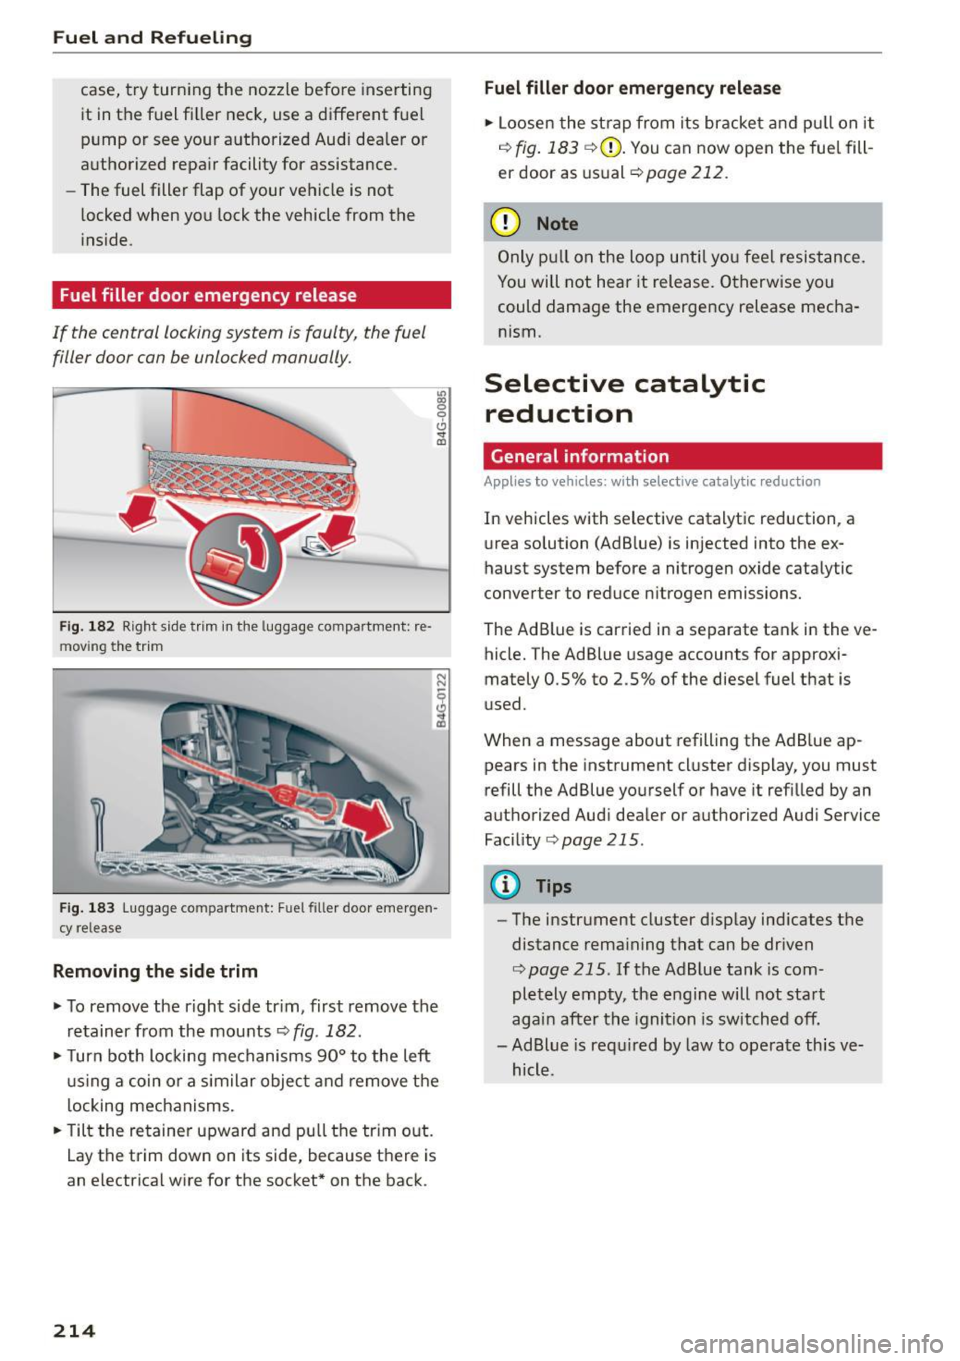
Fuel filler door emergency release
If the central locking system is faulty, the fuel
filler door can be unlocked manually.
Fig. 182 Right side tri m in the luggag e compartme nt: re·
mov ing the trim
"' ~ 0
<.:l
Fig. 183 Luggage compartment: Fuel filler door emergen
cy release
Removing the side trim
• To remove the right side tr im, first remove the
retainer from the mounts
r:!.> fig. 182.
• Turn both locking mechanisms 90° to the Left
using a coin or a similar object and remove the
locking mechanisms.
• Tilt the retainer upward and pu ll the tr im out.
Lay the trim down on its side, because there is
an electrical wire for the socket* on the back.
214
Fuel filler door emergency release
• Loosen the strap from its bracket and pull on it
r:!.> fig. 183 r:!.>{2) . You can now open the fuel fill
er door as usu al
r:!.> page 212.
(D Note
Only pull on the Loop until you feel resistance.
You will not hear it release. Otherwise you
could damage the emergency release mecha nism.
Selective catalytic reduction
General information
Applies to vehicles: with selective catalyt ic red uction
In vehicles with selective catalytic reduction, a
urea solution (AdB lue) is injected into the ex
haust system before a nitrogen oxide catalytic
converter to reduce nitrogen emissions.
The Ad Blue is carried in a separate tank in the ve
hicle. The Ad Blue usage accounts for approxi
mately O. 5 % to 2. 5% of the diesel fuel that is
used.
When a message about refilling the AdBlue ap
pears in the instrument cluster display, you must
refill the Ad Blue yourself or have it refilled by an
authorized Audi dealer or authorized Audi Service
Facility
r:!.> page 215.
{!) Tips
-The instrument cluster d isp lay indicates the
distance remaining that can be driven
r:!.>page 215. If the AdBlue tank is com
pletely empty, the engine will not start
again after the ignition is switched off.
- Ad Blue is requ ired by law to operate this ve
hicle.
Page 217 of 294
M N <( I.J "". rl I.O
"' N I.O rl
Messages in the instrument cluster display
Applies to vehicles: with selective catalyt ic reductio n
The display indicates if the Ad Blue level is low or
if there is a system malfunction .
AdBlue level low
You will be informed if the Ad Blue in the tank
drops be low a certain level.
Please refill Ad Blue. Range 1500 mi (2400 km )
This message appea rs whe n there is o nly enoug h
Ad B lue left to dr ive the d ist ance ind icated in the
d river i nfo rmation sys tem . Fill the AdBl ue.
Ad Blue ,0 Refill AdBlue! No restart in 600 mi
( 1000 km)! See owner 's manual
This message appea rs when there is o nly enoug h
Ad Blue left to dr ive the distance indicated in the
d river info rmation system . Fill the Ad Blue . Othe r
wise the eng ine will not sta rt again if you s top it
once the di stan ce in dicated ha s been driven. You
can also check t he rem ain ing distance in the on
board comp ute r*.
Refill Ad Blu e! No restart! See own -
er' s manual
This message appea rs whe n the AdBlue tank is
empty . Fill t he AdBl ue. Othe rw ise you w ill not be
ab le to start the engine aga in once yo u stop it.
T he AdBlue must be refi lled when t he amo unt in
the tank has reac hed the m inimum leve l
q page 215, Filling Ad Blue .
Incorrect filling/system malfunction
A message appears if the AdBl ue tank was filled
with a fluid other than AdBlue and the system has detected t hat the ta nk was f illed incor rectly,
or if there is a sys tem ma lf u nction .
Ad Blue -I' Ad Blue: System fault! No restart in
600 mi (1000 km). See owner's manual.
This message appea rs when it is only poss ible to
drive the d istance ind icated in the dr iver informa
tion system. Drive to the nearest authori zed Audi
dealer or authorized Aud i Service Fac ility to have
the ma lfunction corrected . Otherwise the engine
w ill not start aga in if you stop it once the dis
tance ind icated has been driven .
Fuel and Refueling
AdBlue: System fault No restart!
See owner's manual
T his mes sage ap pea rs if t he system h as detec ted
t h at the t ank was fi lled incor rectly o r tha t there
is a ma lf u nction . Drive immed iate ly to the near
est authorized A udi dealer or autho rized A udi
Se rv ice Facility to have the ma lf u nction co rrect
ed. Otherwise yo u will not be ab le to start the en
gine aga in once you stop it .
Filling AdBlue
Applies to vehicles: with selective catalytic reduction
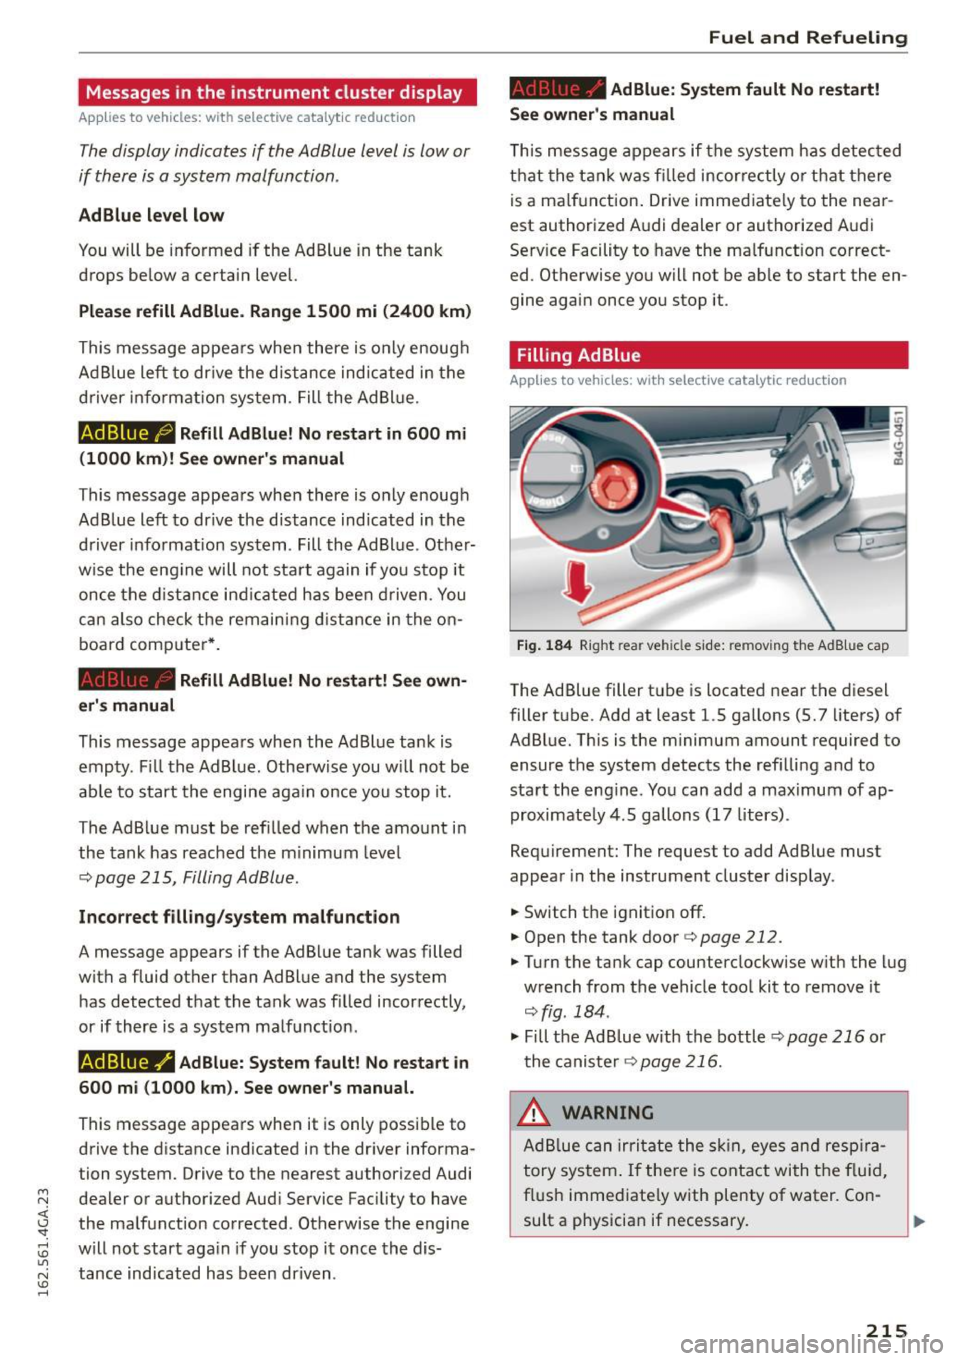
Fig. 184 Rig ht rea r ve hicle s ide: re m oving t he AdB lu e cap
The Ad Blue filler t ube is located near the diesel
filler t ube . Add at least 1.5 ga llons (5.7 liters) of
AdBl ue. This is the m inimum amount required to
ensure the system detects the refi lling a nd to
start the eng ine . Yo u can add a max imum of ap
proximate ly 4.5 gallons (17 liters) .
Req uirement: The request to add Ad Blue must
appear in the instrument cluster display .
.. Switch t he ignit ion off .
.. Open the tank door
q page 212.
.,. Turn the tank cap counterclockwise w it h the lug
w rench from the vehicle too l kit to remove it
q fig . 184 .
.,. Fill the Ad Blue with th e bottl e ~ page 216 or
the caniste r<=>
page 216.
.&_ WARNING
Ad Bl ue can irri tate the skin , eye s and respira
tory sys tem . If the re is con tact with t he flu id,
f lush imme diate ly w ith plenty of water. Co n-
su lt a physicia n if necessary. .,,_
215
Page 224 of 294
Checking and Fill in g
@ Tips
-The oil pre ssure warning displ ay. is not
a n ind icato r of the oil le vel. Do no t rel y on
i t. In stead , che ck the oil level i n your en
gine at regular inte rvals, preferab ly each
tim e you r efu el, and alway s befor e going
on a long trip .
-If you have the impression your engine con
sumes excess ive amounts of o il, we recom
mend that you cons ult your Audi dealer to
have the cause of your concern prope rly di
agnosed. Keep in mind that t he accurate
measurement of oil consumpt ion req uires
great care and may take some time . Your
A udi dealer has instructions about how to
measure oil consumption accurately.
Checking the eng ine oil level
The engine oil level can be checked in the Info
tainment system
F ig. 189 Infotainment: o il level indicato r
• Park your vehicle on a level surface.
• Shut the engine off when it is warm.
• Switch only the ignit ion back on .
• Wait approximately two minutes .
• Se lect : the
ICAR I function button > (C ar)* Sys
tem s
control but ton > S er vic e & con trol > O il
le vel.
• Check the oil leve l in the Info tainment system
display ¢
fig. 189. Add engine oil if the bar of
the oil level indicator is near "min"
r::!;>page222.
Depending on the way the vehicle is driven and
the operating conditions, oil consumption can be
up to 1/2 quart per 600 miles (0.5 liter per
222
1,000 km). Consumption may be h igher within
the first 3,000 miles (5,000 km).
Because of t his, the engine oil Leve l must be
chec ked regu larly . It wo uld be best to check each
time you refuel your vehicle and before long
drives .
{!) Tips
The oil level indicator in the instr ument clus
ter d isplay is only an informational display. If
the oil leve l is too low, a m inimum oil warning
appears in the instrument cluster. Add oil. If
the hood was opened, the current oi l Level is
shown in the instrument cluster the next ti me
the ignition is switched on.
Adding engine oil 'l:::1:
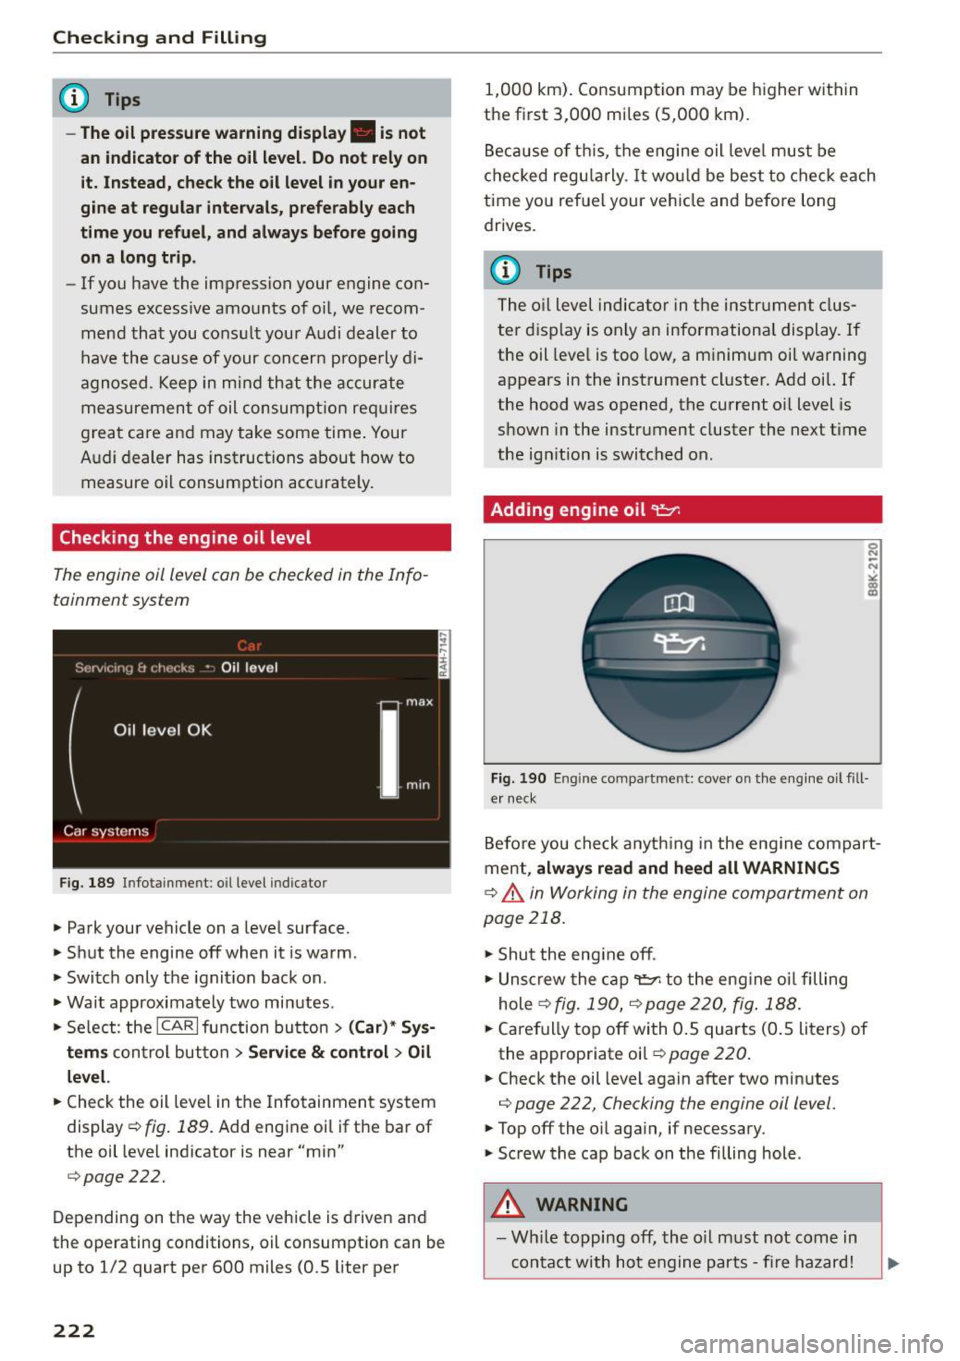
Fig. 190 Engine compart ment: cover on the engine oil fill
er neck
Before you check anyth ing in the eng ine compart
ment,
alwa ys read and h eed all WARN ING S
r::!;> .&. in Working in the engine compartment on
page 218.
• Shu t the eng ine off .
• Unscrew the cap~ to the eng ine oi l filling
hole
r::!;> fig. 190, r::!;> page 220, fig. 188.
• Carefully top off with 0 .5 quarts (0.S liters) of
the appropriate oil
r::!;> page 220.
• Check the oil level again after two minutes
r::!;> page 222, Checking the engine oil level.
• Top off the oil aga in, if necessary.
• Screw the cap back on the filling hole.
_&. WARNING
-Wh ile topping off, the o il must not come in
con tact with hot engine parts -fire hazard!
Page 253 of 294
M N <( I.J "". rl I.O
"' N I.O rl
_& WARNING
Temperature grades apply to tires that are properly inflated and not over or underinflat
ed .
Tire pressure monitoring
system
CD General notes
Each tire, includ ing the spare (if provided),
should be checked monthly when cold and inflat
ed to the inflation pressure recommended by the
vehicle manufacturer on the vehicle placard or tire inflation pressure label. (If your veh icle has
tires of a different size than the size indicated on
the vehicle placard or tire inflation pressure la
be l, you shou ld determine the proper tire infla
tion pressure for those tires).
As an added safety feature, your vehicle has been
equipped with a tire pressure monitoring system
(TPMS) that illuminates a low tire pressure tell
tale when one or more of your tires is significant ly under -inflated. Accordingly, when the low tire
pressure telltale illuminates, you should stop and
check your tires as soon as poss ible, and inflate
them to the proper pressure. Driving on a signifi cantly under-inflated tire causes the tire to over
heat and can lead to t ire failure. Under-inflation
also reduces fuel efficiency and tire tread life,
and may affect the vehicle's handling and stop
ping ability .
Please note that the TPMS is not a substitute for
proper tire maintenance, and it is the driver's re
sponsib ility to ma inta in correct tire pressure,
even if under-inflation has not reached the level
to trigger illuminat ion of the TPMS low t ire pres
sure telltale.
Your vehicle has also been equ ipped with a TPMS
malfunction indicator to indicate when the sys
tem is not operating properly. The TPMS mal
function indicator is combined with the low tire
pressure telltale. When the system detects a
malfunction, the telltale will flash for approxi
mately one minute and then remain continuously
illuminated . This sequence will cont inue upon
Wheels
subsequent vehicle start -ups as long as the mal
function exists.
When the malfunction indicator is illuminated ,
the system may not be able to detect or signal
low tire pressure as intended . TPMS malfunctions
may occur for a variety of reasons, including the
i nsta llation of replacement or alternate tires or
wheels on the vehicle that prevent the TPMS
from functioning properly. Always check the
TPMS malfunction telltale after replacing one or
more t ires or wheels on your veh icle to ensure
that the replacement or alternate t ires and
whee ls allow the TPMS to continue to function
properly.
If the Tire Pressure Monitoring System
indicator appears
The tire pressure indicator in the instrument
cluster informs you if the tire pressure is too low
or if there is a system mo/function .
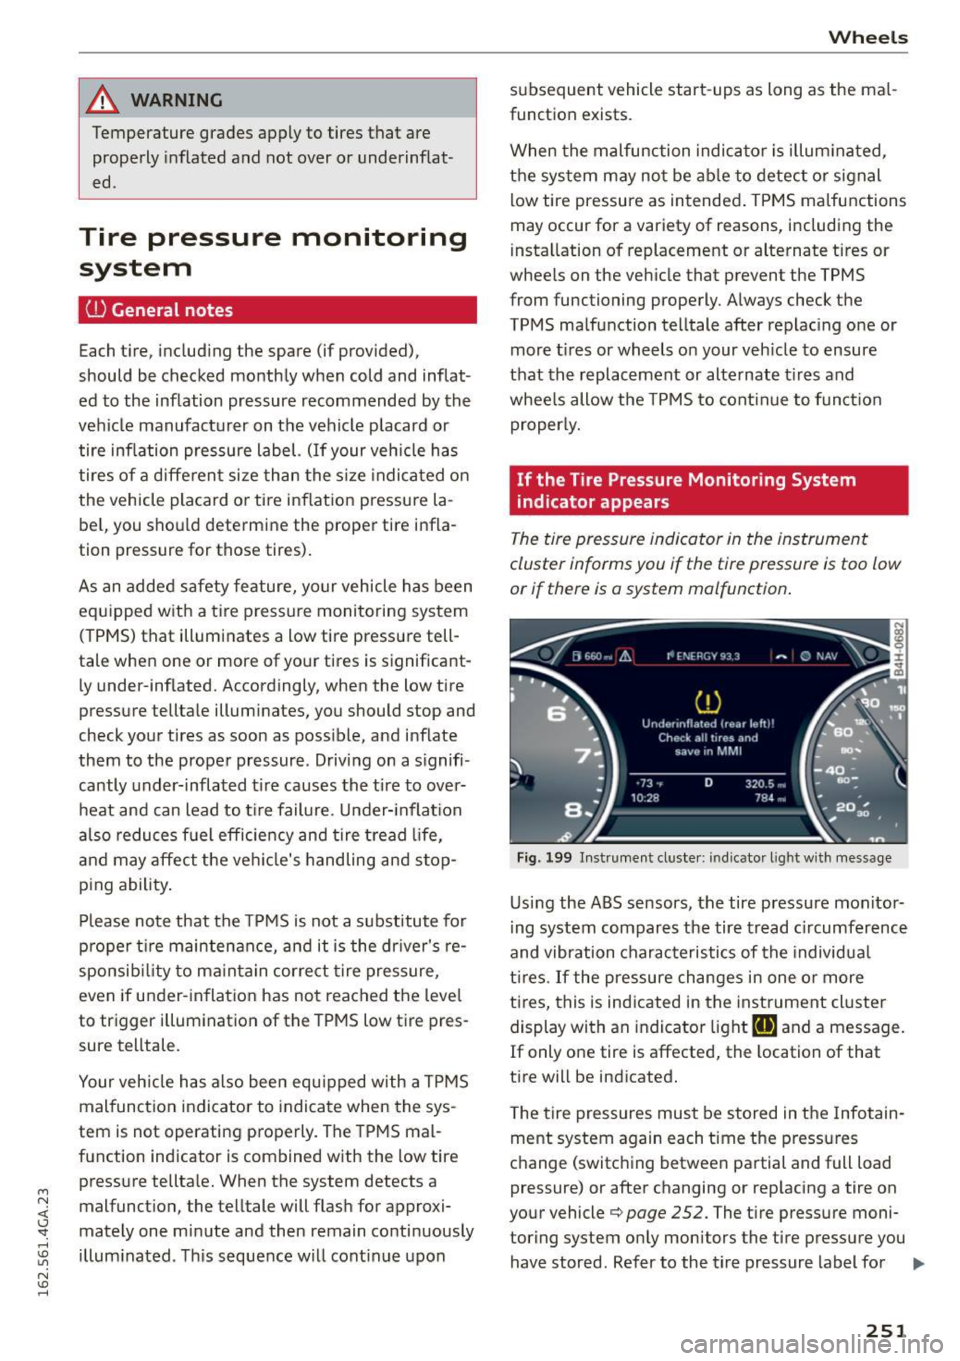
Fig. 199 Instrument cluster: indicator light with message
Using the ABS sensors, the tire pressure monitor
ing system compares the tire tread circumference
and vibration characteristics of the individual
tires . If the pressure changes in one or more
t ir es, this is indicated in the instrument cluster
display with an indicator light
HE and a message.
If only one tire is affected, the location of that
tire will be indicated.
T he tire pressures must be stored in the Infotain
ment system again each time the pressures
change (switching between partial and full load
pressure) or after changing or rep lacing a tire on
your vehicle
¢ page 252. The ti re pressure moni
toring system only monitors the tire pressure you have stored. Refer to the tire pressure label for ..,.
251
Page 254 of 294
Wheels
the recommended tire pressure for your vehicle
¢ page 243, fig. 198.
Tire tread ci rcumfe rence and v ibration character
istics can change and cause a tire pressure warn
ing if:
- the tire pressure in one or more t ires is too low .
- the tire has structural damage .
- the tire was replaced or the tire pressure was
changed and it was not stored
¢ page 252.
-the spare tire* is installed .
Indicator lights
IE Loss of pressure in at least one tire¢.&. .
Check the tires and replace or repair if necessary.
Check/correct the pressures of all four tires and
store the pressure again in the Infotainment sys
tem
¢page 252 .
mm (Tire Pressure Monitoring System) Tire pres
sure: System malfunction!. Ifffim
appears after
switching the ignition on or while driving and the
IE indicator light in the instrument cluster
blinks for approximately one minute and then
stays on, there is system malfunction . Try to
store the correct tire pressures¢ page 252. If
the indicator light does turn off or turns on again
after a short period of time, drive to your author
ized Audi dealer or authorized Audi Service Facili
ty immediately to have the malfunction correct
ed .
A WARNING
- If the tire pressure indicator appears in the
display, reduce your speed immediately and
avoid any hard steering or braking maneu
vers . Stop as soon as possible and check the
t ir es and their pressure .
- The driver is responsible for maintaining the correct tire pressure. You must check the
tire pressure regularly.
- Under certain conditions (such as a sporty
dr iving style, winter cond itions or unpaved
roads), the tire pressure monitoring system
indicator may be delayed.
- Do not use run-flat tires on your veh icle. Us
ing them when not permitted can lead to
vehicle damage or accidents.
252
(D Tips
-The tire pressure monitoring system can al
so stop working when there is an ESC mal
function.
- Using snow chains may result in a system
malfunction.
- The tires with the identification "AO" or
"RO" ¢
page 240 have been matched with
your Audi tire pressure monitoring system.
We recommend that you use these tires.
Storing tire pressures
If the tire pressure changes or a tire is replaced,
it must be confirmed in the Infotainment sys tem.
... Make sure before storing that the tire pressures
of all four tires meet the specified values and
are adapted to the load¢
page 243 .
... Switch the ignition on .
... Select: the
I CARI function button > (Car)* Sys
tems
control button > Servicing & checks > Tire
pressure monitoring
> Store tire pressures >
Yes, store now.
(D Tips
Do not store the tire pressures if snow chains
are instal led.
Page 265 of 294
M N <( I.J "". rl I.O
"' N I.O rl
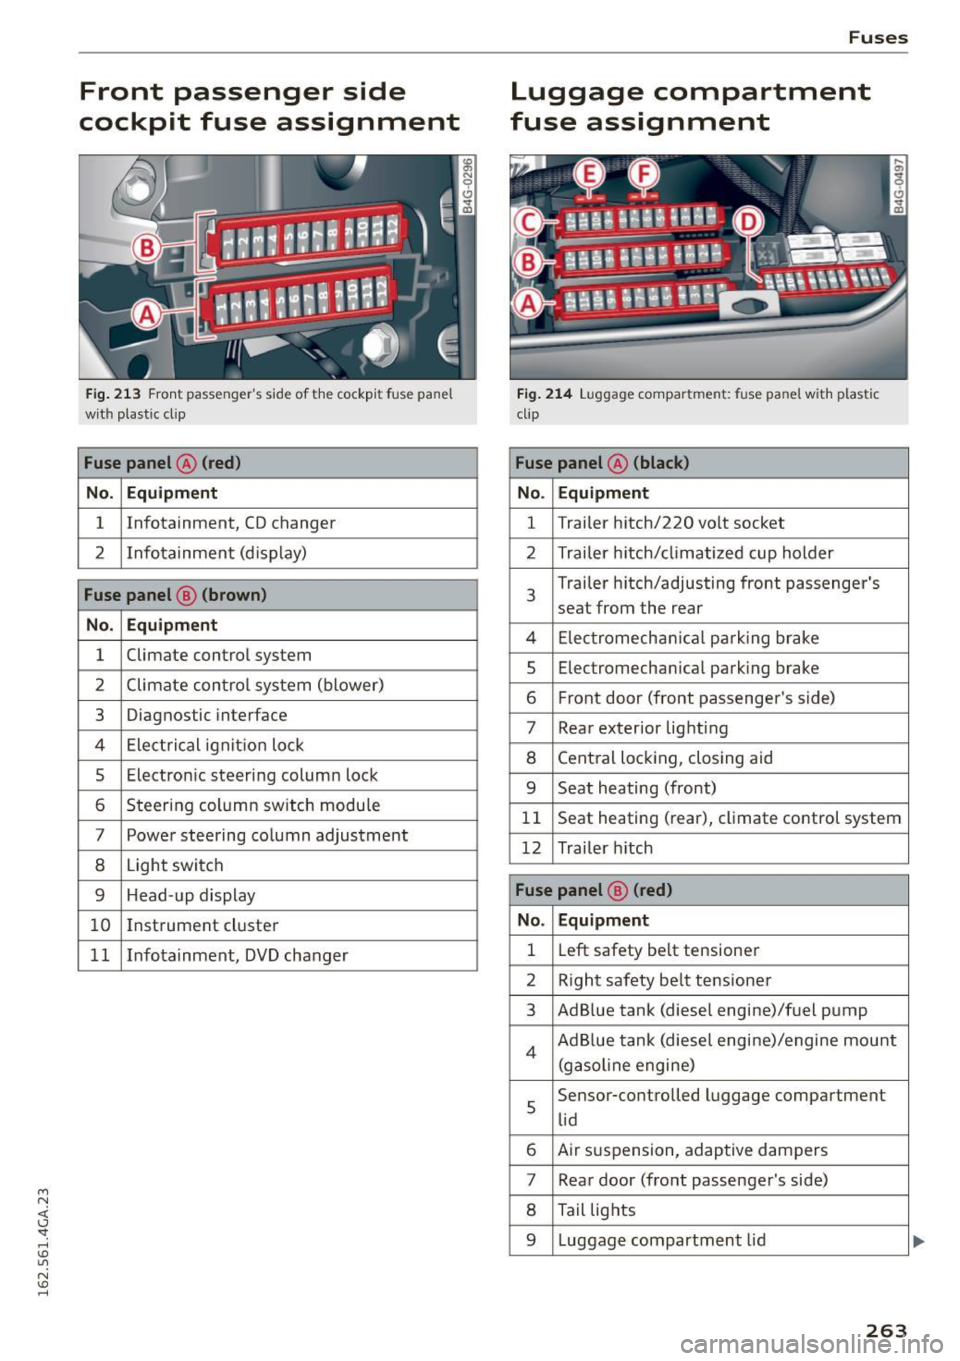
Front passenger side
cockpit fuse assignment
F ig. 21 3 Front passenger 's s ide of t he cockp it fuse pa nel
wit h plast ic cl ip
Fuse panel @ (red)
No. Equipment
1 Infotainment, CD changer
2 I nfotain ment (d isplay)
Fuse panel @ (brown)
No . Equipment
1 Climate control system
2 Climate con
trol sys tem (blower)
3 Diagnostic interface
4 Ele ctric al ignit ion loc k
5 Electro nic steer ing colum n lock
6 Steer ing column sw itch modu le
7 Power steering co lumn adjustment
8 Light switch
9 Head-up display
1 0 I
nstrument cluste r
1 1 Infotainment, DVD changer
Fuses
Luggage compartment
fuse assignment
F ig . 214 Lu ggage compa rtm ent: fuse pa nel w ith plastic
cli p
Fuse panel @ (black)
No. Equipment
1 Trailer h
itch/220 vo lt socket
2 Trailer h itch/ climatize d cup holder
3
Trailer h itch/adjusting front passenger's
seat from the rear
4 El ec tromech anical p ar kin g bra ke
5 Electromecha nica l park ing brake
6 Fr ont door (front passenger 's side)
7 Rear exterior lig hti ng
8 Cent ral loc king, closing aid
9 Seat heating (front)
1 1 Seat heating (rear), climate control system
12 Trailer h itch
Fuse panel @ (r ed)
No. Equipment
1 L
eft safety be lt tensioner
2 R ight safety be lt tensione r
3 AdBlue tank (diesel engine)/f uel p ump
4 Ad B lue tank (diese l engi ne)/engine mount
(g asol ine engine)
s
Sensor -co ntrolled luggage compartment
li d
6 Air s uspension, adaptive dam pers
7 Rear door (fro nt passenge r's side)
8 Tail lig hts
9 Luggage compartment lid
263
Page 282 of 294
Index
Checking
Engin e coolant leve l. . . . . . . . . . . . . . . . . .
224
Ch ild restra ints
D anger of using ch ild restra ints in the front
seat... .. .. .. .... ... .. .. .... .. .. .. .
144
Where can I get additional information
about child restraints and their use? . . . .
184
Ch ild restra int system anchors . . . . . . . . . . 180
Ch ild safety . . . . . . . . . . . . . . . . . . . . . . . . . . 167
Important sa fety ins truc tions for us ing ch ild
safety seats . . . . . . . . . . . . . . . . . . . . . . . .
170
Important things to know when dr iv ing with
chi ldren . . . . . . . . . . . . . . . . . . . . . . . . . . .
167
Tethe r anchors . . . . . . . . . . . . . . . . . . . . . . 183
Tether st raps . . . . . . . . . . . . . . . . . . . . . . . 183
Ch ild safety lock
Rear doors, windows in the rear . . . . . . . . .
39
Ch ild safety seats
Booster seats . . . . . . . . . . . . . . . . . . . . . . .
176
Convertible c hild seats . . . . . . . . . . . . . . . 174
Convertible locking retractor . . . . . . . . . . . 179
H ow do I p roperly install a ch ild safety seat
. h' l 7 170 in myve 1c e .... ... ..... ... .. .. .. .. .
I nfant sea ts . . . . . . . . . . . . . . . . . . . . . . . .
173
Insta lling a child res traint using the LA T CH
system . . . . . . . . . . . . . . . . . . . . . . . . . . . .
18 2
LA T CH system . . . . . . . . . . . . . . . . . . . . . . . 182
Lower anchorages . . . . . . . . . . . . . . . . . . . 181
Mounting and re leasing the anchorage
hook . . . . . . . . . . . . . . . . . . . . . . . . . . . . . .
182
Safety instructions . . . . . . . . . . . . . . . . . . . 170
Unused safety belts on the rear seat . . . . 172
Chil d seats . . . . . . . . . . . . . . . . . . . . . . . . . . 173
Secur ing . . . . . . . . . . . . . . . . . . . . . . . . . . . 177
Ciga re tte lig hte r . . . . . . . . . . . . . . . . . . . . . . . 58
Clea ning . . . . . . . . . . . . . . . . . . . . . . . . . . . . 205
Clea ning/removing ice from windows . . . . . 207
C lea ning Alcanta ra . . . . . . . . . . . . . . . . . . . . 208
Clean ing artificia l leather. . . . . . . . . . . . . . . 208
C lean ing carbon parts . . . . . . . . . . . . . 207, 20 8
Cleaning controls . . . . . . . . . . . . . . . . . . . . . 207
Clean ing deco rative parts and trim . . . 206, 207
C lea ning displays . . . . . . . . . . . . . . . . . . . . . 207
Clean ing exhaust ta il pipes . . . . . . . . . . . . . 206
Clea ning plastic parts . . . . . . . . . . . . . . . . . . 207
Clea ning rims . . . . . . . . . . . . . . . . . . . . . . . . 206
Clean ing texti les . . . . . . . . . . . . . . . . . . . . . . 208
280
Climate control system . . . . . . . . . . . . . . . . . 68
Closing
Su nroof. . . . . . . . . . . . . . . . . . . . . . . . . . . . .
40
Windows . .. .... .. .. .. ........... .. . 39
Coming home . . . . . . . . . . . . . . . . . . . . . . . . . 45
Compact spare tire . . . . . . . . . . . . . . . . . . . . 254
Compartments . . . . . . . . . . . . . . . . . . . . . . . . 59
Compliance . . . . . . . . . . . . . . . . . . . . . . . . . .
277
Consumer info rmation . . . . . . . . . . . . . . . . . 2 74
Consumer Information . . . . . . . . . . . . . . . . . 133
Co nsumption (fuel) . . . . . . . . . . . . . . . . . . . . 24
Contacting NHTSA . . . . . . . . . . . . . . . . . . . . 133
Convenience key . . . . . . . . . . . . . . . . . . . . . . . 34
Starting the engine (START ENGINE S TOP
button) . . . . . . . . . . . . . . . . . . . . . . . . . . . . . 75
Stopping the eng ine (START ENG INE S TOP
bu tton) . . . . . . . . . . . . . . . . . . . . . . . . . . . . .
76
Swi tc hi ng the ignit ion on . . . . . . . . . . . . . . 75
U nlocking and locking vehi cle . . . . . . . . . . .
34
Convenience opening . . . . . . . . . . . . . . . . . . . 40
Convertib le child safety seats . . . . . . . . . . . 1 74
Conve rtib le locki ng retractor
Activati ng . . . . . . . . . . . . . . . . . . . . . . . . . .
179
Dea ct ivatin g . . . . . . . . . . . . . . . . . . . . . . . . 180
U sing to secure a child safety seat . . . . . . 179
Coolant
refer to Eng ine coolan t . . . . . . . . . . . . . . . 224
Cooling mode (four- zone automatic climate
control) . . . . . . . . . . . . . . . . . . . . . . . . . . . . . .
71
Cooling mode (three-zone climate control) . 69
Cross ing wa ter . . . . . . . . . . . . . . . . . . . . . . . 196
Cruise contro l
Switc hing off . . . . . . . . . . . . . . . . . . . . . . . .
84
Warning/indicator lights . . . . . . . . . . . . . . . 22
Cruise contro l system
Changi ng speed . . . . . . . . . . . . . . . . . . . . . .
83
Preselect ing speed . . . . . . . . . . . . . . . . . . . . 84
switching on . . . . . . . . . . . . . . . . . . . . . . . . . 83
(upholder . . . . . . . . . . . . . . . . . . . . . . . . . . . . 59
Cu rve light . . . . . . . . . . . . . . . . . . . . . . . . . . .
101
Cylinder management
refer to Cylinder on demand System . . . . . 24
Cylinder on demand System . . . . . . . . . . . . .
24
D
Data recorde r . . . . . . . . . . . . . . . . . . . . . . . . 18 7