AUDI A8 2001 D2 / 1.G 01V Transmission Rear Differential Assembly Workshop Manual
Manufacturer: AUDI, Model Year: 2001,
Model line: A8,
Model: AUDI A8 2001 D2 / 1.G
Pages: 16, PDF Size: 0.35 MB
AUDI A8 2001 D2 / 1.G 01V Transmission Rear Differential Assembly Workshop Manual
A8 2001 D2 / 1.G
AUDI
AUDI
https://www.carmanualsonline.info/img/6/1201/w960_1201-0.png
AUDI A8 2001 D2 / 1.G 01V Transmission Rear Differential Assembly Workshop Manual
Trending: light, tow, oil, lock, ECU, torque, warning
Page 1 of 16
39-136
Differential, disassembling and
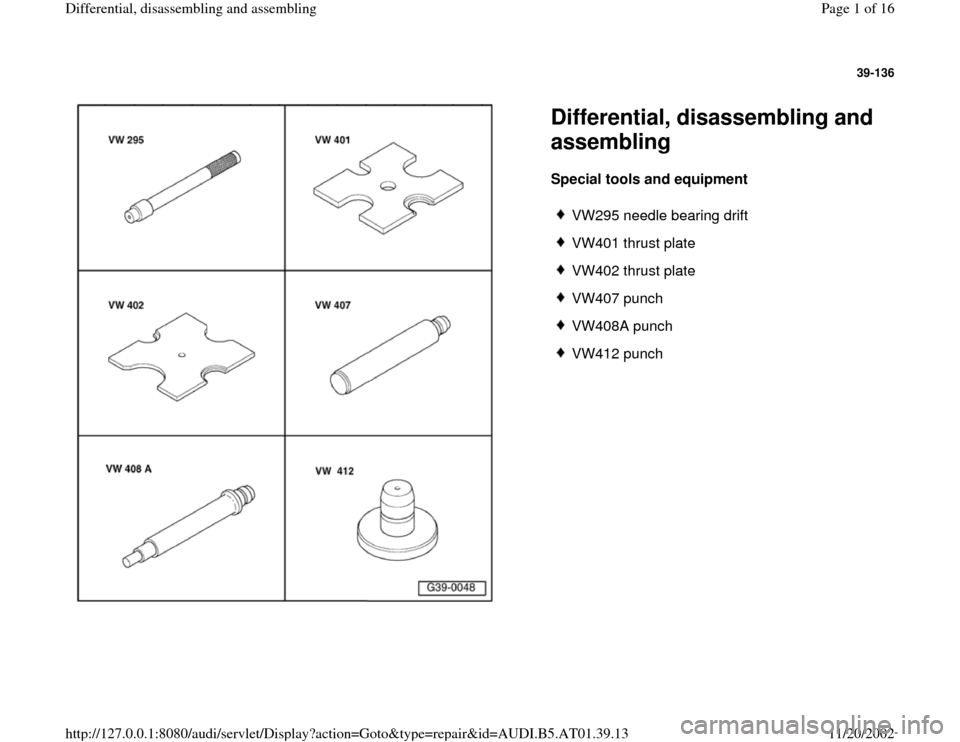
assembling Special tools and equipment
VW295 needle bearing drift
VW401 thrust plate
VW402 thrust plate
VW407 punch
VW408A punch
VW412 punch
Pa
ge 1 of 16 Differential, disassemblin
g and assemblin
g
11/20/2002 htt
p://127.0.0.1:8080/audi/servlet/Dis
play?action=Goto&t
yp
e=re
pair&id=AUDI.B5.AT01.39.13
Page 2 of 16
39-137
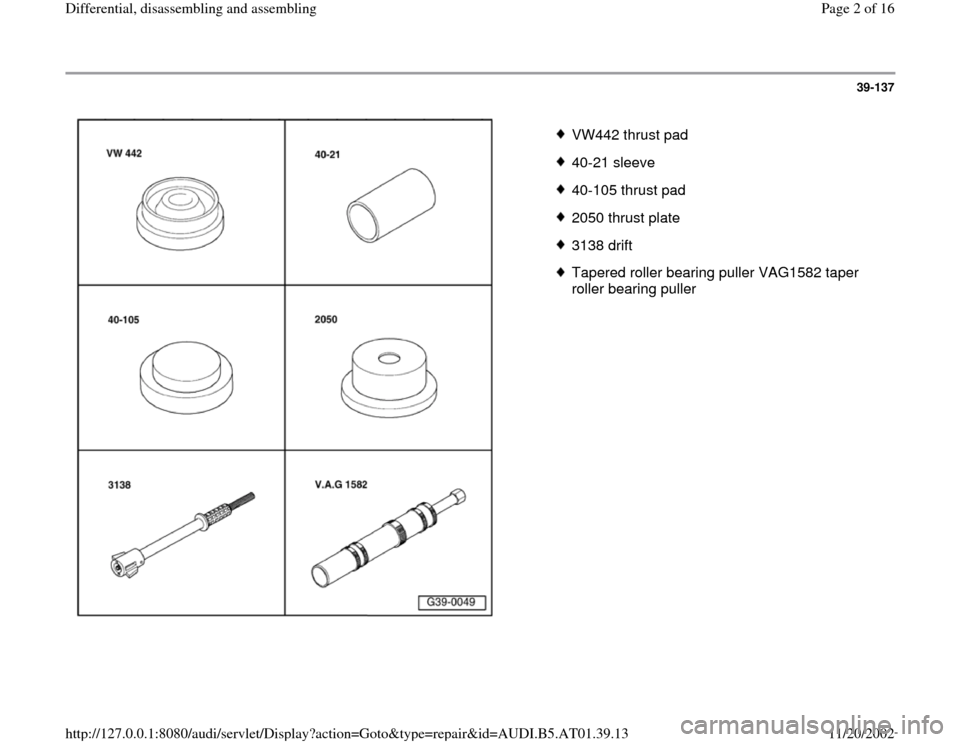
VW442 thrust pad
40-21 sleeve
40-105 thrust pad
2050 thrust plate
3138 drift
Tapered roller bearing puller VAG1582 taper
roller bearing puller
Pa
ge 2 of 16 Differential, disassemblin
g and assemblin
g
11/20/2002 htt
p://127.0.0.1:8080/audi/servlet/Dis
play?action=Goto&t
yp
e=re
pair&id=AUDI.B5.AT01.39.13
Page 3 of 16
39-138
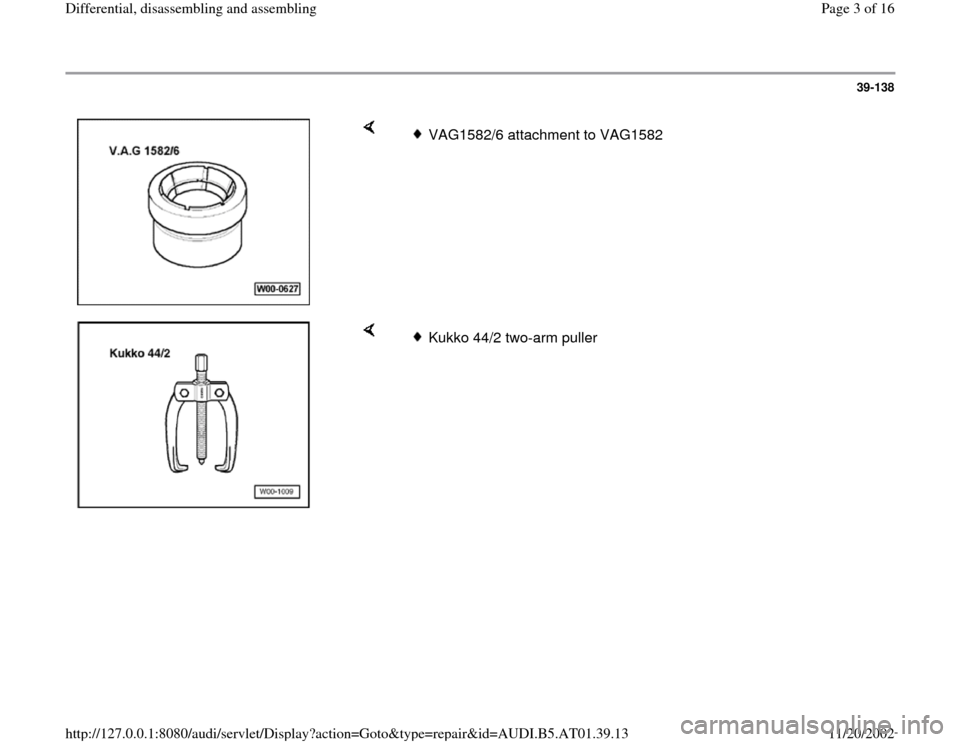
VAG1582/6 attachment to VAG1582
Kukko 44/2 two-arm puller
Pa
ge 3 of 16 Differential, disassemblin
g and assemblin
g
11/20/2002 htt
p://127.0.0.1:8080/audi/servlet/Dis
play?action=Goto&t
yp
e=re
pair&id=AUDI.B5.AT01.39.13
Page 4 of 16
39-139
Notes:
General repair notes: page 00
-27
.
Replace both tapered roller bearings together. If
possible, use same manufacturer!
Adjustments are required when replacing
components marked with
1) Adjustment
overview page 39
-170
.
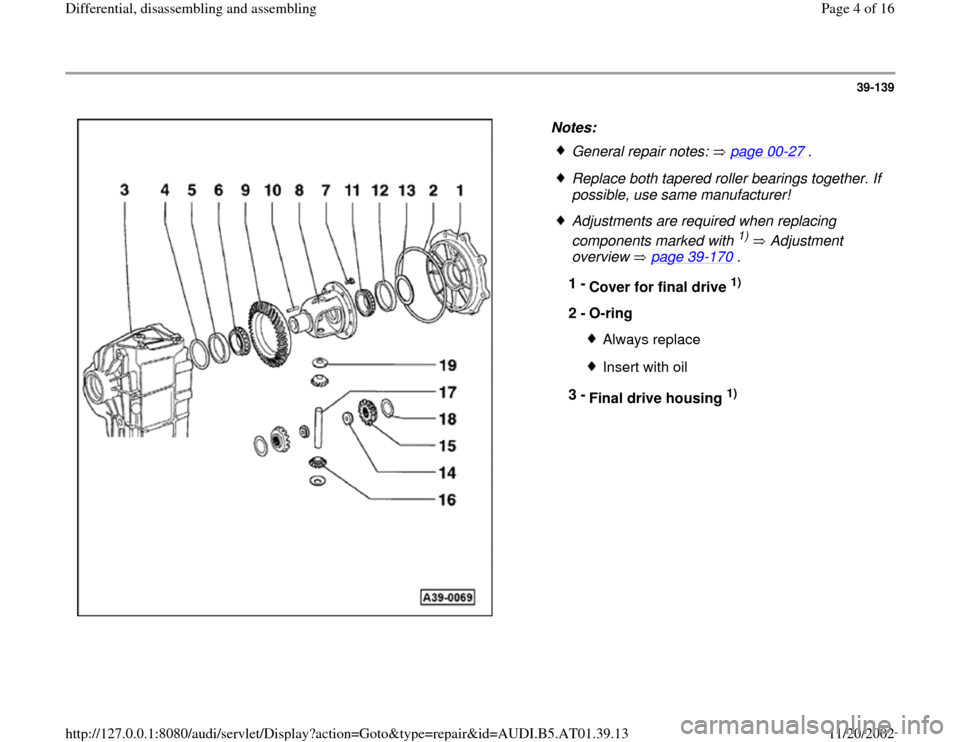
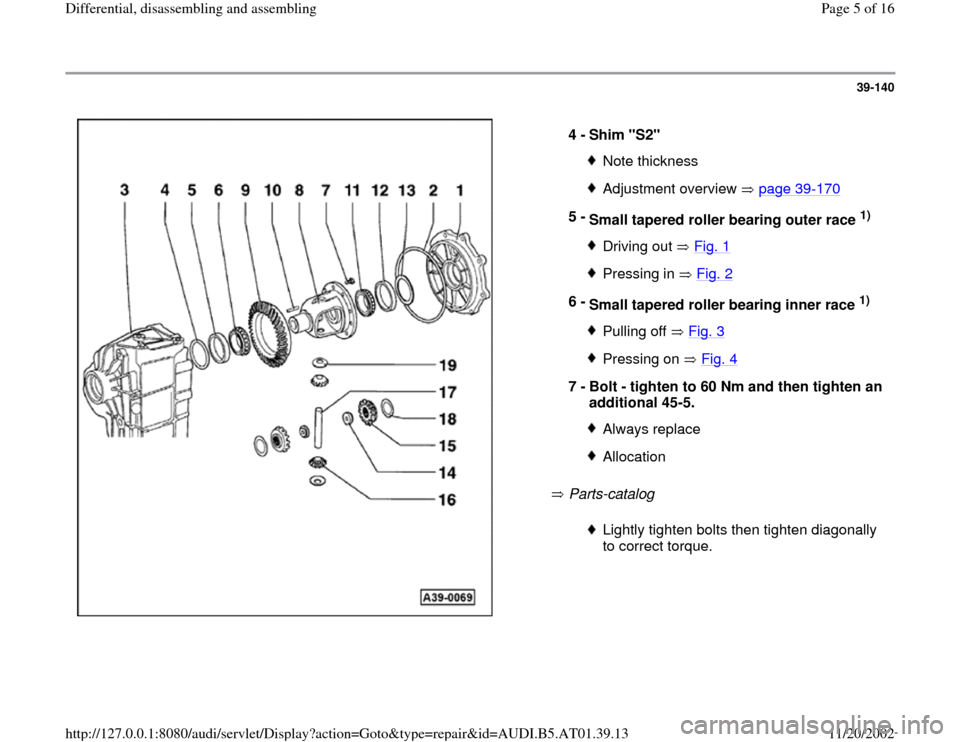
1 -
Cover for final drive
1)
2 -
O-ring
Always replaceInsert with oil
3 -
Final drive housing
1)
Pa
ge 4 of 16 Differential, disassemblin
g and assemblin
g
11/20/2002 htt
p://127.0.0.1:8080/audi/servlet/Dis
play?action=Goto&t
yp
e=re
pair&id=AUDI.B5.AT01.39.13
Page 5 of 16
39-140
Parts-catalog 4 -
Shim "S2"
Note thicknessAdjustment overview page 39
-170
5 -
Small tapered roller bearing outer race
1)
Driving out Fig. 1Pressing in Fig. 2
6 -
Small tapered roller bearing inner race
1)
Pulling off Fig. 3Pressing on Fig. 4
7 -
Bolt - tighten to 60 Nm and then tighten an
additional 45-5.
Always replaceAllocationLightly tighten bolts then tighten diagonally
to correct torque.
Pa
ge 5 of 16 Differential, disassemblin
g and assemblin
g
11/20/2002 htt
p://127.0.0.1:8080/audi/servlet/Dis
play?action=Goto&t
yp
e=re
pair&id=AUDI.B5.AT01.39.13
Page 6 of 16
39-141
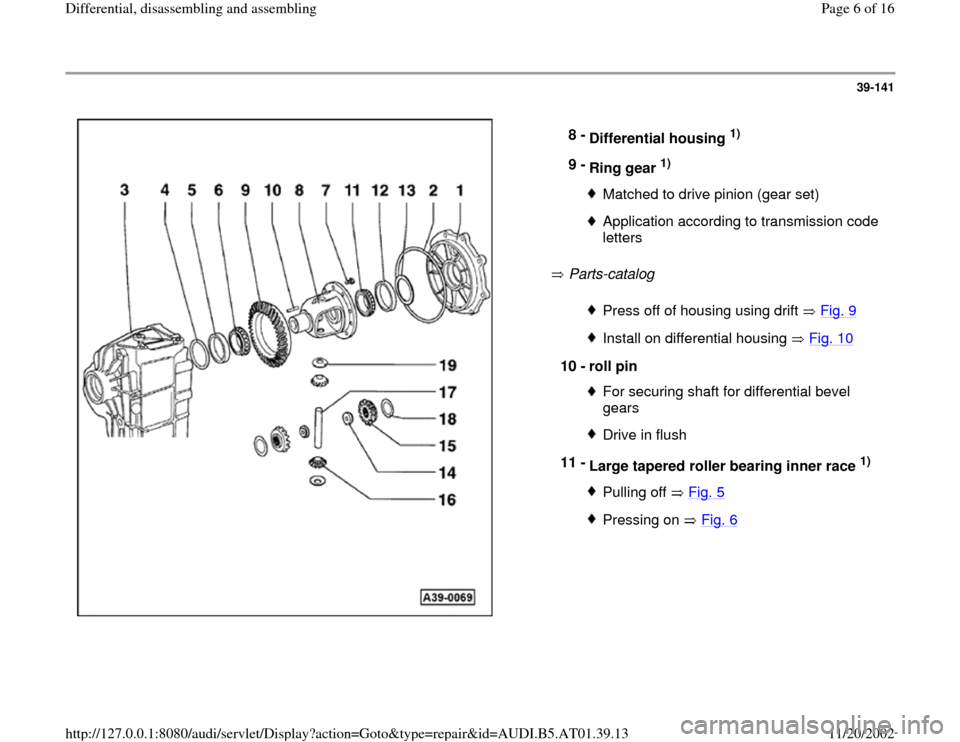
Parts-catalog 8 -
Differential housing
1)
9 -
Ring gear
1)
Matched to drive pinion (gear set)Application according to transmission code
letters Press off of housing using drift Fig. 9Install on differential housing Fig. 10
10 -
roll pin
For securing shaft for differential bevel
gears Drive in flush
11 -
Large tapered roller bearing inner race
1)
Pulling off Fig. 5Pressing on Fig. 6
Pa
ge 6 of 16 Differential, disassemblin
g and assemblin
g
11/20/2002 htt
p://127.0.0.1:8080/audi/servlet/Dis
play?action=Goto&t
yp
e=re
pair&id=AUDI.B5.AT01.39.13
Page 7 of 16
39-142
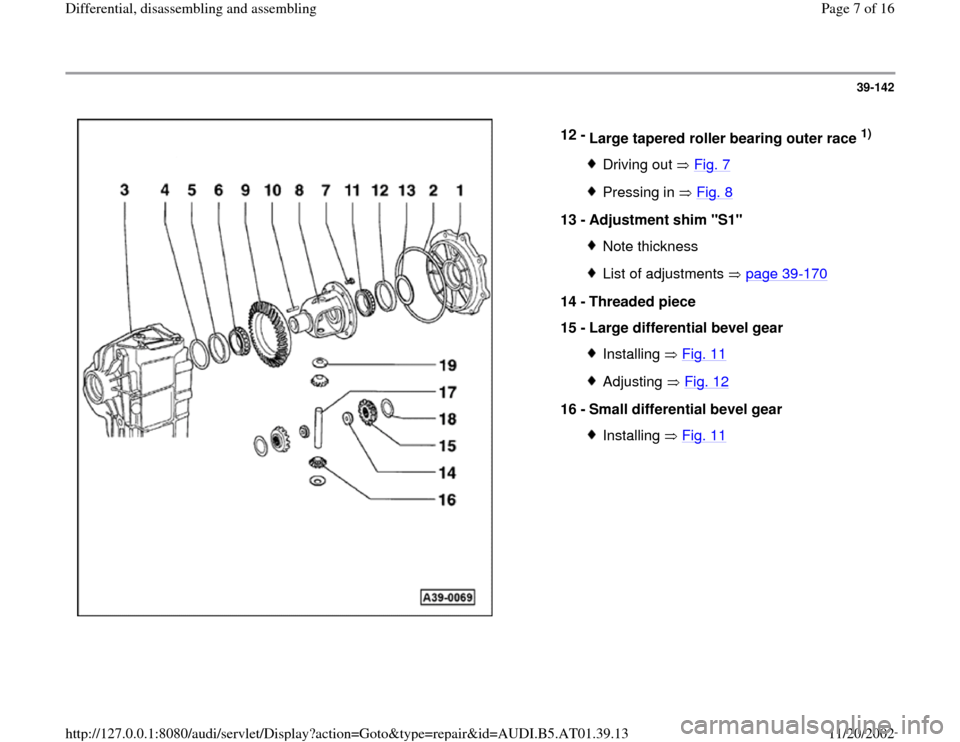
12 -
Large tapered roller bearing outer race
1)
Driving out Fig. 7Pressing in Fig. 8
13 -
Adjustment shim "S1"
Note thicknessList of adjustments page 39
-170
14 -
Threaded piece
15 -
Large differential bevel gear
Installing Fig. 11Adjusting Fig. 12
16 -
Small differential bevel gear
Installing Fig. 11
Pa
ge 7 of 16 Differential, disassemblin
g and assemblin
g
11/20/2002 htt
p://127.0.0.1:8080/audi/servlet/Dis
play?action=Goto&t
yp
e=re
pair&id=AUDI.B5.AT01.39.13
Page 8 of 16
39-143
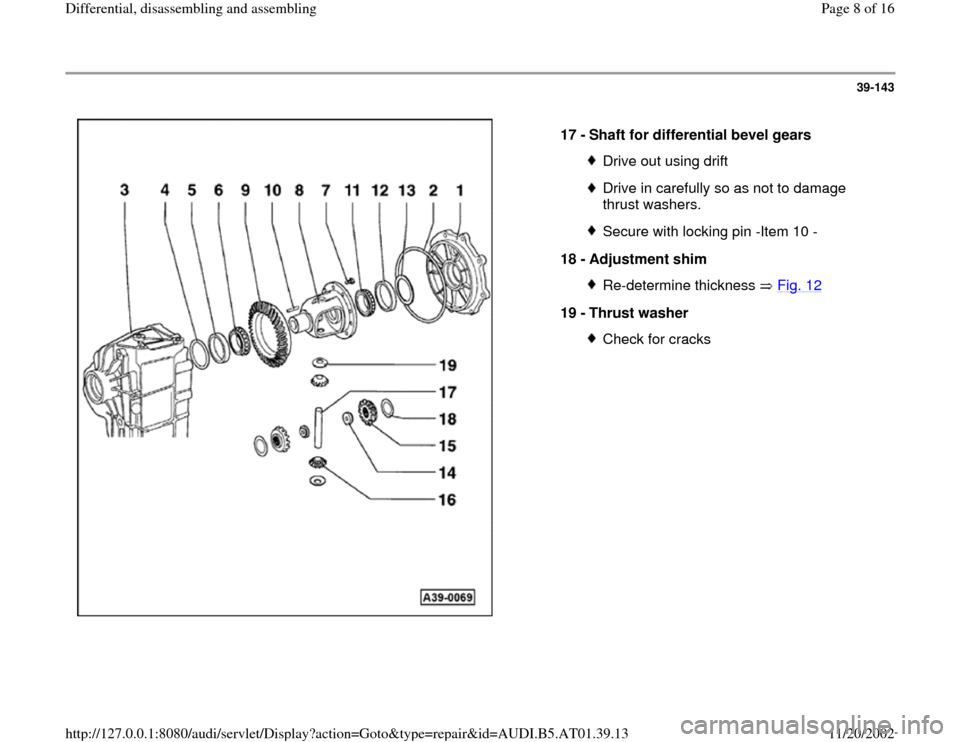
17 -
Shaft for differential bevel gears
Drive out using driftDrive in carefully so as not to damage
thrust washers. Secure with locking pin -Item 10 -
18 -
Adjustment shim Re-determine thickness Fig. 12
19 -
Thrust washer
Check for cracks
Pa
ge 8 of 16 Differential, disassemblin
g and assemblin
g
11/20/2002 htt
p://127.0.0.1:8080/audi/servlet/Dis
play?action=Goto&t
yp
e=re
pair&id=AUDI.B5.AT01.39.13
Page 9 of 16
39-144
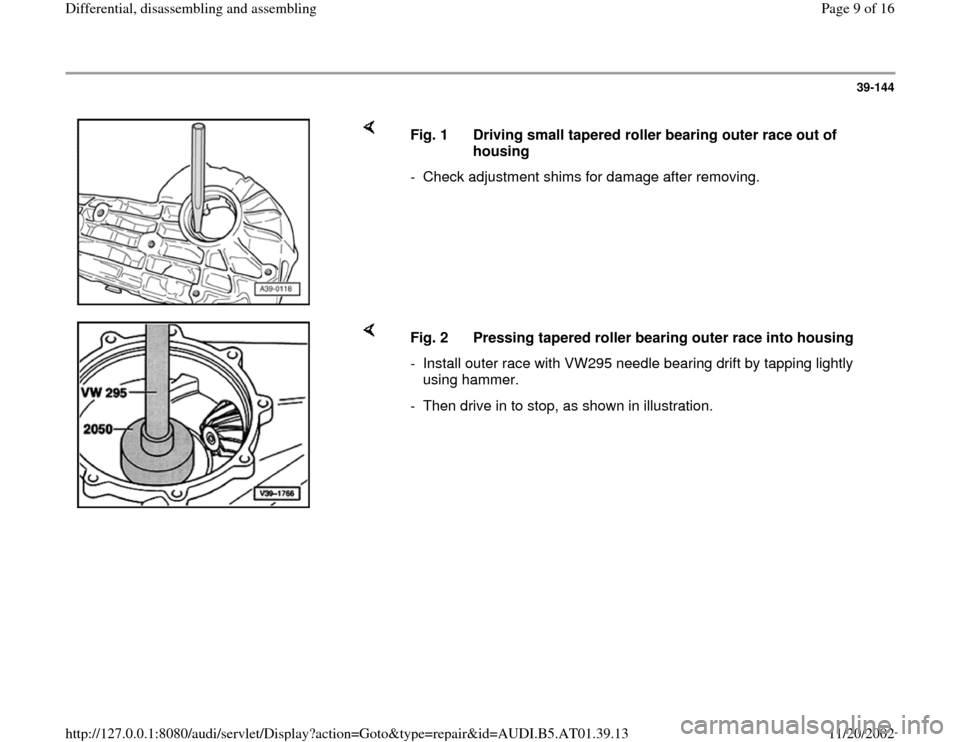
Fig. 1 Driving small tapered roller bearing outer race out of
housing
- Check adjustment shims for damage after removing.
Fig. 2 Pressing tapered roller bearing outer race into housing
- Install outer race with VW295 needle bearing drift by tapping lightly
using hammer.
- Then drive in to stop, as shown in illustration.
Pa
ge 9 of 16 Differential, disassemblin
g and assemblin
g
11/20/2002 htt
p://127.0.0.1:8080/audi/servlet/Dis
play?action=Goto&t
yp
e=re
pair&id=AUDI.B5.AT01.39.13
Page 10 of 16
39-145
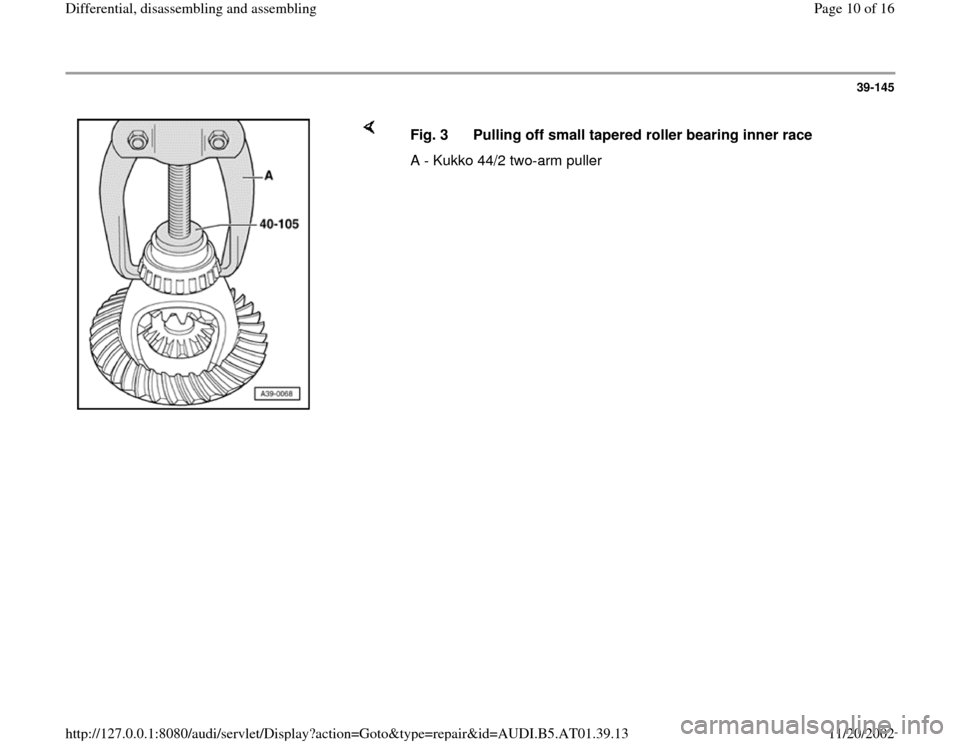
Fig. 3 Pulling off small tapered roller bearing inner race
A - Kukko 44/2 two-arm puller
Pa
ge 10 of 16 Differential, disassemblin
g and assemblin
g
11/20/2002 htt
p://127.0.0.1:8080/audi/servlet/Dis
play?action=Goto&t
yp
e=re
pair&id=AUDI.B5.AT01.39.13
Trending: torque, light, lock, warning, tow, ECU, oil
