ECO mode AUDI A8 2012 Owner's Guide
[x] Cancel search | Manufacturer: AUDI, Model Year: 2012, Model line: A8, Model: AUDI A8 2012Pages: 300, PDF Size: 75.06 MB
Page 224 of 300

222 Check ing and filling
(D Windshield/headlight washer
t . (
PP. ) con ainer ""' .......... ... . 234
@ Jump start point( -) with hex
head screw . .. .......... ... . 233 , 270
@ Jump start point( +) under a cov-
er . ..... .............. ... . 233, 270
© Eng ine oil filler cap(~) . . . . . 225
® Brake fluid reservo ir ((0)) . . . . . 229
® Coolant expansion tank (-L) . . . 227
0 Power steering reservoir . . . . . . 191
@ Oil dipstick . . . . . . . . . . . . . . . . . 225
The engine oil filler neck (item@) may be lo
cated in a different area depend ing on the ver
sion of the engine .
& WARNING
Before you check anything in the engine
compartment, always read and heed all
WARNINGS¢ .&.
in Working in the engine
compartment on page 219.
Engine oil
Engine oil specifications
The engine oil used in your Audi needs the
right kind of oil.
-
The engine in your Audi is a sophisticated
powerp lant that was built to exacting specifi
cations . This engine needs the r ight kind of
engine o il that meets spec ificat ions regarding
qua lity and viscos ity so that it can run
smoothly and reliably . Choos ing the righ t oi l
and changing oil within the time and mileage
interva ls printed in your vehicle 's Warranty
&
Maintenance book let matters a lot more to
day than it did years ago. Audi has developed
a special quality standard for engine oil that
will help assure that your veh icle's eng ine will
get the lubrication it needs for proper opera
tion.
Modern engine lubrication has taken a quan
tum leap in the last few years. Many synthetic
oils ava ilable today provide better engine lu
brication that can outlast trad itional petrole -u
m -based oils, making them a smart choice
for use throughout the life of your Audi.
Whether you use synthet ic o r petro le um
based eng ine oil, the oi l that you use m ust
conform to Audi's oi l quality standard
VW 502 00 to help keep your vehicle's engine runn ing smooth ly and help prevent the for
mation of harmfu l deposits, sometimes called
"sludge," that over time can lead to expensive
repairs.
At the time of printing, engine oils ava ilable in
the U.S. and Canada that meet the exacting
specifications of Audi oil standard VW 502 00
are synthet ic eng ine oils . Th is does not mean,
howeve r, that every synthetic engine oil will
meet Audi o il standard VW 502 00 . So always
be su re that you use an approved oil.
To help prevent the formation of harmfu l de
pos its use only o il w ith the following specifi
cations pr inted on the o il conta iner:
Audi oil standard VW 502 00
Oil container labels may carry the specifica
tion sing ly or in combination with other desig
nations and oil quality standards.
V is cos ity
Engine o ils are graded a ccord ing to their vis
cosity . The proper vis cos ity grade oil fo r yo ur
engine depends on climactic or seasona l con
ditions where you drive. You can use oil with a
viscosity grade of SAE 5W40 across a ll tem
perature ranges for norma l driving conditions.
However, if engine oil v iscosity g rade SA E
SW40 is not available , you can also use viscos
ity grade SAE SW-30 or SAE OW-40 as long as
it meets Audi oil qua lity standard VW 502 00
specifications.
Beca use engine oi l that meets the Audi oil
standard may not be availab le everywhere
when you need it, we strong ly recommend
that you a lways carry with you an extra quart
( li ter) of oil that express ly conforms to the
VW 502 00 spec ificat ion, in case you have to
top off the o il while o n the road . ..,_
Page 229 of 300

Engine cooling system
Coolant
The engine coolant performs two functions: it
keeps the engine from overheating and it pro
te cts the engine from freezing in the winter .
The cooling system is sealed and generally re
qu ires little attention .
The cooling system has been filled at the fac
tory with a permanent coolant which does not need to be changed. The coolant consists of a
mixture of water and the manufacturer's gly
col-based coolant additive G13 ant ifreeze
w ith anticorrosion add itives (SO% fo r USA
models; 60% for Canad ian models). This mix
ture bot h assu res the ne cessary frost protec
tion and protects metal components in the
engine's coo ling system from corrosion and
scaling. It also raises the boili ng po int of t he
coolant.
D o not red uce the concentration o f the coo l
ant in the summer by adding plain water .
The
proportion of coolant addit ive must be at
least 50% but not mo re than 60 %
to main
tain antifree ze protection and cooling efficien
cy. If the coolant frost protection is too low,
the coolant cou ld freeze and damage the veh i
cle heating and eng ine cooling system .
For year-round driving, antifree ze is added at
the factory for temperatures down to:
- -3 1°F (-3S°C)USA
- -40 ° F ( - 4 0 °C) Canada.
A WARNING
Before yo u check anything in the engine
compartment , always read and heed a ll
WARNINGS ¢
& in Working in the engine
compartment on page 219.
(D Note
- Befo re winter sets i n, have the coolant
chec ked to see i f th e coo lant ad dit ive i n
you r vehicle is suffic ient to meet the cli
mate cond itions . T hi s is especially impor
ta nt if yo u live in a regi on whe re the w in-
-
Checkin g and fillin g 22 7
ter is ex treme ly co ld. If necessary, i n
crease t he p ro po rtion of coo lant additive
to 60%.
- W hen a dding coolant additive to yo ur
cooling system , remembe r:
- We recommend us ing on ly coo la nt ad
di tive G 12++ or G 13 for your v ehicle .
T his co olan t ad ditive is av ailab le at au
t hor ized A udi dealers . O ther types of
an tifree ze can signi fican tly reduce cor
r osion pro te ction . The resulti ng cor ro
sion can ca use a loss of coolant a nd se
rious engine damage.
- Do not add any ty pe of rad iator leak seal
ant to you r vehicle's engine coo lant .
Add ing radiator repair flu id may adverse
ly affect t he fu nction and performance of
your cooling system and cou ld result in
damage not covered by yo ur New Ve hicle
L imited Warranty .
Checking the engine coolant level
The engine coolant level can be checked with
a quick glance.
Fig. 179 En gine co mpart ment: cover on t he coo la nt
expansio n ta nk
Before you check a nyth ing in the eng ine com
partment,
always read and heed all WARN
INGS <=>&.
in Working in the engine compart
ment on page 219 .
Park your vehicle on a level surface.
.., Switch off t he ignition.
.., Read t he engine coolant level from the
coo lant expansion tank¢
fig. 179,
¢ page 221 . With a cold engine, the coolant
level shou ld be between the "min" and
"ma x" markings . When the engi ne is warm, ..,.
Page 232 of 300
230 Check ing and filling
• Read the brake fluid level from the brake
fluid reservoi r¢
fig. 180, ¢ page 221. The
brake f lu id leve l must be between the "MIN"
and "MAX" markings.
The location of the brake fluid reservoir can be
seen in the engine compartment illustration
co page 221.
The fl uid level may drop slightly after some
time due to the automatic adjustment of the brake pads . This is not cause for alarm .
I f the brake fluid level falls
considerably be
l ow the "MIN" mark, the brake wa rning/indi
cator light- (U.S.
models) ;II (Canadian
models) will come on ¢
page 14. Do not con
tinue to operate the vehicle. The comp lete
brake system should be thoroughly checked
by an authorized Audi dealer or other quali
fied fac ility and the cause corrected. If the
brake fluid level is too low, the brake war ning/
in dicato r light w ill illuminate . Contact an au
thor ized A udi dealer
immediately .
Changing brake fluid
Have the brake fluid changed by an experi
enced technician .
Brake fluid absorbs moistu re from the a ir . If
the water content in the brake fluid is too
h igh, corrosion in the brake system may result
after a per iod of t ime . The bo iling po int of the
b rake fluid w ill also decrease considerably and
dec rease braking per formance.
Therefore, the brake flu id must be changed
e ver y two yea rs. A lways use new b rake fluid
which confo rms to Fede ral Motor Vehicle
Standard "FMVSS 1 16 DO T 4".
The brake flu id rese rvoi r ca n be difficult to
r ea ch, therefo re , we re commend that yo u
have the brake fl uid changed by yo ur a utho r
ized
Audi dealer. Your dea ler has the correct
too ls, the right brake fluid and the know-how
to do this for you .
A WARNING
-Brake flu id is poisonous. It must be stor
ed only in the closed or iginal conta iner
out of the reach of children!
- Brake failure can resu lt from o ld or inap
prop riate brake flu id . Obse rve these pre
cautions:
- Use only brake fluid that meets SA E
specification
J 1703 and conforms to
Federa l Moto r Ve hicle Standard 1 16 .
A lways check with your authorized A udi
dealer to make sure you are using the
correct brake fluid . The cor rect type of
brake flu id is also ind icated on the
brake flu id rese rvoir .
- The brake fluid must be new . Heavy use
of the brakes can cause a vapo r lock if
the b ra ke fluid is left i n the system too
l o ng. This can se riously affect the effi
c iency of the br akes as well as your
sa fety. This co uld resu lt in an accident.
(D Note
Brake fluid will damage the pai nt of you r
vehicle.
@ For the sake of the environment
Because of the p rob lem of proper disposal
of b ra ke fluid as well as the spec ial too ls
r equired and the nece ssary expe rti se, we
r ecommend that yo u have the brake fl uid
changed by yo ur authorized Aud i dea ler.
Battery
General information
U nder normal operat ing cond itions, the bat
te ry in yo ur Audi does not need any ma inte
nance . With
high outside temperatures or
l o ng da ily d rives we recommend that you have
the e lec trolyte leve l checked by a serv ice fa
c ility. The electrolyte leve l should also be
checked each time the battery is cha rged
¢ page 233. .,..
Page 242 of 300
240 Tires and wheels
change. In the event of discrepancies, the tire
pressure labe l is located on the driver's side B
p ill ar a lways takes precedence.
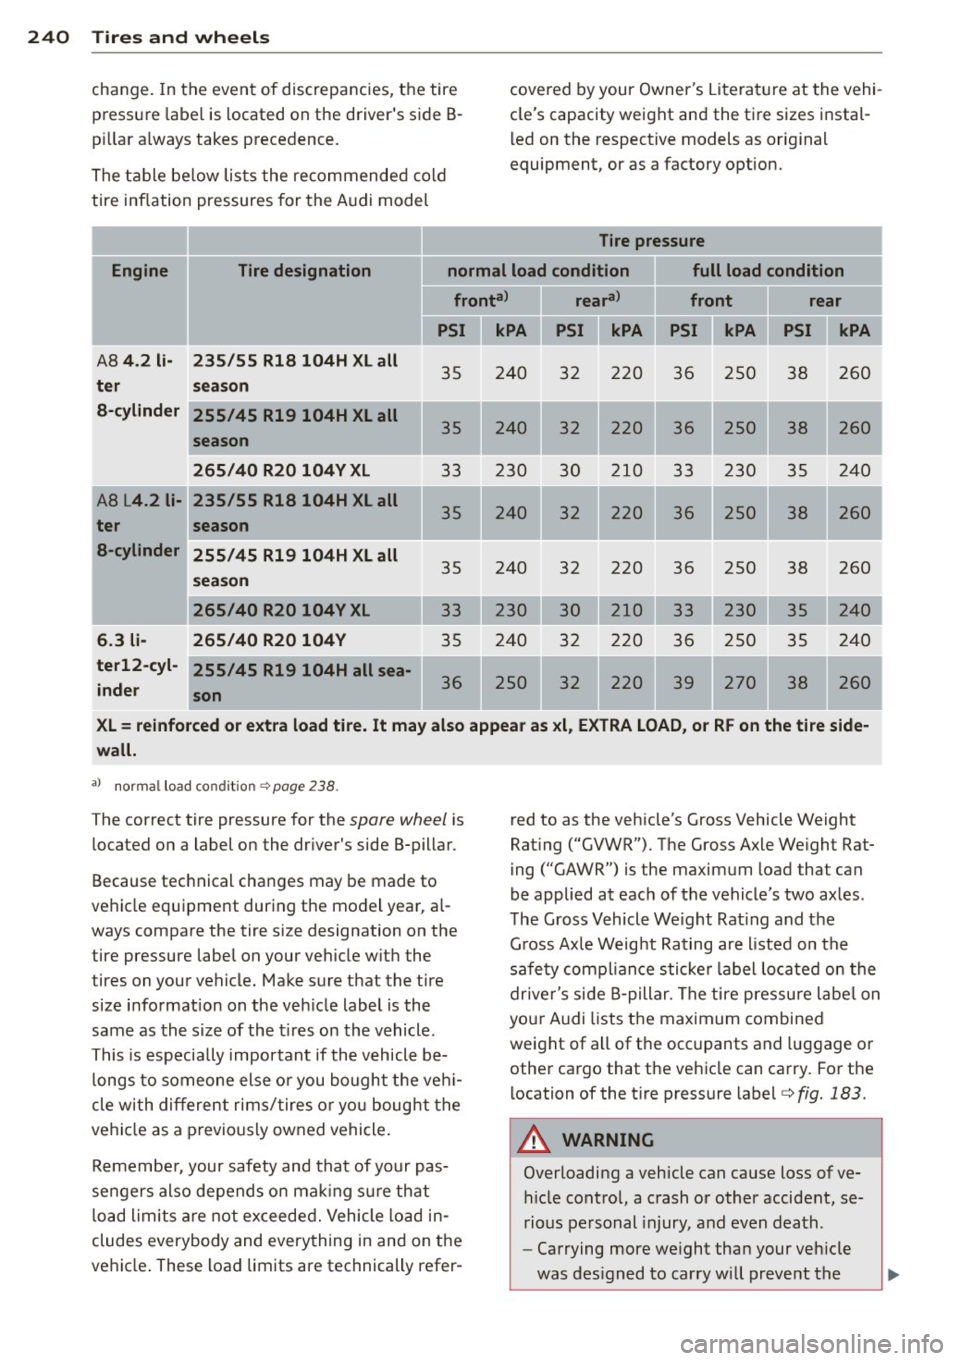
The table below lis ts the recommended cold
tire inflation pressures for the Audi model covered
by your Owner's Literature at the vehi
cle's capacity weight and the tire sizes instal
l ed on the respective models as orig inal
equipment, or as a factory option.
Tire pressure
Engine Tire designation normal load condition full load condition
fronta> reara>
front rear
AS 4.2 Ii-235/55 Rla 104H XL all
ter season
a -cylinder 255/45 R19 104H XL all
season
265/40 R20 104V XL
IA8 L4.2 Ii-235/55 Rla 104H XL all
ter season
a-cylinder 255/45 R19 104H XL all
season
6.3 li
ter12-cyl
inder 265
/40 R20 104V XL
265/40 R20 104V
255/45 R19 104H all sea-
son PSI
35
35
33
35
35
35
36
kPA
240
240
230
240
240
240
250
PSI
32
32
30
32
32
32
32
kPA
220
220
210
220
220
220
220
PSI kPA
36
250
36 250
33 230
36 250
36 250
36 250
39 270
PSI
38
38
35
38
38
35
38
kPA
260
260
240
260
260
240
240
260
I
I
I
XL= reinforced or extra load tire. It may also appear as xl, EXTRA LOAD, or RF on the tire side
wall.
a l nor mal load co nd it io n"'> page 238 .
The correct tire pressure for the spare wheel is
located on a label on the driver's side B-pillar.
Because technical changes may be made to
vehicle equipment during the model year, a l
ways compare the tire size designation on the
tire pressure label on your vehicle with the
tires on your vehicle. Make sure that the tire
size information on the veh icle label is the
same as the size of the tires on the vehicle.
This is especially important if the vehicle be
l ongs to someone else or you bought the veh i
cle with different rims/tires or you bought the
vehicle as a previously owned vehicle .
Remember, your safety and that of your pas
sengers also depends on mak ing su re that
l oad limits are not exceeded. Vehicle load in
cludes everybody and everything in and on the
vehicle . These load limits are technically refer- red to as the veh
icle's Gross Vehicle Weight
Rat ing ("GVWR"). The Gross Axle Weight Rat
ing ("GAWR") is the maximum load that can
be applied at each of the vehicle's two axles .
The Gross Vehicle Weight Rating and the
Gross Axle Weight Rating are listed on the
safety compl iance sticke r label located on the
driver's side B-pillar. The tire pressu re labe l on
your Audi lists the maximum combined
weight of all of the occupants and luggage or
other cargo that the vehicle can carry. For the
location of the tire pressure label
¢ fig. 183.
A WARNING
Overloading a vehicle can cause loss of ve
hicle contro l, a crash or other accident, se
rious personal injury, and even death.
- Carrying more we ight than your veh icle
was designed to carry will prevent the
Page 254 of 300
252 Tire s and wheel s
chains because the vehicle will be ex
tremely low. If you do drive with snow
chains on while the vehicle is at this lev
el, the snow chains might severe ly dam
age the wheelhouse and other parts of
the veh icle.
(D} Tips
Where snow chains are mandatory oncer
tain roads, this normally also applies to vehicles with All Wheel Drive.
Wheel bolts
Wheel bolts must always be tightened to the
correct torque .
The design of whee l bolts is matched to the
factory installed r ims. If different rims
are fit
ted, the correct wheel bolts with the right length and correctly shaped bolt heads must
be used. This ensures that wheels are fitted
secure ly and that the brake system functions
correctly .
In certain circumstances, you may not use
wheel bolts from a different vehicle -even if it
is the same mode l
¢page 282.
_& WARNING
Imprope rly tig htened o r maintained whee l
bolts can be come loose ca using loss of
contro l, a co llision and serious persona l in
jury.
- Always keep the wheel bol ts an d the
threads in the wheel hubs clea n so the
wheel bolts can tu rn easily and be prop
er ly tightened .
- Never grease or oil the wheel bo lts and
the threads in the wheel h ubs. They can
become loose w hile driving if greased or
oiled, even if tightened to the specif ied
torque.
- Only use wheel bolts that belong to the rim being installed.
- Never use different whee ls bolts on your
vehicle.
- Always maintain the correct tighten ing
torq ue for the wheel bo lts to reduce the risk of a whee
l loss. If the tightening tor
que of the wheel bolts is too low, they
can loosen and come out when the vehi
cle is mov ing. If the tighte ning torque is
too high, the wheel bolts a nd threads
can be damaged and the whee l can be
come loose.
([) Note
The specified torque for the whee l bolts is
90 ft lb (120 Nm) with a tolerance of± 7,4
ft lb(± 10 Nm). Torque whee l bolts diago
nally. Afte r changing a whee l, the torque
must be checked as soon as possible wi th a
torque wrench -pre ferably by an au thor
ized Audi dealer or qualified workshop .
Low aspect ratio tires
Your Audi is factory-equipped with low aspect
ratio tires. These tires have been thoro ughly
tested and been se lected specifically for your
model for their superb performance, road fee l
and hand ling u nder a var iety of d riv ing condi
t ions . As k your author ized Audi dealer for
more details.
The low aspect ratio of these tires is ind icated
by a numeral of
55 or less in the tire's s ize
designation . The numeral rep resents the ratio
of the t ire's s idewa ll height in relation to its
t read width ex pressed in percentage. Conven
tiona l tires have a he igh t/w idth rat io of 60 or
more.
The performanc e of low -a sp ec t-ratio tires i s
pa rticularly sensitive to improper inflation
pre ssure . It is therefore important that low
a spect ratio tires are inflated to the specified
pre ssure and that the inflation pressure i s
regularly checked and maintained. Tire pre s
sures should be checked at least once a month and always befo re a long trip
¢ page 241, Checking tire pressure .
What you can do to avoid tire and rim
damage
Low aspect ratio tires can be damaged more
easily by impact w ith potholes, curbs, gull ies .,..
Page 262 of 300
260 What do I do now ?
in its storage area properly and tighten
the knurled retaining screw securely.
@ Tips
Before changing the wheel, you m ust acti
vate t he jacking mode , so that the auto
matic controls for the Adaptive Air Sus
pension do not make it more diff icu lt to
lift the vehicle with the jack
q page 262.
Changing a wheel
When you change a wheel, follow these
quence de scribed below s tep-by-s tep and in
exac tly tha t order.
1. Act ivat e the vehicle jack mod e
¢page 262.
2. Remove the de corat ive wh eel co ver* . For
more details see also¢
page 260, Deco
rative wheel covers
or ¢ page 261 ,
Wheels with wheel bolt cops.
3 . Loosen the wheel bolts¢ page 261 .
4. Locate the proper mo unt ing po int for the
jack and align the jac k below that point
¢ pag e 262.
5. R ais e the car with the jack¢ page 262.
6. Remove the wheel with the fl at tire and
then in stall
the spare ¢ page 263 .
7. Tigh ten all wheel bol ts ligh tly.
8 .
Lo wer the veh icle with the jack .
9 . Use the whee l bolt wrench and
firml y
tighte n all whee l bolts ¢ page 261.
10. Replace the decorative wheel c over*.
11. De activate the veh icle jack mode in the
MMI:
! CARI function button> Ca r syst em s
control button > Se rv icing & chec ks > Air
sus p.: jack mode > Off.
The vehicle jac k mode sw itches off automati
cally at speeds above 10 km/h.
A WARNING
Always read and follow all WARNINGS and
information
¢ &. in Raising the vehicle on
page 262
and ¢ page 264.
After changing a wheel
A wheel change is not complete without the
doing the following .
.,. Alw ays store the vehicle tool kit, the jack*
and the repl aced tire in the luggage com
pa rtment
¢ page 130.
... Check the tir e pres su re on the spare wheel
immed iate ly afte r mounting it.
.,. As soon as possib le, have the
tight ening
torque s
on all whee l bolts checked with a
torque wrench . The correc t tightening tor
que is 90 ft lb (120 Nm).
... Hav e the flat tire
repl aced as soon as possi
ble .
@ Tips
-If you notice that the wheel bo lts are
corroded and difficult to turn while
changing a tire, they should be rep laced
before you check the tightening torque.
- Dr ive at reduced speed until you have the
tightening torques checked.
- After changing a whee l, the t ire press ure
in all four tires must be checked/correct
ed and the tire pressure monitoring ind i
cator must be stored in the MMI
¢ page 255.
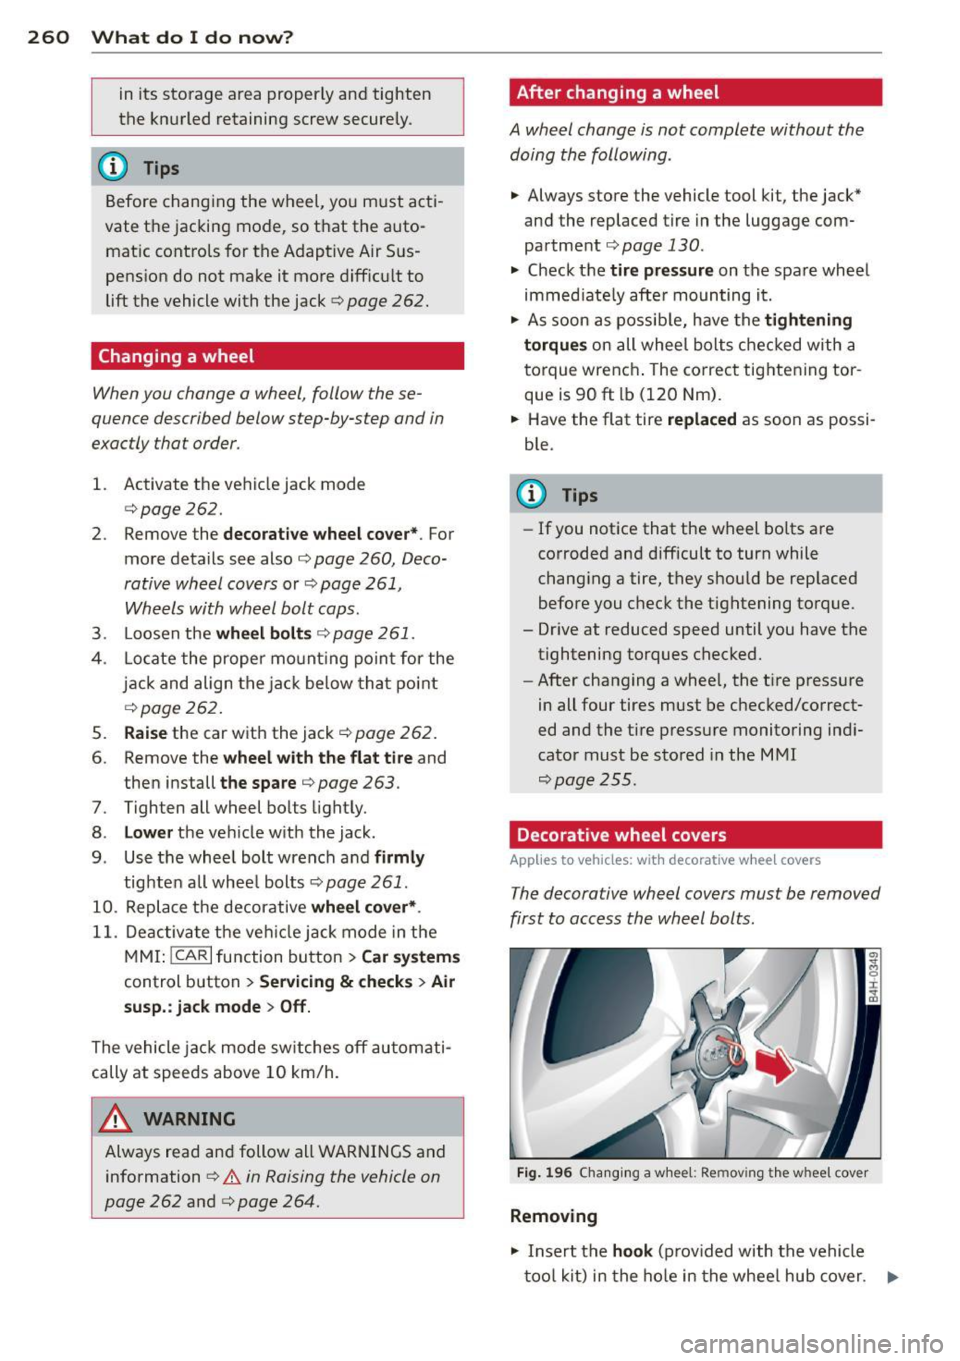
' Decorative wheel covers
Applies to vehicles: w ith decorative whee l covers
The decora tive wheel covers mus t be removed
first to access the wheel bolts.
Fi g. 1 96 Chang ing a whee l: Re mov ing th e w hee l cov er
Removing
.,. Insert the hook (prov ided with the vehicle
too l kit) in the ho le in the whee l hub cover . .,..
Page 265 of 300
CD Note
Do not lift the vehicle by the sill. Position
the vehicle jack only at the designated lift ing points on the sill. Otherwise, your vehi
cle will be damaged.
(D Tips
The vehicle jack mode switches off auto
matically at speeds above 10 km/h.
Taking the wheel off/installing the spare
Follow these instructions step-by-step for
changing the wheel.
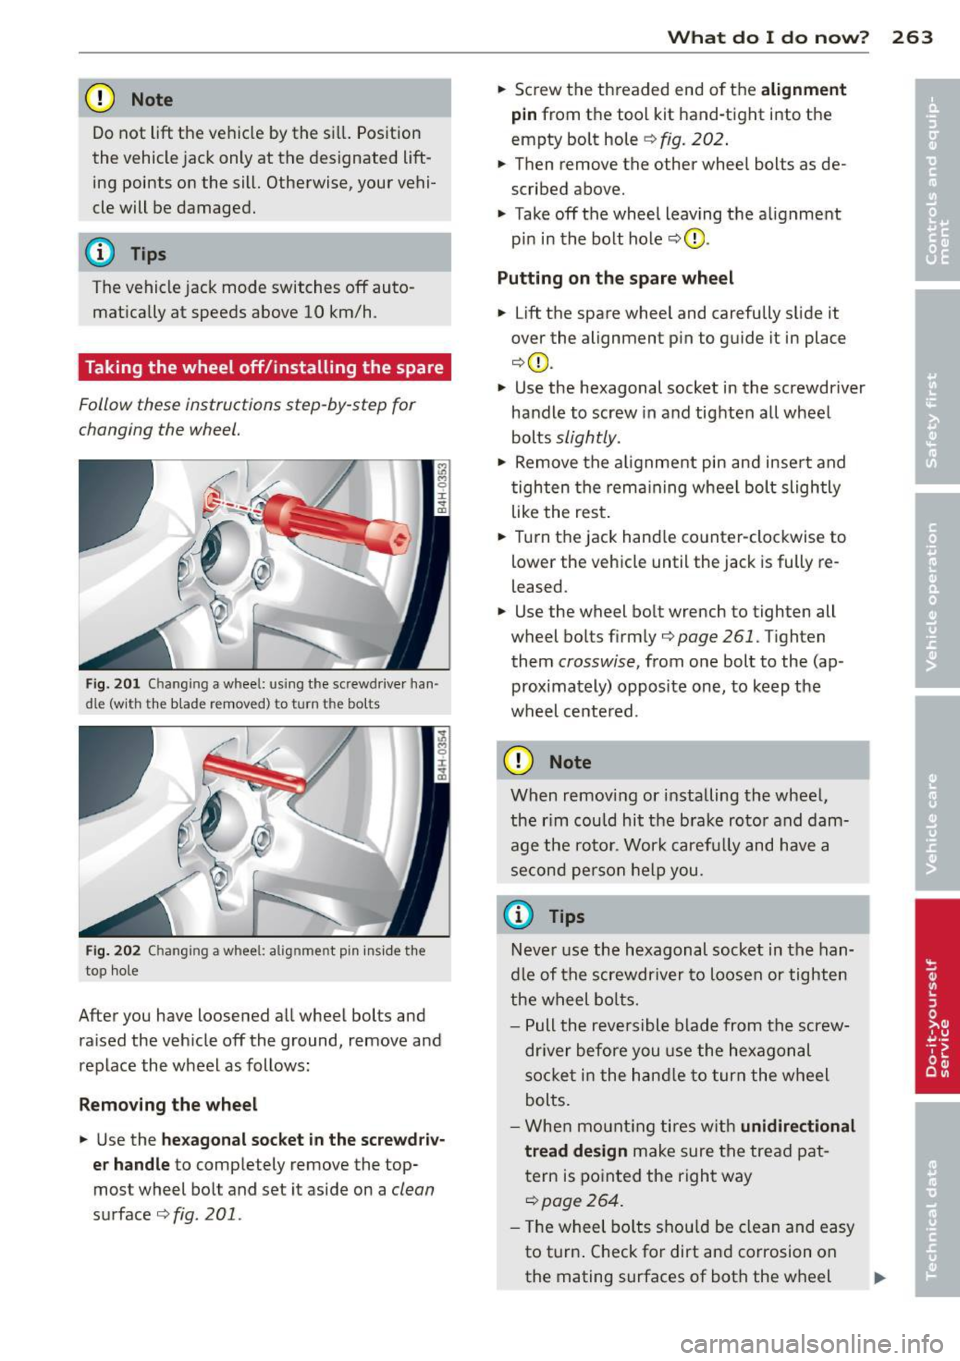
Fig . 201 Chang ing a whee l: using the screwdrive r han
dle (with the blade removed) to turn the bolts
Fi g. 202 Ch anging a wheel: alignment pin inside the
top hole
After you have loosened all wheel bolts and
raised the veh icle off the ground, remove and
replace the wheel as follows:
Re moving th e wh eel
.. Use the hex agon al so cket i n the s cre wdr iv
e r handle
to completely remove the top
most wheel bolt and set it aside on a
clean
surface ¢fig. 201.
What do I d o now ? 263
.. Sc rew the threaded end o f the alignment
pin
from the tool kit hand-tight into the
empty bolt hole¢
fig. 202 .
.. Then remove the other wheel bolts as de
scribed above.
.. Take off the wheel leaving the alignment
pin in the bolt hole
¢ (D .
Putting o n the spare w heel
.. Lift the spare wheel and carefully slide it
over the alignment p in to guide it in place
¢(]) .
.. Use the hexagonal socket in the screwdriver
handle to screw in and tighten all wheel
bolts
slightly.
.,. Remove the a lignment pin and insert and
tighten the rema ining wheel bolt slightly
like the rest .
.. Turn the jack hand le counter-clockwise to
lower the vehicle until the jack is fully re
leased .
.. Use the wheel bolt wrench to tighten all
wheel bolts firmly¢
page 261. Tighten
them
crosswise, from one bolt to the (ap
proximately) opposite one, to keep the
wheel cente red.
CD Note
When removing or installing the wheel,
the r im cou ld hit the b rake rotor and dam
age the rotor. Wor k carefully and have a
second pe rson help you.
@ Tips
Neve r use the hexagonal socket in the han
dle of the screwdr iver to loosen or tighten
the wheel bo lts.
- Pull the reversible blade from the screw
dr iver before you use the hexagonal
socke t in the hand le to turn the wheel
bolts.
- Whe n mount ing tires w ith
unidire ctional
t read de sign
make sure the tread pat
tern is pointed the right way
¢page 264.
- The wheel bo lts s hou ld be clean and ea sy
to turn . Check for dirt and corrosion on
the mating surfaces of both the wheel
Page 273 of 300
@ Tips
- The discharged battery must be properly
connected to the vehicle's electrical sys
tem. When jump start ing or charging the
battery, never connect the negative
ground cable to the battery negative post because the battery manager sys
tem must be able to detect the battery's
state of cha rge. A lways connect the neg
ative g round cab le to the negative
gro und post o f the battery manage r con
trol uni t.
Use of jumper cables
Make sure to connect the jumper coble
clomps in exactly the order described below!
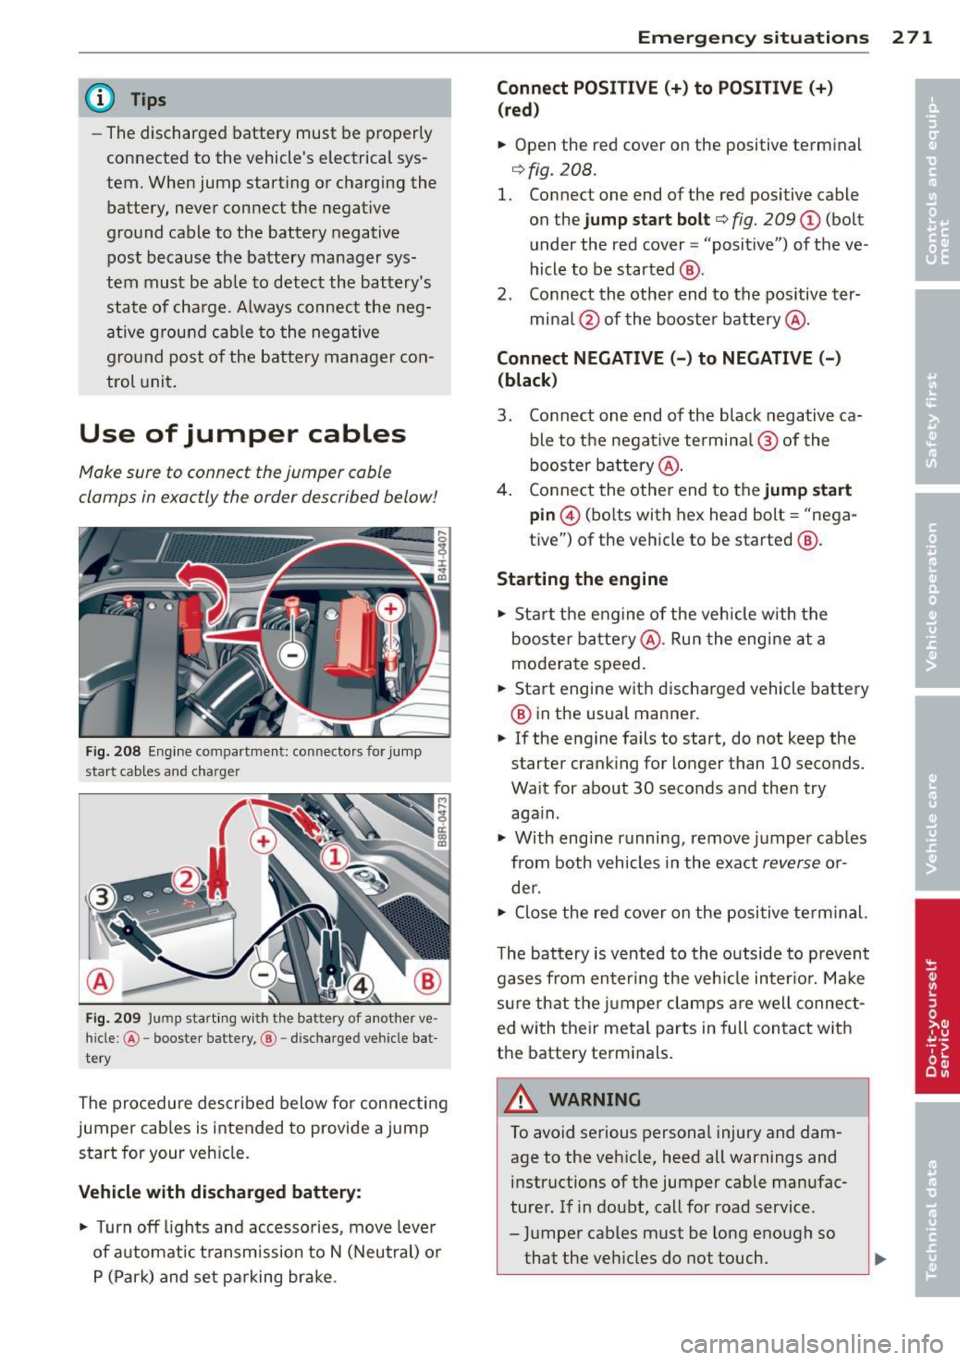
Fig. 2 08 Engine compartment: connecto rs for jump
start cables and charger
Fi g. 209 Jump start ing w ith the battery of another ve
hicle: @-booste r batte ry, @ -discharged vehicle bat
te ry
The procedure described below fo r connecting
jumper cab les is intended to provide a jump
start for your veh icle.
Vehicle with discharged batt ery:
.. Turn off lights and acc esso ries, move leve r
of automat ic t ransm ission to N (Neutral) o r
P (Park) and set pa rking brake .
Emergenc y situ ation s 2 71
Connect POSI TIVE(+) to POSITIVE (+ )
(red )
.. Open the red cover on the positive terminal
¢fig. 208.
1. Connect one end of the red positive cable
on the
jump sta rt bolt ¢ fig. 209 (D (bolt
under the red cover = "positive") of the ve
hicle to be started @.
2. Co nnect th e other end to the pos itive ter-
mina l@ of the booster battery @.
Connect NEGATIVE( -) to NEGATIVE(-)
(black )
3. Connect one end of the black negative ca ble to the negat ive termina l@ of the
booster b attery @.
4 . Connect the othe r end to the
jump start
pin @ (bolts with hex head bolt = "nega
tive") of the vehicle to be started @.
Starting the engine .. Sta rt the engine of the veh icle w ith the
booste r ba ttery @. Ru n the engine at a
moderate speed .
.. Start engine wit h discha rged vehicle battery
@ in the usual manner .
.. If the eng ine fails to start, do not keep the
starter cranking for longer than 10 seconds.
Wait for about 30 seco nds a nd the n try
aga in .
.. With engi ne runni ng, remove j umper cab les
from both vehicles in the exact
reverse o r
de r .
.. Close the red cover on the positive term inal.
T he battery is vented to th e outside to p revent
gases from en ter ing the veh icle in ter io r. Ma ke
s ur e th at the j umper clamps are well connec t
ed with their meta l parts in full con ta ct w ith
the battery term inals.
A WARNING
To avoid se rious personal injury and dam
age to the veh icle, heed all warnings and
instructions of the jumper cable man ufac
turer. If in doubt, call for road service .
- J umper cables m ust be long enough so
that the veh icles d o not touch.
-
Page 282 of 300
280 Consumer Information
Consumer Information
Warranty coverages
You r Audi is covered by the following war
ranties:
- New Vehicle Limited Warranty
- Limited Warranty Against Corrosion Perfo-
ration
- Emissions Control System Warranty
- Emissions Performance Warranty
- California Emissions Control Warranty (USA
vehicles only)
- California Emissions Performance Warranty
(USA vehicles only)
Detailed information regarding your warran
ties can be found in your
Warranty & Mainte
nance booklet .
Operating your vehicle
outside the U.S.A. or
Canada
Government regu lations in the United States
and Canada require that automobiles meet
specific emission regulations and safety
standards. Therefore, veh icles built for the
U.S.A . and Canada differ from vehicles sold in
other countries .
If you p lan to take your vehicle outside the
continental limits of the United States or Can
ada, there is the possibility that
- unleaded fuels for vehicles with cata lytic
converter may not be available;
- fuel may have a considerably lowe r octane
rating. Improper fuel may cause engine
damage ;
- service may be inadequate due to lack of
proper service facilities, tools or testing
equipment ;
- replacement pa rts may not be readily availa
ble.
- Navigation systems for vehicles built for the
U.S.A. and Canada will not necessar ily work
in Europe, and may not work in other coun
tries outside North America .
(D Note
Audi cannot be responsible for mechanical
damage that could result from inadequate
fuel, service or parts availability.
Audi Service Repair Manuals and Literature
Audi Official Factory Service Manuals and Lit
erature are published as soon as possible after
model introduction. Service manuals and lit
erature are available to order from the Audi
T echnical Literature Ordering Center at:
www.audi.techliterature.com
Maintenance
General
Your vehicle has been designed to help keep
maintenance requirements to a minimum.
However, a certain amount of regular mainte
nance is still necessary to assure your vehicle's
s afety, economy and rel iability. For detailed
vehicle maintenance consult your Warranty &
Maintenance booklet.
Under difficult operating conditions, for ex
ample at extremely low outside temperatures,
i n very dusty regions , when towing a trailer
very frequently, etc., some service work
should be performed between the intervals
specified. This applies particularly to:
- oil changes, and
- cleaning or replacing the air filter .
(® For the sake of the environment
By regularly maintaining your vehicle, you
help make sure that emission standards
are maintained, thus minimizing adverse
effects on the environment.
Important considerations for you and
your vehicle
The increasing use of electronics, sophisticat
ed fuel injection and emission contro l sys-
tems, and the genera lly increasing technical
liJJ,
Page 289 of 300
Convertible locking retractor .... .. .. . 17 5
How do I prop erly install a child safety
seat in my vehicle? ....... ... .. .. .. .
169
Infant seats . . . . . . . . . . . . . . . . . . . . . . 171
Instal ling .. ............. .... .. ... 175
Instal ling a child restraint us ing the
L A T C H system .... .. ... ... .. .. .. .. .
18 1
LATCH system ................... .. 181
Lower ancho rages ........ .. .. .. .. . 179
M ounti ng and releas ing the anchorage
hook . ..... .. .. ... ..... ... .. .. ...
181
Safety instructions ..... ... .. .. .. .. . 169
C leaning and protection .............. 203
Alcantara (synthet ic suede) . .. .. .. .. . 2 12
Cooler . .. .. .... ........... .. .. ... 213
Eng ine compartment ... ... .. .. .. .. . 213
Exhaust tail p ipes . ..... ... .. .. .. .. . 209
Fabrics and fabric coverings . ... .. .. . 209
Instrument panel .................. 210
Interior .......................... 209
Leather . . . . . . . . . . . . . . . . . . . . . . . . . . 211
MMI disp lay/controls ............. .. 209
Plastic and v inyl .... ... ... .. .. .. .. . 206
Plastic pa rts ...................... 210
Safety belts . . . . . . . . . . . . . . . . . . . . . . 2 12
tr im str ips . ............. .... .. ... 207
Trim str ips .... .. ..... ... .. .. .. ... 20 6
Climate controls ............ ...... ... 75
C lock ... .... .. .. .. .. .... .. . .. .. .. .. 25
C losing
Panor amic su nroof ........ .. .. .. .. ..
4 1
Sliding/ tilting sun roof .. ... .. .. .. .. .. 4 0
Sun shade (panoramic sunroof) ... .. .. 42
Cold ti re i nflat ion p ressu re ... .. .. .. .. .
239
Coming home ............. .... .. .... 45
Compact spare tire . ..... ... .. .. .. .. .
258
Compartments ................... ... 7 1
Compass in the mirro r ... ... .. .. .. .. .. 52
Comp lian ce .. ............. .... .. ... 283
Consumer Information . . . . . . . . . . 132, 280
Consumption (fue l) . . . . . . . . . . . . . . . . . . 24
Contact ing N HTSA ................ ..
132
Conven ience key ........... .... .. .... 32
Starting the engine ................. 80
Stopping the engine (START ENGINE
STOP button) ......................
81 Inde
x 287
Switching the ignition on .... ... .. .. . 80
U nl ocking and locking vehicle . ... .. .. . 32
Conve rtib le child safety seats ......... 172
Convertible locking retractor
Activati ng ........................
177
Deact ivating ...... ........... ..... 178
U sing to secure a child safety seat 1.75, 17 7
Coolant
refer to Eng ine coolant ............. 227
Cooler ... .. .. .... ... .. .. ..... ... .. . 72
Cleaning . ... .... .. . .. .. ..... ... .. 213
Operation . . . . . . . . . . . . . . . . . . . . . . . . . 72
Cooling mode (automa tic climate cont rol) 76
Cornering light .. .. ................. 103
C ruise cont ro l
Changing speed .... . .. ..... ... .. .. .
85
Presetting your speed .. ..... ... .. .. . 86
Switch ing off .. .. ............... .. . 86
Switching on . .. .. ................. . 85
Cu pholder . . . . . . . . . . . . . . . . . . . . . . . . . . 71
D
Data .............................. 278
Data recorder . . . . . . . . . . . . . . . . . . . . . . 187
Date disp lay . ..... ... .. .. ..... ... .. . 25
Daytime runn ing lights .............. .. 43
Declarat ion of compliance
Adaptive cruise control .............
283
Audi side ass ist .............. .... . 283
Cell phone package . . . . . . . . . . . . . . . . 283
Convenience key .................. . 283
Electronic immob ilizer .......... .. .. 2 83
Homel in k® uni versal remote control .. 283
Remote con tro l key ... ...... ... .. .. 283
DEF
What does this mean when it appears in
t h e tr ip odometer display? ...........
25
Defective light bulb warning ........... 21
Defrosting (windows) .. .. ..... ... .. .. . 77
Del uxe a utomat ic cl imate control .. .. .. . 76
Determ ining correct load limit ........ 243
Digi tal compass . . . . . . . . . . . . . . . . . . . . .
52
Dimens ions ... .. .. .. . .. .... ...... .. 277
Dimming the rearview mirror .. ... .. .. . 51
Dista nce . .. .. .. .. .. ............... . 24
Door/rear lid warning ............ .. .. .
23
•
•