display AUDI A8 2016 Repair Manual
[x] Cancel search | Manufacturer: AUDI, Model Year: 2016, Model line: A8, Model: AUDI A8 2016Pages: 302, PDF Size: 75.68 MB
Page 210 of 302
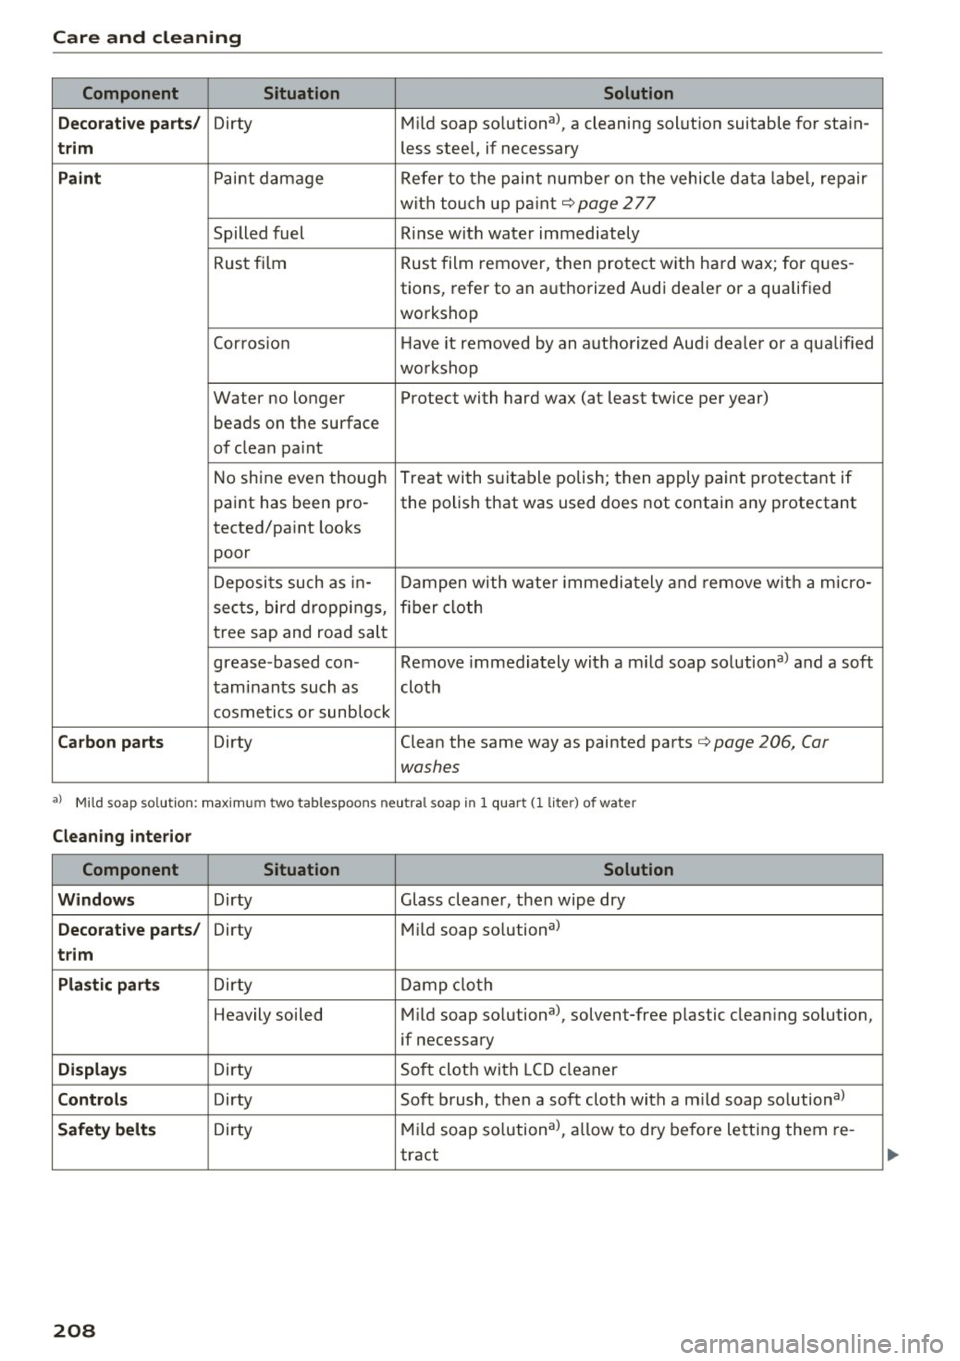
Care and cleaning Component Situation Solution
Decorative parts/
Dirty Mild soap solutiona>, a cleaning solution suitable for stain-
trim less steel, if necessary
Paint Paint damage Refer to the paint number on the vehicle data label, repair
with touch up paint
¢page 277
Spilled fuel Rinse with water immediately
Rust film Rust film remover, then protect
with hard wax; for ques-
tions, refer to an authorized Audi dealer or a qualified
workshop
Corros ion Have it removed by an authorized Aud i dea ler or a qua lified
wo rkshop
Water no longer Protect with hard wax (at least twice per year)
beads on the surface
of clean pa int
No shine even though Treat with suitable polish; then apply paint protectant if
paint has been pro- the polish that was used does not contain any protectant
tected/paint looks
poor
Deposits such as in-Dampen with water immediately and remove w ith a micro-
sects, bird droppings, fiber cloth
tree sap and road salt
grease-based con- Remove immediately with a m ild soap solutiona> and a soft
taminants such as cloth
cosmetics or sunblock
Carbon parts Dirty Clean the same way as painted parts¢ page 206, Car
washes
a l Mild soap so lution: maxim um two tablespoo ns neu tra l soap in 1 quar t Cl lite r) of water
Cleaning interior
Component Situation Solution
Windows
Dirty Glass cleaner, then wipe dry
Decorative parts/ Dirty Mild soap so lutiona>
trim
Plastic parts
Dirty Damp cloth
Heavily soiled Mild soap solutiona>, solvent-free p lastic clean ing solution,
if necessary
Displays Dirty Soft cloth with LCD cleaner
Controls Dirty Soft brush, then a soft cloth with a m ild soap solutiona >
Safety belts Dirty Mild
soap solutiona>, allow to dry before letting them re-
tract
208
...
Page 212 of 302
Care and cleaning
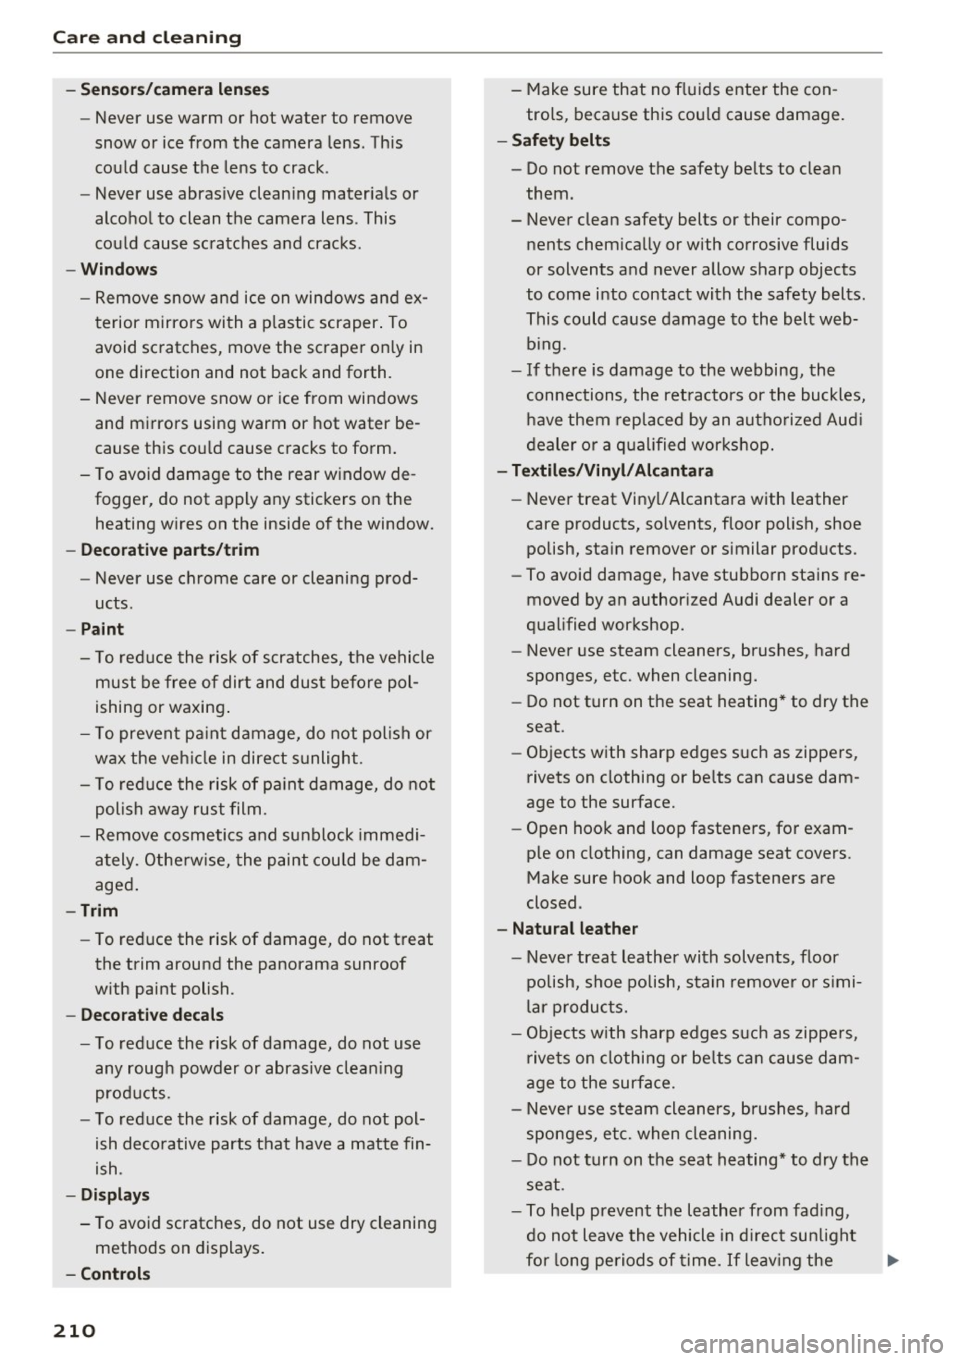
-Sensors/camera lenses
- Never use warm or hot water to remove
snow or ice from the camera lens. This
could cause the lens to crack .
- Never use abrasive cleaning materials or
alcohol to clean the camera lens . This
could cause scratches and cracks .
-Windows
- Remove snow and ice on windows and ex-
terior mirrors with a plastic scraper. To
avoid scratches, move the scraper only in
one direction and not back and forth.
- Never remove snow or ice from windows
and mirrors using warm or hot water be
cause this could cause cracks to form.
- To avoid damage to the rear window de
fogger, do not apply any stickers on the heating wires on the inside of the window.
- Decorative part .s/trim
- Never use chrome care or cleaning prod-
ucts.
-Paint
-To reduce the risk of scratches, the vehicle
must be free of dirt and dust before pol
ishing or waxing.
- To prevent paint damage, do not polish or
wax the vehicle in direct sunlight.
- To reduce the risk of paint damage, do not
polish away rust film .
- Remove cosmetics and sunblock immedi
ately. Otherwise, the paint could be dam
aged.
-Trim
- To reduce the risk of damage, do not treat
the trim around the panorama sunroof
with paint polish.
- Decorative decals
-To reduce the risk of damage, do not use
any rough powder or abrasive cleaning
products .
- To reduce the risk of damage, do not pol
ish decorative parts that have a matte fin
ish .
-Displays
- To avoid scratches, do not use dry cleaning
methods on displays.
-Controls
210
- Make sure that no fluids enter the con
trols, because this could cause damage.
- Safety belts
- Do not remove the safety belts to clean
them .
- Never clean safety belts or their compo
nents chemically or with corrosive fluids
or solvents and never allow sharp objects
to come into contact with the safety belts.
This could cause damage to the belt web bing .
- If there is damage to the webbing, the
connections , the retractors or the buckles,
have them replaced by an authorized Audi
dealer or a qualified workshop.
- Textiles/Vinyl/ Alcantara
- Never treat Vinyl/ Alcantara with leather
care products, solvents, floor polish, shoe
polish, stain remover or similar products .
- To avoid damage, have stubborn stains re
moved by an authorized Audi dealer or a
qualified workshop.
- Never use steam cleaners, brushes, hard
sponges, etc. when cleaning.
-Do not turn on the seat heating* to dry the
seat.
- Objects with sharp edges such as zippers,
rivets on clothing or belts can cause dam
age to the surface.
- Open hook and loop fasteners , for exam
ple on clothing, can damage seat covers .
Make sure hook and loop fasteners are
closed .
-Natural leather
- Never treat leather with solvents, floor
polish, shoe polish, stain remover or simi
lar products.
- Objects with sharp edges such as zippers,
rivets on clothing or belts can cause dam
age to the surface.
- Never use steam cleaners, brushes , hard
sponges, etc. when cleaning.
- Do not turn on the seat heating* to dry the
seat .
- To help prevent the leather from fading,
do not leave the vehicle in direct sunlight
for long periods of time. If leaving the
Page 218 of 302
Fuel and Refueling
nozzle. A worn or damaged nozzle or a noz
zle that is too small may not be ab le to open
the diesel m isfueling protector. If th is is the
case, try turning the nozzle before inserting
i t in the fuel f iller neck, use a different fuel
pump or see your authorized Audi dealer or
authorized repair facility for ass istance.
- The fuel filler flap of your vehicle is not
locked when you lock the veh icle from the
i nside .
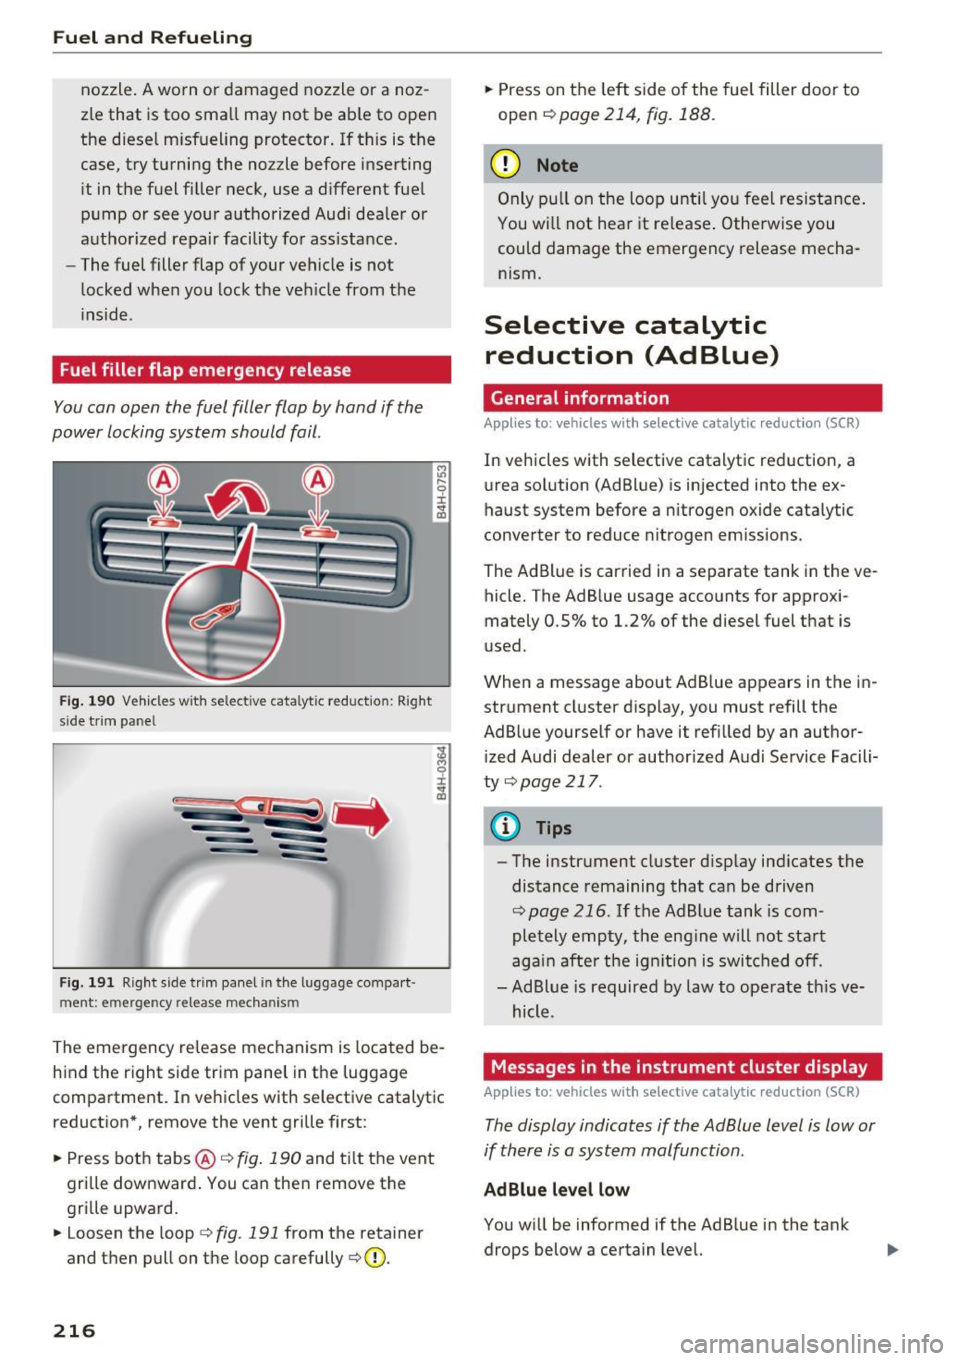
Fuel filler flap emergency release
You can open the fuel filler flap by hand if the
power locking system should fail.
F ig . 190 Vehicles w ith se lect ive cata lytic reductio n: Right
side tr im pane l
Fig. 191 Right side trim panel in the lu ggage compart ·
ment: e mergency release mechan is m
...,
"' 9 ::i: ... (D
The emergency release mechanism is located be
hind the right side trim panel in the luggage
compartment. In vehicles with selective catalytic
reduction*, remove the vent grille first :
.. Press both tabs@¢
fig. 190 and tilt the vent
gri lle downward. You can then remove the
grille upward.
.. Loosen the loop¢
fig. 191 from the retainer
and then pull on the loop carefully ¢(D.
216
.. Press on the left side of the fuel filler door to
open
¢ page 214, fig. 188.
(D Note
Only pull on the loop until you feel resistance .
You wi ll not hea r it re lease . Otherwise you
could damage the emergency release mecha nism.
Selective catalytic reduction (Ad Blue)
General information
Applies to: vehicles with selective catalytic reduction (SCR)
In vehicles with selective catalytic reduction, a
urea solution (AdBlue) is injected into the ex
haust system before a nitrogen oxide catalytic
converter to reduce nitrogen emissions .
The Ad Blue is carried in a separate tank in the ve
hicle. The AdBlue usage accounts for approxi
mately 0.5% to 1.2% of the diesel fuel that is
used.
When a message about Ad Blue appears in the in
strument cluster display, you must refill the
Ad Blue yourself or have it refilled by an author ized Audi dealer or author ized Audi Service Facili
ty
¢ page 217.
@ Tips
-The instrument cluster display indicates the
distance remaining that can be driven
¢page 216. If the AdBlue tank is com
pletely empty , the eng ine will not start
again after the ign ition is switched off.
- Ad Blue is required by law to operate th is ve
hicle.
Messages in the instrument cluster display
Applies to: vehicles with selective catalytic reduction (SCR)
The display indicates if the Ad Blue level is Low or
if there is a system malfunction .
AdBlue level low
You will be informed if the AdBlue in the tank
drops below a certain level.
Page 221 of 302
-A permitted refill canister contains approxi
mately 1.3 gallons (5 liters) of Ad B lue .
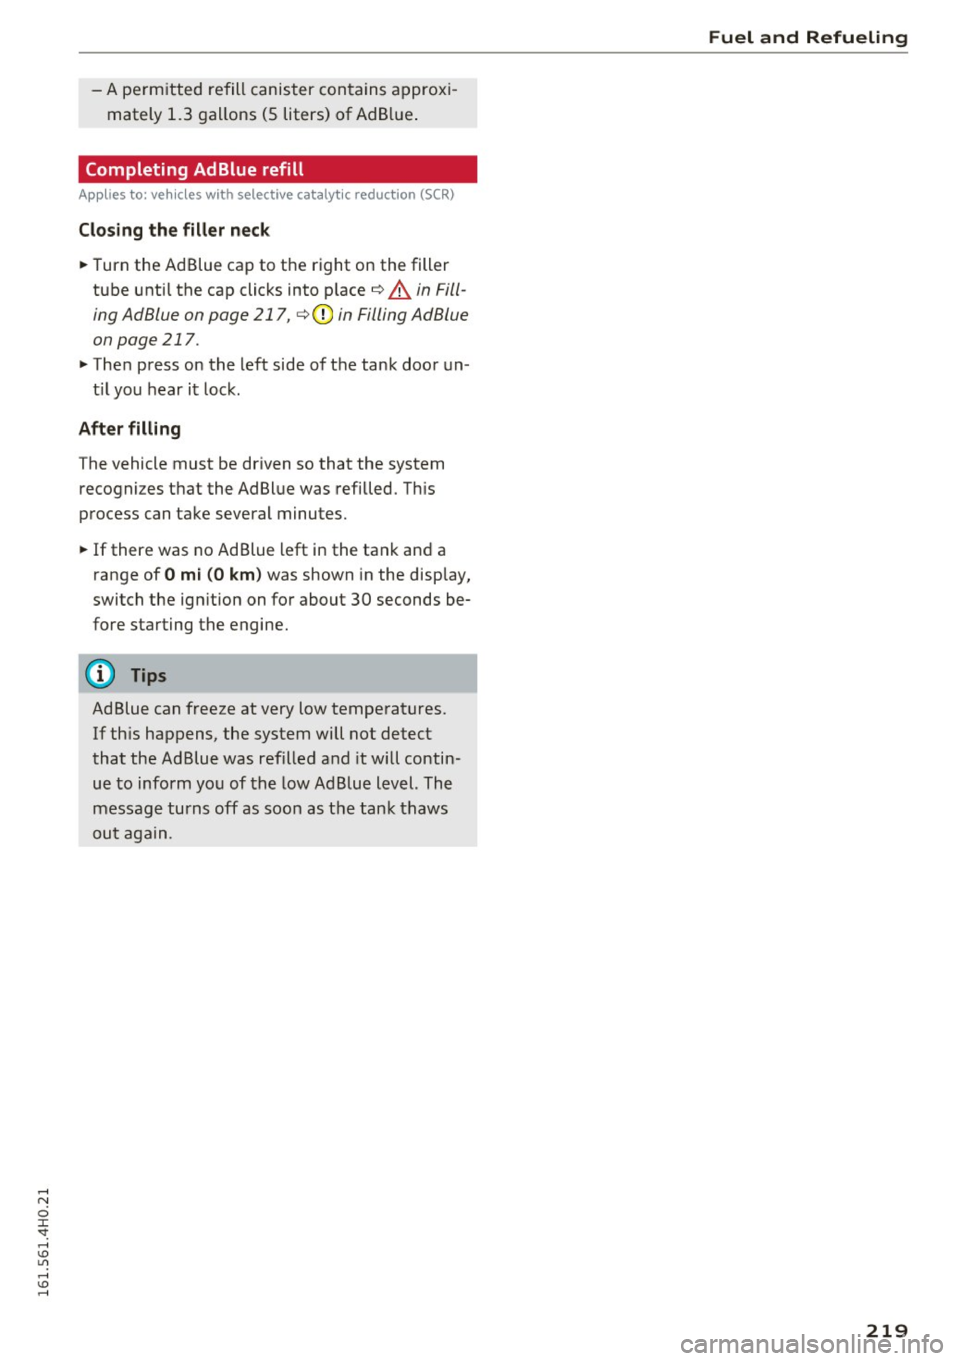
Completing AdBlue refill
Applies to: veh icles with selective catalyt ic reduction (SCR)
Cl os ing the fill er ne ck
~ Turn the Ad Blue cap to the r ight on the fill er
tube unti l the cap clicks into place ¢
A in Fill
ing Ad Blue on page 217,
¢ CD in Filling Ad Blue
on page 217 .
~ Then press on the left side of the tank door un -
t il you hear it lock.
After filling
T he vehicle must be driven so that the system
recogni zes th at the Ad Blue was refilled. Th is
process can take several minutes.
~ If there was no Ad Blue left in the tank and a
range of
O m i (0 km ) was shown in the display,
switch the ign ition on for about 30 seconds be
fore starting the engine.
Ad Blue can freeze at very low temperatures. If th is happens, the system will not detect
that the Ad Blue was refilled and it wi ll contin
ue to inform yo u of the low Ad Blue level. The
message turns off as soon as the tank thaws
out again .
Fuel and R efueling
219
Page 225 of 302
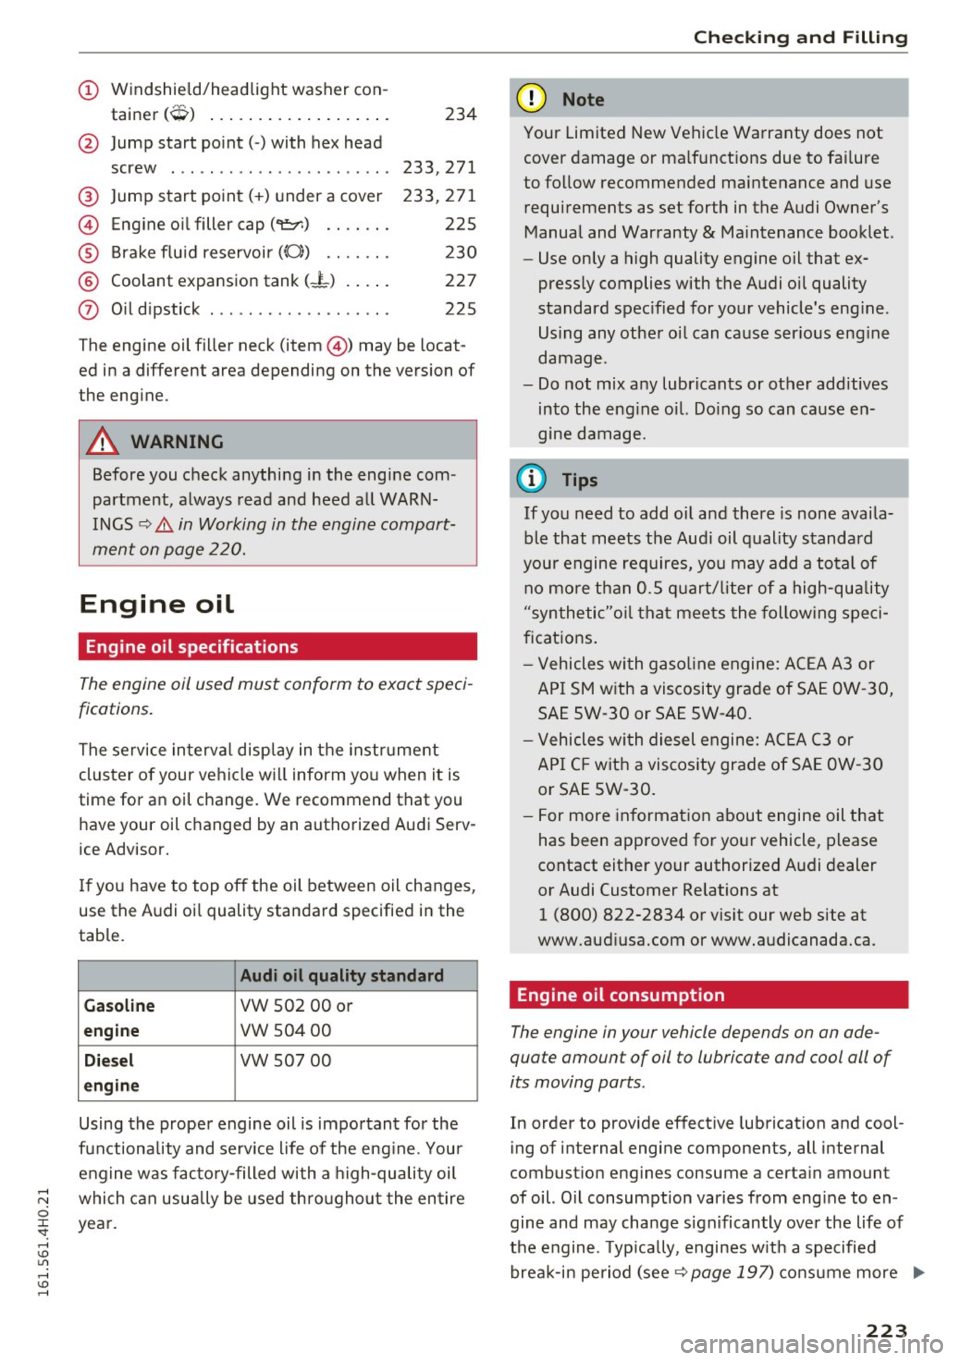
(!) Windshield/headlight washer con-
tainer
(O) ................. . .
@ Jump start point(-) with hex head
screw . ..................... .
@ Jump start point(+) under a cover
© Engine oil filler cap ("t!:r.) ...... .
® Brake fluid reservoir((();) ...... .
® Coolant expansion tank (-L) .... .
0 Oil dipstick .................. . 234
233,271
233,271 225
230
227
225
The engine oil filler neck (item@) may be locat
ed in a different area depending on the version of
the engine.
A WARNING
Before you check anything in the engine com
partment, always read and heed all WARN
INGS ¢
&. in Working in the engine compart
ment on page 220.
Engine oil
Engine oil specifications
The engine oil used must conform to exact speci
fications.
The service interval display in the instrument
cluster of your vehicle will inform you when it is
time for an oil change. We recommend that you hav e your oil changed by an authorized Audi Serv
ice Advisor.
I f you have to top off the oil between oil changes,
use the Audi oi l quality standard specified in the
table.
Audi oil quality standard
Gasoline
VW 502 00 or
engine vw 50400
Diesel vw 507 00
engine
Using the proper engine oil is impo rtant for the
functiona lity and service life of the eng ine. Your
engine was factory-filled with a high-quality oil
;:;:: which can usually be used throughout the entire
0
~ year.
,....,
(D Note
Your Limited New Vehicle Warranty does not
cover damage or malfunctions due to failure
to follow recommended maintenance and use
requirements as set forth in the Audi Owner's
Manual and Warranty
& Maintenance booklet .
- Use only a high quality engine oil that ex-
pressly complies with the Audi oil quality
standard spec ified for your vehicle's eng ine.
Us ing any other oil can cause ser ious eng ine
damage.
- Do not mix any lubricants or other additives
into the eng ine oi l. Do ing so can cause en
gine damage.
(D Tips
If you need to add oil and there is none availa
ble that meets the Aud i oil quality standard
your engine requires, you may add a total of no more than 0.5 quart/liter of a high-quality
"synthetic"oi l that meets the following speci
fications.
- Vehicles with gasoline engine: ACEA A3 or
API SM with a viscosity grade of SAE OW-30,
SAE SW -30 or SAE 5W-40.
- Vehicles with diesel engine: ACEA C3 or
API C F with a viscosity grade of SAE OW-30
or SAE SW-30.
- For more information about engine oil that
has been approved for your vehicle, please
contact either your authorized Audi dealer
or Audi Customer Relations at
1 (800) 822-2834 or visit our web site at
www.audiusa.com or www.audicanada.ca.
Engine oil consumption
The engine in your vehicle depends on an ade
quate amount of oil to lubricate and cool all of
its moving parts.
In order to provide effective lubrication and cool
ing of internal engine components, all internal
combust ion engines consume a certain amount
of oil. O il consumption varies from eng ine to en
gine and may change significantly over the life of
the engine. Typ ically, engines w ith a specified
break-in period (see ¢
page 197) consume more ""
223
Page 226 of 302
Check ing and F illing
oil du ring the break -in period than they consume
after oil consumption has stabilized .
Unde r no rmal condi tions, the rate of o il con
sumpt ion depends on the quality and viscosity of
the oi l, the RPM (revolutions per minute) at
which the engine is operat ed, the ambient tem
perature and road cond itions . Further factors are
the amount of oil dilut ion from water condensa
tion or fuel residue and the oxidation level of the
oil. As any eng ine is subject to wear as m ileage
bu ilds up, the oil consumption may increase over
time until rep lacement of worn components may
become necessa ry .
W ith all these variables com ing into play, no
standard rate of oil consumpt ion ca n be estab
lished or specified . There is no a lternative to reg
ular and frequent checking of the oil leve l, see
Note .
If the ye llow eng ine oil level war ning symbol in
the instrument cluster
II lights up, you should
check t he oil leve l as soon as possib le
¢
page 224 o r ¢ page 225. Top off the o il at
your ea rliest convenience ¢
page 225.
A WARNING
Before you check anything in the engine com
partment, a lways read and heed a ll WARN
INGS ¢.&
in Working in the engine compart
ment on page 220.
(D Note
Driving with an insufficient oil level is likely to
cause severe damage to the engine .
@ Tips
-The oil pres sure warning display. i s not
an indicator of the o il level. Do not rely on
i t. Instead , check the oil level in your en
gine at regular intervals, preferably ea ch
time you refuel , and always befo re going
on a long trip.
- If you have the impression your engine con
sumes excessive amounts of oil, we recom
mend that you co nsul t yo ur Audi dealer to
have the cause of your concern p roperly di
agnosed . Keep in mind that the acc urat e
224
meas urement of oi l consumption re quires
great care and may take some t ime. Yo ur
Audi dea ler has instructions about how to
meas ure o il consumption acc urately.
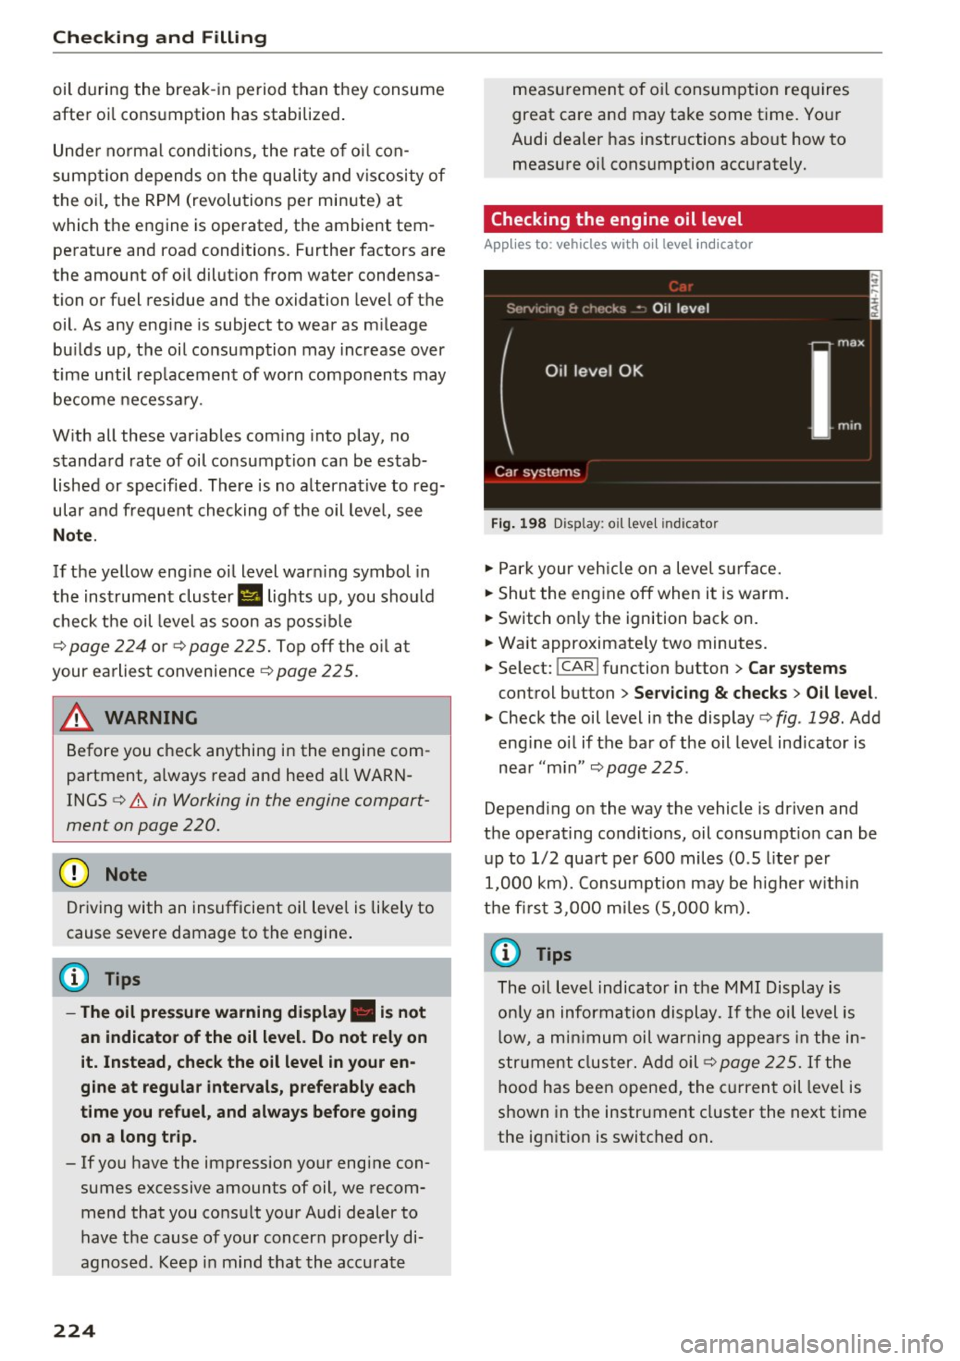
Checking the engine oil level
App lies to: vehicles wi th oil level indicato r
Fig. 198 Disp lay : o il leve l ind icato r
.,. Par k your veh icle on a leve l su rface.
.,. Shut the eng ine off when it is warm .
.,. Switch o nly the ignition back on.
.,. Wait approximate ly two minutes.
.,. Select:
!CAR ! function button > Car systems
control button > Servicing & checks > Oil le vel.
.,. Check the oil level in the display c> fig . 198 . Add
eng ine oi l if the ba r of the oil leve l ind icator is
nea r "m in"
¢ page 225 .
Depend ing on the way the vehicle is driven and
the operating cond it ions, oil consumpt io n can be
u p to 1/2 qua rt pe r 600 miles (0 .S liter per
1,000 km). Consumpt ion may be h igher w it hi n
the first 3, 000 mi les (5,00 0 km).
(D Tips
The o il level indicato r in the MMI Display is
o nl y an information display. If t he oi l level is
l ow, a m inimum oil w arn ing appea rs in the in
str ument clus ter. Ad d oil ¢
page 225. If the
hood has been opened, the curren t oil level is
shown in the instrument cluster the next t ime
the ignition is switched on .
Page 256 of 302
Wheels
_& WARNING
Temperature grades apply to tires that are
properly inflated and not over or underinf lat
ed.
Tire pressure monitoring system
U) General notes
Applies to: vehicles with tire pressure monito ring system
Each tire, including the spare (if provided),
should be checked monthly when cold and inflat
ed to the inflation pressure recommended by the
vehicle manufacturer on the vehicle placard or
tire inflat ion pressure label. (If your vehicle has
tires of a different size than the size indicated on
the vehicle placard or tire inflation pressure la
bel, you should determine the proper tire infla
tion pressure fo r those tir es) .
As an added safety feature, your vehicle has been
equipped with a t ire pressure monitoring system
(TPMS) that illuminates a low tire pressure tell
tale when one or more of your tires is significant
ly under-inflated . Accord ingly, when the low tire
p ressure telltale illuminates, you should stop and
check your tires as soon as possible, and inflate
them to the proper pressure. Driving on a signifi
cantly under-inflated tire causes the tire to over
heat and can lead to tire failure. Under-inflation
also reduces fuel efficiency and tire tread life,
and may affect the vehicle's handling and stop
ping ability.
Please note that the TPMS is not a substitute for
proper tire maintenance, and it is the driver's re
sponsib ility to maintain correct tire pressure,
even if under-inflation has not reached the level
to trigger illumination of the TPMS low tire pres
sure telltale.
Your vehicle has also been equipped with a TPMS
malfunct ion indicator to indicate when the sys
tem is not operating properly. The TPMS mal
function indicator is comb ined w ith the low tire
pressure telltale. When the system detects a
malfunction, the telltale will flash for approxi
mately one minute and then remain cont inuous ly
illuminated. This sequence will continue upon
254
subsequent vehicle start-ups as long as the mal
function exists.
When the malfunction indicator is illum inated,
the system may not be able to detect or s ignal
low tire pressure as intended . TPMS malfunctions
may occur for a variety of reasons, including the
i nstallation of replacement or alternate tires or
wheels on the vehicle that prevent the TPMS
from functioning properly. Always check the
TPMS malfunction telltale after replacing one or
more tires or wheels on your vehicle to ensure
that the replacement or alternate tires and
whee ls allow the TPMS to continue to function
properly.
If the Tire Pressure Monitoring System
indicator appears
Applies to: vehicles with tire pressure monitoring system
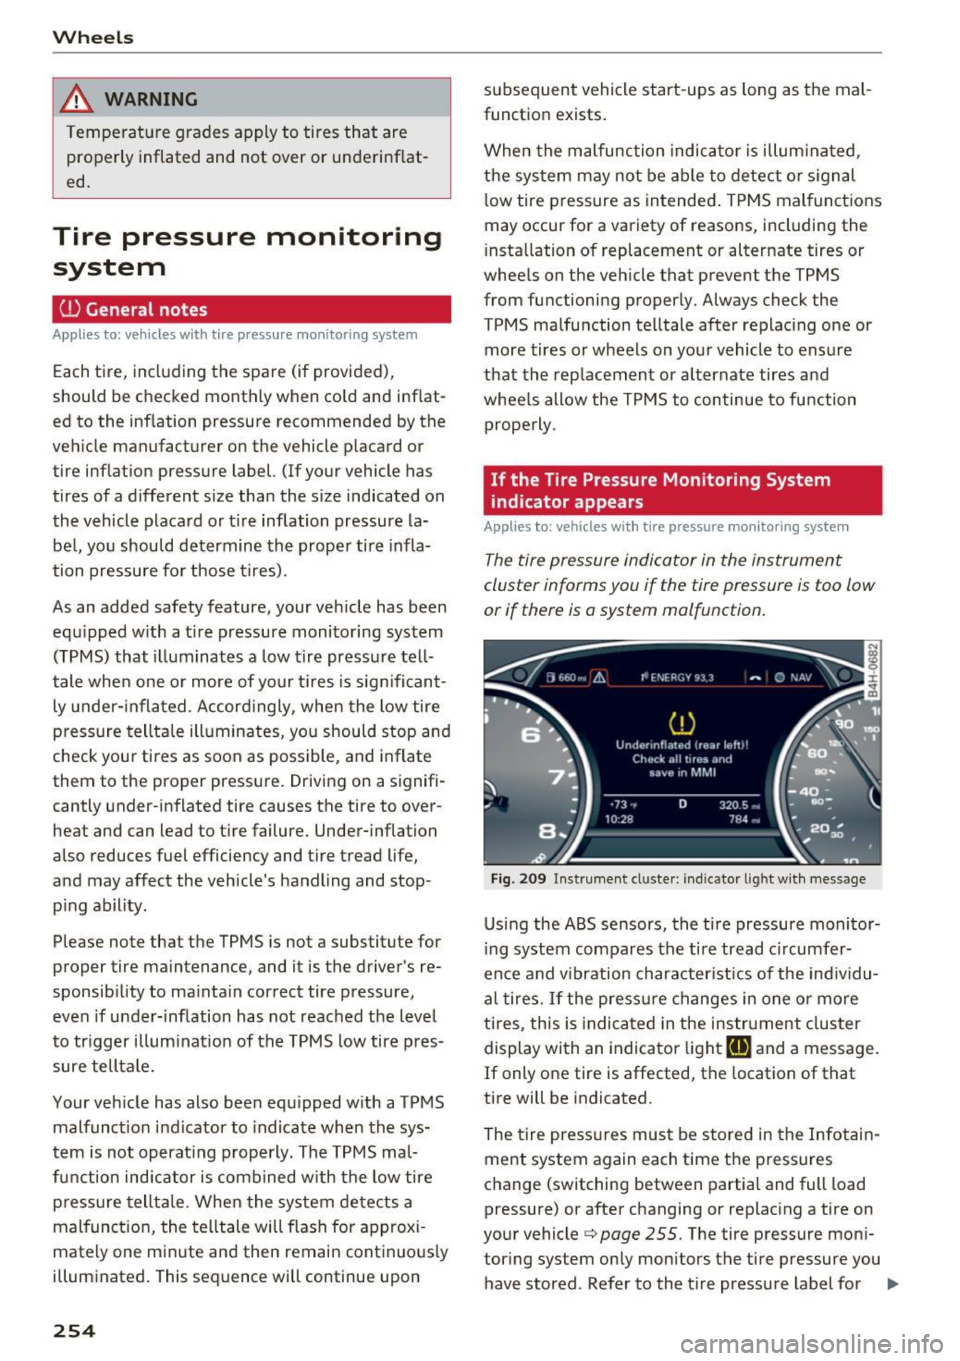
The tire pressure indicator in the instrument
cluster informs you if the tire pressure is too low
or if there is a system malfunction.
Fig . 209 Instrument cl uste r: indicator light with me ssage
Using the ABS sensors, the tire pressure monitor
ing system compares the tire tread c ircumfer
ence and v ibration characteristics of the individu
al tires.
If the pressure changes in one or more
ti res, this is ind icated in the instrument cluster
display with an indicator light
[I] and a message.
If only one tire is affected, the locat ion of that
tire will be indicated.
The tire pressures must be stored in the Infotain
ment system again each time the pressures
change (switching between partial and full load
pressure) or after changing or replacing a tire on
your vehicle ¢
page 255. The tire pressure moni
tor ing system only monitors the tire pressure you
have stored . Refer to the t ire pressure label for ..,.
Page 257 of 302
the recommended tire pressure for you r ve hicle
¢ page 246, fig . 208.
T ire tread circumference and v ibrat ion character
istics can change and cause a ti re pressure warn
ing if :
- the tire p ressure in one o r more tires is too low.
- the tire has structura l damage .
- the tire was replaced or the tire pressure was
changed and it was not stored¢
page 255 .
-the spare t ire* is installed.
Ind icat or light s
IE Loss of press ure in at least one tire q &. .
Check the tires and replace or repair if necessary.
Check/correct the pressures of a ll four tires and
store the pressure again in the Infotainment sys
tem ¢
page 255.
ffim (T ire Pressure Monitoring System) Tire
pressu re: Sys tem malfunction !.
Iffflm appears
after switching the ignition on or wh ile driving
and the
IE indicator light in the instrument clus
ter blinks for approximate ly one minute and then
stays on, there is system malfunction . Try to
store the correct tire pressures¢ page 255 . If
the indicator light does tur n off or t urns on again
a fte r a short period of time, dr ive to you r author
ized A udi dealer or qualified repair fac ility imme
diate ly to have the ma lfunction co rrected.
&_ WARNING
- If the tire pressu re indicator appears in the
display, reduce your speed immed iate ly and
avoid any hard steer ing or braking maneu
vers. Stop as soon as possib le and check the
t ir es and their press ure .
- The driver is responsib le for maintaining the
correct tire pressure. You must check the
t ir e pressu re regu la rly .
- Under certa in conditions (such as a sporty
dr iv ing style, wi nter cond itions or unpaved
roads), the tire p ressure monitoring system
indicator may be de layed.
- Do not use r un-flat tires on your vehicle. Us
ing them when not permitted can lead to
vehicle damage or accidents.
Wh eel s
(D Tips
-The tire p ressure monitoring system can al
so stop working when there is an ESC mal
function.
- Using snow c hains may result in a system
ma lf u nction.
- The tires wit h the identification "AO" or
"RO"
q page 243 have been matched wit h
your Audi t ire press ure monitoring system.
We recommend that you use these tires.
Storing tire pressures
If the tire pressure changes or a tire is replaced,
it must be confirmed in the Infotainment sys tem.
.,. Ma ke sure befo re storing t hat the t ire pressures
of all four tires meet the specified values and
are adapted to the load ¢
page 244.
.,. Switch the ignit ion on .
.,. Select: the
I CAR ! funct io n button > Car Systems
cont rol button > Serv icing & check s > Tire
pressure monitoring > Store tire pressures >
Ye s, store now .
(j) Tips
Do not sto re the tire pressures if snow chains
are ins talled. Ot he rw ise the system could
malfunc tion.
255
Page 269 of 302
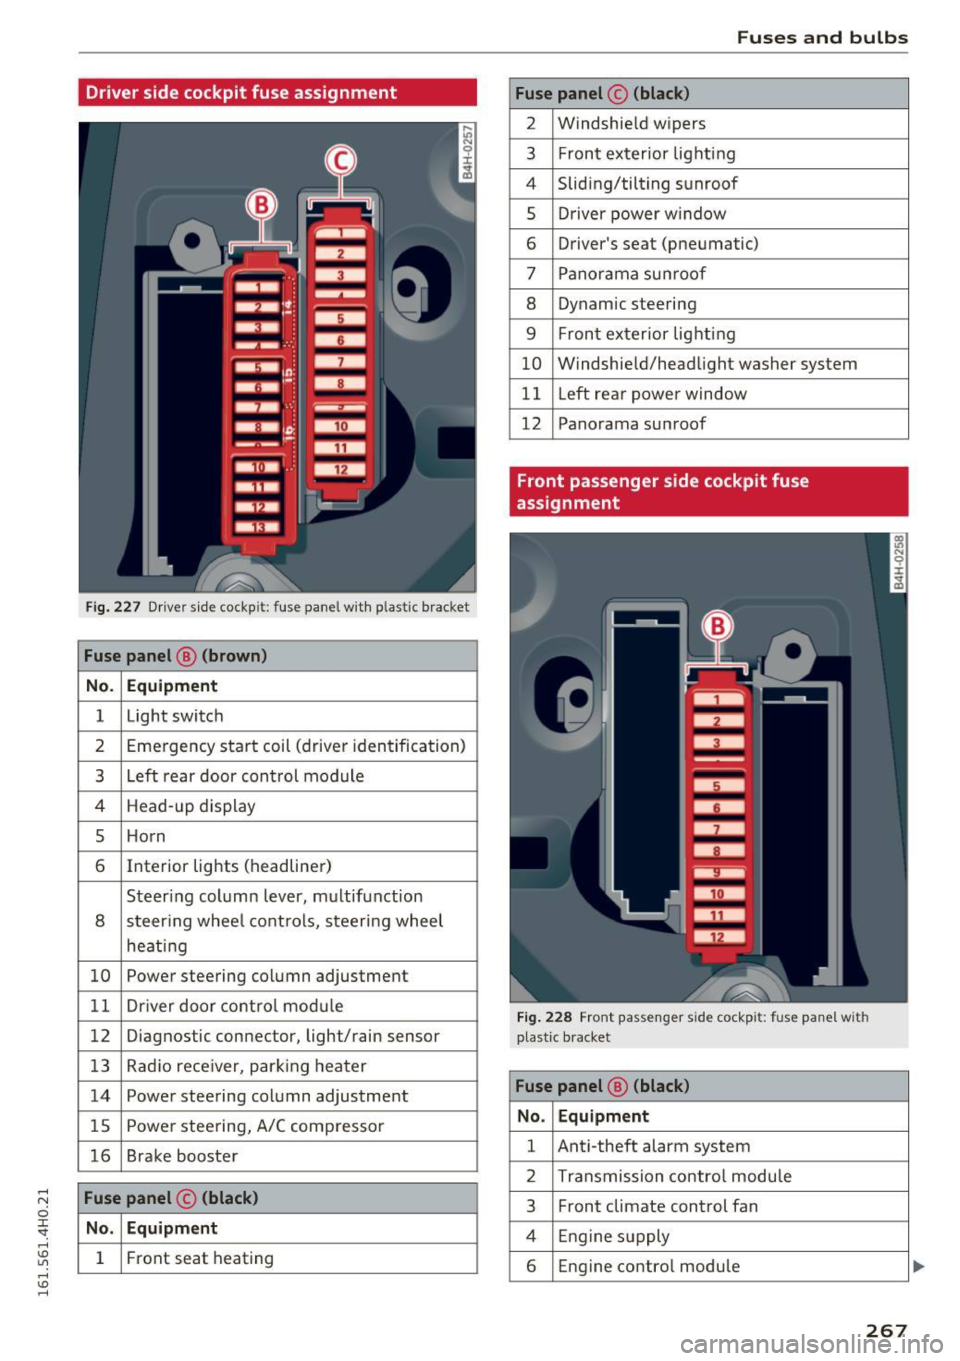
Driver side cockpit fuse assignment
Fig . 227 D river sid e cockpit: fuse panel with plastic bracket
Fuse panel @ (brown )
No . Equipment
1 Light switch
2 Emergency start coil (driver iden tification)
3 Left rear door con trol module
4 Head -up display
5 Ho rn
6 Interior lights (headliner)
Steering column lever, m ultifunction
8 steer ing whee l cont ro ls, steering wheel
heati ng
10 Powe r steering column adjustment
1 1 Dr iver door co ntro l mod ule
12 Diagnostic con nector, light/rain sensor
13 Radio rece iver, par king heater
14 Power steering column adjustment
15 Powe r stee ring, A/C comp resso r
16 Brake booster
Fuse panel © (black)
No . Equipment
1 Front seat heating
Fuses and bulbs
Fuse panel © (black)
2 Windshie ld w ipers
3 F ron t ex terior lig hti ng
4 Sliding/tilting s unroof
5 Dr iver power w indow
6 Driver's seat (pneumatic)
7 Pano rama su nroo f
8 Dynam ic steering
9 F ron t ex terior lig hting
10 W indshie ld/head light washer system
11 Left rea r powe r window
12 Panorama su nroof
Front passenger side cockpit fuse
assignment
Fig. 228 Front passenge r side cockp it: fuse panel with
p last ic b racket
Fuse panel @ (black)
No . Equipment
1 Ant i-theft alarm system
2 Transmission contro l modu le
3 Front climate control fan
4 Engine supply
6 Engine control module
267
Page 287 of 302
A
A/C (automatic climate control) . . . . . . . . . . 77
ABS
refer to Anti-lock braking system . . . . . . . 190
Accessories . . . . . . . . . . . . . . . . . . . . . . . . . . 283
Active lane assist . . . . . . . . . . . . . . . . . . . . . . 99
Activating and deactivating . . . . . . . . . . . . 100
C leaning the camera area . . . . . . . . . . . . . 207
Descr iption . . . . . . . . . . . . . . . . . . . . . . . . . . 99
Instrument cluster indicator light . . . . . . 100
Messages . . . . . . . . . . . . . . . . . . . . . . . . . . 100
Notes on instrument cluster display . . . . . 100
Sett ing the steering wheel vibration . . . . 101
Adaptive air suspension/sport . . . . . . . . . . . 106
Adapt ive cruise control . . . . . . . . . . . . . . . . . . 90
C leaning the sensor . . . . . . . . . . . . . . . . . . 207
Messages . . . . . . . . . . . . . . . . . . . . . . . . . . . 97
Request for driver intervention . . . . . . . . . . 95
Stop-and-go traffic . . . . . . . . . . . . . . . . . . . 94
Adapt ive Light (defective) . . . . . . . . . . . . . . . 22
AdBlue .. .. .. .. ................. ..... 216
Messages . . . . . . . . . . . . . . . . . . . . . . . . . . 216
Opening the tank door . . . . . . . . . . . . . . . . 217
Refilling . . . . . . . . . . . . . . . . . . . . . . . . . . . 217
Adding Engine coolant . . . . . . . . . . . . . . . . . . . . . . 228
Engine oil . . . . . . . . . . . . . . . . . . . . . . . . . . 225
Additives Engine oil 225
Adjustab le steer ing column . . . . . . . . . . . . . . 80
Adjusting Air distribution (automat ic cl imate control) .78
Instrument illuminat ion . . . . . . . . . . . . . . . 51
Steering column . . . . . . . . . . . . . . . . . . . . . . 80
Temperature (automatic climate control) . 78
Airbag . . . . . . . . . . . . . . . . . . . . . . . . . . . . . . 146
Airbag system . . . . . . . . . . . . . . . . . . . . . . . . 164
Advanced Airbag-System . . . . . . . . . . . . . . 150
Advanced Airbag System components . . . 152
Care . . . . . . . . . . . . . . . . . . . . . . . . . . . . . . 159
Children . . . . . . . . . . . . . . . . . . . . . . . . . . . 169
Ch ild restraints . . . . . . . . . . . . . . . . . . . . . 170
Components (front a irbags) . . . . . . . . . . . 152
Danger of fitting a child seat on the front
passenger seat . . . . . . . . . . . . . . . . . . . . . . 147
Disposal . . . . . . . . . . . . . . . . . . . . . . . . . . . 159
Fr ont airbags ................. .. 150, 151
Index
How do the front airbags work? . . . . . . . . 154
How many airbags does my vehicle have? 152
How the Advanced Airbag System compo-
nents work together . . . . . . . . . . . . . . . . . 154
Important information . . . . . . . . . . . . . . . 146
Important safety instructions on the knee
airbag system . . . . . . . . . . . . . . . . . . . . . . . 162
Knee airbags . . . . . . . . . . . . . . . . . . . . . . . . 160
Monitoring . . . . . . . . . . . . . . . . . . . . . . . . . 156
PASSENGER AIR BAG OFF light . . . . . . . . . 156
Repairs . . . . . . . . . . . . . . . . . . . . . . . . . . . . 159
Safety instructions . . . . . . . . . . . . . . . . . . . 158
Side airbags . . . . . . . . . . . . . . . . . . . . . . . . 162
S ide curta in a irbags . . . . . . . . . . . . . . . . . . 165
Warning/indicator lights . . . . . . . . . . . . . . . 18
Warning/Indicator lights . . . . . . . . . . . . . 156
Weight-sensing mat . . . . . . . . . . . . . . . . . 169
When must the system be inspected? 156
Aircraft Transporting your vehicle 274
Alcantara Cleaning . . . . . . . . . . . . . . . . . . . . . . . . . . . 209
Alignment pin (tire changing) . . . . . . . . . . . 256
All season ti res . . . . . . . . . . . . . . . . . . . . . . . 2 51
All Wheel Dr ive . . . . . . . . . . . . . . . . . . . . . . . 195
Alternator
refer to Generato r . . . . . . . . . . . . . . . . . . . . 15
Amb ience lighting . . . . . . . . . . . . . . . . . . . . . 50
Anti-freeze Windshield washer system . . . . . . . . . . . . 234
also refer to Engine coolant . . . . . . . . . . . 227
Anti-lock braking system . . . . . . . . . . . . . . . 190
Warning/indicator lights . . . . . . . . . . . . . . . 18
Anti-slip regulation . . . . . . . . . . . . . . . . . . . 190
Warning/indicator lights . . . . . . . . . . . . . . . 18
Anti-theft systems Electronic immobilizer . . . . . . . . . . . . . . . . . 31
ASR
refer to Anti-slip regulation . . . . . . . . . . . 190
Audi braking guard
refer to Braking guard . . . . . . . . . . . . . . . . . 90
Audi drive select
refer to Drive select . . . . . . . . . . . . . . . . . . 106
Audi Service Repair Manuals and Literature 281
AUTO Automat ic climate control . . . . . . . . . . . . . . 78
Automat ic headl ights . . . . . . . . . . . . . . . . . 46
285