display AUDI A8 2016 Owner's Manual
[x] Cancel search | Manufacturer: AUDI, Model Year: 2016, Model line: A8, Model: AUDI A8 2016Pages: 302, PDF Size: 75.68 MB
Page 59 of 302
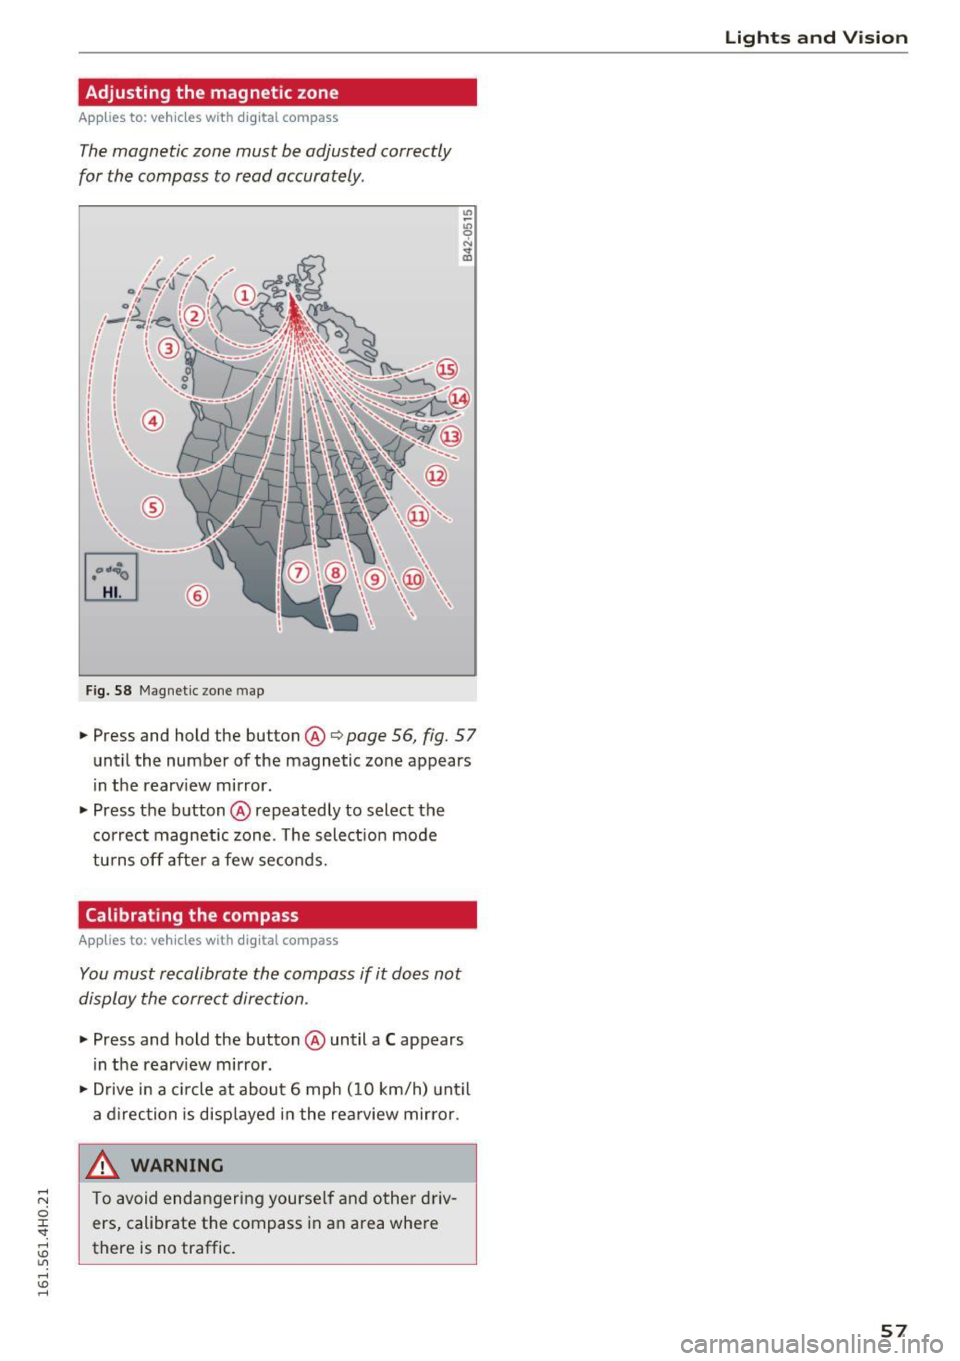
Adjusting the magnetic zone
Applies to: vehicles with digital compass
The magnetic zone must be adjusted correctly
for the compass to read accurately .
®
Fig. 58 Magnetic zone map
• Press and hold the button @i=> page 56, fig. 57
until the number of the magnetic zone appears
in the rearv iew mirror.
• Press the button @repeatedly to select the
correct magnetic zone. The select ion mode
tu rns off after a few seconds.
Calibrating the compass
Applies to: vehicles with digital compass
You must recalibrate the compass if it does not
display the correct direction .
• Press and hold the button @until a C appears
in the rearv iew mirror.
• Drive in a c ircle at about 6 mph ( 10 km/h) until
a direction is disp layed in the rearview mirror.
_& WARNING ,___
To avoid endangering yourself and other driv
ers, calibrate the compass in an area where
there is no traffic.
Lights and V ision
57
Page 62 of 302
Sea ts and stor age
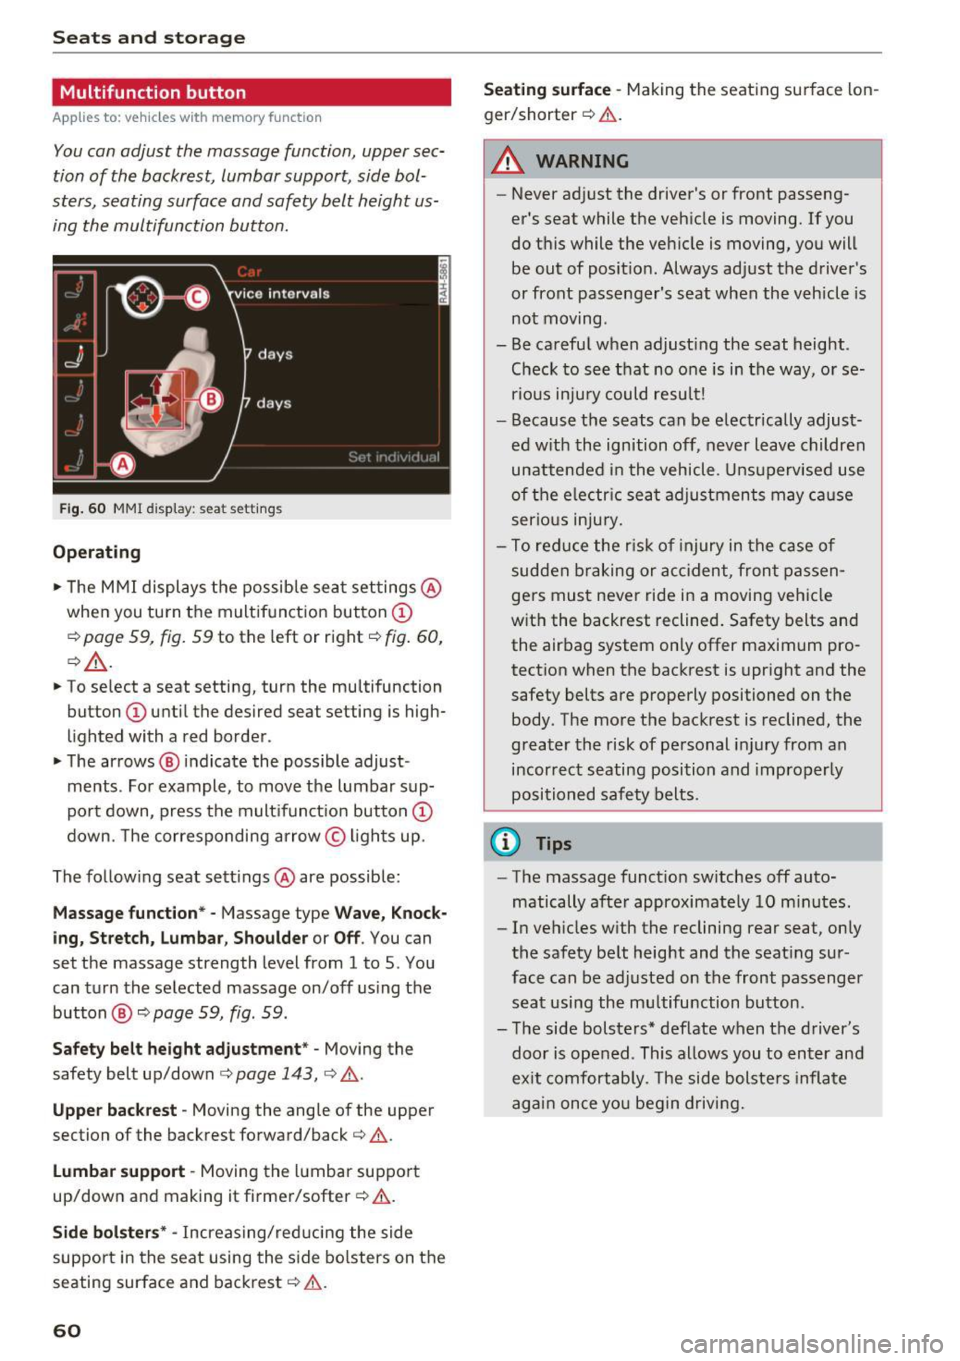
Multifunction button
Applies to: ve hicles w ith memory funct ion
You con adjust the massage function, upper sec
tion of the backrest, lumbar support, side bol
sters, seating surface and safety belt height us
ing the multifunction button.
F ig . 60 MMI display: seat settings
Operat ing
,.. The M MI displays the possible sea t set tings @
when you tu rn the multifunct ion button @
c::> page 59, fig . 59 to the left or right c::> fig. 60,
c::> _&. .
,.. To select a seat setting, turn the multifunction
button
(I) until the desired seat setting is high
lighted with a red border .
• The arrows ® indicate the possible adjust
ments . Fo r example, to move the lumbar sup
po rt down, press the mult ifunct ion button @
down. The corresponding arrow © ligh ts up.
The follow ing seat sett ings @are possible:
Massage func tion * -Massage type Wave, Kno ck
ing , Stre tch, Lumbar , S houlder or Off .
You can
set the massage strength level from 1 to 5. You
can turn the selected massage on/off us ing the
button @
c::> page 59, fig . 59.
Safe ty belt height adju stm ent * -Moving the
safety belt up/down
c::> page 143, c::> &.
Uppe r back rest -Moving the angle of the upper
section of the backrest forward/back
c::> &.
Lumb ar support -Moving the l umbar support
up/down and making it firmer/softer
c::> & .
Side bolst ers* -Increas ing/red ucing the side
support in the seat using the s ide bo lsters on the
seating surface and backrest
c::> .&. .
60
Seating surface -Making the seating surface lon
ger/shorter
c::> & .
A WARNING
-Never ad just the driver's or front passeng
er 's seat while the vehicle is moving. If you
do this while the vehicle is moving, you will
be out of posit io n. Always adjust the driver's
or front passenger's seat when the vehicle is
not moving .
- Be careful when adjust ing the seat height .
Check to see that no o ne is in the way, or se
rious inju ry could result!
- Because the seats can be electr ically adjust
ed w ith the ignition off, never leave children
unattended i n the vehicle. Uns upervised use
of the e lectr ic sea t adjustments may ca use
serious in ju ry.
- To reduce the r is k of injury in the case of
sudden b raking or accident, front pa ssen
gers must never ride in a moving vehicle
w ith the backrest reclined . Safety belts and
the airbag system on ly offer maximum pro
tection when the backrest is upright and the
safety belts are properly positioned on the
body. The more the backrest is reclined, the
greater the risk of pe rsonal injury from an
incorrect seating position and improperly
positioned safety belts.
@ Tips
- The massage funct ion sw itches off auto
matically after approximately 10 m inutes.
- In vehicles w ith the reclining rear seat, on ly
the safety be lt height and the seat ing sur
face can be adjusted on the front passenger
seat using the mu ltifunction bu tton.
- The side bolsters* deflate when the driver's
door is ope ned . This allows you to enter and
ex it comfortab ly. The side bolste rs infla te
again once yo u begin driving.
-
Page 64 of 302
Seat s and sto rage
Adju st ing th e seat po sition
.,. To adjust the seat forwa rd/bac k, press the but
ton © forward/back .
.,. To move the seat up/down, press the button ©
upward/downward .
Adjusting th e massage function*
.,. To adjust the "p ulsating"/"wave" massage
funct ion, press the butto n© to the left/r ight.
The massage f unction is at its strongest level
when three LEDs in the button turn on .
.,. To reduce the massage level, press the © but
ton again .
.,. To switch the massage function off, press the
button repeatedly until the LED turns off.
Adju st ing th e re clining p osition
.,. To adjust the reclining position, press and hold
the button ® until the seat reaches its end po
s ition .
.,. Applies to vehicles with reclining seat*: If you
select the reclining position, the front passeng
er's seat moves forward and the backrest re
cl ines. Depending on the last setting, the leg
support may fold out at the same t ime. The
front passenger 's seat can no longer be used in
the recl ining position¢ _&.. You can adjust the
l eg support or fold the display fo rward in the
reclining position.
Selecting the standard seat position
.,. To adjust the standard seat pos ition, press and
hold the bu tton (D unt il the seat reaches its
end position .
.,. Applies to vehicles with reclining seat*: If you
select the standard seat position, the front pas
senger's seat is moved back into the starting
pos ition, the head restra int is moved to the up
rig ht posit ion a nd the leg support is folded in
ward ¢_& .
Adju st ing th e di splay*
.,. To tilt the disp lay forward/back, press and hold
the left/right button @ unt il the display reach
es the desired pos ition.
.,. Applies to vehicles with reclining seat*: To
maintain a clear view of the road when the seat
is in the reclining position, press and hold the
62
right button @ until the disp lay has folded for
ward. Make sure the driver has a clear view of the exter ior mirrors. If so, confirm the quest ion
in the Infotainment system with
Yes . If you an
swer
No or do not respond to the quest ion, the
disp lay w ill return to the upright pos ition.
Adju sting the leg support (vehicles with
reclining seat*)
Requirement: The reclining pos it ion must be se
lected ¢
page 62.
.,. To fold the leg support o ut/in, press and hold
the left/r ight button @ until the leg support
reaches the desired pos it ion.
.,. To angle the leg support so that it is more up
r ight/more reclined or to move it forward/back,
adjusting the front passenger's seat accord ing
ly.
Adjusting the front pa ssenger 's seat
.,. Make sure that the front passenger's seat ad
justment is switched on in the Infotainment
system
¢ page 64 .
.,. To act ivate the front passenger's seat adjust
ment, press the button ®·
.,. To adjust the front p assenger's se at forward/
back, press the button © forward/back .
.,. To move the front passenger's seat up/down,
press the button © upward/downward .
.,. To adjust the front passenger's seat backrest so
that is more upright/more recl ined, press the
button @ forward/back .
.,. Applies to veh icles with reclin ing seat*: To ad
just the reclin ing/standa rd seat position, press
and hold the button@/(D unt il the seat reach
es its end position.
~ WARNING
-
- The power ad justment for the ind iv idual
seats a lso works with the ignition. For this
reason, children sho uld never be left unat
tended in the vehicle -they could be injured!
- Exercise caution when adjust ing the seats.
Unsupervised or careless seat adjustment
can pinch fingers or hands ca us ing injur ies .
Page 65 of 302
-Vehicles with a pass through in the center
console have seating for four. The long cen
ter console between the two rear seats is
not a seating position . Therefore, a safety
belt is not provided .
- Applies to vehicles with reclining rear seat*:
- Do not use the front passenger's seat for
seating when it is in the reclining position.
This increases the risk of serious injury or
death .
- Never adjust the reclining position when
the front passenger 's seat is occupied .
This increases the risk of injury.
- Do not tilt the display if the driver's view
of the right exterior mirror will be ob
structed .
- Make sure the area between the leg sup
port and the front passenger's seat back
rest is clear before folding the leg support in so that you are not pinched.
(D Note
If a child seat is attached to one of the rear
seats, this seat must not be adjusted using
the power controls under any circumstances.
The easy entry function for this seat must also
be deactivated in the MMI
c:> page 64. The
child seat as well as the rear seat can be dam
aged by the adjustment process .
(!) Tips
The massage function switches off automati
cally after approximately
10 minutes .
- If you cannot move the front passenger seat
or the reclining rear seat, it may be because
- the front passenger's seat memory func
tion is switched off¢
page 66 or
- the child safety lock is switched on (the~
button ¢
page 40 or the right T button
c::> page 40 lights up in the driver's door),
or
- the front passenger seat adjustment is
switched off in the MMI
c:> page 64.
Seats and storage
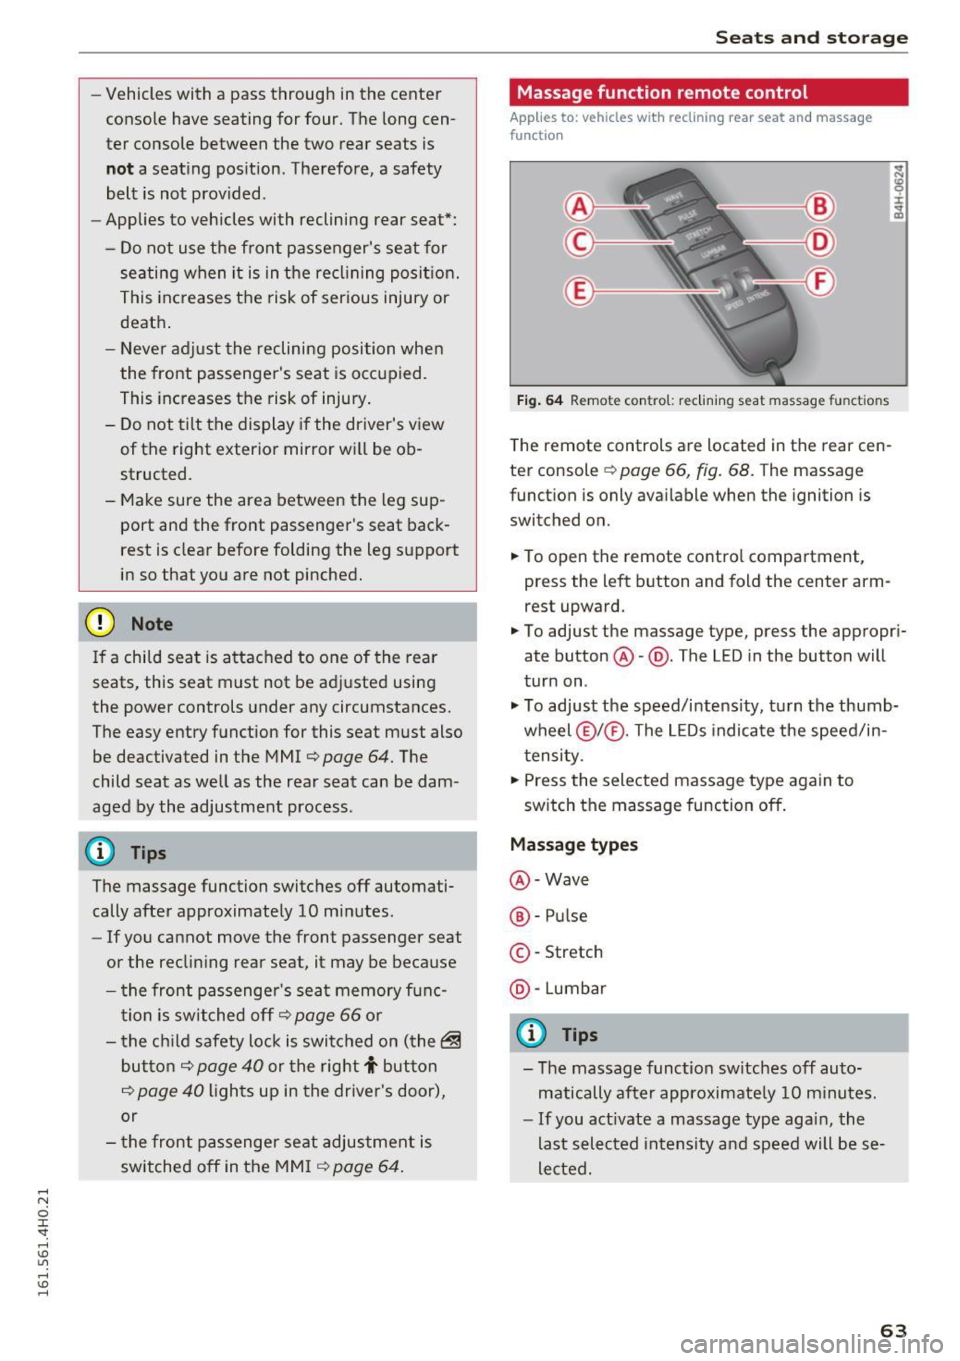
Massage function remote control
Applies to: vehicles with reclining rear seat and massage
functio n
Fig. 64 Remote con trol: re clining seat massag e functions
The remote controls are located in the rear cen
ter console
c::> page 66, fig. 68. T he massage
function is only available when the ignition is
switched on.
.,. To open the remote control compartment,
press the left button and fold the center arm rest upward.
.,. To adjust the massage type, press the appropri
ate button @-@ . The L ED in the button will
turn on .
.,. To adjust the speed/intensity, turn the thumb
wheel @I® . The LEDs indicate the speed/in
tensity.
.,. Press the selected massage type again to
switch the massage function off.
Massage types
@-Wave
®-Pulse
©-Stretch
@ -Lumbar
@ Tips
- The massage function switches off auto
matically after approximate ly
10 minutes.
- If you act ivate a massage type again, the
last selected intensity and speed will be se
lected.
63
Page 79 of 302
Warm and cold
Operation
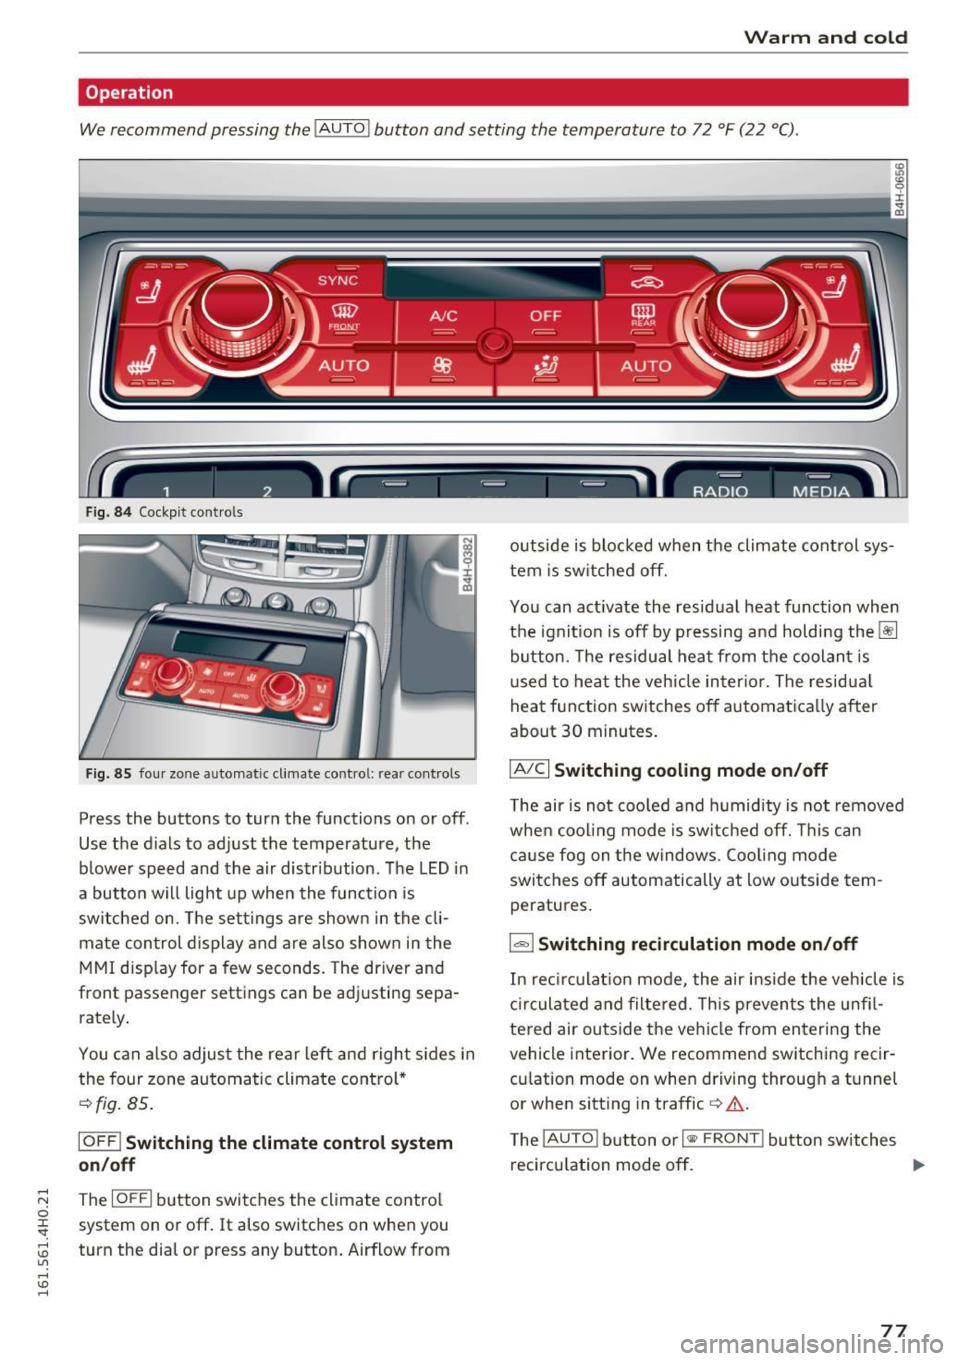
We recommend pressing the
! AUTO ! button and setting the temperature to 72 °F (22 °C).
Fig. 84 Cockpit con trols
Fig. 85 four zone automatic climate control: rear controls
Press the buttons to turn the functions on or off .
Use the dials to adjust the temperature, the
b lower speed and the air distr ibut ion. The LED in
a butto n will light up when the function is
switched on. The settings a re shown in the cli
mate con trol display and are also shown in the
MMI disp lay for a few seconds. The driver and
front passenger settings can be adj usting sepa
rately .
You can also adjus t the rear left and right sides in
the four zone automatic climate control*
¢fig. 85 .
IOFF I Switching the climate control system
on/off
~ The IOFFI button switches the climate control 0
~ system on or off. It also switches on when you
~ turn the dial or press any button. Airflow from U"I ,...., \!) ,....,
outside is blocked when the climate control sys
tem is switched off.
You can act ivate the residual heat function when
the ignit io n i s off by pressing and holding the~
button. The residual heat from the coolant is
u sed to heat the veh icle inter ior. The residua l
heat function switches off automatica lly after
about 30 minutes .
IA/Cl Switching cooling mode on/off
The air is not cooled and humidity is not removed
when cooling mode is switched off. This can
cause fog on the windows. Coo ling mode
switches off automatically at low outside tem
peratures.
1 .,.,,1 Switching recirculation mode on/off
In rec irculat ion mode, the air inside the vehicle is
circulated and filtered. This prevents the unfi l
tered air outside the vehicle from entering the
vehicle interior. We recommend switching recir
cu lation mode on when driving through a tunnel
or when sitting in traffic
c> &.
The !AUTO I button or I
recircu lation mode off. ..,.
77
Page 81 of 302
(D Note
To avoid damage to the heating elements in
the seats, do not kneel on the seats or place
heavy loads on a small area of the seat.
Setup
The climate control system setup is accessed
through the MMI.
.. Select : I CARI function button> Car systems
control button > A/C .
Rear cabin settings*
When this function is selec ted, a ll sett ings for
t he rear can be adjusted through the climate con
trol system in the cockpit . T he climate control
system settings cannot be adjusted in the rear
seat at the same time. This function switches off
after a certain period of time or when one of the
dials in the cockpit is pressed.
Auto recirculation*
The sensit ivity level of the automatic recircula
tion mode can be set at various leve ls from
off to
sensitive . The recirculation mode l""' I is controlled
on automatically. You must press the
I~ FRONT I
button if fog forms on the w indows .
Footwell temperature
You can adjust the footwell temperature so that
it is cooler or warmer.
Windshield heat*
When the defroster I@ FRONT I is switched on and
the
Auto setting is selected, the windshield de
froster is con trolled automatically .
Supplementary heater*
The supplementary heater warms the interior of
veh icles with diese l engines* more quickly . The
supp lementary heate r is controlled automat ically
in the
Auto setting.
Solar roof*
Parking ventilation is controlled automatically in
the
auto setting .
Warm and cold
When the ignition is off, so lar-powered parking
ventilation may switch on, as long as
- t here is sufficient sunlight ,
- the outside temperature is not too low,
- the sunroof is closed or tilted and
-auto (MMI) is selected.
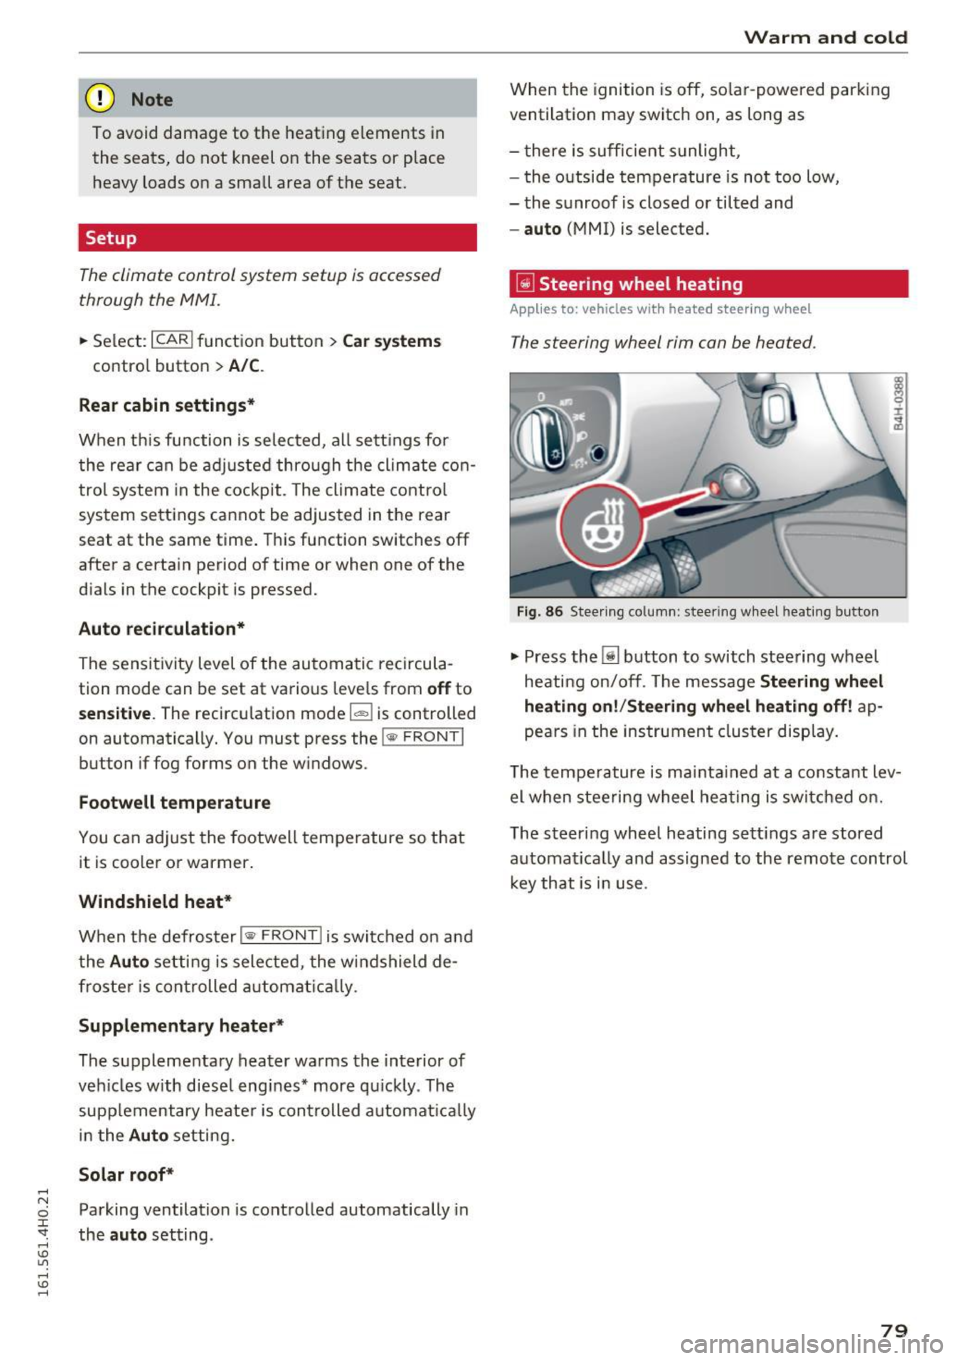
~ Steer ing wheel heating
Applies to: vehicles with heated steering wheel
T he steering wheel rim can be heated .
Fig. 86 Stee ring co lumn: steer ing wheel heating bu tton
.,. Press the [j] button to switch steering wheel
heating on/off. The message
Steering wheel
heating on!/Steering wheel heating off!
ap
pears in the instrument cluster display.
T he temperature is maintained at a constant lev
el when steering wheel heating is switched on.
The steering wheel heating sett ings are stored
automat ically and assigned to the remote control
key that is in use .
79
Page 84 of 302
Driving
more force to turn or brake if necessary. Be
cause you cannot steer and brake as you
usually would, this could lead to crashes
and serious injur ies.
- For safety reasons, you should a lways park
yo ur vehicle with the selector lever in P.
O therwise, the ve hicle co uld inadverte ntly
r oll away.
- After the engine has been sw itched off , the
rad iator fan can con tinue to ru n for up to 10
mi nutes -even with the ig nition switched
off.
It ca n also swi tc h on again after some
t ime if t he coolant te mperature ris es as th e
resul t of a he at bu ildup o r if the eng ine is
hot an d the engine compartme nt is addi
t iona lly heated by the sun's rays.
([) Note
Do not s top the e ngine immed ia te ly after
h ard o r ex tende d driving. Keep the engine
r u nning for approxima tely two m in utes to
prevent excessive heat b uild- up.
Driver message in the instrument cluster
display
Turn off ignition before leaving car
This message appears and a warn ing tone sounds
if you open the driver's door when the ignition is
sw itched on.
Press brake pedal to start engine
T his message appea rs if you press the
I START ENGI NE STOP I butt on to st art the engine
and do not depress the brake pedal. The eng ine
can only be started if the bra ke pe dal is de
pressed.
Ill Is key in the vehicle ?
If the i nd icator light t urns on and the message
appears, the remote co ntro l key was removed
from the vehicle while the eng ine was ru nning. If
the ignition key is no t in the vehicle yo u w ill not
be ab le to sw itch on the ign ition or restart the
engine after it has been switched off . You will a l
so not be able to lock the ve hicle from the out
side.
82
Shift to P, othe rwi se vehicle can roll away.
Door s do not lock if lever is not in P.
This dr ive r mess age ap pears for safety re a sons if
the tra nsmission has not been shifted to the P
p os it ion when you switch the ignition off . Move
the se lecto r lever to the P position. Otherwise the
vehicle is not p rotected from rol ling and cannot
be locked .
fl Key is not recognized. Hold back of key
against marked area. See owner 's manual.
If the indic ator ligh t turns on and this mes sage
appea rs, there is a ma lfunction
¢page 83 .
Turn off ignition before leaving car . Battery is
discharging
This message appears if the driver's door is
opened wh ile the ign ition is sw itched on. Always
swi tch off the ignition if yo u are leav ing the ve hi
cl e. See a lso
¢ page 87.
Shift to P and turn off ignition before leaving
car, otherwise vehicle can roll away
This message appears if the driver's door is
opened wh ile the ignition is switched on and the
selector lever is not in the P position . S hi ft the
selector lever i nto the P posit io n and sw itch off
t h e ign it io n when yo u exit the vehicle . Otherwise
t h e ve hicle co uld ro ll. See a lso
¢ page 87.
Page 88 of 302

Driving
(D Note
Always switch off the Start-Stop-System
when driving through water
c::> page 87.
Starting/stopping the engine
A pp lies to: ve hicles w ith Sta rt-Sto p-System
Fig. 91 Instrument cluste r: engin e sw itched off (s top
ph ase)
.. Slow the vehicle to a stop using the brake and
keep pressing the brake pedal. The engine will
switch off . The
[I] indicator light appears in the
information line in the instrument cluster dis
play.
.. When you take your foot off the brake pedal,
the engine restarts. The indicator light turns
off.
Additional information
The engine will switch off in the P, D, N and S po
sitions as well as in manual mode. In the P posi
tion , the engine will also remain off if you take
your foot off the brake pedal. The eng ine starts
again when you select another selector lever po
sition and take your foot off the brake pedal.
If you select the R position during a Stop phase,
the engine will start again.
Shift from D to P quickly to prevent the engine
from starting unintentionally when shifting
through R.
You can determine for yourself if the engine will
stop or not by reducing or increasing the amount
of force you use to press the brake pedal. For ex
ample , if you only light ly press on the brake ped
al in stop-and and-go traffic or when turning, the
engine will not switch off when the vehicle is sta-
86
tionary. As soon as you press the brake down
harder, the engine will switch off.
General information
Applies to: vehicles wi th Start-S top-Sys te m
The standard Start-Stop-mode can be cancelled
for different system-related reasons.
Fig. 92 Instrumen t cluster: e ngin e-Stop temporarily un
ava ilable
Engine will not switch off
Before each stop phase, the system checks if cer
tain conditions have been met. For example, the
engine will
not be switched off in the following
situations :
- The engine has not reached the minimum re
quired temperature for Start-Stop-mode.
- The interior temperature selected by the A/C
system has not been reached .
- The outside temperature is extremely high/low.
- The windshield is being defrosted
c::> page 79 .
- The parking system* is switched on.
- The battery charge level is too low.
- The steering wheel is sharply turned or there is
a steering movement .
- After engaging the reverse gear .
- On sharp inclines.
The
llJ indicator light appears in the information
line in the instrument cluster display
c::>fig . 92.
Engine automatically restarts
The stop phase is interrupted in the following sit
uations, for example . The engine restarts without
any action by the driver .
- The interior temperature varies from the tem-
perature selected in the A/C system. ..,.
Page 89 of 302
-The windshield is being defrosted~ page 79.
-The brake pedal is pressed sever al t imes in a
row .
- T he battery charge level becomes too low .
- High power cons umption .
Switching the ignition off automa tic ally
To prevent the battery from dra ining, the ignition
will sw itch off
auto mati call y when all of the fol
lowing cond itions have been met:
- The vehicle has already been driven.
- The eng ine has been turned
off by the Start-
Stop -System*.
- The driver's door is opened .
- The driver's seat bel t is removed.
- The brake pedal is not p ressed down.
- The veh icle is stationary.
In this case, the activated low beam will be re
p laced by the s ide marker lights. The side marker
lights will switch
off after appro ximately 30 mi
nutes or when you lock the veh icle.
If the Start-Stop System has
not turned off the
engine or if you have sw itched the Start-Stop sys
tem
off manually , the ignition will not be auto
mat ica lly switched
off and the engine w ill contin
ue to run~& .
& WARNING
Never allow the engine to r un in confi ned
spaces - da nger o f as phyxia tio n.
(D Tips
-
If you shift in to the D, Nor S posit ions after
shifti ng into reve rse, the veh icle must be driv
en faster th an 6 mph (10 km/h) in order for
t he eng ine to swi tc h
off aga in.
D rivi ng
Switching the Start-Stop-System on/off
manually
Applies to: vehicles with Start-Stop-System
If you do not wish to use th e system, you can
switch it off manually.
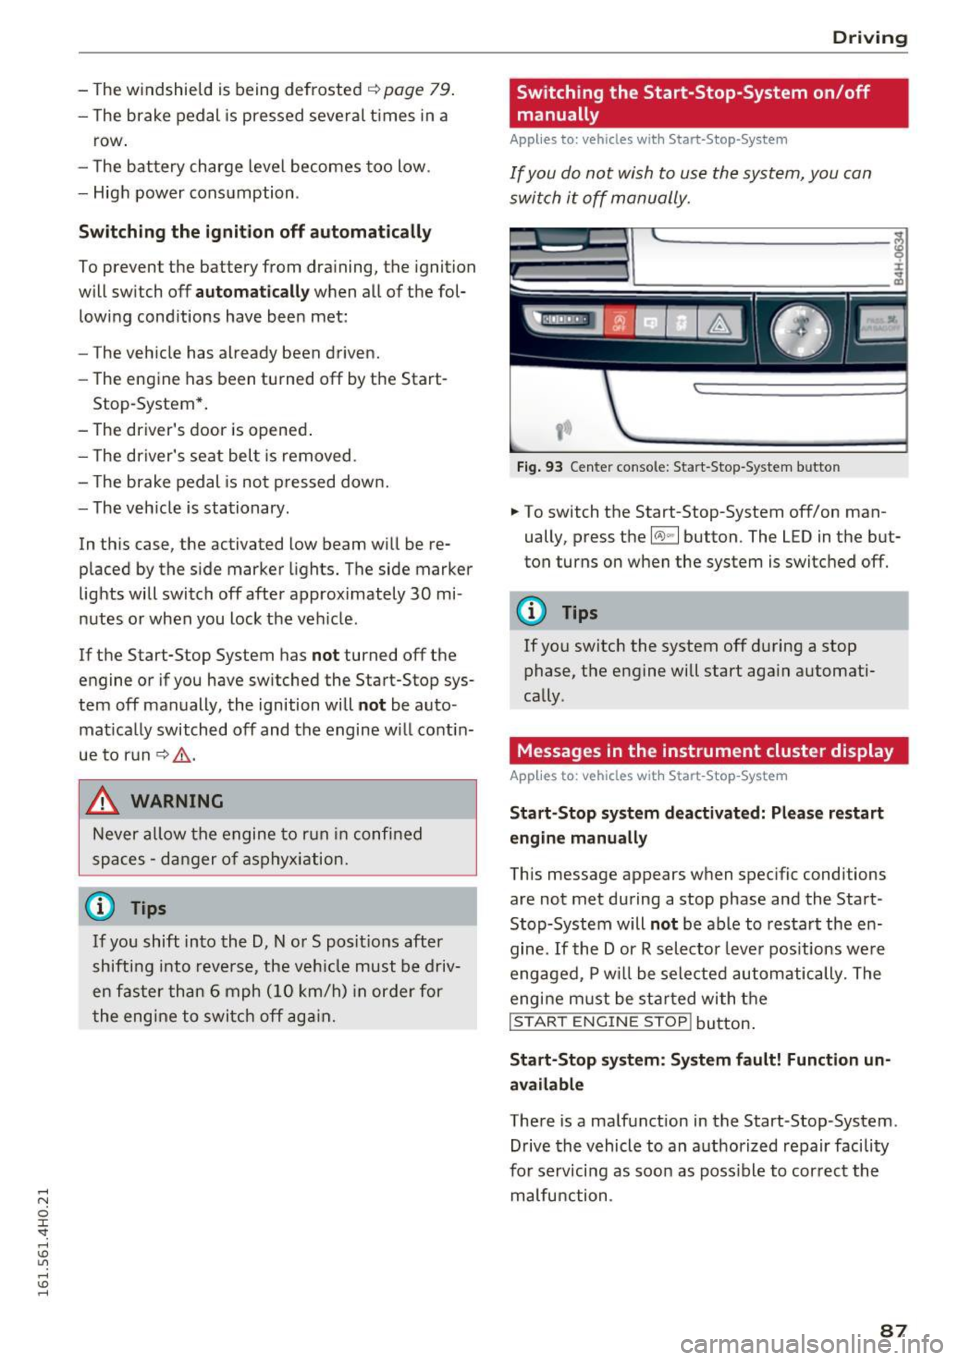
Fi g. 93 Center console: Start-Stop -System button
.. To switch the Start-Stop-System off/on man
ually, press the
l(A) ~ I button. The LED in the but
ton turns on when the system is switc hed
off.
(D Tips
If you sw itch the system off during a stop
phase, the engine will start aga in automati
cally .
Messages in the instrument cluster display
Applies to: vehicles with Start-Stop -System
Start-Stop system deactiv ated: Plea se restart
engin e manually
This message appears when spec ific conditions
are not met during a stop phase and the Start
Stop-System will
not be able to resta rt the en
gine.
If the Dor R selector leve r pos itions we re
engaged, P w ill be sele cted automatically. The
engi ne m ust be st arted wi th t he
I START ENGINE STOP! button .
Start-Stop s yst em : S y stem fault! Function un
available
There is a malfunction in the Start-Stop-System.
Drive the vehicle to an a uthorized repair facility
for serv icing as soo n as poss ible to cor rec t the
malfunction .
87
Page 90 of 302
Driving
Speed warning system
Introduction
The speed warning system helps you to stay un
der a specified maximum speed .
The speed warning system warns you if you are
exceeding the maximum speed that you have set .
You will hear a warning tone when your speed ex
ceeds the stored value by approximately 3 mph
(3 km/h). An indicator light . (USA models) .
(Canada models) in the instrument cluster dis
p lay also tur ns on at the same time. The indicator
light •• turns off when the speed decreases
be low the stored maximum speed.
Setting a threshold is recommended if you would
like to be reminded when you reach a certa in
maximum speed. Situations where you may want
to do so include driving in a country with a gener
al speed limit or if there is a specified maximum
speed for winter tires.
(D Tips
Even though your vehicle is equipped with a
speed warning system, you should still watch
the speedometer to make sure you are not
driving faster than the speed limit.
Setting the threshold
You con set, change and delete the threshold in
the MMI.
.,. Select:
ICARI function button > Car systems
contro l button > Driver assist > Speed warning.
You can set any threshold between 20 mph (30
km/h) and 150 mph (240 km/h). Settings can
each be adjusted in increments of S mph (10 km/
h).
88
Cruise control system
Switching on
The cruise control system makes it possible to
drive at a constant speed starting at 20 mph (30 km/h) .
0
f
®l
0
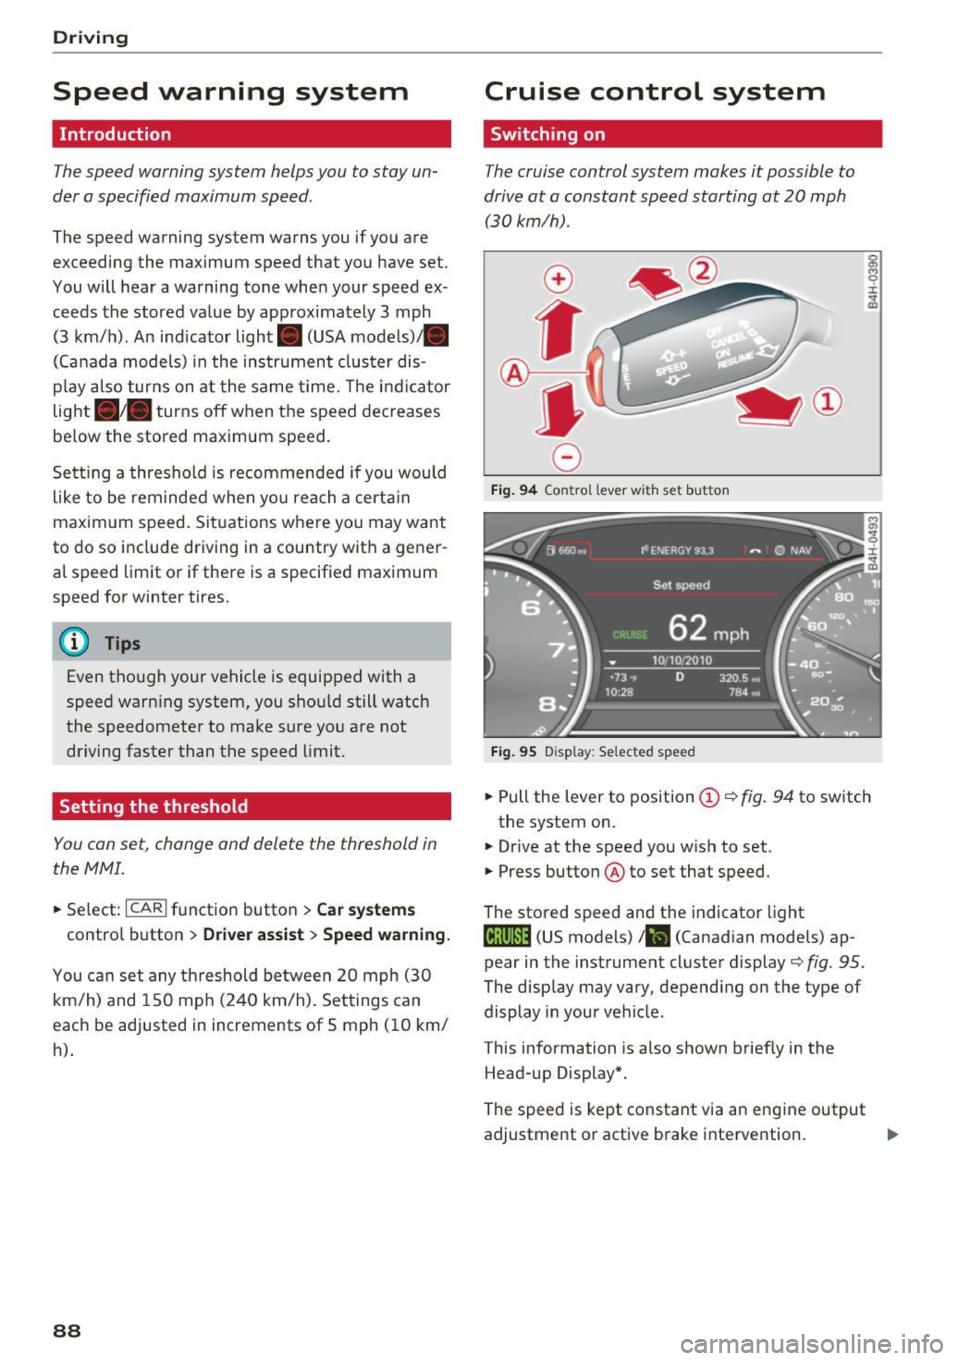
Fig. 94 Contro l lever wi th se t but ton
Fig. 95 D isp lay : Selected speed
g M 0 ±
~
.,. Pull the lever to position (D <::> fig . 94 to switch
the system on.
.,. Drive at the speed you wish to set .
.,. Press button @to set that speed .
The stored speed and the indicator light
Iij;\1)~14 (US models) !Bl (Canadian models) ap
pear in the instrument cluster display
c> fig. 95.
The display may vary, depending on the type of
display in your vehicle.
This information is also shown briefly in the
Head-up Display*.
The speed is kept constant via an engine output
adjustment or active brake intervention. ..,_