start stop button AUDI A8 2018 User Guide
[x] Cancel search | Manufacturer: AUDI, Model Year: 2018, Model line: A8, Model: AUDI A8 2018Pages: 356, PDF Size: 54.71 MB
Page 83 of 356
lL t:0 ....
"' ......
"' .... 0 0 :c '
parking brake
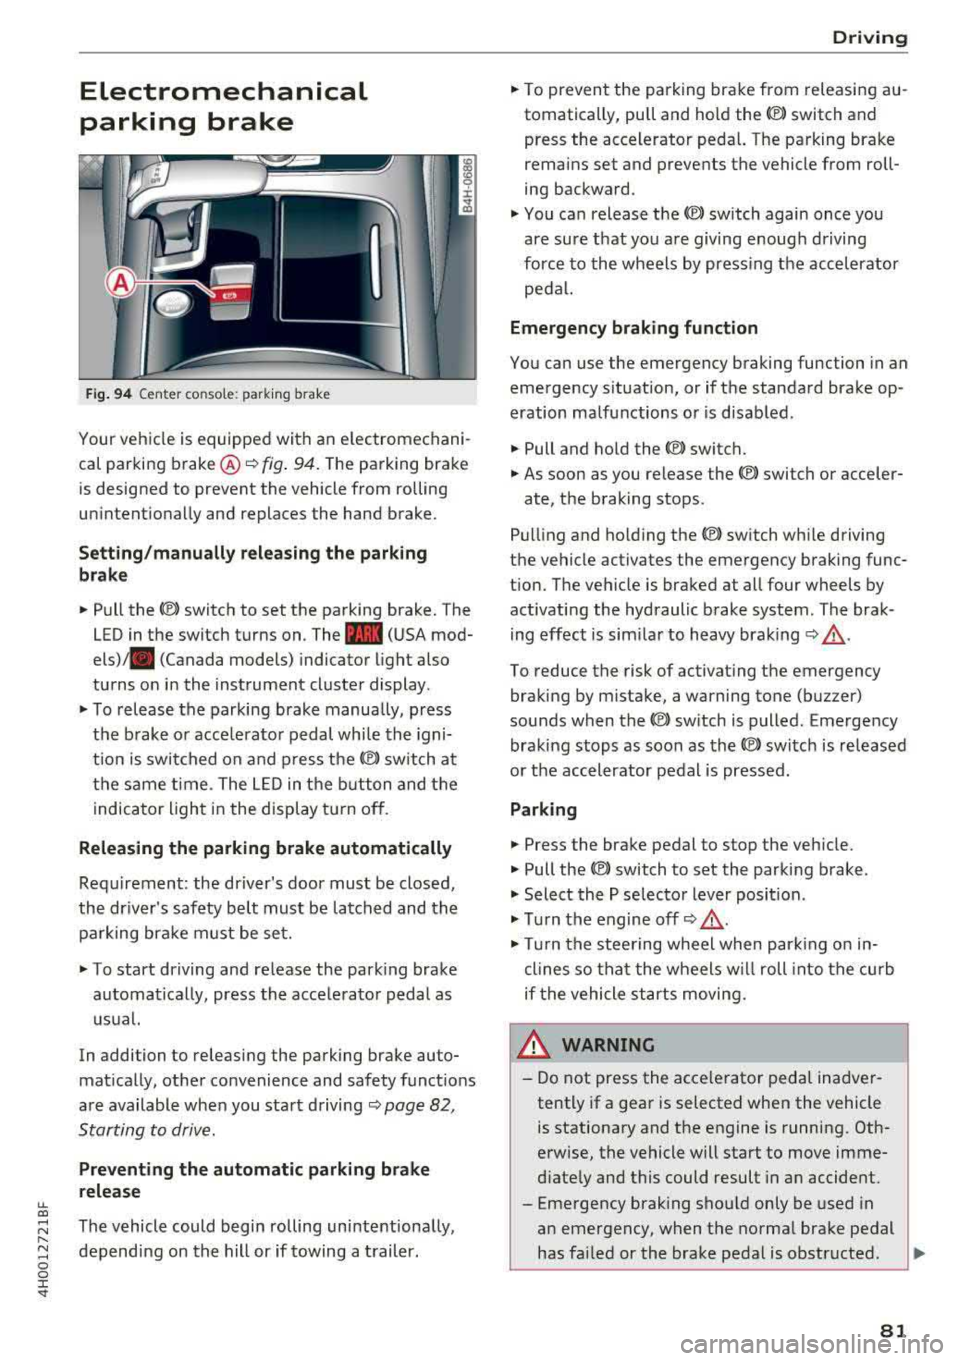
Fig. 94 Center console: parking brake
Your vehicle is equipped with an electromechani
cal parking brake ®
i=)fig. 94. The parking brake
is designed to prevent the vehicle from rolling
unintentionally and replaces the hand brake.
Setting/manually releasing the parking
brake
.. Pull the C®> switch to set the parking brake. The
LED in the switch turns on. The
-(USA mod
els) . (Canada models) indicator light also
turns on in the instrument cluster display.
.. To release the parking brake manua lly, press
the brake or acce lerator pedal while the igni
t ion is switched on and press
the(®) switch at
the same time. The LED in the button and the
indicator light in the display turn off.
Releasing the parking brake automatically
Requirement: the driver's door must be closed,
the driver's safety belt must be latched and the parking brake must be set.
.. To start driving and release the parking brake
automatically, press the accelerator pedal as
usual.
In addition to releasing the parking brake auto
matically, other convenience and safety functions
are available when you start driving
i=)page 82,
Starting to drive.
Preventing the automatic parking brake
release
The vehicle could begin rolling unintentionally,
depending on the hill or if towing a trailer.
Driving
.. To prevent the parking brake from releasing au
tomatically, pull and hold the<®> switch and press the accelerator pedal. The parking brake
remains set and prevents the vehicle from roll
ing backward .
.,. You can release the<®> switch again once you
are sure that you are giving enough driving
force to the wheels by pressing the accelerator
pedal.
Emergency braking function
You can use the emergency braking function in an
emergency situation, or if the standard brake op
eration malfunctions or is disabled.
.. Pull and hold the<®> switch.
.. As soon as you release the <®> switch or acceler-
ate, the braking stops.
Pulling and ho lding
the(®) switch while driving
the vehicle activates the emergency braking func
tion. The vehicle is braked at all four wheels by activating the hydraulic brake system. The brak
ing effect is similar to heavy braking
i=) ,& .
To reduce the risk of activating the emergency
braking by mistake, a warning tone (buzzer)
sounds when the
<®l switch is pulled. Emergency
braking stops as soon as
the© switch is released
or the accelerator pedal is pressed.
Parking
.. Press the brake pedal to stop the vehicle.
.. Pull the<®> switch to set the parking brake .
.,. Select the P selector lever position .
.,. Turn the engine off i=) ,&.
.,. Turn the steering wheel when parking on in
clines so that the wheels w ill roll into the curb
if the vehicle starts moving.
8_ WARNING
-Do not press the acce lerator pedal inadver
tently if a gear is selected when the vehicle
is stationary and the engine is running. Oth
erwise, the vehicle will start to move imme
diately and this could result in an accident.
-Eme rgency braking should only be used in
an emergency, when the normal brake pedal
has failed or the brake pedal is obstructed .
.,.
81
Page 87 of 356
u. co ..... N
" N ..... 0 0 :c '
lect the R or P posit ions w hile d riving.
- Power is sti ll transmitted to the w heels
when the eng ine is r unning at idle. To pre
vent the veh icle from "creeping", you must
keep your foot on the brake i n all se lector
lever posi tions (except P and N) when the
eng ine is ru nning. Do not inadvertent ly
press the acce le ra to r pedal whe n the veh icle
is sta tionary. Oth e rw ise the vehicle will s tart
to move immed iate ly, even if t he pa rking
bra ke is set . This could r esult in a crash.
- B efore open ing the hood, se lect t he P s ele c
to r leve r pos it ion and se t the pa rk ing br ake.
T his red uces the r is k of an accident. Always
read and fo llow the applicable warnings
¢ page 2 72, Working in the engine com
partment.
- Never leave yo ur vehicle with the engine
running wh ile in gear. If yo u must leave
yo ur vehicle when the engine is ru nning, set
the parking brake and move t he se lector lev
er to the P pos ition .
(D Tips
If you accidentally se lect N w hile driving, take
your foot off the acce lerato r peda l and wa it
for the engine to s low down to idle before se
lect ing Dor S.
Driving tips
Starting the engine
.,. T he selector lever must be in the P or the N po
s it ion.
St arting from a stop
.. Press and hold the brake pedal.
.. Start the engine¢ page 76.
.. Press the button o n the selector lever and se
lect the D, Sor R selector lever pos ition
¢ page 83 .
.,. Wait a moment unt il the t ransm iss ion shifts .
Yo u will no tice a slight movement when t he
gear engages.
.. Release t he brake pedal and press the acce le ra
tor pedal
¢ ,&. .
Driving
Various convenience functions are available for
starting on hi lls
¢ page 82.
Stopping temporarily
.,. Press the bra ke pedal to stop the ve hicle, for
examp le a t a tra ffic lig ht. Do not press the ac
celerator pedal when doing this .
.. To prevent the vehicle from ro ll ing when you
start driving, set the pa rking brake when stop
ping on steep
hills ¢&. and ¢@ .
.. The parking brake will release automat ically
and the vehicle will start movi ng once you press
the accelerator pedal.
Stopping /par king
If the selector lever is not in the P position when
you open the driver's door, the vehicle cou ld roll.
The message
V ehicle may roll! Selector le ver not
in P
appears.
.. Press and hold the b rake peda l¢ ,&. .
.. Set the park ing brake.
.. To engage the P selector lever position, press
the button on the selector lever and shift into
the P position ¢ page 83 .
Under certain conditions, such as driving in the
mountains or when towing a trai ler, it may be
helpful to switch to manual mode temporar ily
and shift manually to adapt to the drivi ng cond i
tions ¢ page 86 .
On hills, activate the park ing brake first and then
shift into the P
position ¢ page 81 . This prevents
too much stress from being p laced on the lock ing
mechan ism .
.&, WARNING
- The vehicle can roll even if t he ignit ion is
sw itche d off .
- D o not press the acce le rato r peda l when
cha ng ing the se lec to r lever posi tion while
t he ve hicle is s ta ti onary and the engi ne is
r u nning . This could result in a crash.
- T o redu ce the r is k of an accident, neve r se
lec t the R o r P posi tions while driv ing.
- P owe r is still tr ansmit ted to t he wheels
when the engine is runn ing at idle . T o pr e
vent the vehicle from "creepi ng", yo u must
-
85
Page 93 of 356
u. co .... N
" N .... 0 0 :c '
When driv ing with a trailer, activate the trailer
mode of the air suspension. Switch the air sus
pension trailer mode on when you are towing a
trailer . This will limit the regulation by the air
suspension while driving. Select in the MMI:
ICARI function button> (Car)* systems control
button >
Vehicle settings > Air susp.: towing >
On.
Coolant temperature
The coolant temperature gauge ¢ page 9 must
be observed carefully . The coolant temperature
can increase if you dr ive on long inclines in a low
gear at h igh engine speeds . Reduce your speed
i mmed iately if the LEDs in the top part of the dis
p lay turn on.
For more information about ind icator lights, re
fer
to . ¢ page 20.
A WARNING
Anyone not properly restrained in a moving
veh icle is at a much greater risk in an acci
de nt. Never let anyone ride in you r car who is
not properly wearing the restraints p rovided
by Audi.
Trailer towing
information
Important to know
-
Your ve hicle handles different ly when towing a
tra ile r because of the additiona l we ight and dif
ferent weight distribution . Safety, performance
and economy wi ll greatly depend on how careful
l y you load your trailer and operate your rig.
Before you actually tow your trailer, practice
turning, stopping and backing up in an area away
from traffic . Keep practicing until you have be
come comp letely familiar with the way your vehi
cle-trailer combination behaves and responds.
Backing up is difficult and requires practice .
Backing up with a trailer generally requires steer
ing action opposite to that when backing up your
vehicle without a trailer.
Trailer towing
Maintain a greater distance between your vehicle
and the one in front of you . You will need more
room to stop . To compensate for the trailer, you
will need a larger than normal turning radius.
When passing, remember that you cannot accel
erate as fast as you normally wou ld because of
the added load. Make sure you have enough room
to pass. After passing, allow p lenty of room for
your trailer before changing lanes again.
Avoid jerky starts, sharp turns or rapid lane
c h anges.
(D Tips
-Do not tow a trailer during the break-in peri
od of your ve hicle.
-If you tow a trailer, your Audi may require
more frequent maintenance due to the ex
tra load
¢ page 336 .
Parking on a slope
Do not park on a slope with a trailer. If it cannot
be avoided, do so only after doing the following:
When parking:
.,. App ly the foot brake.
.,. Have someone place chocks under both the ve
hicle and the trailer wheels .
.,. With chocks in place, slowly release the brakes
until the wheel chocks absorb the load .
.,. Tur n the whee ls towards the curb .
.,. Apply the parking brake .
.,. Select the P selector lever posit ion.
When restarting after parking:
.. App ly the foot brake .
.. Start the engine .
.,. Select the D selector lever position.
.,. Release the parking brake and slowly pull out
and away from the wheel chocks.
.,. Stop and have someone retrieve the wheel
chocks .
(D Tips
If you move the selector lever of the automat
i c transmission to P befo re applying the park-
in g brake and before blocking the wheels, you
.,_
91
Page 95 of 356
lL t:0 ....
"' ......
"' .... 0 0 :c '
The speed warning system helps you to stay un
der a specified maximum speed.
The speed warning system warns you if you are
exceeding the maximum speed that you have set.
A warning tone will sound as soon as your speed
exceeds the stored value slightly.
The. (USA models)/ . (Canada models) indi
cator light and a message appear in the instru
ment cluster display at the same time. The
•
• indicator light and the message turn off if the
speed falls back below the stored maximum
speed.
Setting a threshold is recommended if you would like to be reminded when you reach a certain
maximum speed. Situations where you may want
to do so include driving in a country with a gener
al speed limit or if there is a specified maximum
speed for winter tires.
Setting the warning threshold
The warning threshold is set in the Infotainment
system.
.. Select: I CARI function button > Car systems
contro l button > Driver assistance > Speed
warning.
(D Tips
Regardless of the speed warning system, you
should always monitor your speed using the
speedometer and make sure you are following
the legal speed limit.
Assistance systems
Cruise control system
Switching on
The cruise control system makes it possible to
drive at a constant speed starting at 20 mph (30
km/h).
0
f
®t
0
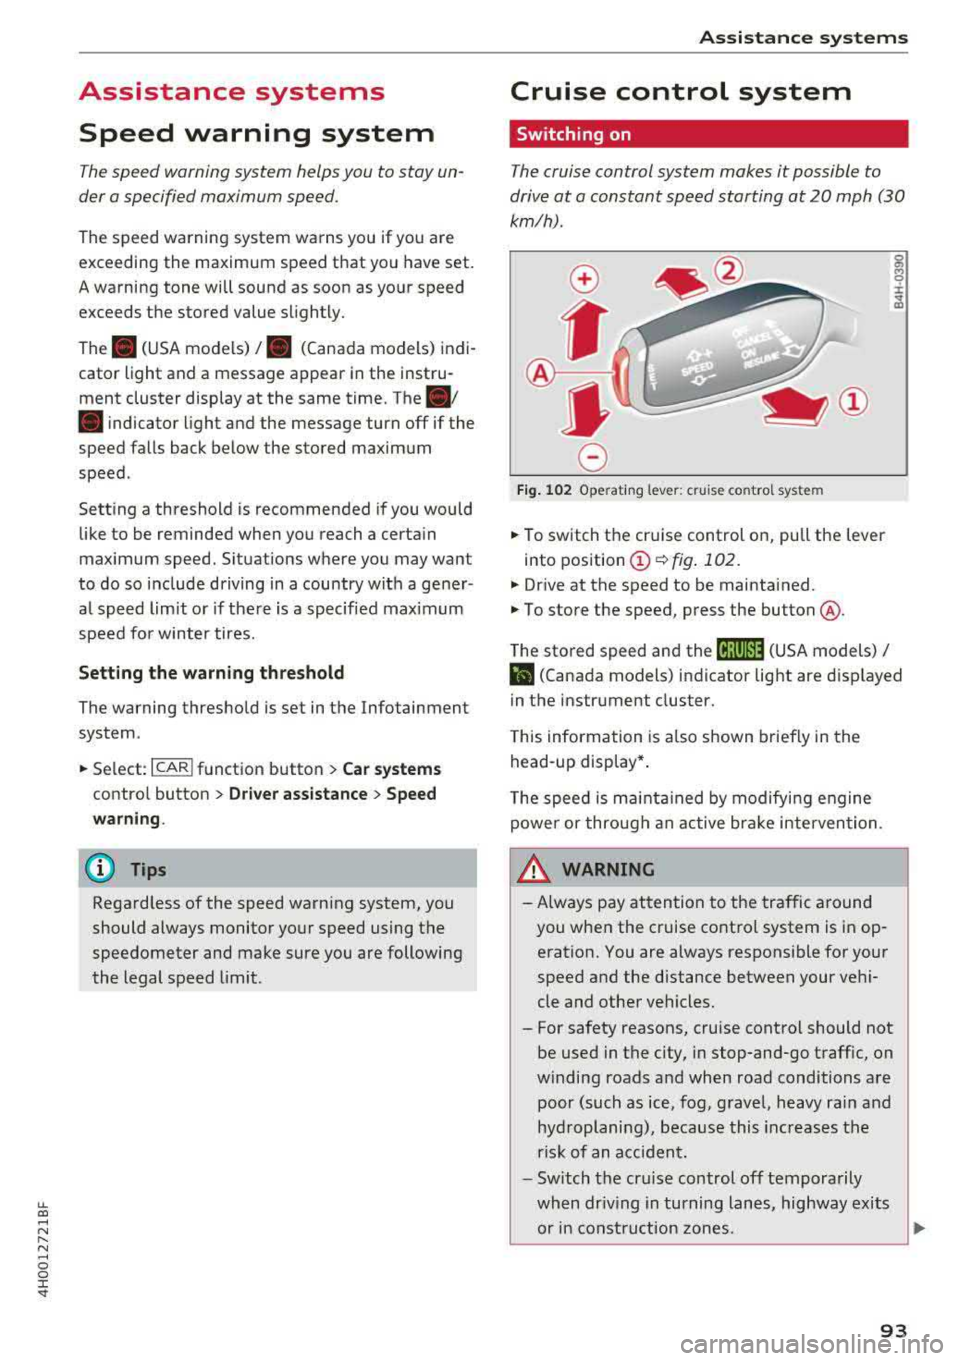
Fig. 102 Operating lever: cruise control system
g M 0 :i: ;A
.. To switch the cruise control on, pull the lever
into position
(D ¢ fig. 102.
.. Drive at the speed to be maintained.
.. To store the speed, press the button @.
The stored speed and the
(ij;ji)M~ (USA models) /
l'I (Canada models) indicator light are displayed
in the instrument cluster.
This information is also shown briefly in the
head-up display* .
The speed is maintained by modifying engine
power or through an active brake intervention.
_.&. WARNING
-
-Always pay attention to the traffic around
you when the cruise control system is in op
eration. You are always responsible for your
speed and the distance between your vehi
cle and other vehicles.
-For safety reasons, cruise control should not
be used in the city, in stop-and-go traffic, on
winding roads and when road conditions are poor (such as ice, fog, gravel, heavy rain and
hydroplaning), because this increases the
risk of an accident.
-Switch the cruise control off temporarily
when driving in turning lanes, highway exits or in construction zones.
~
93
Page 100 of 356
Ass is tance sy stem s
Switch ing adaptive cruise control off
.,. Push the lever away from you into position @
until it clicks into place . The message
ACC: off
appears.
@ Indicator lights
It -adaptive cruise cont rol is switched on . No
objects a re detected ahead . T he stored speed is
main tained.
• -an object ahead was detected. The adaptive
cru ise control system regulates the speed and
d istance to the object ahead a nd accelerates/
b rakes a utomatically .
(ii-adaptive cruise control is switched on . An
object ahead was detec ted . Your vehicle rema ins
stopped and w ill not start dr iv ing a utomat ically .
•-The automatic braking is no t enough to
maintain a sufficient distance to an object ahead .
You must
i nte rvene ~ page 100, Driver interven
tion request.
© Instrument cluster display
If adaptive cruise control is not shown in the in
strument cluster display, you can call it up usi ng
the multifunction stee ring wheel b uttons
~ page 12.
Based on the graphics in the d isplay, you can de
termine if the system is ma inta ining a distance to
the object ahead and what that distance is .
No vehicl e -no object was detected ahead.
White vehicle -an ob ject was detected ahead.
Red vehicle -request for driver intervention
~ page 100 .
Both arrow s on the scale © indicate the distance
to the object ahead. No arrow appea rs when the
ve hicl e is o n an open road and there is no obje ct
ahead. If an object is de tected ahead, the arrow
moves on the scale.
The green zo ne on the scale indicates the sto re
d istance. For information o n chang ing the d is
tance, refer to
Q page 99 . If the distan ce se
lected is exceeded or not reached, the a rrow
moves into the red zone on the sca le .
98
A WARNING
If you press the !SET ! button when driving at
speeds below 20 mph (30 km/h), the veh icle
accelerates automatically up to 20 mph (30
km/h), wh ich is the minim um speed that can
be set .
(D Tips
-If you switch the ign it ion or the adaptive
cruise control sys tem off, the set speed is
erased fo r safety reasons .
-The electronic stabilization control (ESC)
and the an ti-slip-regulat ion (ASR) are auto
matically switc hed on when the adaptive
cruise cont rol is swi tched on.
Changing the speed
Applies to: vehicles with Audi adaptive cruise control
0
f
•
0
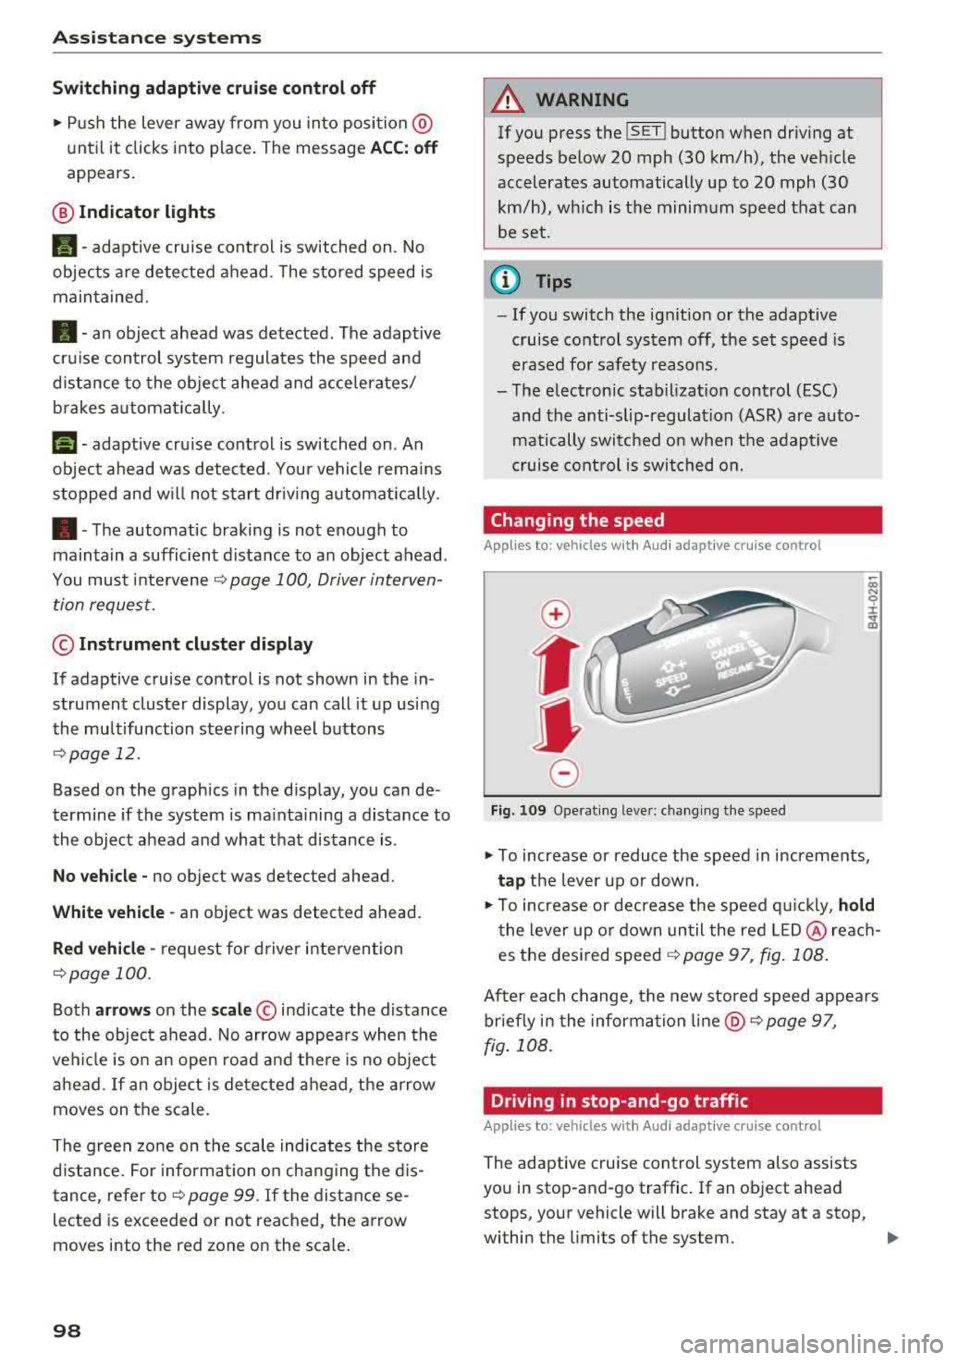
Fig. 10 9 Operat ing leve r: ch ang ing the speed
.,. To increase or reduce the speed in increments,
ta p the lever up or down .
.,. To increase or decrease t he speed q uickly, hold
t he lever up o r down un til the red LED @ reac h
es the desired
speed ~ page 97, fig. 108 .
After each change, the new stored speed appea rs
briefly in the information
li ne @ ~ page 97,
fig . 108 .
Driving in stop-and-go traffic
Applies to: vehicles with Audi adaptive cruise control
The adapt ive cru ise control system also assists
you in stop-and-go traffic . If an object ahead
stops, your vehicle will brake and stay at a stop,
within the limits of the system.
..
Page 126 of 356
Parking systems
,.. Turn the Infotainment system on and shift into
reverse gear. The parking system is turned on
and the
Cross parking view is displayed.
,.. Press the control button on the Infotainment
unit @ Q page 119, fig . 13 7. The Parallel park
ing
view is displayed .
,.. Back up and align your vehicle so the blue area
@ borders on the rear end of the vehicle be
hind yo u or on the parking space line
Q .&. in
General information on page 120,
Q (Q) in Gen
eral information on page 120 .
The blue area
rep resents an extension of the vehicle's out line
by approximately 16 ft (5 meters) to the rear.
The long s ide of the blue area should be on the
curb . The entire blue area must f it into the
parking space.
,.. With the vehicle stopped, turn the steering
wheel to the right as far as it w ill go .
,.. Back into the parking space until the b lue curve
Q fig. 150 touches the curb-=?.&. in General in
formation on page 120, ¢@ in General infor
mation on page 120.
Stop the vehicle .
,.. With the vehicle stopped, turn the steering
whee l to the left as far as it will go.
,.. Continue to back into the parking space until
the vehicle is parked parallel to the
curb¢ &.
in General information on page 120, ¢@ in
General information on page 120 .
® repre
sents the rear bumper. At the very latest, stop
the vehicle when the red orientation
line ©
borde rs an object . Keep an eye on the front of
your vehicle while doing this.
Parking next to obstacles
If there is an obstacle (such as a wall) next to the
parking space, position the vehicle so there is
mo re space on that side. Position the long side of
the blue area so that there is sufficient space
from the object. The area must not be on the
ob
stacle. You will a lso need to start turning the
steering whee l earlier. The blue curve
¢ page 119, fig . 138 must not touch the obsta
cle , but rather there should be enough distance.
@ Tips
The left or right orientation lines and surfaces
will be displayed, depending on the turn
sig
nal being used.
124
Trailer mode
Applies to: vehicles with peripheral cameras and trailer hitch
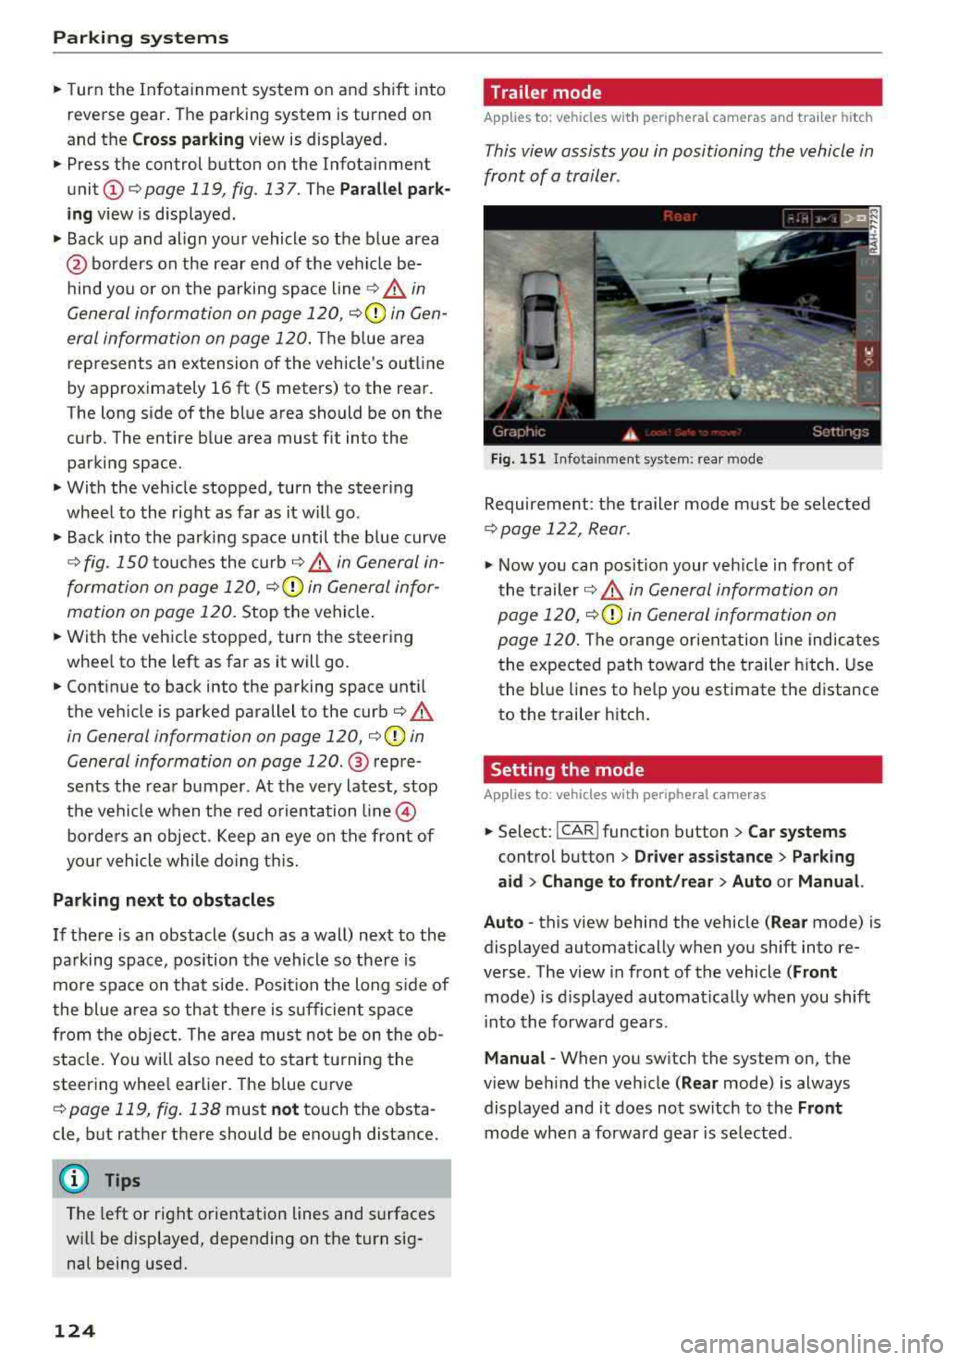
This view assists you in positioning the vehicle in
front of a trailer .
Fig. 151 In fota inment system: rear mode
Requirement: the trailer mode must be selected
¢ page 122, Rear.
.,. Now you can posit ion your veh icle in front of
the trailer
c::;, .&. in General information on
page 120,
c::;, (Q) in General information on
page 120.
The orange or ientation line indicates
the expected path toward the trailer hitch. Use
the blue lines to help you estimate the d istance
to the trailer hitch.
Setting the mode
Applies to : vehicles with peripheral cameras
,.. Select: !CAR ! function button> Car systems
control button > Driver assistance > Parking
aid > Change to front/rear > Auto or Manual.
Auto
-this view behind the vehicle ( Rear mode) is
displayed automatically when you shift into re
verse. The view in front of the vehicle
(Front
mode) is d isplayed automat ically when you shift
i nto the forward gears .
Manual -When you switch the system on, the
view beh ind the veh icle
( Rear mode) is always
displayed and it does not switch to the
Front
mode when a forward gear is se lected.
Page 168 of 356
Navigation
Navigation
Opening navigation
Applies to: vehicles with navigation system
The navigation system directs you to your desti
nation , around traffic incidents and on alterna
tive routes, if desired .
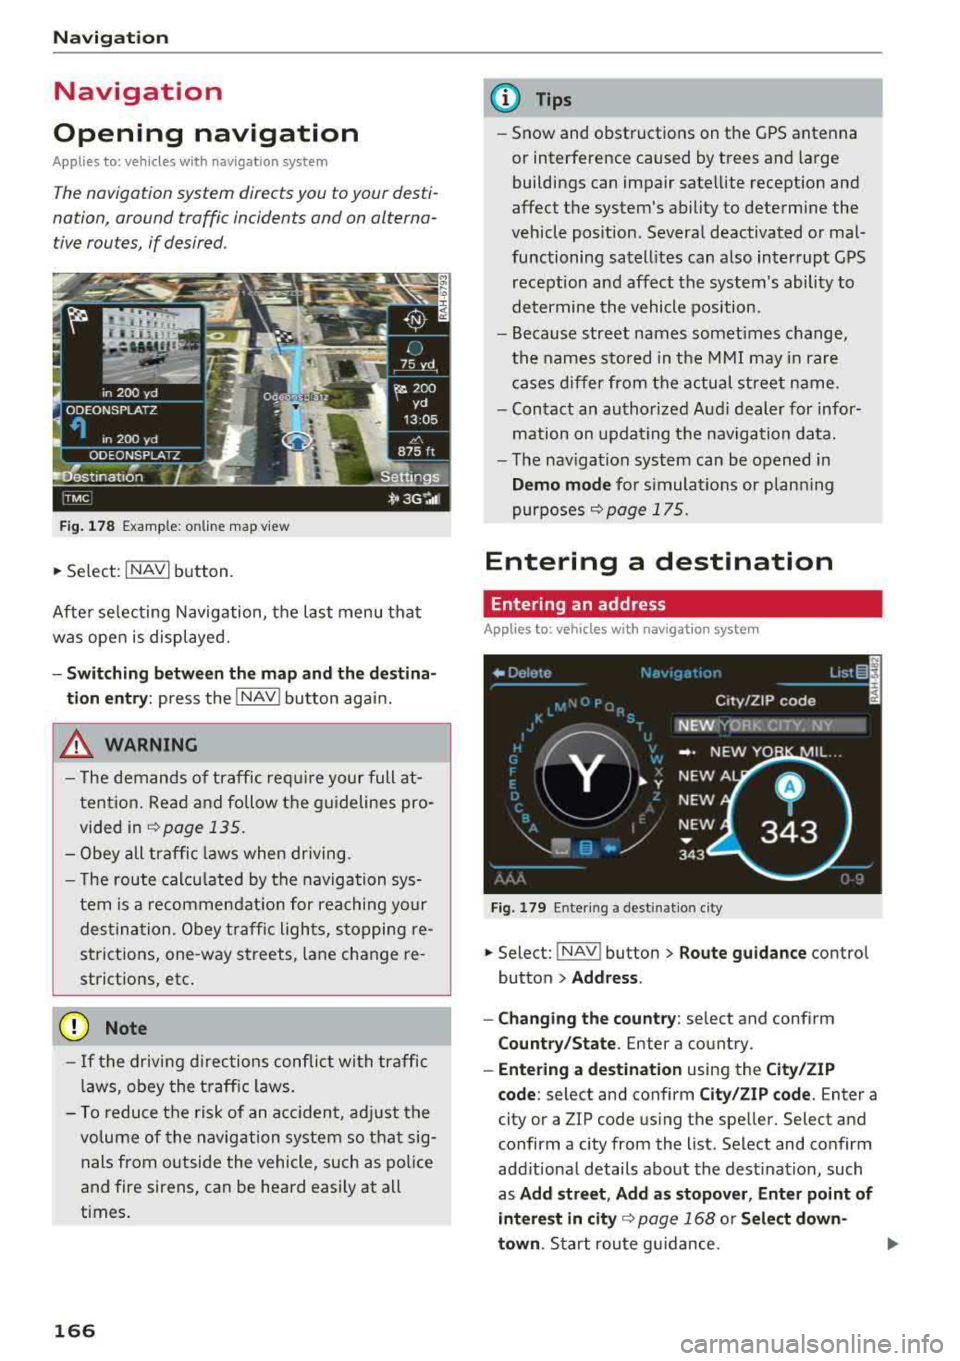
Fig. 178 Example: on lin e map v iew
.. Select : INAVI button.
After selecting Navigation, the last menu that
was ope n is displayed.
- Switching between the map and the destina
t ion entry:
press the !NAV ! button again.
,&. WARNING
-The demands of traffic require your full at
tention. Read and follow the guidelines pro
vided in
i=;,poge 135.
-Obey all traffic laws when driving.
- The route calcu lated by the navigation sys-
tem is a recommendat ion for reaching your
destination. Obey traffic lights, stopping re
strictions, one-way streets , lan e change re
strictions, etc.
@ Note
- If the driving directions conflict with traffic
laws, obey the traffic laws.
- To reduce the risk of an accident, adjust the
volume of the navigation system so that sig
nals from outside the vehicle, such as police
and fire sirens, can be heard easily at all
times.
166
.
@ Tips
- Snow and obstructions on the GPS antenna
or interference caused by trees and large
buildings can impair satellite reception and
affect the system's ability to determine the
vehicle position. Several deactivated or mal
functioning satellites can also interrupt GPS reception and affect the system's ability to
determine the vehicle position .
- Because street names somet imes change,
the names stored in the MMI may in rare
cases differ from the actual street name.
- Contact an authorized Audi dealer for infor
mation on updating the navigation data.
- The navigation system can be opened in
Demo mode for s imulations or plann ing
purposes
re;, page 175.
Entering a destination
Entering an address
Applies to : vehicles with navigat ion system
Fig . 179 En ter ing a destina tion city
.. Select: !NAV ! button > Route guidance contro l
button
> Address .
- Changing the country:
select and conf irm
Country/State . Enter a country .
- Entering a destination using the City/ZIP
code:
select and confirm City/ZIP code. Enter a
city or a ZIP code using the spe ller. Select and
confirm a city from the list. Select and confirm
add itional details about the dest ination, such
as
Add street , Add as stopover, Enter point of
interest in
city re;, page 168 or Select down
town .
Start route guidance.
Page 171 of 356
u. co .... N
" N .... 0 0 :c '
services must be met¢
page 158.
.,. Select : I NAVI button> Route guidance control
button >
Online destinations.
- Search at location or vicinity of destination/
stopover
1> : select and confirm Search in imme
diate vicinity or Search at destination/stop
over.
Enter a search term, s uch as restaurant,
and confirm the inp ut with
OK. Select and con
firm a point of interest>
Start route guidance.
- Search in new
city l): select and confirm In new
city > Find city.
Enter the name of the city and
confirm the input with
OK . Enter a search term,
such as restaurant, and confirm the input with
OK . Select and confirm a point of interest>
Start route guidance.
- Finding destinations from myAudi account
2>:
select and confirm Find destination from
myAudi account .
Enter the myAudi PIN for
your myAud i account, if necessary . The contacts
stored in the myAudi account a re displayed.
You only need to enter the
myAudi PIN one
time . You will rece ive the
myAudi PIN in yo ur
myAudi account once you have assigned a vehi
cle to the account. Select and confirm a con
tact. Se lect and confirm a private or business
navigation destination >
Start route guidance .
You can display additional information about on
line destinations in the
Destination details menu
¢fig . 182.
(D Tips
- For additional information on the myAudi
account, visit
www .audi.com/myAudi.
- Refer to the notes in the chapter About
Audi connect
¢ page 163.
1> Prov ider at time of printing .
2> Requ irement : yo u must have a m yAudi account set up at
my .audiusa .com. You must have a vehicle stored in your
my Audi accou nt and you must have a destinat io n sto red .
Navigation
Setting a favorite/home address as the
destination
Applies to : vehicles wi th navigat ion syste m
Favorites make it easier to enter a destination
that you use often.
Requirement: a favorite or home address must
be stored ¢
page 173.
.,. Select: !NAV ! button> Route guidance contro l
button >
Favorites.
.,. Select and confirm a favorite or t he home ad-
dress . Start route g uidance .
You can store up to ten ind iv idual desti nat ions
and your
Home address as favorites ¢ page 173.
(D Tips
- You can disp lay, find, ed it and delete your
stored favorites and home address on the
map
¢ page 173.
- Favor ites are displayed on the map at a
scale up to l.S miles (2.S km) .
Loading the last destination
Applies to: vehicles wit h navigat ion system
Your previous destinations are stored automati
cally and can be loaded directly as destinations.
.,. Select: ! NAV ! button> Route guidance contro l
button >
Last destinations .
.,. Select and confirm a previous destination from
the list. Start route guidance .
(D Tips
The list of last destinations can be deleted
¢pag e 175.
169
Page 172 of 356
Nav igatio n
Setting the home address as the
destination
A pplies to: ve hicles w ith navigation system
Start route guidance to the home address you
set simply and quickly .
Requirement: a home address must be stored
Qpoge 173 .
.. Selec t: I NAVI button > Route gu id anc e control
button
> Hom e address .
.. Start route guidance .
Transferring a destination from the
directory
A pplies to: ve hicles w ith naviga tion system
You con navigate directly to destinations in the
directory.
Requirement: the directory must contain con
tacts w ith private/bus iness addresses stored as
destinations.
.. Se le ct: I NAVI button > Ro ut e guidance control
button >
Dir ectory .
.. Select and confirm a contact . If a contact con
ta ins two navigation destinations (private and
business) , se lect and confirm one destination .
Start route guidance.
Entering a destination using geo
coordinates
A pp lies to : ve hicles w ith navigation system
.. Se lect : I NAVI button > Route gu idan ce control
button >
Addr ess > Coordin ates .
.. Select and confirm the Latitude and Long itud e.
Start route guida nce.
170
Entering a stopover/route plan
App lies to : vehicles wit h navigat ion system
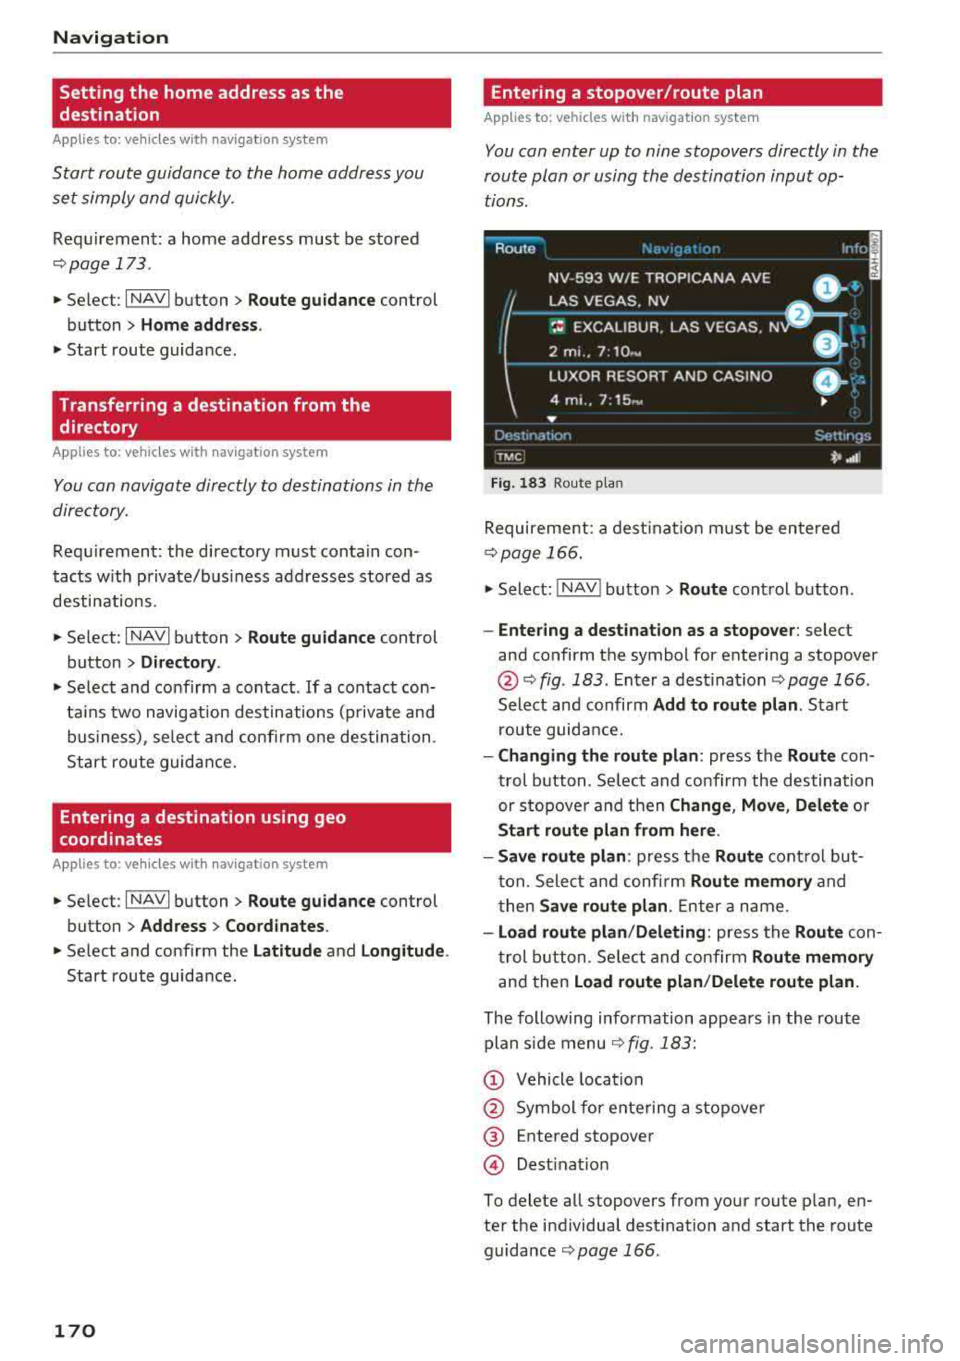
You con enter up to nine stopovers directly in the
route pion or using the destination input op tions .
Route
NV-593 W/E
::~~;~~ 'NA AVE -ln :o l
LAS VEGAS . NV ,--------- B:i----
~= EXCALIBUR . LAS VEGAS . N D I .
2 mi. , 7:10 .y
LUXOR RESORT AND CASINO • ; ·.
4 mi .. 7 : 15~, •
...
Dest1nat 1or l
TMC
Fi g. 183 Rou te p lan
Sett rr 1ys
*' .• 1
Requirement: a dest inat ion must be entered
¢ page 166.
.. Select: !N A V ! button > Route control button .
-Ente ring a de stination as a s topo ver: select
and confirm the symbol for entering a stopover
@ Q fig. 183 . Enter a dest inat ion Q page 166 .
Select and confirm Add to route plan. Start
route guidance.
- Cha nging the route plan : press the Route con
trol b utton . Se lect and confirm the destination
or s topove r and then
Change , Mo ve, Delete or
Start route plan from here .
- Save route plan :
press the Route control but
t on. Select and confi rm
Route mem ory and
t hen
S ave rout e plan . Enter a name .
-Load route plan /D ele ting : press the Route con
t rol b utton . Se lect and confirm
Route memory
and then Load route pl an/D elete rout e plan.
The following information appea rs in the route
plan s ide menu
¢ fig. 183:
Q) Vehicle location
@ Symbol for ente ring a stopove r
@ Entered stopover
@ Destinat ion
To dele te all stopove rs from your route p lan , en
ter the i ndividual dest ination and start the route
guidance
¢ page 166 .
Page 173 of 356
lL t:0 ,..,
"" ......
"" ,..,
0 0 :c '
guidance
Applies to: ve hicles with navigation system
You can a lso cancel route guidance by enter ing a
new destination
¢ page 166 .
-Starting route guidance when entering a new
destination :
select the I NAVI button > Route
guidance
control button > Enter a des tination
> Start route guidance .
- Restarting/canceling last route guidance :
se
lect the
I NAVI but ton> Route guidance control
button
> Start /Cance l.
The fo llow ing additional functions are ava ilable
when enter ing a new destination:
Display alternative routes: three route s ugges
tions are calcu lated for the destination that is
currently entered. The side menu shows informa
tion about the alternative routes , such as dis
tance to the dest inat ion and the calculated arriv
a l time .
Alternat ive routes can only be calcu lated for indi
vidual destinations .
Enter point of interest in city : allows you to
search for attractions and public places around
the specified locat ion, such as hospitals , mov ie
theaters , recreation areas, etc. The po ints of in
terest can be selected direct ly as a destination.
Select downtown : the navigation system ca lcu
l ates the ro ute to the center of the city or distr ict
that is entered .
Display destination on map : the destination en
tered is disp layed on the map.
1l O nly appl ies to vehicles w ithou t camer a-based speed lim it
d isp lay .
Navigation
Operating the map
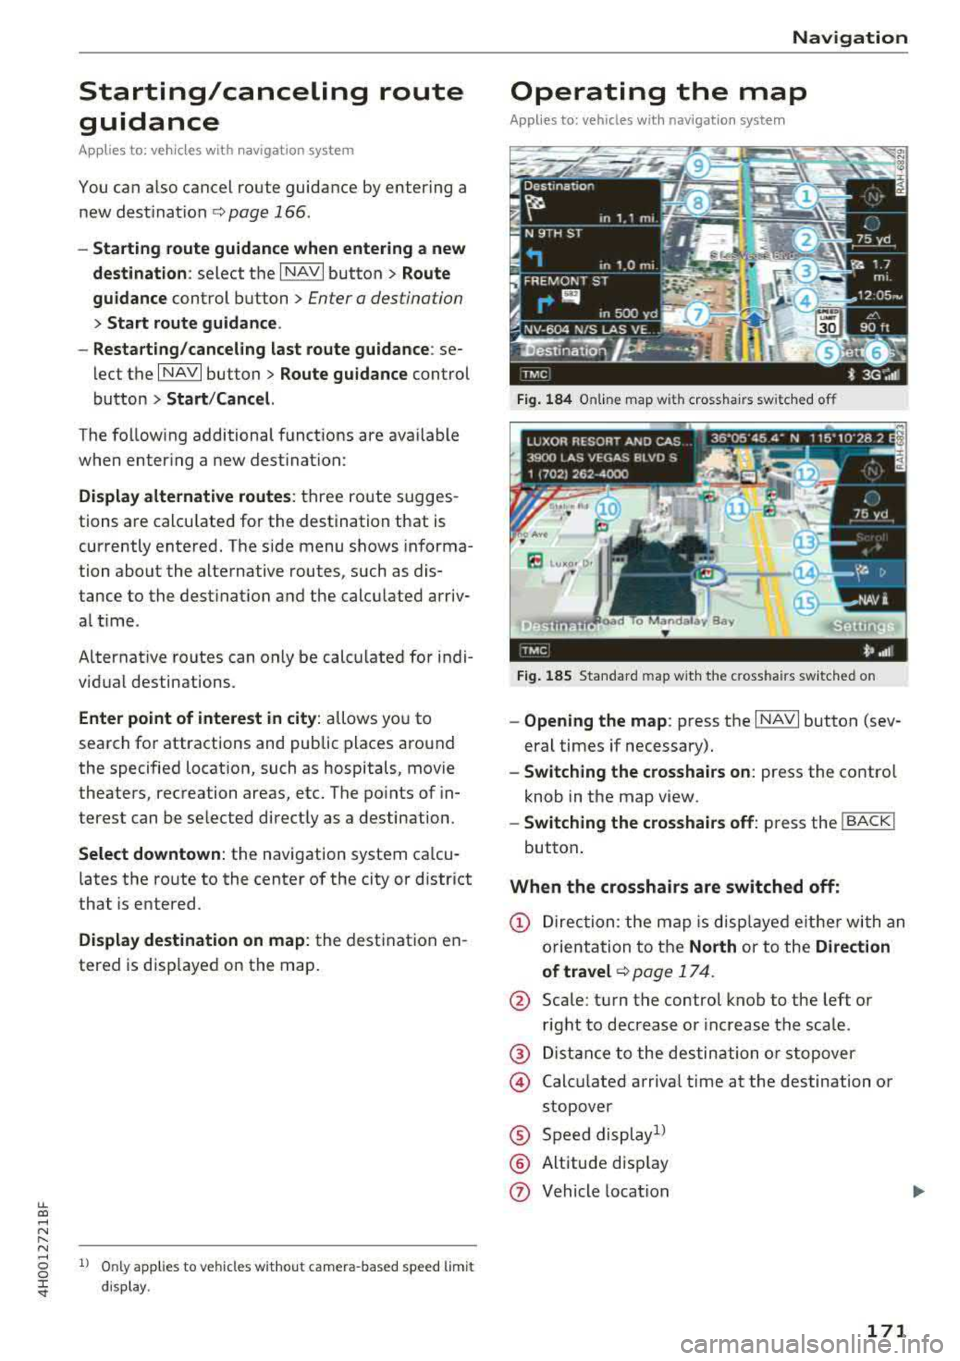
Appl ies to: vehicles with navigation system
Fig. 184 Online map wit h crossha irs sw itched off
Fig. 185 Standard map wit h the c ross hair s sw itched o n
-Opening the map : press the I NAVI button (sev
eral times if necessary).
- Switching the crosshairs on: press the contro l
knob in the map view.
- Switching the crosshairs off: press the I BACK I
button.
When the crosshairs are switched off:
(D Direction : the map is displayed eith er with an
orientation to the
North or to the Direction
of
travel ¢ page 174.
@ Scale: turn the control knob to the left or
right to decrease or increase the scale .
@ Distance to the destination or stopover
@ Calcu lated arriva l time at the destination or
stopover
® Speed display1l
® Altitude d isp lay
(J) Vehicle location
171