ESP AUDI A8 2020 Owners Manual
[x] Cancel search | Manufacturer: AUDI, Model Year: 2020, Model line: A8, Model: AUDI A8 2020Pages: 360, PDF Size: 95.38 MB
Page 5 of 360
4N0012721BD
Table of contents
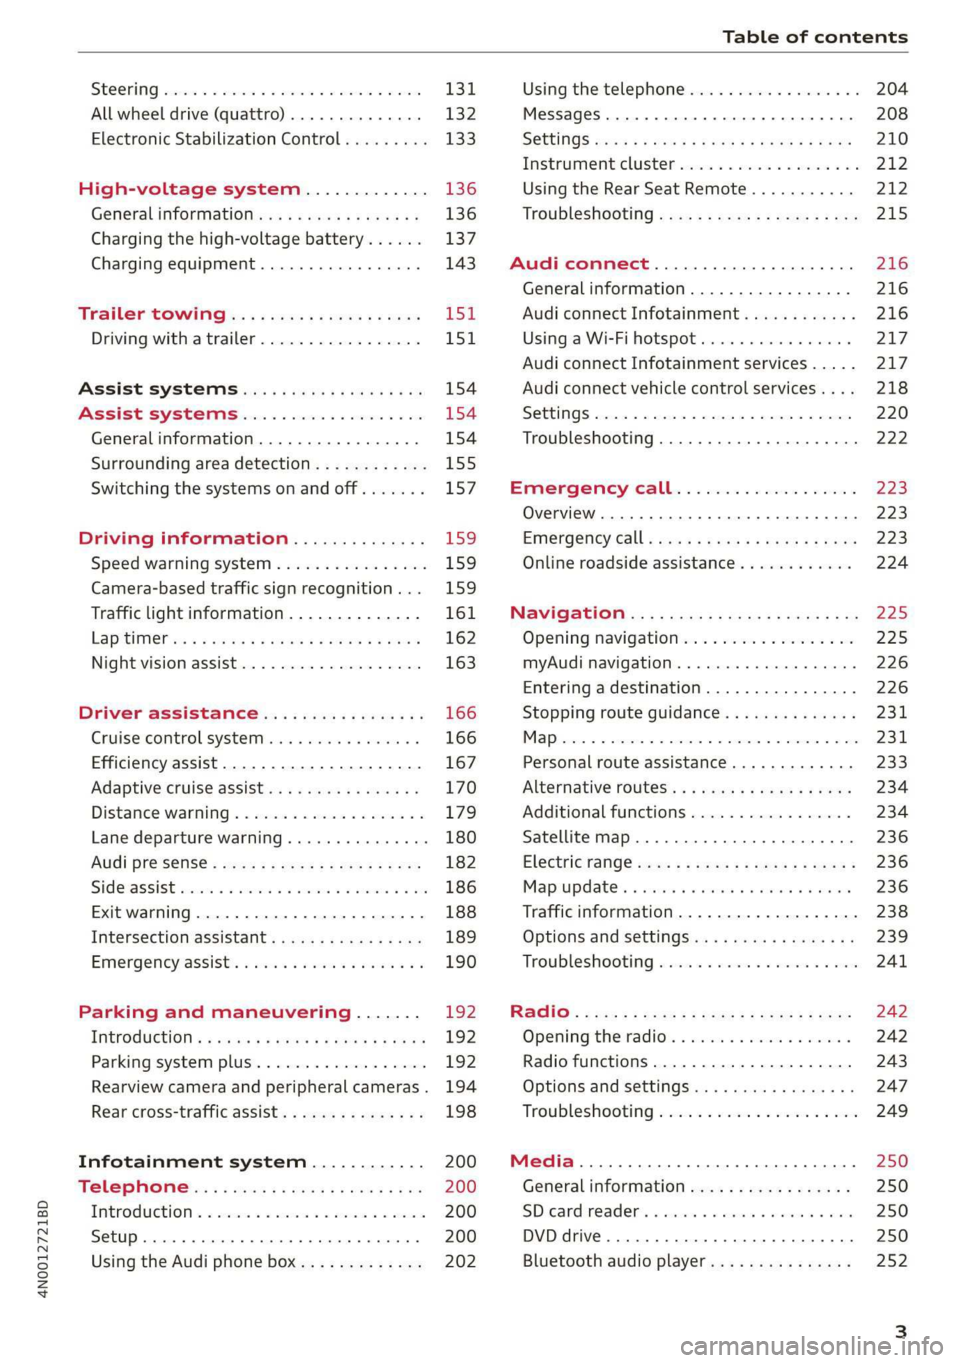
SEOOKING assess © & secwens + + anes ww ceawien Hewes 131
All wheel drive (quattro).............. 132
Electronic Stabilization Control......... 133
High-voltage system............. 136
General information...........0..5.5 136
Charging the high-voltage battery...... 137
Charging equipment................. 143
TANS COWINIG ss 5 & cews 4c ous ce ewe LSL
Driving with atrailer................. 151
Assist systems.................0. 154
Assist systems................... 154
Generalinformation................. 154
Surrounding area detection............ 155
Switching the systems on and off....... 157
Driving information.............. 159
Speed warning system................ 159
Camera-based traffic sign recognition... 159
Traffic light information.............. 161
LAP Mer as « 2 eons x = nevos ¢ 6 aus ¢ 8 em 162
Night vision assist..............-.04. 163
Driver assistance................. 166
Cruise control system.............0-5 166
Efficiency assist.............02--004. 167
Adaptive cruise assist............00-. 170
Distance Warning « « wse« 6 3 sone se eee oa LID:
Lane departure warning.............4. 180
Audi presense............-.22+--05- 182
Side@rassist esses: sv vows © v ememe © 2 suman 2 eae 186
Exit warning ...........-.....2.0000. 188
Intersection assistant................ 189
Emergeneyassists. «ican & wacen 3 3 woes ¥ 5 190
Parking and maneuvering....... 192
INEFODUCKION « » sey: x « caus 4 2 wasn 4 & Rees 192
Parking system plus...............00. 192
Rearview camera and peripheral cameras. 194
Rear cross-traffic assist... 2.2.2.0... 198
Infotainment system............ 200
TELEBNOMEs: 5 «ees & Cees 4 e oeew eee 200
IMtrOdUGEION « 2 asaces < a asomee x a wma Sewanee 200
Setup... eee eee ee eee 200
Using the Audi phone box............. 202
Using the telephone.................. 204
MessageS ... 0... cece cece eee eee 208
SOCtinGS eva 3 x espa o Kae 5s BER Bo ee 210
Instrument:cluster css vo evn ee ween eae 212
Using the Rear Seat Remote........... 212
Troubleshooting «<< <= eccn ss yews sp es 215
Audi connect..................0.. 216
Generalinformation................. 216
Audi connect Infotainment............ 216
Using a Wi-Fi hotspot................ 217
Audi connect Infotainment services..... 217
Audi connect vehicle control services.... 218
SCttINGS come
EMe@ngency CALL. « «ccc 6 i cs 6 vee « 223
Overview... ... 0. eee eee eee 223
Emergency Call « cas « wean s + gee os pee 223
Online roadside assistance............ 224
Navigation....................005- 225
Opening navigation.................. 225
myAudi navigation...............000% 226
Entering adestination................ 226
Stopping route guidance.............. 231
MapPinceins i + cxanees i ¥ scree © sammee @ =m ommeae #0 oe 2231.
Personal route assistance............. 233
Alternative routes...............000- 234
Additional functions................. 234
Satellite map......... 0... eee eee eee 236
Eleetric'rangeé acc sv sees 5 ¢ eee se Hews: 236
Mapiupdater, « sss + a cssmee + & nen «5 enaens 236
Traffic information................00- 238
Options aNd 'SEtNGS is « x see s x sews 4 vs 239
Troubleshooting wees «= wer = o wees ov eee 241
Ragios: sce ¢ = nae ¢ ¢ seuss 2 2 eeu 2 2 eee 242
Opening the radio...............000. 242
Radio functions.................0-4. 243
Options and settings...............0. 247
Troubleshooting esc 2 2 wee ts wie oo wee 249
Media............ cc eee eee 250
Generalinformation................. 250
SD card reader... ..... cc eee eee eee 250
DVD drive... 2... eee eee eee 250
Bluetooth audio player............... 252
Page 7 of 360
4N0012721BD
About this Owner's Manual
This Owner's Manual applies to all versions of
this model. It contains important information,
tips, suggestions, and warnings for using your ve-
hicle.
KEEP THIS GUIDE
Keep this manual and any other applicable docu-
ments in your vehicle at all times. This is espe-
cially important if you loan your vehicle to others
or sell it.
This owner's manual describes the equipment
range specified for this model at the time of
printing. Individual equipment options described
may only be available at a later date or may only
be offered in certain countries.
Some sections in this manual do not apply to all
vehicles. When this is the case, the beginning of
the section indicates the validity, for example
“Applies to: vehicles with speed warning sys-
tem”. Optional or vehicle-specific equipment is
also identified with an asterisk “*”.
The illustrations in this manual are a guide.
Some of the details in your vehicle may differ
from the illustration.
All directions, such as “Left”, “right”, “front” and
“rear”, are based on the vehicle's direction of
travel.
* — Optional equipment or vehicle-specific equip-
ment
» The section continues on the next page.
=> A\ Cross reference to a “WARNING” within a
section. If a page number is indicated, the
WARNING is located outside of the section.
ZA WARNING
Text with this symbol contains information
about safety and how to reduce the risk of se-
rious personal injury or death.
@) Note
Text with this symbol contains information
about reducing the risk of damage to your ve-
hicle.
(@) For the sake of the environment
Text with this symbol contains information on
protecting the environment.
@) Tips
Text with this symbol contains additional use-
ful information.
Page 24 of 360
Touch displays
> To adjust the placement of the buttons in the
quick access bar, pull them to the desired posi-
tion in the bar.
> Press Done to complete the configuration.
@ Tips
The position of © cannot be adjusted.
Display area
You can freely change the location of the buttons
on the home screen display area.
Configuring the display area
> Press and hold a button on the home screen
display area.
> To adjust the placement of the buttons, pull
them to the desired locations.
> Press Done to complete the configuration.
Switching between menu pages
If a menu contains multiple menu pages, fabatm |S
displayed in the display area. The white bar
shows the location of the current menu page.
> To switch between menu pages, swipe your fin-
ger to the right or left.
Off Of o8
O88 of af
C8 Oo of
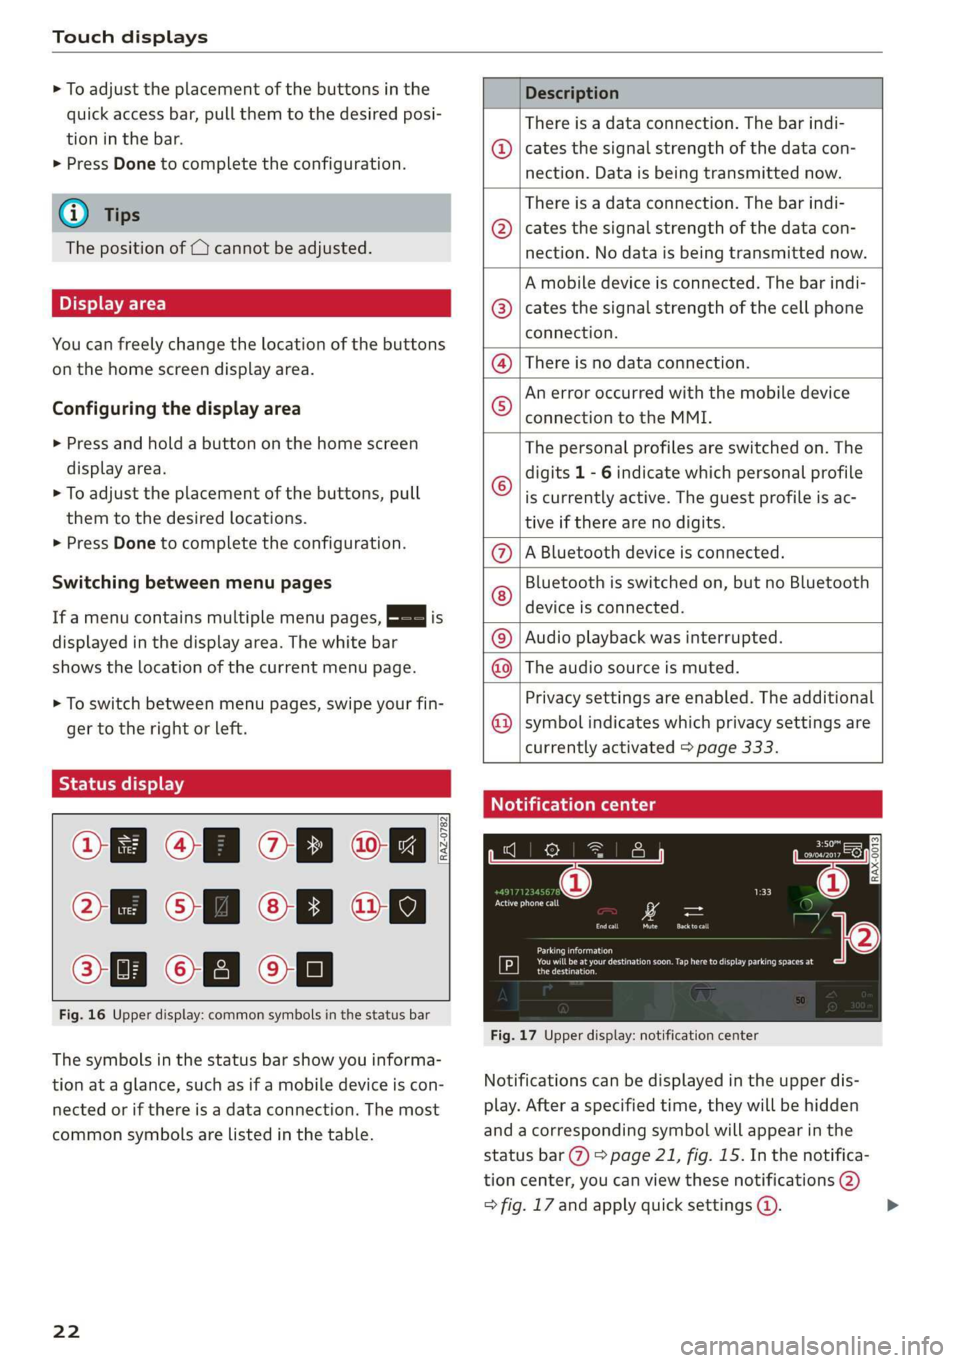
Fig. 16 Upper display: common symbols in the status bar
[RAZ-0782
The symbols in the status bar show you informa-
tion at a glance, such as if a mobile device is con-
nected or if there is a data connection. The most
common symbols are listed in the table.
22
Description
There is a data connection. The bar indi-
cates the signal strength of the data con-
nection. Data is being transmitted now.
There is a data connection. The bar indi-
cates the signal strength of the data con-
nection. No data is being transmitted now.
A mobile device is connected. The bar indi-
cates the signal strength of the cell phone
connection.
® There is no data connection.
An error occurred with the mobile device
connection to the MMI. @
The personal profiles are switched on. The
digits 1 - 6 indicate which personal profile
is currently active. The guest profile is ac-
tive if there are no digits.
A Bluetooth device is connected.
Bluetooth is switched on, but no Bluetooth
device is connected. ©®e
©
Audio playback was interrupted.
The audio source is muted. @|©
Privacy settings are enabled. The additional
symbol indicates which privacy settings are ©
currently activated > page 333.
Notification center
ll
RAX-0013
reuse
Sear)
You will be at your destination soon. Tap here to display parking spaces at
[P] eesti
Fig. 17 Upper display: notification center
Notifications can be displayed in the upper dis-
play. After a specified time, they will be hidden
and a corresponding symbol will appear in the
status bar (2) > page 21, fig. 15. In the notifica-
tion center, you can view these notifications @)
> fig. 17 and apply quick settings @. >
Page 25 of 360
![AUDI A8 2020 Owners Manual 4N0012721BD
Touch displays
Using the notification center
> To open the notification center, pull the status
bar downward, or
> Press the E=] button on the status bar.
> To apply quick setting AUDI A8 2020 Owners Manual 4N0012721BD
Touch displays
Using the notification center
> To open the notification center, pull the status
bar downward, or
> Press the E=] button on the status bar.
> To apply quick setting](/img/6/57606/w960_57606-24.png)
4N0012721BD
Touch displays
Using the notification center
> To open the notification center, pull the status
bar downward, or
> Press the E=] button on the status bar.
> To apply quick settings, press the respective
symbol (@).
> To obtain additional information about a notifi-
cation, press it.
> To delete a notification, pull it toward the right
edge of the screen.
> If there are more than four notifications in the
notification center, the older notifications will
be hidden. To display the older notifications,
drag
your finger upward on the screen.
Setting displayed content
You can set whether some notifications should be
displayed.
> To set the displayed content, press &@, or
> Applies to MMI: Select on the home screen:
SETTINGS > Notifications.
> Select and confirm which notifications should
be displayed.
Possible quick settings
Symbol Description
Apply sound settings
Open menu settings
Manage connected devices
Manage personal profiles
Set date and time
= Set displayed content in the noti-
fication center
Depending on the vehicle equipment, you can op-
erate various functions in the function bar.
Description
Switch Start/Stop system on or
off
Applies to: Plug-in hybrid drive:
Selecting the driving mode
Symbol Description
Opens the garage door opener
function
Press: adjust sunshade
Press and hold: convenience
opening and closing
Press: shows settings for the
head-up display
Press and hold: switches the
head-up display on or off
Press: switches the upper display
on or off
Press and hold: switches both dis-
plays on or off
Shortcuts
By creating shortcuts, you have quick access to
various items, such as radio stations, frequently
used contacts, or vehicle settings.
Adding shortcuts
The «++ buttons in the upper display indicate, for
example, if a selected radio station can be added
to the shortcuts. Depending on the context, you
may also be able to add items from a list to the
shortcuts.
> Press «+» or press and hold an item ina list.
> Press Save as a shortcut. The selected item will
be added to the shortcuts on the lower display
and
displayed as a tile.
Using shortcuts
> Press the ac! @) > page 21, fig. 15 button in the
function bar on the lower screen. The saved
shortcuts will be displayed or hidden.
> To access the stored function, press the respec-
tive tile.
Moving or deleting shortcuts
> Press and hold a shortcut on the lower display.
> To adjust the order of the shortcuts, drag a
shortcut to the desired location.
> To delete a shortcut, press ®.
23
Page 28 of 360
![AUDI A8 2020 Owners Manual Touch displays
Lea TN]
Applies to: vehicles with Rear Seat Remote
Lt
=.
S
Fig. 19 Rear Seat Remote: overview
[RAH-9143]
@ Microphone
@ Volume button (decrease/mute)
@® Volu AUDI A8 2020 Owners Manual Touch displays
Lea TN]
Applies to: vehicles with Rear Seat Remote
Lt
=.
S
Fig. 19 Rear Seat Remote: overview
[RAH-9143]
@ Microphone
@ Volume button (decrease/mute)
@® Volu](/img/6/57606/w960_57606-27.png)
Touch displays
Lea TN]
Applies to: vehicles with Rear Seat Remote
Lt
=.
S
Fig. 19 Rear Seat Remote: overview
[RAH-9143]
@ Microphone
@ Volume button (decrease/mute)
@® Volume button (increase)
@ Speaker
©) Display
Using the holder
Applies to: vehicles with Rear Seat Remote
[RAH-9144)
Fig. 20 Rear center armrest/full-length center console:
Rear Seat Remote holder
Depending on the equipment, the Rear Seat Re-
mote may be located in the rear center armrest
or on the full-length center console.
Removing the Rear Seat Remote
> To release the Rear Seat Remote, press the A
button @.
26
>» Remove the Rear Seat Remote from the holder
using both hands > A\ in Introduction on
page 25.
Securing the Rear Seat Remote
> Hold the Rear Seat Remote in both hands so
that the volume buttons @) and @) > page 26,
fig. 19 face upward.
> Carefully press the Rear Seat Remote toward
the holder until the Rear Seat Remote locks in-
to place.
Charging the battery
Applies to: vehicles with Rear Seat Remote
Requirement: the ignition must be switched on.
> To charge the battery, secure the Rear Seat Re-
mote in the holder > page 26. The battery will
charge automatically.
@) Note
The Rear Seat Remote battery is permanently
installed and may only be replaced by an au-
thorized Audi dealer or authorized Audi Serv-
ice Facility. If the battery replacement is not
done correctly, it may cause malfunctions and
increase the risk of damaging the Rear Seat
Remote.
@ Tips
— Batteries have a limited service life. If the
operating time decreases significantly, the
battery should be replaced. Contact an au-
thorized Audi dealer or authorized Audi
Service Facility if you need a new battery.
— The Rear Seat Remote is equipped with an
intelligent battery management system to
provide a long battery service life. There-
fore, the battery may not be charged to its
full capacity, especially when temperatures
are high or low.
Page 34 of 360
Touch displays
@) Note
— Only use microSD cards (0.43 in x 0.59 in
(11 mmx 15 mm)). If a card of a different
size is inserted in the card reader instead of
a microSD card, do not under any circum-
stances remove this card yourself due to the
risk of card reader damage. Contact an au-
thorized Audi dealer or authorized Audi
Service Facility.
— There is a risk of damaging the Audi tablet if
you use an SD card adapter, because vibra-
tions can cause the microSD card to fall out
of the adapter while driving.
Charging the battery
Applies to: vehicles with Audi tablet
Requirement: the ignition must be switched on.
> To charge the battery, secure the Audi tablet in
the holder > page 30. The battery will charge
automatically. The charge level is shown in the
status display 2) > page 33, fig. 28.
©) Note
The Audi tablet battery is permanently instal-
led and may only be replaced by an authorized
Audi dealer or authorized Audi Service Facili-
ty. If the battery replacement is not done cor-
rectly, it may cause malfunctions and increase
the risk of damaging the Audi tablet.
G) Tips
— Batteries have a limited service life. If the
operating time decreases significantly, the
battery should be replaced. Contact an au-
thorized Audi dealer or authorized Audi
Service Facility if you need to have the bat-
tery replaced.
— The Audi tablet is equipped with an intelli-
gent battery management system to pro-
32
vide a long battery service life. Therefore,
the battery may not be charged to its full
capacity, especially when temperatures are
high or low.
Se mate mele) (alee Rol
Applies to: vehicles with Audi tablet
You can turn the Audi tablet on and off manually.
If the Audi tablet is not used for a certain
amount of time, the screensaver or standby
mode activates.
Turning on or off manually
> To turn the Audi tablet on, press and hold the
> page 30, fig. 23 button (@ briefly.
> To turn the Audi tablet off, press and hold the
= page 30, fig. 23 button @ until a menu ap-
pears. Press () Switch off.
Turning on from standby mode
> Press the button @) & page 30, fig. 23.
Hiding the screensaver
Requirement: the Audi tablet must be in the
holder.
> Touch the display at any location %) > page 30,
fig. 23.
Gi) Tips
— The MMI switches off automatically if the
engine is not running and the vehicle bat-
tery is low. If the Audi tablet is in the hold-
er, it will also switch off.
—If the MMI, the MMI Wi-Fi hotspot, or the
Audi tablet Wi-Fi is turned off, only the non-
vehicle applications and functions will be
available.
— For some services, it may be necessary to
set up an account with the respective serv-
ice provider before use.
Page 35 of 360
4N0012721BD
Touch displays
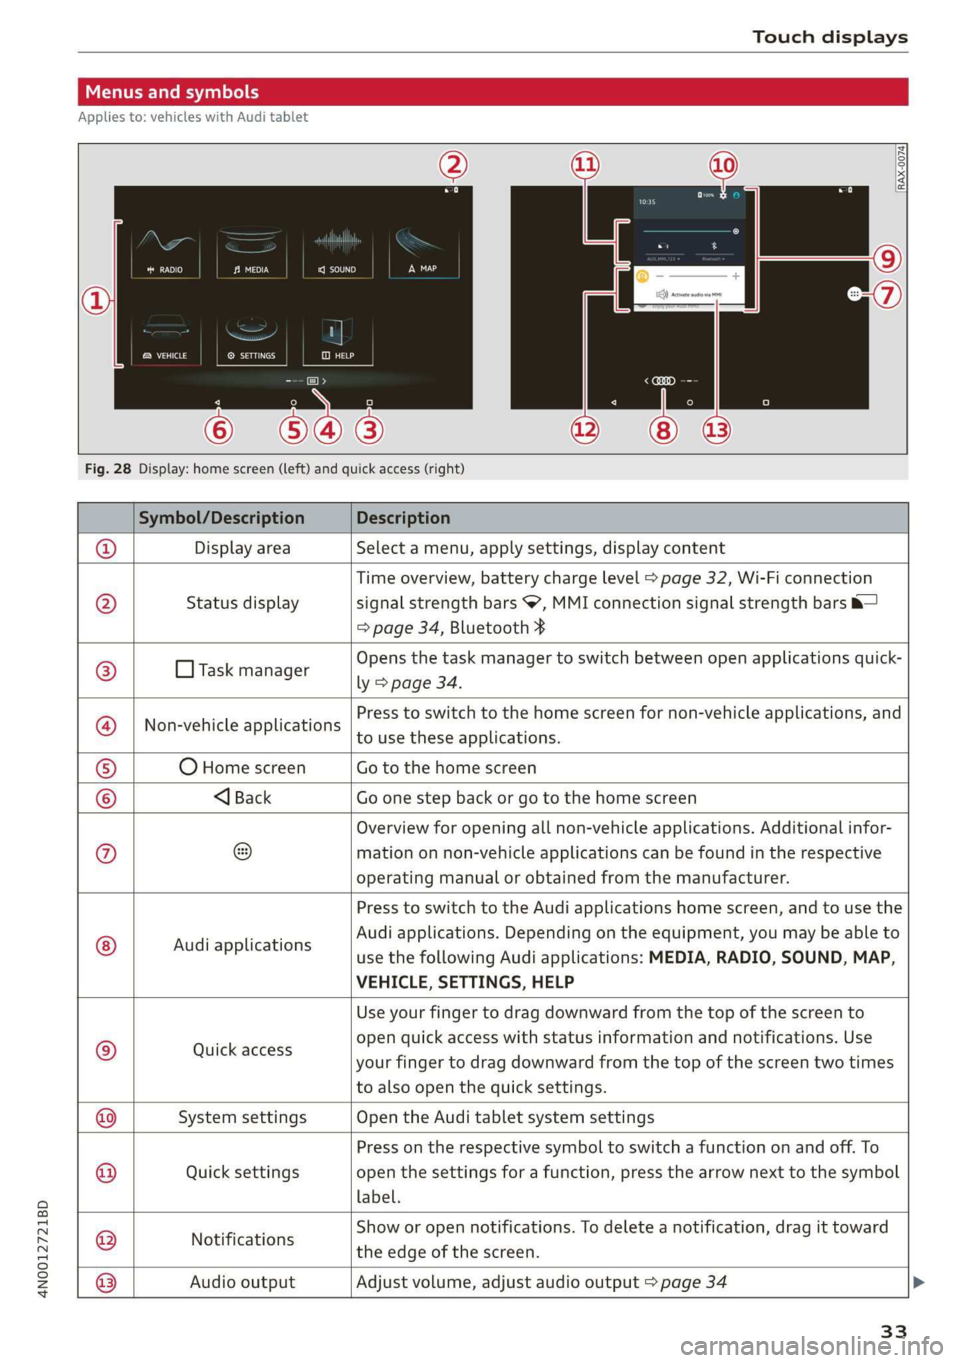
Menus and symbols
Applies to: vehicles with Audi tablet
emsa || | cea
Rats ® SETTINGS
Cy
Fig. 28 Display: home screen (left) and quick access (right)
Symbol/Description Description
Display area Select a menu, apply settings, display content
Status display
Time overview, battery charge level > page 32, Wi-Fi connection
signal strength bars , MMI connection signal strength bars &—
=> page 34, Bluetooth ¥
O Task manager
Opens the task manager to switch between open applications quick-
ly > page 34.
Non-vehicle applications
Press to switch to the home screen for non-vehicle applications, and
to use these applications.
O Home screen Go to the home screen
®@
Ef
©|e|
©
|}
<1 Back Go one step back or go to the home screen
Overview for opening all non-vehicle applications. Additional infor-
mation on non-vehicle applications can be found in the respective
operating manual or obtained from the manufacturer.
© Audi applications
Press to switch to the Audi applications home screen, and to use the
Audi applications. Depending on the equipment, you may be able to
use the following Audi applications: MEDIA, RADIO, SOUND, MAP,
VEHICLE, SETTINGS, HELP
Quick access
Use your finger to drag downward from the top of the screen to
open quick access with status information and notifications. Use
your finger to drag downward from the top of the screen two times
to also open the quick settings.
@|
©
System settings Open the Audi tablet system settings
Quick settings
Press on the respective symbol to switch a function on and off. To
open the settings for a function, press the arrow next to the symbol
label.
Notifications
Show or open notifications. To delete a notification, drag it toward
the edge of the screen.
@|O|]
©
Audio output
Adjust volume, adjust audio output > page 34
33
Page 36 of 360
Touch displays
Switching between Audi applications and
non-vehicle applications
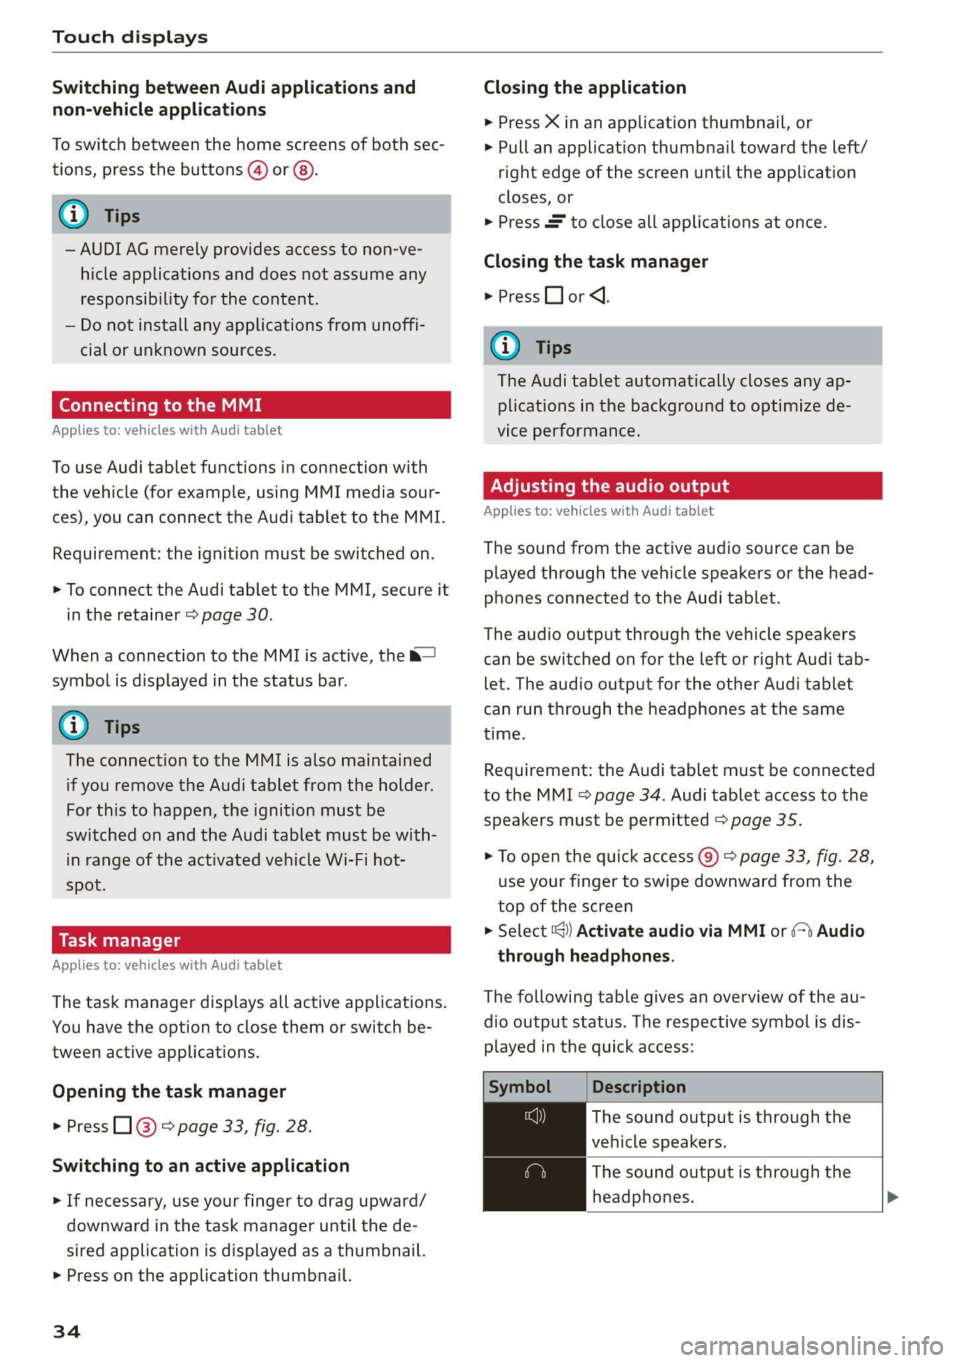
To switch between the home screens of both sec-
tions, press the buttons @) or @).
@) Tips
— AUDI AG merely provides access to non-ve-
hicle applications and does not assume any
responsibility for the content.
— Do not install any applications from unoffi-
cial or unknown sources.
Connecting to the MMI
Applies to: vehicles with Audi tablet
To use Audi tablet functions in connection with
the vehicle (for example, using MMI media sour-
ces), you can connect the Audi tablet to the MMI.
Requirement: the ignition must be switched on.
> To connect the Audi tablet to the MMI, secure it
in the retainer > page 30.
When a connection to the MMI is active, the &—
symbol is displayed in the status bar.
G) Tips
The connection to the MMI is also maintained
if you remove the Audi tablet from the holder.
For this to happen, the ignition must be
switched on and the Audi tablet must be with-
in range of the activated vehicle Wi-Fi hot-
spot.
Applies to: vehicles with Audi tablet
The task manager displays all active applications.
You have the option to close them or switch be-
tween active applications.
Opening the task manager
> Press L]@ © page 33, fig. 28.
Switching to an active application
> If necessary, use your finger to drag upward/
downward in the task manager until the de-
sired application is displayed as a thumbnail.
> Press on the application thumbnail.
34
Closing the application
> Press X in an application thumbnail, or
> Pull an application thumbnail toward the left/
right edge of the screen until the application
closes, or
> Press & to close all applications at once.
Closing the task manager
> Press LJ or <1.
G) Tips
The Audi tablet automatically closes any ap-
plications in the background to optimize de-
vice performance.
Adjusting the audio output
Applies to: vehicles with Audi tablet
The sound from the active audio source can be
played through the vehicle speakers or the head-
phones connected to the Audi tablet.
The audio output through the vehicle speakers
can be switched on for the left or right Audi tab-
let. The audio output for the other Audi tablet
can run through the headphones at the same
time.
Requirement: the Audi tablet must be connected
to the MMI & page 34. Audi tablet access to the
speakers must be permitted > page 35.
> To open the quick access @) > page 33, fig. 28,
use
your finger to swipe downward from the
top of the screen
> Select ‘@) Activate audio via MMI or (>t Audio
through headphones.
The following table gives an overview of the au-
dio output status. The respective symbol is dis-
played in the quick access:
Symbol Description
The sound output is through the
vehicle speakers.
The sound output is through the
headphones. >
Page 40 of 360
Voice recognition system
Voice recognition system
General information
Applies to: vehicles with voice recognition system
You can operate many functions in the vehicle
easily using voice commands.
Using the voice recognition system optimally
> Speak clearly and distinctly at a normal volume.
Speak louder when driving faster.
> Emphasize the words in the commands evenly
and do not leave long pauses.
> Close the doors, the windows, and the sunroof*
to reduce background noise. Make sure that
passengers are not speaking when you are giv-
ing a voice command.
> Do not direct the vents toward the hands-free
microphone, which is in the roof headliner near
the front interior lights.
> Only the driver should speak to the system, be-
cause the handsfree microphone is aimed to-
ward this seating position.
ZA\ WARNING
— Direct your full attention to driving. As the
driver, you have complete responsibility for
safety in traffic. Only use the functions in
such a way that you always maintain com-
plete control over your vehicle in all traffic
situations.
— Do not use the voice recognition system in
emergencies because your voice may change
in stressful situations. The system may take
longer to dial the number or may not be
able to dial it at all. Dial the emergency
number manually.
G) Tips
There are no voice guidance* prompts when a
dialog is active.
38
Operating
Applies to: vehicles with voice recognition system
See
Dat)
Where is a
Connect
Diala
coy
Es
ea
cog
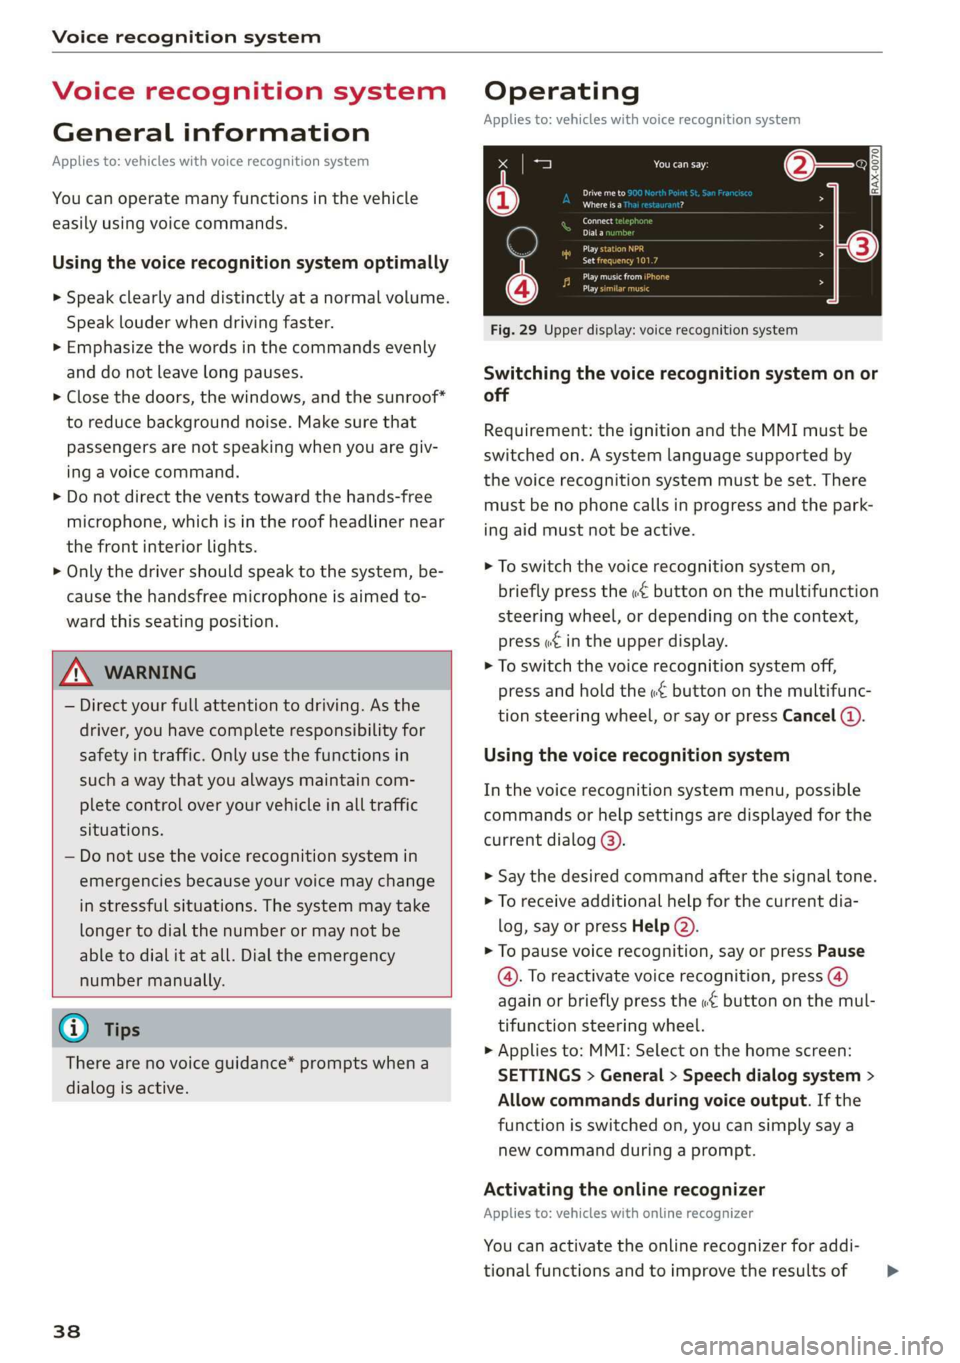
Fig. 29 Upper display: voice recognition system
Switching the voice recognition system on or
off
Requirement: the ignition and the MMI must be
switched on. A system language supported by
the voice recognition system must be set. There
must be no phone calls in progress and the park-
ing aid must not be active.
> To switch the voice recognition system on,
briefly press the «€ button on the multifunction
steering wheel, or depending on the context,
press w¢ in the upper display.
> To switch the voice recognition system off,
press and hold the « button on the multifunc-
tion steering wheel, or say or press Cancel (a).
Using the voice recognition system
In the voice recognition system menu, possible
commands or help settings are displayed for the
current dialog @).
> Say the desired command after the signal tone.
> To receive additional help for the current dia-
log, say or press Help (2).
> To pause voice recognition, say or press Pause
@. To reactivate voice recognition, press (@)
again or briefly press the «€ button on the mul-
tifunction steering wheel.
> Applies to: MMI: Select on the home screen:
SETTINGS > General > Speech dialog system >
Allow commands during voice output. If the
function is switched on, you can simply say a
new command during a prompt.
Activating the online recognizer
Applies to: vehicles with online recognizer
You can activate the online recognizer for addi-
tional functions and to improve the results of >
Page 41 of 360
4N0012721BD
Voice recognition system
voice recognition. A supported menu language
must be selected. When there is an active Inter-
net connection, the spoken command is evaluat-
ed in the vehicle and online.
> When you switch on the voice recognition sys-
tem for the first time, a menu for the online
recognizer opens. Or:
> Applies to: MMI: Select on the home screen:
SETTINGS > General > Speech dialog system >
Consent to online speech recognizer.
> Read the licensing agreements and accept
them.
Activating Amazon Alexa!)
Applies to: vehicles with Amazon Alexa integration
You can activate Amazon Alexa to access special
additional functions. A supported menu lan-
guage must be selected. A reduced number of
commands are available during this.
Requirement: you must be logged in to your
myAudi account in the vehicle. The online recog-
nizer must be activated.
> Applies to: MMI: Select on the home screen:
USER > Connect to Amazon Alexa.
> Follow the instructions in the display.
> After connecting successfully, turn on the voice
recognition system as normal > page 38,
Switching the voice recognition system on or
off, say the activation word “Alexa”, and then
say the desired command.
©) Note
Read the information about Audi connect, and
be sure to note the connectivity costs section
=@ in General information on page 216.
External voice operation
Applies to: vehicles with external speech dialog system
You can access and control the voice operation on
a connected mobile device through your vehicle.
2) AUDI AG provides access to services from third party pro-
viders. Permanent availability cannot be guaranteed, be-
cause that depends on the third party provider.
Switching external voice operation on or off
Requirement: the ignition and the MMI must be
switched on. A cell phone must be connected to
the MMI with the Handsfree profile > page 200.
The mobile device being connected must have
voice control that can be controlled externally.
There must be no phone calls in progress and the
parking aid must not be active.
> To switch on the external voice operation, press
and hold the «€ button longer on the multifunc-
tion steering wheel.
> To switch off the external voice operation, press
and hold the «€ button longer on the multifunc-
tion steering wheel or press Cancel.
Using external voice operation
> Say the desired command after the signal tone.
> To reactivate voice recognition when it is
paused, press the «¢ button briefly on the mul-
tifunction steering wheel or press Resume.
G@) Tips
AUDI AG simply provides access to control
your mobile device with voice operation and
does not assume any responsibility for the
content and commands within the external
voice control.
39