stop AUDI A8 2020 Owners Manual
[x] Cancel search | Manufacturer: AUDI, Model Year: 2020, Model line: A8, Model: AUDI A8 2020Pages: 360, PDF Size: 95.38 MB
Page 4 of 360
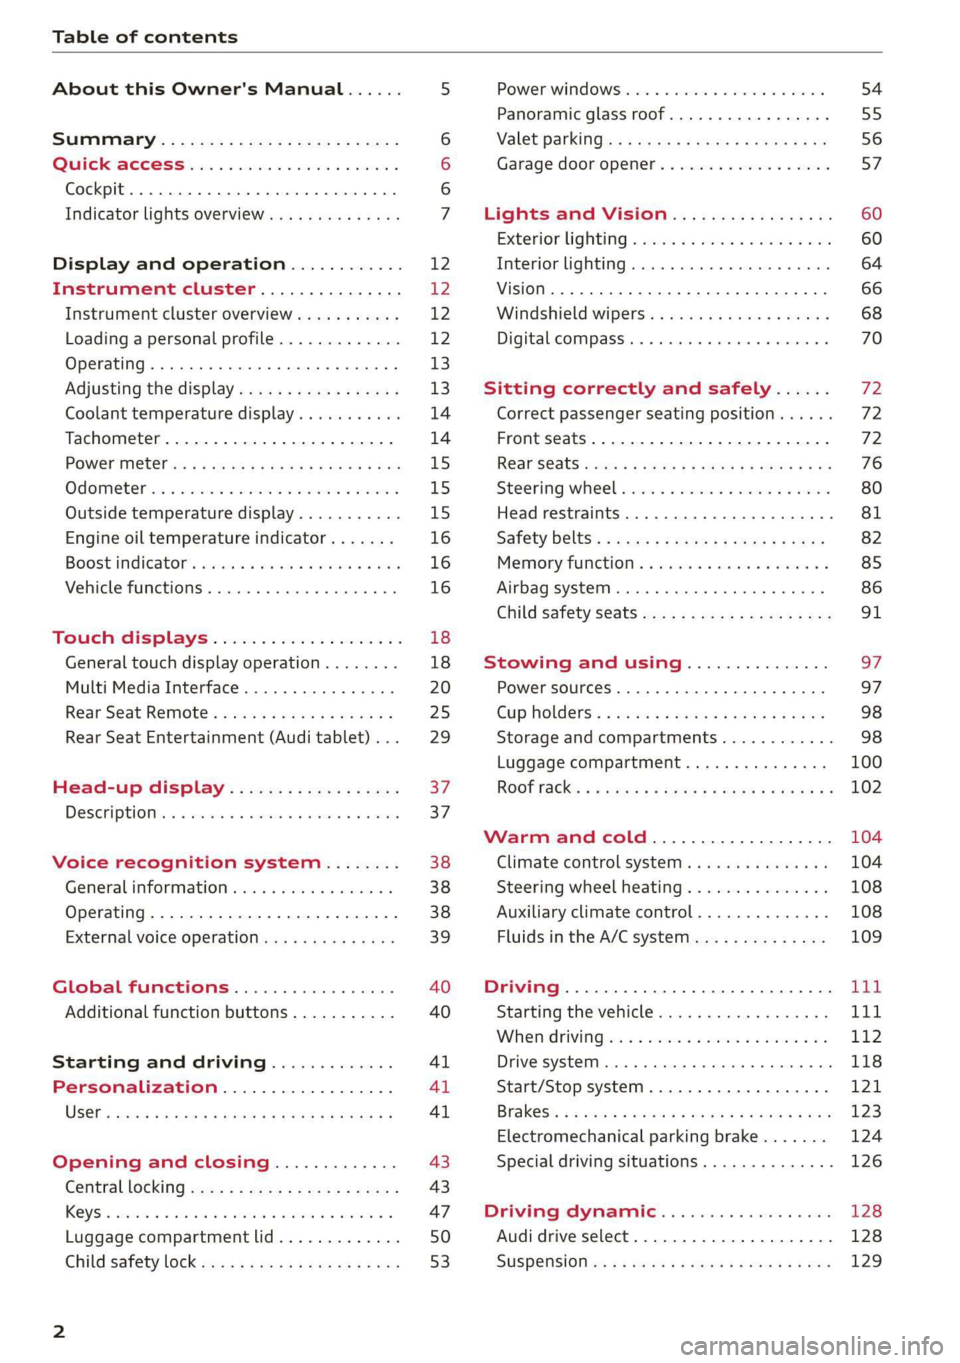
Table of contents
About this Owner's Manual......
SUMIMALY: ; « ss6% : osen ss sean cs poe s
QC CCeS Skis: si esis a 6 ores os ewe
Cockpit... 2... ee eee eee eee
Indicator lights overview...........0.
Display and operation............
Instrument cluster...............
Instrument cluster overview...........
Loading a personal profile.............
Operating. ........ 20.00. cece eee eee
Adjusting the display.................
Coolant temperature display...........
Tachometer............. eee eee eee
POWErIMEEEr ss 5 2 sags & e eaters # eee < ae
Odometer wack «sce o sesvens we oon wo ereeees
Outside temperature display...........
Engine oil temperature indicator.......
Boost indicator’. wis as caren se owen oo ocers
Vehicle functions ..............000 00
TOUCHHAISPLAYS). w:suis 6 6 sere sx eee oo
General touch display operation........
Multi Media Interface................
Rear Seat Remote « wiws s essa ss nena ss
Rear Seat Entertainment (Audi tablet) . . .
Head-up display..................
DESCRIPTION. 6 & wisn ox saosin + & asexiue 6 v sirosius
Voice recognition system........
General information.................
Operating...............0..0..0000-
External voice operation..............
Global functions.................
Additional function buttons...........
Starting and driving.............
Personalization..................
Opening and closing.............
Cenittal locking #acx <= zene es ese s eran:
NOD
OO
13
18
18
20
25
29 37 37 38 38 38 39
40 40
4l 41 Al
Power windOwS sevice vs seca ¥ & aenios 6 v aware 54
Panoramic glass roof.............0005 55
Valet parking’: s ¢ sewn s 2 seus « eee gc oe 56
Garage door opener...........--.00-- 5H
Lights and Vision................. 60
Exterior lighting « ssscs< <2 coos 2 eeeme + aes 60
Tmterior UQhting)ecoo 6. secre» «scones 6 + euniece 64
VISION... ke eee eee 66
Windshield wipers................... 68
Digital compass............... 000 eee 70
Sitting correctly and safely...... 72
Correct passenger seating position...... 72
Front seatS 1.2... . 0. e eee eee ee eee 72
REAP SEAUS sass = = seeps © ¢ syns F = sees 7 oe 76
Steering wheel wie. <6 ese oy eee ee eee 80
Head restraints ..........0.-..0000005 81
Safety belts’: « sees + ¢ weve ss wae oe eee 82
Memory function's 5 sce << seas sv evan sx 85
Airbag system... 22... ee eee eee eee 86
Child safety seats.............2..000. 91
Stowing and using............... 97.
Power SOUrCeS ... 2... ee eee eee eee 97
Cup holders’: « ssa s ¢ sews s 5 eeies & 2 wees 98
Storage and compartments............ 98
Luggage compartment............... 100
ROOTTSCK:
« = cwwea « ¢ mee 4 2 awa ts ewe ea 102
Warm and cold................... 104
Climate control system.........-.0005 104
Steering wheel heating............... 108
Auxiliary climate control.............. 108
Fluids in the A/C system.............. 109
Driving................. 0.00.00. 00. Ltt
Starting the vehicle................0- 11
When drivingjen <2 neve se eree ve sen eos 112
Drive system... 0... eee ee eee ee 118
Start/Stop system...........--00000- 121
Brakes, « s wees + pase ss pose ss meee ss TET 123
Electromechanical parking brake....... 124
Special driving situations.............. 126
Driving dynamic.................. 128
Audi drive select...............00000. 128
SUSPENSION e « « sues g « omen 3 e eee a ¥ es 129
Page 5 of 360
4N0012721BD
Table of contents
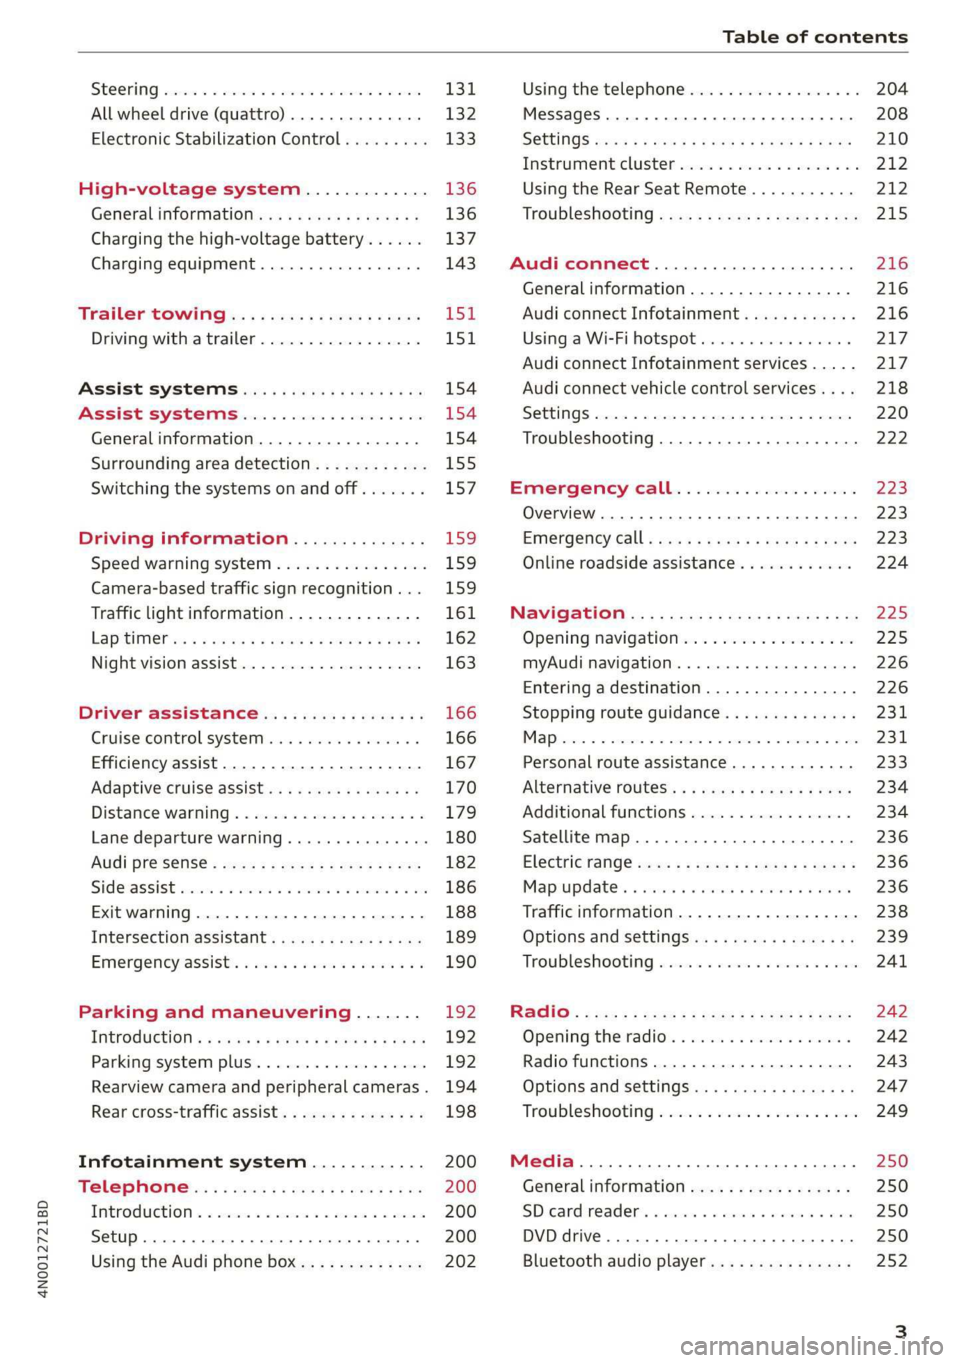
SEOOKING assess © & secwens + + anes ww ceawien Hewes 131
All wheel drive (quattro).............. 132
Electronic Stabilization Control......... 133
High-voltage system............. 136
General information...........0..5.5 136
Charging the high-voltage battery...... 137
Charging equipment................. 143
TANS COWINIG ss 5 & cews 4c ous ce ewe LSL
Driving with atrailer................. 151
Assist systems.................0. 154
Assist systems................... 154
Generalinformation................. 154
Surrounding area detection............ 155
Switching the systems on and off....... 157
Driving information.............. 159
Speed warning system................ 159
Camera-based traffic sign recognition... 159
Traffic light information.............. 161
LAP Mer as « 2 eons x = nevos ¢ 6 aus ¢ 8 em 162
Night vision assist..............-.04. 163
Driver assistance................. 166
Cruise control system.............0-5 166
Efficiency assist.............02--004. 167
Adaptive cruise assist............00-. 170
Distance Warning « « wse« 6 3 sone se eee oa LID:
Lane departure warning.............4. 180
Audi presense............-.22+--05- 182
Side@rassist esses: sv vows © v ememe © 2 suman 2 eae 186
Exit warning ...........-.....2.0000. 188
Intersection assistant................ 189
Emergeneyassists. «ican & wacen 3 3 woes ¥ 5 190
Parking and maneuvering....... 192
INEFODUCKION « » sey: x « caus 4 2 wasn 4 & Rees 192
Parking system plus...............00. 192
Rearview camera and peripheral cameras. 194
Rear cross-traffic assist... 2.2.2.0... 198
Infotainment system............ 200
TELEBNOMEs: 5 «ees & Cees 4 e oeew eee 200
IMtrOdUGEION « 2 asaces < a asomee x a wma Sewanee 200
Setup... eee eee ee eee 200
Using the Audi phone box............. 202
Using the telephone.................. 204
MessageS ... 0... cece cece eee eee 208
SOCtinGS eva 3 x espa o Kae 5s BER Bo ee 210
Instrument:cluster css vo evn ee ween eae 212
Using the Rear Seat Remote........... 212
Troubleshooting «<< <= eccn ss yews sp es 215
Audi connect..................0.. 216
Generalinformation................. 216
Audi connect Infotainment............ 216
Using a Wi-Fi hotspot................ 217
Audi connect Infotainment services..... 217
Audi connect vehicle control services.... 218
SCttINGS come
EMe@ngency CALL. « «ccc 6 i cs 6 vee « 223
Overview... ... 0. eee eee eee 223
Emergency Call « cas « wean s + gee os pee 223
Online roadside assistance............ 224
Navigation....................005- 225
Opening navigation.................. 225
myAudi navigation...............000% 226
Entering adestination................ 226
Stopping route guidance.............. 231
MapPinceins i + cxanees i ¥ scree © sammee @ =m ommeae #0 oe 2231.
Personal route assistance............. 233
Alternative routes...............000- 234
Additional functions................. 234
Satellite map......... 0... eee eee eee 236
Eleetric'rangeé acc sv sees 5 ¢ eee se Hews: 236
Mapiupdater, « sss + a cssmee + & nen «5 enaens 236
Traffic information................00- 238
Options aNd 'SEtNGS is « x see s x sews 4 vs 239
Troubleshooting wees «= wer = o wees ov eee 241
Ragios: sce ¢ = nae ¢ ¢ seuss 2 2 eeu 2 2 eee 242
Opening the radio...............000. 242
Radio functions.................0-4. 243
Options and settings...............0. 247
Troubleshooting esc 2 2 wee ts wie oo wee 249
Media............ cc eee eee 250
Generalinformation................. 250
SD card reader... ..... cc eee eee eee 250
DVD drive... 2... eee eee eee 250
Bluetooth audio player............... 252
Page 9 of 360
4N0012721BD
Quick access
— Driver assistance systems ......
@ Depending on equipment:
—Cup holders ..............0..
—Socket .........0..0 0.000000.
@0) Depending on equipment:
— Starting the engine when there is
@ MMALFUMGEION: «5 csscice 6 2 soeeane + ane
—
Audi musicinterface ..........
— Audi phone box ...............
—SDcardreader ...............
@) Electromechanical parking brake
button 2.2... 6. cece eee eee eee
@3) Automatic transmission selector
lever... 2... cece ee eee eee eee
@) [START ENGINE STOP] button ....
@4 Steering wheel adjustment ......
@5) Lever for:
— Cruise control system .........
— Adaptive cruise assist ..........
@8 Data link connector for On Board
Diagnostic System (OBD) ........
@) Buttons for:
— LIQHtS sc ss cease se wees ts ee es
—All-weather lights ............
— Rear fog lights ...............
@8 Hood release ................-.
@9) Button for:
— Luggage compartment lid ......
— Fuel filler door release (plug-in
hybrid drive) ..............0.0.
G0 Exterior mirror adjustment ......
@2 Buttons for:
— Power windows .............-
—Child safety lock ..............
G) Tips
157
98 97
L112
254
202
250
124
113 111
80
166
170
332
60 60 60
276
50
271
66
54
53
Some the equipment listed here is only instal-
led in certain models or is available as an op-
tion.
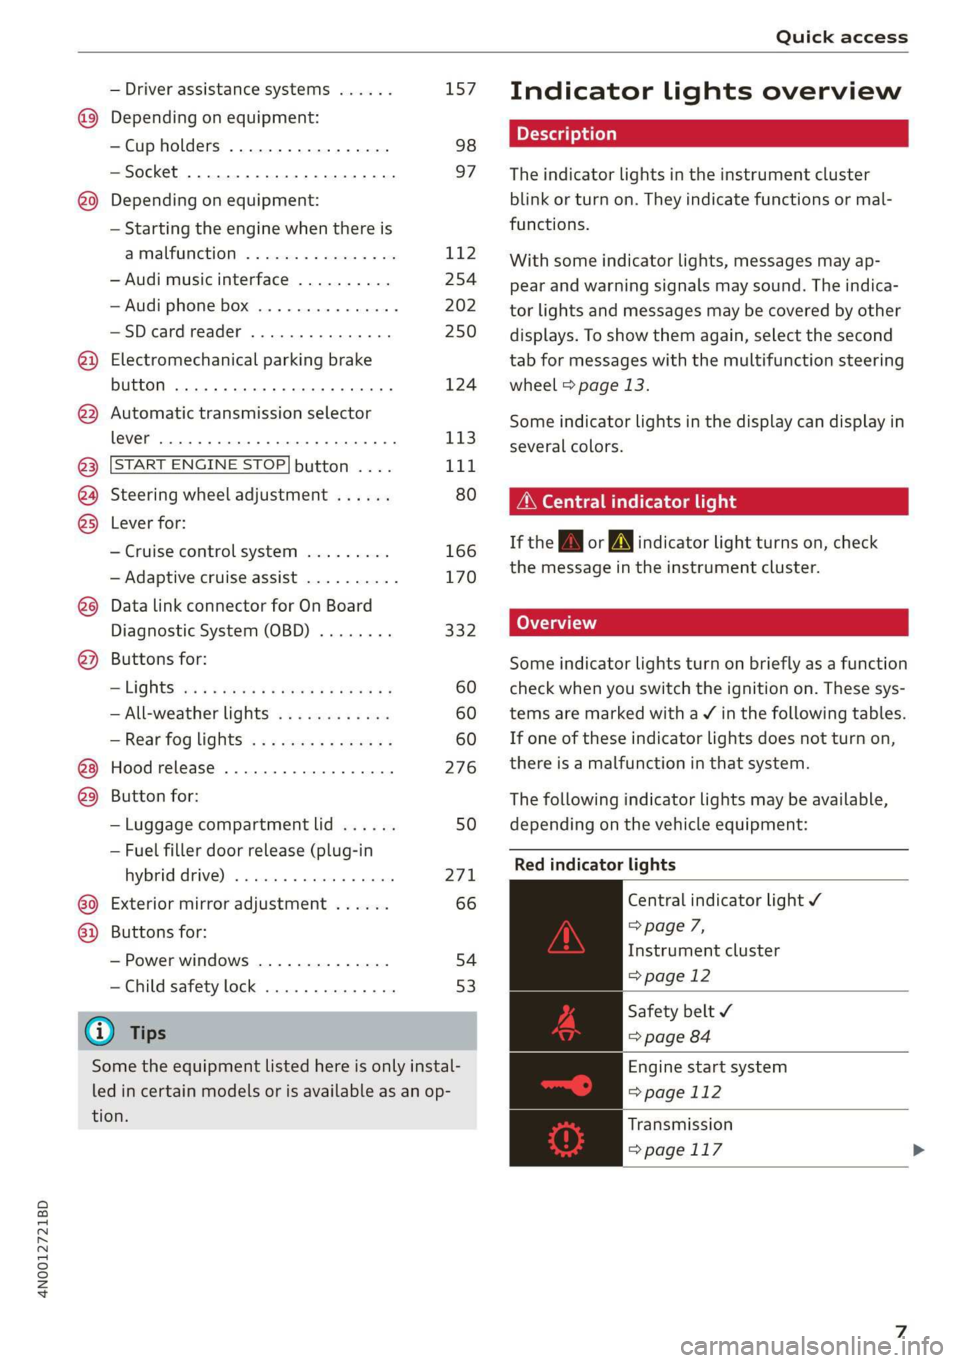
Indicator lights overview
The indicator lights in the instrument cluster
blink or turn on. They indicate functions or mal-
functions.
With some indicator lights, messages may ap-
pear and warning signals may sound. The indica-
tor lights and messages may be covered by other
displays. To show them again, select the second
tab for messages with the multifunction steering
wheel & page 13.
Some indicator lights in the display can display in
several colors.
Oeil ans
If the A or N indicator light turns on, check
the message in the instrument cluster.
Some indicator lights turn on briefly as a function
check
when you switch the ignition on. These sys-
tems are marked with a V in the following tables.
If one of these indicator lights does not turn on,
there is a malfunction in that system.
The following indicator lights may be available,
depending on the vehicle equipment:
Red indicator lights
Central indicator light ¥
=> page 7,
Instrument cluster
=>page 12
Safety belt
=> page 84
Engine start system
=>page 112
Transmission
=>page 117
Page 12 of 360
Quick access
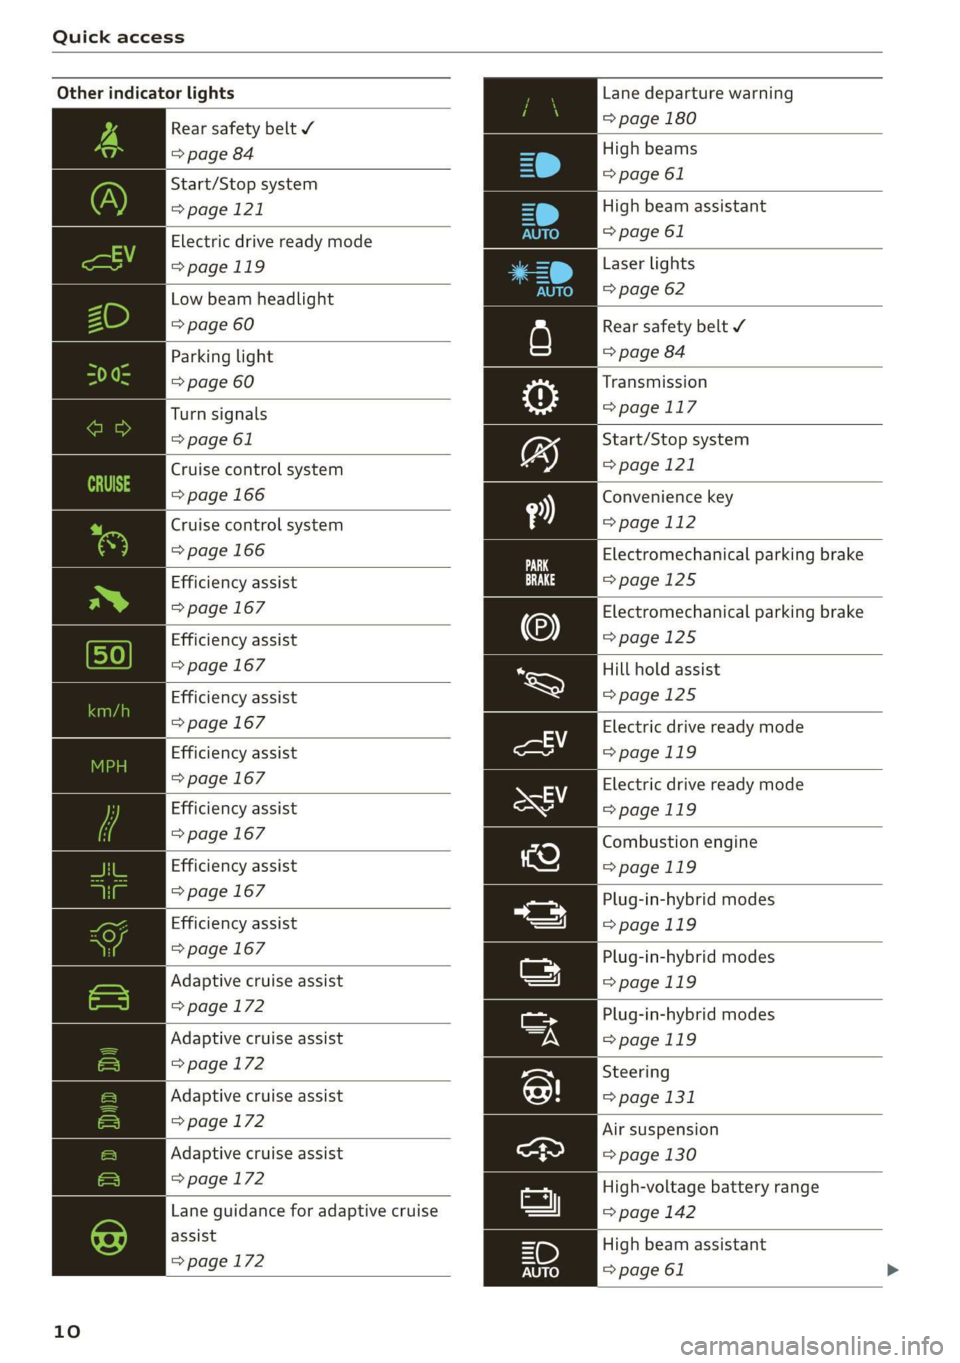
Other indicator lights
Rear safety belt Y
=> page 84
Start/Stop system
>page 121
Electric drive ready mode
>page 119
Low beam headlight
=> page 60
Parking light
=> page 60
Turn signals
=> page 61
Cruise control system
=> page 166
Cruise control system
=> page 166
Efficiency assist
=> page 167
Efficiency assist
=> page 167
Efficiency assist
=> page 167
Efficiency assist
=> page 167
Efficiency assist
> page 167
Efficiency assist
=> page 167
Efficiency assist
=> page 167
|
Adaptive cruise assist
=> page 172
Adaptive cruise assist
=>page 172
Adaptive cruise assist
=> page 172
Adaptive cruise assist
=>page 172
|
Lane guidance for adaptive cruise
assist
=> page 172
10
Lane departure warning
=> page 180
High beams
=> page 61
High beam assistant
=> page 61
Laser lights
=> page 62
Rear safety belt ¥
=> page 84
Transmission
=> page 117
Start/Stop system
=> page 121
Convenience key
=> page 112
Electromechanical parking brake
=>page 125
Electromechanical parking brake
=>page 125
Hill hold assist
=>page 125
Electric drive ready mode
=>page 119
Electric drive ready mode
>page 119
Combustion engine
=>page 119
Plug-in-hybrid modes
>page 119
Plug-in-hybrid modes
=>page 119
Plug-in-hybrid modes
=>page 119
Steering
=> page 131
Air suspension
=> page 130
High-voltage battery range
=> page 142
High beam assistant
=> page 61
Page 14 of 360
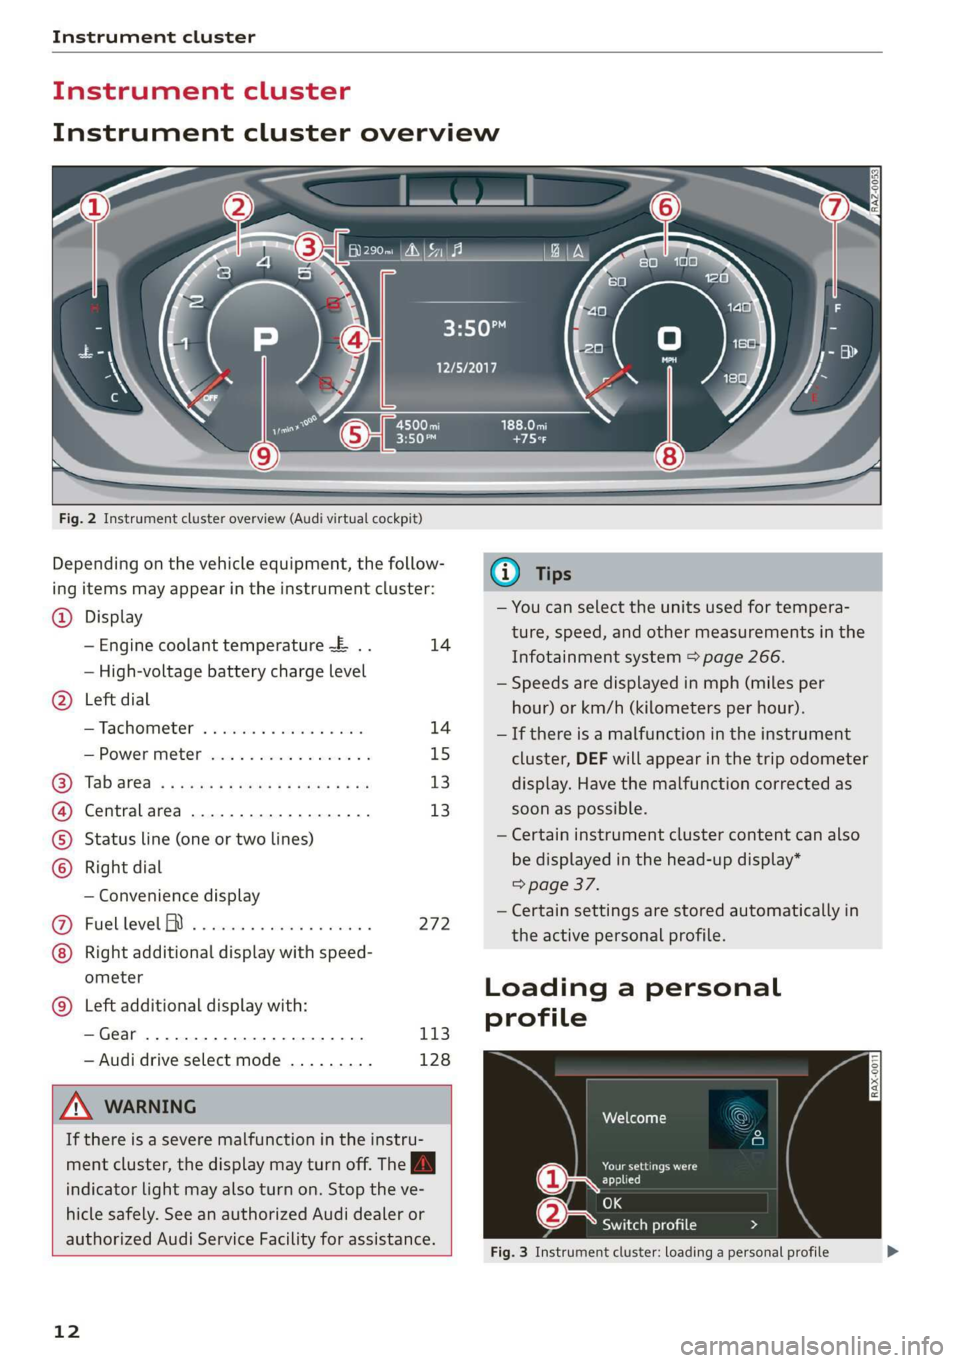
Instrument cluster
Instrument cluster
cH) Olas
aE
Fig. 2 Instrument cluster overview (Audi virtual cockpit)
Depending on the vehicle equipment, the follow-
ing items may appear in the instrument cluster:
@) Display
— Engine coolant temperature ~E .. 14
— High-voltage battery charge level
Left
dial
—Tachometer ........ 000s eee 14
POWER MCLE cose so cece oo cesuene ¥ & 15
Tab ated « < neues « + sees 2 eas be 13
Central area ..............02.0. 13
Status line (one or two lines)
Right dial
— Convenience display
Fuellevel IY ...... 2... eee eee 272
Right additional display with speed-
ometer
Left additional display with:
—Gear ...... 0... eee eee 113
— Audi drive select mode ......... 128
Z\ WARNING
If there is a severe malfunction in the instru
ment cluster, the display may turn off. The
indicator
light may also turn on. Stop the ve-
hicle safely. See an authorized Audi dealer or
authorized Audi Service Facility for assistance.
12
@ Tips
— You can select the units used for tempera-
ture, speed, and other measurements in the
Infotainment system > page 266.
— Speeds are displayed in mph (miles per
hour) or km/h (kilometers per hour).
— If there is a malfunction in the instrument
cluster, DEF will appear in the trip odometer
display. Have the malfunction corrected as
soon as possible.
— Certain instrument cluster content can also
be displayed in the head-up display*
=> page 37.
— Certain settings are stored automatically in
the active personal profile.
Loading a personal
profile
Nel Ceto dna}
me Gasca ard
(1 re ests)
e-: - Switch profile
Fig. 3 Instrument cluster: loading a personal profile
Page 22 of 360
Touch displays
> Press the SETTINGS button.
> If the General button is not displayed, swipe
toward the left or right with one finger until it
appears.
> Press the General button.
> If the Date & time button is not displayed,
swipe upward or downward with one finger un-
tilit appears.
> Press the Date & time button.
@) Tips
If a menu or symbol is in parentheses in the
path, for example, (General) or ({23), then it is
an optional menu item that does not need to
be used in every system.
You can adjust or turn off the MMI touch display
feedback.
> Applies to: MMI: Select on the home screen:
SETTINGS > Display & brightness > MMI.
Possible settings:
— Brightness
— Touchscreen Feedback
Multi Media Interface
MeCN ACen
Audi recommends performing certain Infotain-
ment system functions, such as entering a desti-
nation, only when the vehicle is stationary. Al-
ways be prepared to stop operating the Infotain-
ment system in the interest of your safety and
the safety of other road users.
ZA WARNING
Only use the Infotainment system when road,
traffic, weather, and visibility conditions per-
mit and always in a way that allows you to
maintain complete control over your vehicle.
@ Tips
Certain functions are not available while driv-
ing.
20
Wine mela mel mela
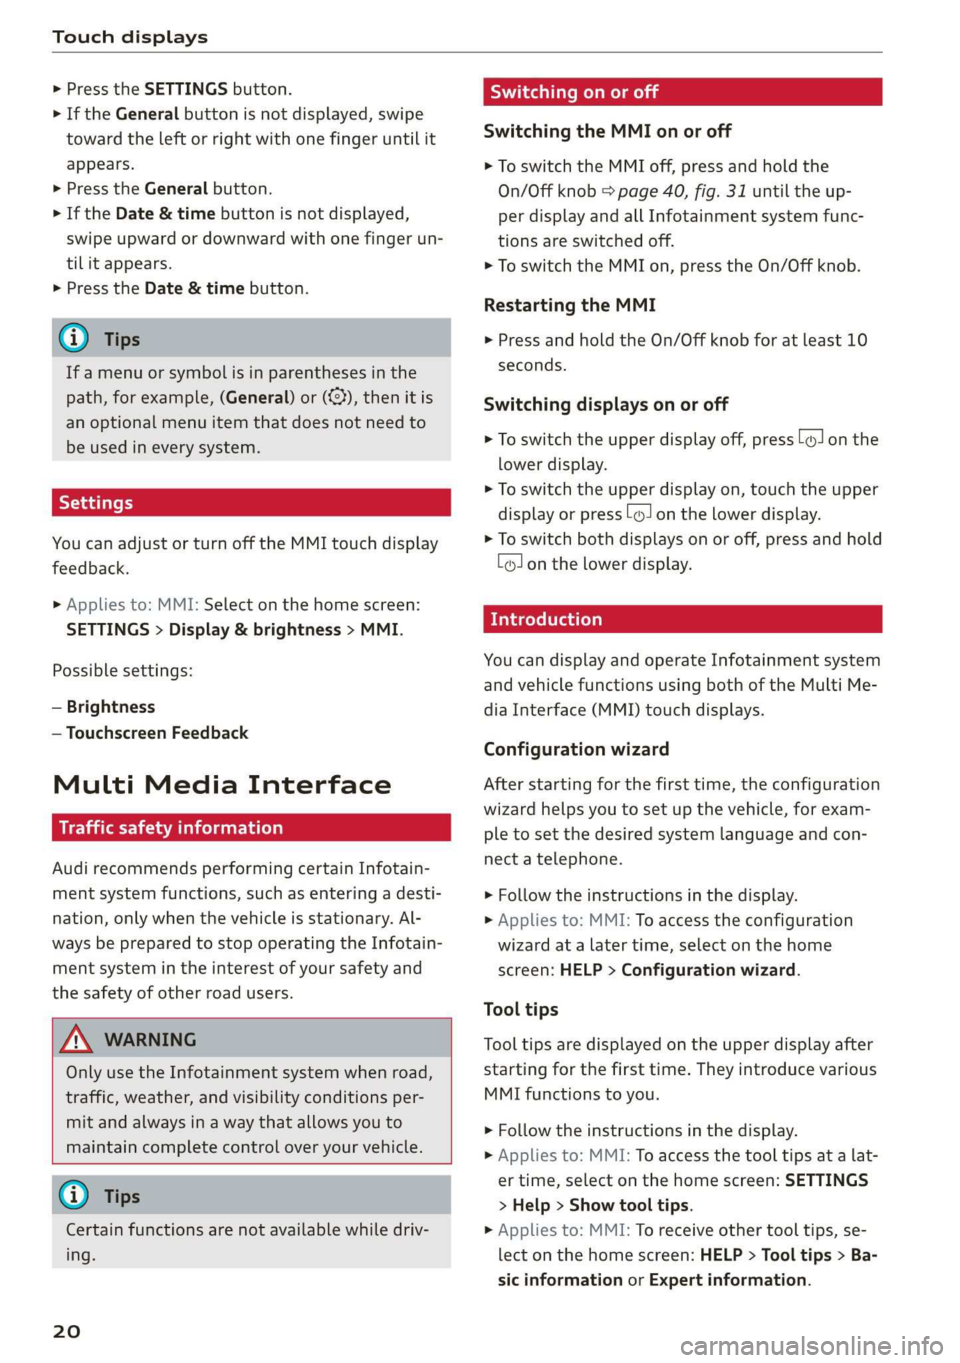
Switching the MMI on or off
> To switch the MMI off, press and hold the
On/Off knob > page 40, fig. 31 until the up-
per
display and all Infotainment system func-
tions are switched off.
> To switch the MMI on, press the On/Off knob.
Restarting the MMI
>» Press and hold the On/Off knob for at least 10
seconds.
Switching displays on or off
> To switch the upper display off, press [Jon the
lower display.
> To switch the upper display on, touch the upper
display or press [Jon the lower display.
> To switch both displays on or off, press and hold
Co] on the lower display.
Introduction
You can display and operate Infotainment system
and vehicle functions using both of the Multi Me-
dia Interface (MMI) touch displays.
Configuration wizard
After starting for the first time, the configuration
wizard helps you to set up the vehicle, for exam-
ple to set the desired system language and con-
nect a telephone.
> Follow the instructions in the display.
> Applies to: MMI: To access the configuration
wizard at a later time, select on the home
screen: HELP > Configuration wizard.
Tool tips
Tool tips are displayed on the upper display after
starting for the first time. They introduce various
MMI functions to you.
> Follow the instructions in the display.
» Applies to: MMI: To access the tool tips at a lat-
er time, select on the home screen: SETTINGS
> Help > Show tool tips.
> Applies to: MMI: To receive other tool tips, se-
lect on the home screen: HELP > Tool tips > Ba-
sic information or Expert information.
Page 25 of 360
![AUDI A8 2020 Owners Manual 4N0012721BD
Touch displays
Using the notification center
> To open the notification center, pull the status
bar downward, or
> Press the E=] button on the status bar.
> To apply quick setting](/img/6/57606/w960_57606-24.png "AUDI A8 2020 Owners Manual 4N0012721BD
Touch displays
Using the notification center
> To open the notification center, pull the status
bar downward, or
> Press the E=] button on the status bar.
> To apply quick setting")
4N0012721BD
Touch displays
Using the notification center
> To open the notification center, pull the status
bar downward, or
> Press the E=] button on the status bar.
> To apply quick settings, press the respective
symbol (@).
> To obtain additional information about a notifi-
cation, press it.
> To delete a notification, pull it toward the right
edge of the screen.
> If there are more than four notifications in the
notification center, the older notifications will
be hidden. To display the older notifications,
drag
your finger upward on the screen.
Setting displayed content
You can set whether some notifications should be
displayed.
> To set the displayed content, press &@, or
> Applies to MMI: Select on the home screen:
SETTINGS > Notifications.
> Select and confirm which notifications should
be displayed.
Possible quick settings
Symbol Description
Apply sound settings
Open menu settings
Manage connected devices
Manage personal profiles
Set date and time
= Set displayed content in the noti-
fication center
Depending on the vehicle equipment, you can op-
erate various functions in the function bar.
Description
Switch Start/Stop system on or
off
Applies to: Plug-in hybrid drive:
Selecting the driving mode
Symbol Description
Opens the garage door opener
function
Press: adjust sunshade
Press and hold: convenience
opening and closing
Press: shows settings for the
head-up display
Press and hold: switches the
head-up display on or off
Press: switches the upper display
on or off
Press and hold: switches both dis-
plays on or off
Shortcuts
By creating shortcuts, you have quick access to
various items, such as radio stations, frequently
used contacts, or vehicle settings.
Adding shortcuts
The «++ buttons in the upper display indicate, for
example, if a selected radio station can be added
to the shortcuts. Depending on the context, you
may also be able to add items from a list to the
shortcuts.
> Press «+» or press and hold an item ina list.
> Press Save as a shortcut. The selected item will
be added to the shortcuts on the lower display
and
displayed as a tile.
Using shortcuts
> Press the ac! @) > page 21, fig. 15 button in the
function bar on the lower screen. The saved
shortcuts will be displayed or hidden.
> To access the stored function, press the respec-
tive tile.
Moving or deleting shortcuts
> Press and hold a shortcut on the lower display.
> To adjust the order of the shortcuts, drag a
shortcut to the desired location.
> To delete a shortcut, press ®.
23
Page 46 of 360
Opening and closing
ZA WARNING
Follow the safety precautions > page 43.
Z\ WARNING
Applies to: vehicles with power closing function
—To reduce the risk of injury, make sure that
the area where the door is closing is clear
during the closing process.
— The closing process can be stopped at any
time by pulling on the outer or inner door
handle.
@) Note
— If the vehicle key that was last used is de-
tected inside the passenger compartment,
then the vehicle cannot be locked from the
outside using the sensor. Take the vehicle
key with you and lock the vehicle again. Oth-
erwise, the vehicle will not be protected
against unauthorized access.
— If you lock the vehicle using the button on
the vehicle key with the front passenger's
or rear door open while accidentally placing
the key in the passenger compartment and
closing the door, the vehicle will not lock.
The turn signals will flash several times to
indicate this. If you do not open the vehicle
to remove the vehicle key within a brief peri-
od, then the vehicle will lock automatically.
This prevents the vehicle from being left un-
locked for long periods of time. The key will
then be locked inside the vehicle.
— If the vehicle key that was used last is de-
tected inside the luggage compartment, it
will not be possible to lock the luggage
compartment and the luggage compart-
ment lid will open. The turn signals will
flash several times to indicate this. The
doors will lock. Always take the vehicle key
with you, or unauthorized persons may be
able to enter the vehicle.
G) Tips
— Do not leave valuables unattended in the ve-
hicle. A locked vehicle is not a safe!
— The LED in the driver's door rail blinks when
you lock the vehicle. If the LED turns on for
44
approximately 30 seconds after locking,
there is a malfunction in the central locking
system. Have the problem corrected by an
authorized Audi dealer or authorized Audi
Service Facility.
Setting the central locking system
You can adjust the central locking system to your
preferences. The settings depend on the vehicle
equipment.
> Applies to: MMI: Select on the home screen:
VEHICLE > Settings & Service > Central lock-
ing.
Door unlocking
—If you select All, all doors and the luggage
compartment lid will be unlocked when unlock-
ing.
— If you select Driver's door, only the driver's
door will be unlocked. To unlock all doors and
the luggage compartment lid, press the & but-
ton on the vehicle key twice. In vehicles with a
convenience key*, only the driver's door will un-
lock when you pull the driver's door handle. If
you pull another door handle, the entire vehicle
will be unlocked.
The entire vehicle will always be locked when you
press the & button.
Long press to open windows
You can select if all windows and the panoramic
glass roof* should open using the vehicle key
= page 54, Convenience opening and closing. If
you press and hold the fj button on the vehicle
key, all of the windows and the panoramic glass
roof* will close.
Disable rear lid handle
You can select if the luggage compartment lid
can open with the handle. If you activate this
function, the luggage compartment lid can only
be opened with the <¥ or 4s button on the vehi-
cle key or in the driver's door. In vehicles with a
convenience key*, you can still open the luggage
compartment lid using the handle if an author-
ized convenience key is detected > page 50. >
Page 47 of 360
4N0012721BD
Opening and closing
Fold mirrors
You can select if the exterior mirrors automatical-
ly fold in when locking.
Tone
when locking)
You can select if an audio signal sounds when
locking the vehicle.
Open with convenience key
Applies to: vehicles with convenience key
You can deactivate the feature for unlocking us-
ing the sensor. The function for locking via the
sensor will still be enabled > page 48.
G@) Tips
The settings are automatically stored and as-
signed to the active personal profile.
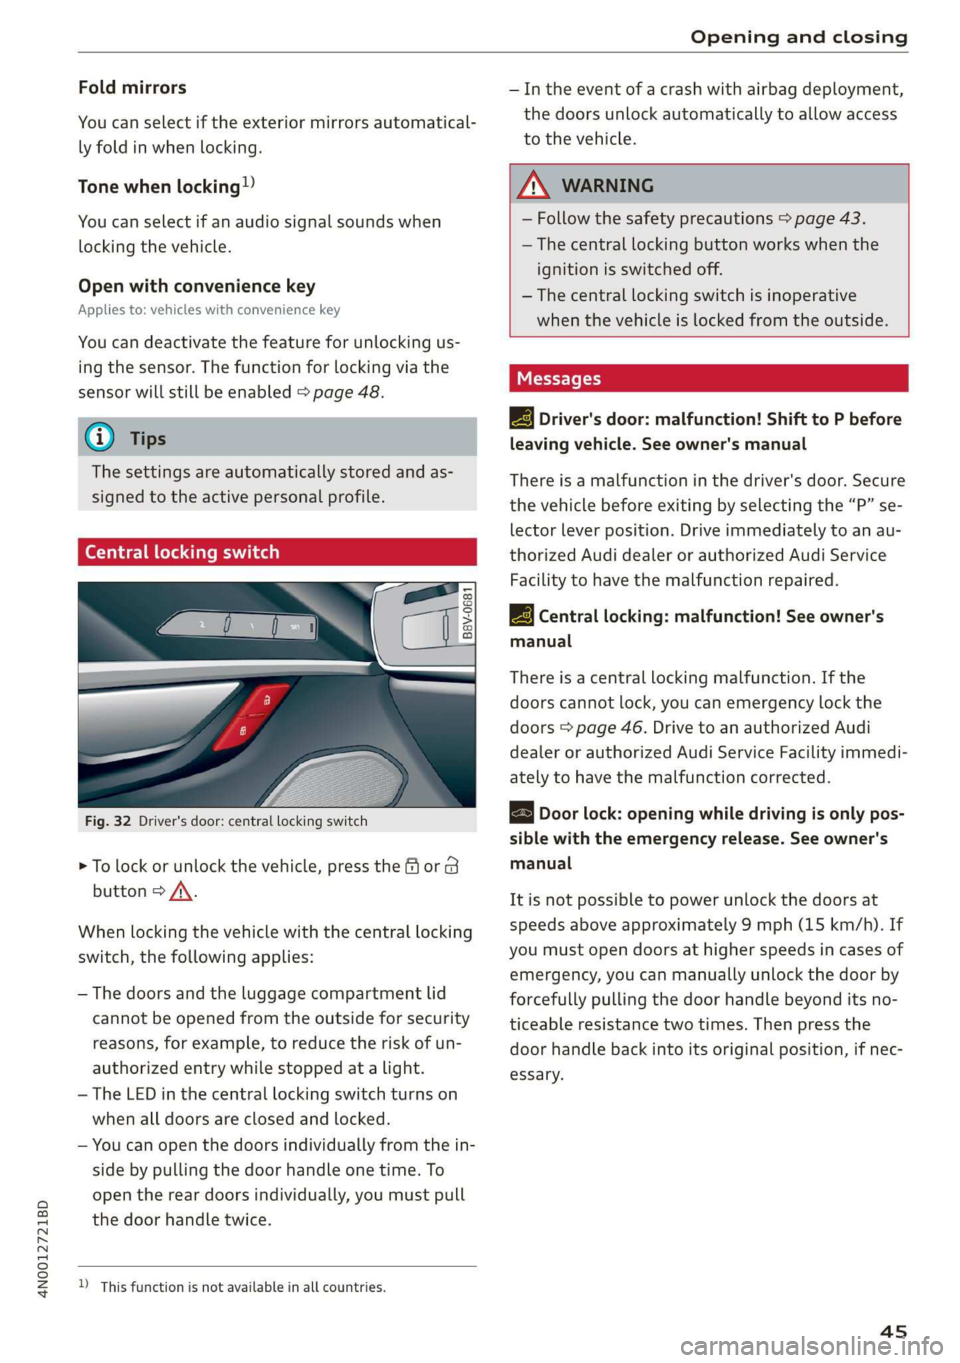
Central locking switch
B8V-0681
Fig. 32 Driver's door: central locking switch
> To lock or unlock the vehicle, press the or 8
button > /\.
When locking the vehicle with the central locking
switch,
the following applies:
— The doors and the luggage compartment lid
cannot be opened from the outside for security
reasons, for example, to reduce the risk of un-
authorized entry while stopped at a light.
—The LED in the central locking switch turns on
when all doors are closed and locked.
— You can open the doors individually from the in-
side by pulling the door handle one time. To
open the rear doors individually, you must pull
the door handle twice.
)_ This function is not available in all countries.
— In the event of a crash with airbag deployment,
the doors unlock automatically to allow access
to the vehicle.
Z\ WARNING
— Follow the safety precautions > page 43.
— The central locking button works when the
ignition is switched off.
— The central locking switch is inoperative
when the vehicle is locked from the outside.
Messages
EB Driver's door: malfunction! Shift to P before
leaving vehicle. See owner's manual
There is a malfunction in the driver's door. Secure
the vehicle before exiting by selecting the “P” se-
lector lever position. Drive immediately to an au-
thorized Audi dealer or authorized Audi Service
Facility to have the malfunction repaired.
|-3} Central locking: malfunction! See owner's
manual
There is a central locking malfunction. If the
doors cannot lock, you can emergency lock the
doors > page 46. Drive to an authorized Audi
dealer or authorized Audi Service Facility immedi-
ately to have the malfunction corrected.
B Door lock: opening while driving is only pos-
sible with the emergency release. See owner's
manual
It is not possible to power unlock the doors at
speeds above approximately 9 mph (15 km/h). If
you must open doors at higher speeds in cases of
emergency, you can manually unlock the door by
forcefully pulling the door handle beyond its no-
ticeable resistance two times. Then press the
door handle back into its original position, if nec-
essary.
45
Page 53 of 360

4N0012721BD
Opening and closing
» Applies to: vehicles without convenience keys:
Unlock the vehicle using the B / <3 / As button
on the vehicle key and press the handle in the
luggage compartment lid. Or
> Applies to: vehicles with convenience key: Press
the handle in the luggage compartment lid.
The vehicle key cannot be more than approxi-
mately 4 feet (1.5 m) away from the luggage
compartment.
Closing the luggage compartment lid
> Applies to: vehicles without automatic luggage
compartment lid: Use the inside grip to pull the
luggage compartment lid down and allow it to
close using a gentle push. Or
> Applies to: vehicles with automatic luggage
compartment lid: See > page 51.
Z\ WARNING
Follow the safety precautions > page 50.
Automatic luggage compartment lid
Applies to: vehicles with automatic luggage compartment lid
RAZ-0082|
Fig. 39 Luggage compartment lid: @ closing button*, @)
lock button* (vehicles with convenience key*)
Opening the luggage compartment lid
> When the ignition is switched off, press and
hold the < button > page 47, fig. 35 on the
vehicle key for at least one second or press the
3 button twice. Or
> Engage the "P" selector lever position and pull
the <3 button* in the driver's door. Or
> Applies to: vehicles with convenience key: Press
the handle in the luggage compartment lid.
The vehicle key cannot be more than approxi-
mately 4 feet (1.5 m) away from the luggage
compartment.
Closing the luggage compartment lid
> Press the < button in the luggage compart-
ment lid. Or
> Press the handle in the luggage compartment
lid. Or
> Press the luggage compartment lid downward
slightly. Or
> When the ignition is switched on, pull the <>
switch in the driver's door > page 50, fig. 38
until the luggage compartment lid is closed. Or
> Applies to: vehicles with convenience key: With
the ignition switched off, press and hold the
<3 / As button on the vehicle key until the lug-
gage compartment lid is closed. Make sure
there is enough distance (maximum of approxi-
mately 9 feet (3 m)) between you and the lug-
gage compartment lid. Or
> Applies to: vehicles with convenience key: With
the ignition switched off, press the <4 / fi* but-
ton in the luggage compartment lid. The vehi-
cle key must not be more than approximately
4 feet (1.5 m) away from the luggage compart-
ment and it must not be inside the vehicle. If
you press the f}* button, then the vehicle will
lock.
The automatic opening or closing will stop if:
— You press the < button or press the handle in
the luggage compartment lid again Or
— If something blocks the luggage compartment
lid or makes it difficult for the lid to move.
If you press the < button or press the handle in
the luggage compartment lid again, the luggage
compartment lid will open again.
Z\ WARNING
Follow the safety precautions > page 50.
@® Tips
The luggage compartment lid can be operat-
ed manually if the vehicle battery is low. It is
necessary to use more force when doing this.
Move the lid slowly to reduce the amount of
force needed.
51