warning AUDI Q2 2021 Owner´s Manual
[x] Cancel search | Manufacturer: AUDI, Model Year: 2021, Model line: Q2, Model: AUDI Q2 2021Pages: 364, PDF Size: 87.77 MB
Page 95 of 364
Driving
CO
< o rN
iv
rN
i—i
00
Releasing the selector lever manually (left-
hand drive vehicles)
Applies to: vehicles with automatic gearbox
The
selector lever can be released manually if
the electrical power supply should
fail.
K
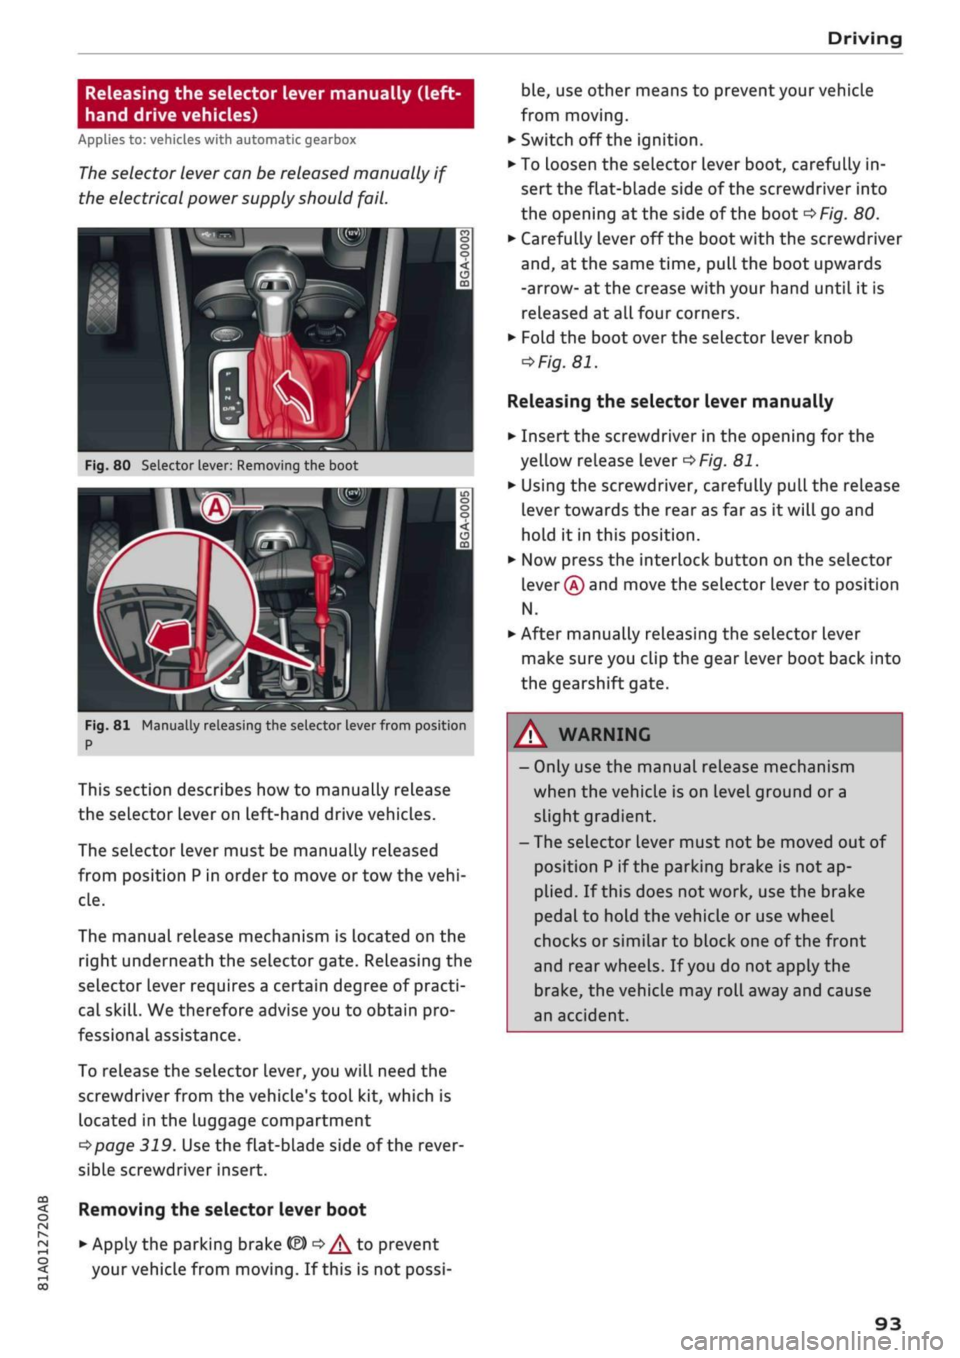
Fig.
80 Selector lever: Removing the boot
Fig.
81 Manually releasing the selector lever from position
P
This section describes how to manually release
the selector Lever on Left-hand drive vehicles.
The selector lever must be manually released
from position
P
in order to move or tow the
vehi
cle.
The manual release mechanism is Located on the
right underneath the selector gate. Releasing the
selector lever requires a certain degree of practi
cal
skill.
We therefore advise you to obtain pro
fessional assistance.
To release the selector lever, you
wilL
need the
screwdriver from the vehicle's tool kit, which is
located in the luggage compartment
^>page
319. Use the flat-blade side of the rever
sible screwdriver insert.
Removing the selector lever boot
• Apply the parking brake
& ^/^
to prevent
your vehicle from moving. If this is not possi
ble,
use other means to prevent your vehicle
from moving.
•
Switch off the ignition.
• To loosen the selector lever boot, carefully in
sert the flat-blade side of the screwdriver into
the opening
at
the side of the boot
^>Fig.
80.
•
Carefully lever off the boot with the screwdriver
and,
at the same time, pull the boot upwards
-arrow- at the crease with your hand until it is
released at all four corners.
•
Fold the boot over the selector lever knob
=>
Fig.
81.
Releasing the selector lever manually
•
Insert the screwdriver in the opening for the
yellow release lever
^>Fig.
81.
•
Using the screwdriver, carefully pull the release
lever towards the rear as far as it will go and
hold it in this position.
•
Now press the interlock button on the selector
lever
®
and move the selector lever to position
N.
•
After manually releasing the selector lever
make sure you clip the gear lever boot back into
the gearshift gate.
A WARNING
- Only use the manual release mechanism
when the vehicle is on level ground or a
slight gradient.
- The selector lever must not be moved out of
position
P
if the parking brake is not ap
plied.
If this does not work, use the brake
pedal to hold the vehicle or use wheel
chocks or similar to block one of the front
and rear wheels. If
you
do not apply the
brake,
the vehicle may roll away and cause
an accident.
93
Page 96 of 364
Driving
Releasing the selector lever manually
(right-hand drive vehicles)
Applies to: vehicles with automatic gearbox
The
selector lever can be released manually if
the electrical power supply should
fail.
n
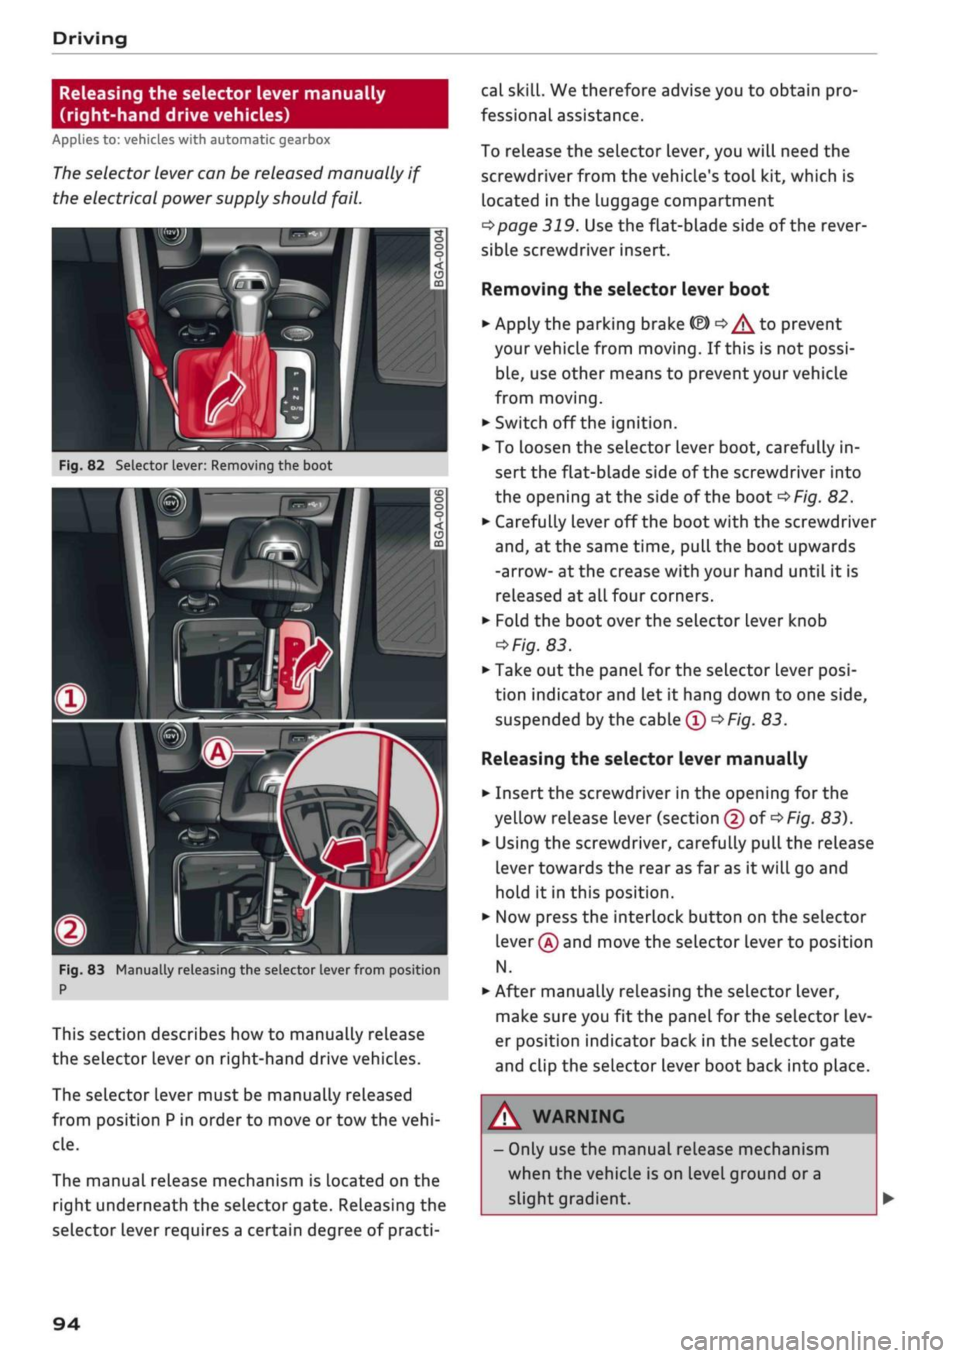
Fig.
82 Selector lever: Removing the boot
m
i
Fig.
83 Manually releasing the selector lever from position
P
This section describes how to manually release
the selector lever on right-hand drive vehicles.
The selector lever must be manually released
from position
P
in order to move or tow the
vehi
cle.
The manual release mechanism is located on the
right underneath the selector gate. Releasing the
selector lever requires a certain degree of practi
cal
skill.
We therefore advise you to obtain pro
fessional assistance.
To release the selector lever, you will need the
screwdriver from the vehicle's tool kit, which is
located in the luggage compartment
^>page
319. Use the flat-blade side of the rever
sible screwdriver insert.
Removing the selector lever boot
•
Apply the parking brake fâ)
o^
to prevent
your vehicLe from moving. If this is not possi
ble,
use other means to prevent your vehicle
from moving.
•
Switch off the ignition.
• To Loosen the selector lever boot, carefully in
sert the flat-blade side of the screwdriver into
the opening
at
the side of the boot
^>Fig.
82.
*•
Carefully lever off the
boot
with the screwdriver
and,
at the same time, pull the boot upwards
-arrow- at the crease with your hand until it is
released at
alL
four corners.
•
Fold the boot over the selector lever knob
^Fig.
83.
•
Take out the panel for the selector Lever
posi
tion indicator and Let it hang down to one side,
suspended by the cable
0 •=>
Fig.
83.
Releasing the selector lever manually
•
Insert the screwdriver in the opening for the
yellow release lever (section
@
of
<$
Fig.
83).
•
Using the screwdriver, carefully pull the release
lever towards the rear as far as it will go and
hold it in this position.
•
Now press the interlock button on the selector
lever
@
and move the selector Lever to position
N.
•
After manually releasing the selector lever,
make sure you fit the panel for the selector lev
er position indicator back in the selector gate
and clip the selector lever boot back into place.
A WARNING
- Only use the manual release mechanism
when the vehicle is on level ground or a
slight gradient.
94
Page 98 of 364
Towing a trailer
Towing a trailer
Driving the vehicle with a
trailer or caravan
Technical requirements
The
towing bracket must comply with certain
technical requirements.
Your car is intended mainly for transporting pas
sengers and luggage. However, if suitably equip
ped,
it can also be used to tow a trailer or cara
van.
If the car is supplied with a factory-fitted towing
bracket it will already have the necessary techni
cal modifications and meet the statutory require
ments.
A 13-pin socket is provided to make the electrical
connection between the car and the trailer. If the
trailer you wish to tow has a 7-pin plug, the nec
essary adapter cable can be obtained from a spe
cialist retailer.
If
a
towing bracket is to be fitted after the car is
purchased,
this must be done according to the in
structions of the towing bracket manufacturer
^page
102.
A WARNING
If
a
towing bracket is retrofitted, the installa
tion should be carried out by
a
qualified work
shop.
- In particular in high outside temperatures it
is not possible to drive up long steep gradi
ents without
a
suitable cooling system. The
engine would then overheat.
- Incorrect installation can result in a safety
risk.
Points to check before towing
There are a number of points which need to be
checked before towing a trailer or caravan.
*•
Observe the maximum permitted trailer
weights
^>page
342.
Trailer weights
Never exceed the maximum permitted trailer
weights.
If
you
do not load the trailer up to the maximum
permitted trailer weight, you can then climb cor
respondingly steeper gradients.
The maximum trailer weights listed are only ap
plicable for altitudes up to 1000 m above sea
level.
With increasing altitude the engine power
and therefore the car's climbing ability are im
paired because of the reduced air density, so the
maximum trailer weight has to be reduced ac
cordingly. The weight of the car and trailer must
be reduced by about 10% for every further
1000 m (or part thereof). This figure refers to
the combined weight of the (loaded) vehicle and
(Loaded) trailer.
The figures for the draw bar weight that appear
on the identification plate of the towing bracket
are for certification purposes only. The correct
figures for your specific model, which may be
lower than these figures for the towing bracket,
are given in the registration documents and in
•=>
page 343.
Drive select*
Please note that the
efficiency*
mode is not
available in towing mode.
Exterior lights
Before starting
a
journey, make sure that all the
lights for the trailer are working properly.
Distributing the load
Distribute loads in the trailer so that heavy ob
jects are as near to the axle as possible. Loads
carried in the trailer must be secured to prevent
them slipping. A badly distributed load can also
affect handling. This can activate the trailer sta
bilisation feature and cause the vehicle to reduce
speed.
Where possible, operate the trailer with the max
imum permitted draw bar weight on the ball
joint of the towing bracket, but do not exceed the
specified limit. •
96
Page 100 of 364
Towing a trailer
Requirements for correct functioning of the
trailer stabilisation system
If these conditions are not met in
full,
the trailer
stabilisation system will only intervene to a
limi
ted extent or not at all
>=>
A-
- The electrical connection between the towing
vehicle and the trailer must be functioning cor
rectly.
- The load on the trailer must be properly se
cured.
- The tyre pressures on both the vehicLe and the
trailer must be adapted to the load that is be
ing carried.
- Where possible, operate the trailer with the
maximum permitted draw bar weight.
- The trailer overrun brake must be set correctly.
This is important to ensure that the trailer can
be braked correctly, to avoid the vehicle and
trailer "jack-knifing" and to prevent excess
braking of the trailer.
- At low outside temperatures, both the towing
vehicle and the trailer should be fitted with
winter tyres.
A WARNING
It is essential that you adjust your speed to
suit the weather, road and traffic conditions.
Do not let the trailer stabilisation system
tempt you into taking any risks when driving -
this can cause accidents.
- The ESC and trailer stabilisation system
can
not defy the Laws of physics. This should be
kept in mind, particularly on slippery and
wet roads and when towing a trailer with a
light Load.
- The trailer stabilisation system is function
al,
regardless of whether the trailer has a
mechanical overrun brake or not.
- The trailer stabilisation system is not always
able to detect swaying of trailers with a
light load and will therefore not intervene.
- A trailer can still "jack-knife" on slippery
roads with little grip, even if the towing ve
hicle is equipped with the trailer stabilisa
tion system.
-Trailers with a high centre of gravity may
even tip over before they start to sway
side
ways.
-If
you
are not towing a trailer,
but
the
trail
er socket is being used (e.g. for an illumina
ted bicycle rack), the trailer stabilisation
system may be activated in extreme driving
conditions.
- Please note the additional information and
warnings
^>page
98, Driving tips.
Driving tips
Driving with a trailer always requires extra care.
Weight distribution
Try to avoid towing a loaded trailer with an unla
den vehicle. If this cannot be avoided, drive extra
slowly to allow for the unbalanced weight distri
bution.
Speed
Normally, you must not exceed 80 km/h when
towing a trailer or caravan. However, if the
trail
er/caravan is equipped with a trailer stabilisation
system,
you can drive at max. 100 km/h. Please
observe any other regulations applicable in the
country in which you are travelling.
The stability of the car and trailer is reduced with
increasing speed. For this reason it is advisable
not to drive at the maximum permissible top
speed in unfavourable
road,
weather or wind
con
ditions. This applies especially on a downhill gra
dient.
You should always reduce speed immediately if
the trailer shows the slightest sign of swaying.
Never try to stop the swaying by accelerating fur
ther.
Always brake in good time. If the trailer has an
overrun brake, apply the brakes gently at first
and then firmly. This will prevent the jerking that
can be caused by the trailer wheels locking.
Change down in good time before going down a
steep hill so
that
you can use the engine braking
effect to slow down the vehicLe.
Swaying and pitching can be reduced by attach
ing an extra stabiliser to the trailer. It should •
98
Page 101 of 364

Towing
a
trailer
CO
< o rN
iv
rN
t-H
o < 00
have friction linings at the sides to prevent exces
sive wear. Degrease and clean the ball joint be
fore using a stabiLiser. The stabiliser can be pur
chased and installed
at
a qualified workshop.
Electronic stabilisation control
The
ESC
-
in particular in conjunction with the
trailer stabilisation system
o^page
97 - makes
it
easier to stabilise a trailer
if it
starts to skid
or
sway. You should therefore keep the
ESC
switch
ed on
at
all times.
Overheating
In hot weather, keep an eye on the coolant
tem
perature gauge
^page
13. When climbing long
hills with the engine running fast in low gear, the
coolant temperature can increase. Reduce speed
immediately
if
the needle moves to the right end
of the scale. For information on the warning
lamp
||
refer to
opage
30.
Rear carrier systems
When using rear carrier systems (e.g. bicycle
racks) on the towing bracket,
it
is important not
to exceed the maximum load.
The total weight
of
the rear carrier system and
its
load must not exceed
75
kg for this vehicle. How
ever,
it
is also important to observe the maxi
mum permissible load for the rear carrier sys
tem.
The greater the distance from the towing brack
et, the smaller the maximum permissible Load
on
the rear carrier system. For this reason, you
should secure heavy objects as near as possible
to the towing bracket.
Note the instructions provided by the manufac
turer of the rear carrier system.
Please make sure that the rear carrier system
is
approved for use on your vehicle.
l
Note
A WARNING
The use of an unsuitable rear carrier system
could cause severe damage
to
the towing
bracket. The towing bracket could then break
and cause an accident.
Degrease and clean the ball joint before using
a rear carrier system.
Removable towing
bracket
Introduction
Applies to: vehicles with removable towing bracket
Special care is required when fitting and remov
ing the towing bracket.
Fig.
84 Luggage compartment:
Ball
joint for towing brack
et (stowage example)
The removable ball joint attachment for the tow
ing bracket is stored under the floor panel or in a
separate bag on the floor of the luggage com
partment.
The ball joint can be fitted and removed by hand.
WARNING
Never use tools of any kind when fitting and
removing the ball joint. This could damage
the mechanism which locks the
ball
joint
in
place and impair its safety
-
risk of accident!
© Note
- Do not attempt to modify or repair the ball
joint or other towing bracket components.
- Should you have any difficulties when using
the towing bracket, or suspect that
it
is not
fitted properly, contact
a
qualified work
shop.
- Before setting off, always check that the
ball
joint is secured properly
Opage
101.
99
Page 102 of 364
Towing a trailer
- Never disengage the ball joint with the cara
van / trailer still hitched or with a bicycle
rack or similar accessory still attached.
- It is advisable to remove the ball joint when
you are not towing a trailer. Check whether
the plug is properly inserted in the mount
ing fixture and that the bumper cover is fit
ted.
-The
ball
joint must be removed if
you
intend
to clean the car with a steam cleaning at
tachment. Check whether the plug is prop
erly inserted in the mounting fixture and
that the bumper cover is fitted.
- For installation and removal of the ball joint
we recommend using the gloves provided
for
this purpose.
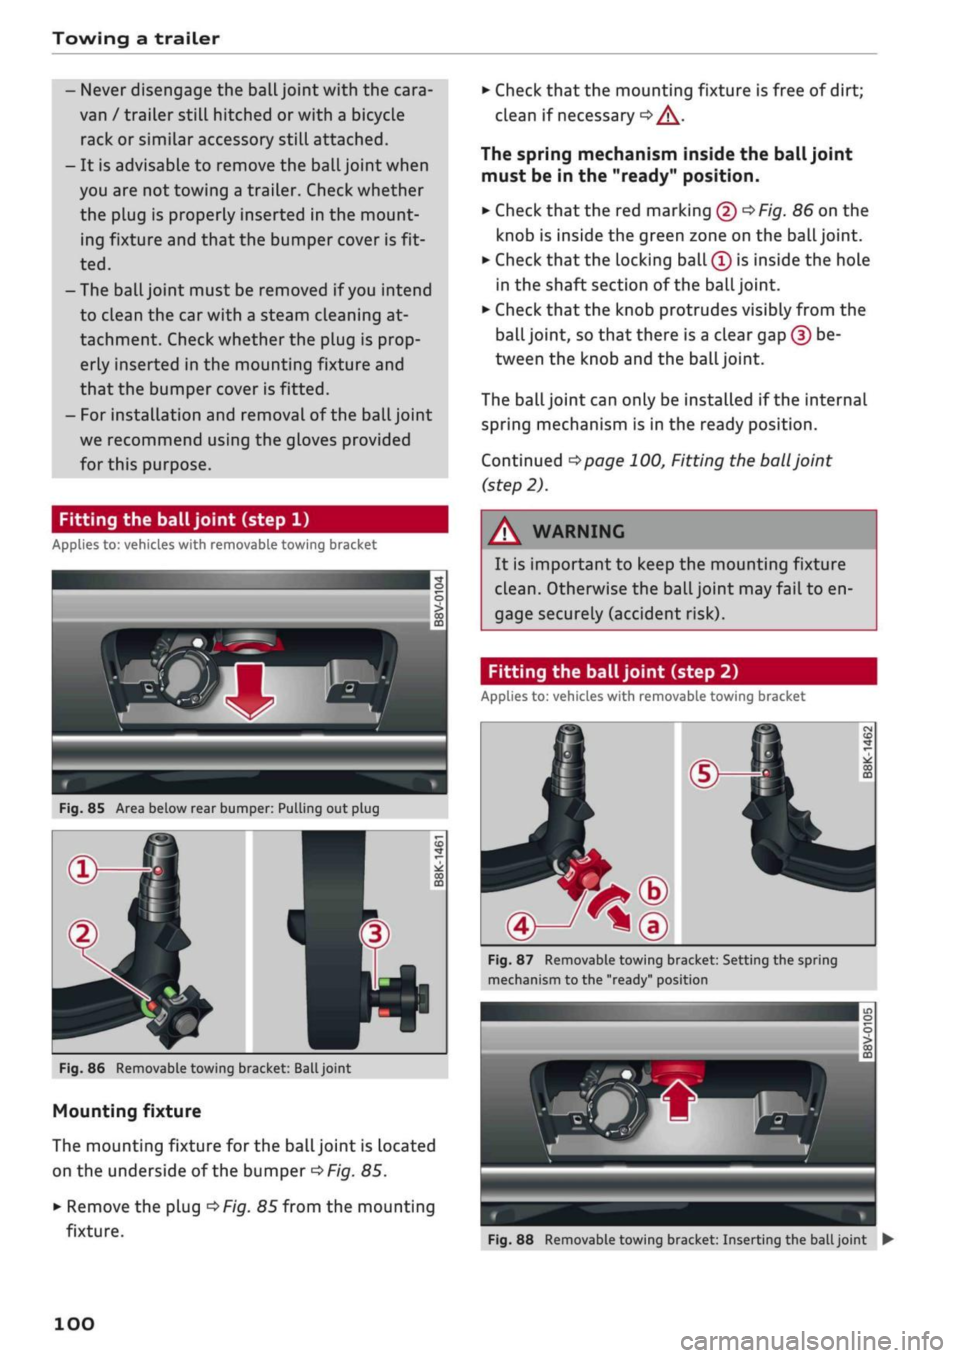
Fitting the ball joint (step 1)
Applies to: vehicles with removable towing bracket
Fig.
85 Area below rear bumper: Pulling out plug
Fig.
86 Removable towing bracket:
Ball
joint
Mounting fixture
The mounting fixture for the ball joint is located
on the underside of the bumper
^>Fig.
85.
•
Remove the plug
^>Fig.
85 from the mounting
fixture.
•
Check that the mounting fixture is free of dirt;
clean if necessary
•=> /\.
The spring mechanism inside the ball joint
must be in the "ready" position.
•
Check
that
the red marking (5)
^>Fig.
86 on the
knob is inside the green zone on the
ball
joint.
•
Check that the locking ball
(Î)
is inside the hole
in the shaft section of the
ball
joint.
•
Check that the knob protrudes visibly from the
ball joint, so that there is a clear gap (?) be
tween the knob and the
ball
joint.
The
ball
joint can only be installed if the internal
spring mechanism is in the ready position.
Continued
^>page
100, Fitting the
ball
joint
(step 2).
WARNING
It is important to keep the mounting fixture
clean.
Otherwise the ball joint may fail to en
gage securely (accident risk).
Fitting the ball joint (step 2)
Applies to: vehicles with removable towing bracket
Fig.
87 Removable towing bracket: Setting the spring
mechanism to the "ready" position
Fig.
88 Removable towing bracket: Inserting the
ball
joint •
100
Page 103 of 364
Towing a trailer
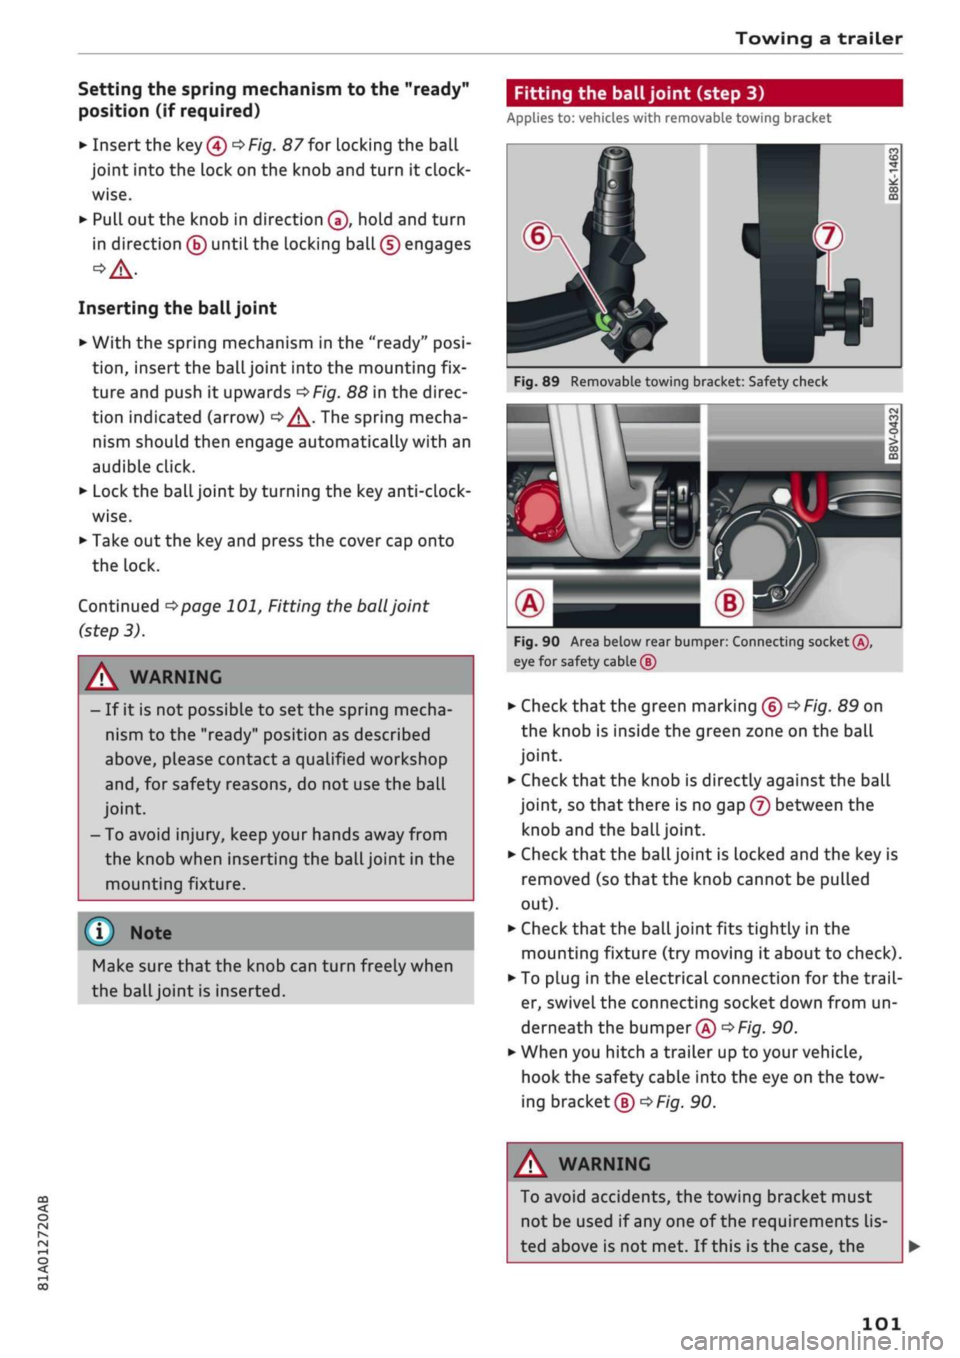
Setting the spring mechanism to the "ready"
position (if required)
•
Insert the key®
^>Fig.
87 for locking the ball
joint into the lock on the knob and turn it
clock
wise.
•
Pull out the knob in direction ®, hold and turn
in direction ® until the locking ball (5) engages
Inserting the ball joint
•
With the spring mechanism in the "ready"
posi
tion,
insert the ball joint into the mounting fix
ture and push it upwards
<=$Fig.
88 in the direc
tion indicated (arrow)
•=> ^.
The spring mecha
nism should then engage automatically with an
audible click.
•
Lock the ball joint by turning the key
anti-clock
wise.
•
Take out the key and press the cover cap onto
the lock.
Continued
^>page
101, Fitting the
ball
joint
(step 3).
Fitting the ball joint (step 3)
Applies to: vehicles with removable towing bracket
A WARNING
- If it is not possible to set the spring mecha
nism to the "ready" position as described
above,
please contact
a
qualified workshop
and,
for safety reasons, do not use the ball
joint.
- To avoid injury, keep your hands away from
the knob when inserting the ball joint in the
mounting fixture.
Make sure that the knob can turn freely when
the
ball
joint is inserted.
Fig.
89 Removable towing bracket: Safety check
M \
AH^H
eg
n
•>*
0
CO
J
m
Fig.
90 Area below rear bumper: Connecting socket®,
eye for safety cable (5)
•
Check
that
the green marking ®
^>Fig.
89 on
the knob is inside the green zone on the ball
joint.
•
Check that the knob is directly against the ball
joint, so that there is no gap (7) between the
knob and the
ball
joint.
•
Check that the ball joint is locked and the key is
removed (so that the knob cannot be pulled
out).
•
Check that the ball joint fits tightly in the
mounting fixture (try moving it about to check).
• To plug in the electrical connection for the
trail
er, swivel the connecting socket down from un
derneath the bumper®
^>Fig.
90.
*•
When you hitch a trailer up to your vehicle,
hook the safety cable into the eye on the tow
ing bracket®
^F/g.
90.
CO
rN
rN
1-1
00
A WARNING
To avoid accidents, the towing bracket must
not be used if any one of the requirements
lis
ted above is not met. If this is the case, the
101
Page 105 of 364
Towing a trailer
CO
rN
rN
•-i
00
If a towing bracket is to be fitted after the car is
purchased,
this must be done according to the in
structions of the towing bracket manufacturer.
The towing bracket is bolted to the body at the
securing points®
^F/'g.
93.
Qualified workshops are familiar with the meth
od of installation and any modifications which
may be required for the cooling system.
/\
WARNING
If a towing bracket is retrofitted, the installa
tion should be carried out by a qualified work
shop.
- A towing bracket that is not fitted properly
constitutes an accident risk.
- For your own safety, please observe the in
structions provided by the manufacturer of
the towing bracket.
©
1
CAUTION
- If the connector socket is not fitted correct
ly, this could cause damage to the vehicle's
electrical system.
- In particular in high outside temperatures it
is not possible to drive up Long steep gradi
ents without a suitable cooling
system,
there is a risk of damaging the engine.
103
Page 106 of 364

Driver assist systems
Driver assist systems Cruise
control,
system
Speed warning function
Applies to: vehicles with speed warning function
The speed warning function can
help
you keep
below a pre-set maximum speed. It can be set,
changed and deleted on the infotainment sys
tem.
The speed warning function will warn you if the
vehicle exceeds the pre-set maximum speed. The
system gives an audible warning signal if the set
speed is exceeded by a small amount. At the
same time, a warning lamp [5] and a message
will appear on the instrument cluster display.
The indicator Lamp [5] and the message will dis
appear when the road speed drops below the set
value.
You are recommended to store this speed limit
warning if you wish to be reminded of a particu
lar speed limit. This could be when driving in
countries with general speed limits, or if you
need to keep below a particular speed when
win
ter tyres are fitted, etc.
Setting speed limit warning
•
Select the following on the infotainment sys
tem:
IMENUI
button > Car > left control button
> Driver assist > Speed warning > manual.
© Note
- Please bear in mind that, even with the
speed warning function, it is still important
to keep a check on the car's speed with the
speedometer and to observe the statutory
speed limits.
- On vehicles for some markets, the speed
warning function warns you when you reach
a speed of 120 km/h. This speed limit warn
ing is preset at the factory.
Switching on
Applies to: vehicles with cruise control system
The cruise control system allows you to drive at a
constant speed of 20 km/h or
higher.
Fig.
94 Control lever for cruise control system
• Pull
the lever to position
®
<^>Fig.
94 to switch
on the system.
•
Drive at the speed you wish to set the system
to.
• Press the button marked ® to store the speed.
The indicator lamp
[3]
in the instrument cluster
will light up. Information is also provided in the
head-up display*.
The instrument cluster display will briefly
indi
cate the stored or
pre-selected
speed.
A constant speed is maintained by adjusting the
engine power or braking the vehicle accordingly.
WARNING
- Always direct your full attention to the
road,
even when you are using the cruise control
system.
It is always the driver who is re
sponsible for determining the speed and for
keeping a safe distance to the other vehicles
on the
road.
- For safety reasons, the cruise control sys
tem must not be used in city traffic, stop-
and-go traffic, on roads with a lot of bends
or in difficult or slippery driving conditions
(such as ice, fog, Loose grit or gravel, heavy
rain,
etc.) - risk of accident!
- When you take a turn-off, drive along a mo
torway exit lane or pass through roadwork
104
Page 108 of 364
Driver assist systems
Automatic deactivation
Cruise control system: currently unavailable.
See owner's manual
The cruise control system has been automatically
deactivated because the system has detected a
fault which could impair its function. Try switch
ing the cruise control system on again later.
A WARNING
Do not resume the programmed cruising
speed if this is too high
for
the traffic condi
tions - this can cause accidents.
Speed Limiter
Description
Applies to: vehicles with speed limiter
®
LIM
•
km/h
|
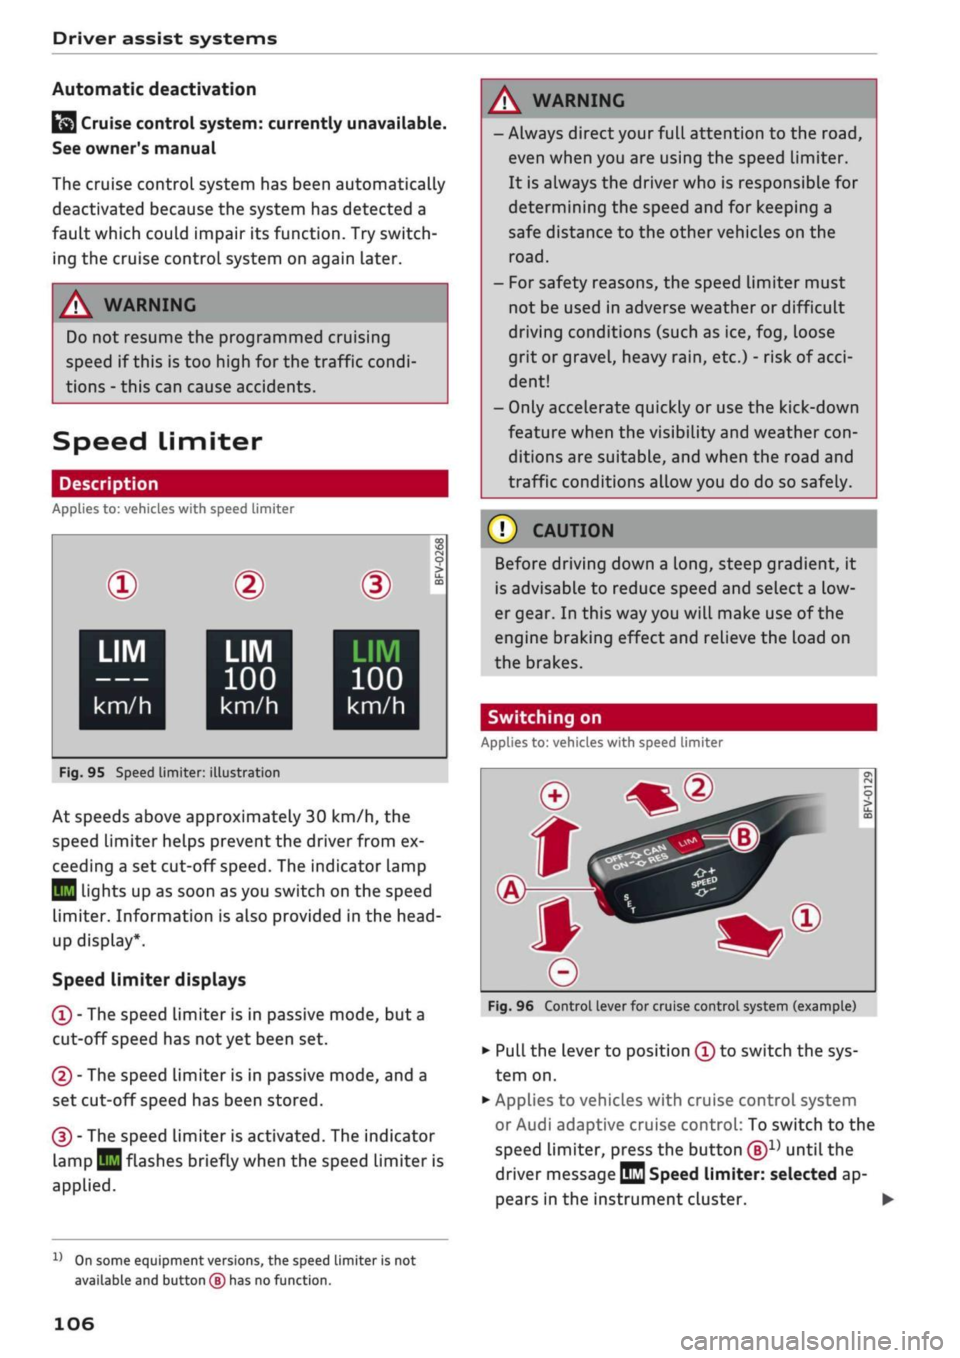
Fig.
95 Speed limiter:
©
LIM
100
km/h
illustration
BFV-0268
LIM
100
km/h
At speeds above approximately 30 km/h, the
speed limiter helps prevent the driver from ex
ceeding a set cut-off
speed.
The indicator lamp
Q
Lights up as soon as you switch on the speed
limiter. Information is also provided in the head-
up display*.
Speed limiter displays
© - The speed limiter is in passive mode, but a
cut-off speed has
not
yet been set.
®
- The speed limiter is in passive mode, and a
set cut-off speed has been stored.
® - The speed limiter is activated. The indicator
lamp
BH
flashes briefly when the speed limiter is
applied.
A WARNING
- Always direct your full attention to the
road,
even when you are using the speed limiter.
It is always the driver who is responsible for
determining the speed and for keeping a
safe distance to the other vehicles on the
road.
- For safety reasons, the speed limiter must
not be used in adverse weather or difficult
driving conditions (such as ice, fog, loose
grit or gravel, heavy
rain,
etc.) - risk of
acci
dent!
- Only accelerate quickly or use the kick-down
feature when the visibility and weather
con
ditions are suitable, and when the road and
traffic conditions allow you do do so safely.
Before driving down a
long,
steep gradient, it
is advisable to reduce speed and select a low
er gear. In this way you will make use of the
engine braking effect and relieve the Load on
the brakes.
Switching on
Applies to: vehicles with speed limiter
Fig.
96 Control lever for cruise control system (example)
•
Pull the lever to position © to switch the sys
tem on.
•
Applies to vehicles with cruise control system
or Audi adaptive cruise control: To switch to the
speed limiter, press the button
®1)
until the
driver message
QQ
Speed limiter: selected ap
pears in the instrument cluster. •
l)
On some equipment versions, the speed limiter is not
available and button
(B)
has no function.
106