Temperature AUDI Q2 2021 Owner´s Manual
[x] Cancel search | Manufacturer: AUDI, Model Year: 2021, Model line: Q2, Model: AUDI Q2 2021Pages: 364, PDF Size: 87.77 MB
Page 14 of 364
Instruments and controls
- Some of the items of equipment listed in
this section are only fitted on certain
mod
els or are optional extras.
- Applies to right-hand drive vehicles: The ar
rangement of switches and controls may be
slightly different from the layout shown on
tapage
10. However, the symbols used to
identify the controls are the same.
Instrument cluster
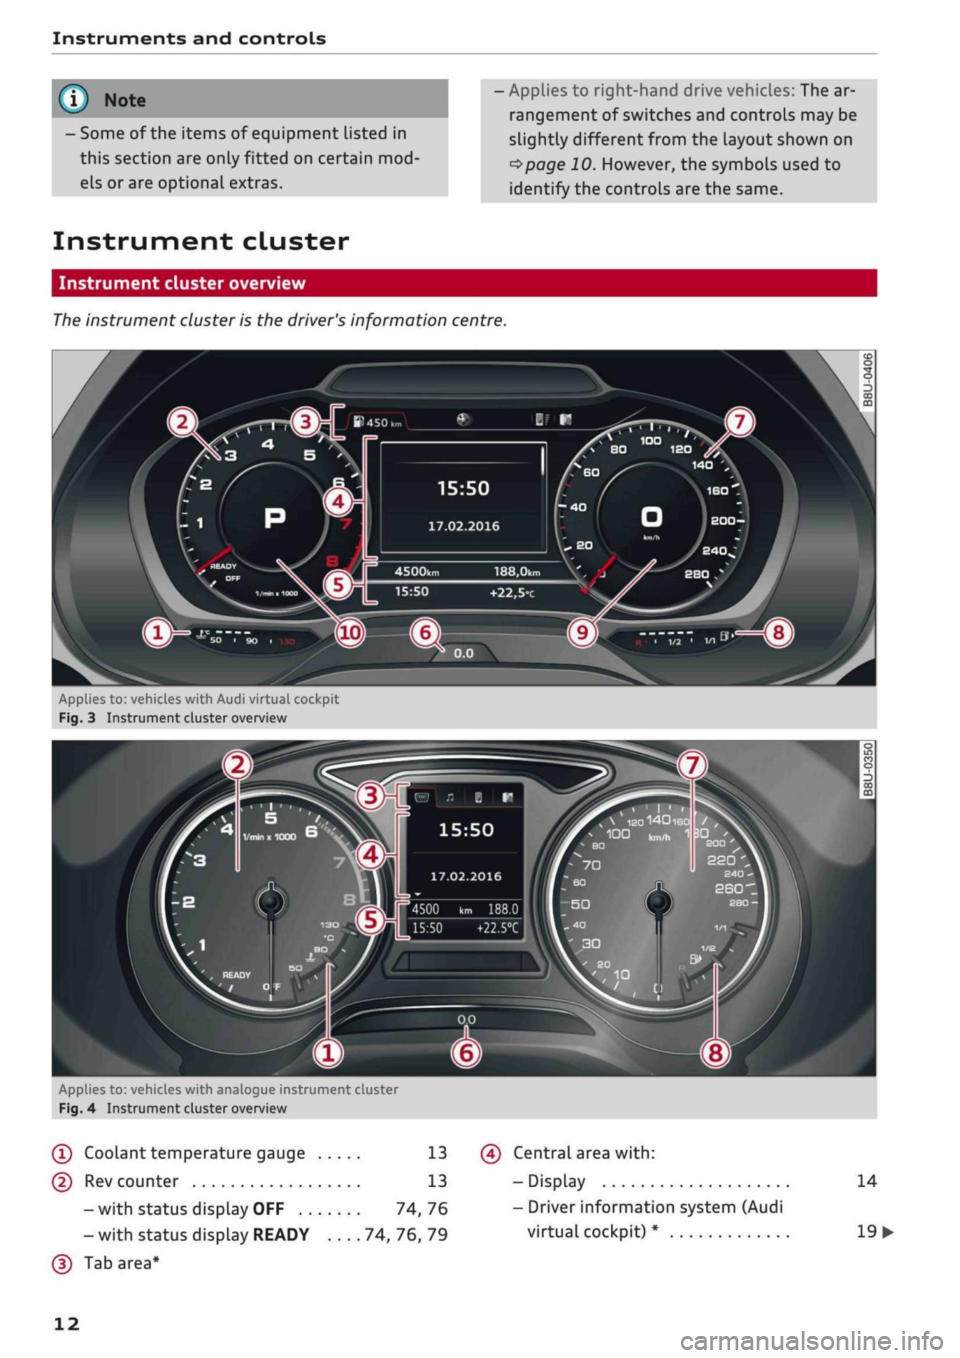
Instrument cluster overview
The
instrument cluster is the driver's information centre.
15:50
17.02.2016
188,0km
+22,5°c
Applies to:
vehicl.es
with Audi virtual cockpit
Fig.
3 Instrument cluster overview
„
\
IS0140180
/
,
100
kn,^
1
3DI '
BO
£00
22Q
4500 km 188.0
15:50
+22.5°C
Applies to: vehicles with analogue instrument cluster
Fig.
4 Instrument cluster overview
(T)
Coolant
temperature
gauge 13
(D Rev counter 13
-with status display OFF 74,76
- with status display READY 74, 76, 79
(D
Tab area*
(?) Central area
with:
- Display
- Driver information system (Audi
virtual cockpit) *
14
19
•
12
Page 15 of 364
Instruments and controls
CO
<
O
rN
r>
I-I
00
19
26
14
14
- Driver information system (ana
logue instrument cluster)* ....
-Warning and indicator Lamps ..
(f)
Status line (displayed on one
or
two
lines)
(?) Reset button for trip recorder ...
(7) Speedometer/convenience display
(§)
Fuel gauge
(9) Speedometer
@
Additional display on left (two sep
arate sections in extended view)
Further warning/indicator lamps may appear in
the rev counter
(2),
in the speedometer
(f),
in the
status line (5) and above or below the central
area
@,
depending on the instrument cluster
version.
Most of the illustrations on the following pages
show the colour analogue instrument cluster*.
The display and position of the elements may be
different on the monochrome instrument cluster
or the Audi virtual cockpit*.
1) Note
- Depending on the vehicle equipment, the
instrument lighting (for dials and needles)
may be switched on when the ignition is on
and the vehicle's lights are off. The illumi
nation of the diaLs and needles is automati
cally reduced as it becomes dark outside
and is eventually switched off altogether.
This function is intended to remind the driv
er to switch on the dipped headlights in
good time.
- You can change the measurement units for
temperature or speed, etc. via the infotain
ment system
^>page
255.
Coolant temperature gauge
The coolant temperature gauge
(T) ^>page
12,
Fig.
41 ^>page
12, Fig. 3 only works when the ig
nition is switched on. In order to avoid possible
damage to the engine, please read the following
notes for the different temperature ranges.
Engine cold
If the LEDs are still in the lower range of the dis
play, this indicates that the engine has not yet
reached operating temperature. Avoid high en
gine speeds, full acceleration and heavy engine
loads.
Normal temperature
The LEDs will settle somewhere in the centre of
the display once the engine has reached operat
ing temperature. If the warning lamp || lights
up in the instrument cluster display, the coolant
temperature is too high
<^>page
30.
© CAUTIO
- Additional lights and other accessories in
front of the air inlet reduce the cooling ef
fect of the radiator. At high outside temper
atures and high engine loads, there is a risk
of the engine overheating.
- The front spoiler also ensures proper distri
bution of the cooling air when the vehicle is
moving.
If the spoiler is damaged this can
reduce the cooling effect, which could cause
the engine to overheat. Obtain professional
assistance.
® Note
Applies to: vehicles with diesel engine
These engines are so efficient that they may
not reach their full operating temperature in
very cold weather. This is quite normal and no
cause for concern.
Rev counter
The
rev counter indicates the number of engine
revolutions per minute.
The start of the red zone on the dial indicates the
maximum engine speed which may be used brief
ly in all gears when the engine is warm and after
it has been run in properly. However, it is advisa
ble to change up a gear or move the selector lev
er to D/S (or
lift your
foot
off
the accelerator) be
fore the needle reaches the red zone. •
13
Page 17 of 364
Instruments
and
controls
CO
<
o
IV
tN
I-I
00
Vehicles with manual gearbox
-
•
Shifting
up
a gear:
The
suggested gear
ap
pears
to the
right
of
the current gear when
a
higher gear
is
recommended.
-
4
Shifting down
a
gear:
The
suggested gear
ap
pears
to the
left
of
the current gear when
a
lower gear
is
recommended.
The gearyou
are
currently
in and the
recommen
ded gear will
be
displayed. Gears
may
occasional
ly
be
skipped
(3 • 5).
Vehicles with start/stop system:
If
all
the
condi
tions
for
a
stop phase
^>page
79
have been
met,
but the
gear lever
is in
gear with
the
clutch
depressed,
the
gear change indicator will recom
mend changing
to
•N.
Put the
gear lever
in
neu
tral and take your foot
off
the clutch pedal.
The
start/stop system will automatically switch
off
the engine.
Vehicles with automatic gearbox
The display
is
only visible
in
tiptronic mode
^>page
90.
The symbol
Î
after
the
current gear means
change
up a
gear.
© CAUTION
The gear-change indicator
is
intended
to
help
save
fuel.
It is not
intended
to
recommend
the right gear
for all
driving situations.
In
cer
tain situations, only
the
driver can choose
the
correct gear
(for
instance when overtaking,
driving
up
a steep gradient
or
towing a
trail
er).
(T) Note
Applies
to:
vehicles with manual gearbox
The gear-change indicator
in the
instrument
cluster goes
out
when you press
the
clutch
pedal.
Outside temperature display
When
the
vehicle
is
stationary
or
travelling
at
very
low
speeds,
the
temperature displayed
may
be slightly higher than
the
actual outside
tem
perature
as
a result
of
the heat radiated from
the
engine.
At temperatures below +5°C a snowflake symbol
appears next
to the
temperature display
<=> A-
A WARNING
Do
not
rely
on the
outside temperature dis
play
as an ice
warning. Bear
in
mind that
there
may be
patches
of
ice
on the
roads even
at outside temperatures around
+5
°C
-
risk
of
accident!
Multi-function steering
wheel plus
How
to use the
multi-function steering
wheel
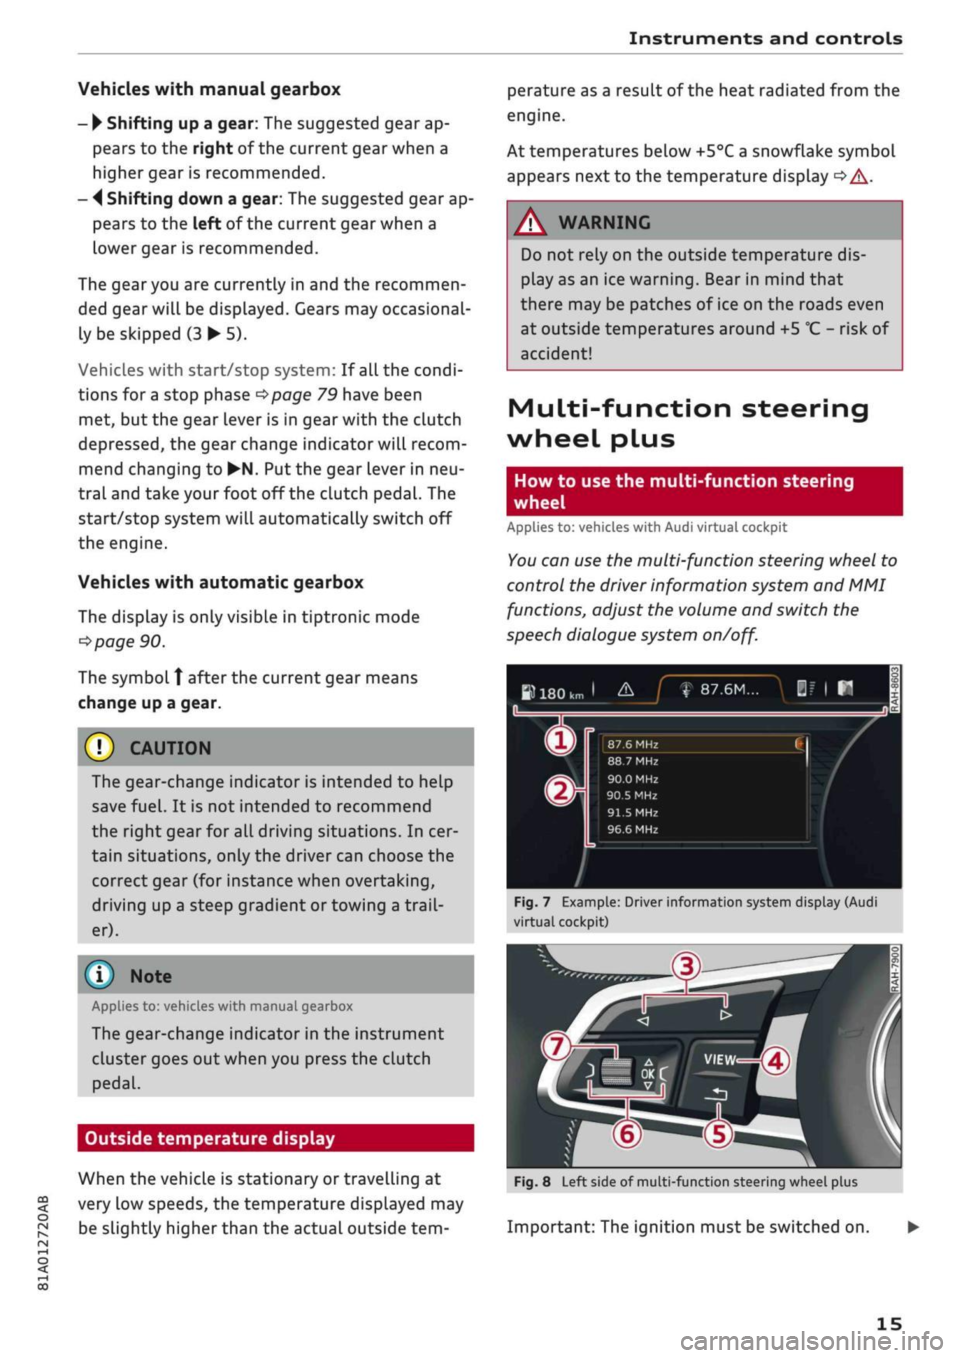
Applies
to:
vehicles with Audi virtual cockpit
You
can
use
the
multi-function steering wheel
to
control
the
driver information system
and MMI
functions, adjust
the
volume
and
switch
the
speech dialogue system
on/off.
»180km
1
&_J
f
87.6M...
|f
|
H
n
^
_
X
m
®r
87.6 MHz CI /
88.7 MHz
90.0 MHz
90.5
MHz
91.5
MHz
96.6 MHz
Fig.
7
Example: Driver information system display (Audi
virtual cockpit)
In
1-
m
Fig.
8
Left side
of
multi-function steering wheel plus
Important:
The
ignition must
be
switched
on.
15
Page 32 of 364
Instruments
and
controls
The brakes
may
perform differently than usual
and
the
brake pedal may vibrate.
Drive
to
a qualified workshop without delay
and
have
the
fault rectified.
A WARNING
- Before opening
the
bonnet and checking
the
brake fluid level, observe
the
warning infor
mation
on
*$page
295,
Working
on
compo
nents
in the
engine compartment.
-
If
the brake warning lamp does
not go out,
or
if it
lights up when driving,
the
brake
flu
id level in
the
reservoir
is too low -
this
may
cause an increased accident risk. Stop
the
vehicle and
do not
drive on. Obtain profes
sional assistance.
-
If
the brake warning lamp lights
up
togeth
er with
the
ABS indicator lamp and
the
ESC
indicator lamp, this can mean that
the
con
trol function
of
the ESC/ABS
is not
working.
Input from
the
functions that stabilise
the
vehicle
is no
longer available. This could
cause
the
tail of
the vehicle
to
skid
side
ways.
Do not
drive on. Obtain professional
assistance.
(®)/0
Electro-mechanical parking brake
The warning lamp
||
lights
up
when
the
parking
brake
is
applied.
If the warning lamp
||
flashes, insufficient brak
ing force
has
been applied
or
released. Select
first gear (manual gearbox)
or
position
P
(auto
matic gearbox)
as an
additional safeguard. Make
sure that
the
warning lamp has gone
out
before
you drive
off.
2J
Parking brake!
There
is
a malfunction
in the
parking brake. Drive
to a qualified workshop soon
and
have
the
fault
rectified.
[ft]
Parking brake auto release: unavailable
If this message appears, press
the
brake pedal
and then release
the
parking brake.
If the warning lamp flashes and
the
message
ap
pears,
the
brake
may not be
strong enough
to
hold
the
vehicle. The brakes have overheated.
The vehicle can roll away, even
on a
gentle slope.
©J Parking brake is applied
If this message appears, press
the
brake pedal
and then reLease
the
parking brake
as
necessary.
For further information
on the
parking brake
refer
to
^>page
82.
•as
Cooling system
| Switch
off
engine and check coolant level.
See owner's manual
The coolant level
is too low.
Switch
off
the engine and
do not
drive on. Check
the coolant level
^>page
299.
-
If
the coolant level
is too
low, add more coolant
^>page
300. Do not
drive
on
until
the
warning
lamp has gone
out.
| Coolant temperature too high! Let engine
run with vehicle stationary
Let
the
engine cool down
by
running
it at
idling
speed
for
a
few
minutes until
the
warning lamp
goes
out.
-
Do not
drive
on if
the warning lamp does
not
disappear. Obtain professional assistance.
JgJ
Caution:
Vehicle parked
too
steep
A WARNING
- Never open
the
bonnet
if
you
can see
or
hear
steam
or
coolant escaping from
the
engine
compartment; there
is
a risk
of
being
scal
ded.
Wait until you
can no
longer see
or
hear escaping steam
or
coolant.
-The engine compartment
of
any motor
vehi
cle
is
a dangerous place. Before carrying
out
any work
in the
engine compartment, switch
off the engine and allow
it to
cool down.
Please observe
the
important safety warn
ings
^>page
295,
Working
on
components
in
the
engine compartment.
30
Page 36 of 364
Instruments and controls
the exhaust gas and damage the catalytic
con
verter.
Drive slowly to a qualified workshop without de
lay and have the fault rectified.
Diesel particulate filter
Applies to: vehicles with diesel particulate filter
|
Particulate filter: system fault. See owner's
manual
The diesel particulate filter requires regenera
tion.
You can assist the self-cleaning function of
the filter by driving as follows:
Drive at a speed of at least 60 km/h for about
15 minutes in 4th or 5th gear (on vehicles with
manual gearbox), or with the selector lever in po
sition S (on vehicles with automatic gearbox).
Keep the engine speed at about 2000
rpm.
As a
result of the increase in temperature, the soot in
the filter will be burned off. The indicator lamp
will go out once the cleaning process has been
completed successfully.
If the indicator lamp does not go out, drive to a
qualified workshop without delay and have the
fault rectified.
A WARNING
It is essential that you adjust your speed to
suit the weather,
road,
terrain and traffic
con
ditions. The recommended driving speed
must never lead to the driver disregarding the
traffic regulations.
(T) Note
For more information about the diesel partic
ulate filter, refer to
^>page
295.
!
»
Engine speed governing
Applies to: vehicles with engine speed governing
[51 Max. engine speed: XXXX rpm
The engine speed will automatically be governed
to the speed displayed in the instrument cluster.
This protects the engine from overheating.
The rev limiter is deactivated as soon as the en
gine temperature is no longer within the critical
range and you have taken
your
foot off the accel
erator.
If the rev limiter has been activated because of a
fault in the engine management system, the in
dicator lamp
Q or[|2g
will also light up. Make
sure that the engine speed does not exceed the
speed displayed in the driver information system,
for example when shifting down a gear. Drive to
a qualified workshop without delay and have the
fault rectified.
Engine oil level
(MIN)
23
Please check oil level
You can continue driving for the time being but
you should check the engine oil level as soon as
possible
<^page
297.
- If the engine oil level is too Low, add more oil
^>page
298, Checking and topping up the en
gine oil level.
- If the engine oil level is normal but the indica
tor lamp stays on, drive to a qualified workshop
without delay and avoid high engine speeds.
ST
Engine oil sensor
3
Oil level sensor: system fault
The sensor for checking the engine oil level has
failed.
Drive to a qualified workshop soon and
have the fault rectified.
3
Oil level sensor: oil change required. Please
contact workshop
The engine oil level is too
high.
Drive to a qualified workshop without delay and
have the fault rectified.
CAUTION
Please observe the procedure described in the
Owner's Manual
^>page
298, Checking and
topping up the engine oil level.
f Engine warm-up
requested
Please warm up engine
34
Page 37 of 364
Instruments and controls
CO
s
rN rN
•-i
00
Fuel has entered the engine oil due to low out
side temperatures or frequent short trips. Drive
until the engine is warm to allow the fuel to
evaporate out of the engine oil. When doing so,
avoid high engine speeds, full acceleration and
heavy engine loads.
m
Fuel tank system
P3 Please refuel
When the indicator lamp lights up for the first
time and the message appears, there are still
about 7 litres (front-wheeL drive) or about
8.5
li
tres (four-wheel drive) of fuel left in the tank.
IM
Please refuel immediately
If the indicator lamp lights up and the message
appears, the fuel tank is almost empty. Drive to a
filling station without delay.
E3
Tank system malfunction! Please contact
workshop
There is a malfunction in the tank system.
Drive to a qualified workshop without delay and
have the fault rectified.
S
Driver's door*
For more information about filling the tank,
refer to
=>page
290.
Please add washer fluid
With the ignition switched off, top up the fluid
for the windscreen washer and headlight washer
system*
^>page
303.
Windscreen wipers
Windscreen wiper defective
There is a malfunction in the windscreen wipers.
Drive to a qualified workshop without delay and
have the fault rectified.
E]
Driver's door: fault. Shift to P before leaving
vehicle. See owner's manual
A malfunction has occurred in the driver's door.
Move the selector lever to position P (automatic
gearbox) to hold the vehicle.
Drive to a qualified workshop soon and have the
fault rectified.
-
If the indicator Lamp
jjjj
Lights up, a bulb has
failed.
The message indicates the location of the
bulb.
Have the bulb replaced without delay.
Vehicle lights: malfunction!
There is a fault with the headlights or light
switch.
Drive to a qualified workshop soon and
have the fault rectified.
/\
WARNING
Bulbs are sensitive to pressure. The glass can
break when you touch the bulb, causing in
jury.
ip
Dynamic headlight range control
Applies to: vehicles with dynamic headlight range control
13
Headlight range control: system fault!
There is a malfunction in the dynamic headlight
range control which may cause other road users
to be dazzled.
Drive to a qualified workshop without delay and
have the fault rectified.
•D
Audi adaptive light
Applies to: vehicles with Audi adaptive light
US
Audi adaptive light: system fault!
There is a malfunction in the adaptive light. The
dipped beam headlights will still be working nor
mally.
Drive to a qualified workshop soon and have the
fault rectified.
35
Page 50 of 364
Doors and windows
Panorama sun roof
Description
Applies to: vehicles with panorama sun roof
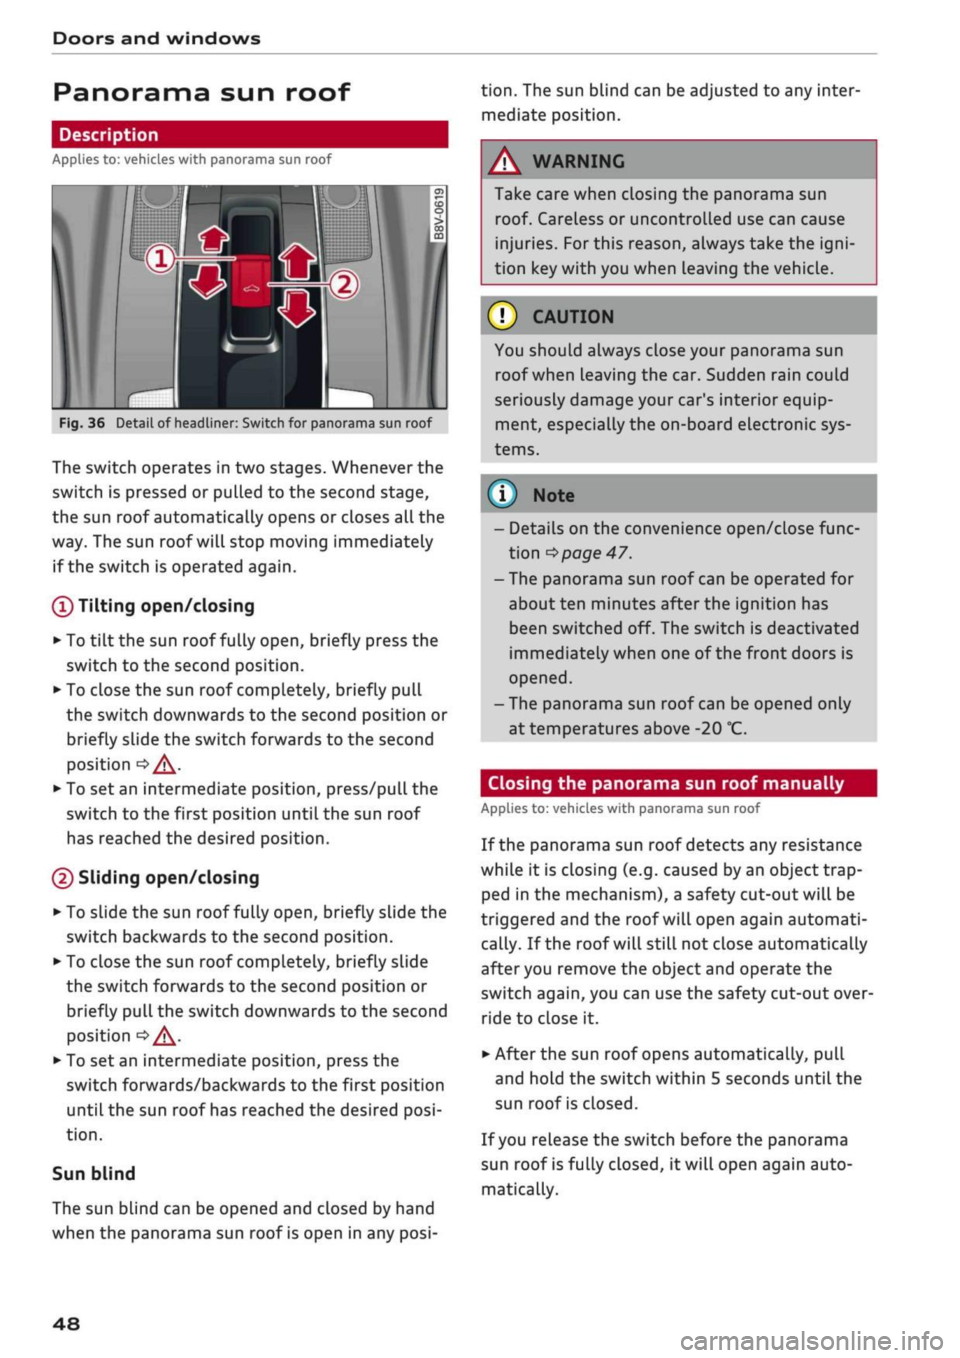
1
Fig.
36 Detail of headliner: Switch for panorama sun roof
The switch operates in two stages. Whenever the
switch is pressed or pulled to the second stage,
the sun roof automatically opens or closes all the
way. The sun roof will stop moving immediately
if the switch is operated again.
(T)
Tilting open/closing
• To
tilt
the sun roof fully open, briefly press the
switch to the second position.
•
To close the sun roof completely, briefly pull
the switch downwards to the second position or
briefly slide the switch forwards to the second
position
•=> /\.
• To set an intermediate position, press/pull the
switch to the first position until the sun roof
has reached the desired position.
(D Sliding open/closing
•
To slide the sun roof fully open, briefly slide the
switch backwards to the second position.
•
To close the sun roof completely, briefly slide
the switch forwards to the second position or
briefly pull the switch downwards to the second
position
oA-
•
To set an intermediate position, press the
switch forwards/backwards to the first position
until the sun roof has reached the desired
posi
tion.
Sun blind
The sun blind can be opened and closed by hand
when the panorama sun roof is open in any
posi
tion.
The sun blind can be adjusted to any inter
mediate position.
Take care when closing the panorama sun
roof. Careless or uncontrolled use can cause
injuries. For this reason, always take the
igni
tion key with you when Leaving the vehicle.
© CAUTION
You should always close your panorama sun
roof when leaving the car. Sudden rain could
seriously damage your car's interior equip
ment, especially the on-board electronic sys
tems.
© Note
- Details on the convenience open/close func
tion
^>
page 47.
-The panorama sun roof can be operated for
about ten minutes after the ignition has
been switched off. The switch is deactivated
immediately when one of the front doors is
opened.
-The panorama sun roof can be opened only
at temperatures above -20
°C.
Closing the panorama sun roof manually
Applies to: vehicles with panorama sun roof
If the panorama sun roof detects any resistance
while it is closing (e.g. caused by an object trap
ped in the mechanism), a safety cut-out will be
triggered and the roof will open again automati
cally. If the roof will still not close automatically
after you remove the object and operate the
switch again, you can use the safety cut-out over
ride to close it.
• After the sun roof opens automatically, pull
and hold the switch within 5 seconds until the
sun roof is closed.
If
you
release the switch before the panorama
sun roof is fully closed, it will open again auto
matically.
48
Page 52 of 364
Lights and vision
Avoid using the side lights for long periods
(several hours). If possible, switch the left
or right parking Lights on.
Observe all relevant statutory requirements
when using the lighting systems described
here.
- The light sensor for the automatic
head
lights*
is Located in the mounting for the in
terior mirror. Do not affix any stickers on
this section of the windscreen.
- Depending on the export market, the rear
lights on some vehicles may be switched on
together with the headlights when the
day
time running lights* are activated. On other
vehicles, the rear lights remain off.
-In cool
or
damp weather, the inside of the
headlights, turn signals or rear lights can
sometimes mist up, due to the temperature
difference between the interior and exterior
of the car. They should clear again partially
or completely soon after you switch on the
headlights. This phenomenon has no
influ
ence on the life expectancy of the vehicle
lights.
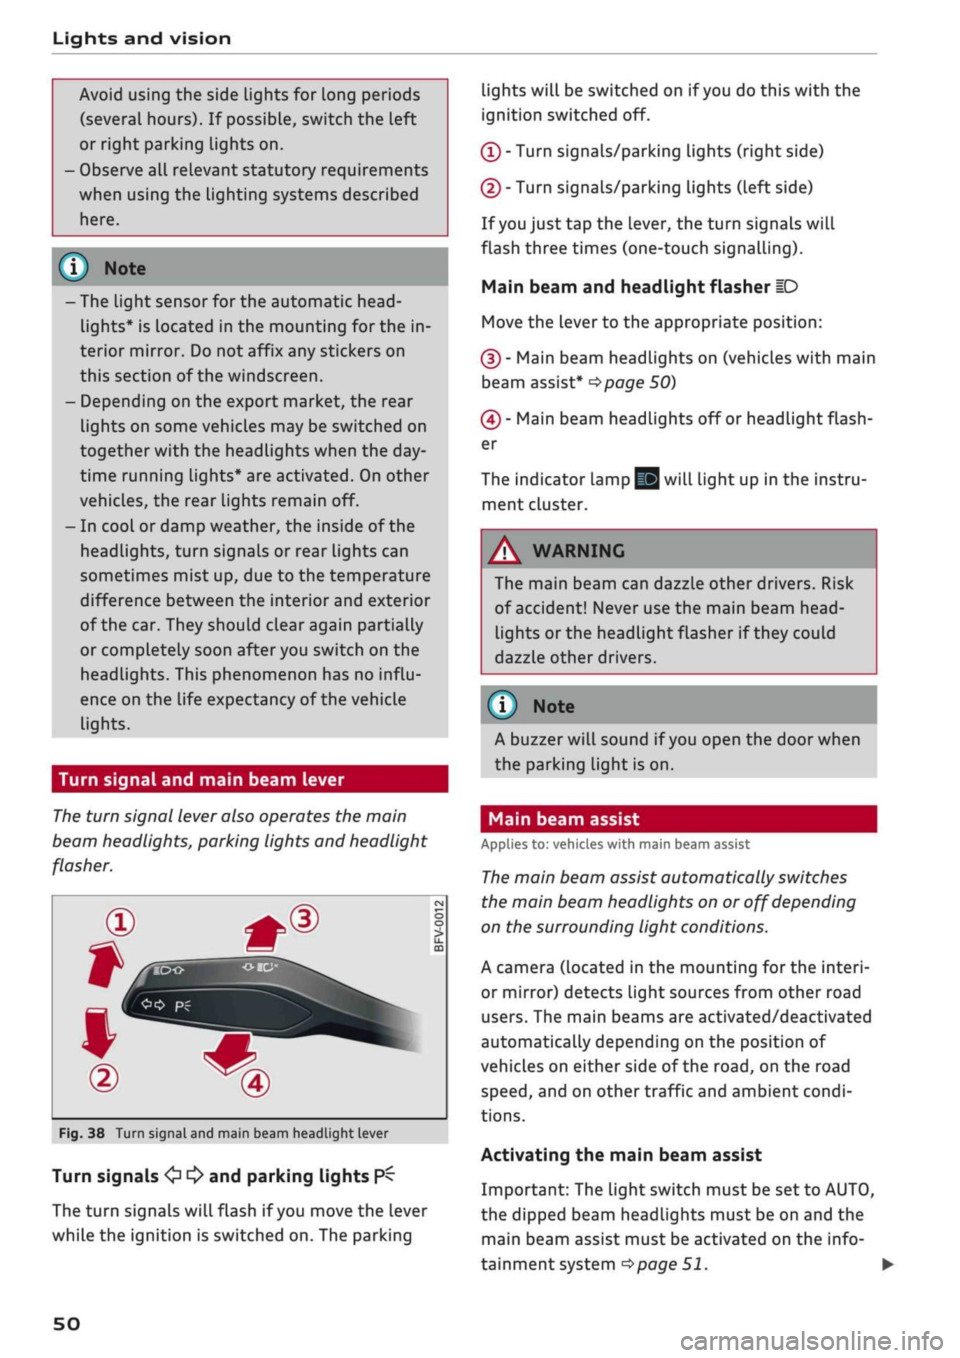
Turn signal and main beam lever
The
turn signal lever also operates the main
beam headlights, parking lights and headlight
flasher.
oo
PÏ
Fig.
38 Turn signal and main beam headlight lever
Turn signals
<£> ^
and parking lights
P^
The turn signals will flash if
you
move the lever
while the ignition is switched on. The parking
lights will be switched on if
you
do this with the
ignition switched off.
(T)
- Turn signals/parking Lights (right side)
(D - Turn signals/parking lights (left side)
If
you
just tap the lever, the turn signals will
flash three times (one-touch signalling).
Main beam and headlight flasher
ID
Move the lever to the appropriate position:
(§)
- Main beam headlights on (vehicles with main
beam assist*
^>page
50)
(4) - Main beam headlights off or headlight flash
er
The indicator lamp
gg
will light up in the instru
ment cluster.
A WARNING
The main beam can dazzle other drivers. Risk
of accident! Never use the main beam
head-
Lights or the headlight flasher if they could
dazzle other drivers.
© Note
A buzzer will sound if
you
open the door when
the parking light is on.
Main beam assist
Applies to: vehicles with main beam assist
The
main beam assist automatically switches
the main beam headlights on or off depending
on the surrounding light conditions.
A camera (located in the mounting for the interi
or mirror) detects light sources from other road
users.
The main beams are activated/deactivated
automatically depending on the position of
vehicles on either side of the
road,
on the road
speed,
and on other traffic and ambient condi
tions.
Activating the main beam assist
Important: The light switch must be set to AUTO,
the dipped beam headlights must be on and the
main beam assist must be activated on the info
tainment system
^>page
51.
•
50
Page 55 of 364

Lights and vision
CO
<
O
rN
iv
rN
i—i
o
< 00
Background lighting
Applies
to: vehicles with background lighting
The
background lighting can be adjusted via the
infotainment system.
• Select the following on the infotainment sys
tem:
|MENU| button > Car
>
left control button
> Vehicle settings > Background lighting.
It may be possible to adjust the brightness of the
individual zones, depending on the equipment
fitted in your vehicle:
• Press the right control button and select one of
the zones displayed.
The background lighting will be switched on
when you switch on the headlights with the
igni
tion on.
Instrument lighting
The
background lighting of the instruments and
displays (including the head-up display*) can be
adjusted as required.
Fig.
42 Instrument lighting
• Briefly press the knob to release it.
• Turn the knob towards "-" or "+" to reduce or in
crease the brightness of the lighting.
• Briefly press the knob again to engage it.
Depending on the vehicle equipment, the in
strument lighting (for dials and needLes) may
be switched on when the ignition is on and
the vehicle's lights are off. The illumination of
the dials and needles is automatically reduced
as it becomes dark outside and is eventually
switched off altogether. This function is in
tended to remind the driver to switch on the
dipped headlights in good time.
dear
vision
Adjusting the exterior mirrors
Fig.
43 Driver's door: Adjuster knob for exterior mirrors
(example)
Turn the knob to the appropriate position:
0 - To deactivate all setting functions.
C}/^
- To adjust the exterior mirror (left or right
side).
Move the knob in the desired direction.
Q#l
- To heat* the mirrors (depends on the outside
temperature).
&
- To fold in the exterior mirrors*. To fold the
mirrors out, turn the knob to any of the other po
sitions. One of the infotainment settings allows
you to control whether or not the mirrors are
fol
ded in when you lock the vehicle
•=>page
41.
Tilt function* for front passenger's exterior
mirror
The mirror is tiLted slightly to provide a better
view of the kerb when parking backwards. This
feature only works when the knob is in the
posi
tion for adjusting the mirror on the passenger
side.
You can adjust the tilted mirror surface by mov
ing the knob in the desired direction. This new
position is automatically stored and assigned to
the remote control key when you take the car out
of reverse.
The mirror returns to its original position as soon
as you drive forwards at over 15 km/h or switch
off the ignition. •
53
Page 57 of 364

Lights and vision
CO
<
o
rN
iv
rN
t-H
o
< 00
The light* for the make-up mirror comes on auto
matically when you slide open the mirror cover
©•
Windscreen wipers
Switching on the windscreen wipers
V
WJIO
*
Fig. 45
Windscreen
wiper
lever
m®
v
"trj-i
s
to
o > 03 m
Fig.
46 Control lever for rear wiper
Move the windscreen wiper lever to the appropri
ate position:
@-Wipers
off
(Î) - Intermittent wipe. Move switch
®
to the Left
or to the right to increase or reduce the wiper de
lay interval. If your vehicle is equipped with a rain
sensor*, the windscreen wipers will be activated
automatically in the rain as long as the vehicle
has been moving faster than approx. 4 km/h at
Least once. The higher the sensitivity level for the
rain sensor (i.e. the further switch
(Â)
is moved to
the right), the sooner the windscreen wipers re
act to moisture on the windscreen. You can deac
tivate the rain sensor mode on the infotainment
system (this will activate the intermittent wipe
mode). To do so, select: |MENU| button > Car >
left control button > Driver assist
>
Rain sensor.
@-
Slow wipe
(|)-
Fast
wipe
(?) - Single wipe. If
you
hold the lever in this
posi
tion,
the wipers will switch from slow continuous
wiping to fast continuous wiping after
a
while.
(D - Wash/wipe. The screen is given an extra wipe
a few seconds later to remove any dribbles of wa
ter (if the vehicle is moving and the temperature
is above approx. 4
°C).
You can deactivate this
function by moving the lever to position
(s)
again
within 10 seconds after the extra wipe. The ex
tra-wipe function is activated again the next time
you switch on the ignition.
Headlight washers*. The headlight washer sys
tem*
only operates when the dipped headlights
are switched on. The headlights are also auto
matically washed intermittently when you move
the lever to position
(s).
(?) - Rear wipe. The rear window is wiped approxi
mately every 6 seconds.
If the windscreen wipers are on and in operation,
the rear window wiper will also be switched on
automatically when you engage reverse gear.
©-
Rear wash/wipe. The number of wiper cycles
depends on how long you hold the Lever in
posi
tion©.
A WARNING
- The rain sensor* is only intended to assist
the driver. The driver is still obliged to
man
ually operate the windscreen wipers as re
quired depending on visibility.
- Do not use water-repellent coatings on the
windscreen. In bad visibility conditions such
as light
rain,
low sun or when driving at
night these coatings can cause increased
dazzle, which is a serious safety hazard.
Such coatings can aLso cause the wiper
blades to judder.
- Poor visibility can cause accidents. Always
ensure that the wiper blades are in good
condition
^>page
56, Changing the
wind
screen wiper blades.
55