USB AUDI Q2 2021 Owner´s Manual
[x] Cancel search | Manufacturer: AUDI, Model Year: 2021, Model line: Q2, Model: AUDI Q2 2021Pages: 364, PDF Size: 87.77 MB
Page 13 of 364
Instruments and controls
CO
<
o
IV
tN
t-H
o <
(D
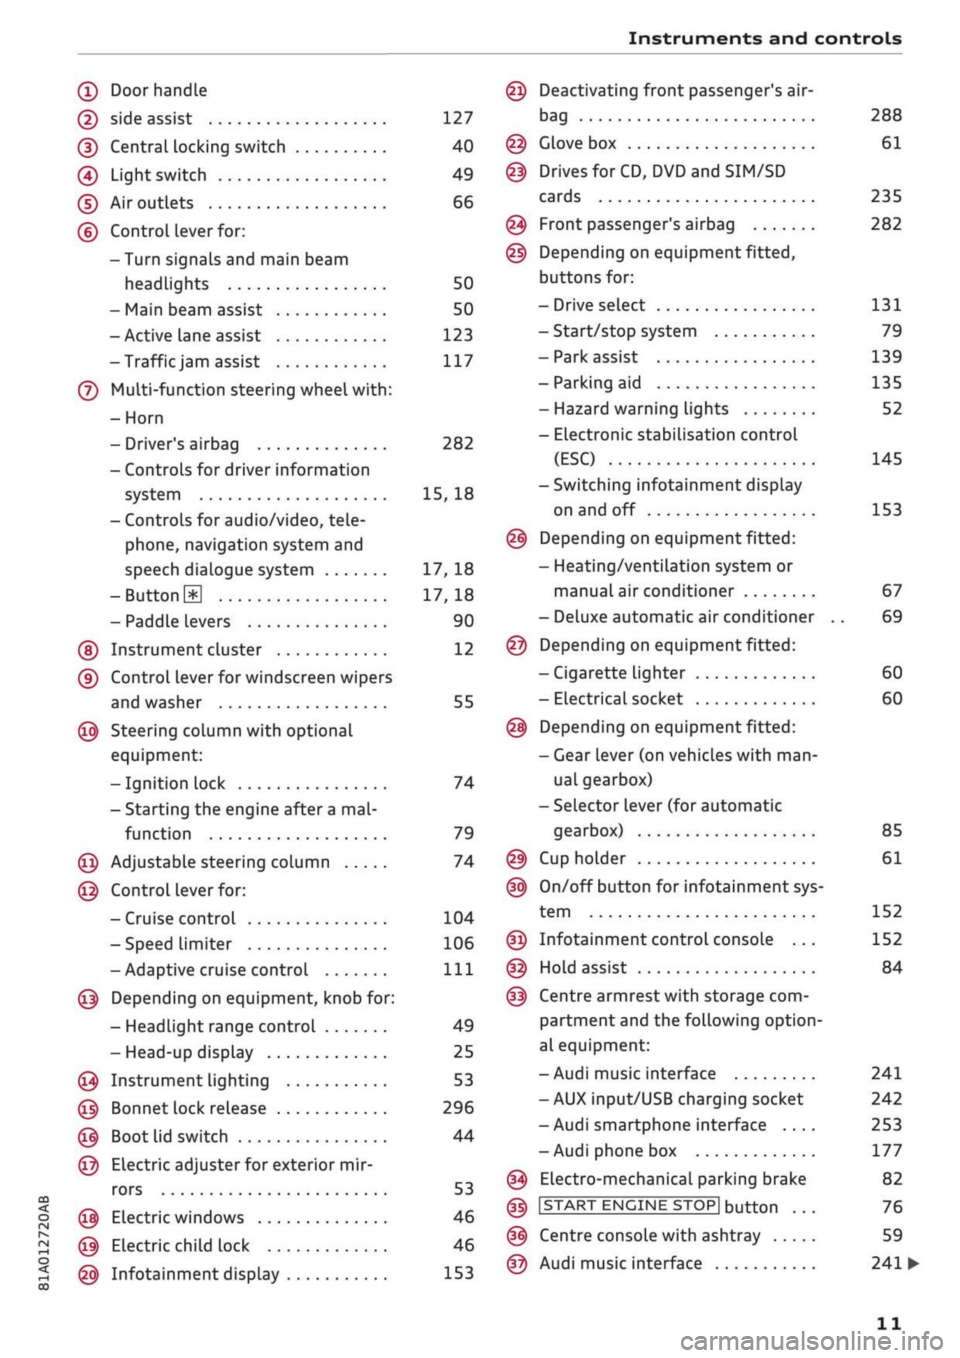
Doorhandle
(D side assist 127
(D CentraL
locking switch 40
@
Light switch 49
(D Air outlets 66
(?) Control lever for:
- Turn signals and main beam
headlights 50
- Main beam assist 50
- Active lane assist 123
-Trafficjam
assist 117
(7) Multi-function steering wheel
with:
- Horn
- Driver's airbag 282
- Controls for driver information
system 15, 18
- Controls for audio/video, tele
phone,
navigation system and
speech dialogue system 17, 18
-ButtonH
17,18
- Paddle levers 90
(5) Instrument cluster 12
(?) Control lever for windscreen wipers
and washer 55
@
Steering column with optional
equipment:
- Ignition lock 74
- Starting the engine after a
mal
function 79
@
Adjustable steering column 74
@
Control lever for:
- Cruise control 104
- Speed limiter 106
-Adaptive cruise control
Ill
@
Depending on equipment, knob for:
- Headlight range control 49
- Head-up display 25
@
Instrument lighting 53
@
Bonnet lock release 296
@
Boot lid switch 44
@
Electric adjuster for exterior mir
rors 53
@
Electric windows 46
@
Electric child lock 46
@
Infotainment display 153
Deactivating front passenger's air-
bag
Glove box
Drives for CD, DVD and
SIM/SD
cards
Front passenger's airbag
Depending on equipment fitted,
buttons for:
- Drive select
- Start/stop system
- Park assist
- Parking aid
- Hazard warning lights
- Electronic stabilisation control
(ESC)
-Switching infotainment display
on and off
Depending on equipment fitted:
- Heating/ventilation system or
manual air conditioner
- Deluxe automatic air conditioner
Depending on equipment fitted:
- Cigarette lighter
- Electrical socket
Depending on equipment fitted:
- Gear lever (on vehicles with
man
ual gearbox)
- Selector lever (for automatic
gearbox)
Cup holder
On/off button for infotainment sys
tem
Infotainment control console ...
Hold assist
Centre armrest with storage com
partment and the following option
al equipment:
- Audi music interface
- AUX input/USB charging socket
- Audi smartphone interface ....
- Audi phone box
Electro-mechanical parking brake
|START
ENGINE STOP] button
Centre console with ashtray
Audi music interface
288
61
235
282
131
79
139
135
52
145
153
67
69
60
60
85
61
152
152
84
241
242
253
177
82
76
59
241
•
11
Page 62 of 364
Seats and storage
The ashtray is inserted in the centre console and
can be placed on either the driver's or front pas
senger's side. Lift the lid to open the ashtray. Al
ways put the ashtray safely back into the holder
after removing it (e.g. after emptying it).
A WARNING
Never put waste paper in the ashtray, as this
could cause a fire
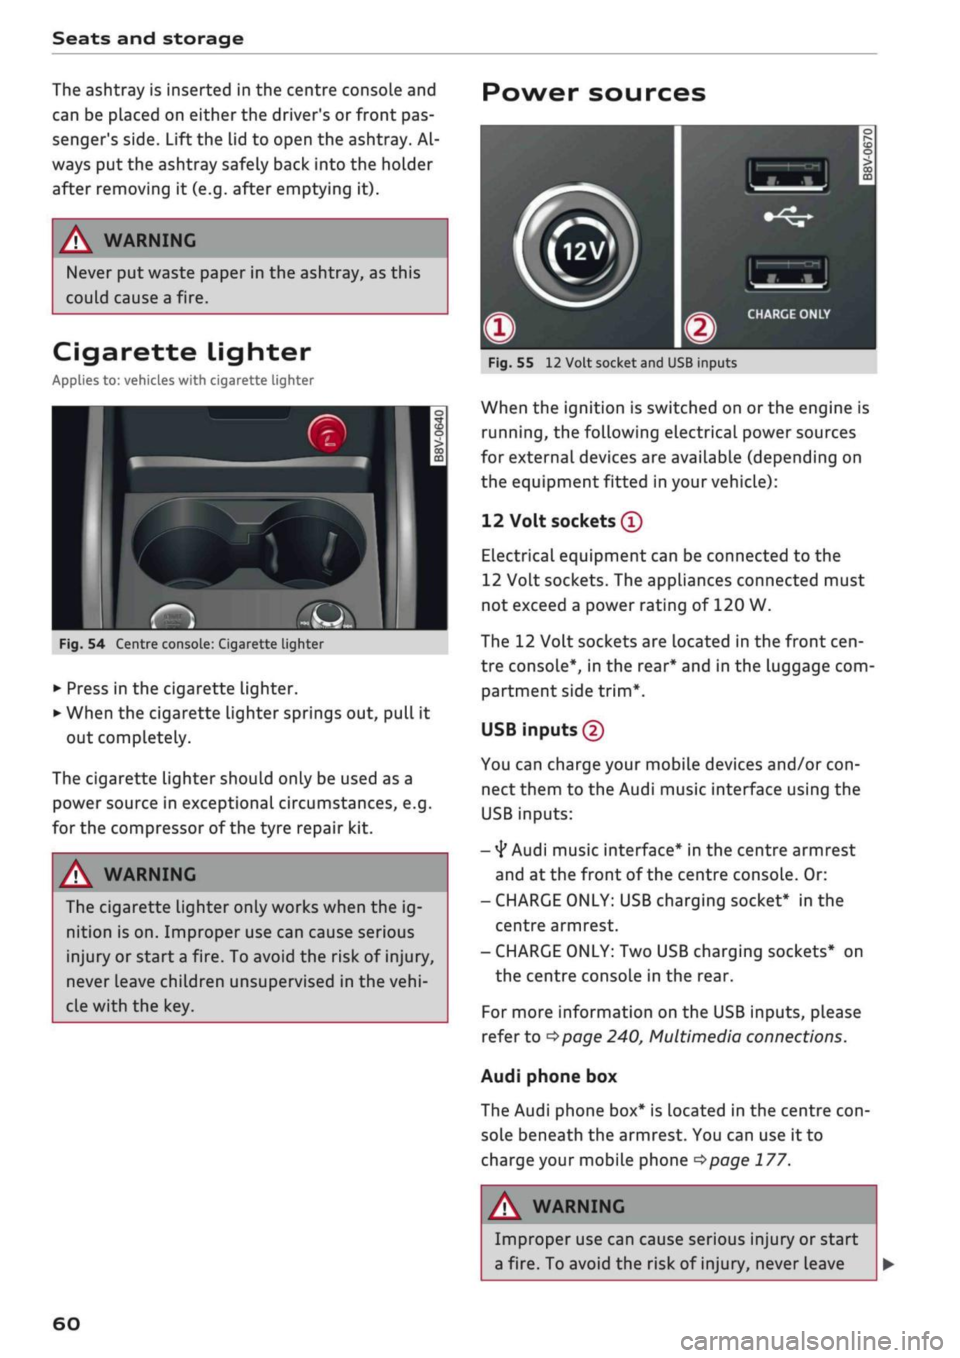
Cigarette lighter
Applies to: vehicles with cigarette lighter
-
c
cc
o
Fig.
54 Centre console: Cigarette lighter
• Press in the cigarette lighter.
• When the cigarette lighter springs out, pull it
out completely.
The cigarette lighter should only be used as a
power source in exceptional circumstances, e.g.
for the compressor of the tyre repair kit.
A WARNING
The cigarette lighter only works when the ig
nition is on. Improper use can cause serious
injury or start a fire. To avoid the risk of injury,
never leave children unsupervised in the
vehi
cle with the key.
60
Power sources
-
CO
-
Fig.
55
12
Volt socket and USB inputs
When the ignition is switched on
or
the engine is
running,
the following electrical power sources
for external devices are available (depending on
the equipment fitted in your vehicle):
12 Volt sockets
®
Electrical equipment can be connected to the
12 Volt sockets. The appliances connected must
not exceed a power rating of 120 W.
The 12 Volt sockets are located in the front
cen
tre console*, in the rear* and in the luggage com
partment side
trim*.
USB inputs (2)
You can charge your mobile devices and/or
con
nect them to the Audi music interface using the
USB inputs:
-
4*
Audi music interface* in the centre armrest
and at the front of the centre console. Or:
- CHARGE ONLY: USB charging socket* in the
centre armrest.
- CHARGE ONLY: Two USB charging sockets* on
the centre console in the rear.
For more information on the USB inputs, please
refer to
^>page
240, Multimedia connections.
Audi phone box
The Audi phone box* is located in the centre
con
sole beneath the armrest. You can use it to
charge your mobile phone
<$page
177.
A
i
WARNING
Improper use can cause serious injury or start
a fire. To avoid the risk of injury, never Leave
Page 63 of 364
Seats and storage
CO
rN
•-i
00
children unsupervised in the vehicle with the
key.
© CAUTION
- To avoid damage, please take care when de
taching connectors from the electrical pow
er sources.
-To avoid damage to the vehicle's electrical
system,
never connect equipment that
gen
erates electrical current, such as a solar
panel or battery charger, to the power sour
ces in order to charge the vehicle's battery.
- Always use the correct type of plugs to
avoid damaging the power sources.
©
USB charging sockets marked "CHARGE ON
LY" cannot transfer data and are intended for
charging only.
Storage
Cup holders
/
Fig.
56
BfT
^^—- j
^^ m /
Detail of the rear seat bench: Rear cup holder*
r^
n
co
3
>
CO
m
A
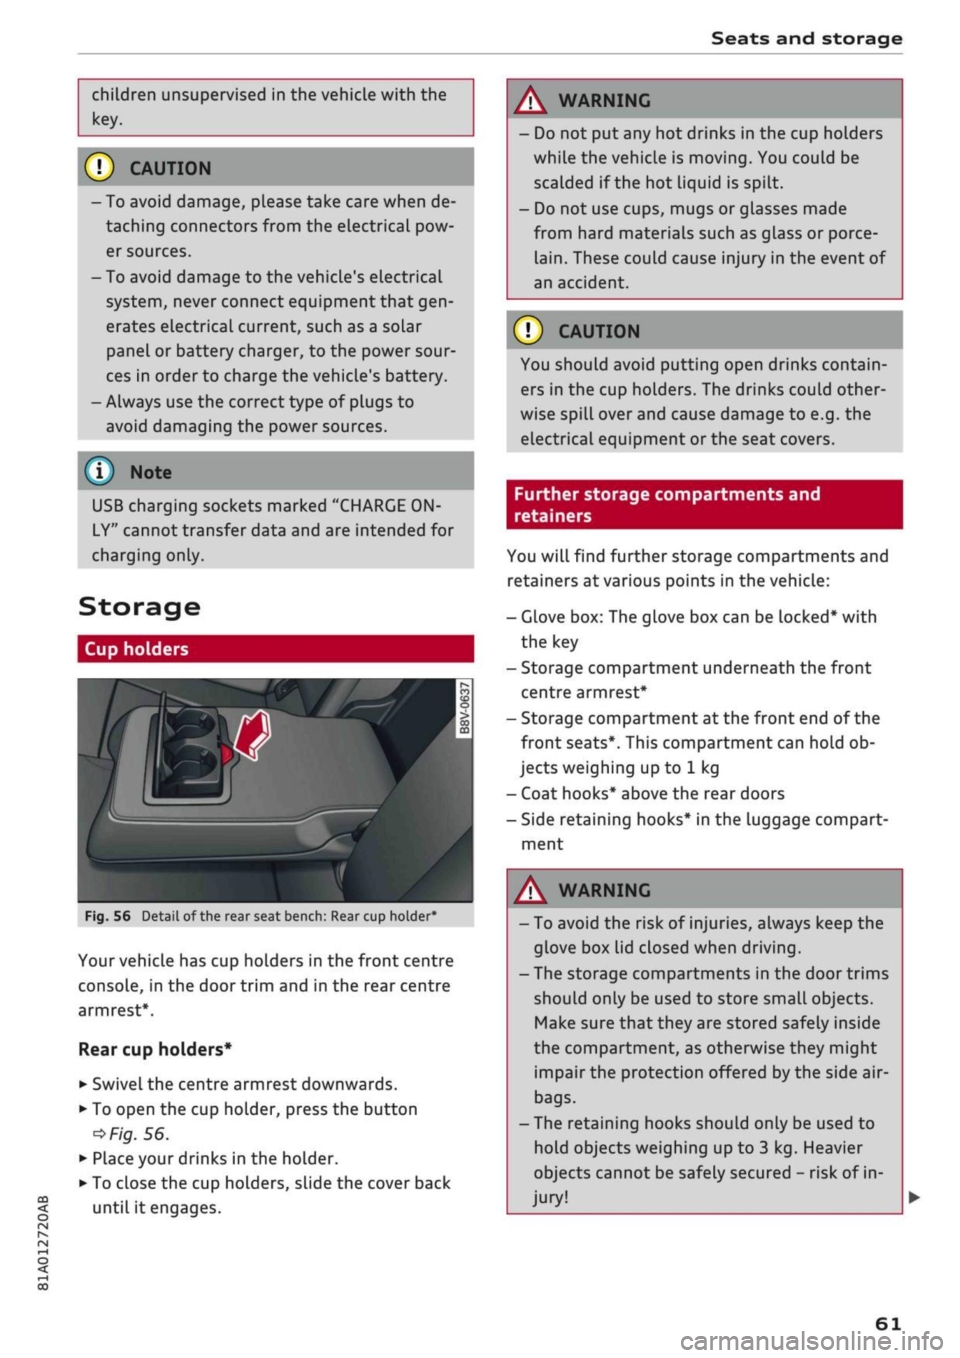
Your vehicle has cup holders in the front centre
console, in the door trim and in the rear centre
armrest*.
Rear cup holders*
• Swivel the centre armrest downwards.
• To open the cup holder, press the button
•=>
Fig.
56.
• Place your drinks in the holder.
• To close the cup holders, sLide the cover back
until it engages.
A WARNING
- Do not put any hot drinks in the cup holders
while the vehicle is moving. You could be
scalded if the hot liquid is spilt.
- Do not use cups, mugs or glasses made
from hard materials such as glass or porce
lain.
These could cause injury in the event of
an accident.
© CAUTION
You should avoid putting open drinks contain
ers in the cup holders. The drinks could other
wise spill over and cause damage to e.g. the
electrical equipment or the seat covers.
Further storage compartments and
retainers
You will find further storage compartments and
retainers at various points in the vehicle:
- Glove box: The glove box can be Locked* with
the key
- Storage compartment underneath the front
centre armrest*
- Storage compartment at the front end of the
front seats*. This compartment can hold ob
jects weighing up to 1 kg
- Coat hooks* above the rear doors
- Side retaining hooks* in the luggage compart
ment
A WARNING
- To avoid the risk of injuries, always keep the
glove box Lid closed when driving.
- The storage compartments in the door trims
should only be used to store small objects.
Make sure that they are stored safely inside
the compartment, as otherwise they might
impair the protection offered by the side air-
bags.
- The retaining hooks should only be used to
hold objects weighing up to 3 kg. Heavier
objects cannot be safely secured - risk of in
jury!
61
Page 158 of 364
Multi Media Interface
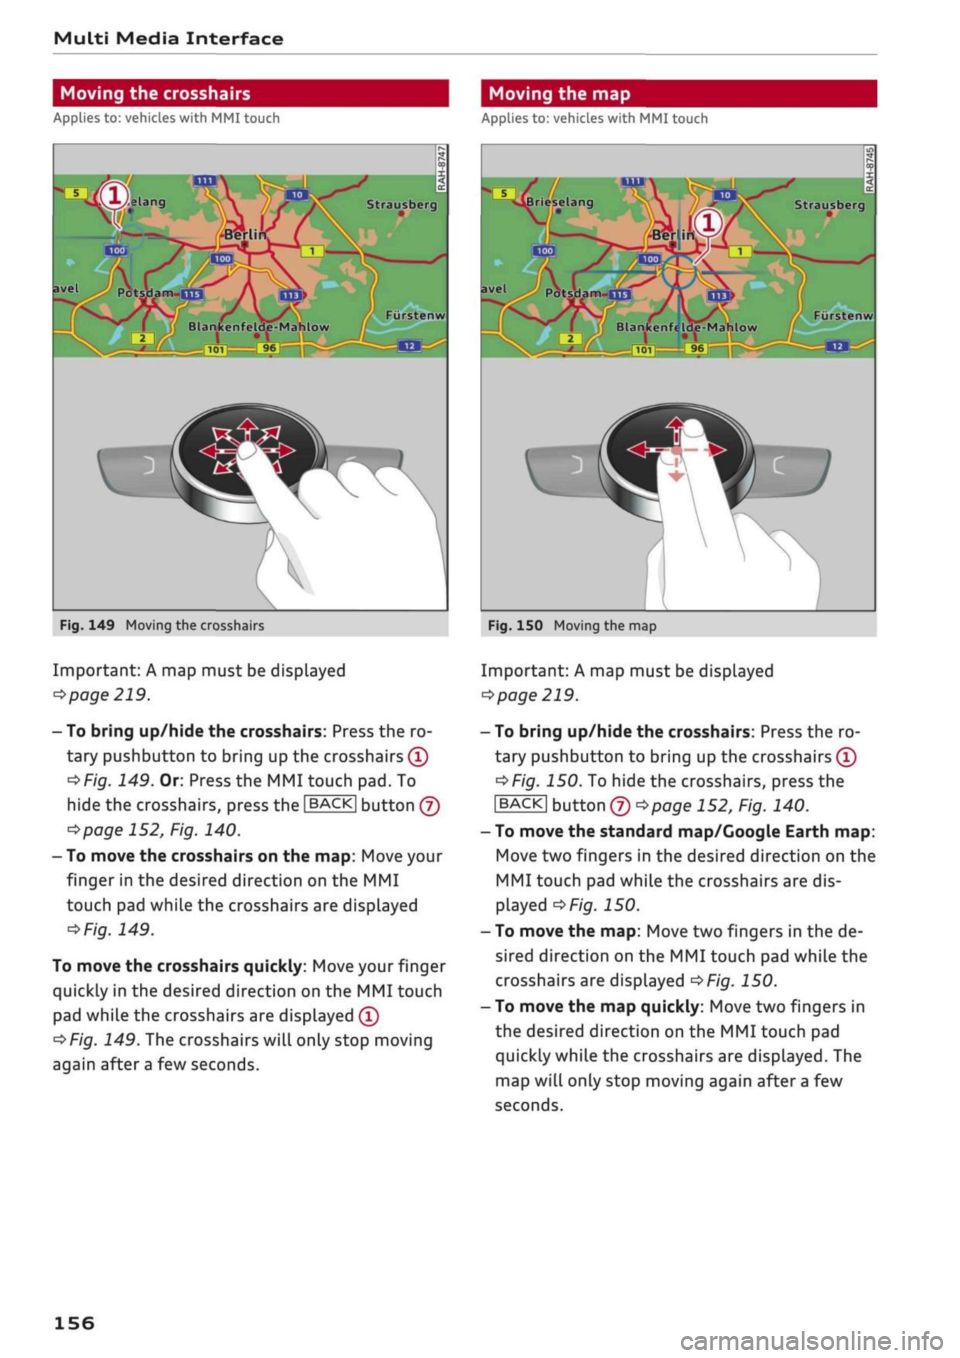
Moving the crosshairs
Applies to: vehicles with MMI touch
Moving the map
Applies to: vehicles with MMI touch
Strausberg
Potsdam-UJ3
/
101
9l
kenfelde-Mahlow
Fiirstenw
Fig.
149 Moving the crosshairs
Important: A map must be displayed
•=>
page 219.
- To bring up/hide the crosshairs: Press the ro
tary pushbutton to bring up the crosshairs
(Î)
*>Fig.
149. Or: Press the MMI touch pad. To
hide the crosshairs, press the
JBACK|
button
(J)
^>page
152, Fig. 140.
- To move the crosshairs on the map: Move your
finger in the desired direction on the MMI
touch pad while the crosshairs are displayed
^Fig.
149.
To move the crosshairs quickly: Move your finger
quickly in the desired direction on the MMI touch
pad while the crosshairs are displayed
(Î)
^Fig.
149. The crosshairs will only stop moving
again after
a
few seconds.
Briesela Strausberg
avel
PotsHam-na
Furstenw
Blankenfe Ide-Mahlow
L
•J
Fig.
150 Moving the map
Important: A map must be displayed
•=>
page 219.
- To bring up/hide the crosshairs: Press the ro
tary pushbutton to bring up the crosshairs
(T)
•=>F/g.
150. To hide the crosshairs, press the
|BACK| button
® ^>page
152, Fig. 140.
- To move the standard map/Google Earth map:
Move two fingers in the desired direction on the
MMI touch pad while the crosshairs are dis
played
^>Fig.
150.
- To move the map: Move two fingers in the de
sired direction on the MMI touch pad while the
crosshairs are displayed
^>Fig.
150.
- To move the map quickly: Move two fingers in
the desired direction on the MMI touch pad
quickly while the crosshairs are displayed. The
map will only stop moving again after
a
few
seconds.
156
Page 165 of 364
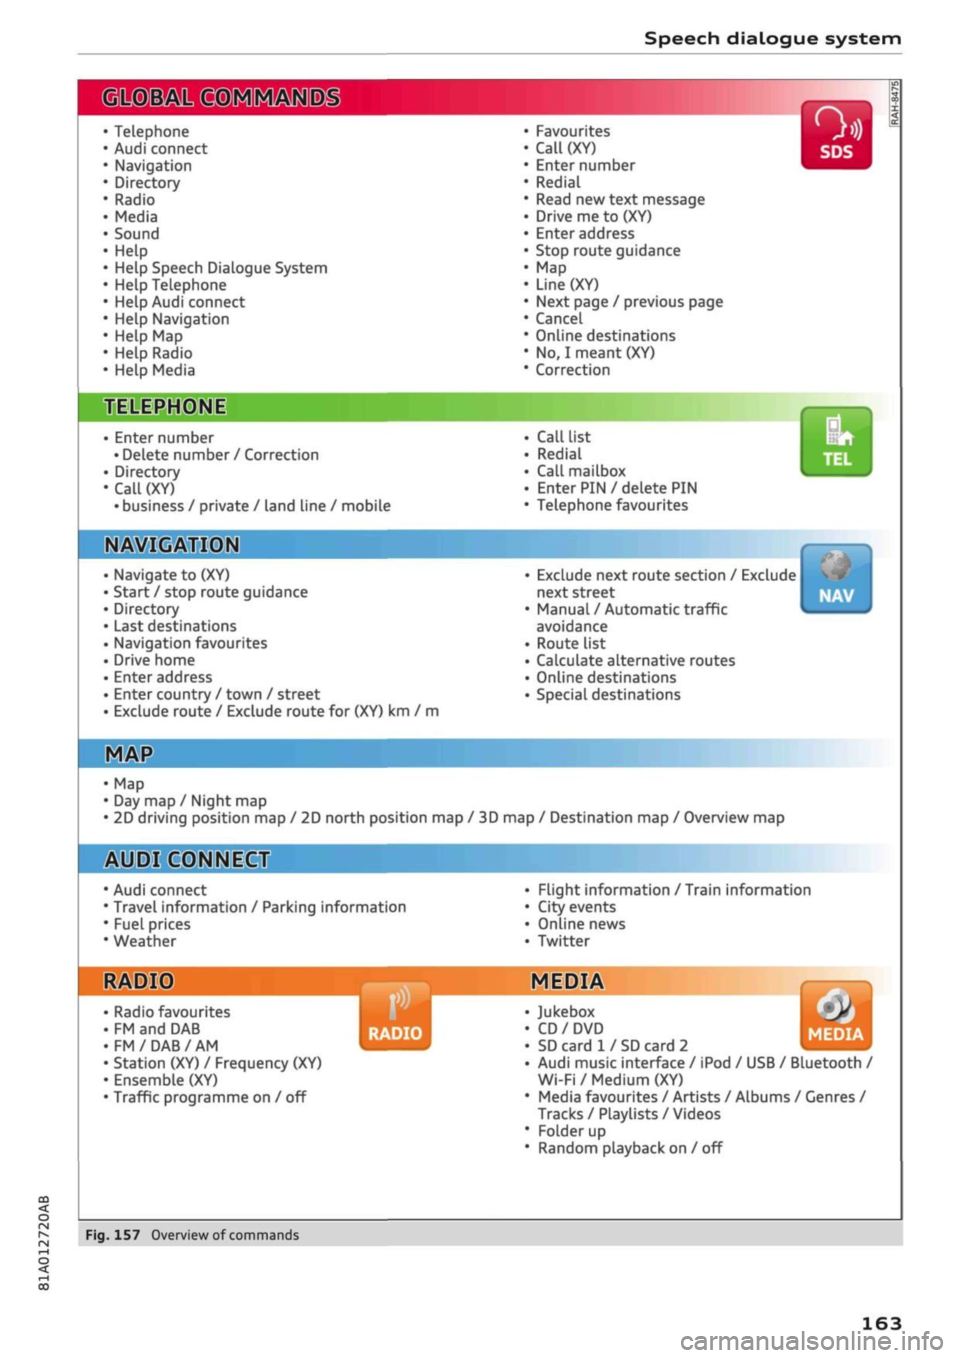
Speech dialogue system
• Telephone
• Audi connect
• Navigation
• Directory
• Radio
• Media
• Sound
• Help
• Help Speech Dialogue System
• Help Telephone
• Help Audi connect
• Help Navigation
• Help
Map
• Help Radio
• Help Media
SIIPCMI
Enter number
• Delete number
/
Correction
Directory
Call (XY)
• business
/
private
/
land line
/
mobile
NAVIGi
mm
• Navigate
to (XY)
• Start
/
stop route guidance
• Directory
• Last destinations
• Navigation favourites
• Drive home
• Enter address
• Enter country
/
town
/
street
• Exclude route
/
Exclude route
for
(XY)
km / m
• Favourites
• Call
(XY)
• Enter number
• Redial
• Read
new
text message
• Drive
me to (XY)
• Enter address
• Stop route guidance
•
Map
• Line
(XY)
• Next page
/
previous page
• Cancel
• Online destinations
•
No, I
meant
(XY)
• Correction
Call list
Redial
Call mailbox
Enter PIN
/
delete
PIN
Telephone favourites
Exclude next route section
/
Exclude
next street
Manual
/
Automatic traffic
avoidance
Route list
Calculate alternative routes
Online destinations
Special destinations
Map
Day
map /
Night
map
2D driving position
map / 2D
north position
map / 3D map /
Destination
map /
Overview
map
Flight information
/
Train information
City events
Online news
Twitter
^iuiDit(5.Q:NiNE:(aH
• Audi connect
• Travel information
/
Parking information
• Fuel prices
• Weather
RADIO MEDIA
RADIO MEDIA
• Radio favourites
• FM
and DAB
•FM/DAB/AM
• Station (XY)
/
Frequency
(XY)
• Ensemble
(XY)
• Traffic programme
on / off
Jukebox
CD/DVD
SD card
1 /
SD card
2
Audi music interface
/
iPod
/
USB
/
Bluetooth
/
Wi-Fi/Medium
(XY)
Media favourites
/
Artists
/
Albums
/
Genres
/
Tracks
/
Playlists
/
Videos
Folder
up
Random playback
on / off
Fig.
157
Overview
of
commands
00
163
Page 172 of 364
Speech dialogue system
Applies to: vehicles with speech dialogue system
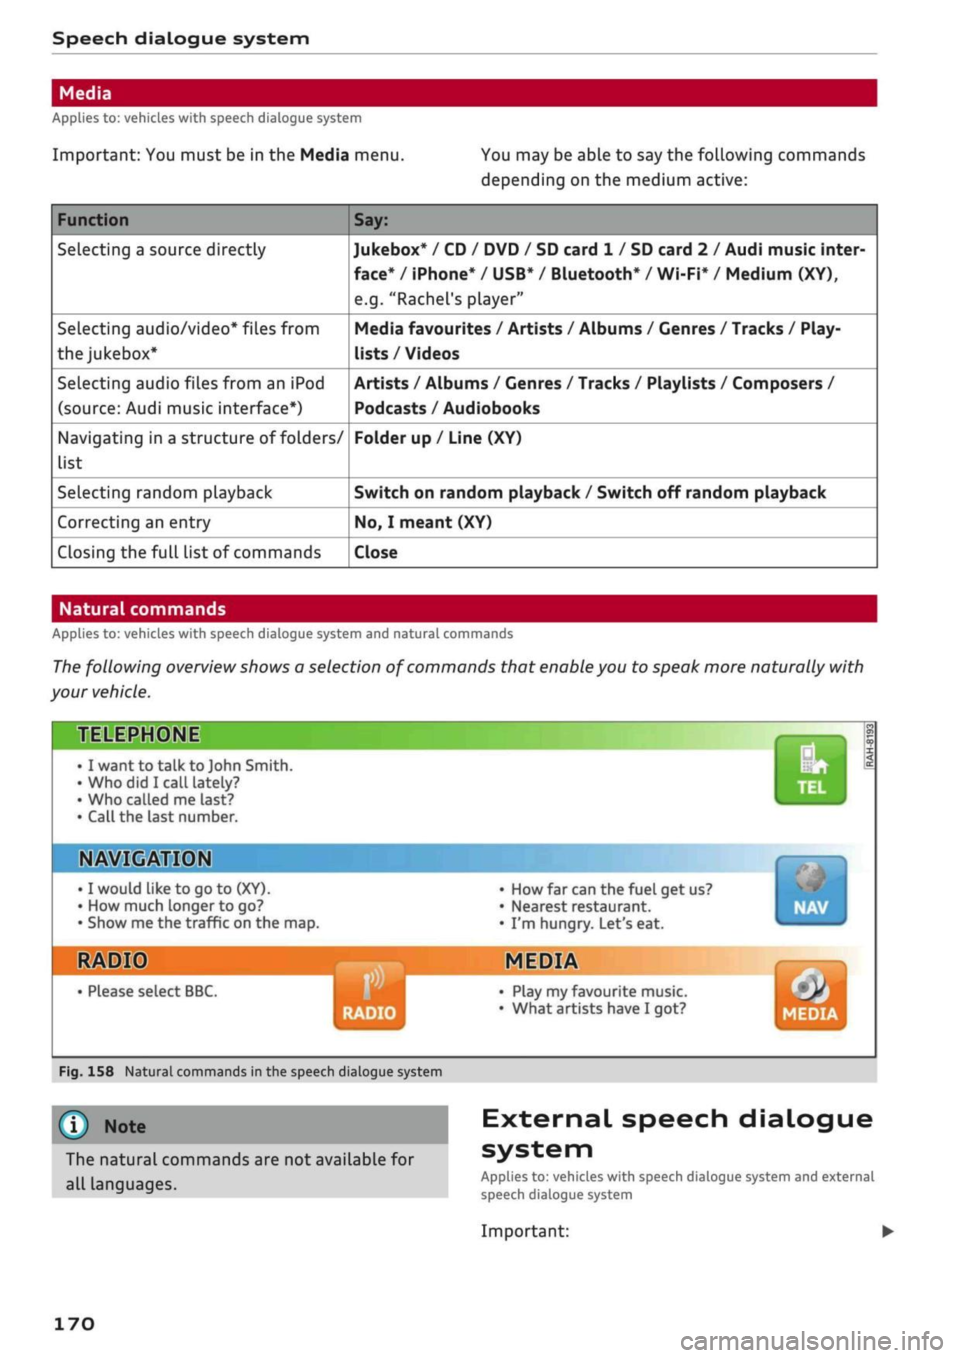
Important: You must be in the Media menu. You may be able to say the following commands
depending on the medium active:
Function
Selecting a source directly
Selecting audio/video* files from
the
jukebox*
Selecting audio files from an iPod
(source: Audi music interface*)
Navigating in a structure of folders/
list
Selecting random playback
Correcting an entry
Closing the full list of commands
Say:
Jukebox* / CD / DVD / SD card 1 / SD card 2 / Audi music inter
face*
/ iPhone* / USB* / Bluetooth* / Wi-Fi* / Medium (XY),
e.g.
"Rachel's player"
Media favourites / Artists / Albums / Genres / Tracks / Play-
lists / Videos
Artists / Albums / Genres / Tracks / Playlists / Composers /
Podcasts / Audiobooks
Folder up / Line (XY)
Switch on random playback / Switch off random playback
No,
I meant (XY)
Close
Natural commands
Applies to: vehicles with speech dialogue system and natural commands
The following overview shows a selection of commands that enable you to speak more naturally with
your vehicle.
TELEPHONE
• I want to talk to John Smith.
•Who did I
call lately?
• Who called me last?
• Call the last number.
IN»
©MM
I would
like to go to
(XY).
How much longer to go?
Show me the traffic on the map.
HIS
• Please select BBC.
• How far can the fuel get us?
• Nearest restaurant.
• I'm hungry. Let's eat.
MEDIA
RADIO
• Play my favourite music.
• What artists have I got? MEDIA
Fig.
158 Natural commands in the speech dialogue system
©
Note
The natural commands are not available for
all languages.
External speech dialogue
system
Applies to: vehicles with speech dialogue system and external
speech dialogue system
Important:
170
Page 179 of 364

Telephone
|MENU|
button
>
Settings
>
left control button >
MMI settings > Connection manager
•=>
page 257.
In addition, the contacts on the mobile phone are
automatically loaded into the directory of the
MMI.
This may take several minutes, depending
on how many contacts are stored on the mobile
phone.
Removing a mini SIM card
• Briefly press the mini SIM
card.
The card will
then eject from the slot. Remove the mini SIM
card.
© CAUTION
-To avoid damaging the SIM card reader, on
ly use mini SIM cards
(25
mm x
15
mm)
^Fig.
160. Please contact your service pro
vider for more information on mini SIM
cards.
- Should you have inserted a different SIM
card size in the SIM card reader, do not un
der any circumstances attempt to remove it
yourself as this may damage the SIM card
reader. Please contact
a
qualified workshop.
- If
you
use SIM card adapters, the vibrations
caused by the movement of the vehicle may
cause the SIM card to become detached
from the adapter - risk of damage to the
SIM card reader.
If your mobile phone does not support the re
mote SIM Access Profile (e.g. iPhone), you can
use the contacts from your mobile phone by
connecting the mobiLe phone to the system
via the Directory/contacts profile
•=>
page 258.
Using the Audi phone
box
Applies
to: vehicles with Audi phone box
You
can use the Audi phone box to charge your
mobile phone's battery.
You
can use the vehicle's
external aerial to make calls, which reduces
radi
ation in the vehicle and also ensures better re
ception quality.*
Fig.
161 Audi phone
box
with
connections
The Audi phone box is Located in the centre
con
sole beneath the armrest©
opage
10, Fig. 2
Important: A mobile phone must be connected
via Bluetooth
^>page
173.
The following options are available:
- To establish a connection with the external car
aerial15:
Place your mobiLe phone onto the
mid
dle of the telephone symbol in the Audi phone
box
^>Fig.
161 with the phone's display facing
upwards. When doing so, make sure that there
are no objects between the Audi phone box and
the mobile phone.
- To charge a mobile phone wirelessly: Place
your
Qi
compatible25 mobile phone onto the
middle of the
<]>
symbol in the Audi phone box
oFig.
161 with the phone's display facing up
wards. The mobile phone
wiLl
be charged.
- To charge a mobile phone via a USB adapter:
Connect your mobile phone to the USB charging
socket
(TjoF/g.
161 using a USB adapter cable.
You can charge your mobiLe phone using special
USB adapters
^>page
240, Fig. 196. •
CO
<
O
rN
IN
rN
t-H
o
< 00
^
Not available in all markets. Additional car telephone
function
only with Audi connect (infotainment)*.
2)
The Qi standard enables you to charge your mobile phone
wirelessly.
177
Page 180 of 364
Telephone
A WARNING
- Loose objects can be flung around in the
passenger compartment in the event of
sud
den driving or braking manoeuvres. This
could result in serious injuries and also
cause you to lose control of the vehicle. Al
ways keep the centre armrest closed when
driving.
- The mobile phone may become hot while
charging wirelessly. Consider the tempera
ture of your mobile phone when removing
it.
Take the mobile phone out of the Audi
phone box carefully.
© Note
- The Audi phone box is not available in all
countries. Your Audi dealer will be able to
provide you with more detailed information.
- If the mobile phone is placed in the Audi
phone box in a bag or
a
protective case, this
may interfere with the connection to the ex
ternal aerial*.
- Any metal objects in the Audi phone box will
prevent the mobile phone from charging
wirelessly or being used to make calls via
the external aerial*.
- The charging time and the temperature vary
depending on the mobile phone being used.
-The ignition must be switched on to charge
a mobile phone in the Audi phone box.
- To avoid malfunctions, ensure that the mo
biLe phone is correctly placed inside the
Audi phone box.
-The maximum charging capacity is 5 W.
- An enhanced transmission quality cannot be
guaranteed if more than one mobile phone
is placed inside.*
-Audi recommends the use of Audi Genuine
Accessories. Audi has tested these products
for suitability, reliability and safety.
- USB adapters are available from Audi
deal
ers or specialist retailers.
- When you charge your mobile phone wire
lessly, the charging procedure may be inter
rupted if
you
place your remote control key
in the Audi phone box together with the
mobile phone.
Using the telephone
Calling up the telephone
Applies
to: vehicles with telephone
~~ .*|
Call
list
^^
•£?
Favourites
i
'^
Directory
y»
^ Enter
phone number
^^f
I
Text message (SIM card)
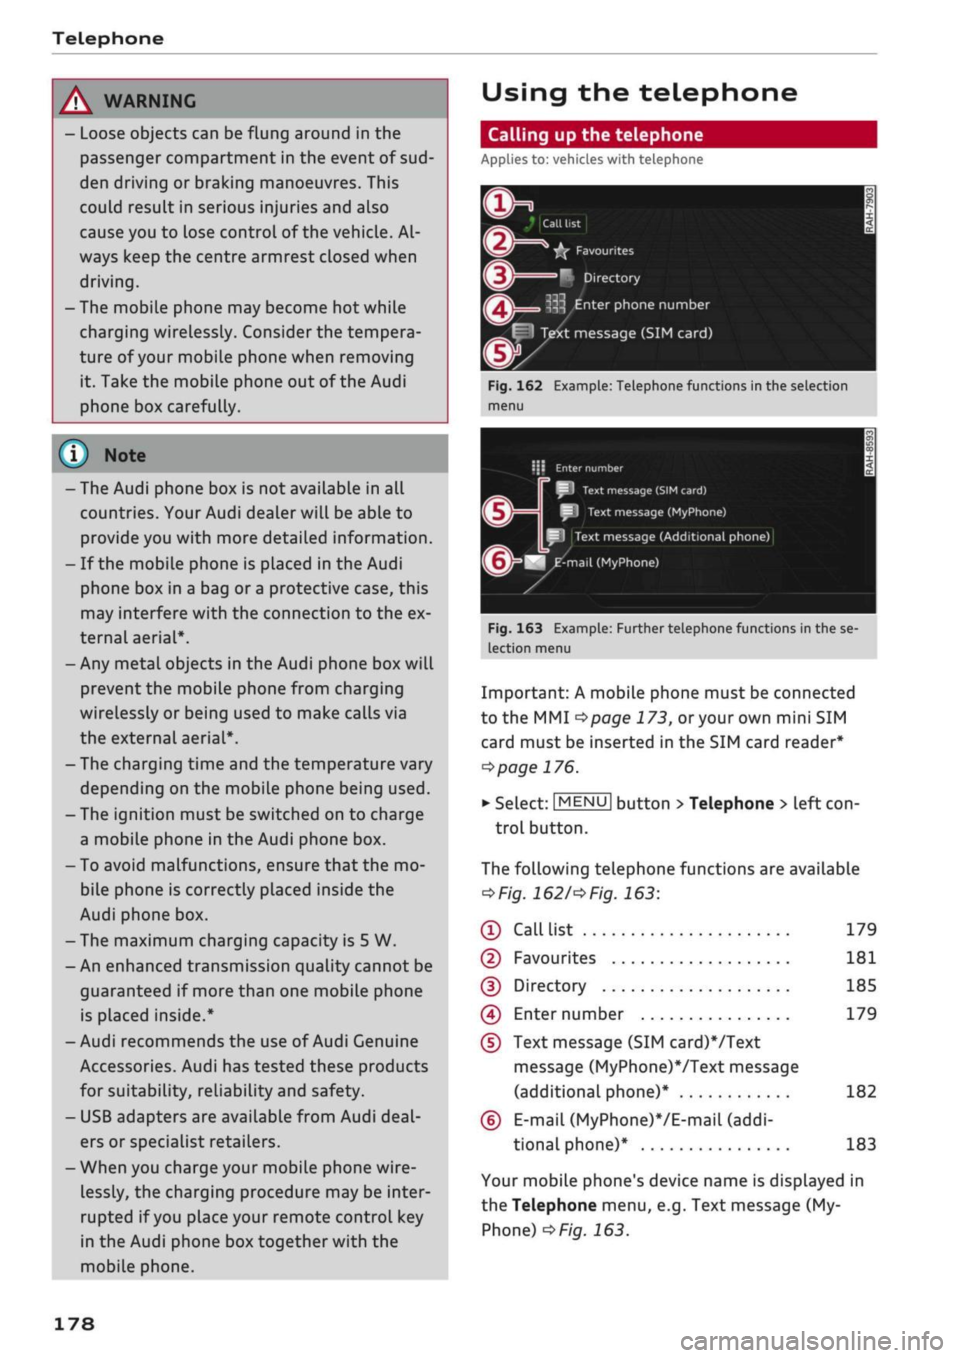
Fig.
162 Example: Telephone functions in the selection
menu
i\ï
Enter
number
SI
Text
message
(SIM
card)
I
Text message (MyPhone)
Text
message (Additional phone)
^mail
(MyPhone)
Fig.
163 Example: Further telephone functions in the se
lection
menu
Important: A mobile phone must be connected
to the MMI
<^>page
173,
or
your own mini SIM
card must be inserted in the SIM card reader*
^>page
176.
• Select: |MENU| button
>
Telephone > left
con
trol button.
The following telephone functions are available
*Fig.
1621'*
Fig.
163:
® Call
list 179
©
Favourites 181
(D Directory 185
(4) Enter number 179
(D
Text message (SIM card)*/Text
message (MyPhone)VText message
(additional phone)* 182
(6)
E-mail
(MyPhone)*/E-mail
(addi
tional phone)* 183
Your mobile phone's device name is displayed in
the Telephone menu, e.g. Text message (My
Phone)
^>Fig.
163.
178
Page 189 of 364

Telephone
CO
rN
IN
rN
•-H
00
Store as favourite
Refer to
^>page
181, Favourites.
Send text message*
You can send the selected contact a text message
tapage
182.
Delete contact
You can delete a contact you have selected.
© Note
You can only edit/delete the contacts in the
local MMI memory.
Importing/exporting contacts
Applies to: vehicles with telephone
You
can import or export contacts in the vCard
format
(.vcf)
into or from the directory.
Important: An SD card must be inserted in one of
the SD card readers *
^>page
235, a USB mass
storage device must be connected to the Audi
music interface*
Opage
240, or the require
ments for Audi connect infotainment services*
must be fulfilled
^>page
191.
*•
Select:
|MENU|
button
>
Telephone
>
left
con
troL button > Directory.
•
Select: right control button > Directory set
tings.
- To import contacts from a storage device: Se
lect and confirm Import contacts
>
SD card 1/
SD card 2 or USB device
1/USB
device 2
>
de
sired contacts
>
Start import.
- To export contacts to a storage device: Select
and confirm Export contacts
>
SD card
1/SD
card 2 or USB device 1/USB device 2
>
desired
contacts
>
Start export.
- To select all contacts at once for import/ex
port: Select and confirm Import contacts/Ex
port contacts > SD card 1/SD card 2 or USB de
vice 1/USB device 2
>
All
>
Start import/Start
export.
- Please always note the information in the
chapter
^>page
204, General notes on Audi
connect (infotainment).
- For more information on the myAudi ac
count, please refer to my.audi.com.
- The imported contacts are stored in the lo
cal memory of the directory you are using.
- You can import up to 1000 contacts. You
can call up the memory capacity of the di
rectory any time
^page
189.
- Never store important data on SD cards or
USB mass storage devices. Audi shall not ac
cept any liability whatsoever for the Loss of
data or media.
- It is not possible to export contacts which
have been downloaded from a mobile
phone.
- There should be no files or directories on
the storage medium other than the contacts
you wish to import.
Other settings
Telephone settings
Applies to: vehicles with telephone
•
Select:
|MENU|
button
>
Telephone
>
right
con
trol button
>
Telephone settings.
Call options*
Call forward: Forwarding of incoming calls to
your mailbox or to another phone number can be
switched on/off. You can use Check status to
check whether this function is activated or deacti
vated.
Call waiting: If this option is activated
Fvf,
you
will be informed of incoming calls when you are
on the phone. You can use Check status to check
whether this function is activated or deactivated.
Transmit caller ID: Sending your telephone num
ber in outgoing calls can be activated/deactiva
ted.
With the Network-dependent option, the
setting agreed in your mobile network service
contract will be used. The settings apply only to
the Telephone menu in the MMI system. When
the Bluetooth connection has been terminated,
187
Page 223 of 364
Navigation
CO
< o rN
IV
rN
t-H
o <
00
Map
How to
use
the map
Applies
to: vehicles with navigation system
H
an^fc Hetnuc'ijlo
'
in
1,2 km
Blaubach
in
1,0
km
Autobahn-Flugh
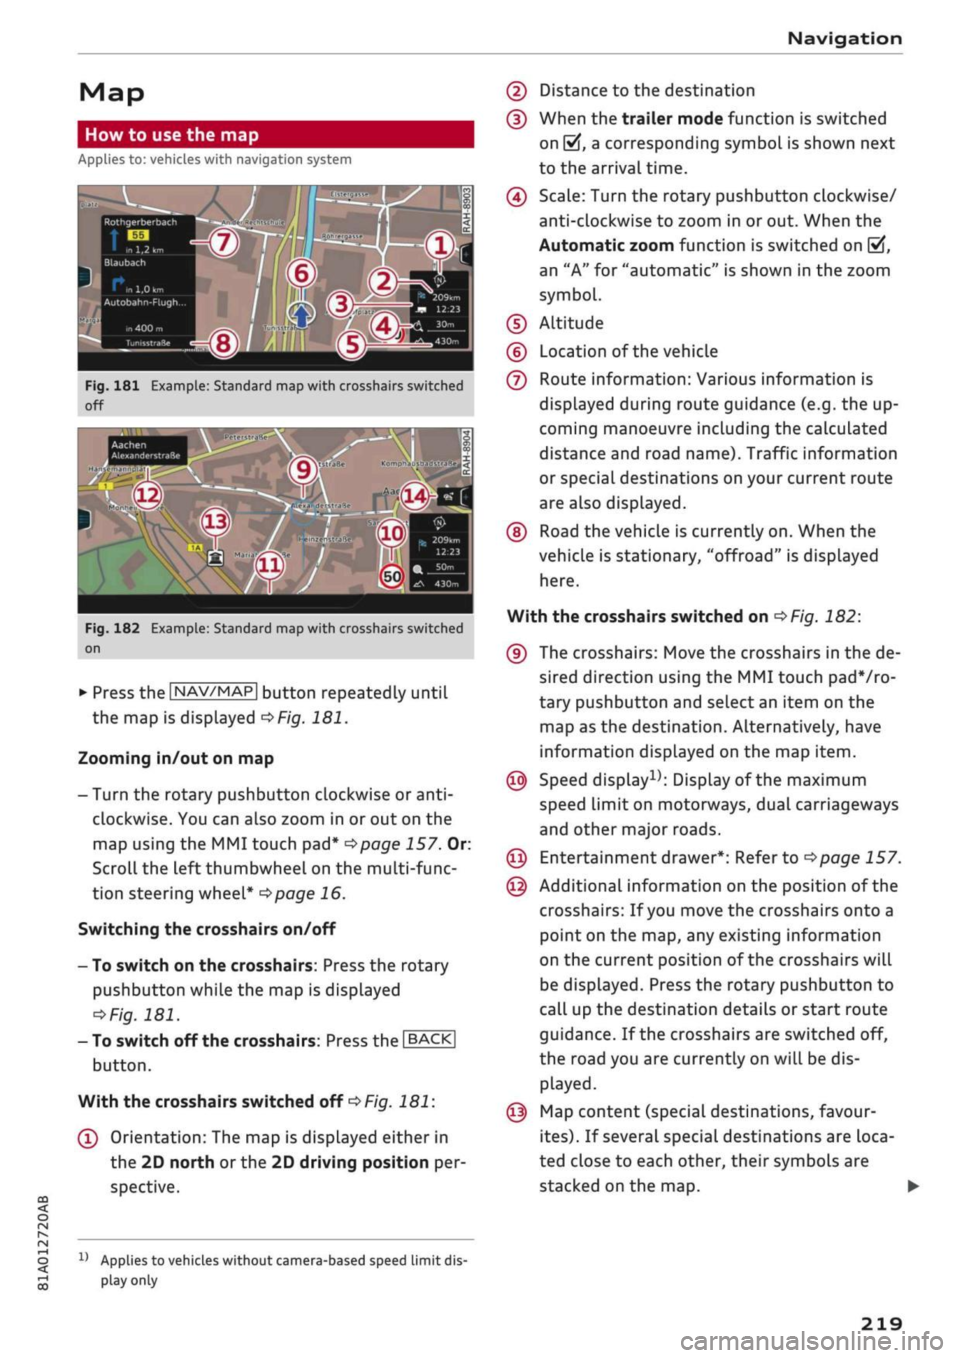
Fig.
181 Example: Standard map with crosshairs switched
off
Aachen
AlexanderstraBe Komphausbad da n se m an n pi
a
Fig.
182 Example: Standard map with crosshairs switched
on
•
Press the |NAV/MAP| button repeatedly until
the map is displayed
^Fig.
181.
Zooming in/out on map
- Turn the rotary pushbutton clockwise or
anti
clockwise. You can also zoom in or out on the
map using the MMI touch
pad*
^>page
157. Or:
Scroll the left thumbwheel on the multi-func
tion steering wheel*
^>page
16.
Switching the crosshairs on/off
- To switch on the crosshairs: Press the rotary
pushbutton while the map is displayed
^Fig.
181.
- To switch off the crosshairs: Press the |BACK|
button.
With the crosshairs switched off
•=>
Fig.
181:
(l)
Orientation: The map is displayed either in
the 2D north
or
the 2D driving position per
spective.
1J
Applies to vehicles without camera-based speed limit
dis
play
only
(2) Distance to the destination
(D When the trailer mode function is switched
on
[vj,
a corresponding symbol is shown next
to the arrival time.
(4) Scale: Turn the rotary pushbutton clockwise/
anti-clockwise to zoom in or out. When the
Automatic zoom function is switched on
(vf,
an "A" for "automatic" is shown in the zoom
symbol.
(D Altitude
(?) Location of the vehicle
(7) Route information: Various information is
displayed during route guidance (e.g. the up
coming manoeuvre including the calculated
distance and road name). Traffic information
or special destinations on your current route
are also displayed.
(D Road the vehicle is currently on. When the
vehicle is stationary, "offroad" is displayed
here.
With the crosshairs switched on
^>Fig.
182:
(9) The crosshairs: Move the crosshairs in the de
sired direction using the MMI touch padVro-
tary pushbutton and select an item on the
map as the destination. Alternatively, have
information displayed on the map item.
© Speed display1); Display of the maximum
speed limit on motorways, dual carriageways
and other major roads.
© Entertainment drawer*: Refer to
^page
157.
© Additional information on the position of the
crosshairs: If
you
move the crosshairs onto a
point on the map, any existing information
on the current position of the crosshairs will
be displayed. Press the rotary pushbutton to
call up the destination details or start route
guidance. If the crosshairs are switched off,
the road you are currently on will be dis
played.
© Map content (special destinations, favour
ites).
If several special destinations are loca
ted close to each other, their symbols are
stacked on the map.
219