AUDI Q3 2015 Repair Manual
Manufacturer: AUDI, Model Year: 2015, Model line: Q3, Model: AUDI Q3 2015Pages: 258, PDF Size: 64.9 MB
Page 61 of 258
M N M N
0 ::i co
rl I.O
"' rl
"' rl
-Never exceed the maximum permissible
load carry ing capacity of the roof of your
vehicle, the perm issible axle weights and
the permiss ible total weight of your veh i
cle ¢
page 234 , Weights .
(D Note
- Make sure the rear lid does not hit the
cargo on the roof rack when you open it.
On vehicles with automatic rear lid/trunk
lid operation* you may have to adjust the
open position of the rear lid
¢ page 35.
- Remove the roof rack and attachment
before taking your vehicle through an au
tomatic car wash to avoid damage .
@l For the sake of the environment
As a result of the increased w ind resist
ance created by a roof rack, your veh icle is
using fue l unnecessarily . So remove the
roof rack after using it.
Luggage compartment
General information
,& WARNING
Read and heed the importan t safety pre
cautions on ¢
page 100, Stowing lug
gage .
Luggage compartment cover
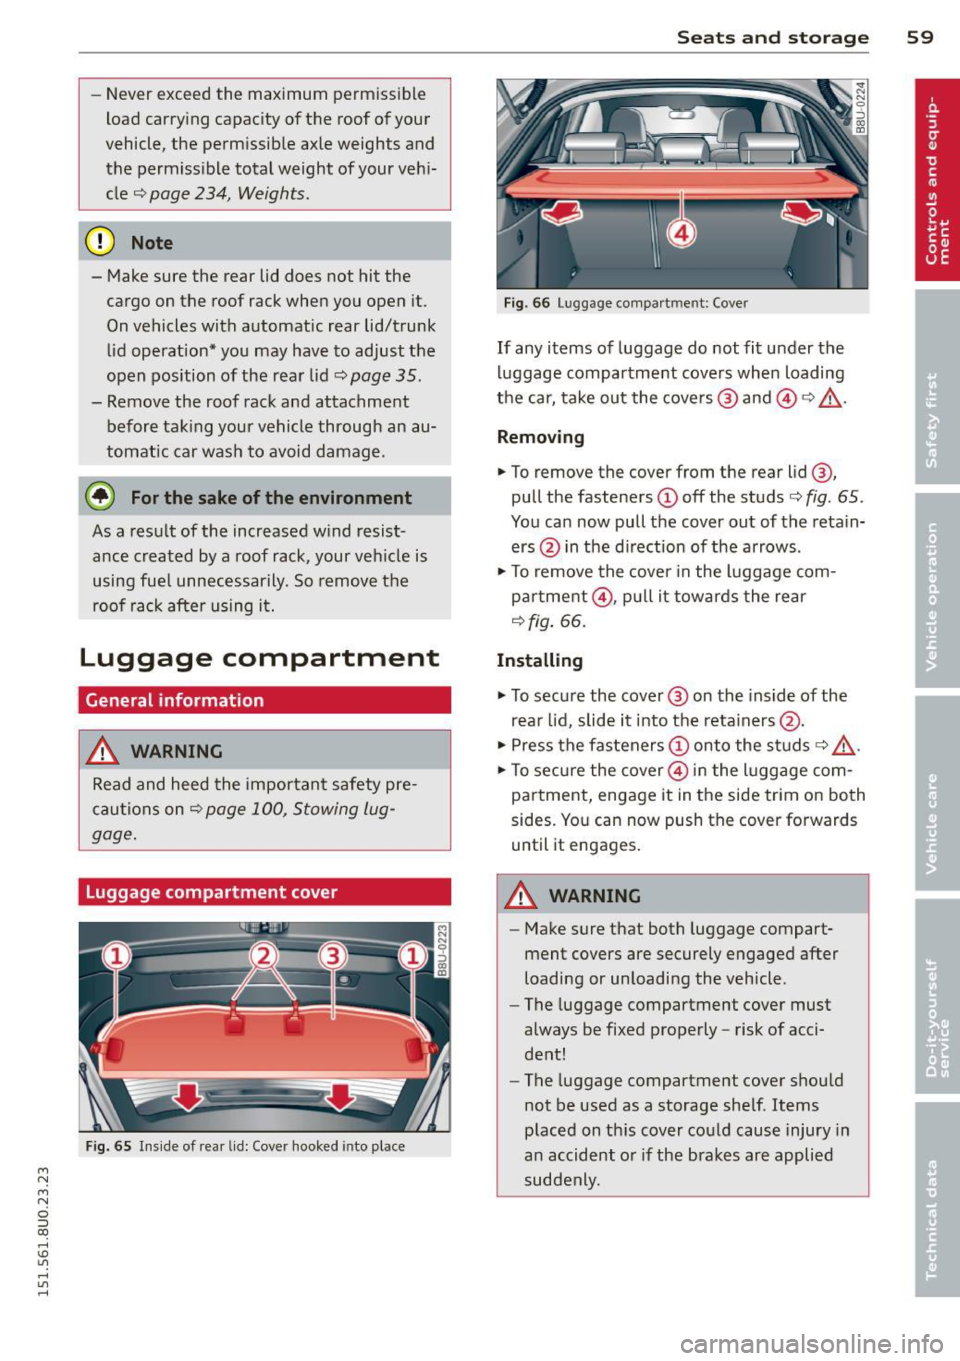
Fig. 65 Inside of re ar lid: Cove r hooked in to pl ace
-
S ea ts a nd s to rage 59
Fig. 66 Lug gage compa rtm en t: Co ver
If any items of luggage do not fit under the
luggage compartment covers when loading
the car, take out the covers @ and @¢,&. .
Remo ving
.,. To remove the cover from the rear lid@,
pull the fasteners
CD off the studs c:> fig. 65 .
You can now pull the cover ou t of the retain
ers @in the d irection of the arrows .
.,. To remove the cove r in the luggage com
p a rtment @, pu ll it towards the rear
¢ fig. 66.
Installing
.,. To secure the cover @ on the inside of the
rea r lid, slide it into the reta iners @.
.,. Press the fasteners
CD onto the studs¢,&. .
.,. To sec ure the cover @ in the luggage com
partment, engage it in the side trim on both
sides. You can now push the cover forwards
until it engages.
,& WARNING
- Make sure that both luggage compart
ment covers are securely engaged after
loading or unloading the vehicle .
- The luggage compartment cover must
always be fixed properly -risk of acci
dent!
- The luggage compartment cover shou ld
not be used as a storage shelf. Items
placed on th is cover could cause injury in
an accident o r if the bra kes are applied
suddenly.
-
Page 62 of 258
60 Seats and st o rage
Enlarging the luggage compartment
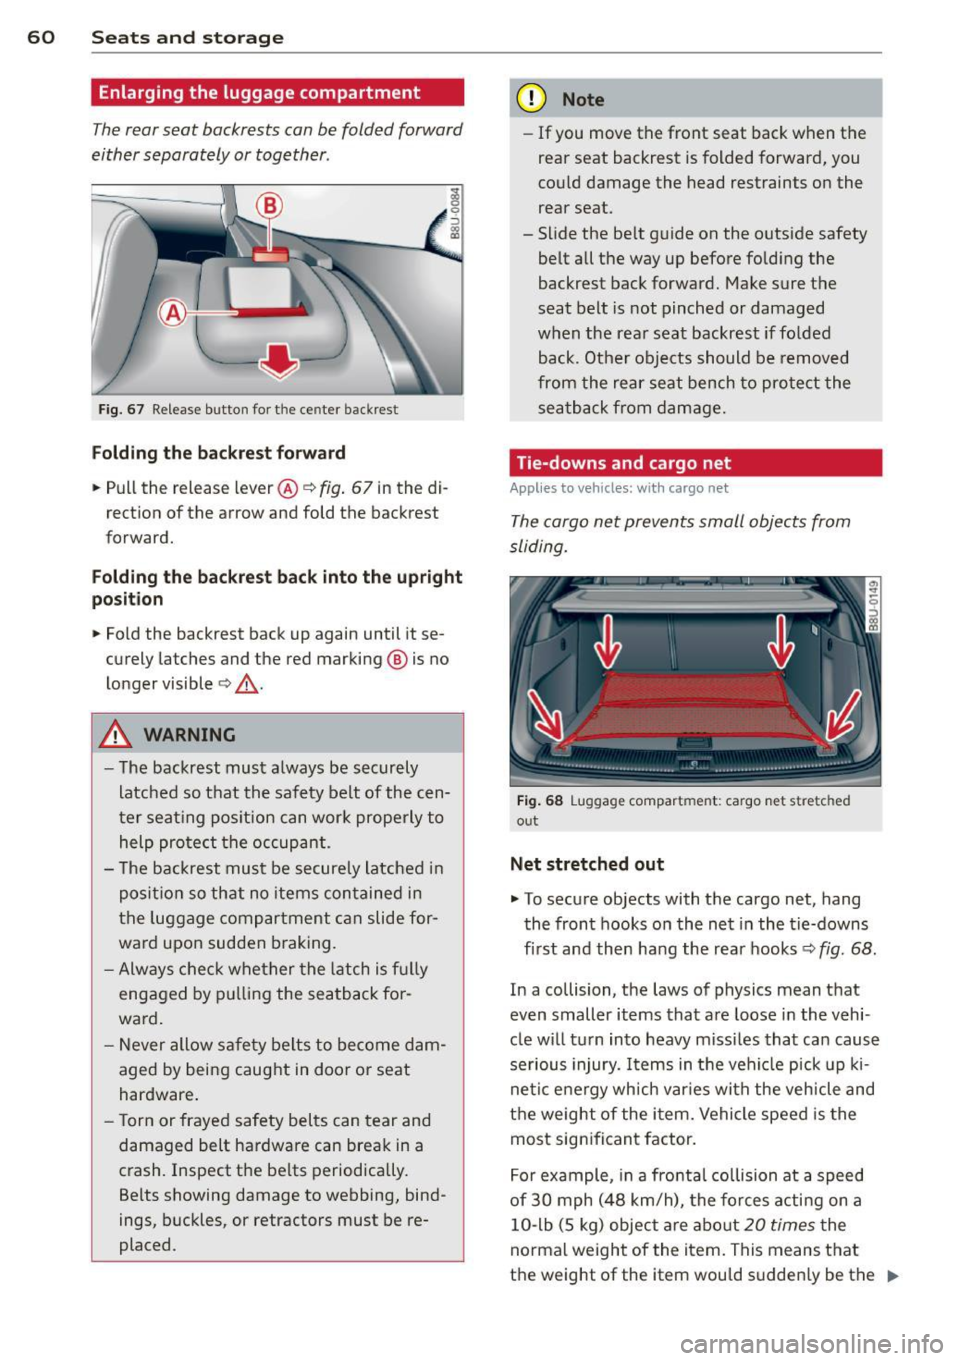
The rear seat backrests can be folded forward
either separately or together .
Fig. 67 Release button for t he ce nter backr est
Folding th e back rest forward
.. Pull the release lever®¢ fig. 67 in the di
rect ion of the arrow and fold the backrest
forward.
Folding th e back rest back into th e upright
position
.. Fold the backrest back up again until it se
curely latches and the red marking @ is no
longer visible ¢
_&..
&_ WARNING
-The backrest must a lways be securely
latched so that the safety belt of the cen
ter seat ing pos ition can wor k properly to
help protect the oc cupant .
- T he backrest must be secure ly latched in
posi tion so that no items contained in
the luggage compar tment can slide for
ward upon sudden braking.
- Alw ays che ck whe ther the l atch is f ully
engaged by p ulling the seatback for
ward .
- Never allow safe ty belts to be come dam
aged by being caught in doo r or seat
hardware.
- T orn or frayed safety belts can tear and
damaged belt hardware can break in a
crash. Inspect the be lts periodically.
Belts showing damage to webbing, bind
ings, buckles, or retractors must be re
placed .
(D Note
-If you move the front seat back when the
rear seat backrest is folded forward, you
cou ld damage the head restraints on the
rear seat.
- Slide the be lt guide on the outside safety
belt all the way up before folding the
backrest back forward. Make sure the
seat belt is not pinched or damaged
when the rear seat backrest if folded
back. Other objects should be removed
from the rear seat bench to protect the sea tback from damage.
Tie-downs and cargo net
Applies to vehicles: with cargo ne t
The cargo net prevents small objects from
sliding.
Fi g. 68 Lu gg ag e compar tment: cargo net s tre tc h ed
o u t
Net stretched out
.. To secure objects with the cargo net, hang
the front hooks on the net in the tie-downs
f ir st and then hang the rear hooks¢
fig. 68 .
In a co llision, the laws of physics mean that
even smaller items that are loose in the vehi
cle w ill turn into heavy miss iles that can cause
serious injury. Items in the vehi cle pick up k i
neti c energy wh ich var ie s with the veh icle and
t h e weight of the item. Vehicle speed is the
most sig nificant factor.
For example, in a fronta l collision at a speed
of 30 mph (48 km/h), the forces a cti ng on a
10-lb (5 kg) object are abo ut
20 times the
normal weight of the item. This means t hat
t h e weight of the item wou ld sudden ly be the
ll-
Page 63 of 258
M N M N
0 ::i co
rl I.O
"' rl
"' rl
equivalent of about 200 lbs (90 kg). One can
easi ly imagine the injuries that an item of that
weight flying free ly through the passenger
compartment can cause in a collision at a
speed considered relatively low.
A WARNING
Weak, damaged or improper straps used
to secure items to t ie-downs can fail dur
ing hard brak ing o r in a collision and cause
ser ious personal injury.
- Always use suitable retaining straps and
properly secure items to the tie-downs in
the luggage compartment to help pre
vent items from shifting or flying for
ward.
- When the rear seat backrest is folded down, always use su itab le retain ing
st raps and proper ly sec ure items to the
tie-downs in the luggage compartment
to help prevent items from flying for
ward into the passenger compartment.
- Never attach a child safety seat tether
strap to a tie-down.
Ski sack
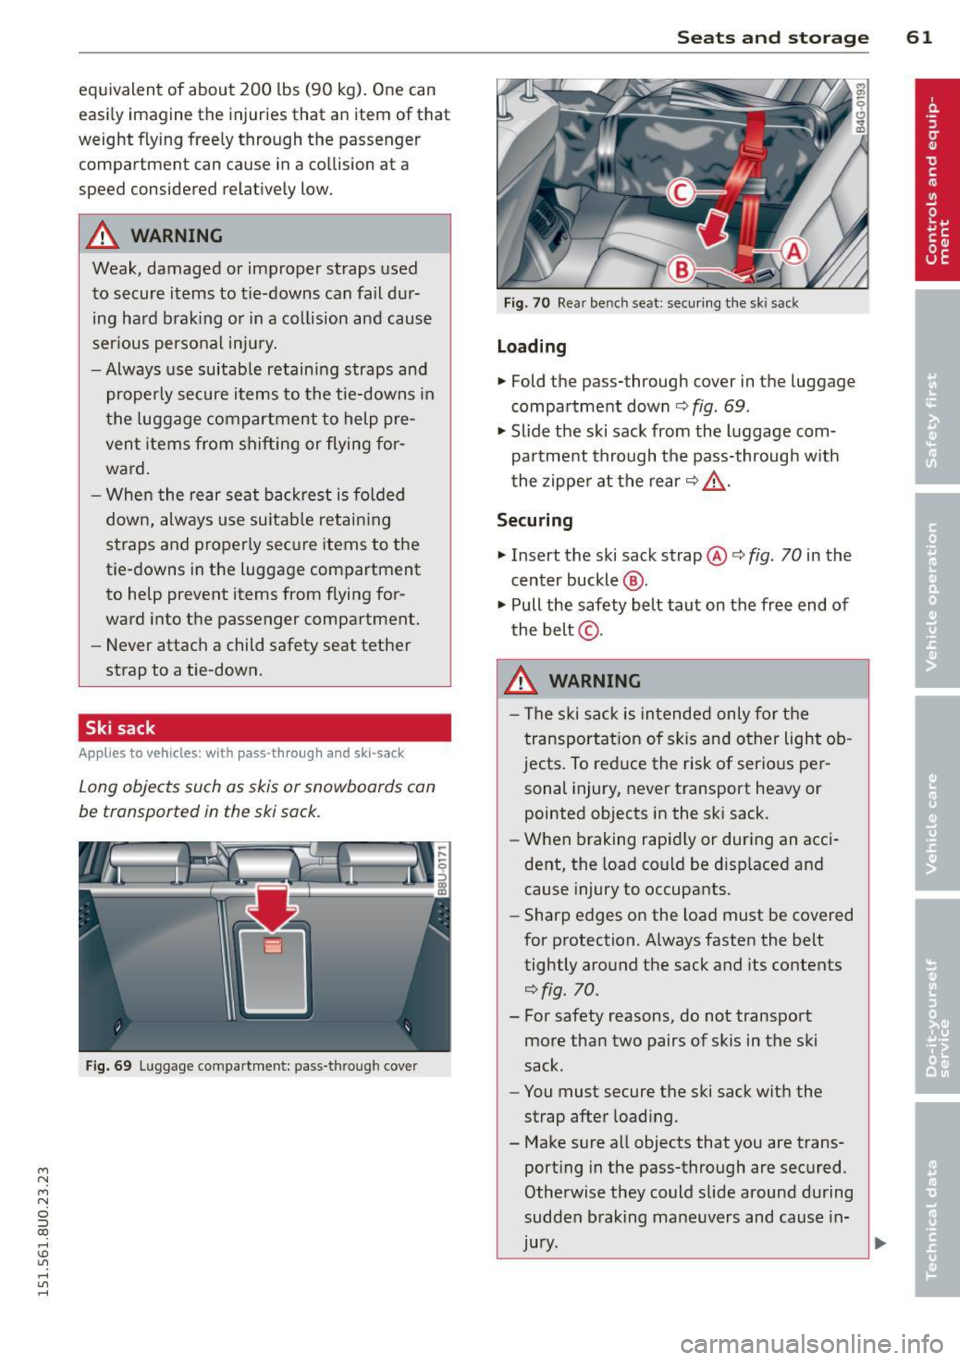
Appl ies to vehicles : wit h pass -t hr oug h and ski -sack
Long objects such as skis or snowboards can
be transported in the ski sack.
F ig. 69 Luggag .e compartment: pass-t hroug h cover
Sea ts a nd s to rage 61
Fig . 70 Rea r be nch seat : secu ring the ski sack
Lo ading
.. Fold the pass-through cover in the luggage
compartment down
¢ fig . 69 .
.. Slide the ski sack from the luggage com
partment through the pass-through with
the zipper at the rear ¢
,&.
Securing
.. Insert the ski sack strap@¢ fig. 70 in the
center buckle @.
.. Pull the safety belt taut on the free end of
the belt @.
8_ WARNING
-
-The s ki sack is intended only for the
transportat ion of sk is and other light ob
jects . To reduce the risk of serious per
sonal injury, never transport heavy or pointed objects in the sk i sack.
- When braking rapid ly or during an acci
dent, the load could be d isp laced and
cause injury to occupants.
- Sharp edges on the load must be covered
for protection. A lways fasten the belt
tightly around the sack and its contents
¢fig. 70.
- For safety reasons, do not transport
more than two pairs of skis in the ski
sack .
- You must secure the ski sack wit h the
strap after load ing.
- Make sure all objects that you are trans port ing in the pass-through are secured .
Otherwise they could slide around during
sudden braking maneuvers and cause in-
jury .
~
Page 64 of 258
62 Seats and storage
@ Tips
- Never stow the ski sack away when it is
still wet or damp (for example, snow
melt ing from skis). Allow it to dry com
pletely before stowing it away.
- When transporting skis or snowboards, tighten the securing strap between the
bindings.
- Position skis in the ski sack w ith the
po inted ends facing the front and ski
po les with the pointed ends facing the
rear.
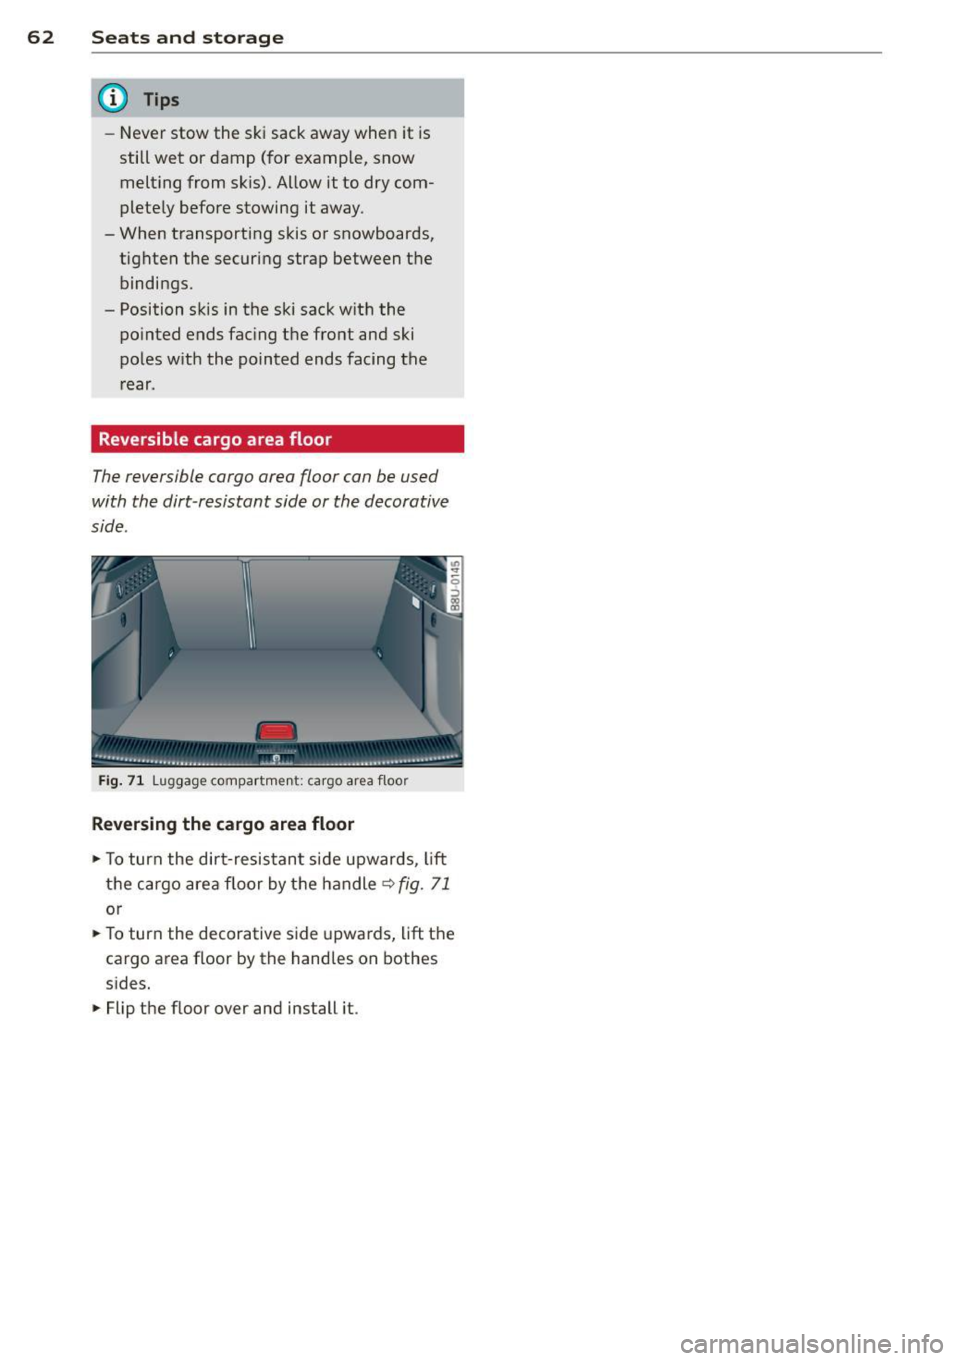
Reversible cargo area floor
The reversible cargo area floor can be used
with the dirt-resistant side or the decorative
side .
Fig. 71 Luggage compartment: cargo area floor
Reversing the cargo area floor
.,. To turn the dir t-resistant side upwards, lift
the cargo area floor by t he handle ~
fig. 71
or
.. To turn the decorative side upwards, lift the
cargo area floor by the handles on bothes
sides .
.. Flip the floor over and install it .
Page 65 of 258
M N
M N
0 ::i co ,...., \!) 1.1'1 ,...., 1.1'1 ,....,
Warm and cold Climate control
Description
The climate control system warms, cools and
adds humidity to the a ir in the veh icle inter io r.
It is the most effect ive when the windows and
sunroof are closed . If the re is a build-up of
h eat inside the vehicle, ventilation can help to
speed up the cooling process .
Condensat ion from the cooling sys tem can
drip and form a puddle of water under the ve
hicle. This is normal and does not mean there
is a leak .
Pollution filter
The po llution filte r removes impuri ties, such
as dus t and po llen, from the air.
The air pollutants filter must be changed at
the intervals spec ified in you r Wa rra nty
&
M aintenance book let, so tha t the air condi
tioner can prope rly work .
If you drive your vehicle in an area with h igh
a ir po llution, the fi lter may need to be
changed more frequent ly than specified in
your Aud i Warr anty
& Ma intenance booklet. If
in doubt, ask your authorized A udi Service Ad
visor for advice .
A WARNING
Reduced visibility is dangero us and can
cause accidents.
-
- For safe dr iv ing it is very important that
all windows be free of ice, snow and con
densation.
Warm and c old 63
-Comp letely fam iliarize yourse lf with the
proper use and f unct ion of the heat ing
a nd venti lation system and especially
how to defog and defrost the w indows.
- Never use the windshield wiper/washer
system in freez ing weather unt il you
have warmed the w indshield first, using
the heating and ve ntilation system. The
washer sol ution may freeze on the wi nd
shie ld and re duce visib ility.
0 Note
- If you suspect that the air conditioner
has been damaged, switch t he system
off to avoid furt her damage and have it
in spec ted by a q ual ified dea lership.
- Repairs to the Audi air conditioner re
quire specia l te ch nical know ledge and
speci al to ols. Conta ct an autho rized Aud i
dea ler fo r ass istance.
(® For the sake of the environment
B y reducing the a mou nt of f uel you use,
you also reduce the amount of pollu tants
emitted in to the air.
(D Tips
- Keep the air intake s lots ( in fro nt of the
w indshield) free from ice, snow and de
br is in order to maintain the proper f unc
t ion of the climate control sys tem.
- T he e nergy m ana gement system m ay
switch the seat heating * or rear window
defroster off temporari ly . These systems
are available again as soon as the energy
balance has been resto red.
Page 66 of 258
64 Warm and cold
Operation
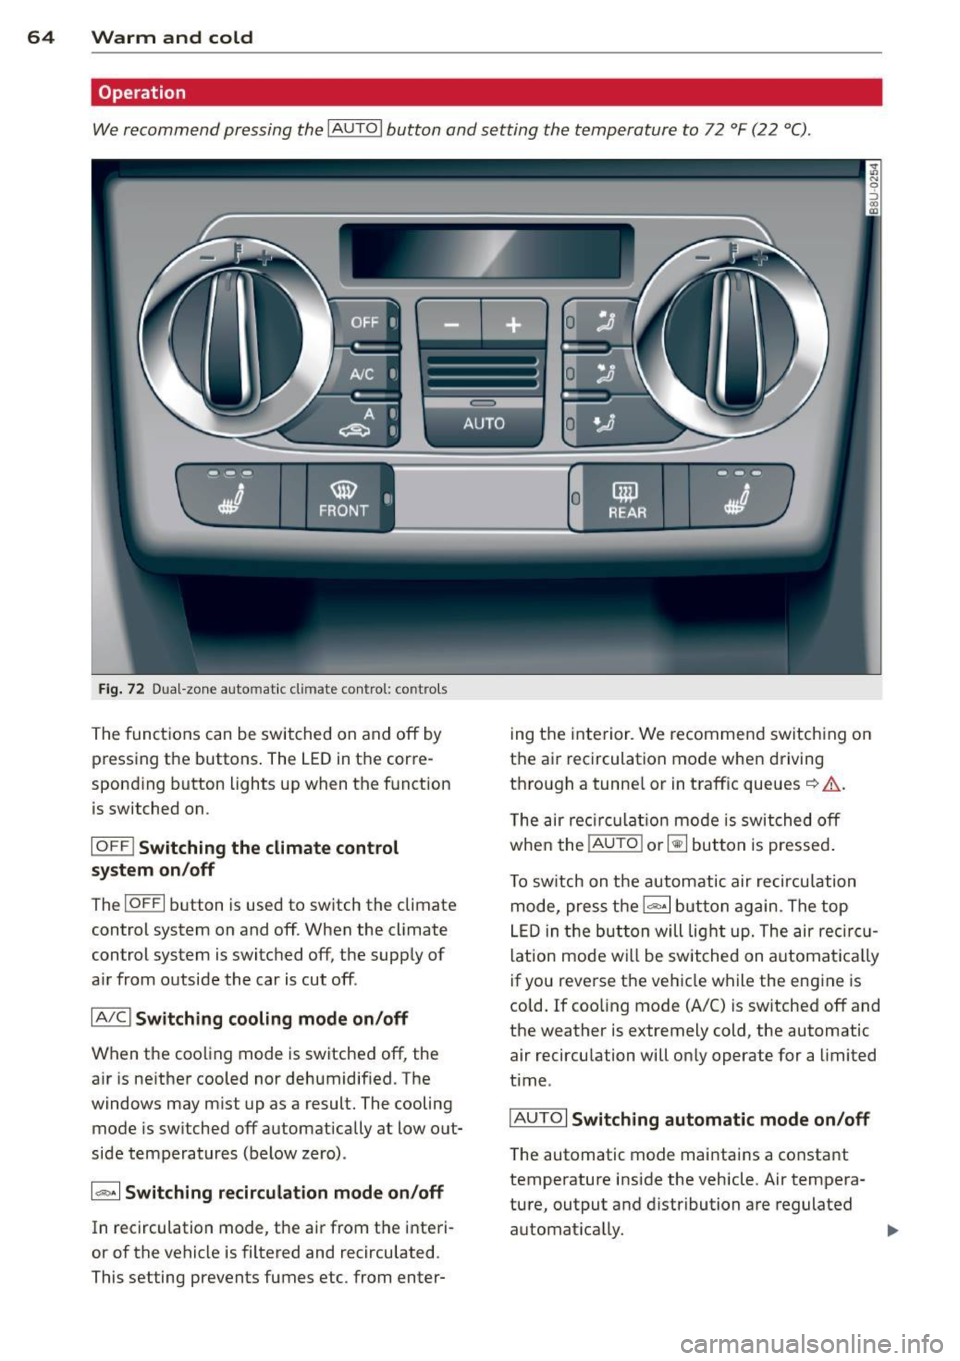
We recommend pressing the IAU TOI button and setting the temperature to 72 °F (22 °C) .
)-~~~
•I;. .. Q
Fig. 72 Dua l-zon e auto mat ic cl imate control: co ntrols
The functions can be switched on and off by
pressing the buttons . The LED in the corre
sponding button lights up when the function is switched on .
IOFFI Switching the climate control
sy stem on /off
ThelOFFI b utton is used to switch the climate
control system on and off . When the climate
control system is switched off, the supp ly of
a ir from outside the car is cut off .
IA/Cl Switching cooling mode on /off
When the cooling mode is switched off, the
a ir is ne ither cooled nor dehumidif ied. The
windows may m ist up as a result. The cooling
mode is sw itched off automatically at low o ut
side temperatures (below zero) .
1~ 1 Switching r ecirculat ion mod e on /off
In recirculation mode, the air from the interi
or of the vehicle is filtered and recirculated .
This setting prevents fumes etc. from enter- 0
mil
--f-~
REAR ~~ -=-
ing the inte rior . We recommend switch ing on
the ai r recirculation mode when driving
t h ro ugh a tunne l or in traff ic queues ~.&. .
T he air reci rcul atio n mo de is switched off
whe n the !AUTO
I o r~ button is pressed .
T o sw itch on the automatic air recircu lation
mode, press the
1 ""' ·1 b utt on again . The top
LE D in the but ton will lig ht up. The air reci rc u
lation mode wi ll be switched on automat ica lly
if you reverse the ve hicle while the engine is
cold. If coo ling mode (A/C) is sw itched off and
the weather is extremely c old, the automatic
air recircu lation will on ly operate for a limited
t ime .
IAU TOI
Switching automatic mode on /off
T he automatic mode maintains a constant
temperature inside the vehicle. Air tempera
ture, output and d istribution are regulated
automat ica lly. ..,.
Page 67 of 258
M N
M N
0 ::i co ,...., \!) 1.1'1 ,...., 1.1'1 ,....,
0 Adjusting the temperature
Separate temperatures can be selected for the
driver's and front passenger's side using the
left and right rotary controls . The tempera
ture can be adjusted between +60
°F (+16 °C)
and +84 °F (+28 °C) . Outside this range, LO or
HI will appear on the air conditioner display .
In the two extreme settings the air condition
er operates continuously with maximum cool
ing or heating output, and the temperature is
not regulated automatically.
[:]1 (±] Adjusting the airflow
You can adjust the volume of air delivery man
ually to suit your individual requirements.
Press the
IAUTOI button for automatic blower
regulat ion .
~/1 :J!/l~ I Adjusting the air distribution
You can direct the flow of air manually to se
lected outlets. The buttons can be operated
e ither separately or in combination . Press the
IAUTOI button for automat ic air distribution.
J Adjusting the seat heating
When you press the button, the seat heating
is switched on at level 3 (the highest level) .
The LEDs indicate the temperature level. To
reduce the temperature, press the button
again . T o switch off the seat heating, press
the button repeatedly unti l all the LEDs have
gone out.
The seat heating automatically switches from level 3 to level 2 after 10 minutes .
I@ F RON T! Switching the defroster on/off
The windscreen and s ide windows are defrost
ed or demisted as quickly as possible . The air
output is increased to maximum and most of
the air comes out of the outlets below the
windscreen . The air recirculation mode is de
activated. The temperature should be set to
+ 72
°F (22 °() or higher.
The defroster is switched off when the
I AUTO I
button is pressed .
Warm and cold 65
!iii! REAR ! Switching the rear window
heating on/off
The rear window heating operates only when
the engine is running and switches off auto
matically after about 10 minutes.
Synchronisat ion
By pressing and ho lding the IAU TO j button,
you can set the temperature of the front pas
senger's side to the temperature of the driv
er's side. The synchronisation is deactivated as
soon as the temperature on the front pas
senger's s ide is changed .
Air outlets
The thumbwhee ls can be used to open and
close the air outlets in the center and on ei
ther side of the dashboard and rear center
console . The lever in the center of the outlets
can be used to adjust the direction of air flow.
Changing the temperature units
The temperature display can be switched be
tween
° F and 0C. Press and hold the 1- ·1 but
ton ¢
fig. 72 and turn the rotary control on
the driver's s ide to+ for 3 seconds.
A WARNING
- Do not use the recirculation for extended
periods of time. The windows could fog
up since no fresh air can enter the vehi
cle. If the windows fog up, press the air
recir culation button again immediately
to switch off the air recirculation func
tion or se lect defrost .
- Individ uals w ith reduced sensitivity to
pain or temperature could develop burns
when using the seat heating function. To
red uce the risk of injury, these individu
als should not use seat heating .
(D Note
To avoid damage to the heating elements
in the seats, do not kneel on the seats or
place heavy loads on a small area of the
seat.
Page 68 of 258
66 On th e road
On the road
Steering
Manually adjustable steering wheel
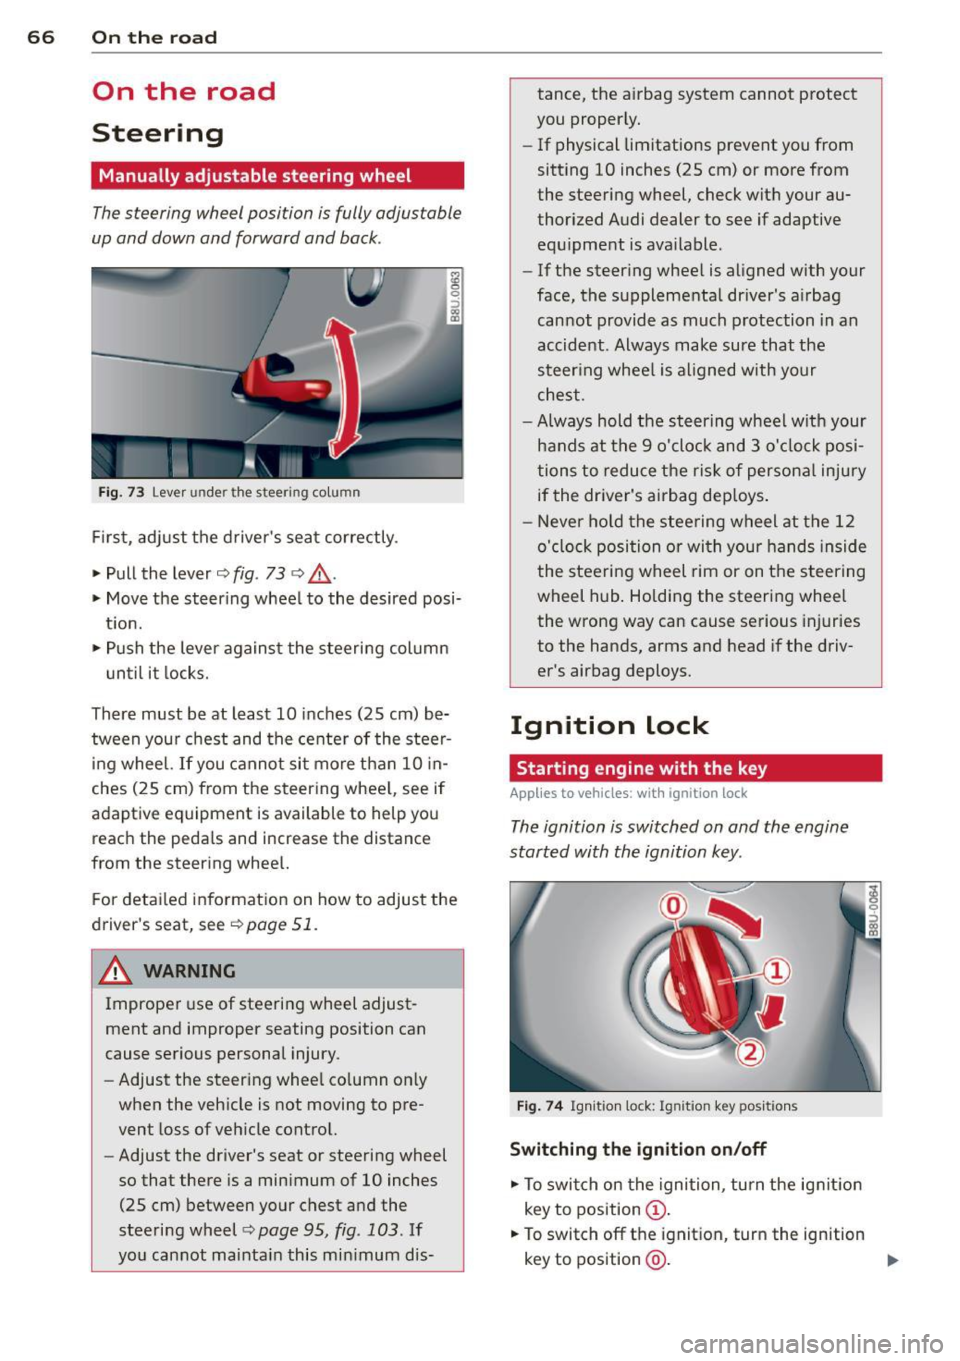
The steering wheel position is fully adjustable
up and down and forward and bock .
Fig. 73 Lever under the steer ing colu mn
First, adjust the driver's seat correctly .
• Pull the lever
c> fig . 73 <=> &_ .
• Move the steer ing whee l to the desired posi
t ion.
• Push the lever against the steering column
until it locks.
There must be at least 10 inches (25 cm) be tween your chest and the center of the steer
ing wheel. If you cannot sit more than 10 in
ches (25 cm) from the steering whee l, see if
adaptive equipment is available to help you reach the pedals and increase the distance
from the steering wheel.
F or detai led information on how to adjust the
driver's seat, see
c> page 51 .
A WARNING
Improper use of steeri ng wheel adjust
ment and improper seating position can
cause serious personal injury.
- Adjust the steering whee l co lumn on ly
when the veh icle is not moving to pre
vent loss of veh icle control.
- Adjust the driver's seat or steering wheel
so that there is a minimum of 10 inches
(25 cm) between your chest and the
steering wheel
¢ page 95, fig. 103. If
yo u cannot mainta in this min imum dis- tance, the airbag system cannot protect
you proper ly.
- If physical limitations prevent you from
sitting 10 inches (25 cm) or more from
the steering wheel, check with your au
thorized Audi dealer to see if adaptive equ ipment is ava ilable .
- If the steer ing wheel is aligned with your
face, the supplementa l driver's a irbag
cannot provide as much protection in an
accident . Always make sure that the
steer ing wheel is aligned with your
chest.
- Always hold the steering wheel w ith your
hands at the 9 o'clock and 3 o'clock posi
tions to reduce the risk of persona l injury
if the driver's airbag dep loys .
- Never hold the stee ring wheel at the 12
o'clock position or with your hands inside
the steeri ng wheel rim or on the steering
wheel hub . Holding the steering wheel
the wrong way can cause serious injuries
to the hands, arms and head if the driv
er's airbag deploys.
Ignition lock
Starting engine with the key
Applies to vehicles : w ith ign ition lock
The ignition is switched on and the engine
started with the ignition key .
Fig. 74 Igni tion tock : Igni tion key po siti ons
Switching the ignition on /off
• To switch on the ignition , turn the ignit ion
key to position
(D .
• To switch off the ignit ion, turn the ignition
key to position
@ . ..,.
Page 69 of 258
M N
M N
0 ::i co ,...., \!) 1.1'1 ,...., 1.1'1 ,....,
Starting th e engin e
"'Pre ss the brake peda l and move the se lector
lever to position P or N.
"' Turn the ignition key to position @. The ig
nition key automatica lly returns to position
® · Do not press the accelerator.
If the engine fails to start immediately, switch
off the starter and try again after about
30 seconds . To start the engine again, turn
the ignition key to position @.
A WARNING
-Never allow the engine to run in confined
spaces -dange r of asphyxiation.
- Never remove the ign ition key from the
ignition look while the vehicle is moving.
Otherw ise, the stee ring lock could sud
denly engage and you would not be able
to steer the vehicle.
- Always take the key with you whenever
you leave your vehicle . Otherwise, the
engine could be started or e lectr ica l
equipment such as the power w indows
cou ld be operated . This can lead to seri
o us injury .
- Never leave c hildren or persons requi ring
assistance unattended in the vehicle. The
doo rs can be locked using the remote
transmitter, preventing peop le from es
caping from the vehicle on their own in
the event of an emergency. Depend ing
on the time of year, people inside the ve
hicle can be exposed to very h igh or ve ry
low temperatures .
(D Note
Avoid high engine rpm, full throttle and
heavy eng ine loads until the eng ine has
reached operat ing temperature -other
w ise you risk engine damage.
@) For the sake of the environment
Do not let the engine run while parked to
warm up. Beg in driving immediately. This
red uces unnecessary em iss ions.
On th e ro ad 67
(D Tips
-If it is difficult to turn the ignition key to
posit ion ©, move the steering wheel (to
take the load off the steer ing lock mech
anism) until the key turns freely.
-After starting a cold engine, there may be a brief period of increased no ise be
cause the oil pressure must f irst bu ild up
in the hydraulic valve adjusters. This is
normal and not a cause for concern.
Stopping the engine
App lies to vehicles : wit h ignition lock
Stopping the engine
"' Bring the veh icle to a full stop .
"' Tu rn the ignition key to posit ion @.
Steering lock
Req uirement: The selector lever must be in
pos ition P .
"' Remove the ignition key whi le it is in posi
tion @¢
page 66, fig. 74 ¢ &,.
"'Turn the steering wheel until you hear the
steer ing lock engage .
The steering lock acts as a theft deterrent.
A WARNING
- Never turn off the engine before the ve
hicle has come to a comp lete stop. The
fu ll funct ion of the brake booster and the
power steeri ng is not gua ranteed . You
must use more fo rce to tu rn o r brake if
necessa ry. Be ca use you canno t steer and
bra ke as you usually wo uld, this could
lead to crashes and ser ious injuries .
- F or safety re aso ns, you sho uld a lways
pa rk your vehi cle w it h the selector lever
in P. Otherwise, the vehicle could inad
vertently roll away.
- T he radiator fan can continue to run for
up to 10 minutes even after you have
turned off the engine and removed the ignit ion key. The radiator fan can a lso
turn on again if the engine coo lant heats
~
Page 70 of 258
68 On th e road
up because of intense sunlight or heat
build-up in the engine compartment.
- Always take the key with you whenever
you leave your vehicle . Otherwise, the
engine could be started or electr ica l
equipment such as the power w indows
could be operated . This can lead to seri
ous inju ry.
- Never leave children or persons requiring
ass istance unattended in the vehicle . The
doors can be locked using th e remote
transmitter, preventing people from es caping from the vehicle on their own in
the event of an eme rgency . Depend ing
on the time of year, people inside the ve
hicle can be exposed to very high or very
low temperatures.
(D Note
If the engine has been under heavy load
for an extended period, heat builds up in
the engine compartment after the engine is switched off- there is a risk of damaging
the engine. Allow the engine to r un at idle
for about two minutes before switching it off.
Convenience key
Starting the engine
Appl ies to vehicles: wit h convenience key
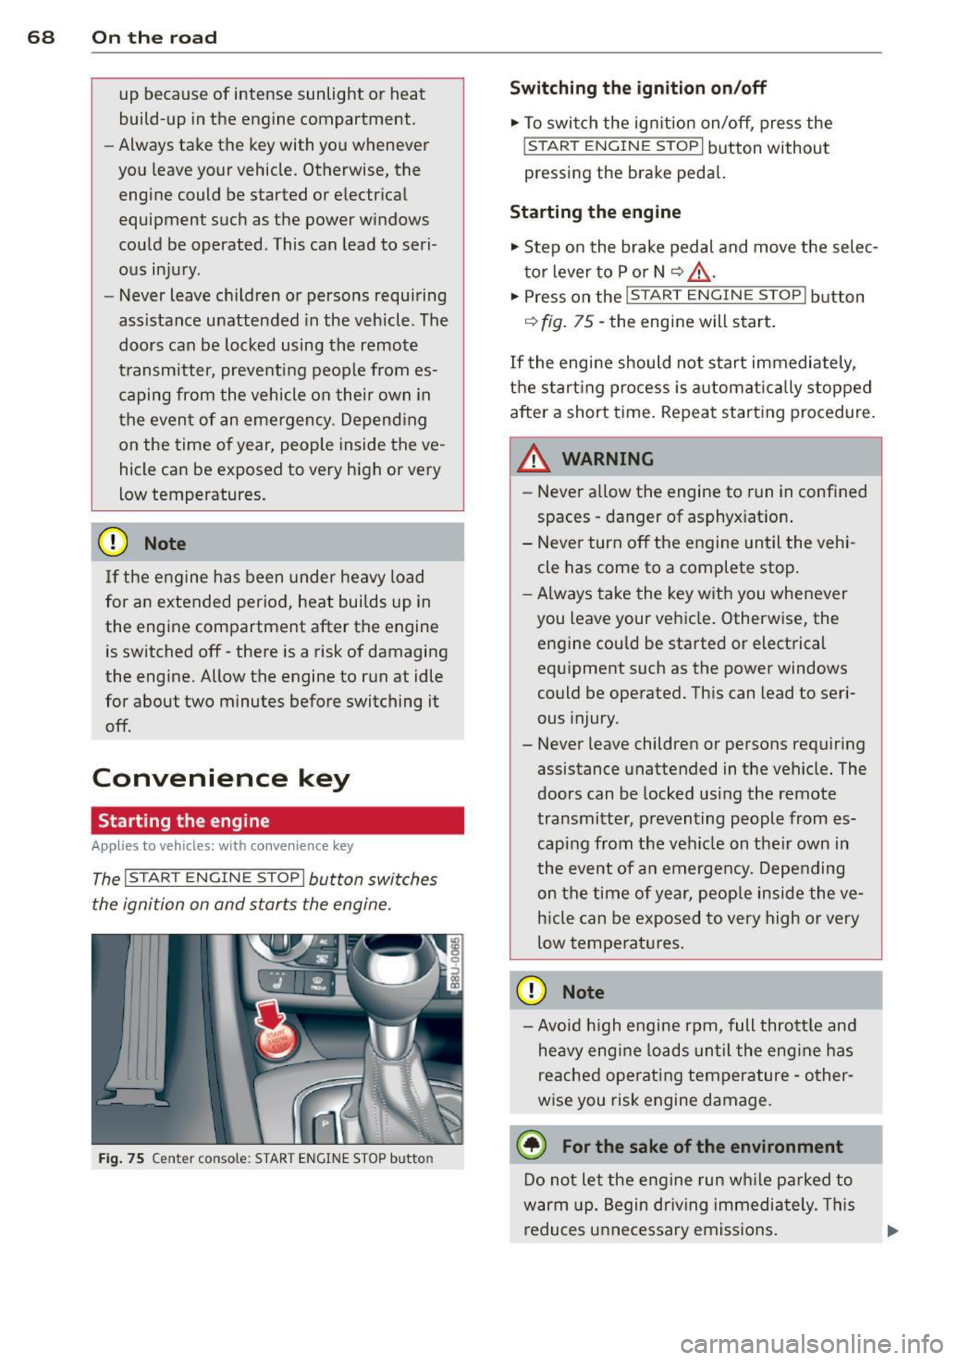
The I STAR T ENG IN E ST OPI button switches
the igni tion on and starts the engine.
Fig . 75 C en te r conso le: STAR T ENGIN E STOP b utto n
Switching the ignition on /off
"' To swi tch the ign ition on/off, press the
! S TART ENGINE STOP I button without
pressing the brake peda l.
Starting the engine
"' Step on the brake pedal and move the se lec
t o r lever to P or N
~ .&_ .
.. Press On the r::1 S::;T ;:-::A -::R :-:;;T :-: E:, N:-7"=: G":'.I N:-:-= E-=s=-= T=-=o =-= p:--i l butt On
~ fig. 75 -the engine will start.
If the engi ne should not start immediately,
t h e start ing process is automat ic all y stopped
after a short time. Repeat starting procedure.
A WARNING
=
- Never a llow the engine to run in confined
spaces -danger of asphy xiat ion .
- Never turn off the engine until the vehi cle has come to a complete stop .
- Always take the key w ith you whenever
you leave your ve hicle . Otherwise, the
engine cou ld be started or electrical
equ ipment such as the power windows
could be operated. This can lead to seri
ous injury.
- Never leave children or persons requiring
assistance unattended in t he vehicle . The
doors can be locked us ing the remote
transmitte r, preventing people from es
caping from the veh icle on their own in
t he event of a n emergency. Depe nding
on the time of yea r, peop le inside the ve
h icle can be exposed to very high or very
low temperatures .
(D Note
-Avo id high engine rpm, full thrott le and
heavy e ng ine lo ads un til the eng ine has
reached operat ing temperature -other
w ise you risk engine damage.
@ For the sake of the environment
Do not let the engine run w hile parked to
warm up. Begin dr iving immediately . Th is
reduces unnecessary emissions .